

Page 1

OWNER’S GUIDE
S3501UKL
S3501UKL_IB_ENG_101006.indd 1 10-10-06 2:29 PM
Page 2

ww w.lake land.co.uk
WHEN USING YOUR SHARK
STEAM MOP, BASIC SAFETY
PRECAUTIONS SHOULD
ALWAYS BE FOLLOWED,
INCLUDING THE FOLLOWING:
READ ALL INSTRUCTIONS
BEFORE USING YOUR
STEAM MOP.
DANGER OF SCALDING.
Please use caution when
using the steam mop. The steam
emitted from the steam mop is
very hot.
IMPORTANT:
This appliance is not intended
for use by persons (including
children) with reduced physical,
sensory or mental capabilities,
or lack of experience and
knowledge, unless they have
been given supervision or
instruction concerning the use
of the appliance by a person
responsible for their safety.
1. Use the system only for its
intended use.
2. DO NOT use outdoors.
3. DO NOT leave the appliance
unattended when plugged in.
Always unplug the power cord
from the electrical outlet when not
in use and before servicing.
4. DO NOT allow the appliance to be
used by children. Close attention
is necessary when used by or near
children, pets or plants.
5. Use only as described in this
manual.
6. Use only manufacturer’s
recommended accessories.
7. DO NOT operate the appliance
with a damaged plug or cord, or
if the unit has been dropped or
damaged. To avoid the risk of
electric shock, do not disassemble
or attempt to repair the appliance
on your own. Incorrect re-assembly
or repair can cause a risk of
electrical shock or injury to persons
when the appliance is used.
8. To protect against a risk of electric
shock, DO NOT immerse the steam
mop into water or any other liquids.
9. DO NOT handle plug or steam
mop with wet hands or operate
appliance without shoes.
10. DO NOT pull or carry by power
cord, use power cord as handle,
close a door on the power cord, or
pull the power cord around sharp
edges or corners. Keep power cord
away from heated surfaces.
IMPORTANT SAFETY INSTRUCTIONS
SAVE THESE INSTRUCTIONS
For Household Use Only
S3501UKL_IB_ENG_101006.indd 2 10-10-06 2:29 PM
Page 3

ww w.lake land.co.uk
11. DO NOT unplug by pulling on
power cord. To unplug, grasp the
plug not the power cord. Do not
use extension cords or outlets
with inadequate current carrying
capacity.
12. DO NOT put any objects into
openings. Do not use with any
opening blocked.
13. DO NOT put hands or feet under
the steam mop. Unit gets very hot.
14. Use ONLY on flat, horizontal
surfaces. Do not use on walls,
counters or windows.
15. DO NOT use on leather, wax
polished furniture or floors,
synthetic fabrics, velvet or other
delicate, steam sensitive materials.
16. DO NOT add cleaning solutions,
scented perfumes, oils or any other
chemicals to the water used in this
appliance as this may damage the
unit or make it unsafe for use. If
you live in a hard water area, we
recommend using distilled water in
your steam mop.
17. When in use, NEVER turn the
appliance over or on its side.
NEVER DIRECT STEAM TOWARDS
PEOPLE, ANIMALS OR PLANTS.
18. NEVER LEAVE THE STEAM MOP
IN ONE SPOT ON ANY SURFACE
FOR ANY PERIOD OF TIME
WHEN MICROFIBRE POCKET IS
ATTACHED.
19. Carefully remove the microfibre
pocket immediately after you have
unplugged and allowed the steam
mop to cool.
20. When cleaning the steam mop,
unplug the power cord from the
electrical outlet and clean with a
dry or damp cloth. Do not pour
water or use alcohol, benzene or
paint thinner on the unit.
21. Extreme caution should be
exercised when using this
appliance to clean stairs.
22. Never use steam mop without
microfibre pocket attached.
23. Keep your work area well lit.
24. Store steam mop indoors in a cool,
dry place.
25. To avoid circuit overload, do not
operate another appliance on the
same socket (circuit) as the steam
cleaner.
26. If an extension cord is absolutely
necessary, an extension cord
rated a minimum of 2.5mm2 cord
and 4m in length should be used.
Cords rated for less amperage may
overheat. Care should be taken to
arrange cord so that it cannot be
pulled or tripped over.
27. DO NOT leave your Steam Mop
unattended when the system is
connected to a power supply
/electrical outlet.
28. DO NOT store unit with damp or
wet microfibre cleaning pocket
attached. Never leave the steam
mop in one spot on any surface
for any period of time with a damp
or wet microfibre cleaning pocket
attached as this will damage
your floors.
29 Always unplug and allow the steam
mop to cool before removing or
changing mop heads.
WARNING: Your steam mop
is designed to clean hard floor
surfaces that will withstand high
heat. Do not use on unsealed wood
or unglazed ceramic floors. On
surfaces that have been treated
with wax or some no wax floors,
the sheen may be removed by the
heat and steam action. It is always
recommended to test an isolated
area of the surface to be cleaned
before proceeding. We also
recommend that you check the use
and care instructions from the floor
manufacturer.
S3501UKL_IB_ENG_101006.indd 3 10-10-06 2:29 PM
Page 4
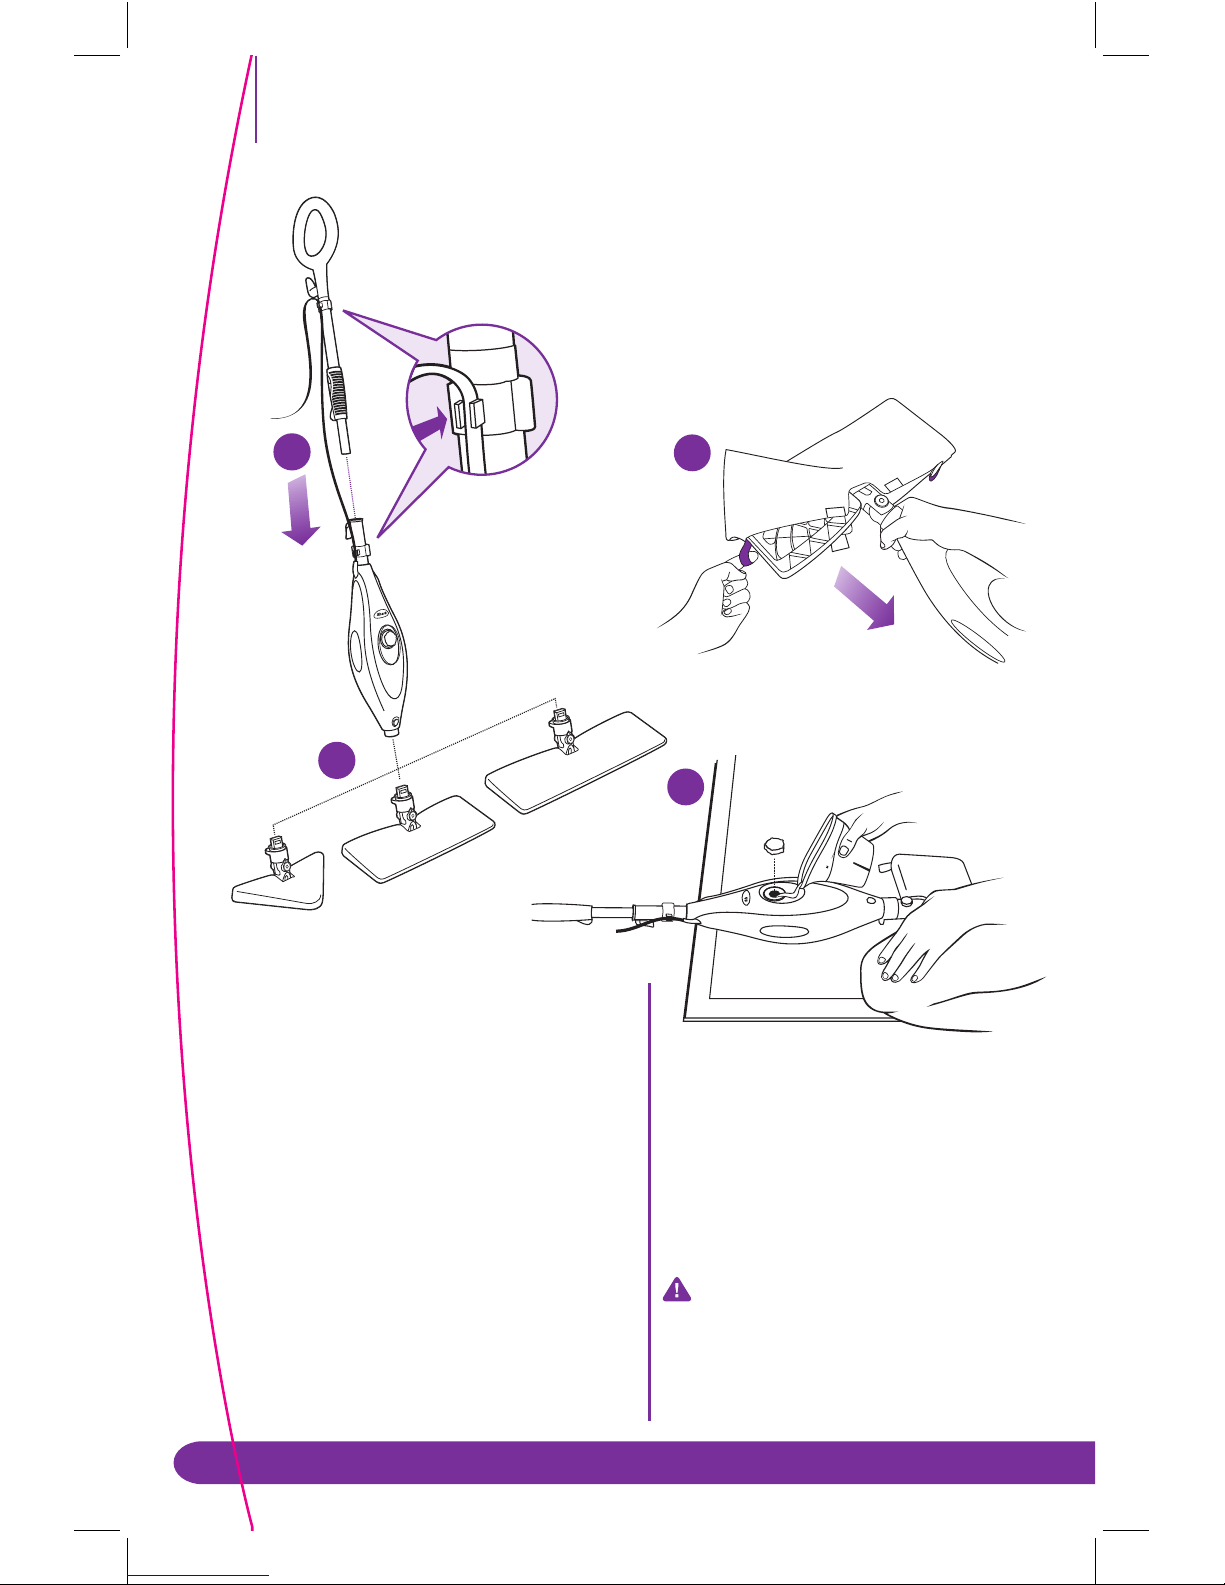
ASSEMBLE
1 Insert the mop handle into the
pump actuator (the tube that leads
to the tank). Push the mop handle
and pump actuator together in
until you hear it click into place.
2 Select a mop head and cleaning
pad. Fit one side of the pocket
onto the head first, then using
the lavender loop, pull the pocket
over the head. Attach the quick
fasteners on the top of the pocket
to secure in place.
3 Snap the mop head into the base to
secure it. Press the release button
to exchange mop heads.
FILL
4 Lay the mop on the floor or on
a counter top and remove the
water tank cap by turning counter
clockwise. Fill the water tank using
the filling flask. Do not overfill the
water tank. Replace the water cap
and tighten.
IMPORTANT: Make sure your floors
are sealed. Before using the Steam
Mop consult page 4 for more
information.
Quick Start
2
4
When assembling your steam mop
there may be a little water in or around
the water tank. This is because we test
all our steam mops 100% before you
buy them, so you get a quality
Shark
®
Steam Mop.
3
1
S3501UKL_IB_ENG_101006.indd 4 10-10-06 2:29 PM
Page 5
Quick Start
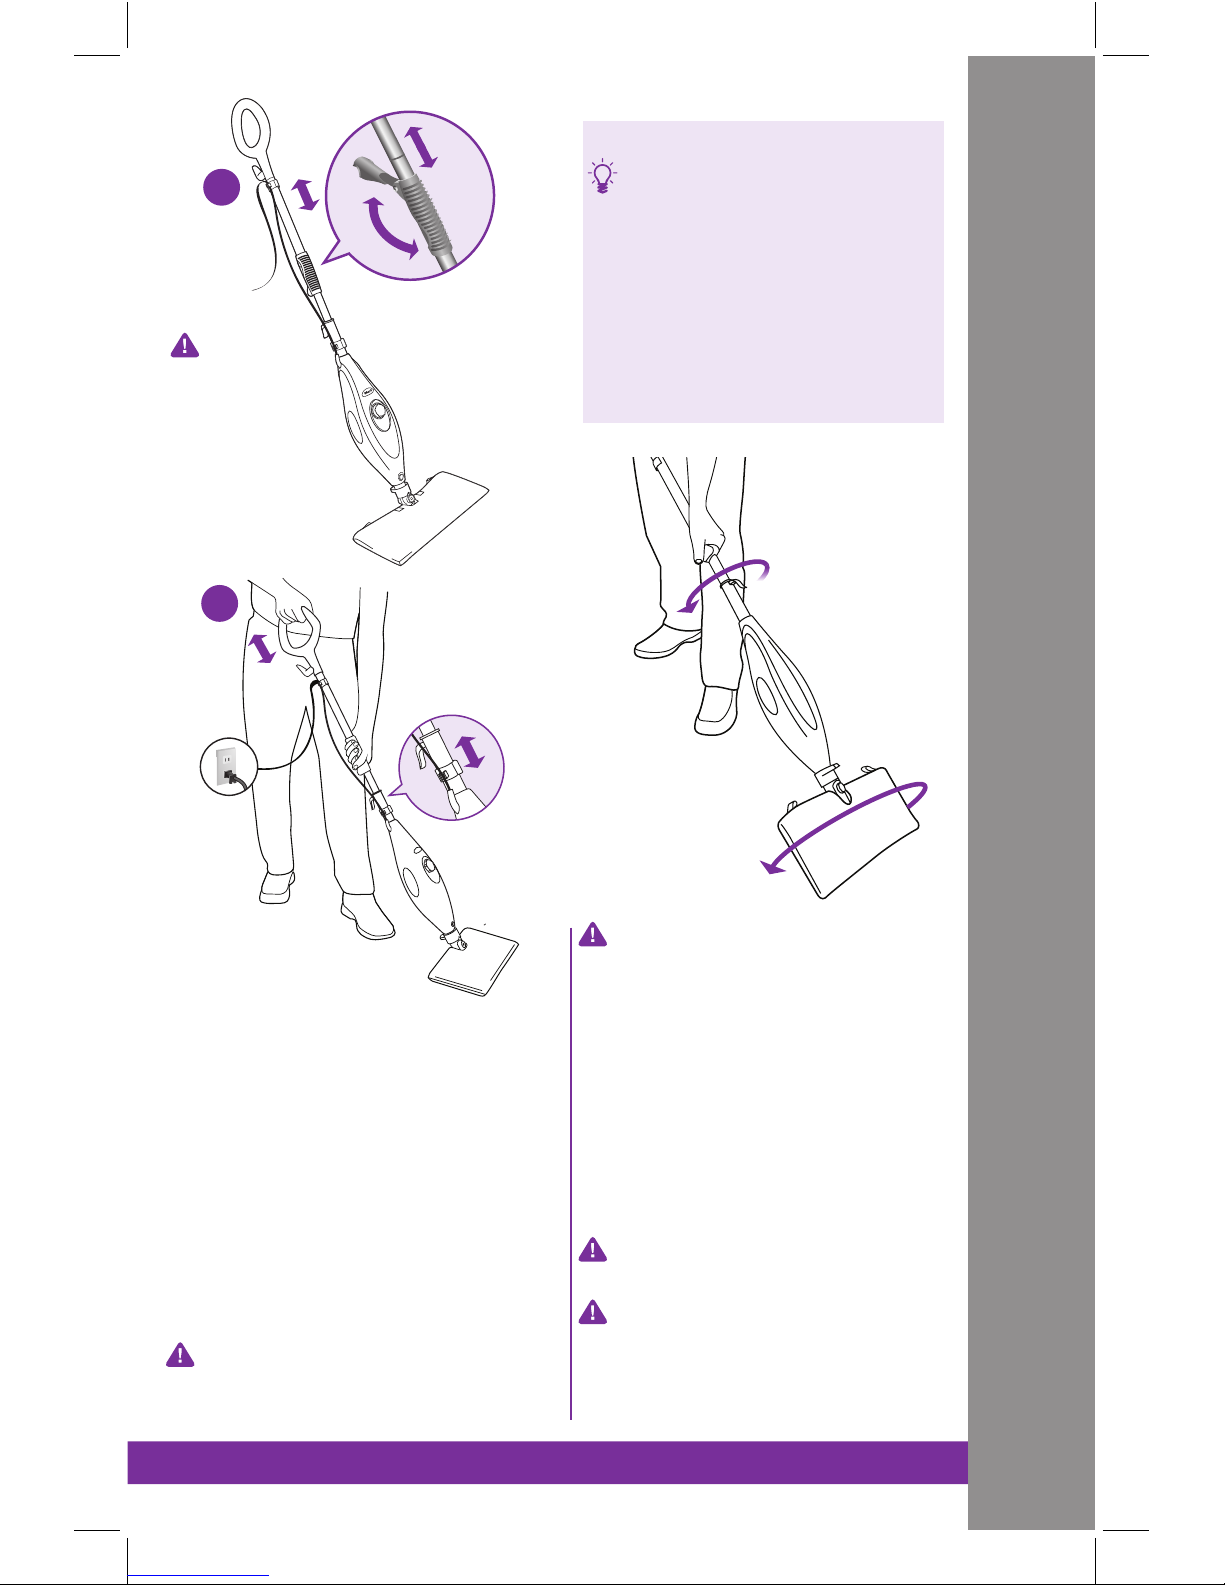
PREPARE
5 For your comfort, you can adjust
the height of the mop. Just lift the
latch on the tube 90 degrees to the
open position. Holding the handle,
extend the tube to the height that’s
right for you and then close latch to
locked position.
6 Plug in mop and wait 30 seconds
or less for the mop to heat up.
Pump the handle of the mop by
pushing downward about 10 to 12
times to create steam.
NOTE: Steam is created
automatically when you start
mopping.
QUICK TIP: We’ve added
additional mop heads for your
convenience. Each mop head
can be used on your floors.
The Triangle Mop Head was
specifically designed to reach into
those tight corners and spaces,
especially those found in the
bathroom. The XL Mop Head was
designed to make quick work of
large open spaces. The Rectangle
Mop Head is completely versatile.
NOTE: Do not leave your Steam
Mop unattended during use.
IMPORTANT: Never leave the
steam mop in one spot for any
period of time with a damp or wet
microfibre pocket attached as this
will damage your floors.
5
6
QUICK
TIP: For
easier
pushing
and pulling,
extend the
handle length
DIRT CAN’T HIDE ON
EITHER SIDE! All new
design allows for optimal
cleaning! When one side
of the pocket gets dirty,
just turn the mop head
over and clean with the
other side of the pocket.
S3501UKL_IB_ENG_101006.indd 5 10-10-06 2:29 PM
Page 6
ww w.lake land.co.uk
TECHNICAL SPECIFICATIONS
Voltage: 220-240V., 50Hz.
Power: 1550 Watts
Water Capacity: 450 ml
Not to be dispos ed
of with other
household wa ste.
IPX4
This appliance complies with the WEEE-Directive 2002/96/EC on the disposal of electrical
and electronic equipment (WEEE).
This appliance complies with the European directives for electromagnetic compatibility
(EMC) 2004/108/EC and its revisions, as well as Low Voltage Directive (LVD) 2006/95/EC
and its revisions.
This marking indicates that this product should not be disposed with other
household wastes throughout the EU. To prevent possible harm to the
environment or human health from uncontrolled waste disposal, recycle it
responsibly to promote the sustainable reuse of material sources. To return
your used device, please use the return and collection systems or contact the
retailer where this product was purchased. They can take this product for
environmental safe recycling.
THIS MANUAL COVERS MODEL NUMBER:
S3501UKL 11
S3501UKL_IB_ENG_101006.indd 6 10-10-06 2:29 PM
Page 7

1
ww w.lake land.co.uk
Contents
Getting Started ................................................................................ 2
Using Your Steam Mop ................................................................. 5
Using Your Carpet Glider ............................................................. 7
Care of Your Steam Mop .............................................................. 8
Ordering Replacement Parts ................................................... 10
Troubleshooting Guide .................................................................11
Thank you for
purchasing
the Shark
®
Steam Pocket
Mop.
S3501UKL_IB_ENG_101006.indd 1 10-10-06 2:29 PM
Page 8

2
ww w.lake land.co.uk
Getting Started
j Quick Release Swivel Cord Wrap
k Cord Clips
l Mop Handle
m Telescopic Handle Latch
n Water Tank Viewing Window
o Power-On Blue Light
(Lights up when plugged-in)
p Water Tank Cap
a Rectangle Cleaning Pad
b Steam Duster Pad
c Triangle Cleaning Pad
d XL Rectangle Cleaning Pad
e Carpet Glider
f Triangle Mop Head
g Rectangle Mop Head
h XL Rectangle Mop head
i Filling Flask
When assembling your steam mop there
may be a little water in or around the
water tank. This is because we test all
our steam mops 100% before you buy
them, so you get a quality Shark
®
Steam Pocket Mop.
c
a
e
g
f
b
d
h i
k
l
o
n
p
j
m
S3501UKL_IB_ENG_101006.indd 2 10-10-06 2:29 PM
Page 9

3
ww w.lake land.co.uk
2
3
1
ASSEMBLE
1 Insert the mop handle into the pump
actuator (the tube that leads to the
tank). Push the mop handle and pump
actuator together in until you hear it
click into place.
2 Select a mop head and cleaning pad.
Fit one side of the pocket onto the head
first, then using the lavender loop, pull
the pocket over the head. Attach the
quick fasteners on the top of the pocket
to secure in place.
3 Snap the mop head into the base to
secure it. Press the release button to
exchange mop heads.
S3501UKL_IB_ENG_101006.indd 3 10-10-06 2:29 PM
Page 10

4
ww w.lake land.co.uk
IMPORTANT: First things first, always
make sure the mop is UNPLUGGED
from the wall when not in use. Never
fill the mop, attach the mop head,
change or remove the microfibre
pocket when the mop is plugged into
the wall. If you have hard water you
might want to use distilled water to
prolong the life of the Shark® Steam
Mop. Make sure you only add water
to the tank. Chemicals or cleaning
solution may damage the appliance
and could be unsafe for you and
your family.
attach the quick fasteners on the
top of the pocket to secure in place.
You can also use the loop to pull the
dirty pocket off when you are done
mopping after it has cooled.
3 Snap the mop head into the base to
secure it.
IMPORTANT: Don’t use on unsealed
wood or unglazed ceramic floors.
On surfaces that have been treated
with wax or some no wax floors,
the sheen may be removed by
the heat and steam action. It is
always recommended to test an
isolated area of the surface to be
cleaned before proceeding. We
recommend that you check the use
and care instructions from the floor
manufacturer.
1 Turn the water tank cap counter
clockwise and remove from the tank.
Use the filling flask and pour water
into the tank. Please don’t overfill.
Replace the cap on the water tank by
turning clockwise and tightening.
2 Select a mop head and cleaning
pad. Each mop head can be used
on your floors. The Triangle Mop
Head was specifically designed to
reach into those tight corners and
spaces, especially those found in
the bathroom. The XL Mop Head
was designed to make quick work
of large open spaces. The Rectangle
Mop Head is completely versatile.
Use the lavender loop on the side
of the microfibre cleaning pocket to
place around the mop head. Then
1
2
3
Getting Started - cont’d
S3501UKL_IB_ENG_101006.indd 4 10-10-06 2:29 PM
Page 11

5
ww w.lake land.co.uk
Using Your Steam Mop
IMPORTANT: Make sure you don’t
use the mop without attaching a
microfibre pocket and adding water
to the tank first. When you are
using the mop for the first time, it
might take longer than the normal
30 seconds to start steaming. Just
pump the handle a few times in a
downward motion to prime the
pump and it should be ready.
2 Pump the handle a few times in a
downward motion. This pumping
action will release steam as you
mop and allows you to customise
the amount of steam you want.
Begin mopping with a forward
and backward motion. The natural
motion of mopping will produce
steam.
NOTE: Make sure the floors are
swept or vacuumed before using the
steam mop.
1 Pull and twist the quick release cord
holder to unwrap the power cord
completely. A great time saver!
Plug into a 220-240-volt electrical
outlet. The power “On” light will
turn blue, it takes approximately 30
seconds for the mop to heat up and
the steam to be ready.
2
1
S3501UKL_IB_ENG_101006.indd 5 10-10-06 2:29 PM
Page 12

6
ww w.lake land.co.uk
3 For your comfort, you can adjust the
height of the mop. Just lift the latch
on the tube 90 degrees to the open
position. Holding the handle, extend
the tube to the height that’s right for
you and then close latch to locked
position.
4 When one side of the microfibre
pocket gets dirty, just flip the mop
head and you can quickly start using
the other side. Dirt can’t hide on
either side.
IMPORTANT: Please wait 3-5 minutes
for the Steam Mop to cool off before
switching the mop head or the
microfibre pockets.
5 When the water tank is empty, the
steam mop will stop producing
steam. You can refill the water tank
at any time as long as the mop is
unplugged from the outlet. Follow
the instructions from page 4. This
goes for switching the mop heads or
microfibre pockets as well.
IMPORTANT: Never leave the steam
mop with a damp/wet microfibre
pocket on any floor surface for any
amount of time as this may damage
the floor.
4
3
Using Your Steam Mop - cont’d
S3501UKL_IB_ENG_101006.indd 6 10-10-06 2:29 PM
Page 13

7
ww w.lake land.co.uk
Using Your Carpet Glider
THE CARPET GLIDER
1 The Carpet Glider can be used with
the rectangle mop head to lightly
steam your carpet and area rugs.
Just place the mop head on top
of the glider and move back and
forth across a section of the carpet.
The steam mop won’t clean your
carpeting or areas rugs, but it’s great
for deodorising and freshening.
NOTE: Please note that the Steam
Mop rests on top of the carpet glider
and it is not a fixed attachment.
Do not leave steam mop with carpet
glider in one stationary position for
any period of time.
1
The Steam Mop won’t clean
your carpeting or area
rugs. However, it’s great for
deodorising and freshening.
S3501UKL_IB_ENG_101006.indd 7 10-10-06 2:29 PM
Page 14

8
ww w.lake land.co.uk
Care of Your Steam Mop
2 Remove the microfibre cleaning
pocket by releasing the quick
fasteners and using the lavender
loop on the side of the pocket,
avoiding contact with the hot pocket
or dirt. Then empty the water tank.
IMPORTANT: Be very careful
because the cleaning pockets can
get very hot from the steam, so use
caution when removing them. Let
the unit cool 2-3 minutes.
3 To store the Shark
®
Steam Mop
hanging up; first remove the head
(after it has cooled and the steam
has been released) then hang on a
large hook.
NOTE: If you want to store it
standing upright then make sure
it’s leaning against a wall for added
support and safety. Always store
your Steam Mop with the microfibre
pocket removed, away from children
or high traffic areas.
AFTER USE AND STORAGE
1 When you have finished using the
steam mop, and your floors are clean,
unplug the cord from the outlet and
move it into an upright position. Let
the unit cool 2-3 minutes and release
steam by pumping the handle several
times before removing the microfibre
cleaning pocket from the mop head.
1
2
3
S3501UKL_IB_ENG_101006.indd 8 10-10-06 2:29 PM
Page 15

9
ww w.lake land.co.uk
KEEPING YOUR MICROFIBRE
CLEANING POCKET AS GOOD
AS NEW
1 We recommend washing your
microfibre pockets separately from
other fabrics to avoid picking up lint.
Only use liquid detergent.
(no powder detergent) Don’t use
any fabric softeners or bleach.
Line dry. Do not tumble dry.
2 If there are loose threads on the
pocket carefully cut the thread with
scissors. Don’t pull on them or cut at
the base.
1
2
40°
S3501UKL_IB_ENG_101006.indd 9 10-10-06 2:29 PM
Page 16

10
ww w.lake land.co.uk
PART PART NO.
1 1 Standard and 1 Triangle
Cleaning Pads XT3501UKL
2 2 XL Cleaning Pads XLT3501UKL
3 2 Steam Duster
Cleaning Pads XT3501SDUKL
Ordering Replacement Parts
ORDERING REPLACEMENT PARTS
To order additional parts and
accessories, feel free to contact us at:
Shark Customer Services
PO Box 298
Mirfield
WF14 9BA
Freephone 0800 862 0453
1
2
3
S3501UKL_IB_ENG_101006.indd 10 10-10-06 2:29 PM
Page 17

11
ww w.lake land.co.uk
Troubleshooting Guide
PROBLEM POSSIBLE REASONS & SOLUTIONS
The Steam Mop
will not turn on.
Your Steam Mop should be securely plugged into a
220-240V AC electrical outlet only.
Check your fuse or breaker.
If your unit still doesn’t work, give us a call at
Freephone 0800 862 0453.
Steam Mop will not
make steam.
Prime the pump, see page 5 for more information.
Is there water in the water tank? If not, add water to your
Steam Mop following the instructions.
Steam Mop leaves
water on the floor.
Check to see if your microfibre cleaning pocket is too wet.
We recommend you unplug the Steam Mop and change the
microfibre cleaning pocket.
Make sure the steam pocket is attached correctly.
Steam Mop is hard
to push.
Make sure the steam pocket is attached correctly.
Check to see if your pocket is excessively dirty.
Try increasing the height of the pole for better leverage.
Floors are cloudy,
streaky or spotty
after steaming.
The microfibre pocket might be dirty. Flip or change
the pocket.
If you washed the pocket with powder detergent then the
pocket might be ruined.
If you are cleaning in a kitchen area where there might be a
build-up of grease then use a degreasing agent such as an
all-purpose cleaner or dish soap and paper towels to clean
the area first.
You might have left the mop in the same spot for
too long.
Do you have hard water? If you do you, we recommend
switching to distilled water.
S3501UKL_IB_ENG_101006.indd 11 10-10-06 2:29 PM
Page 18

12
ww w.lake land.co.uk
Notes
S3501UKL_IB_ENG_101006.indd 12 10-10-06 2:29 PM
Page 19

13
ww w.lake land.co.uk
Notes
S3501UKL_IB_ENG_101006.indd 13 10-10-06 2:29 PM
Page 20

Shark Customer Services
PO Box 29 8
Mirfield
WF 14 9BA
Freephon e 0 80 0 8 62 0453
www.lake land.co.uk
Technical Details
Model number: S3501UKL 11
Input: 1550 Watts
Main unit voltage: 220-240V., 50 Hz.
COP YRI GHT© EURO -PRO O PER ATING LLC 2 010
PRI NTE D IN C HIN A
S35 01U KL. E.101 006
Ill ustr atio ns ma y dif fer f rom a ctual prod uct .
Not to be dispos ed
of with other
household wa ste.
IPX4
S3501UKL_IB_ENG_101006.indd 14 10-10-06 2:29 PM
 Loading...