

Page 1
S2901UK
OWNER’S GUIDE
Page 2

IMPORTANT SAFETY INSTRUCTIONS
For Household Use Only
WHEN USING YOUR SHARK®
STEAM MOP, BASIC SAFETY
PRECAUTIONS SHOULD ALWAYS
BE FOLLOWED, INCLUDING THE
FOLLOWING:
READ ALL INSTRUCTIONS
BEFORE USING YOUR SHARK
®
MULTI-FUNCTION STEAM
POCKET MOP LITE.
DANGER OF SCALDING.
Please use caution when using the steam
mop. The steam emitted from the steam
mop is very hot.
IMPORTANT:
This appliance is not intended for use by
persons with reduced physical, sensory or
mental capabilities, or lack of experience
and knowledge, unless they have been given
supervision or instruction concerning use of
the appliance by a person responsible for
their safety.
Children shall not use or play with this
appliance. Close supervision is necessary
to keep appliance out of reach of children
during use and cooling.
WARNING:
TO REDUCE THE RISK OF FIRE,
ELECTRIC SHOCK OR INJURY:
1. Use the system only for its intended use.
2. DO NOT use outdoors.
3. DO NOT leave the appliance unattended when
plugged in. Always unplug the power cord from
the electrical outlet when not in use and before
servicing.
4. DO NOT allow the appliance to be used by
children. Close attention is necessary when used
near children, pets or plants.
5. Use only as described in this manual.
6 . Use only manufacturer’s recommended
accessories.
7. DO NOT use with damaged cord or plug.
8. DO NOT USE if the appliance is not working,
has been dropped, dropped into water, damaged
or left outdoors.
9. NO SERVICEABLE PARTS. Incorrect re-
assembly or repair can cause a risk of electrical
shock or injury to persons when the appliance is
used. Contact Customer Service.
10. To protect against a risk of electric shock, DO
NOT immerse the steam mop into water or any
other liquids.
11. DO NOT handle plug or steam mop with wet
hands or operate appliance without shoes.
12. DO NOT pull or carry by power cord, use power
cord as handle, close a door on the power cord,
or pull the power cord around sharp edges or
corners. Keep power cord away from heated
surfaces.
FREEPHONE 0800 862 0453
Page 3

1
3. DO NOT unplug by pulling on power cord. To
unplug, grasp the plug not the power cord. Do not
use extension cords or outlets with inadequate
current carrying capacity.
14. DO NOT put any objects into openings. Do not
use with any opening that is blocked.
15. DO NOT put hands or feet under the steam mop.
Unit gets very hot.
16. Use ONLY on flat, horizontal surfaces when
using in steam mop mode. Do not use on walls,
counters or windows when using in steam mop
mode.
17. DO NOT use on leather, wax polished furniture
or floors, synthetic fabrics, velvet or other delicate,
steam sensitive materials.
18. Liquid or steam must not be directed towards
equipment containing electrical components, such
as the interior of ovens.
19. DO NOT add cleaning solutions, scented
perfumes, oils or any other chemicals to the water
used in this appliance as this may damage the
unit or make it unsafe for use. If you live in a hard
water area, we recommend using distilled water in
your steam mop.
20. When in use, NEVER turn the appliance over
or on its side. NEVER DIRECT STEAM
TOWARDS PEOPLE, ANIMALS OR
PLANTS.
21. NEVER LEAVE THE STEAM MOP IN
ONE SPOT ON ANY SURFACE FOR
ANY PERIOD OF TIME WHEN THE
CLEANING POCKET IS ATTACHED AS
THIS WILL DAMAGE YOUR FLOORS.
22. Carefully remove the cleaning pocket immediately
after you have unplugged and allowed the steam
mop to cool.
23. When cleaning the steam mop, unplug the power
cord from the electrical outlet and clean with a dry
or damp cloth. Do not pour water or use alcohol,
benzene or paint thinner on the unit.
24. Extreme caution should be exercised when using
this appliance to clean stairs.
25. Never use steam mop without the cleaning pocket
attached.
26. Keep your work area well lit.
27. Store steam mop indoors in a cool, dry place.
28. To avoid circuit overload, do not operate another
appliance on the same socket (circuit) as the
steam cleaner.
29. If an extension cord is absolutely necessary, an
extension cord rated a minimum of 15 ampere,
2
2.08mm
(14 AWG) cord should be used. Cords
rated for less amperage may overheat. Care
should be taken to arrange cord so that it cannot
be pulled or tripped over.
30. DO NOT leave unattended when the system is
connected to a power supply or electrical outlet.
Turn off all controls before unplugging the unit.
31. DO NOT store unit with damp or wet cleaning
pocket attached. Never leave the steam mop in
one spot on any surface for any period of time with
a damp or wet cleaning pocket attached as this
will damage your floors.
32. Always unplug and allow the steam mop to cool
before removing or changing mop heads.
33. Make sure that the water tank door is closed when
using the appliance.
WARNING:
to clean hard floor surfaces that will withstand
high heat. Do not use on unsealed wood or
unglazed ceramic floors. On surfaces that have
been treated with wax or some no wax floors,
the sheen may be removed by the heat and
steam action. It is always recommended to test
an isolated area of the surface to be cleaned
before proceeding. We also recommend that you
check the use and care instructions from the floor
manufacturer.
Your steam mop is designed
SAVE THESE
INSTRUCTIONS
www.sharkclean.eu
Page 4
This appliance complies with the WEEE-Directive 2002/96/EC on the disposal of electrical and electronic
equipment (WEEE).
This appliance complies with the European directives for electromagnetic compatibility (EMC) 2004/108/EC and its
revisions, as well as Low Voltage Directive (LVD) 2006/95/EC and its revisions.
This marking indicates that this product should not be disposed with other household wastes
throughout the EU. To prevent possible harm to the environment or human health from uncontrolled
waste disposal, recycle it responsibly to promote the sustainable reuse of material sources. To return
your used device, please use the return and collection systems or contact the retailer where this
product was purchased. They can take this product for environmental safe recycling.
Disconnect the plug from mains af ter use.
Although the product is not provided with standby mode, it still fulfills the requirements of 1275/2008/EC - the
directive for Eco-Design requirements since according to technical justification, it is considered as inappropriate
to provide standby and off modes when connecting to mains. To reduce energy consumption be sure to unplug the
unit after use.
Guarantee: This product is unconditionally guaranteed for one year against all defects of workmanship and
materials. This guarantee does not affect your statutory rights. If this product proves unsatisfactory please
contact our customer service department on freephone 0800 862 0453 or by e-mail ukservice@euro-pro.com.
THIS MANUAL COVERS MODEL NUMBER:
S2 9 01UK 11
TECHNICAL SPECIFICATIONS
Voltage: 220-240V~, 50/60Hz
Power: 1250 Watts
Water Capacity: 350 ml
FREEPHONE 0800 862 0453
IPX4
Page 5

Contents
Thank you for
purchasing
®
the Shark
Multi-Function
Steam Pocket
Mop Lite.
Getting Started ............................................................................................... 2
Assembling Your Steam Mop ........................................................................... 3
Using Your Steam Mop .................................................................................... 4
Using Your Carpet Glider .................................................................................. 5
Using Your Handheld Steamer .......................................................................... 6
®
Using Your Removable Handheld Steamer with Different Accessories .................. 7
Care of Your Steam Mop ................................................................................ 10
Troubleshooting Guide ................................................................................... 12
1www.sharkclean.eu
Page 6
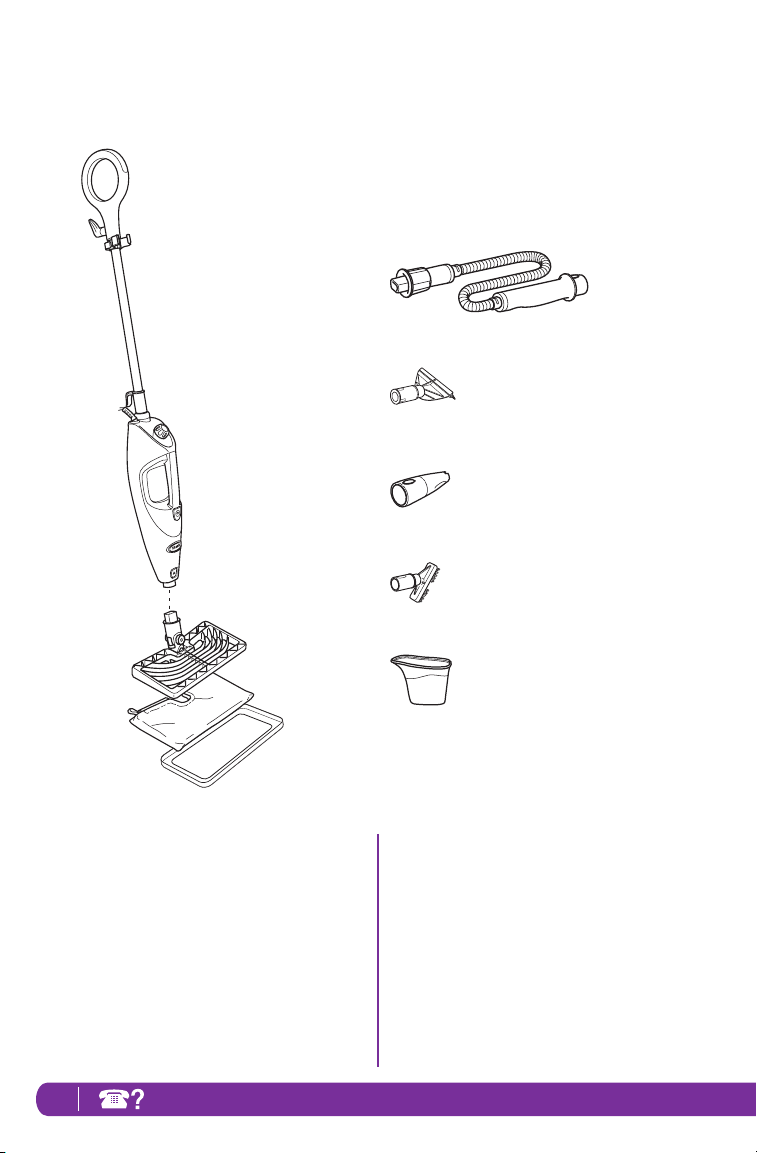
Getting Started
When assembling your steam mop there may be a little water in or around the water tank. This is because we test all
our steam mops 100% before you buy them, so you get a quality Shark
a
®
Multi-Function Steam Pocket® Mop Lite.
b
j
k
c
d
l
e
f
m
g
n
h
i
a Mop Handle
b Cord Clip
c Water Tank Cap
d Handheld Steamer
e Power Button
f Release Button
g Rectangle Mop Head
h Cleaning Pocket for Rectangle Head (x2)
i Carpet Glider (XCG3501)
2 FREEPHONE 0800 862 0453
(P 151W)
j Accessory Hose
(3010FO2901)
k Window Squeegee (1078 SO)
l Concentrator Nozzle (3011FO2901)
m Grout Scrubber Brush (108 1SO)
n Filling Flask (1039SO)
Page 7

Assembling Your Steam Mop
fig. 1
IM PO RTAN T: Always make sure the mop is
UNPLUGGED from the wall when not in use. Never
fill the mop, attach the mop head, change or remove
the cleaning pocket when the mop is plugged
into the wall. To prolong the life of your Shark®
Multi-Function Steam Pocket® Mop Lite we
recommend using distilled water. Make sure you
only add water to the tank. Chemicals or cleaning
solution may damage the appliance and could be
unsafe for you and your family.
fig. 2
STEAM MOP ASSEMBLY
1 Insert the Mop Handle end with the “ “ facing
the front of the unit into the handheld steamer. Push
the mop handle in until you hear it click into place.
(fig. 1)
2 Select the Rectangle or Triangle mop head and the
desired cleaning pocket. Fit one side of the pocket
onto the head first, then using the loop, pull the
pocket over the head. Attach the quick fasteners on
the top of the pocket to secure in place.
3 Snap the mop head into the mop body by lining up
the groove on the back of the mop body with the
groove on the back of the mop head. Push until you
hear it latch into place. Press the release button to
remove or change the mop head. (fig. 2)
3www.sharkclean.eu
Page 8

Using Your Steam Mop
IM POR TANT: Make sure you do not use the mop
without attaching a cleaning pocket and adding
water to the tank first. When you are using the
mop for the first time, it might take longer than the
normal 30 seconds to star t steaming.
fig. 3
fig. 4
fig. 5
fig. 6
1 Turn the water tank cap counter clockwise and
remove from the tank. (fig. 3)
2 Use the filling flask and pour water into the tank. Do
not overfill. Replace the cap on the water tank.
(fig. 4)
I MPO RTAN T: Do not use on unsealed wood or
unglazed ceramic floors. On surfaces that have been
treated with wax or some no wax floors, the sheen
may be removed by the heat and steam action. It
is always recommended to test an isolated area
of the surface to be cleaned before proceeding.
We recommend that you check the use and care
instructions from the floor manufacturer.
4 FREEPHONE 0800 862 0453
NOTE: To prolong the life of your Steam Mop, we
recommend using distilled water.
NOTE: Sweep or vacuum your floors prior to cleaning
with your Steam Mop.
3 Pull and twist the quick release cord holder to
unwrap the power cord completely. Plug into an
electrical outlet. (fig. 5)
4 Press the power button to turn the unit on. (fig. 6)
5 Clean your floors with a forward and backward
motion.
Page 9

fig. 7
6 Use the shaggy side of the cleaning pockets to lift
up and lock away all the dirt and debris and the
scrubbing side to break up the tough stains. (fig. 7)
7 When the water tank is empty, the Steam Mop will
stop producing steam. You can refill the water tank
at any time as long as the mop is unplugged from
the outlet. Follow the instructions from page 4. This
applies to switching the mop head or cleaning pocket
as well.
NOTE: Please wait 2-3 minutes for the Steam Mop
to cool off before switching the mop head or the
cleaning pocket. Never leave the Steam Mop with a
damp/wet cleaning pocket on any floor.
8 When you are done, press the power button to turn
the steam mop off.
Using Your Carpet Glider
fig. 8
THE CARPET GLIDER
1 The Carpet Glider can be used with the Rectangular
Head to lightly steam your carpet and area rugs.
Just place the mop head with cleaning pocket
attached into the glider. (fig. 8)
The Steam Mop will not clean your
carpeting or area rugs. However, it is
great for grooming and freshening.
fig. 9
2 Move the Steam Mop back and forth across a
section of the carpet. (fig. 9)
5www.sharkclean.eu
Page 10

Using Your Handheld Steamer
Your Shark® Multi-Function Steam Pocket® Mop
Lite is designed to clean surfaces that will withstand high
heat and moisture. Do not use on unsealed wood surfaces
(especially wooden antique furniture), unglazed ceramic
tile, painted surfaces or surfaces that have been treated
with wax, oils, varnishes, or shellac. The sheen may be
removed by the heat, steam, and friction of the cleaning
tools. Lacquer and polyurethane coatings provide a hard
durable protective finish that withstands moisture, but it
is always recommended to test an isolated area of the
surface to be cleaned before proceeding.
We also recommend you check the use and care
instructions from the surface manufacturer.
When cleaning finished wood surfaces, use broad,
continuous cleaning strokes. To prevent surface damage,
avoid focusing steam or allowing the cleaning tools to sit
in one spot for any amount of time.
6 FREEPHONE 0800 862 0453
fig. 10
1 To remove the Handheld Steamer, press and hold
down the Handle Release Button while pulling out
the handle. (fig. 10)
2 To remove the mop head, press the mop head
release button and pull the mop head off. (fig. 10)
Page 11

Using Your Removable Handheld Steamer
with the Different Accessories
Release
Button
fig. 11
fig. 12
1 First attach the Accessory Hose to the Handheld
Steamer by snapping the Accessory Hose into the
main nozzle. (fig. 11)
2 Select the desired cleaning tool for use. Follow the
cleaning tool sub-assembly instructions for the
selected tool. (fig. 12 )
3 To remove the Accessory Hose, press and hold
down the Handheld Release Buttons. Then slide out
the Accessory Hose using the grip.
CAUTION: Do not press the power button while
attaching or removing the Accessory Hose.
CAUTION: Do not use the Accessory Hose without
cleaning tools attached.
7www.sharkclean.eu
Page 12

Using Your Removable Handheld Steamer
with the Different Accessories - cont.
fig. 13
USING THE CONCENTRATOR NOZZLE
Cleaning Tip: The Concentrator Nozzle creates direct
steam spray to clean and sanitise hard to reach nooks
& crannies and other places where germs may build
up. Use the Concentrator Nozzle to loosen and dislodge
compact dirt often found in corner and tight places where
traditional methods and cleaning tools tend to push dirt
into, making it tough to reach and clean. Spray direct
steam and wipe clean with a wet cloth or paper towel.
1 Attach the Concentrator Nozzle by pressing the
nozzle onto the Accessor y Hose until it clicks into
place. (fig. 13)
2 Press the power button to start the steamer.
For effective cleaning, hold the steam output nozzle
1-2 inches away from the surface you’re cleaning.
CAUTION: Do not press the power button until the
Concentrator Nozzle is snapped into the accessory
hose of your Handheld Steamer.
3 To remove the Concentrator Nozzle, press and hold
the accessory release button, then pull it out of the
Accessory Hose.
CAUTION: Do not press the power button while
removing the Concentrator Nozzle. Avoid touching
the tip of the Concentrator Nozzle, as this will be very
hot after steaming.
NOTE: The Handheld Steamer may continue to emit
steam for a few seconds after the power button is
pressed to turn the unit off. This is normal, and the
steaming will eventually come to a stop.
8 FREEPHONE 0800 862 0453
Page 13

fig . 14
fig. 15
USING THE GROUT SCRUBBER
Cleaning Tip: The Grout Scrubber is designed for
removing stubborn messes in hard-to-reach nooks,
corners and in grout where focused scrubbing power
may be needed. It can loosen and dislodge compact dirt
often found in corners and tight places where traditional
methods and cleaning tools tend to push dirt into,
making it difficult to reach and clean. Scrub with the
Grout Scrubber and wipe clean with a cleaning cloth.
1 Attach the Grout Scrubber by snapping into the handle
of the Accessory Hose until it clicks into place.
(fig. 14)
2 Press the power button to start steaming.
3 To remove the Grout Scrubber, press and hold
down the Accessory release button. Then slide out
the tool out.
CAUTION: Turn the unit off before attaching or
removing the Grout Scrubber.
USING THE WINDOW SQUEEGEE
Cleaning Tip: To use the window squeegee, work with
the vapor jet down using top to bottom movements. To do
this without leaving streaks, use lateral movements from
the top to the bottom of the surface.
CAUTION: Always avoid any sudden changes
in temperature to prevent breakage of cracks in
windows.
1 Attach the Window Squeegee by snapping into the
handle of the Accessory Hose until it clicks into
place. (fig . 15)
2 Press the power button to start steaming.
3 To remove the Window Squeegee, press and hold
down the Accessory release button. Then slide out
the Window Squeegee.
CAUTION: Turn the unit off before attaching or
removing the Window Squeegee.
9www.sharkclean.eu
Page 14

Care of Your Steam Mop
AFTER USE AND STORAGE
1 Press the power button to turn the unit off. Unplug
the cord from the outlet and place the mop into the
upright position. Let the unit cool for 2-3 minutes.
2 When you have finished using the Handheld Steamer,
reattach the handle to the handheld steamer.
10 FREEPHONE 0800 862 0453
fig. 16
3 Remove the cleaning pocket from the mop head by
releasing the quick fasteners and using the loop on
the side of the pocket, avoiding contact with the hot
pocket or dirt.
4 Empty the water tank before storage. Remove the
water tank cap and empty the tank over a sink.
Replace the water cap.
5 To store the Shark
®
Multi-Function Steam
Pocket® Mop Lite hanging up, first remove the head
(after it has cooled and the steam has been released)
then hang on a large hook. (fig. 16)
Page 15

40°
DECALCIFYING YOUR STEAM MOP
Calcium and mineral deposits can build up and
impact the per formance of your steam mop
over time. To extend the life of your product we
recommend that you use distilled water.
fig. 17
fig. 19
fig. 18
CARE OF YOUR CLEANING POCKETS
1 We recommend washing your cleaning pocket
separately from other fabrics to avoid picking up lint.
For optimal cleaning performance, the pockets may
need to be washed up to (3) three times. Only use
liquid detergent (no powder detergent). Do not
use any fabric softeners or bleach. Line dry. Do
not tumble dry. (fig. 17)
2 If there are loose threads on the cleaning pocket,
carefully cut the thread with scissors. Do not pull on
them or cut at the base. (fig. 18)
IMPORTANT: The cleaning pocket may be very hot
from the steam. Use caution when removing. Let the
unit cool for 2-3 minutes.
CLEANING THE NOZZLE
NOTE: To prevent clogging, it is recommended that
you periodically clean the Direct Steam Nozzle and
the extension hose stem.
1 Your Handheld Steamer should not normally require
cleaning, however, should you notice a decrease in
the steam output, it may be necessary to remove
mineral deposits built up around the nozzles.
2 Unplug the cleaner from the electrical outlet.
3 Use a small diameter stiff metal wire, such as a
straightened metal paperclip, and carefully insert the
end of the wire into the nozzle orifice. See illustration
above. (fig. 19)
4 Move the wire back and forth several times to remove
any deposits.
5 Plug in the appliance to the power outlet and test
steam output.
11www.sharkclean.eu
Page 16

Troubleshooting Guide
PROBLEM POSSIBLE REASONS & SOLUTIONS
The Shark® Multi-Function
Steam Pocket
®
Lite Mop
will not turn-on.
The unit will not make
steam.
The Shark® Multi-Function
Steam Pocket
®
Lite Mop
leaves water on the floor.
The Shark® Multi-Function
Steam Pocket
®
Lite Mop left
a white spot on the floor.
Floors are cloudy, streaky
or spotty after steaming.
The Shark® Multi-Function
Steam Pocket
®
Lite Mop is
hard to push.
Your steam mop should be securely plugged into an electrical outlet only.
Check your fuse or breaker.
Is there water in the water tank? If not, add water to your steam mop following
instructions on page 4.
When using the unit in the handheld mode, ensure that you are holding the
handheld unit horizontally to optimise the steam output. Do not hold the
handheld unit vertically as this will impede steam production. Use the hose with
your chosen accessory to reach difficult areas and above floor cleaning whilst
maintaining the horizontal position of the handheld unit.
If the unit still does not make steam, follow the instructions on page 11 to clean
the nozzle.
Check to see if your cleaning pocket is too wet. We recommend you unplug the
steam mop and change the cleaning pocket.
Make sure the cleaning pocket is attached correctly.
Do not leave your steam mop on the floor with a damp or wet cleaning pocket.
If you’re using tap water, we recommend switching to distilled water.
Make sure the cap is securely on the water tank.
The cleaning pocket might be dirty. Flip or change the cleaning pocket.
If you washed the cleaning pocket with powder detergent, then your pocket
could be damaged and require replacement. Replacement pockets are available
at www.sharkclean.eu.
This could also be an indication of prior soap or grease residue that has
accumulated on the floor. As our steam mops use only a small amount of
water, it may not be wet enough to rinse off the accumulation that the steam
is bringing to the surface. We suggest rinsing the floor with nothing but water,
letting it dry, and then steam mopping again with a clean pocket. One or more
rinses generally removes the residue.
A more stubborn case may require you to rinse the floor with a mix of one part
vinegar and two parts water.
Make sure the cleaning pocket is attached correctly.
Check to see if the cleaning pocket is excessively dirty. If so, replace the
cleaning pocket.
12 FREEPHONE 0800 862 0453
Page 17

Notes
13www.sharkclean.eu
Page 18

Notes
14 FREEPHONE 0800 862 0453
Page 19

Notes
15www.sharkclean.eu
Page 20

Euro-Pro Europe Limited
15 Mariner Court
Calder Park
Wakefield
WF4 3FL
Freephone 0800 862 0453
www.sharkclean.eu
Technical Details
Model number: S2901UK 11
Input: 1250 Watts
Main unit voltage: 220-240V~, 50/60Hz
COPYRIGHT© EURO-PRO OPERATING LLC 2014
Euro-Pro, Steam Pocket, and Shark are trademarks of Euro-Pro Operating LLC. All other brand
names may be trademarks of their respective owners.
PRINT ED IN CHIN A
S29 01UK_11_ IB_E _141016_ 2
Illustrat ions may differ fro m actual product.
IPX4
 Loading...