

Page 1
®
www.PoweredLiftAway.com
1.800.798.7398
Model/Modèle/Modelo
NV681
Page 2
1
www.PoweredLiftAway.com
TECHNICAL SPECIFICATIONS:
Voltage: 120V., 60Hz
Watts: 800W
Amps: 6.7A
Contents
Contenu
Índice
SPÉCIFICATIONS TECHNIQUES :
Tension : 120V., 60Hz
Watts : 800W
Ampères : 6.7A
Thank you for
purchasing the Shark
Rotator® Powered
Lift-Away™ Speed.
Merci d’avoir fait
l’achat de l’aspirateur
Shark Rotator
MD
Powered Lift-AwayMC
Speed.
Gracias por haber
comprado la aspiradora
Shark Rotator
®
Powered Lift-Away™
Speed.
ESPECIFICACIONES TÉCNICAS :
Voltaje: 120V., 60Hz
Potencia : 800W
Amperes : 6.7A
Getting to Know Your Shark Rotator
®
Lift-Away™ Speed .................................................................................................3
Assembly ...........................................................................................................................................................................4
Upright Cleaning ...............................................................................................................................................................5
What Does the Brushroll Indicator Light Mean? ..............................................................................................................5
Above Floor Cleaning . ......................................................................................................................................................6
Changing Floor Nozzles .....................................................................................................................................................7
Powered Lift-Away Cleaning ............................................................................................................................................8
Lift-Away Cleaning ............................................................................................................................................................8
Maintenance ....................................................................................................................................................................9
Emptying the Dust Cup...................................................................................................................................................9
Cleaning the Filters ........................................................................................................................................................9
Checking for Blockages ................................................................................................................................................10
Troubleshooting Guide ....................................................................................................................................................11
Warranty .........................................................................................................................................................................11
Apprendre à connaître votre aspirateur Shark Rotator
MD
Powered Lift-AwayMC Speed ................................................13
Assemblage.....................................................................................................................................................................14
Nettoyage vertical...........................................................................................................................................................15
Que signifient les couleurs du témoin de la brosse motorisée? .....................................................................................15
Nettoyage sur surface élevée . .......................................................................................................................................16
Changer les embouts pour plancher ...............................................................................................................................17
Nettoyage motorisé Lift-Away ........................................................................................................................................18
Nettoyage Lift-Away .......................................................................................................................................................18
Entretien .........................................................................................................................................................................19
Vider le récipient à poussière ......................................................................................................................................19
Nettoyer les filtres .......................................................................................................................................................19
Vérification des obstructions .......................................................................................................................................20
Guide de dépannage .......................................................................................................................................................21
Garantie...........................................................................................................................................................................21
Partes de su Shark Rotator
®
Powered Lift-Away™ Speed ..............................................................................................23
Armado ............................................................................................................................................................................24
Limpieza en modo vertical ..............................................................................................................................................25
¿Qué significa la luz indicadora del cepillo motorizado? ................................................................................................25
Para limpiar por encima del piso . ..................................................................................................................................26
Para cambiar las boquillas para piso ..............................................................................................................................27
Para limpiar con el Lift-Away motorizado .......................................................................................................................28
Limpieza con el Lift-Away ...............................................................................................................................................28
MANTENIMIENTO ........................................................................................................................................................29
Vaciado del recipiente de la tierra ...............................................................................................................................29
Limpie los filtros ...........................................................................................................................................................29
Verificación de obstrucciones ......................................................................................................................................30
Guía de solución de problemas.......................................................................................................................................31
Garantía...........................................................................................................................................................................31
English Français Español
Page 3
1.800.798.7398
2
IMPORTANT SAFEGUARDS
FOR HOUSEHOLD USE ONLY
READ ALL INSTRUCTIONS BEFORE USE
SAVE THESE INSTRUCTIONS
POLARIZED PLUG
To reduce the risk of electric shock, this vacuum cleaner has a polarized plug (one blade is wider than the other). As a safety feature, this plug will fit into a
polarized outlet only one way. If the plug does not fit fully into the outlet, reverse the plug. If it still does not fit, contact a qualified electrician. DO NOT force into
outlet or try to modify to fit.
IMPORTANT SAFEGUARDS
CAUTION: The Power nozzle, wand, and handle contain electrical
connections:
- These are not serviceable parts.
- Do not use to vacuum any liquids.
- Do not immerse in water when cleaning.
- If handle/wand is damaged, discontinue use.
When using an electrical appliance, basic safety precautions should
always be observed, including the following:
WARNING
TO REDUCE THE RISK OF FIRE, ELECTRIC SHOCK OR INJURY:
1 DO NOT use outdoors or on wet surfaces.
2 Unplug from electrical outlet when not in use and before servicing.
3 Inspect power cord or plug for any damage before use. DO NOT use vacuum
cleaner with a damaged cord or plug.
4 If vacuum cleaner is not working as it should, has been dropped, damaged,
left outdoors, or dropped into water, return it to EURO-PRO Operating LLC for
examination, repair, or adjustment.
5 The hose contains electrical wires. Do not use when damaged, cut or punctured.
6 DO NOT pull or carry vacuum cleaner by the cord or use the cord as a handle.
7 DO NOT unplug by pulling on cord; to unplug, grasp the plug, not the cord.
8 DO NOT handle plug or vacuum cleaner with wet hands.
9 DO NOT run the vacuum cleaner over the power cord, close a door on the cord or
pull cord around sharp corners.
10 The use of an extension cord is not recommended.
11 DO NOT leave vacuum cleaner when plugged in.
12 Keep cord away from heated surfaces.
13 Turn off all controls before plugging or unplugging the vacuum cleaner.
14 Store your vacuum cleaner with the power cord secured around the two cord
holders.
GENERAL USE
15 Use only as described in this manual.
16 DO NOT put any objects into openings. DO NOT use with any opening blocked;
keep free of dust, lint, hair, and anything that may reduce air flow.
17 Keep your work area well lit.
18 Keep the vacuum cleaner moving over the carpet surface at all times to avoid
damaging the carpet fibers.
19 DO NOT place vacuum cleaner on unstable surfaces such as chairs or tables.
20 DO NOT allow young children to operate the vacuum cleaner or use as a toy.
Close attention is necessary when used near children.
21 DO NOT use without dust cup and/or filters in place.
HOSE ATTACHMENTS
22 DO NOT use if air flow is restricted; if the air paths or the motorized floor nozzle
become blocked, turn the vacuum cleaner off and unplug from electrical outlet.
Remove all obstructions before you turn on the unit again.
23 Keep the end of the hose and accessory openings away from face and body.
24 Keep cleaning tools and hose suction openings away from hair, face, fingers,
uncovered feet, or loose clothing.
25 Only use manufacturer’s recommended attachments.
DUST CUP/FILTERS/ACCESSORIES
Before turning on the vacuum:
26 Make sure that all filters are thoroughly dry after routine cleaning.
27 Make sure that dust cup and all filters are in place after routine maintenance.
28 Make sure accessories are free of blockages.
29 Only use filters and accessories provided by EURO-PRO Operating LLC. [Failure to
do so will void the warranty.]
GENERAL CLEANING
30 DO NOT pick up large-sized objects.
31 DO NOT pick up hard or sharp objects such as glass, nails, screws or coins that
could damage the vacuum cleaner.
32 DO NOT use to pick up drywall dust.
33 DO NOT pick up smoking or burning objects such as hot coals, cigarette butts,
fireplace ash or matches.
34 DO NOT pick up flammable or combustible materials such as lighter fluid,
gasoline, or kerosene or use vacuum in areas where they may be present.
35 DO NOT pick up toxic solutions such as chlorine bleach, ammonia, or drain
cleaner.
36 DO NOT use in an enclosed space where vapors are present from paint, paint
thinner, moth-proofing substances, flammable dust or other explosive or toxic
materials.
37 DO NOT vacuum up any liquids.
38 DO NOT immerse vacuum cleaner in water or other liquids.
39 DO NOT use outdoors or on wet surfaces; use only on dry surfaces.
40 Use extra care when cleaning on stairs.
41 Remove brushroll from unit before rinsing.
English
Page 4
www.PoweredLiftAway.com
3
G
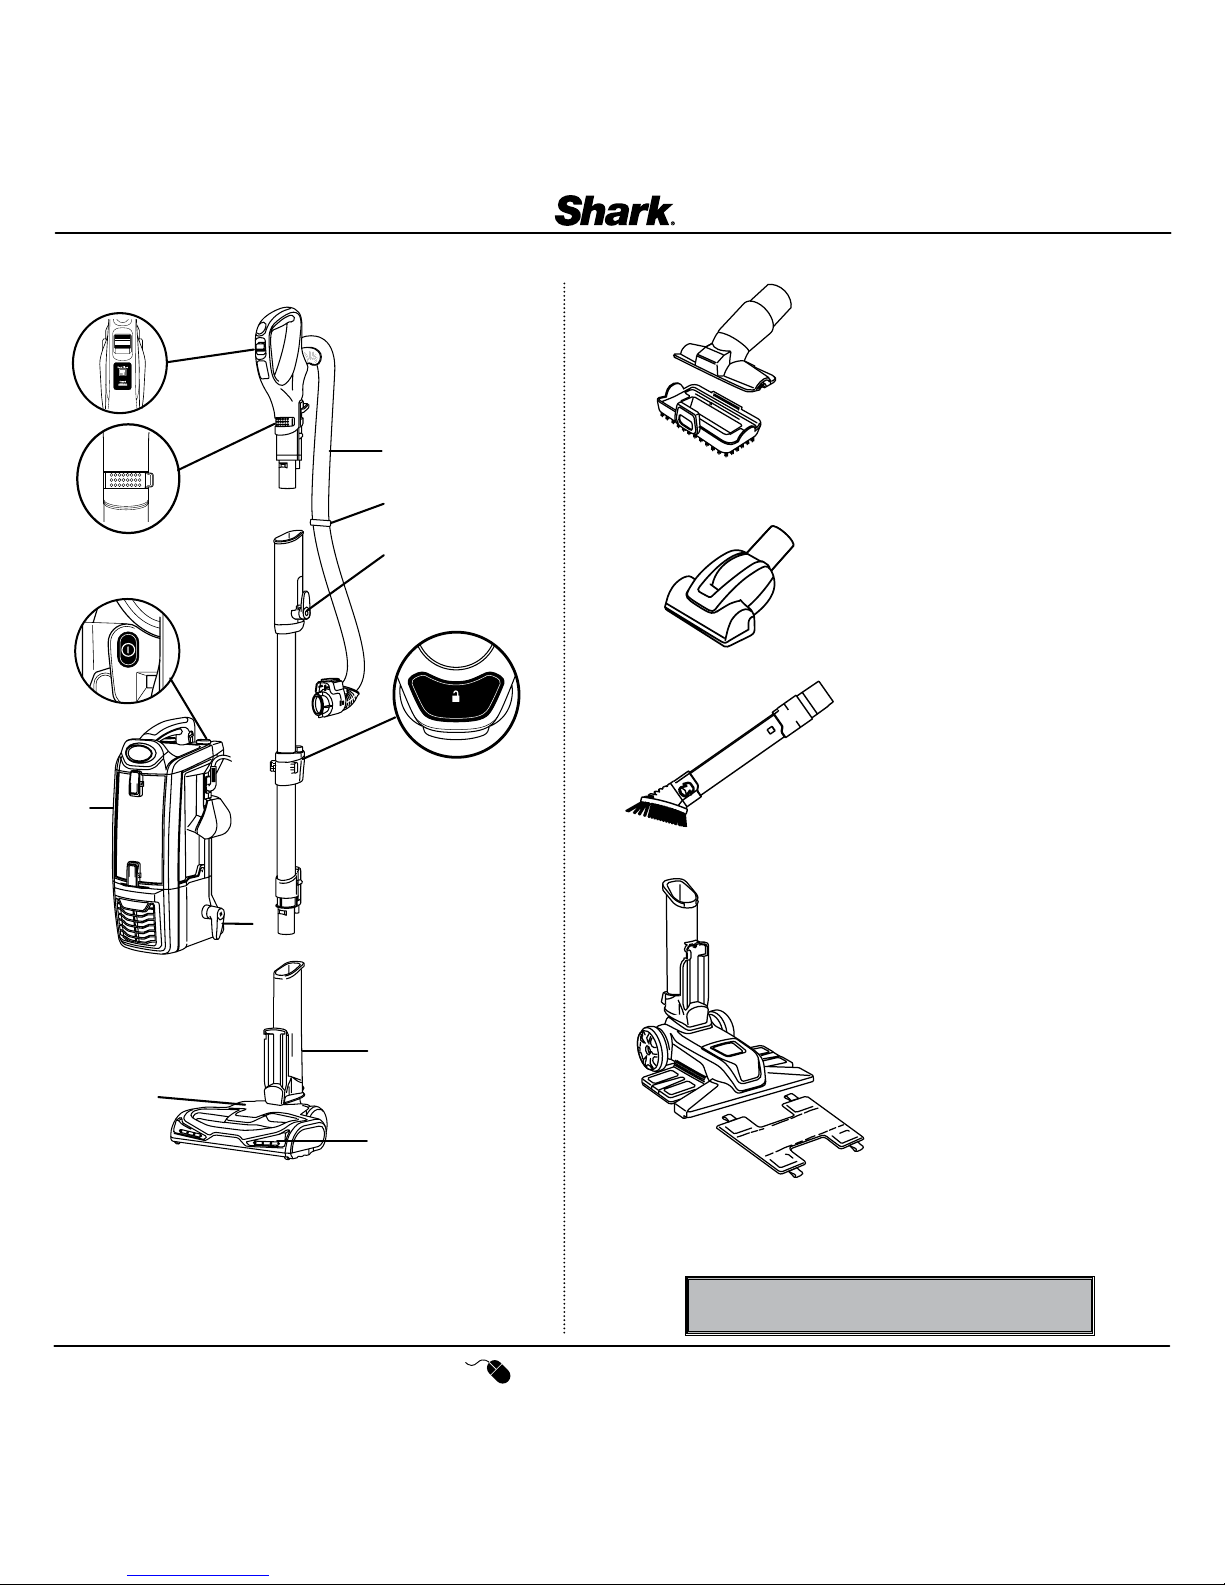
ETTING TO KNOW YOUR SHARK ROTATOR® POWERED LIFT-AWAY™ SPEED
MAIN UNIT
1 Surface Selector
2 Suction Control
3 Hose
4 Hose Clip
5 Upper Cord Hook
6 Power Switch
7 Wand Release
8 Lift-Away Pod
9 Lower Cord Hook
10 Motorized Floor Nozzle
11 Headlights
12 Brushroll Indicator Light
Pet Multi-Tool
187FLI680
Two cleaning tools in one. The stiff bristle
brush gets stuck-on debris off a multitude of
surfaces. Remove the bristles to reveal an
upholstery tool for removing stubborn pet
hair from upholstery and more.
Pet Power Brush
188FLI680
Designed for removal of pet hair and ground
in dirt from carpeted stairs and upholstery.
Duster Crevice
189FLI680
Two cleaning tools in one. The crevice tool
gives you extended cleaning reach for small
spaces, while the dusting brush cleans a
multitude of surfaces.
Dust Away™ Pro & Microfiber Pad
XFGE680G
Durable enough for big crumbs and debris,
but gentle enough for the most delicate
dusting on hard wood and tile floors.
Looking for more accessories and replacement parts?
Check out ww w.PoweredLif tAway.com or call 1-8 00-79 8-7398.
1
3
9
5
6
10
2
Wand Release
7
8
11
4
12
Page 5
1.800.798.7398
4
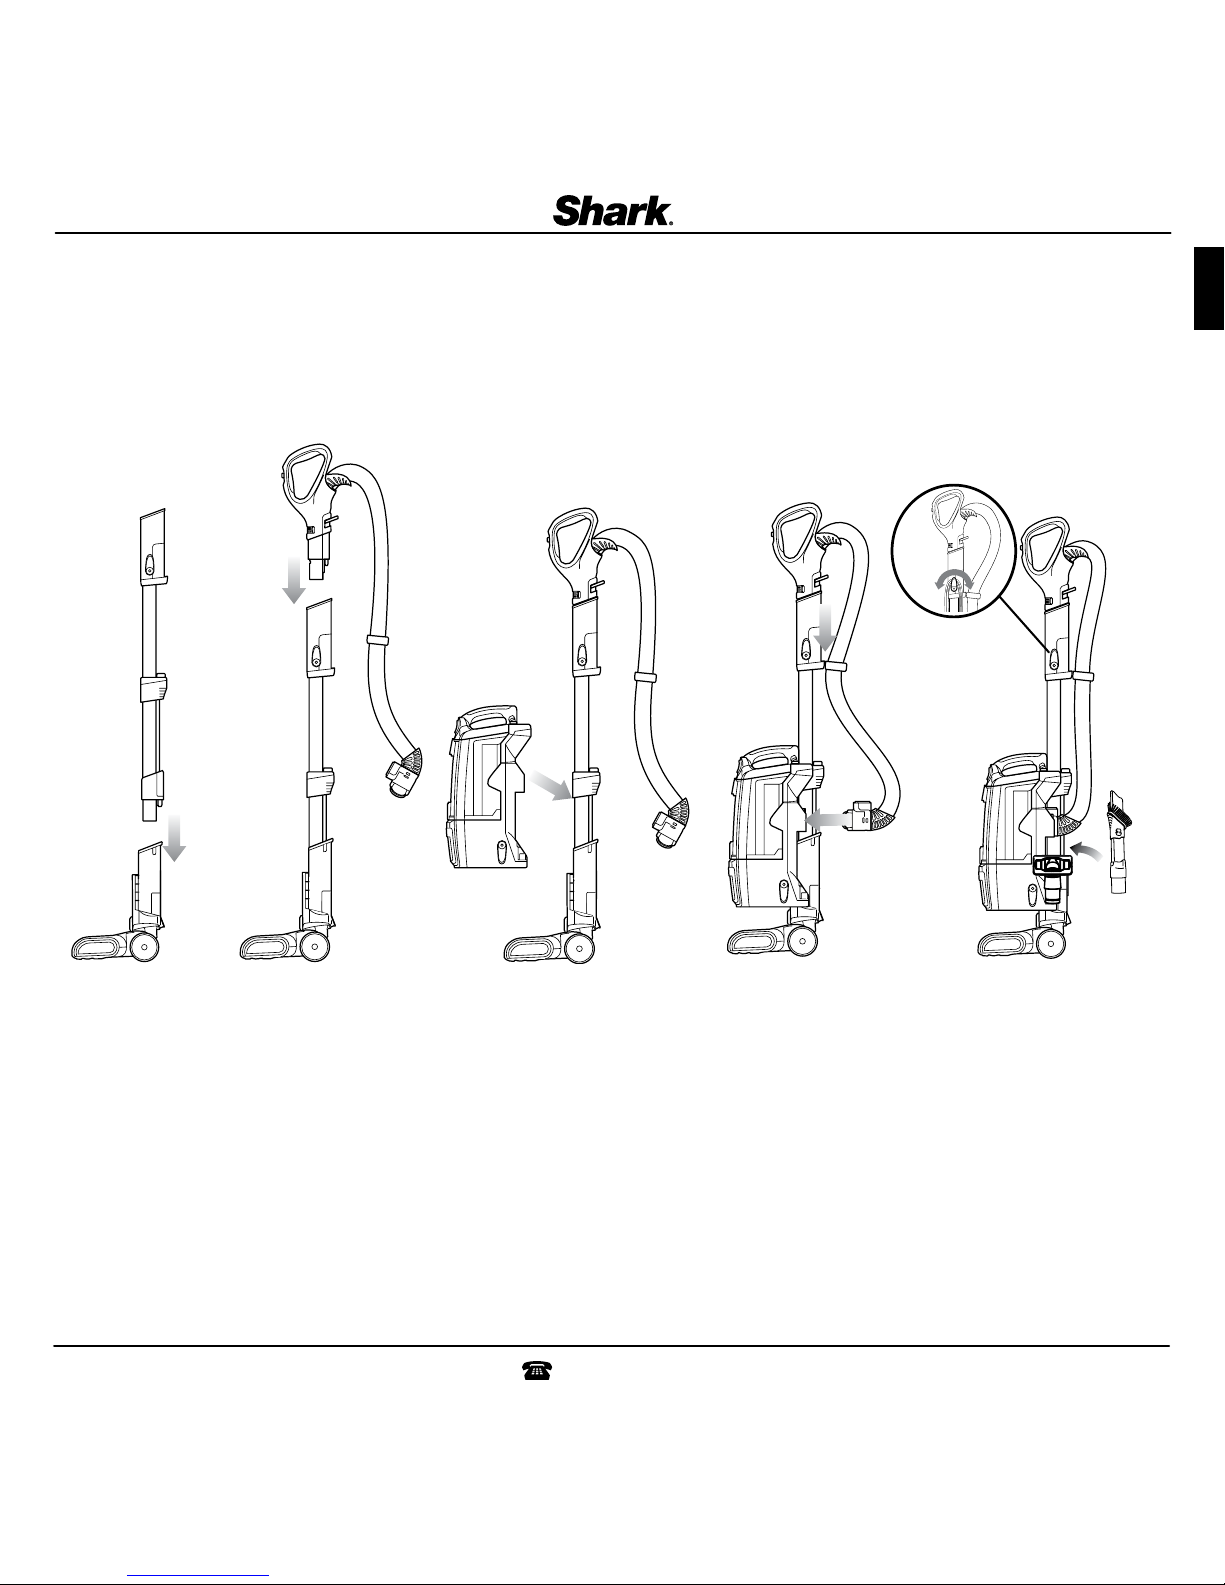
ASSEMBLY
1 Place the selected floor nozzle on the floor and insert
the wand.
2 Insert the handle into the wand.
3 Slide the pod onto the wand.
4 Slide the hose clip into the notch at the back of the
wand.
5 Insert the duster crevice and pet-multi tool into the
accessory posts as shown.
TIP: For quick cord access, rotate upper hook down and
remove cord. Rotate back for cord storage.
STEP 1 STEP 2 STEP 3 STEP 4 STEP 5
English
SLIDE
CLICK
Page 6

5
www.PoweredLiftAway.com
UPRIGHT CLEANING
NOTE: DO NOT use to pick up dr ywall dust or fireplace ash.
1 Plug in power cord into electrical outlet and press
POWER button to turn vacuum on.
2 Hard Floor Cleaning
Set Floor Selector to Hard Floor and Suction Control
to Max for full suction or variable depending on user
preference.
Thick Carpet & Area Rugs Cleaning
Set Floor Selector to Carpet and Suction Control to
Min for reduced suction or variable depending on user
preference.
Carpet Cleaning
Set Floor Selector to Carpet and Suction Control to Max
for full suction or variable depending on user preference.
NOTE: For deep cleaning per ASTM F 608 (embedded dirt in
carpets) please set to Carpet and Suction Control to Max.
3 Place your left foot gently on the floor nozzle and tilt the
handle back to start cleaning.
NOTE: The brushroll will only spin once the vacuum is
reclined back.
STEP 1 STEP 2 STEP 3
Suction Control
Floor Selector
MinMax
WHAT DOES THE BRUSHROLL INDICATOR LIGHT MEAN?
• Solid Green: The brushroll is on and working as it should.
• Solid Red: There is a jam in the brushroll area. Turn your vacuum off and remove the blockage.
• *Flashing Red: The motorized floor nozzle is overheating. Turn your vacuum off and wait for it to cool down.
*See Troubleshooting section for further instructions.
Page 7
1.800.798.7398
6
English
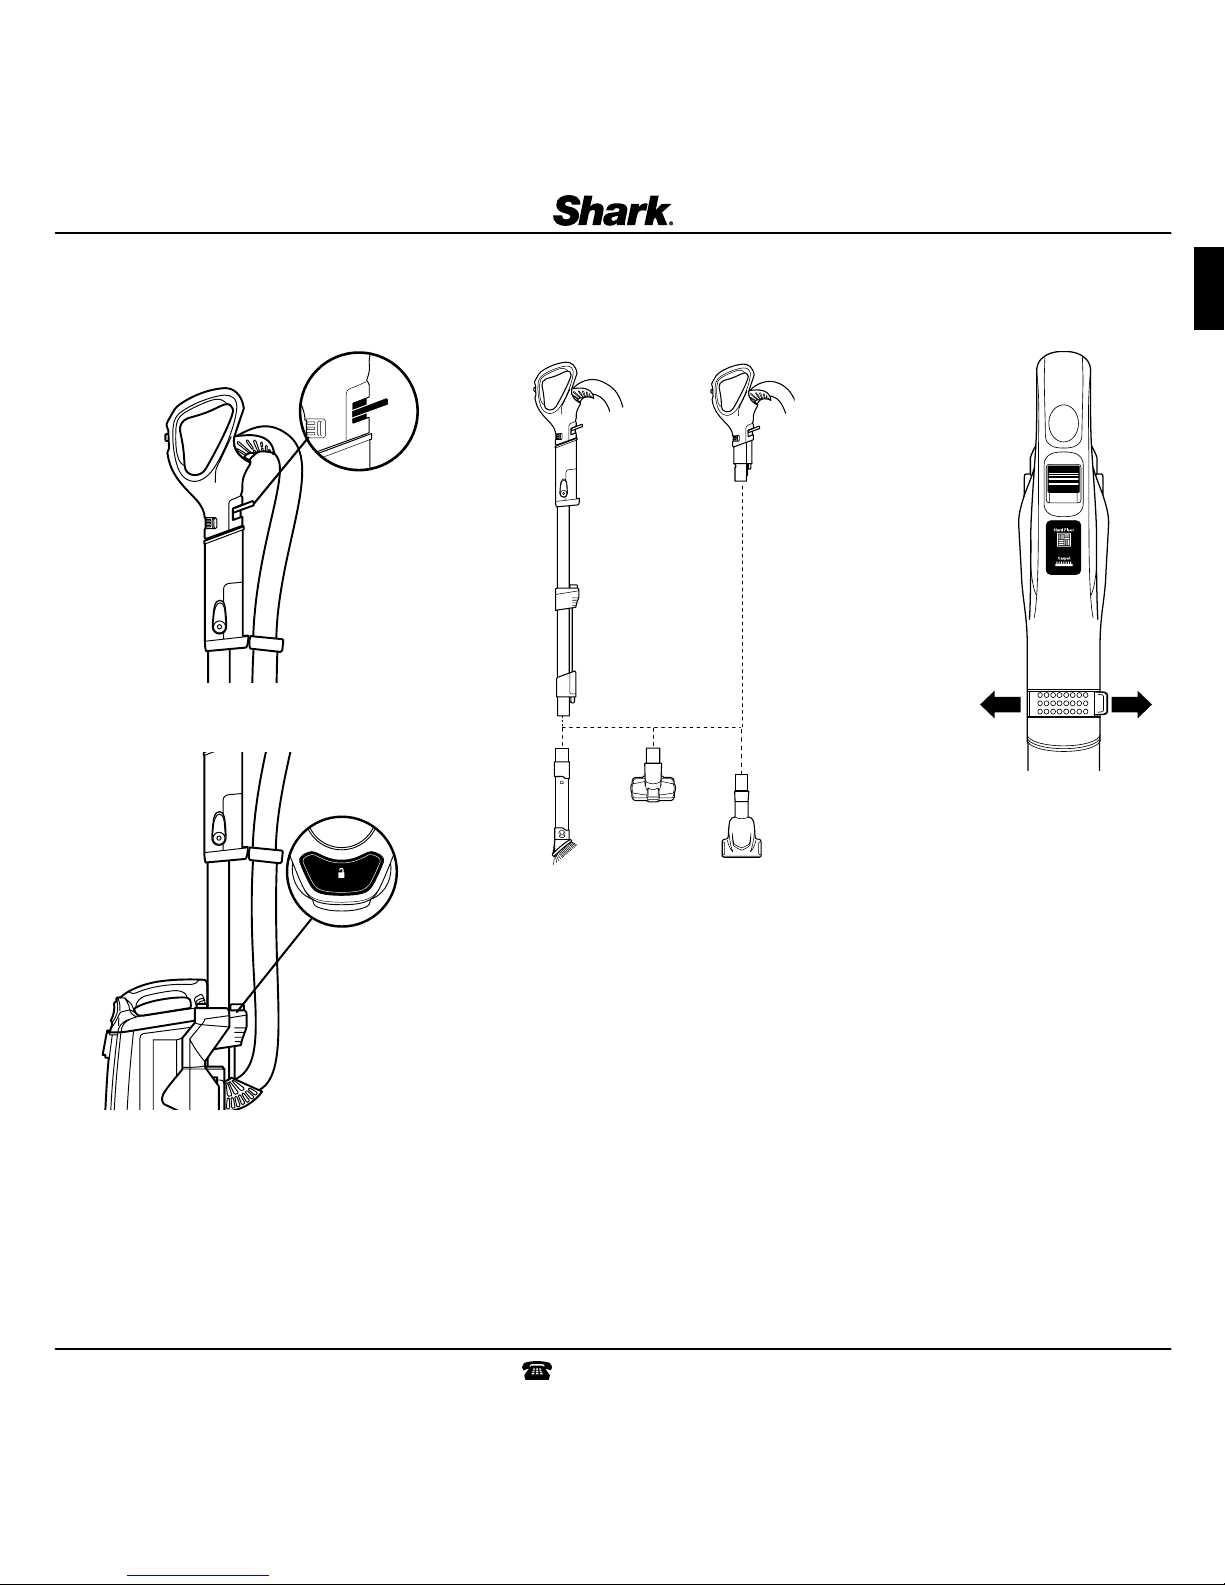
ABOVE FLOOR CLEANING
NOTE: DO NOT use to pick up dr ywall dust or fireplace ash.
1 For above floor cleaning with the hose, press the WAND or
HANDLE release (depending on the amount of reach required)
then lift handle up.
2 Insert wand or handle directly into desired tool. 3 This unit is equipped with SUCTION CONTROL to help when
dusting delicate objects or draper y. Located at base of the
handle, slide the SUCTION CONTROL tab to minimize suction.
Be sure to close again for maximum suction.
OR
STEP 1 STEP 2 STEP 3
Wand Release
OR
Suction Control
MinMax
Page 8
7
www.PoweredLiftAway.com
CHANGING FLOOR NOZZLES
1 Press the WAND RELEASE button to remove the wand
from the motorized floor nozzle.
2 Insert the wand into the Dust Away Pro.
3 Press the LIFT-AWAY button to lift the pod off the
motorized floor nozzle.
4 Place the pod onto the wand and slide down to connect
to the Dust Away™ Pro.
NOTE: For best results, ensure that the SUCTION CONTROL
is set to MAX.
Wand Release
CLICK
Use the motorized floor nozzle for deep cleaning carpets and picking up large debris on hard floors.
Use the Dust Away™ Pro to pick
up debris and wipe away fine dust in one easy step.
STEP 1/STEP 2 STEP 3 STEP 4
DUST AW AY PRO
MOTO RIZED F LOOR NOZ ZLE
Page 9
1.800.798.7398
8
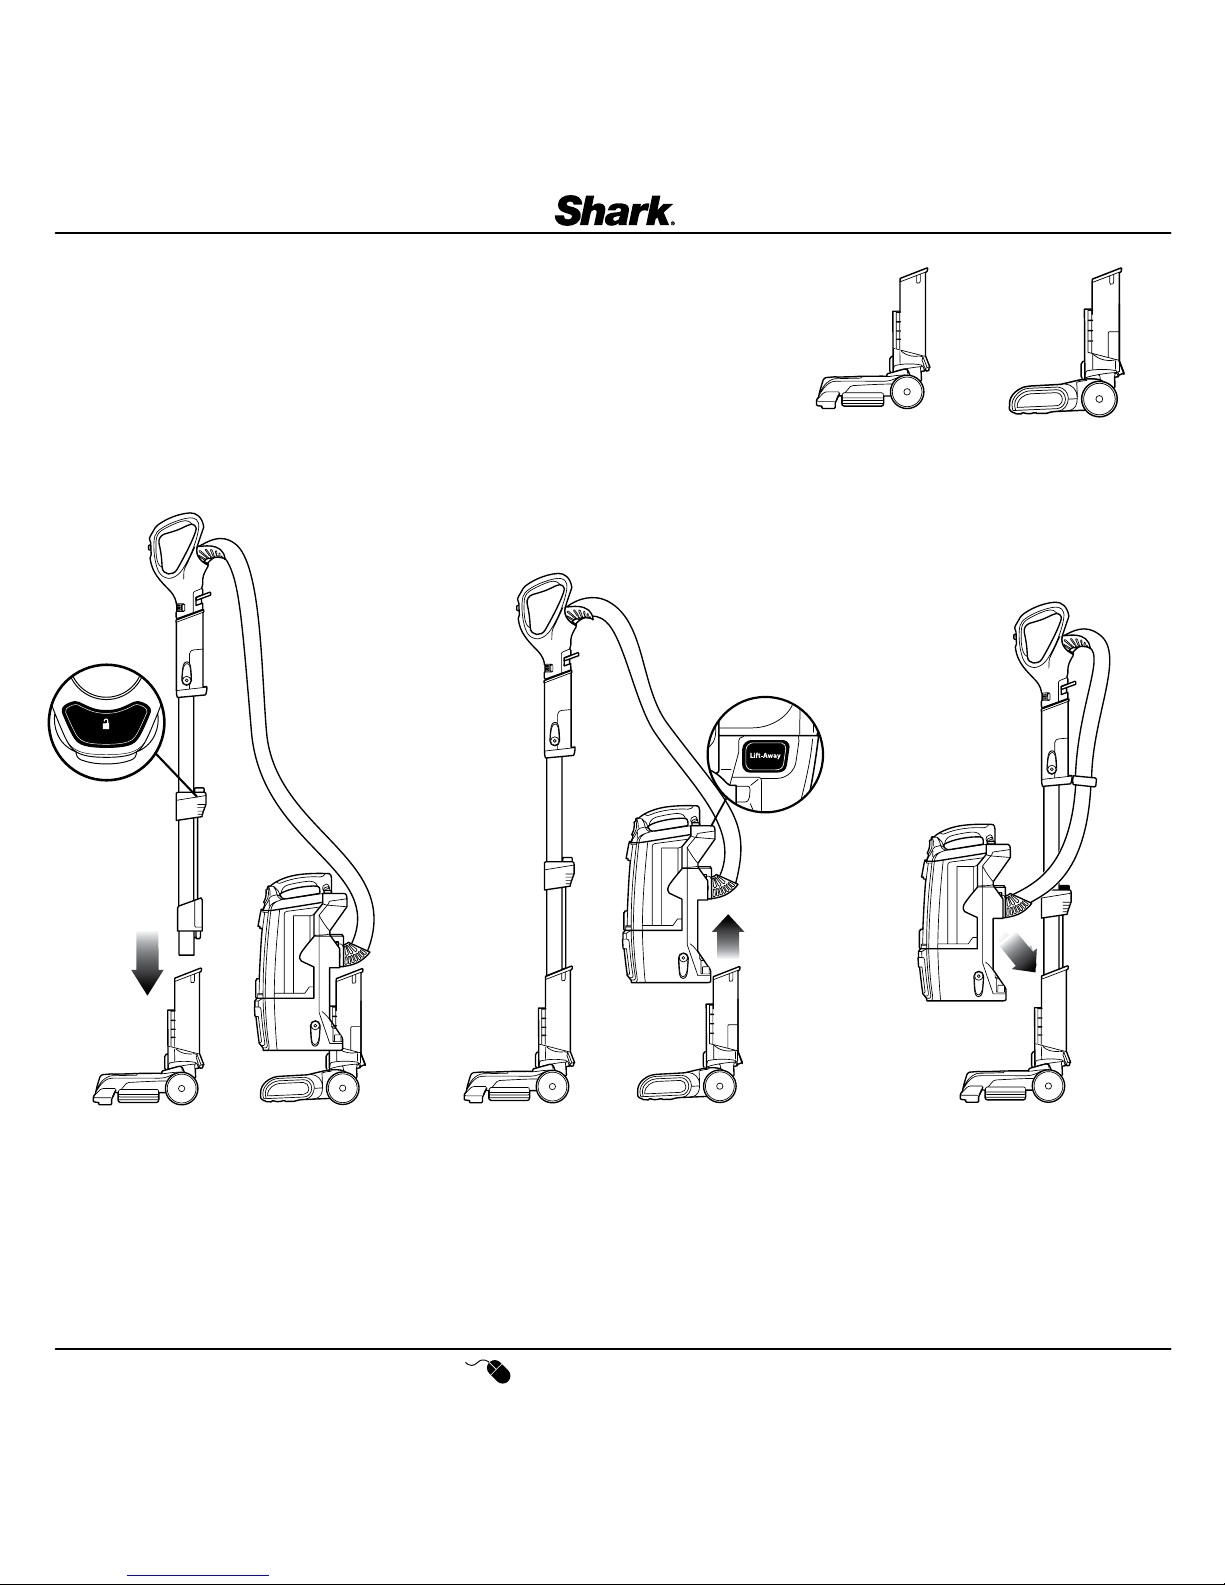
1 Press LIFT-AWAY button to lift the pod off the floor
nozzle.
Insert the WAND into either the motorized floor nozzle
or the Dust Away™ Pro.
TIP Using the vacuum in Powered Lift-Away mode gives you
extended reach for cleaning under furniture and in tight
spaces.
2 Insert the HANDLE into either the motorized floor nozzle
or the Dust Away™ Pro.
TIP Attaching the HANDLE directly into the nozzles makes
cleaning stairs easy.
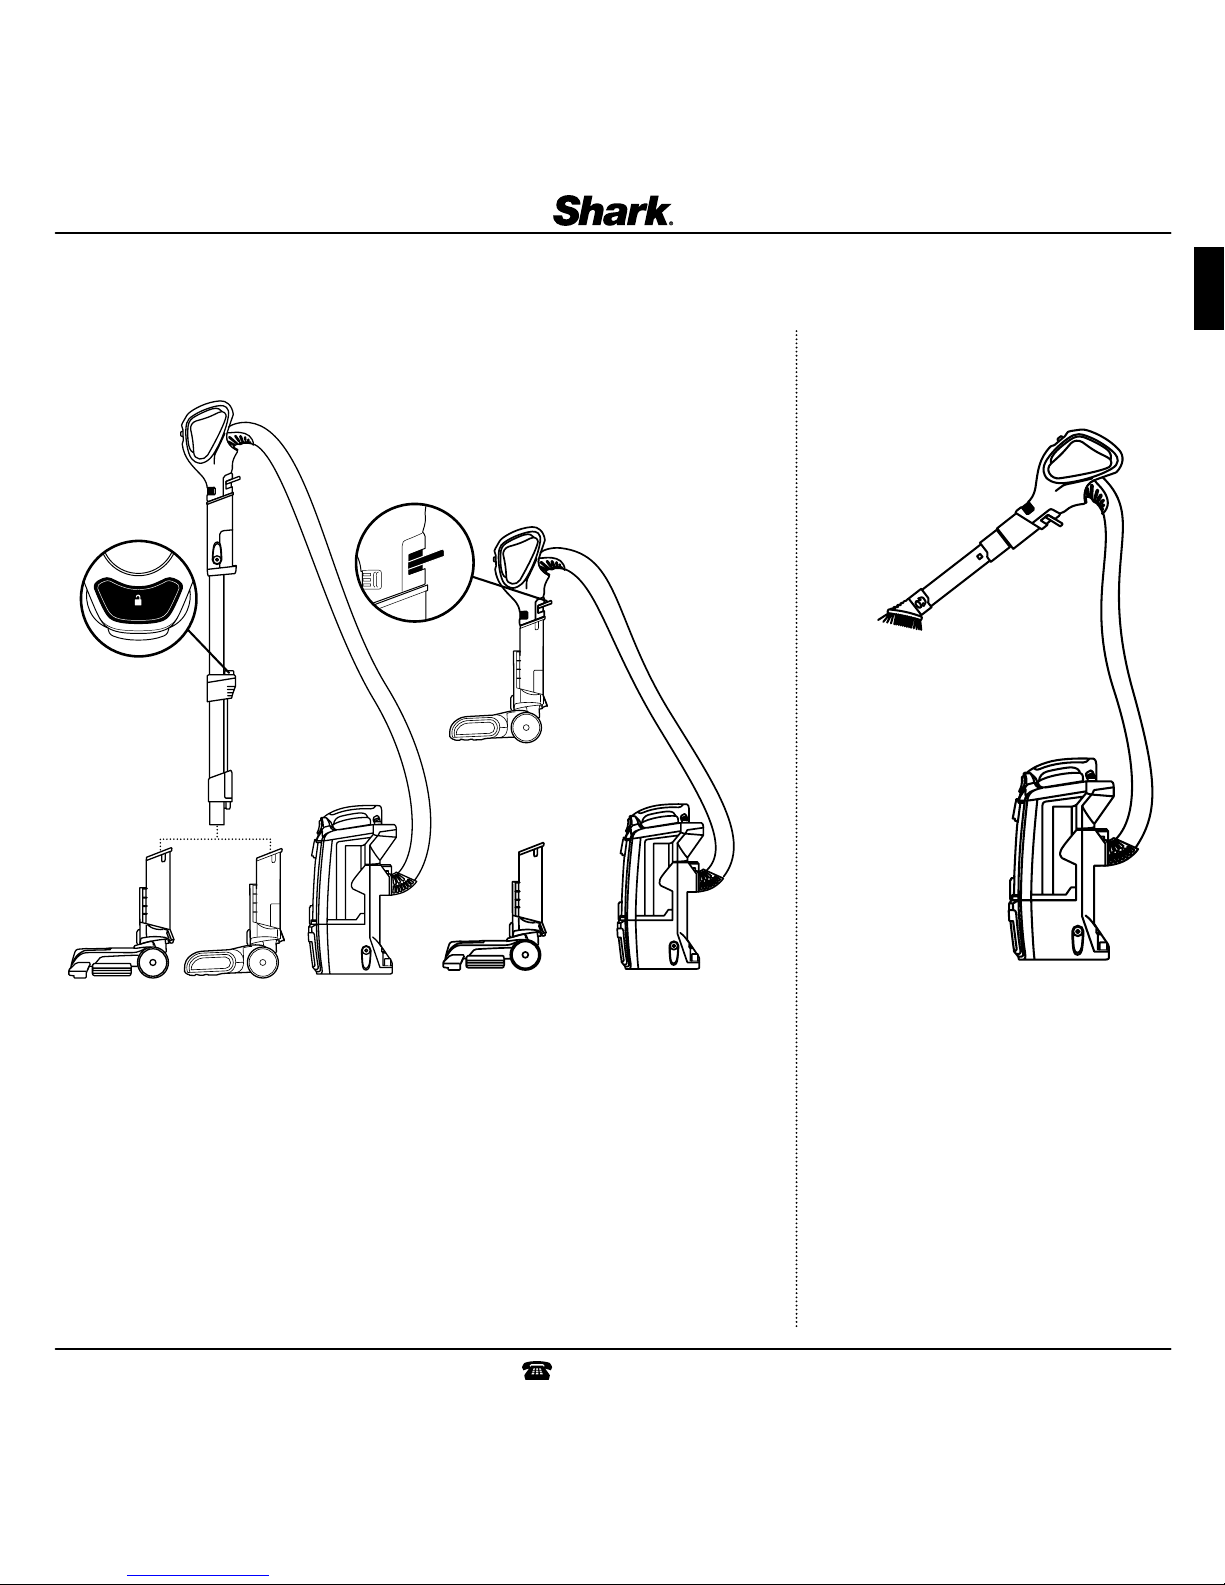
1 Attach the desired accessory directly into the HANDLE.
TIP For an extended reach, attach the desired accessory into
the WAND.
POWERED LIFT-AWAY™ CLEANING
Wand Release
LIFT-AWAY™ CLEANING
English
STEP 1 STEP 2
OR
OR
Page 10
9
www.PoweredLiftAway.com
RECOMMENDED FILTER CLEANING SCHEDULE:
Pre-motor Filter Kit (Foam & Felt): XFF680 Every 3 months
Post Motor Filter: XHF680 Every year
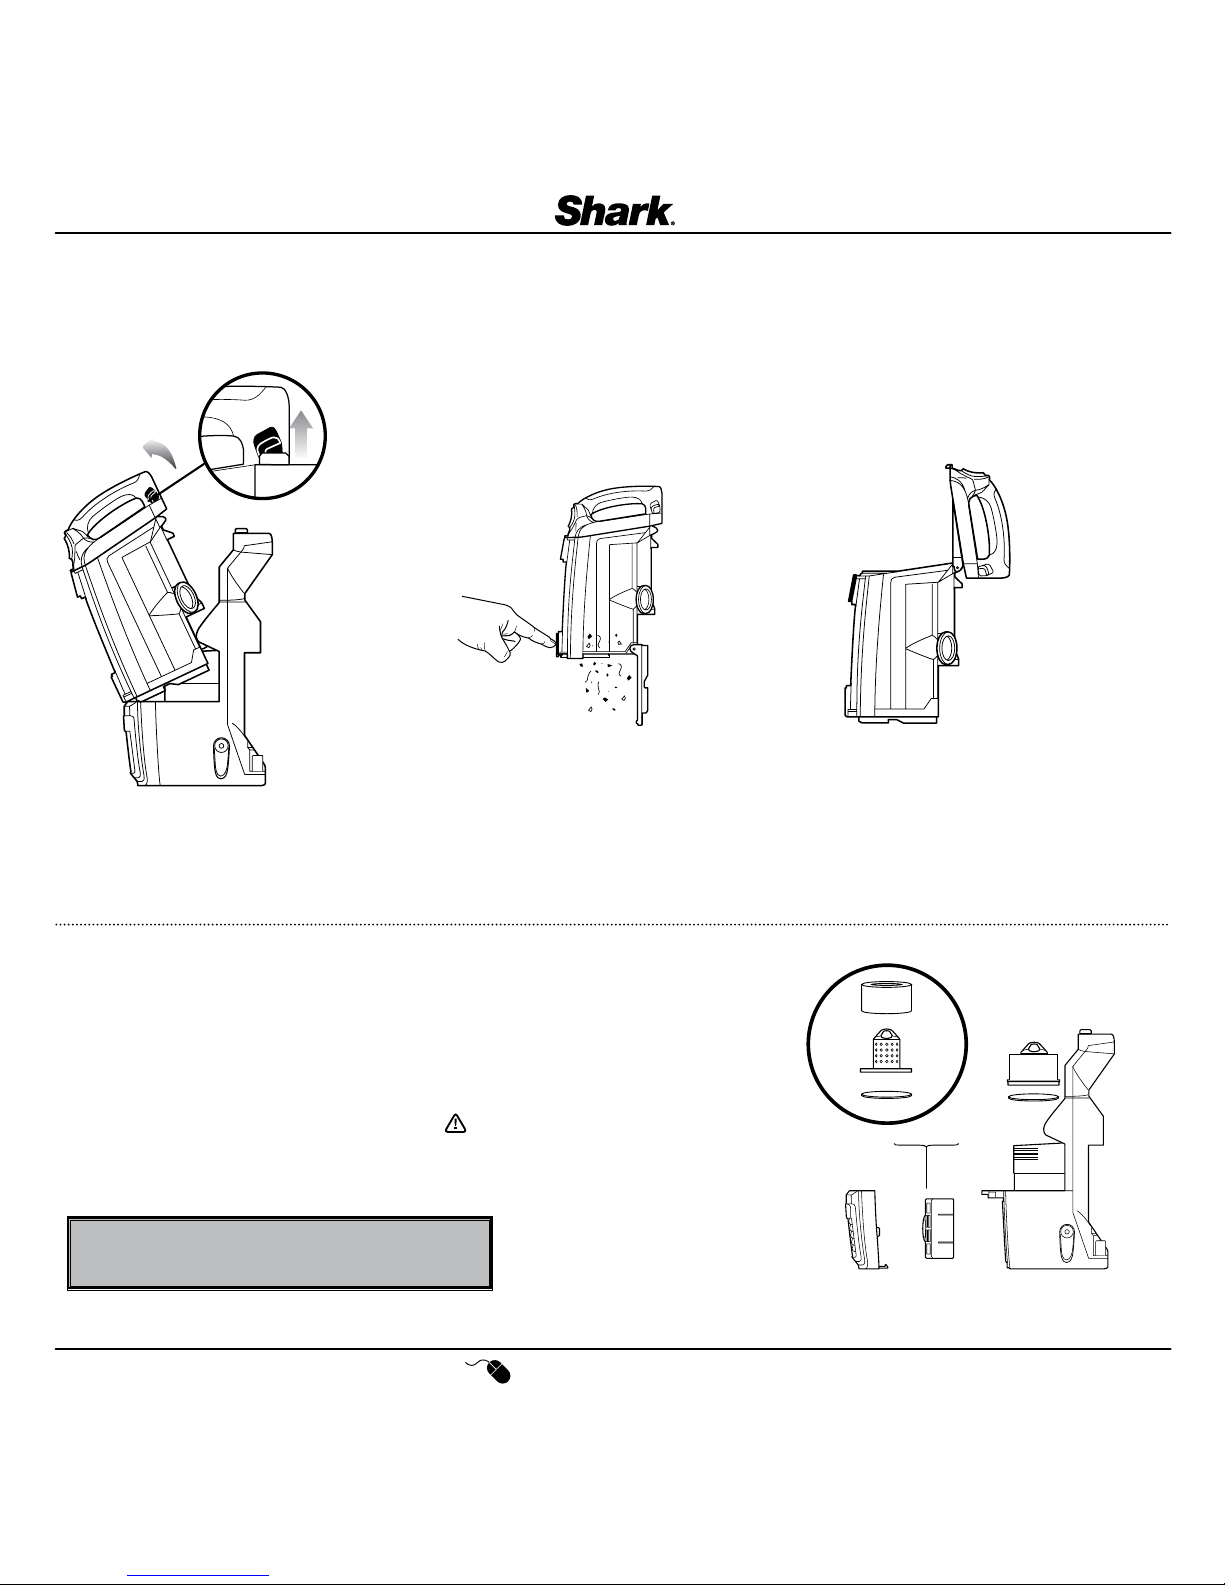
EMPTY THE DUST CUP
1 Pull up on the dust cup release latch and lift the dust
cup off the pod.
2 Holding the dust cup over a garbage bag or can, press
the bottom empty release latch.
3 Press the top dust cup release latch to access the dust
screen and remove built-up debris as required.
HEPA
CLEAN THE FILTERS
1 With the dust cup removed, remove and rinse the foam
and felt filters every 3 months. Let air dry completely
before replacing. Hand wash only. Tap loose dirt off
filters between washes as needed.
2 Once a year open the filter grill and remove and
rinse the HEPA filter. Let air dry completely before
replacing. Hand wash only.
IMPORTANT: DO NOT PICK UP FIREPL ACE ASH
OR DRY WALL DUST.
MAINTENANCE
To keep your vacuum’s suction power optimal, follow these instructions.
Make sure unit is off and cord unplugged.
IMPORTANT: Allow ALL filters to dry completely before replacing into the vacuum.
STEP 1 STEP 2 STEP 3
FELT FILTER
FOAM FILTER
FILTER FRAME
Page 11
1.800.798.7398
10
English
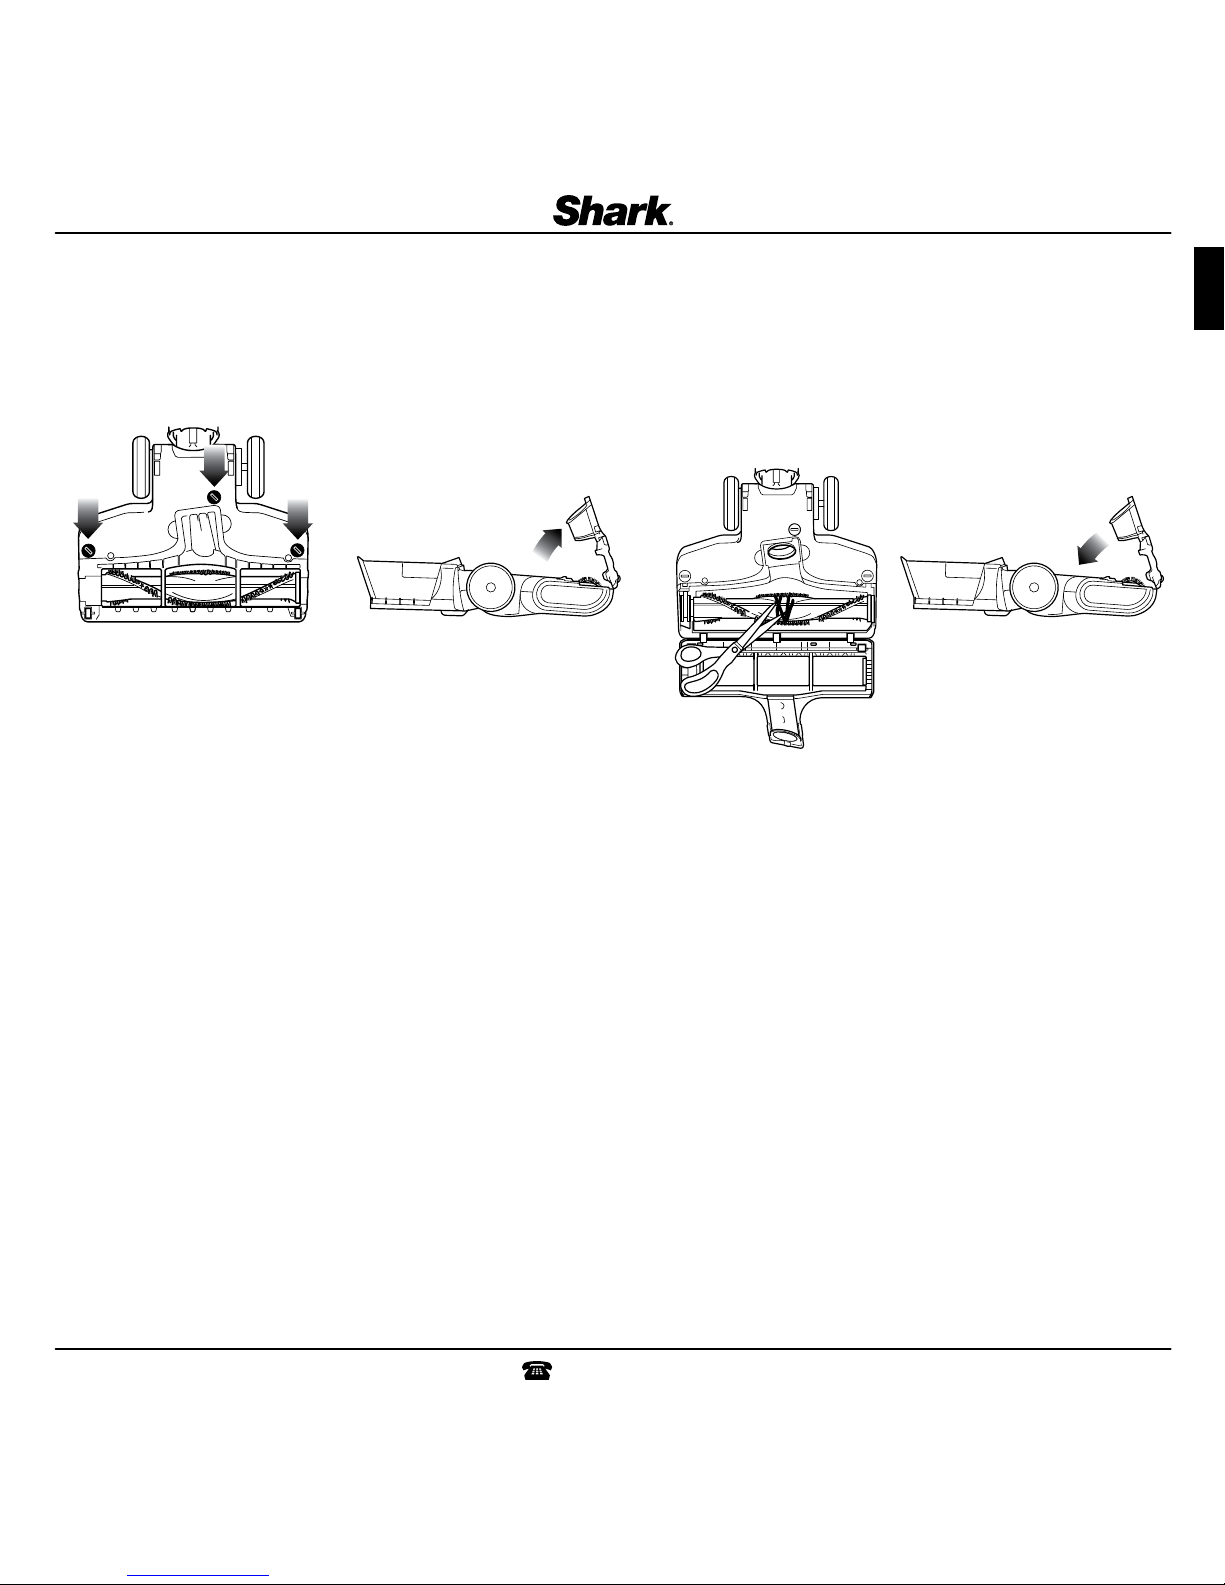
CHECK FOR BLOCKAGES
1 Use a coin to unlock the 3 locks on the
bottom of the floor nozzle.
2 A portion of the base is removable to
allow for better access to the brushroll
and exposure to the airway. Shine a
flashlight from the bottom to check for
possible blockage in the airway.
3 Remove any string, carpet fibers or
hair that may be wrapped around
the brushroll. There is a groove on
the brush bar that allows a pair of
scissors to cut across it to loosen
up the debris.
4 To reassemble, replace base by
lining it up along the front of the
nozzle. Push down to snap into
place. Lock the 3 locks.
STEP 1 STEP 2 STEP 4STEP 3
Page 12

11
www.PoweredLiftAway.com
TROUBLE-SHOOTING GUIDE
Customer Service: 800-798-7398
EURO-PRO Operating LLC warrants this product to be free from material defects and workmanship for a period of seven (7) years from the date of purchase when utilized for normal household use, subject to the following
conditions, exclusions and exceptions.
The liability of EURO-PRO Operating LLC is limited solely to the cost of the repair or replacement of the unit at our option. This Limited Warranty does not cover normal wear of parts and does not apply to any unit that
has been tampered with or used for commercial purposes. This Limited Warranty does not cover damage caused by misuse, abuse, negligent handling or damage due to faulty packaging or mishandling in transit. This
Limited Warranty does not cover damage or defects caused by or resulting from damages from shipping or repairs, service or alteration to the product or any of its parts, which have been performed by a repair person not
authorized by EURO-PRO Operating LLC.
If your appliance fails to operate properly while in use under normal household conditions within the warranty period, you may return the complete appliance and accessories with proof of purchase and date, freight
prepaid. For assistance with warranty service options or customer support, please call our customer care and product specialists at 1-800-798-7398 or visit our website at www.sharkrocket.com.
If the appliance is found by EURO-PRO Operating LLC to be defective, in EURO-PRO Operating LLC’s sole discretion, we will repair or replace it free of charge. Proof of purchase is required and a fee of $19.95 will apply
to cover the cost of return freight.*
Non-durable parts including, without limitation, filters, brushes and electrical parts which normally require replacement are specifically excluded from warranty.
This Limited Warranty is extended to the original purchaser of the unit and excludes all other legal, implied and/or conventional warranties. The responsibility of EURO-PRO Operating LLC if any, is limited to the specific
obligations expressly assumed by it under the terms of this Limited Warranty. In no event is EURO-PRO Operating LLC liable for incidental or consequential damages to anyone of any nature whatsoever. Some states do
not permit the exclusion or limitation of incidental or consequential damages, so the above may not apply to you.
This Limited Warranty gives you specific legal rights, and you may also have other rights which vary from state to state or province to province.
*IMPORTANT: Carefully pack item to avoid damage in shipping. Be sure to include proof of purchase date and to attach a tag to item before packing including your name, complete address and phone number with a note
giving purchase information, model number and what you believe is the problem with the item. We recommend you insure the package (as damage in shipping is not covered by your warranty). Mark the outside of your
package “ATTENTION CUSTOMER SERVICE”.
Euro-Pro, Shark and Rotato r are registered trademarks of Euro-Pro Operating LLC.
Lift-Awa y and Dust-Away are t rademark s of Euro-P ro Operating LLC.
SEVEN-YEAR (7) LIMITED WARRANTY
Vacuum is not picking up dirt. No suction or light suction • Check filters to see if they need cleaning. Follow instructions for rinsing and drying the filters before re-inserting back into the
vacuum.
• Dust cup may be full; empty dust cup.
• Check hose, hose connections, nozzles, and accessories for blockages; clear blockages if required.
• Remove any string, carpet fibers or hair that may be wrapped around the brushroll.
Vacuum lifts area rugs • Turn off the unit to disengage the brushroll and restart with the POWER button for suction only cleaning.
• Suction is powerful. Take care when vacuuming area rugs or rugs with delicately sewn edges.
• Turn off the unit and disengage the area rug from the brushroll and restart the unit.
Brushroll does not spin • If brushroll indicator light on the floor nozzle turns red, the brushroll has stopped spinning. Immediately turn off and unplug
vacuum, disconnect the nozzle and remove blockage before reconnecting and turning vacuum back on.
• Pull the handle toward you and release the floor nozzle to disengage the auto-off feature.
• Make sure that the carpet height selector is not on the HARD FLOOR setting.
• Immediately turn off and unplug vacuum, disconnect the nozzle and remove blockage before reconnecting and turning vacuum back on.
Vacuum turns off on its own or indicator light flashes red • This vacuum cleaner is equipped with a motor protective thermostat. If for some reason your vacuum overheats, the thermostat
will automatically turn the suction motor off. Should this occur, perform the following steps to restart the thermostat:
1. Turn the unit off.
2. Unplug the vacuum.
3. Empty the dust cup and clean filters (see page previous page)
4. Check for blockages in hose, accessories and inlet openings.
5. Allow the unit to cool for a minimum of 45 minutes.
6. Plug in the vacuum.
7. Restart the unit by turning the power on.
Note: If vacuum still does not start, contact Customer Service at: 1-800-798-7398.
Page 13

1.800.798.7398
12
Français
MESURES DE PROTECTION IMPORTANTES
POUR USAGE DOMESTIQUE SEULEMENT
CONSERVEZ CES INSTRUCTIONS
FICHE POLARISÉE
Pour réduire le risque de chocs électriques, cet aspirateur possède une fiche polarisée (une lame est plus large que l’autre). Par mesure de sécurité, cette fiche ne peut être insérée
que d’un seul côté dans une prise polarisée. Si la fiche ne s’insère pas complètement dans la prise de courant, inversez-la. Si cela ne fonctionne toujours pas, contactez un électricien
qualifié. NE FORCEZ PAS ou ne modifiez pas la fiche pour la brancher dans une prise de courant.
MISE EN GARDE : Le bout motorisé, le tuyau et la poignée contiennent
des connexions électriques :
- Il n’y a aucune pièce pouvait faire l’objet d’un entretien ou d’une
réparation.
- N’utilisez pas l’appareil pour aspirer tout liquide.
- Ne plongez pas l’appareil dans l’eau lors de son nettoyage.
- Si le tuyau ou la poignée s’endommagent, arrêtez d’utiliser l’aspirateur.
Lorsque vous utilisez un appareil électrique, des précautions concernant la
sécurité doivent toujours être observées, incluant celles qui suivent :
AVERTISSEMENT
POUR RÉDUIRE LE RISQUE D’INCENDIE, DE CHOCS ÉLECTRIQUES OU DE BLESSURES :
1 N’UTILISEZ PAS à l’extérieur ou sur des surfaces mouillées.
2 Débranchez l’aspirateur de la prise de courant lorsqu’il n’est pas utilisé et avant tout entretien.
3 Inspectez le cordon ou la fiche électrique pour tout dommage avant d’utiliser l’aspirateur.
N’UTILISEZ PAS l’aspirateur si le cordon ou la fiche est endommagée.
4 Si l’aspirateur ne fonctionne pas comme il se doit, a été échappé, endommagé, laissé à
l’extérieur ou bien échappé dans l’eau, veuillez le retourner à EURO-PRO Operating LLC pour un
examen, une réparation ou un ajustement.
5 Le tuyau contient des fils électriques. N’utilisez pas l’appareil si le tuyau est endommagé,
coupé ou percé.
6 NE TIREZ PAS ou NE TRANSPORTEZ PAS l’aspirateur par le cordon d’alimentation et n’utilisez
pas celui-ci comme une poignée.
7 NE le DÉBRANCHEZ PAS en tirant sur le cordon d’alimentation. Pour le débrancher, agrippez la
fiche et non le cordon.
8 NE MANIPULEZ PAS la fiche d’alimentation électrique ou l’aspirateur avec des mains humides.
9 NE PASSEZ PAS l’aspirateur par-dessus le cordon d’alimentation. Ne fermez pas une porte sur
le cordon et ne le faites pas passer sur des coins pointus.
10 L’utilisation d’une rallonge électrique n’est pas recommandée.
11 NE LAISSEZ PAS l’aspirateur sans surveillance lorsqu’il est branché.
12 Gardez le cordon éloigné des surfaces chaudes.
13 Fermez toutes les commandes avant de brancher ou débrancher l’aspirateur.
14 Rangez votre aspirateur avec le cordon d’alimentation bien enroulé autour des deux supports à
cordon.
UTILISATION GÉNÉRALE
15 Utilisez seulement de la façon indiquée dans ce manuel.
16 N’INSÉREZ PAS d’objets dans les ouvertures. N’UTILISEZ PAS si des ouvertures sont bouchées;
assurez-vous qu’il n’y a pas de poussière, de charpie, de cheveux et tout autre objet pouvant
réduire le débit d’air.
17 Veuillez garder votre zone de travail bien éclairée.
18 L’aspirateur doit toujours être en mouvement sur le tapis afin d’éviter d’endommager les fibres.
19 NE PLACEZ PAS l’aspirateur sur des surfaces instables telles que des chaises ou des tables.
20 NE LAISSEZ PAS les jeunes enfants utiliser l’aspirateur ou l’utiliser comme un jouet. Une
attention particulière doit être portée lorsqu’il utilisé près des enfants.
21 N’UTILISEZ PAS l’aspirateur si le récipient à poussière ou les filtres ne sont pas en place.
ACCESSOIRES POUR BOYAU
22 N’UTILISEZ PAS l’aspirateur si le débit d’air est restreint. Si les conduits d’air ou le bout
motorisé sont obstrués, éteignez l’aspirateur et débranchez-le de la prise électrique. Retirez
toutes les obstructions avant de remettre l’appareil en marche.
23 Tenez éloigné de votre visage et votre corps, le tuyau et les ouvertures pour accessoires.
24 Gardez les outils de nettoyage et les orifices d’aspiration éloignés de vos cheveux, de votre
figure, de vos doigts, de vos pieds nus ou de vêtements amples.
25 N’utilisez que les accessoires recommandés par le manufacturier.
RÉCIPIENT À POUSSIÈRE / FILTRES / ACCESSOIRES
Avant de mettre l’aspirateur en marche :
26 Assurez-vous que les filtres sont complètement secs après le nettoyage de routine.
27 Après avoir effectué l’entretien de routine, assurez-vous que le récipient à poussière et tous les
filtres sont bien en place.
28 Assurez-vous que les accessoires sont libres de toute obstruction.
29 Utilisez seulement les filtres et accessoires fournis par EURO-PRO Operating LLC. [À défaut de
quoi, la garantie sera annulée.]
NETTOYAGE GÉNÉRAL
30 NE RAMASSEZ PAS de gros objets.
31 NE RAMASSEZ pas de gros objets ou des objets pointus comme du verre, des clous, des vis ou
de la monnaie lesquels pourraient endommager l’aspirateur.
32 N’UTILISEZ PAS l’aspirateur pour ramasser de la poussière de cloison sèche.
33 NE RAMASSEZ PAS d’objets fumants ou brûlants comme des charbons chauds, des cendres
chaudes, des bouts de cigarettes ou des allumettes.
34 NE RAMASSEZ PAS de liquides inflammables ou combustibles tels que de l’essence à briquets,
du carburant, du kérosène ou n’utilisez pas l’aspirateur dans des endroits où ces produits
peuvent être présents.
35 NE RAMASSEZ PAS de solutions toxiques telles que de l’eau de javel, de l’ammoniac ou du
nettoyeur à drains.
36 N’UTILISEZ PAS dans des endroits clos où il y a des vapeurs provenant de la peinture, des
diluants à peinture, des substances antimites, de la poussière inflammable ou tout autre
matériel explosif ou toxique.
37 NE PASSEZ PAS l’aspirateur sur aucun liquide.
38 NE PLONGEZ PAS l’aspirateur dans l’eau ou tout autre liquide.
39 N’UTILISEZ PAS à l’extérieur ou sur des surfaces mouillées; utilisez uniquement sur des surfaces
sèches.
40 Faites très attention lors du nettoyage de l’escalier.
41 Retirez la brosse de l’aspirateur avant de la rincer.
LISEZ TOUTES LES INSTRUCTIONS AVANT L’UTILISATION
Page 14

13
www.PoweredLiftAway.com
APPRENDRE À CONNAÎTRE VOTRE ASPIRATEUR SHARK ROTATORMD POWERED LIFT-AWAYMC SPEED
UNITÉ PRINCIPALE
1 Sélecteur de surface
2 Contrôle d’aspiration
3 Tuyau
4 Crochet du tuyau
5 Crochet supérieur du cordon
6 Interrupteur d’alimentation
7 Dégagement du tube
8 Corps de l’aspirateur Lift-Away
9 Crochet inférieur du cordon
10 Brosse à plancher motorisée
11 Voyants lumineux
12 Témoin de la brosse rotative
Outil multiple d’animal domestique
187FLI680
Deux outils de nettoyage en un. La brosse
à poils raides devient coincée sur les débris
d’une multitude de surfaces. Retirez les
poils pour dévoiler un outil spécialisé pour le
nettoyage de poils d’animaux domestiques
sur les articles rembourrés et plus encore.
Brosse motorisée pour animaux
188FLI680
Conçue pour enlever les poils d’animaux et
la saleté incrustée sur les marches recouvertes de tapis et les articles rembourrés.
Suceur plat Duster Crevice
189FLI680
Deux outils de nettoyage en un. L’outil pour
fentes vous donne une portée de nettoyage
étendue pour les petits espaces, alors que
la brosse de dépoussiérage nettoie une
multitude de surfacess.
Dust AwayMC Pro et tampon en
microfibres
XFGE680G
Assez durable pour les grosses miettes et
débris, mais assez doux pour la plupart des
poussières délicates sur le bois sur et les
carreaux de planchers.
Recherchez-vous plus d’accessoires et des pièces de rechange?
Commandez au www.PoweredLiftAway.com ou appelez-nous au 1 800 798-7398.
1
3
9
5
6
10
2
Wand Release
7
8
11
4
12
Page 15

1.800.798.7398
14
Français
ASSEMBLAGE
1 Placez le bout choisi pour planchers sur le plancher et
insérez le tuyau.
2 Insérez la poignée dans le tuyau.
3 Glissez le corps de l’aspirateur dans le tuyau.
4 Glissez l’attache-tuyau dans la coche au dos du tuyau.
5 Insérez le suceur plat et l’accessoire polyvalent pour
animaux domestiques dans les pinces de retenue pour
accessoires comme illustré.
CONSEIL : Pour un accès rapide au cordon, tournez le
crochet supérieur vers le bas et retirez le cordon.
Retournez le crochet à sa position initiale pour
ranger le cordon.
ÉTAPE 1 ÉTAPE 2 ÉTAPE 3 ÉTAPE 4 ÉTAPE 5
SLIDE
CLICK
Page 16

15
www.PoweredLiftAway.com
NETTOYAGE VERTICAL
REMARQUE : N’UTILISEZ PAS l’aspirateur pour ramasser de la poussière de cloison sèche ou des cendres de cheminées.
1 Branchez le cordon d’alimentation dans une prise
électrique appuyez sur le bouton POWER pour mettre en
marche l’aspirateur.
2 Nettoyage de plancher dur
Positionnez le Sélecteur de :Planchers à Plancher Dur
et le Contrôle d’aspiration à Max pour une aspiration
totale ou variable selon vos préférences.
Nettoyage de tapis épais et de petits tapis
Positionnez le Sélecteur de Planchers à Tapis et le
Contrôle d’aspiration à Min pour une aspiration réduite
ou variable selon vos préférences.
Nettoyage de tapis
Positionnez le Sélecteur de Planchers à Tapis et le
Contrôle d’aspiration à Max pour une aspiration totale
ou variable selon vos préférences.
REMARQUE : Pour un nettoyage en profondeur selon
la norme ASTM F-608 (saleté incrustée dans les tapis),
veuillez positionner à Tapis avec le Contrôle d’aspiration
à Max.
3 Placez votre pied gauche légèrement sur l’embout
pour plancher et basculez la poignée vers l’arrière pour
débuter le nettoyage.
REMARQUE : La brosse à plancher tournera uniquement
lorsque l’aspirateur est incliné vers l’arrière.
ÉTAPE 1 ÉTAPE 2 ÉTAPE 3
Suction Control
Sélec teur de
plancher
MinMax
QUE SIGNIFIENT LES COULEURS DU TÉMOIN DE LA BROSSE MOTORISÉE?
• Vert, allumé en continu : La brosse rotative est activée et fonctionne correctement.
• Rouge, allumé en continu : La brosse rotative est bloquée; éteignez l’aspirateur et éliminez le blocage.
• * Rouge, clignotant : La brosse motorisée surchauffe; éteignez l’aspirateur et attendez que la brosse rotative refroidisse.
*Voir le Guide de Dépannage pour obtenir des instructions supplémentaires.
Page 17

1.800.798.7398
16
Français
NETTOYAGE SUR SURFACE ÉLEVÉE
REMARQUE : N’UTILISEZ PAS l’aspirateur pour ramasser de la poussière de cloison sèche ou des cendres de cheminées.
1 Pour le nettoyer au-dessus du plancher avec le tuyau, appuyez
sur le bouton de dégagement du tube ou de la poignée (selon la
portée nécessaire), puis soulevez la poignée.
2 Insérez le tube ou la poignée directement dans
l’accessoire désiré.
3 Cette unité est équipée avec un CONTRÔLE DE L’ASPIRATION
pour aider lors du nettoyage d’objets délicats ou de tentures.
Situé à la base de la poignée, glissez l’onglet de CONTRÔLE
DE L’ASPIRATION pour réduire l’aspiration. Assurez-vous de le
refermer pour une aspiration maximale.
OU
ÉTAPE 1 ÉTAPE 2 ÉTAPE 3
Wand Release
OU
Contrôle
d’aspiration
manuelle
MinMax
Page 18

17
www.PoweredLiftAway.com
CHANGER LES EMBOUTS POUR PLANCHER
1 Appuyez sur le bouton DÉGAGEMENT DU TUYAU pour
retirer le tuyau de l’embout motorisé pour plancher.
2 Insérez le tuyau dans le Dust Away Pro.
3 Appuyez sur le bouton LIFT-AWAY pour soulever le corps
de l’aspirateur de l’embout motorisé pour plancher.
4 Placez le corps de l’aspirateur sur le tuyau et descendez-
le pour le relier au Dust Away Pro.
REMARQUE : Pour de meilleurs résultats, assurez-vous que
CONTRÔLE DE L’ASPIRATION est positionné
à MAX.
Wand Release
CLICK
Utilisez le bout motorisé pour planchers pour un nettoyage en profondeur des tapis et pour ramasser les gros débris
sur les planchers durs.
Utilisez Dust AwayMC Pro pour ramasser les débris et essuyez la poussière fine dans une étape simple
.
ÉTAPE 1/ÉTAPE 2 ÉTAPE 3 ÉTAPE 4
DUST AW AY PRO
EMBOUT MOTORISÉ POUR PLANCHER
Page 19

1.800.798.7398
18
Français
1 Appuyez sur le bouton LIFT-AWAY pour soulever le
corps de l’aspirateur de l’embout pour plancher.
Insérez le TUBE dans soit l’embout motorisé pour
planchers ou le Dust Away Pro.
CONSEILS : Utiliser l’aspirateur en mode Powered Lift-Away
vous donne une plus longue portée pour nettoyer
sous les meubles et dans les espaces restreints.
2 Insérez la POIGNÉE dans soit l’embout motorisé pour
planchers ou le Dust Away Pro.
CONSEILS : Fixer la POIGNÉE directement dans les embouts
rend facile le nettoyage des escaliers.
1 Fixez l’accessoire désiré directement dans la POIGNÉE.
CONSEIL S: Pour une plus longue portée, fixez l’accessoire
désiré dans le TUYAU.
NETTOYAGE MOTORISÉ LIFT-AWAY
MC
Wand Release
NETTOYAGE LIFT-AWAY
MC
ÉTAPE 1 ÉTAPE 2
OU
OU
Page 20

19
www.PoweredLiftAway.com
HORAIRE RECOMMANDÉ POUR LE NETTOYAGE DES FILTRES :
Ensemble de filtre avant-moteur (mousse et feutre) : XFF680 Chaque 3 mois
Filtre après-moteur : XHF680 Chaque an
VIDER LE RÉCIPIENT À POUSSIÈRE
1 Tirez le loquet de dégagement du récipient à poussière
et soulevez-le de la gousse.
2 Tenez le récipient à poussière au-dessus d’un sac à
ordures ou une corbeille, puis appuyez le loquet de
dégagement inférieur pour le vider.
3 Appuyez sur le loquet de dégagement supérieur pour
accéder à l’écran anti poussière et enlevez les débris
accumulés au besoin.
HEPA
NETTOYER LES FILTRES
1 Avec le récipient à poussière enlevé, sortez et rincez
le filtre en mousse et celui de feutre à tous les 3 mois.
Laissez sécher à l’air libre complètement avant de le
remettre dans l’aspirateur. Lavez uniquement à la main.
Tapotez et secouez, au besoin, les filtres pour dégager
la saleté entre les lavages.
2 Une fois par année, ouvrez la grille du filtre, puis
sortez et rincez le filtre HEPA. Laissez sécher à
l’air libre complètement avant de le remettre dans
l’aspirateur. Lavez uniquement à la main.
IMPORTANT : NE RAMASSEZ PAS DE CENDRES
DE CHEMINÉES OU DE POUSSIÈRES DE
CLOISONS SÈCHES.
ENTRETIEN
Pour conserver une puissance d’aspiration optimale de votre aspirateur, suivez ces instructions.
Assurez-vous que l’appareil soit éteint et le cordon débranché.
IMPORTANT : Permettez à TOUS les filtres de sécher complètement avant de les remettre dans l’aspirateur.
ÉTAPE 1 ÉTAPE 2 ÉTAPE 3
FILTRE EN MOUSSE
FILTRE DE FEUTRE
LE CADRE DU FILTRE
Page 21

1.800.798.7398
20
Français
ENTRETIEN
Pour conserver une puissance d’aspiration optimale de votre aspirateur, suivez ces instructions.
Assurez-vous que l’appareil soit éteint et le cordon débranché.
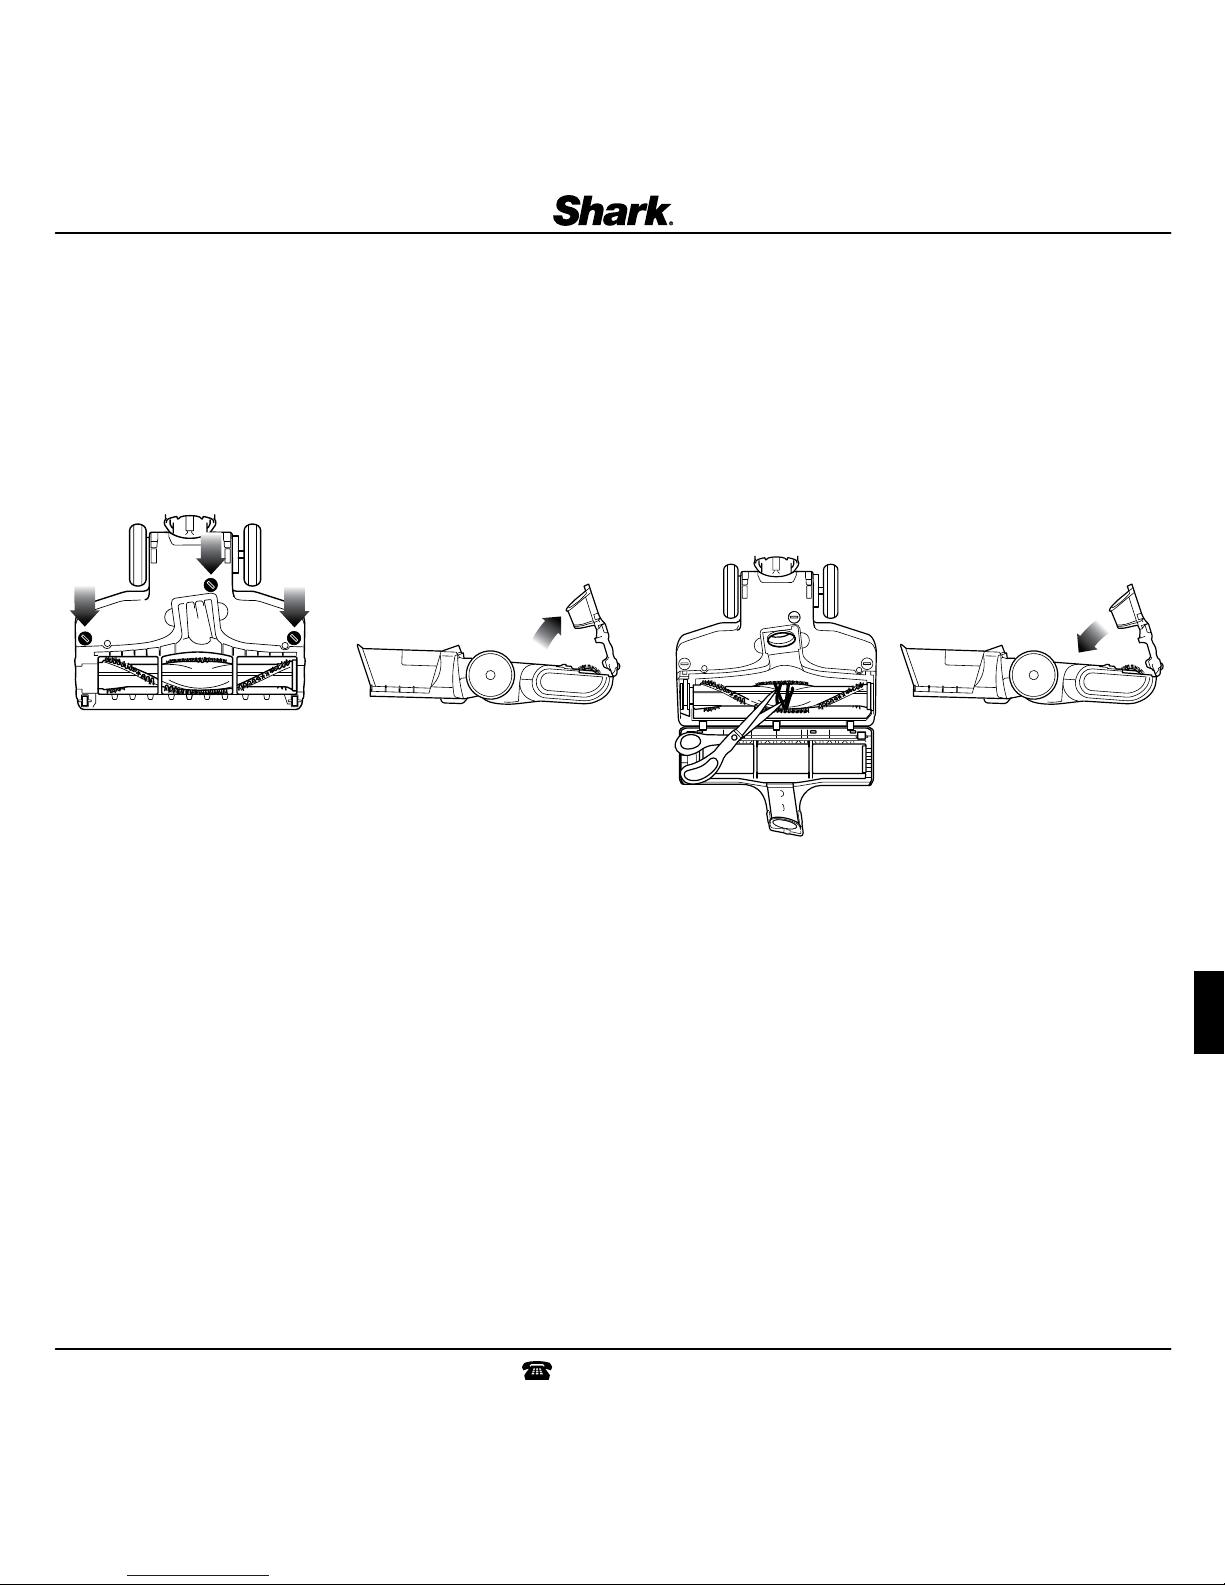
VÉRIFICATION DES OBSTRUCTIONS
1 Utilisez une pièce pour débloquer les
3 verrous au bas de l’embout pour
planchers.
2 Une partie de la base est détachable
pour permettre un meilleur accès à la
brosse et une exposition à la conduite
d’air. À l’aide d’une lampe de poche,
illuminez le bas pour vérifier toute
obstruction possible dans la conduite
d’air.
3 Enlevez les fils, les fibres de tapis
ou les cheveux qui peuvent être
enroulés autour de la brosse. Il
existe une rainure sur la barre de
la brosse qui permet à une paire de
ciseaux de couper au travers pour
libérer les débris.
4 Pour assembler de nouveau,
remplacez la base en l’alignant le
long du devant de la buse. Poussez
vers le bas pour encliqueter en
place. Bloquez les trois verrous.
ÉTAPE 1 ÉTAPE 2 ÉTAPE 4ÉTAPE 3
Page 22

21
www.PoweredLiftAway.com
L’aspirateur ne ramasse pas la saleté.
Aucune aspiration ou peu d’aspiration. • Vérifiez les filtres pour voir s’ils ont besoin d’être nettoyés. Suivez les instructions pour savoir comment rincer et sécher les filtres avant de les réinstaller
dans l’aspirateur.
• Le récipient à poussière est peut-être plein; videz-le.
• Vérifiez le boyau, les connexions du boyau, les buses et les accessoires pour toutes obstructions; dégagez-les si nécessaire.
• Enlevez les fils, les fibres de tapis ou les cheveux qui peuvent être enroulés autour de la brosse.
L’aspirateur soulève les petits tapis. • Éteignez l’appareil pour désengager la brosse à tapis et remettez l’appareil en marche en utilisant le bouton d’alimentation « POWER » pour un nettoyage avec
aspiration uniquement.
• L’aspiration est puissante. Soyez prudent lorsque vous passez l’aspirateur sur des carpettes ou sur des tapis avec des bords à coutures délicates.
• Ouvrez le bouton de commande de l’aspiration sur l’embout pour plancher pour diminuer la force d’aspiration.
La brosse à tapis ne tourne pas. • Si le voyant lumineux sur l’embout pour plancher de la brosse à tapis illumine rouge, la brosse à tapis a cessé de tourner. Éteignez immédiatement
l’aspirateur, débranchez-le et enlever l’obstruction. Rebranchez le cordon d’alimentation dans la prise de courant et mettez en marche l’aspirateur.
• Tirez la poignée vers vous et dégagez l’embout pour plancher pour désengager la fonction de fermeture automatique.
• Assurez-vous que le sélecteur de hauteur de tapis n’est pas à la position PLANCHER DUR.
• Mettez immédiatement l’aspirateur hors tension et débranchez-le; débranchez la buse et enlevez l’obstruction avant de brancher et de remettre l’aspirateur
en marche.
L’aspirateur s’éteint de lui-même ou le
témoin de la brosse motorisée clignote
en rouge. • Cet appareil est doté d’un thermostat de protection du moteur. Si pour quelque raison votre aspirateur surchauffait, le thermostat éteindrait
automatiquement l’appareil. Si cela se produit, effectuez les étapes suivantes pour réinitialiser le thermostat du moteur :
1. Éteignez l’aspirateur.
2. Débranchez l’aspirateur.
3. Videz le récipient à poussière et nettoyez les filtres.
4. Vérifiez s’il y a des obstructions dans le boyau, dans les accessoires et dans les orifices d’entrée.
5. Laissez refroidir l’appareil pendant au moins 45 minutes.
6. Branchez l’aspirateur.
7. Redémarrez l’appareil.
Remarque : si l’aspirateur ne démarre toujours pas, contactez le service à la clientèle au : 1 800 798-7398.
GUIDE DE DÉPANNAGE
Service à la clientèle : 1-800-798-7398
EURO-PRO Operating LLC garantit ce produit contre toute défectuosité de matériel ou de main-d’œuvre pour une période de sept (7) ans à compter de la date d’achat lors d’utilisation dans le cadre d’un usage domestique
normal, sujet aux conditions, exclusions et exceptions suivantes.
La responsabilité d’EURO-PRO Operating LLC est limitée au coût de réparation ou de remplacement de l’appareil, à sa seule discrétion. Cette garantie limitée ne couvre pas l’usure normale des pièces et ne s’applique pas aux
appareils ayant été altérés ou utilisés à des fins commerciales. Cette garantie limitée ne couvre pas les dommages causés par une mauvaise utilisation, l’abus, la négligence lors de la manipulation, un emballage inadéquat ou
la mauvaise manipulation en transit. Cette garantie limitée ne couvre pas les dommages ou défauts causés par ou résultants du transport, des réparations, de l’entretien ou de l’altération du produit ou à ses pièces, effectués
par un technicien non autorisé par EURO-PRO Operating LLC.
Si votre appareil ne fonctionne pas comme il le devrait lors d’un usage domestique normal pendant la période de garantie, vous pouvez le retourner au complet avec ses accessoires, port payé. Pour obtenir de l’assistance avec
les options du service de la garantie ou de l’assistance, veuillez appeler notre service à la clientèle et nos spécialistes de produits au 1-800-798-7398 ou visitez notre site Web à www.sharkrocket.com.
Si EURO-PRO Operating LLC constate que l’appareil est défectueux, à la seule discrétion d’EURO-PRO Operating LLC, nous le réparerons ou le remplacerons sans frais. Une preuve d’achat est requise et un montant de 19,95
$ est nécessaire pour couvrir les frais de retour.*
Les accessoires d’usage courant incluant, mais sans s’y limiter, les filtres, les brosses et les pièces électriques qui nécessitent habituellement un remplacement sont spécifiquement exclus de la garantie.
Cette garantie limitée s’applique à l’acheteur original de l’appareil et exclut toutes les autres garanties juridiques, implicites ou conventionnelles. La responsabilité d’EURO-PRO Operating LLC, s’il y en a une, se limite aux
obligations spécifiques exprimées sous cette garantie limitée. En aucun cas, EURO-PRO Operating LLC ne peut être tenu responsable d’incidents ou de dommages indirects de toute nature que ce soit. Certains États ou
provinces n’autorisent pas l’exclusion ou la limitation de dommages circonstanciels ou conséquents, dans ce cas, cette disposition ne s’appliquerait pas.
Cette garantie limitée vous confère des droits juridiques spécifiques, et d’autres droits légaux vous sont peut-être disponibles, variant d’un État à l’autre ou d’une province à l’autre.
*IMPORTANT : Emballez soigneusement l’appareil pour éviter tout dommage lors du transport. Assurez-vous de joindre la preuve d’achat et d’attacher à l’appareil une étiquette mentionnant votre nom, adresse complète
ainsi que le numéro de téléphone, de même que l’information concernant l’achat, le numéro de modèle et le problème, selon vous, de l’appareil. Nous vous recommandons d’assurer votre colis (puisque les dommages lors du
transport ne sont pas couverts par la garantie). Indiquez sur l’extérieur de votre colis « ATTENTION SERVICE À LA CLIENTÈLE ».
Euro-Pro, Shark et Rotator sont des marques déposées d’Euro-Pro Operating LLC.
Lift-Awa y et Dust-Away sont des marque s de commerce d ’Euro-P ro Operating LLC.
GARANTIE LIMITÉE DE SEPT (7) ANS
Page 23

1.800.798.7398
22
Español
CUIDADO: El cabezal eléctrico, el tubo y el mango contienen
conexiones eléctricas:
- No son partes reparables.
- No aspire ningún líquido.
- No los sumerja en agua al limpiarlos.
- Si el tubo o el mango están dañados, deje de usarlos.
Al usar aparatos eléctricos, siempre debe seguir precauciones básicas
de seguridad, incluyendo las siguientes:
ADVERTENCIA
PARA REDUCIR EL RIESGO DE INCENDIO, DESCARGA ELÉCTRICA O DAÑOS
PERSONALES:
1 NO la utilice en el exterior o en superficies húmedas.
2 Desenchúfela del tomacorriente cuando no la utilice y antes de limpiarla.
3 Inspeccione el cable de alimentación o el enchufe por daños antes de usarla. NO use la
aspiradora si el cable o el enchufe están dañados.
4 Si la aspiradora no funciona como debe, ha sufrido caídas, daños, se ha dejado en el
exterior o caído en el agua, retórnela a EURO-PRO Operating LLC para que sea examinada,
reparada o ajustada.
5 La manguera contiene cables eléctricos. No la use si está dañada, cortada o pinchada.
6 NO arrastre o transporte la aspiradora tirando del cable ni use el cable como un mango.
7 NO la desenchufe tirando del cable; para desenchufarla, sostenga el enchufe, no el cable.
8 NO toque el enchufe o la aspiradora con las manos húmedas.
9 NO pase la aspiradora sobre el cable de alimentación, no apriete el cable al cerrar una
puerta ni tire del cable a través de bordes filosos.
10 NO se recomienda el uso de un cable de extensión.
11 NO deje la aspiradora desatendida cuando esté enchufada.
12 Mantenga el cable alejado de superficies calientes.
13 Apague todos los controles antes de enchufar o desenchufar la aspiradora.
14 Guarde su aspiradora con el cable de alimentación enrollado en los dos soportes.
USO GENERAL
15 Utilícela solamente como se indica en este manual.
16 NO introduzca ningún objeto en las ranuras. NO la use con ninguna abertura tapada;
manténgalas libres de polvo, pelusa, pelos y cualquier otra cosa que pudiera reducir el
flujo de aire.
17 Mantenga el área de trabajo bien iluminada.
18 Mantenga la aspiradora en movimiento sobre la superficie de la alfombra todo el tiempo
para evitar dañar las fibras de la alfombra.
19 NO coloque la aspiradora sobre superficies inestables como sillas o mesas.
20 NO permita que los niños pequeños usen la aspiradora o que se utilice como un juguete.
Debe tener mucho cuidado al ser utilizada cerca de niños.
21 NO la utilice sin el recipiente de la tierra y/o los filtros instalados en su lugar.
ACCESORIOS PARA LA MANGUERA
22 NO la use si el flujo de aire está restringido; si las aberturas de circulación de aire o el
cabezal eléctrico para pisos se tapan, apague y desenchufe la aspiradora. Saque todas las
obstrucciones antes de volver a encender la unidad.
23 Mantenga el extremo de la manguera y las aberturas de los accesorios alejados de la cara
y del cuerpo.
24 Mantenga las herramientas de limpieza y las aberturas de succión de la manguera
alejados del cabello, la cara, los dedos, los pies o ropa suelta.
25 Use únicamente los accesorios recomendados por el fabricante.
RECIPIENTE PARA LA TIERRA/FILTROS/ACCESORIOS
Antes de encender la aspiradora:
26 Verifique que todos los filtros estén completamente secos luego de limpiarlos.
27 Verifique que el recipiente para la tierra y todos los filtros estén en su lugar luego de
realizar el mantenimiento de rutina.
28 Verifique que los accesorios no estén tapados.
29 Use únicamente filtros y accesorios proporcionados por EURO-PRO Operating LLC. [El no
hacerlo invalidará la garantía].
LIMPIEZA GENERAL
30 NO aspire objetos muy grandes.
31 NO aspire objetos duros o filosos como vidrios, clavos, tornillos, monedas, los que podrían
dañar la aspiradora.
32 NO aspire polvo de paneles de yeso.
33 NO aspire objetos con fuego o humeantes tales como carbón caliente, colillas de
cigarrillos, ceniza de hogar a leña o fósforos.
34 NO aspire materiales inflamables o combustibles como líquido para encendedor o
queroseno, ni use la aspiradora en áreas en las cuales puedan estar presentes.
35 NO la use para aspirar soluciones tóxicas tales como lavandina, amoníaco o destapa
cañerías.
36 NO la use en lugares cerrados y con vapores de pintura, diluyente de pintura, substancias
antipolilla, polvo inflamable u otros materiales explosivos o tóxicos.
37 NO aspire ningún líquido.
38 NO sumerja la aspiradora en agua o ningún otro líquido.
39 NO la use en el exterior o en superficies mojadas; úsela únicamente en superficies secas.
40 Tenga especial cuidado al limpiar escaleras.
41 Remueva el cepillo giratorio de la unidad antes de enjuagarlo.
CONSERVE ESTAS INSTRUCCIONES
ENCHUFE POLARIZADO
Para reducir el riesgo de una descarga eléctrica, esta aspiradora posee un enchufe polarizado (una pata es más ancha que la otra). Como medida de seguridad, este cable entrará
únicamente en un tomacorriente polarizado. Si el enchufe no entra completamente en el tomacorriente, inviértalo. Si aún no entra, llame a un electricista calificado. NO lo fuerce dentro
del tomacorriente ni trate de modificarlo para que calce.
LEA COMPLETAMENTE LAS INSTRUCCIONES ANTES DE UTILIZARLO
MEDIDAS IMPORTANTES DE SEGURIDAD
Page 24

23
www.PoweredLiftAway.com
PARTES DE SU SHARK ROTATOR® POWERED LIFT-AWAY™ SPEED
UNIDAD PRINCIPAL
1 Selector de superficie
2 Control de succión
3 Manguera
4 Abrazadera de la manguera
5 Gancho superior para cable
de alimentación
6 Llave de encendido
7 Liberación del tubo
8 Módulo Lift-Away
9 Gancho inferior para cable de
alimentación
10 Cabezal eléctrico para pisos
11 Focos
12 Luz indicadora del cepillo rotativo
Accesorio múltiple para mascotas
187FLI680
Dos accesorios de limpieza en uno. El cepillo
de cerdas duras limpia la suciedad pegada
en muchas superficies. Remueva las cerdas
para revelar un accesorio para tapizados,
que remueve el pelo de mascotas de sus
tapizados y mucho más.
Cepillo giratorio para pelo de
mascotas
188FLI680
Diseñado para remover el pelo de
mascotas y la tierra profunda de escaleras
alfombradas y muebles tapizados.
Genio de limpieza
189FLI680
Dos accesorios de limpieza en uno. El
accesorio esquinero extiende su alcance
para lugares pequeños, mientras que el
cepillo limpiador sirve para limpiar una
variedad de superficies.
Dust Away™ Pro y Almohadilla de
microfibras
XFGE680G
Sufrientemente resistente como para
limpiar migas y residuos grandes, pero lo
suficientemente suave como para limpiar los
pisos más delicados de madera y baldosas.
¿Necesita más accesorios y partes de reemplazo?
Visite www.PoweredLift Away.com o llame al 1-800-798 -7398.
1
3
9
5
6
10
2
Wand Release
7
8
11
4
12
Page 25

1.800.798.7398
24
Español
ARMADO
1 Coloque el cabezal para piso seleccionado en el piso e
insértele el tubo.
2 Inserte el mango en el tubo.
3 Deslice el módulo principal sobre el tubo.
4 Coloque el gancho de la manguera en la ranura de la
parte posterior del tubo.
5 Inserte el Genio de limpieza y Accesorio múltiple para
mascotas dentro del soporte para accesorios como se
muestra.
CONSEJO: Para rápido acceso al cable, rote el gancho
superior hacia abajo y remueva el cable.
Colóquelo nuevamente hacia arriba para guardar
el cable.
PASO 1 PASO 2 PASO 3 PASO 4 PASO 5
SLIDE
CLICK
Page 26

25
www.PoweredLiftAway.com
LIMPIEZA EN MODO VERTICAL
NOTA: NO aspire polvo de paneles de yeso ni cenizas de hogar a leña.
1 Enchufe el cable de alimentación en el tomacorriente
y presione el botón de ENCENDIDO para encender la
aspiradora.
2 Limpieza de pisos duros
Coloque el selector de pisos en Hard Floor y el Suction
Control en Max para máxima succión o variable,
dependiendo de la preferencia del usuario.
Limpieza de alfombras altas y tapetes
Coloque el selector de pisos en Carpet y el Suction
Control en Min para succión reducida o variable,
dependiendo de la preferencia del usuario.
Limpieza de alfombras
Coloque el selector de pisos en Carpet y el Suction
Control en Max para succión reducida o variable,
dependiendo de la preferencia del usuario.
NOTA: Para una limpieza profunda de acuerdo con la ASTM
F 608 (suciedad incrustada en las alfombras) coloque el
ajuste en Carpet el Suction Control en Max.
3 Coloque su pie izquierdo suavemente sobre la boquilla
para piso e incline el mango hacia atrás para comenzar a
limpiar.
NOTA: El cepillo girará únicamente cuando la aspiradora
se recline hacia atrás.
PASO 1 PASO 2 PASO 3
Suction Control
Floor Selector
MinMax
¿QUÉ SIGNIFICA LA LUZ INDICADORA DEL CEPILLO MOTORIZADO?
• Verde sólido: El cepillo rotativo está encendido y funcionando correctamente.
• Rojo sólido: El cepillo está atascado. Apague su aspiradora y remueva la obstrucción.
• *Rojo intermitente: El cepillo motorizado está sobrecalentando. Apague su aspiradora y espere a que se enfríe.
*Consulte la
Guía de Solución de Problemas
para obtener instrucciones adicionales.
Page 27

1.800.798.7398
26
Español
PARA LIMPIAR POR ENCIMA DEL PISO
NOTA: NO aspire polvo de paneles de yeso ni cenizas de hogar a leña.
1 Para limpiar por encima del piso con la manguera, presione el
botón de liberación del MANGO o del TUBO (dependiendo del
largo que necesite) y levante el mango hacia arriba.
2 Inserte el mango o el tubo directamente dentro del
accesorio deseado.
3 Esta unidad viene equipada con CONTROL DE SUCCIÓN
para ayudarle cuando limpia objetos delicados o cortinas. Se
encuentra en la base del mango, y puede deslizar la perilla de
SUCTION CONTROL para minimizar la succión. Asegúrese de
volver a cerrarlo para obtener la máxima succión.
O
PASO 1 PASO 2 PASO 3
Wand Release
O
Suction Control
MinMax
Page 28

27
www.PoweredLiftAway.com
PARA CAMBIAR LAS BOQUILLAS PARA PISO
1 Presione el botón WAND RELEASE para remover el
tubo del cabezal eléctrico para pisos.
2 Inserte el tubo en el Dust Away Pro.
3 Presione el botón LIFT-AWAY para sacar el cuerpo del
cabezal eléctrico para pisos.
4 Coloque el cuerpo sobre el tubo y deslícelo hacia abajo
para conectarlo con el Dust Away Pro.
NOTA: Para obtener los mejores resultados, verifique que el
SUCTION CONTROL esté en MAX.
Wand Release
CLICK
Use el cabezal eléctrico para pisos para limpiar bien alfombras y levantar residuos grandes en pisos duros.
Use el Dust AwayMR Pro para levantar residuos y limpiar polvo fino en un solo paso sencillo
.
PASO 1/PASO 2 PASO 3 PASO 4
DUST AW AY PRO
CABE ZAL EL ÉCTRI CO PARA PI SOS
Page 29

1.800.798.7398
28
Español
1 Presione el botón LIFT-AWAY para sacar el cuerpo de
la boquilla para piso.
Inserte el TUBO dentro del cabezal eléctrico para pisos
o el Dust Away
MR
.
CONSEJO: El usar la aspiradora en el modo Powered Lift-
Away le brinda mayor alcance para limpiar debajo
de los muebles y en lugares pequeños.
2 Inserte el MANGO dentro del cabezal eléctrico para
pisos o el Dust Away Pro.
CONSEJO: Para limpiar escaleras fácilmente, inserte el
MANGO directamente en las boquillas.
1 Coloque el accesorio deseado directamente dentro del
MANGO.
CONSEJO: Para mayor alcance, coloque el accesorio deseado
dentro del TUBO.
PARA LIMPIAR CON EL LIFT-AWAYMR MOTORIZADO
Wand Release
LIMPIEZA CON EL LIFT-AWAY
PASO 1 PASO 2
O
O
Page 30

29
www.PoweredLiftAway.com
PROGRAMA RECOMENDADO DE LIMPIEZA DEL FILTRO:
Juego de filtro del motor (de esponja y de fieltro): XFF680 Cada 3 meses
Filtro de salida: XHF680 Cada año
VACIADO DEL RECIPIENTE DE LA TIERRA
1 Tire hacia arriba de la traba para liberar el recipiente de
la tierra y saque el recipiente de la tierra del cuerpo de la
aspiradora.
2 Sostenga el recipiente de la tierra sobre un cesto o una
bolsa de basura y presione el botón para abrir la tapa de
abajo.
3 Presione el botón de liberación de la tapa superior del
recipiente de la tierra para acceder a la rejilla y remover
la acumulación de desechos si es necesario.
HEPA
LIMPIE LOS FILTROS
1 Con el recipiente de la tierra fuera de la aspiradora,
saque y enjuague los filtros de espuma y de fieltro
cada 3 meses. Deje que se seque completamente
al aire antes de volver a instalarlo. Lávelos a mano
únicamente. Sacuda la basura de los filtros entre
lavados si es necesario.
2 Una vez al año, abra la rejilla del filtro y saque
y enjuague el filtro HEPA. Deje que se seque
completamente al aire antes de volver a instalarlo.
Lávelos a mano únicamente.
IMPORTANTE: NO ASPIRE CENIZAS DE HOGAR
A LEÑA NI POLVO DE PANELES DE YESO.
MANTENIMIENTO
Para mantener la succión óptima de su aspiradora, siga estas instrucciones.
Verifique que la unidad esté apagada y desenchufada.
IMPORTANTE: Permita que TODOS los filtros se sequen completamente antes de volver a colocarlos en la aspiradora.
PASO 1 PASO 2 PASO 3
FILTRO DE FIELTRO
FILTRO DE ESPUMA
MARCO DEL FILTRO
Page 31
1.800.798.7398
30
Español
MANTENIMIENTO
Para mantener la succión óptima de su aspiradora, siga estas instrucciones.
Verifique que la unidad esté apagada y desenchufada.
VERIFICACIÓN DE OBSTRUCCIONES
1 Use una moneda para abrir las 3 trabas
de la parte de abajo del cabezal para
pisos.
2 Una parte de la base es removible
para facilitar el acceso al cepillo y a la
entrada de aire. Use una linterna desde
la parte de abajo para verificar que la
entrada de aire no esté obstruida.
3 Remueva todos los hilos, fibras de
alfombra o pelo que pudiera estar
enrollado alrededor del cepillo
El cepillo tiene una ranura para
poder colocar una tijera y cortar los
desechos para aflojarlos.
4 Para volver a armarla, vuelva a
colocar la base alineándola con el
frente de la boquilla. Empuje hacia
abajo para que trabe en su lugar.
Cierre las 3 trabas.
PASO 1 PASO 2 PASO 4PASO 3
Page 32

31
www.PoweredLiftAway.com
La aspiradora no levanta la tierra. No hay succión o es muy baja. • Revise si hay que limpiar los filtros. Siga las instrucciones para enjuagar y secar los filtros antes de volver a instalarlos en la
aspiradora.
• El recipiente de la tierra puede estar lleno; vacíelo.
• Revise que no haya ninguna obstrucción en la manguera, sus conexiones, las boquillas y los accesorios; limpie las obstrucciones
si es necesario.
•
Remueva todos los hilos, fibras de alfombra o pelo que pudiera estar enrollado alrededor del cepillo giratorio
.
La aspiradora levanta tapetes. • Apague la unidad para destrabar el cepillo y vuelva a encenderla con el botón de ENCENDIDO para limpiar con succión únicamente.
• Demasiada succión. Tenga cuidado al aspirar tapetes o alfombras con bordes bordados delicados.
• Abra el botón de control de succión del cabezal para pisos para disminuir la succión.
El cepillo no gira. • Si la luz indicadora del cepillo giratorio se vuelve roja, el cepillo ha dejado de girar. Apague inmediatamente la aspiradora,
desenchúfela y remueva la obstrucción. Vuelva a enchufar el cable de alimentación en el tomacorriente y encienda la aspiradora.
• Incline el mango hacia usted y libere la boquilla para piso de modo que desactive la función de apagado automático.
• Verifique que el selector de altura de alfombra no esté en la posición HARD FLOOR.
• Apague y desenchufe inmediatamente la aspiradora, desconecte la boquilla y remueva la obstrucción antes de volver a conectarla y
de volver a encender la aspiradora.
La aspiradora se apaga sola o la luz indicadora
del cepillo motorizado parpadea en rojo. • Esta unidad está equipada con un termostato de protección del motor. Si la aspiradora se sobrecalienta por cualquier motivo, el
termostato la apagará automáticamente. Si pasa eso, siga los siguientes pasos para reiniciar el termostato del motor:
1. Apague la unidad.
2. Desenchufe la aspiradora.
3. Vacíe el recipiente para la tierra y limpie los filtros.
4. Revise que la manguera, los accesorios y las entradas de aire no estén tapados.
5. Permita que la unidad se enfríe durante 45 minutos como mínimo.
6. Enchufe la aspiradora.
7. Vuelva a encender la unidad.
Nota: Si la aspiradora todavía no se enciende, llame a nuestro servicio al cliente : 1-800-798-7398.
EURO-PRO Operating LLC garantiza este producto contra defectos de materiales y mano de obra por un término de siete (7) años a partir de la fecha de compra original, siempre que sea utilizado para uso doméstico
normal, sujeto a las siguientes condiciones, exclusiones y excepciones.
La responsabilidad de EURO-PRO Operating LLC se limita únicamente al costo de reparación o reemplazo de la unidad, a nuestro criterio. Esta garantía limitada no cubre el desgaste normal de las partes y no cubre
ninguna unidad que haya sido alterada o utilizada con fines comerciales. Esta garantía limitada no cubre daños ocasionados por uso inadecuado, abuso, negligencia o daños causados por embalaje inapropiado o
maltrato durante el transporte. Esta garantía limitada no cubre daños o defectos causados o resultantes durante el transporte para su reparación o alteraciones del producto o cualquiera de sus partes, realizadas por
una persona no autorizada por EURO-PRO Operating LLC.
Si su artefacto no funciona correctamente al utilizarlo bajo condiciones domésticas normales dentro del período de garantía, puede devolver el artefacto completo y los accesorios, junto con un comprobante de la fecha
de compra, pagando los gastos de envío. Por asistencia con opciones del servicio de garantía o para soporte al cliente, llame a nuestro centro de atención al cliente y especialistas de productos al 1-800-798-7398 o
visite nuestro sitio web en www.PoweredLiftAway.com.
Si EURO-PRO Operating LLC determina que el artefacto presenta un defecto, lo reparará o remplazará sin cargo, a su criterio. Se requiere comprobante de compra y se aplica un cargo de $19.95 para cubrir el costo del
envío de vuelta.
Los insumos tales como, sin limitación, filtros, cepillos y partes eléctricas que normalmente necesitan ser reemplazados son explícitamente excluidos de la garantía.
Esta garantía limitada es válida para el comprador original del producto y excluye cualquier otra garantía legal, implícita y/o convencional. La responsabilidad de EURO-PRO Operating LLC, de existir, se limita a las
obligaciones específicas asumidas expresamente bajo los términos de esta garantía limitada. Bajo ninguna circunstancia EURO-PRO Operating LLC será responsable por daños incidentales o indirectos a cualquiera, de
ninguna clase. Algunos estados no permiten la exclusión o limitación de daños consiguientes o incidentales, por lo tanto lo anterior puede no ser válido para usted.
Esta garantía limitada le otorga derechos legales específicos, y usted puede también tener otros derechos los que varían de estado a estado o de provincia a provincia.
*IMPORTANTE: Embale el producto cuidadosamente para evitar daños durante el transporte. Asegúrese de incluir un comprobante de la fecha de compra y de colocarle una etiqueta al producto con su nombre, dirección
completa y número de teléfono, una nota proporcionando información de la compra, número de modelo y una descripción del problema. Le recomendamos asegurar el paquete (puesto que la garantía no cubre daños de
envío). Escriba en el exterior del paquete “ATTENTION CUSTOMER SERVICE”.
Euro-Pro, Shark y Rotator son marcas registrad as de Euro- Pro LLC operativo registrado.
Lift-Awa y y Dust-Away son marcas comerciales de Euro-Pro Op erating L LC.
GARANTÍA LIMITADA DE SIETE (7) AÑOS
GUÍA DE SOLUCIÓN DE PROBLEMAS
Servicio al Cliente: 1-800-798-7398
Page 33

1.800.798.7398
32
Español
NOTES/REMARQUES/NOTAS
Page 34

33
www.PoweredLiftAway.com
NOTES/REMARQUES/NOTAS
Page 35

1.800.798.7398
34
NOTES/REMARQUES/NOTAS
Page 36

EURO-PRO Operating LLC
New ton, MA USA 0 2459
Ville St . Laurent , Québec Can ada H4S 1A7
For Shark | Ninja U.S. Patent information visit http://www.europro.com/USPatents
Pour des renseignements sur les brevets de Shark | Ninja aux É.-U., veuillez visiter http://www.europro.com/USPatents
Por información acerca de las patentes en EE.UU. de Shark | Ninja, visita http://www.europro.com/USPatents
Illust rations may d iffer fro m actual pro duct. We are constantly striving t o improve our p roducts, t herefore t he specific ations
cont ained herein are subjec t to change wi thout noti ce.
Les illustrat ions peuven t différé es du produit r éel. Nous ess ayons cons tamment d’am éliorer nos pr oduits, donc les claus es
cont enues dans ce d ocument peu vent chang er sans préa vis.
El dibujo p uede no ser igu al al product o real. Nosotros nos esfor zamos cons tantemen te en mejorar n uestros pr oductos, p or lo
tant o las especifi caciones aq uí indicadas p ueden cambi ar sin previo av iso.
NV681_150623_5
© 2015 Eur o-Pro Op erating LL C
Printed in Chin a / Imprimé en Chine / Impre so en China
1.800.798.7398
WE WANT TO HEAR
FROM YOU!
NOUS VOULONS VOUS
ENTENDRE!
QUEREMOS SABER
DE USTED!
@sharkcleaning
youtube.com/shark
www.PoweredLiftAway.com
JOIN THE
CONVERSATION
PARTICIPER À LA
CONVERSATION
ÚNASE A LA
CONVERSACIÓN
WATCH AND LEARN
MORE
REGARDER ET
APPRENDRE PLUS
OBSERVAR Y
APRENDER MÁS
 Loading...