

Shark Rocket HV320 Owner's Manual

Rocket®
HV320
OWNER’S GUIDE
GUÍA DEL PROPIETARIO

THANK YOU
for purchasing the Shark® Rocket® Ultra-Light Upright
CONTENTS
ENGLISH
TIP: The date code is
located on one of the
prongs of the power
cordplug.
TIP: You can find the
model and serial numbers
on the QR code label
on the bottom of the
dust cup.
REGISTER YOUR PURCHASE
registeryourshark.com
1-800-798-7398
Scan QR code using mobile device
RECORD THIS INFORMATION
Model Number: ______________________________
Serial Number: _______________________________
Date of Purchase (Keep receipt): ________________
Store of Purchase: ____________________________
TECHNICAL SPECIFICATIONS
Voltage: 120V., 60Hz
Watts: 500W
Amps: 4.2A
Important Safety Instructions � � � � � � � � � � � � � � � � � � � � � � � � � � � 3
Getting To Know Your Shark® Rocket®
Assembling Your Vacuum � � � � � � � � � � � � � � � � � � � � � � � � � � � � � � 7
Choosing the Appropriate Setting � � � � � � � � � � � � � � � � � � � � � � � 8
Using the Motorized Floor Nozzle � � � � � � � � � � � � � � � � � � � � � � � 9
Using Your Vacuum in Above-Floor Mode � � � � � � � � � � � � � � � 10
Accessories � � � � � � � � � � � � � � � � � � � � � � � � � � � � � � � � � � � � � � � � � � � 11
Using the Dust-Away® Hard Floor Attachment � � � � � � � � � � � 13
Storage � � � � � � � � � � � � � � � � � � � � � � � � � � � � � � � � � � � � � � � � � � � � � 14
Maintaining Your Vacuum � � � � � � � � � � � � � � � � � � � � � � � � � � � � � 15
Emptying the Dust Cup . . . . . . . . . . . . . . . . . . . . . . . . . . . . . . . . . . .15
Cleaning the Filters . . . . . . . . . . . . . . . . . . . . . . . . . . . . . . . . . . . . . . .16
Checking for Blockages . . . . . . . . . . . . . . . . . . . . . . . . . . . . . . . . . . .17
Bottom of Floor Nozzle . . . . . . . . . . . . . . . . . . . . . . . . . . . . . . . . . . .18
Troubleshooting Guide � � � � � � � � � � � � � � � � � � � � � � � � � � � � � � � � 19
Warranty � � � � � � � � � � � � � � � � � � � � � � � � � � � � � � � � � � � � � � � � � � � � 20
Ultra-Light Upright � � 5
PLEASE READ CAREFULLY AND KEEP
FOR FUTURE REFERENCE�
This Owner’s Guide is designed to help
you get a complete understanding of
your new Shark Rocket Deluxe Pro.
If you have any questions, please visit us
at sharkclean.com/support.
1 2sharkclean.com sharkclean.com

IMPORTANT SAFETY INSTRUCTIONS
HOUSEHOLD USE ONLY
To reduce the risk of electric shock, this vacuum cleaner has a polarized
plug (one blade is wider than the other)� As a safety feature, this plug will
fit into a polarized outlet only one way� If the plug does not fit fully into the
outlet, reverse the plug� If it still does not fit, contact a qualified electrician�
DO NOT force into outlet or try to modify to fit�
WARNING
TO REDUCE THE RISK OF FIRE, ELECTRIC SHOCK OR INJURY:
GENERAL WARNINGS
1. Your vacuum cleaner may consist
of a motorized nozzle, wand, hose,
and/or vacuum pod. This device
contains electrical connections,
electrical wiring, and moving
parts that potentially present risk
to the user.
2. Use only identical replacement
parts.
3. Carefully observe and follow the
instructions provided below to
avoid improper use of the appliance.
DO NOT use the vacuum for any
purpose other than those described
in this manual.
4. Before use, carefully inspect all
parts for any damage. DO NOT
use if any parts are damaged.
5. The use of an extension cord is
NOT recommended.
6. This vacuum cleaner contains
no serviceable parts.
USE WARNINGS
7. DO NOT allow the appliance to be
used by children. Close supervision
is necessary when used near
children. This is not a toy.
8. Always turn off the vacuum cleaner
before connecting or disconnecting
any motorized nozzles or other
accessories.
9. DO NOT handle plug or vacuum
cleaner with wet hands.
10. DO NOT use without filters in place.
11. Only use Shark® branded filters
and accessories. Failure to do so
will also void the warranty.
12. DO NOT damage the power cord:
a) DO NOT pull or carry vacuum
cleaner by the cord or use the
cord as a handle.
b) DO NOT unplug by pulling
on cord. Grasp the plug, not
the cord.
c) DO NOT run the vacuum cleaner
over the power cord, close a
door on the cord, pull the cord
around sharp corners, or leave
the cord near heated surfaces.
13. DO NOT put any objects into nozzle
or accessory openings. DO NOT use
with any opening blocked; keep free
of dust, lint, hair, and anything that
may reduce airflow.
14. DO NOT use if nozzle or accessory
airflow is restricted. If the air
paths or the motorized floor
nozzle become blocked, turn the
vacuum cleaner off and unplug
from electrical outlet. Remove all
obstructions before you plug in
and turn on the unit again.
15. Keep nozzle and all vacuum
openings away from hair, face,
fingers, uncovered feet, or
loose clothing.
16. DO NOT use if vacuum cleaner is
not working as it should, or has been
dropped, damaged, left outdoors, or
dropped into water.
SAVE THESE INSTRUCTIONS
READ ALL INSTRUCTIONS BEFORE USE
17. Use extra care when cleaning
on stairs.
18. DO NOT leave the vacuum cleaner
unattended while plugged in.
19. When powered on, keep the
vacuum cleaner moving over the
carpet surface at all times to avoid
damaging the carpet fibers.
20. DO NOT place vacuum cleaner
on unstable surfaces such as chairs
or tables.
21. Your Shark® vacuum may not
be designed to stand up on its own.
When taking a break from cleaning,
you may need to lean it against
furniture or a wall, or lay it flat
on the floor. Using the vacuum
for an application where the unit
lacks stability may result in
personal injury.
22. DO NOT use to pick up:
a) Liquids
b) Large objects
c) Hard or sharp objects
(glass, nails, screws, or coins)
d) Large quantities of dust (drywall
dust, fireplace ash, or embers).
DO NOT use as an attachment to
power tools for dust collection.
e) Smoking or burning objects
(hot coals, cigarette butts,
or matches)
f) Flammable or combustible
materials (lighter fluid, gasoline,
or kerosene)
g) Toxic materials (chlorine bleach,
ammonia, or drain cleaner)
23. DO NOT use in the following areas:
a) Poorly lit areas
b) Wet or damp surfaces
c) Outdoor areas
d) Spaces that are enclosed
and may contain explosive or
toxic fumes or vapors (lighter
fluid, gasoline, kerosene, paint,
paint thinners, mothproofing
substances, or flammable dust)
24. Turn off all controls before plugging
in or unplugging the vacuum.
25. Unplug from electrical outlet
when not in use and before
any maintenance or cleaning.
26. Hand wash with water only.
Washing with cleaning chemicals
could damage the unit.
27. During cleaning or routine
maintenance, DO NOT cut anything
other than hair, fibers, or string
wrapped around the brushroll.
28. Allow all filters to air-dry completely
before replacing in the vacuum to
prevent liquid from being drawn
into electric parts.
29. Make sure the dust cup and all
filters are in place after routine
maintenance.
30. If provided, secure the power
cord around the two cord hooks
during storage.
ENGLISH
3 sharkclean.com 4sharkclean.com

GETTING TO KNOW YOUR
WAND
Dust Cup
Release
SHARK® ROCKET® ULTRA-LIGHT UPRIGHT
WELCOME!
Congratulations on your
purchase. Use this Owner’s
Guide to learn about your new
vacuum’s great features. From
assembly to use to maintenance,
you will find it all in here.
MAIN UNIT
A Power Switch
B Handheld Vacuum
C Dust Cup Release
D Handheld Vacuum Catch
E Cord Hooks (not shown)
F Wand Release
G Wand
H Handheld Vacuum Storage Hook
I Lower Wand Release Pedal
J Brushroll Indicator Light
K Motorized Floor Nozzle
ENGLISH
A
F
H
J
B
C
D
E
G
I
K
5 6sharkclean.com sharkclean.com

ASSEMBLING YOUR VACUUM
CHOOSING THE APPROPRIATE SETTING
STEP 1
Insert the wand into the
motorized floor nozzle
connector until it clicks
into place.
ENGLISH
STEP 2
Insert the handheld
vacuum into the top of
the wand until it clicks
into place.
CLICK
CLICK
Slide the power switch on the handheld vacuum to the appropriate speed setting.
Setting I, Bare Floor, Small Area Rugs: – The brushroll spins slowly to clean bare
floors and delicate arearugs.
Setting II, Carpets – The brushroll spins faster to pick up debris below the surface
ofyour carpets.
NOTE: For deep cleaning per ASTM F 608 (embedded dirt in carpets) use setting II, Carpets.
7 sharkclean.com
8sharkclean.com
USING THE MOTORIZED
WAND
FLOOR NOZZLE
USING YOUR VACUUM
IN ABOVE-FLOOR MODE
ENGLISH
NOTE: Before vacuuming your
delicate area rugs or carpet, refer to
the manufacturer’s recommended
cleaning instructions.
TIP: You can attach the handheld
vacuum directly to the motorized floor
nozzle for convenient stair cleaning.
WHAT DOES THE BRUSHROLL
INDICATOR LIGHT MEAN?
Solid Green
The brushroll is on and working as
it should.
Solid Red
There is a jam in the brushroll area.
Turn your vacuum o and remove
the blockage.
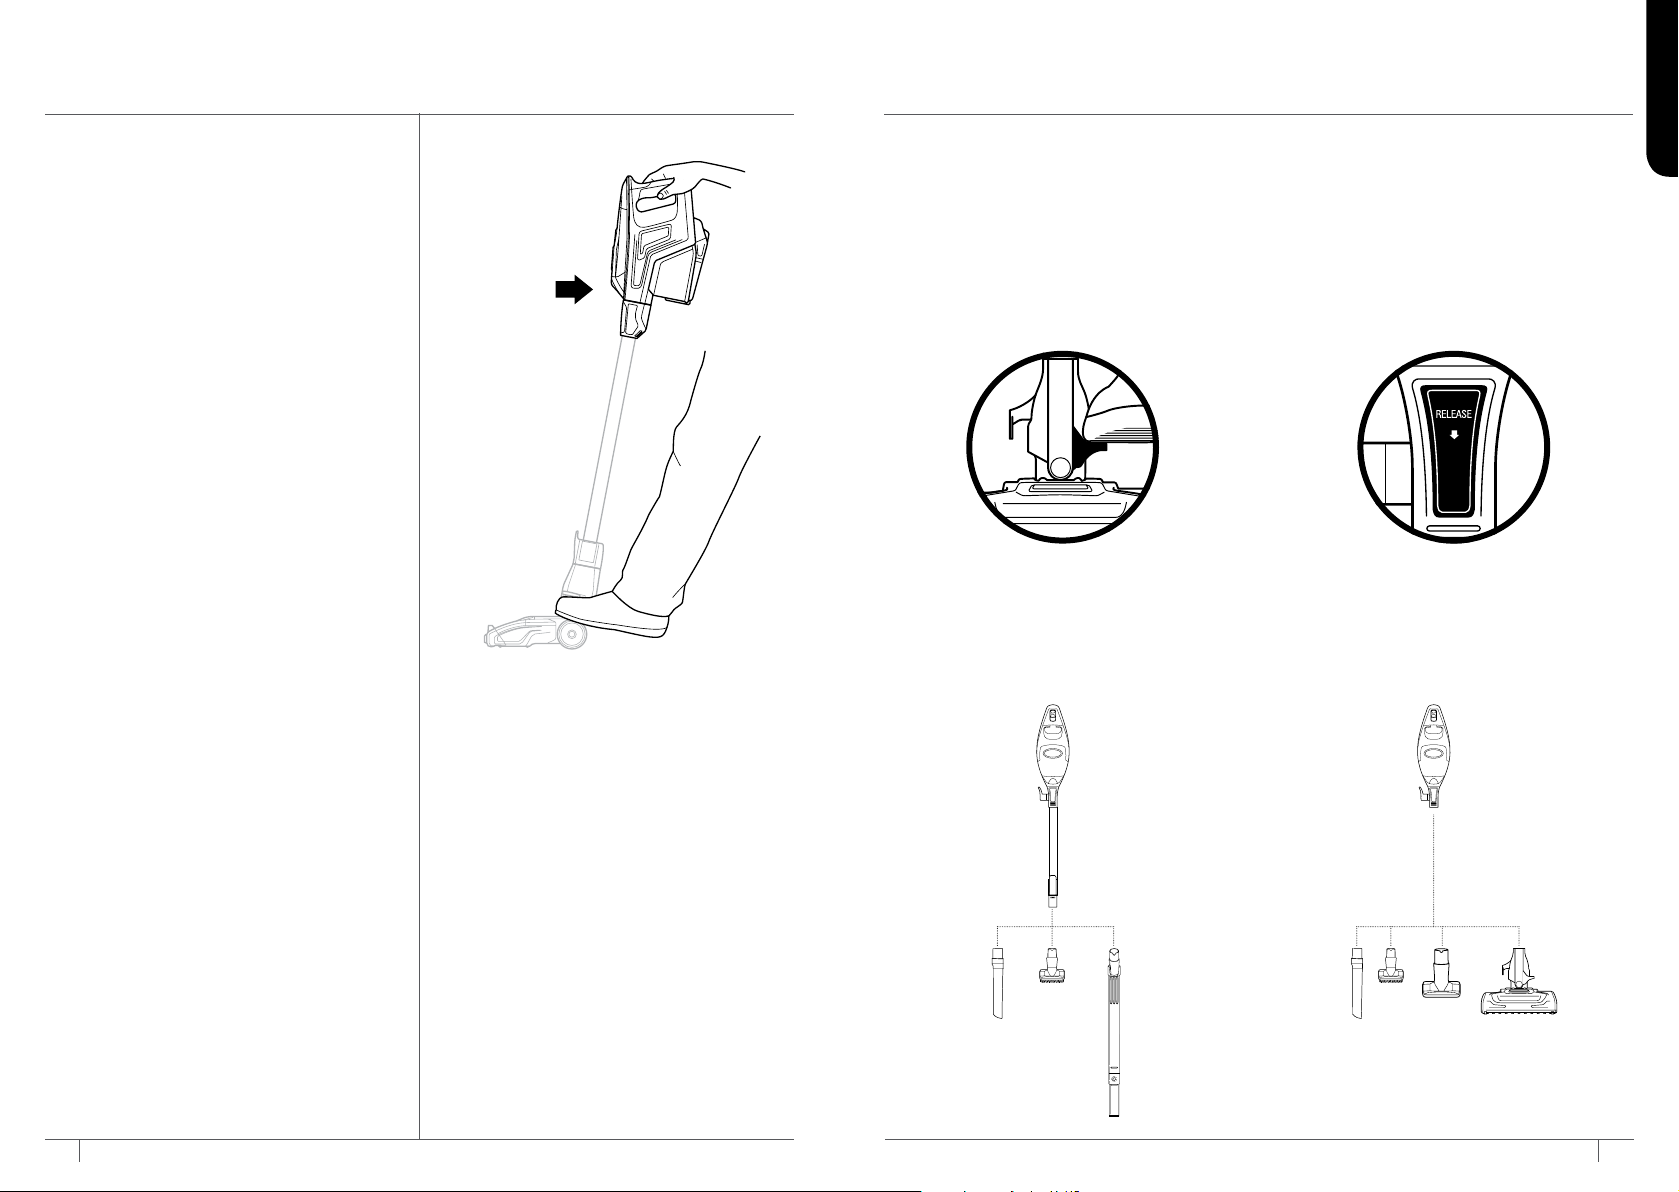
Plug the unit in and recline the wand,
then choose your floor setting to
start cleaning.
WAND HANDHELD
STEP 1 STEP 1
Stand the vacuum upright. Step on
the foot pedal and pull the wand up
to disconnect it from the motorized
floor nozzle.
STEP 2 STEP 2
Attach desired cleaning accessory. Attach desired cleaning accessory.
Press the Wand Release button on
the top of the wand to detach the
handheld vacuum.
9 10sharkclean.com sharkclean.com

ACCESSORIES
There are a variety of accessories that
are compatible with this vacuumseries.
Your Quick Start Guide shows the
accessories that are included with
your model.
To purchase additional accessories,
go to sharkclean�com
A 12" Crevice Tool
Clean in tight spaces or reach
baseboards and ceilings with this slim
crevice tool.
B Pet/Upholstery Tool
Perfect for grabbing pet hair and lint
from furniture and other upholstered
surfaces.
C Duster Crevice Tool
Two cleaning tools in one. The crevice
tool gives you extended cleaning reach
for small spaces, while the dusting brush
cleans a multitude of surfaces.
D Mini Motorized Brush
Picks up pet hair and loose debris
and powerfully cleans dander out of
upholstery and surfaces. Cannot be used
with the Flexible Hose.
E Dust-Away® Hard Floor Attachment
with Microfiber Pad
Direct suction for big crumbs and debris.
The washable, reusable microfiber pad
dusts hardwood and tile floors.
F Dusting Brush
Dust shelves, baseboards, window/door
frames, and much more. Turn the brush
head to adjust the angle to the surface
you’re cleaning.
G Under-Appliance Wand
Clean under and behind hard-to-move
appliances and furniture with this
adjustable 36” tool. Flip the extension
piece over to clean the underside
of appliances.
H Flexible Hose
Stretch and flex this extension hose to
clean around objects and get into hardto-reach spaces. Attach the crevice tool or
another accessory depending on what you
are cleaning.
I Wall Mount
Install the mount to hang your vacuum
on the wall for convenient storage.
Includes screws, anchors, and instruction
sheet with mounting template for easy
installation.
J Onboard Storage Clip
Removable clip attaches to the vacuum
wand. Can hold up to two accessories at
a time while cleaning or for storage.
A B
C D
E
G
I
ENGLISH
F
H
J
11 12sharkclean.com sharkclean.com
USING THE DUST-AWAY®
HARD FLOOR ATTACHMENT
STORAGE
ENGLISH
IMPORTANT: DO NOT use the
Dust-Away Hard Floor Attachment
without the microfiber pad.
MICROFIBER PAD CARE
Machine-wash or hand-wash the pad
separately in warm water with
liquid detergent.
DO NOT use bleach or fabric softeners
as they may damage the pad or
leave a coating that will reduce its
cleaning performance.
Tumble dry low or line-dry to extend
the life of the microfiberfabric.
For the best results, replace the
microfiber pad every 3 to 4 months.
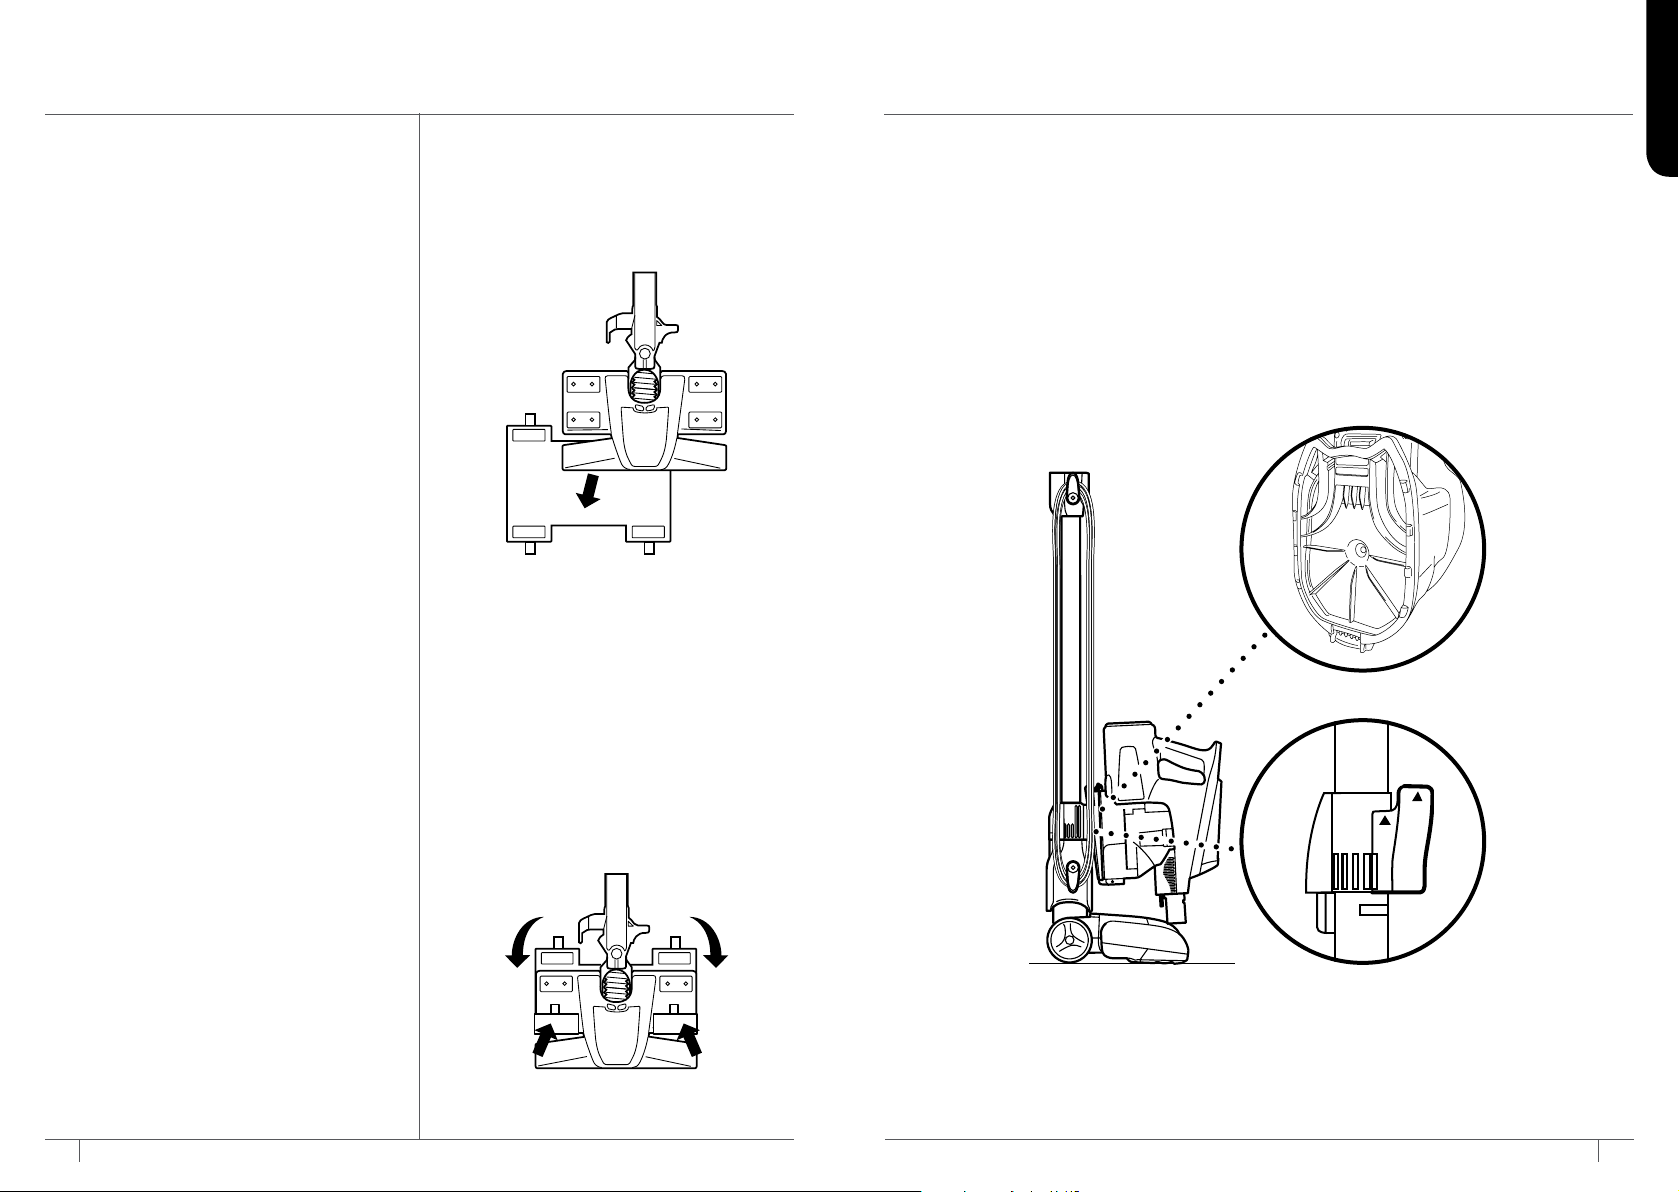
STEP 1
Slip two tabs between the nozzle and
the duster base and attach them to the
front fasteners.
STEP 2
Pull the other two tabs tightly around
to the back fasteners. Ensure the pad
is flat against the bottom surface and
tightly secured.
Slide the power switch to setting I, Bare
Floor, Small Area Rugs to clean hard
floors. Do not use to clean damp floors
or wet/sticky messes. Use only pads
provided by Shark®.
Press the Wand Release button on the top of the wand to release the handheld
vacuum. Align the catch on the bottom of the handheld vacuum with the storage
hook on the wand. Slide the handheld vacuum down so that the catch hangs from
the storage hook. Wrap the cord counterclockwise around the cord hooks, starting
with the top hook.
Note: Ensure there is slack where the cord connects to the handheld vacuum.
Handheld
Vacuum Catch
Handheld Vacuum
Storage Hook
13 14sharkclean.com sharkclean.com
MAINTAINING YOUR VACUUM
Empty
Dust Cup
Release
IMPORTANT: Clean the dust screen
inside the dust cup as required.
NOTE: Empty dust cup when debris
reaches the MAX fill line.
EMPTYING THE DUST CUP
1 Press the Wand Release button on
the top of the wand to disconnect
it from the handheld vacuum.
OR
Remove the dust cup from the
handheld vacuum by squeezing the
two Dust Cup Release buttons on
both sides of the base at the same
time and pulling it out.
2 Hold dust cup over a trash bin and
press the Empty button on the front
of the dust cup. The bottom lid will
open, allowing the debris to fall out.
3 Once dust cup is empty, close the
bottom lid and insert dust cup back
into handheld vacuum until you it
clicks into place.
RECOMMENDED FILTER CLEANING
SCHEDULE:
Pre-Motor Filter Kit
(Foam & Felt)
XPMFK320
Clean once a month.
Post-Motor Filter
Clean once a year.
1084FTV320
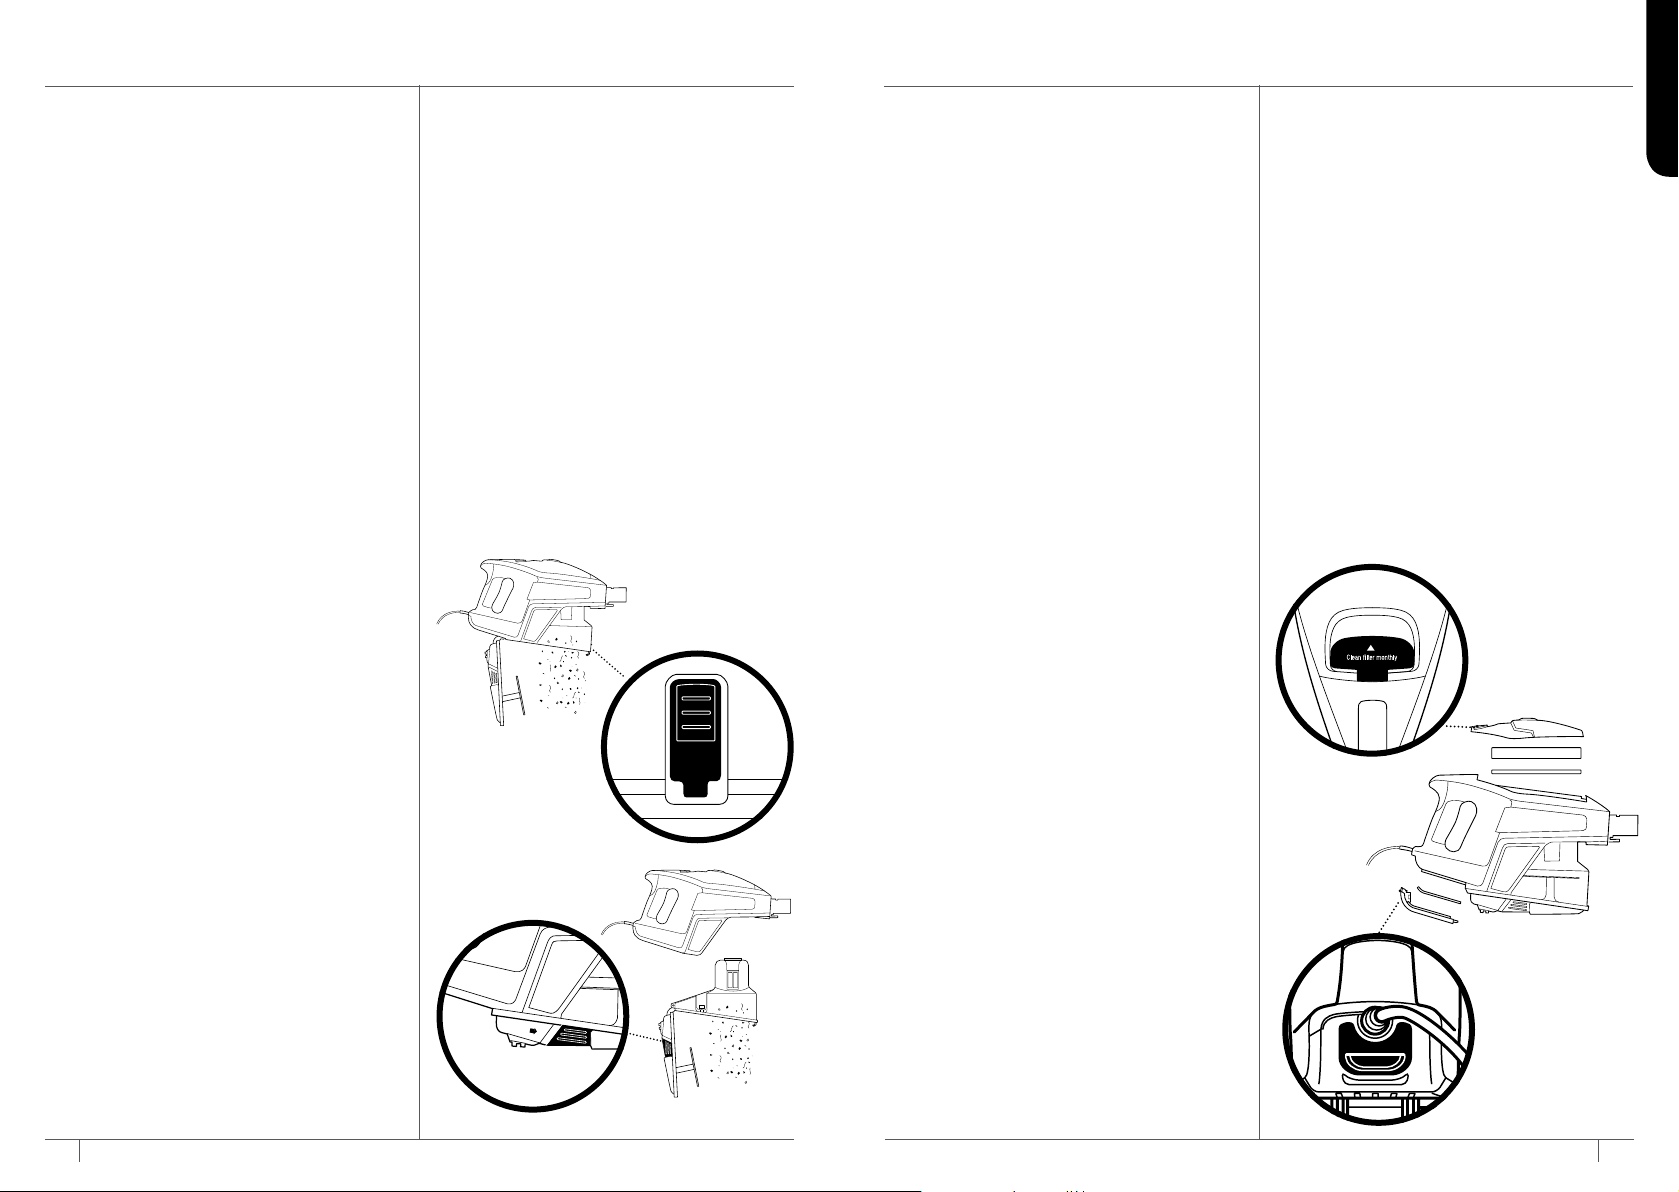
CLEANING THE FILTERS
1 Pre-Motor (foam and felt):
Lift the latch on the top of the
handheld vacuum to open the filter
cover. Take out filters and tap loose
dirt o them. If more cleaning is
needed, rinse filters with water only
and let them air-dry completely.
To reinstall them, insert the felt
filter first, place the foam filter on
top of it, and close the filter cover.
2 Post-Motor:
Lift o the post-motor filter cover
below the handle of the handheld
vacuum. Remove the filter, rinse it
with water only, and let it air-dry
completely. Replace the filter, then
close the cover, pressing it until it
clicks into place.
ENGLISH
15 sharkclean.com
Foam
Felt
16sharkclean.com

MAINTAINING YOUR VACUUM - Continued
TIP: Ensure the bottom of the floor
nozzle is completely sealed and locked
before using.
TIP: You do not need any tools to open
the floor nozzle, just a coin.
CHECKING FOR BLOCKAGES:
HANDHELD AND WAND
1 Remove the wand from the
handheld vacuum and check
all dust cup intake openings.
2 Remove the floor nozzle from
the wand and check the wand
for blockages.
BOTTOM OF FLOOR NOZZLE
1 Use the edge of a coin to open the
three locks on the bottom of the
floor nozzle.
3 Run scissors along the groove in
the brushroll to cut or clear away
any string, carpet fibers, hair, or
other debris.
ENGLISH
2 To access the brushroll, remove
the cover from the bottom of the
floor nozzle. Shine a flashlight into
the nozzle to check for possible
blockages in the airway.
4 To reinstall the cover, line it up,
then rotate down until it clicks into
place. Use the edge of a coin to
close the three locks on the bottom
of the nozzle.
17 18sharkclean.com sharkclean.com
 Loading...