

Page 1
AH452
Model • Modèle • Modelo
INSTRUCTIONS
INSTRUCCIONES
®
sharkclean.com
1-800-798-7398
Page 2
THANK YOU
for purchasing the Shark® Rocket® Powerhead
REGISTER YOUR PURCHASE
sharkclean.com
1-800-798-7398
TIP: You can find the
model number on the
rating label located on
the back of your unit.
TIP: You can locate the
date code on one of the
prongs of the power
cordplug.
RECORD THIS INFORMATION
Model Number: ��������������������������������������
Date Code: �����������������������������������������
Date of Purchase (Keep receipt): �����������������������
Store of Purchase: �����������������������������������
TECHNICAL SPECIFICATIONS
Voltage: 120V., 60Hz
Watts: 600W
Amps: 5A
PLEASE READ CAREFULLY AND KEEP
FOR FUTURE REFERENCE.
These instructions are designed to help you
get a complete understanding of your new
Shark Rocket Powerhead.
1
1-800-798-7398
If you have any questions, please call the
customer service line at 1-800-798-7398.
Page 3

CONTENTS
Important Safety Instructions . . . . . . . . . . . . . . . . . . . . . . . . . . . 3
Getting To Know Your Shark® Rocket® Powerhead . . . . . . . . . 5
Assembling Your Vacuum . . . . . . . . . . . . . . . . . . . . . . . . . . . . . . 7
Speed Settings . . . . . . . . . . . . . . . . . . . . . . . . . . . . . . . . . . . . . . . 9
Suction Control � � � � � � � � � � � � � � � � � � � � � � � � � � � � � � � � � � � � � � � � � � 9
Choosing the Appropriate Brushroll & Setting . . . . . . . . . . . 10
All-Surface Brushroll � � � � � � � � � � � � � � � � � � � � � � � � � � � � � � � � � � � � � �10
Gentle Touch Hard Floor Brushroll � � � � � � � � � � � � � � � � � � � � � � � � �10
Using Your Vacuum . . . . . . . . . . . . . . . . . . . . . . . . . . . . . . . . . . . .11
What Does the Brushroll Indicator Light Mean? � � � � � � � � � � � � �10
Storage . . . . . . . . . . . . . . . . . . . . . . . . . . . . . . . . . . . . . . . . . . . . . 12
Maintenance . . . . . . . . . . . . . . . . . . . . . . . . . . . . . . . . . . . . . . . . . 13
Emptying the Dust Cup � � � � � � � � � � � � � � � � � � � � � � � � � � � � � � � � � � �13
Cleaning the Filters � � � � � � � � � � � � � � � � � � � � � � � � � � � � � � � � � � � � � � �15
Accessing & Cleaning the Brushroll � � � � � � � � � � � � � � � � � � � � � � � � 17
ENGLISH
Troubleshooting Guide . . . . . . . . . . . . . . . . . . . . . . . . . . . . . . . . 19
Warranty . . . . . . . . . . . . . . . . . . . . . . . . . . . . . . . . . . . . . . . . . . . .20
sharkclean.com
2
Page 4

IMPORTANT SAFETY INSTRUCTIONS
FOR HOUSEHOLD USE ONLY
WARNING
To reduce the risk of injury, fire, electric shock, and property damage
resulting from improper use of the appliance, carefully observe the following
instructions. This unit contains electrical connections and moving parts that
potentially present risk to the user.
THE FLOOR NOZZLE, WAND, AND
HANDLE CONTAIN ELECTRICAL
CONNECTIONS:
• These are not serviceable parts.
• Do not use to vacuum any liquids.
• Do not immerse in water.
•
If handle/wand is damaged, discontinue use.
1 Inspect power cord and plug for any
damage before use. DO NOT use vacuum
cleaner with a damaged cord or plug.
Turn off all controls before plugging in or
unplugging the vacuum cleaner. Store
your vacuum cleaner with the power cord
secured around the two cord hooks.
2 DO NOT use outdoors or on wet surfaces.
Use only on dry surfaces.
3 Unplug from electrical outlet when not in
use and before servicing.
4 If vacuum cleaner is not working as it
should, or has been dropped, damaged,
left outdoors, or dropped into water,
return it to SharkNinja Operating LLC for
examination, repair, or adjustment.
5 DO NOT pull or carry vacuum cleaner by
the cord or use the cord as a handle.
6 DO NOT unplug by pulling on cord. Grasp
the plug, not the cord.
7 DO NOT handle plug or vacuum cleaner
with wet hands.
8 DO NOT run the vacuum cleaner over the
power cord, close a door on the cord or
pull the cord around sharp corners.
9 The use of an extension cord is NOT
recommended.
10 DO NOT leave vacuum cleaner when
plugged in.
11 Keep cord away from heated surfaces.
12
Always turn off the vacuum cleaner before
connecting or disconnecting motorized nozzle.
GENERAL USE
13 Use only as described in this manual.
1 4 Keep your work area well lit.
15 Keep the vacuum cleaner moving over
the carpet surface at all times to avoid
damaging the carpet fibers.
16 DO NOT place vacuum cleaner on unstable
surfaces such as chairs or tables.
17 DO NOT put any objects into openings. DO
NOT use with any opening blocked; keep
free of dust, lint, hair, and anything that
may reduce airflow.
18 DO NOT allow the appliance to be used by
children. Close attention is necessary when
used near children. This is not a toy.
19 DO NOT use without dust cup and/or filters
in place.
3
1-800-798-7398
Page 5

SAVE THESE INSTRUCTIONS
PLEASE READ CAREFULLY BEFORE USE
ENGLISH
20 DO NOT use if airflow is restricted. If
the air paths or the floor nozzle become
blocked, turn the vacuum cleaner off and
unplug from electrical outlet. Remove
all obstructions before you turn on the
unitagain.
21 Keep nozzle away from hair, face, fingers,
uncovered feet, or loose clothing.
2 2 Only use manufacturer’s recommended
attachments.
DUST CUP/FILTERS/ACCESSORIES
Before turning on the vacuum:
23 Make sure that all filters are thoroughly dry
after routine cleaning.
24 Make sure that dust cup and all filters are
in place after routine maintenance.
25 Make sure brushrolls are free of blockages
by removing hair and carpet fibers.
26 Only use Shark-brand filters and
accessories (failure to do so will void
thewarranty).
GENERAL CLEANING
27 DO NOT vacuum up large objects.
28 DO NOT vacuum up hard or sharp objects
such as glass, nails, screws, or coins that
could damage the vacuum cleaner.
29 DO NOT vacuum up drywall dust,
fireplace ash, or embers. DO NOT use
as an attachment to power tools for dust
collection.
30 DO NOT vacuum up smoking or burning
objects such as hot coals, cigarette butts,
or matches.
31 DO NOT vacuum up flammable or
combustible materials (e.g., lighter fluid,
gasoline, or kerosene) or use vacuum in
areas where they may be present.
32
DO NOT
chlorine bleach, ammonia, or drain cleaner).
33 DO NOT use in an enclosed space
where vapors are present from paint,
paint thinner, moth-proofing substances,
flammable dust, or other explosive or toxic
materials.
34 DO NOT vacuum up any liquids.
35 DO NOT immerse vacuum cleaner in water
or other liquids.
36 Use extra care when cleaning on stairs.
37 Remove brushroll from unit before rinsing.
POLARIZED PLUG
To reduce the risk of electric shock, this
vacuum cleaner has a polarized plug (one
blade is wider than the other). As a safety
feature, this plug will fit into a polarized outlet
only one way. If the plug does not fit fully into
the outlet, reverse the plug. If it still does not fit,
contact a qualified electrician. DO NOT force
into outlet or try to modify to fit.
vacuum
up toxic solutions (e.g.,
sharkclean.com
4
Page 6

GETTING TO KNOW YOUR
SHARK® ROCKET® POWERHEAD
WELCOME!
Congratulations on
your purchase. Use this
instruction manual to
learn about your new
vacuum’s great features.
From assembly to use
to maintenance, you will
find it all in here.
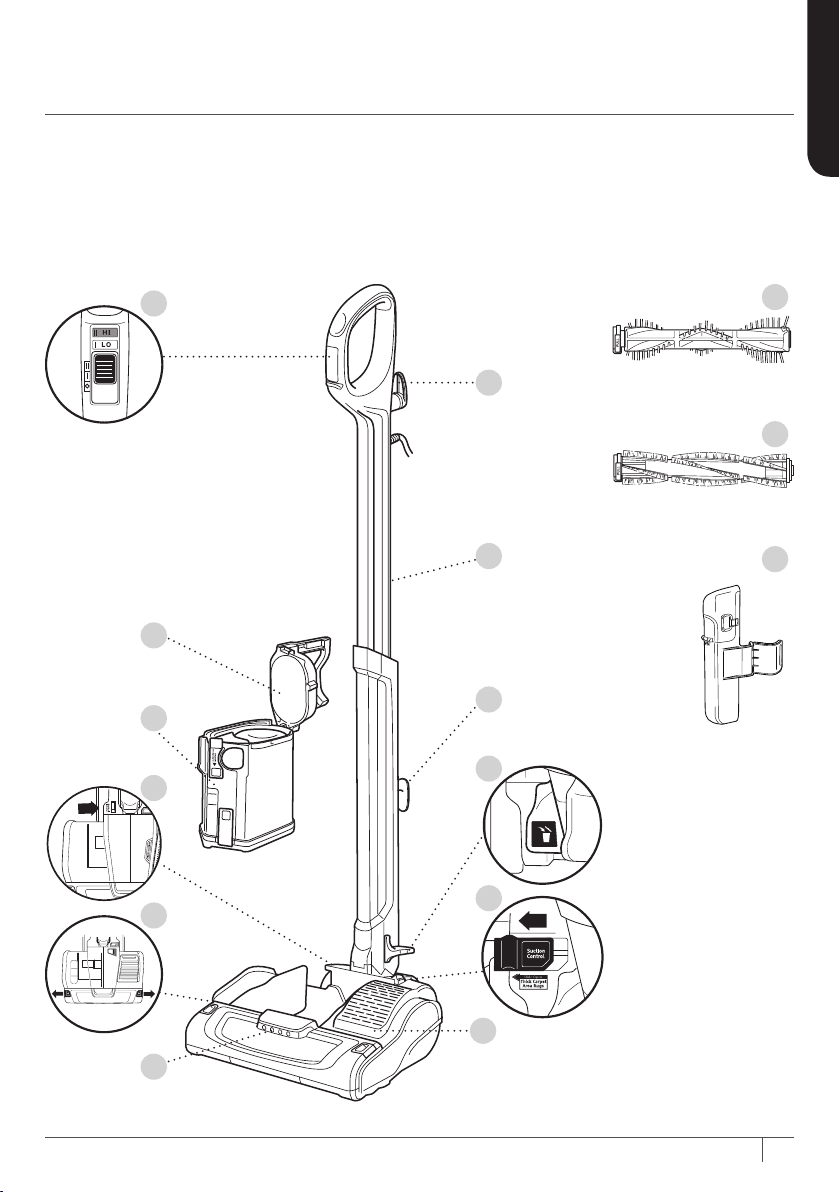
MAIN UNIT
A Power/LO/HI Switch
B Upper Cord Hook
C Wand
D Pre-Motor Filters
E Lower Cord Hook
F Dust Cup
G Dust Cup Release Foot Pedal
H Brushroll Indicator Light
I Suction Control
J Brushroll Cover Release
K Exhaust Grill/Post-Motor Filter
L Headlights
5
1-800-798-7398
ACCESSORIES
M All-Surface Brushroll
N Gentle Touch Hard Floor Brushroll
O Brushroll Holster
Page 7
ENGLISH
A
M
B
N
C
O
D
E
F
G
H
J
I
K
L
sharkclean.com
6
Page 8
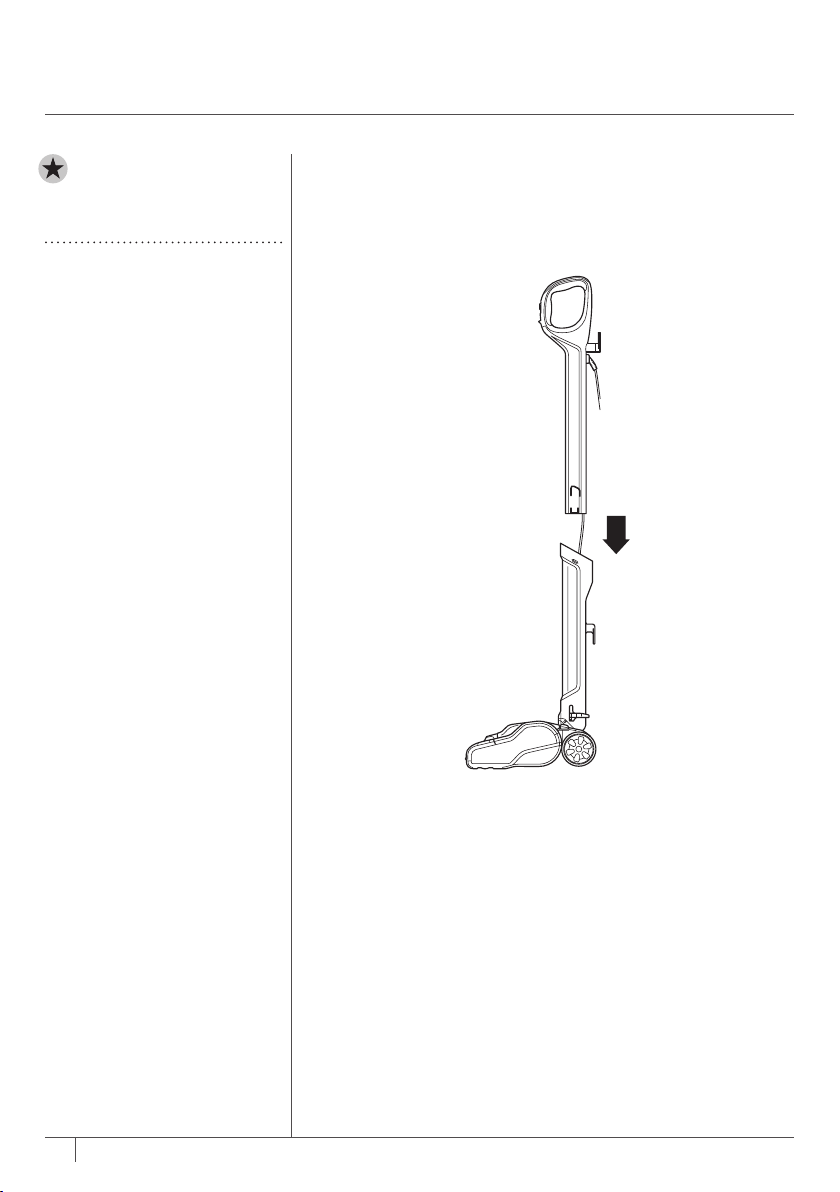
ASSEMBLING
YOUR VACUUM
IMPORTANT: Always
inspect wires for damage
before assembly.
DID YOU KNOW?
The floor nozzle has LED
headlights that illuminate the
floor surface being cleaned.
The lights turn on automatically
in either speed setting.
STEP 1
7
1-800-798-7398
1 Insert upper part of the wand into lower portion until you
hear a click. Make sure not to pinch the wires.
Page 9
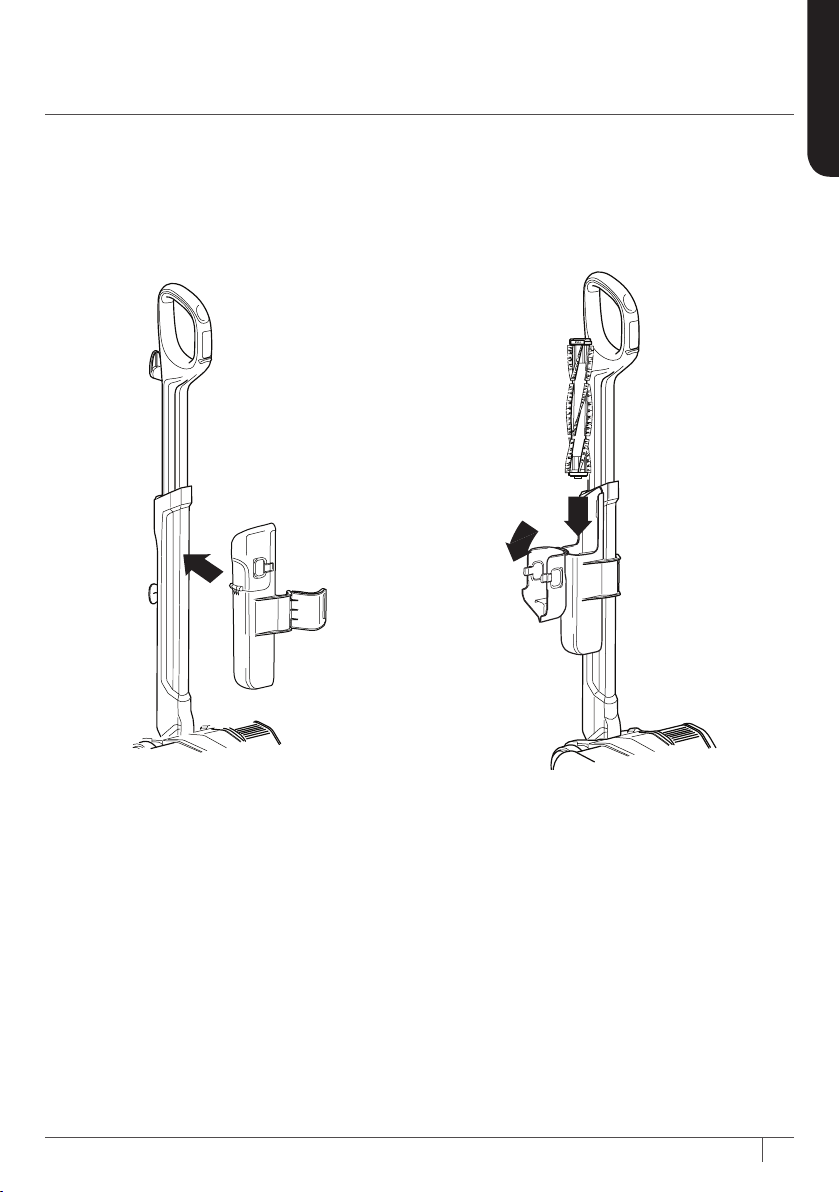
STEP 2 STEP 3
ENGLISH
2 Open the holster collar by pressing “Press
to detach holster”.
Place the collar so it rests on top of the
lower cord hook.
Close the collar. You will hear a click.
3 Open the holster by squeezing the two
ends and insert the spare brushroll. Close
before using the vacuum.
sharkclean.com
8
Page 10

SPEED
SETTINGS
NOTE: Before
vacuuming your delicate
area rugs or carpets, refer
to the manufacturer’s
recommended cleaning
instructions.
Less Suction
opened
More Suction
closed
SUCTION CONTROL
This unit has a Suction
Control slider to help with
push/pull on high-pile carpets
and to release suction when
vacuuming area rugs. Open
to minimize suction. Close for
maximum suction.
9
1-800-798-7398
The Powerhead has a 2-speed Power slider switch on
thehandle.
LO - The brushroll spins slowly.
HI - The brushroll spins quickly.
Page 11

CHOOSING THE APPROPRIATE
BRUSHROLL & SETTING
ENGLISH
ALL-SURFACE BRUSHROLL
The All-Surface Brushroll can be used on all
floor types. It is optimized for deep-carpet
cleaning.
LO - For gentle cleaning on hard floors and
area rugs.
HI - For deep-cleaning carpets by removing
embedded dirt.
1 Plug the unit into an electrical outlet.
2 Slide the Power switch to the LO position
to gently clean hard floors and area rugs.
The brushroll will spin slowly.
3 Slide the Power switch to the HI position
to deep-clean carpets by removing
embedded dirt. The brushroll will spin
quickly.
NOTE: For deep carpet cleaning per ASTM F608
(embedded dirt in carpets) please use the All-Surface
brushroll on HI setting with the Suction Control closed.
GENTLE TOUCH HARD FLOOR
BRUSHROLL
The Gentle Touch Hard Floor Brushroll can
be used on all floor types. It is optimized for
enhanced hard-floor cleaning.
LO - For large and heavy debris pickup.
HI - For loose and stuck-on dust and debris.
1 Plug the unit into an electrical outlet.
2 Slide the Power switch to the LO position
to clean large and heavy debris. The
brushroll will spin slowly.
3 Slide the Power switch to the HI position to
clean loose and stuck-on dust and debris.
The brushroll will spin quickly.
sharkclean.com
10
Page 12
USING YOUR VACUUM
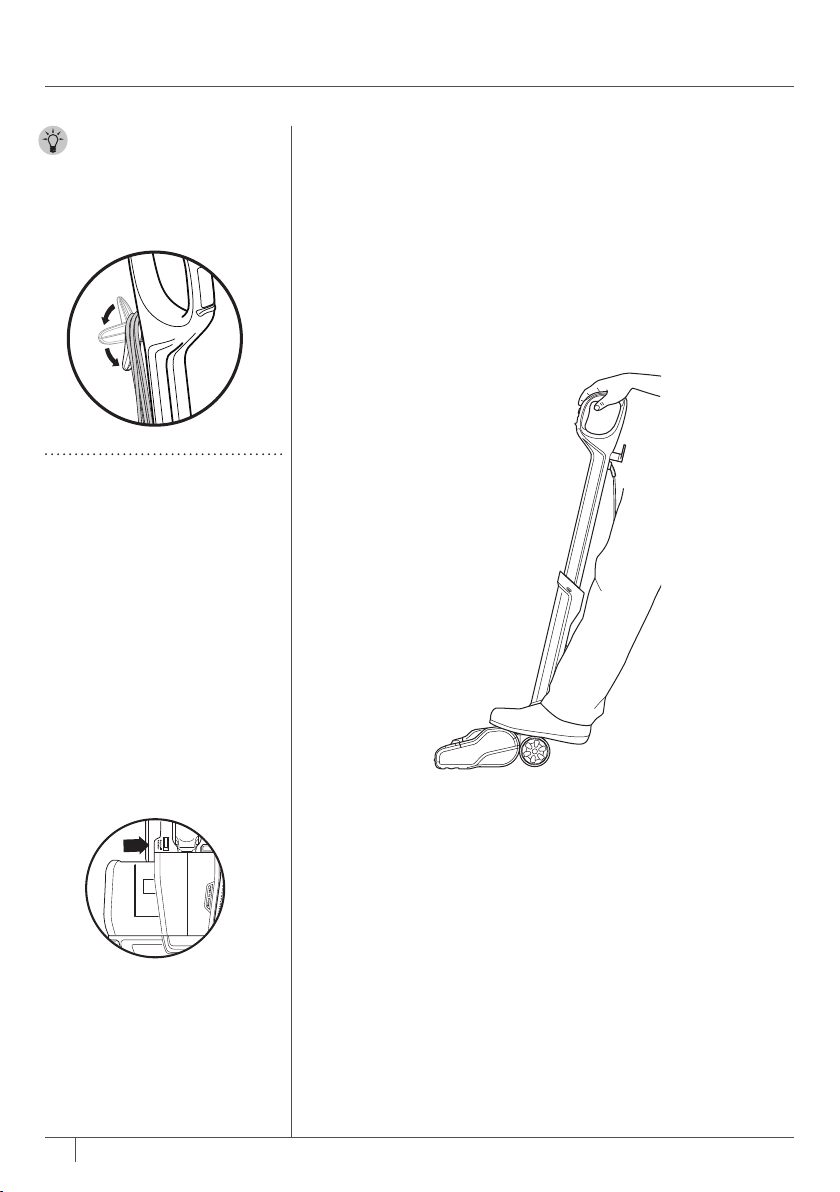
TIP: For quick cord
access, rotate upper
hook down and remove
cord. Rotate back up for
cord storage.
WHAT DOES THE
BRUSHROLL INDICATOR
LIGHT MEAN?
Solid Green
The brushroll is on and
working as it should.
Solid Red
There is a jam in the brushroll
area. Turn your vacuum off
and remove the blockage.
Flashing Red*
The floor nozzle is overheating.
Turn your vacuum off and wait
for it to cool down.
* See Troubleshooting section for
further instructions.
11
1-800-798-7398
1 Plug power cord into electrical outlet. Step on floor nozzle
and pull wand back. Select appropriate vacuum setting
and start cleaning. Please note, the brushroll will not spin
unless the wand isreclined.
Page 13
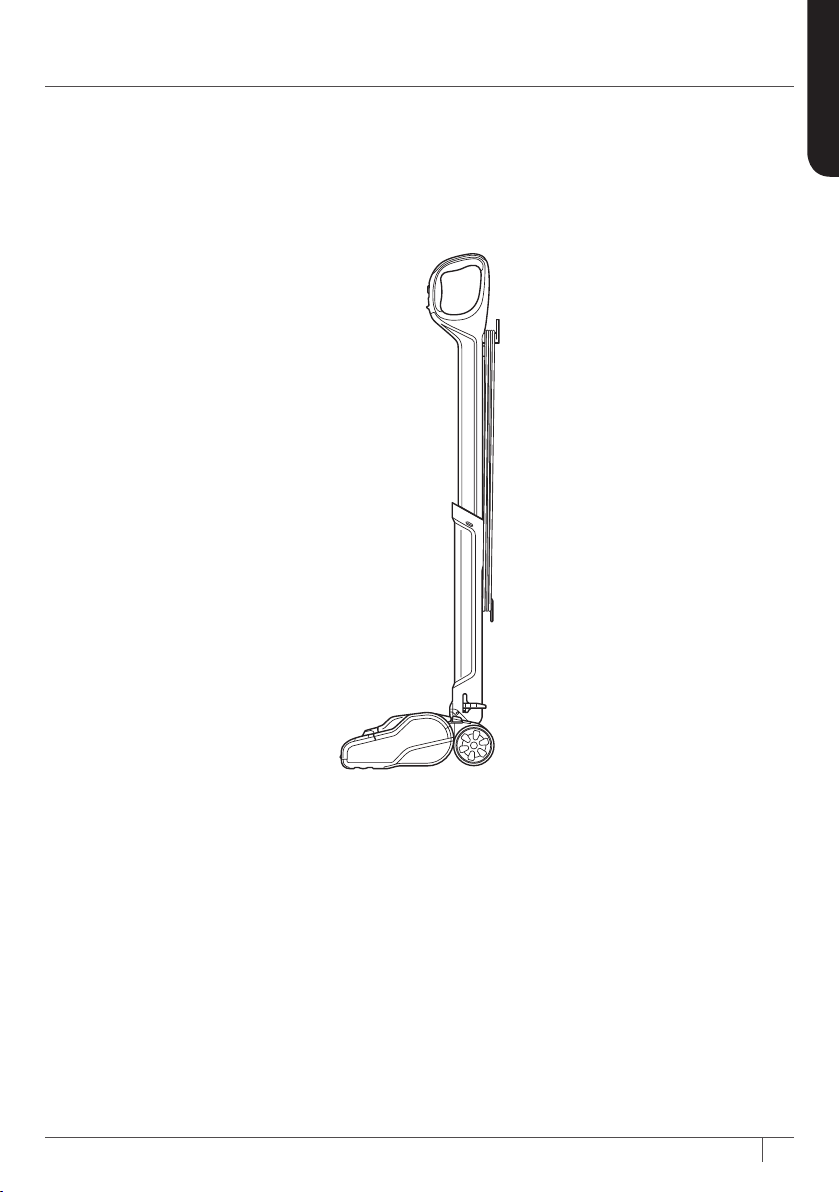
STORAGE
ENGLISH
1 Wrap power cord around cord hooks.
sharkclean.com
12
Page 14
MAINTENANCE
WARNING: To reduce
the risk of shock and
unintended operation,
turn power off and
unplug unit before
servicing.
NOTE: Clean the dust
screen inside the dust cup
as required.
NOTE: The unit will only
run when the dust cup is
locked into place.
NOTE: Empty dust cup
when debris reaches the
MAX fill line.
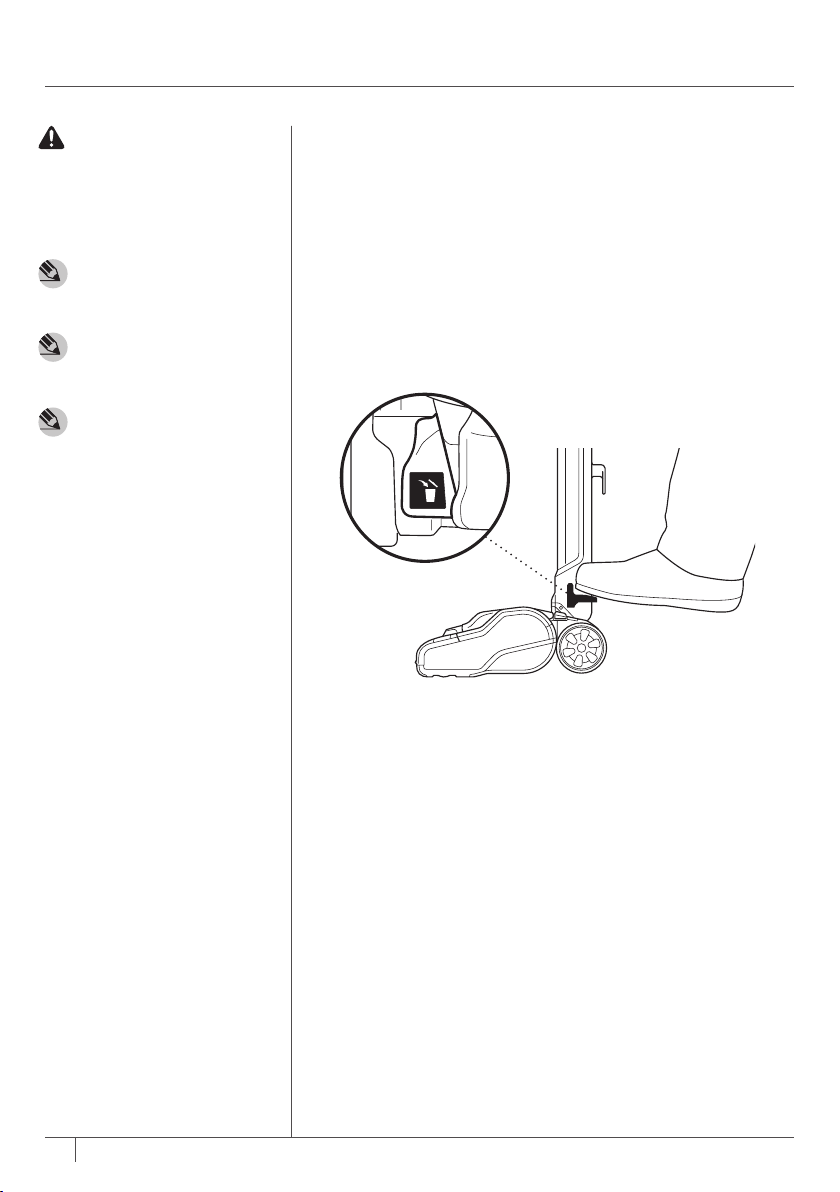
STEP 1
13
1-800-798-7398
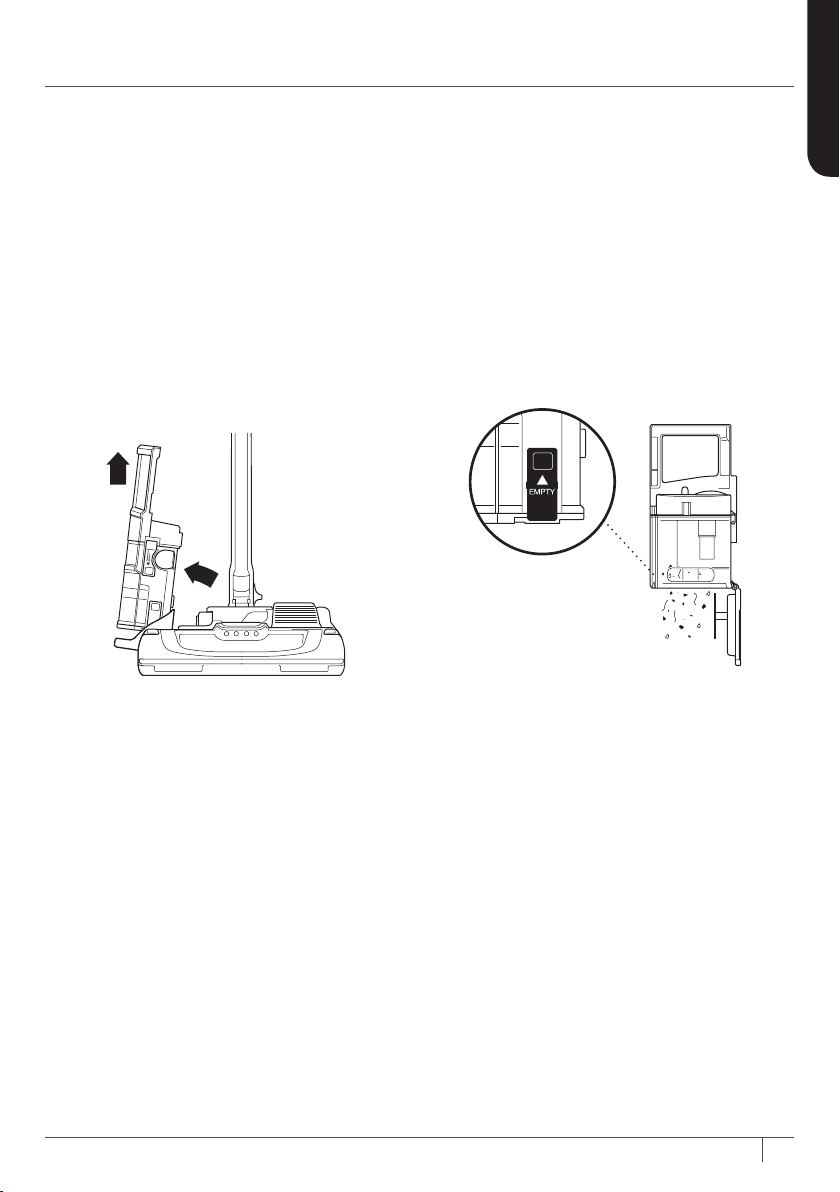
EMPTYING THE DUST CUP
1 Detach the removable dust cup from the floor nozzle by
pressing the dust cup release pedal located on the left side
near the nozzle.
Page 15
STEP 2 STEP 3
ENGLISH
2 Once the dust cup pops up, hold it by the
handle and lift up to remove it from the
floornozzle.
3 Hold the dust cup over a trash bin and
press the EMPTY button. The bottom lid
willopen, allowing the debris to fall out.
sharkclean.com
14
Page 16
MAINTENANCE
FILTER
ACCESS
WARNING: Hand
wash fliters with
water only to prevent
damage from
cleaning chemicals.
Allow ALL filters
to dry completely
before replacing
in the vacuum to
prevent liquid from
being drawn into
electric parts.
RECOMMENDED
FILTER CLEANING
SCHEDULE:
Pre-Motor Filter Kit
(Foam & Felt)
XFFH400
Clean once a month.
Post-Motor Filter
XEXFH400
Clean once a year.
Filter Access Latch
Foam
Felt
15
1-800-798-7398
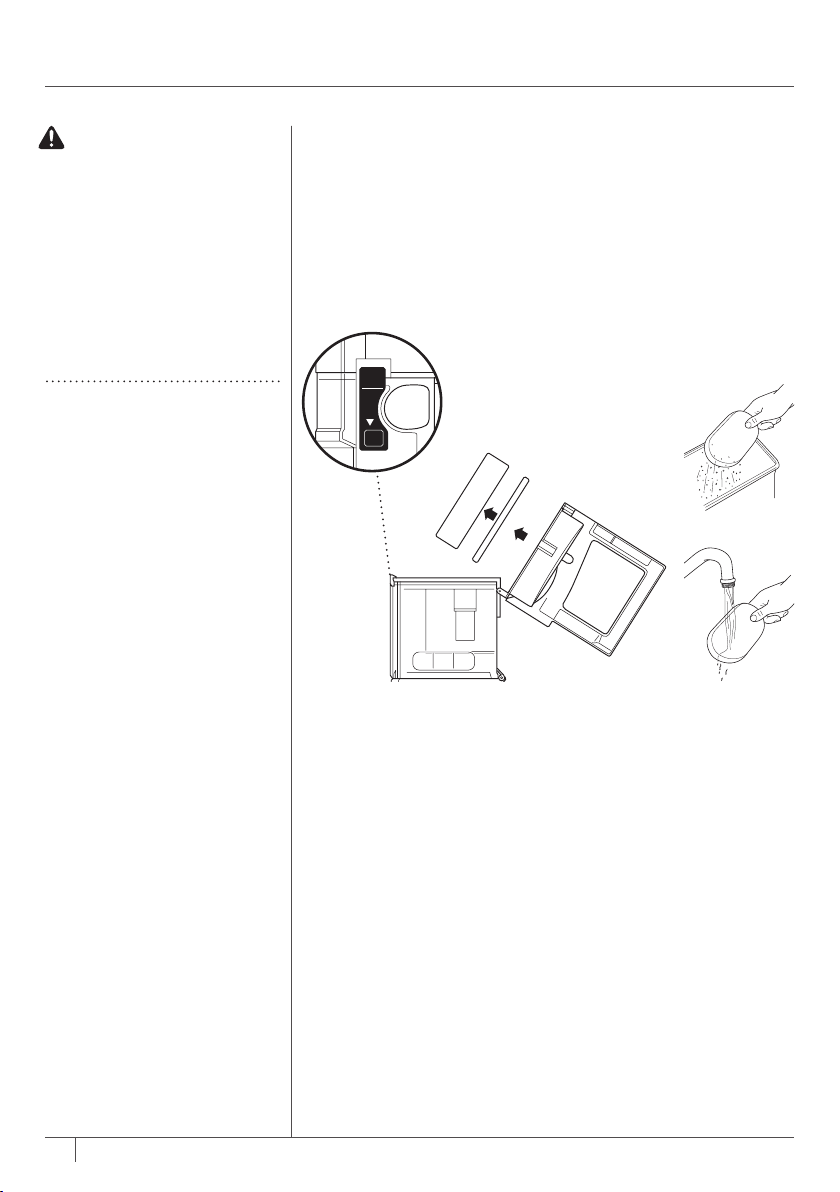
CLEANING THE FILTERS
Pre-Motor Filters
Access the pre-motor filters by pressing the FILTER ACCESS
latch on the top of the dust cup. Remove and rinse the foam
and felt filters with water. Tap loose dirt off filters between
washes as needed. Once completely dry, insert the felt filter
first, then place the foam filter on topof it.
Page 17

ENGLISH
Post-Motor Filter
Access the post-motor filter on top of the floor nozzle. Remove and rinse with water.
sharkclean.com
16
Page 18
MAINTENANCE
WARNING: To reduce
the risk of shock and
unintended operation,
turn power off and
unplug unit before
servicing.
IMPORTANT: Remove
brushroll before rinsing.
IMPORTANT: DO NOT
place brushroll in the
dishwasher to wash or
the dryer to dry. DO NOT
submerge brushroll in
water.
IMPORTANT: Using
a wet brushroll in the
floor nozzle will void your
warranty.
DID YOU KNOW?
The brushroll endcap is
removable to help clear hair/
debris. Ensure the endcap
is pressed firmly onto the
brushroll to reassemble.
STEP 1
STEP 3
STEP 4STEP 2
17
1-800-798-7398
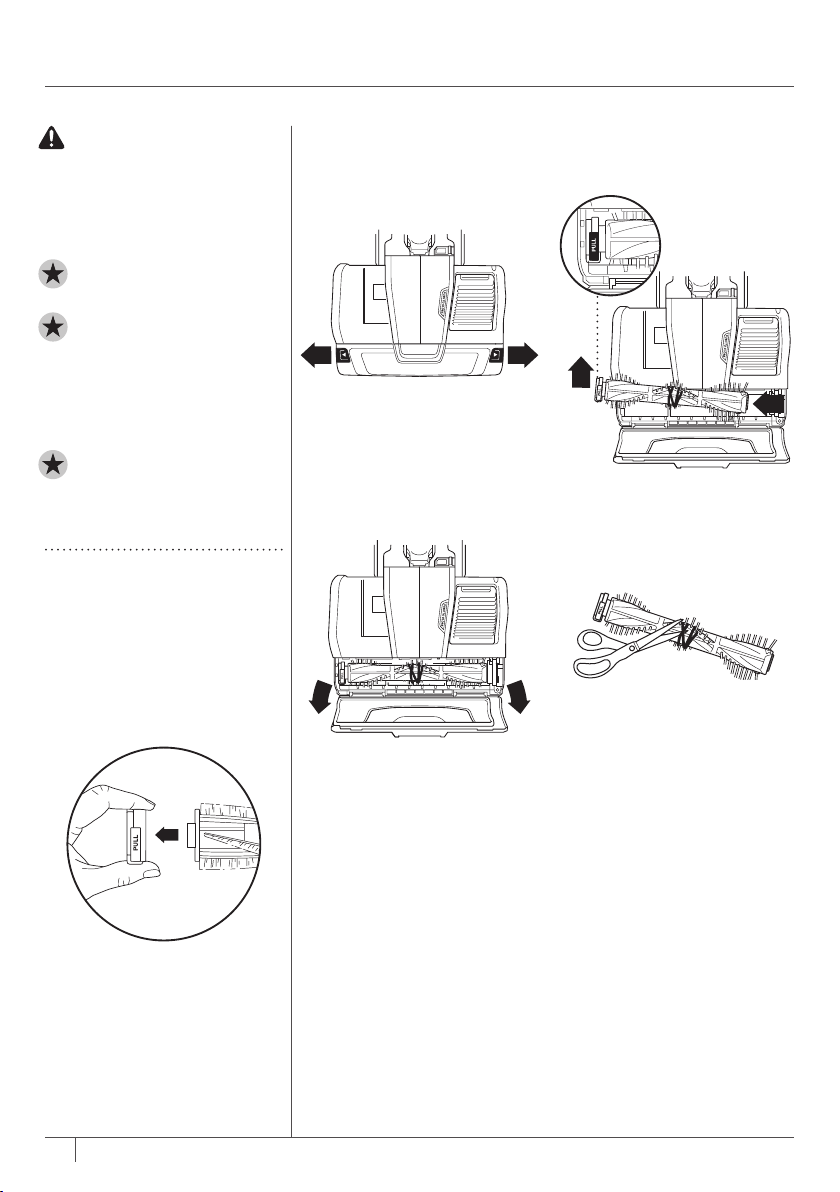
ACCESSING & CLEANING
THE BRUSHROLL
1 Slide the brusholl garage
release buttons out.
2 Pull up to open the
brusholl garage.
3 Lift the endcap on the
brushroll up to remove it
from the floor nozzle.
4 Remove any hair, fibers,
or debris wrapped around
the brushroll. The groove
on the brushroll allows
scissors to cut the debris
without damaging the
bristles.
Page 19
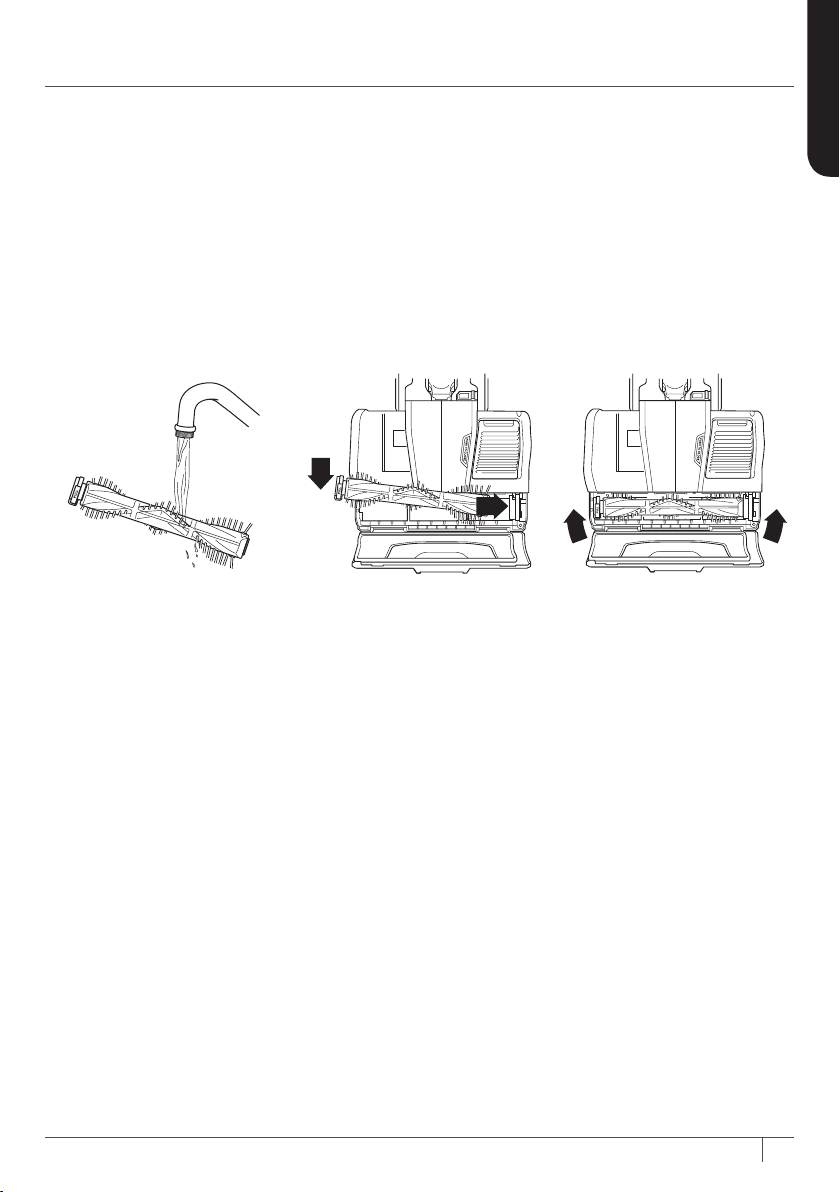
STEP 5 STEP 6 STEP 7
ENGLISH
5 The brushroll can be
rinsed under running
water. Let the brushroll
air-dry completely before
replacing in the vacuum.
6 To reassemble, hold the
brushroll by the endcap
and align the other end
with the gear. With the
endcap facing up, place
the brushroll in the floor
nozzle.
7 Close the brushroll garage.
Listen for a click and make
sure the release buttons
are fully closed.
NOTE: The brushroll will only spin
if the brushroll cover is fully closed
and locked.
sharkclean.com
18
Page 20

TROUBLESHOOTING
GUIDE
WARNING: To reduce the risk of shock and unintended operation, turn
power off and unplug unit before servicing.
Vacuum is not picking up debris. No suction or light suction.
(Refer to Maintenance section for more information.)
• Check filters to see if they need cleaning. Follow instructions for rinsing and completely
air-drying the filters before reinserting in the vacuum.
• Dust cup may be full; empty dust cup.
• Check floor nozzle for blockages; clear blockages if required.
• Remove any string, carpet fibers, or hair that may be wrapped around the brushroll.
Vacuum lifts area rugs.
• Suction is powerful. Take care when vacuuming area rugs or rugs with delicately sewn edges.
• Turn off the unit to disengage the brushroll and restart with the Power slider switch.
• Open the Suction Control slider on the floor nozzle to decrease suction power.
Brushroll does not spin.
• If Brushroll Indicator Light on the floor nozzle turns red, the brushroll has stopped spinning.
Immediately turn off and unplug vacuum and remove blockage. Re-plug the unit into an electrical
outlet and turn vacuum on.
• If Brushroll Indicator Light on the floor nozzle is green, the blockage has been successfully cleared. If
the light is still red, please contact customer service at 1-800-798-7398.
• Check to make sure the brushroll was replaced correctly if it had been removed.
• Ensure brushroll garage of the floor nozzle is closed completely.
• With the power on, recline the wand, which will automatically turn on the brushroll.
Brushroll garage will not close.
• Make sure the brushroll was reinserted correctly with the word “PULL” on the endcap facing up.
Brushroll will not fit back inside the nozzle.
• Make sure the brushroll endcap is pressed firmly onto the brushroll.
Dust cup will not latch back onto floor nozzle.
• Make sure both the brushroll garage and filter access are fully closed. Press firmly in the center
of the dust cup on the floor nozzle until you hear a click. The unit will not run until the dust cup is
closed and locked.
Vacuum turns off on its own or indicator light flashes red.
This vacuum is equipped with a motor-protective thermostat so the vacuum will shut off if it overheats.
Should this occur, perform the following steps to restart the thermostat:
1. Turn vacuum off and unplug it.
2. Empty dust cup and clean filters (see Maintenance section).
3. Check for blockages on the brushroll and remove all hair and carpet fibers.
4. Allow unit to cool for a minimum of 45 minutes.
5. Plug in vacuum and turn it on.
19
1-800-798-7398
Page 21

FIVE (5) YEAR
LIMITED WARRANTY
The 5-Year Limited Warranty applies to purchases made from authorized retailers of SharkNinja
Operating LLC. Warranty coverage applies to the original owner and to the original product only and is
not transferable.
SharkNinja warrants that the unit shall be free from defects in material and workmanship for a period of 5 years
from the date of purchase when it is used under normal household conditions and maintained according to the
requirements outlined in this instruction manual, subject to the following conditions and exclusions.
What is covered in my warranty?
1. The original unit and/or non-wearable components deemed defective, in SharkNinja’s sole discretion,
will be repaired or replaced for up to 5 years from the original purchase date.
2. In the rare event that a replacement unit is issued, the warranty coverage ends six months following the
receipt date of the replacement unit or the remainder of the existing warranty, whichever is greater. If
the unit is replaced, SharkNinja reserves the right to replace the unit with one of equal or greater value.
What is not covered in my warranty?
Our Customer Care/Product Specialists are available to provide all the warranty service options available to
you including the possibility of upgrading to our VIP Warranty Service Options for select product categories.
1. Normal wear and tear of wearable parts such as foam filters, HEPA filters, pads etc., which require regular
maintenance and/or replacement to ensure the proper functioning of your unit are not covered by this warranty.
2. Any unit that has been tampered with or used for commercial purposes.
3. SharkNinja will cover the cost for the customer to send in the unit to us for repair or replacement. A
fee of $19.95 for return shipping costs will be charged at the time of return shipment of the repaired or
replacement unit.
4.
Damage caused by misuse, abuse, or negligent handling, or damage due to mishandling in transit.
5. Consequential and incidental damages.
6. Defects caused by or resulting from damages from shipping or from repairs, service, or alteration to the
product or any of its parts which have been performed by a repair person not authorized by SharkNinja.
7. Products purchased, used or operated outside of North America.
Problems with your unit/How to get service
If your appliance fails to operate properly while in use under normal household conditions within the
warranty period, visit sharkclean.com for product care/maintenance self-help. Our customer care and
product specialists are also available at 1-800-798-7398 to assist with product support and warranty
service options.
How to initiate a warranty claim
You must first activate your warranty by registering your unit online at sharkclean.com/customersupport.
(Note: Purchases made directly from SharkNinja are automatically registered with us and the warranty
activated.) Alternatively you can call 1-800-798-7398 to have a customer care specialist assist you. Please
note you must call 1-800-798-7398 to initiate a warranty claim. Return and Packing Instruction information
will be provided at that time.
The customer care line is open Monday-Saturday, 7am-11pm ET and Sunday, 9am-8pm ET.
Replacement parts are available for purchase at sharkclean.com. For more information on what is
classified as wearable and non-wearable parts, please visit sharkwarranty.com.
This warranty gives you specific legal rights, and you also may have other rights that vary from state to state.
Some states do not permit the exclusion or limitation of incidental or consequential damages, so the above
may not apply to you.
ENGLISH
sharkclean.com
20
Page 22

NOUS VOUS REMERCIONS
d’avoir fait l’achat de
l’aspirateur à brosse motorisée SharkMD Rocket
ENREGISTRER VOTRE ACHAT
sharkclean.com
1-800-798-7398
MD
CONSEIL : Vous trouverez
le numéro de modèle sur la
plaque signalétique située
à l’arrière de l’appareil.
CONSEIL : Vous trouverez
le code de la date de
fabrication sur l’une des
broches de la fiche du
cordon d’alimentation.
NOTER CES RENSEIGNEMENTS
Numéro de modèle: ���������������������������������
Code de la date de fabrication: ������������������������
Date d’achat (conserver le reçu): �����������������������
Lieu d’achat: ���������������������������������������
CARACTÉRISTIQUES TECHNIQUES
Tension électrique: 120V, 60Hz
Watts: 600W
Ampères: 5A
VEUILLEZ LIRE LE PRÉSENT MANUEL
ATTENTIVEMENT ET LE CONSERVER POUR
RÉFÉRENCE FUTURE.
Ces instructions ont été conçues pour vous aider à
bien comprendre le fonctionnement de votre nouvel
aspirateur à tête motorisée Shark Rocket.
21
1-800-798-7398
Pour toute question, veuillez communiquer avec le
service à la clientèle au 1-800-798-7398.
Page 23

TABLE DES MATIÈRES
Consignes de sécurité importantes . . . . . . . . . . . . . . . . . . . . . 23
Apprendre à connaître l’aspirateur
à tête motorisée SharkMD RocketMD . . . . . . . . . . . . . . . . . . . . . 25
Assemblage de l’aspirateur . . . . . . . . . . . . . . . . . . . . . . . . . . . . 27
Réglage de vitesse . . . . . . . . . . . . . . . . . . . . . . . . . . . . . . . . . . . 29
Régulateur d’aspiration � � � � � � � � � � � � � � � � � � � � � � � � � � � � � � � � � � 29
Choisir la brosse rotative et son réglage approprié . . . . . . .30
Brosse rotative toutes surfaces � � � � � � � � � � � � � � � � � � � � � � � � � � � 30
Brosse rotative pour le nettoyage en douceur
des planchers à surface dure � � � � � � � � � � � � � � � � � � � � � � � � � � � � � 30
Utilisation de l’aspirateur . . . . . . . . . . . . . . . . . . . . . . . . . . . . . . 31
Que signifie le témoin lumineux de la brosse rotative? � � � � � � �31
Rangement . . . . . . . . . . . . . . . . . . . . . . . . . . . . . . . . . . . . . . . . . . 32
FRANÇAIS
Entretien . . . . . . . . . . . . . . . . . . . . . . . . . . . . . . . . . . . . . . . . . . . . 33
Vidange du bac à poussière � � � � � � � � � � � � � � � � � � � � � � � � � � � � � � 33
Nettoyage des filtres � � � � � � � � � � � � � � � � � � � � � � � � � � � � � � � � � � � � 35
Accès et nettoyage de la brosse rotative � � � � � � � � � � � � � � � � � � 37
Guide de dépannage . . . . . . . . . . . . . . . . . . . . . . . . . . . . . . . . . . 39
Garantie . . . . . . . . . . . . . . . . . . . . . . . . . . . . . . . . . . . . . . . . . . . . . 40
sharkclean.com
22
Page 24

CONSIGNES DE SÉCURITÉ IMPORTANTES
POUR USAGE DOMESTIQUE
AVERTISSEMENT
Afin de réduire les risques de blessures, d’incendie, de décharge électrique
et de dommages matériels causés par une mauvaise utilisation de l’appareil,
veuillez suivre attentivement les instructions suivantes. Cet appareil contient
des raccordements électriques et des pièces mobiles pouvant exposer
l’utilisateur à certains risques.
LA BUSE DE PLANCHER, LE TUBE
ET LA POIGNÉE CONTIENNENT DES
CONNEXIONS ÉLECTRIQUES :
• Ces pièces ne peuvent être réparées par
l’utilisateur.
• N’utilisez pas cet appareil pour aspirer des
liquides.
• Ne plongez pas l’aspirateur dans l’eau.
• Cessez l’utilisation si la poignée ou le tube
sont endommagés.
1 Inspectez le cordon d’alimentation électrique
et la fiche afin de repérer tout dommage
avant l’utilisation. N’UTILISEZ PAS l’aspirateur
si le cordon d’alimentation ou la fiche sont
endommagés. Fermez toutes les commandes
avant de brancher ou de débrancher
l’aspirateur. Rangez l’aspirateur en prenant
soin d’enrouler le cordon d’alimentation
autour des deux crochets à cordon.
2 N’UTILISEZ PAS l’appareil à l’extérieur
ou sur des surfaces humides; utilisez-le
seulement sur les surfaces sèches.
3 Débranchez l’aspirateur de la prise de
courant lorsqu’il n’est pas utilisé et avant
tout entretien.
4 Si l’aspirateur ne fonctionne pas comme il
se doit, a été échappé, endommagé, laissé
à l’extérieur ou bien échappé dans l’eau,
veuillez le retourner à SharkNinja Operating
LLC pour une vérification, un ajustement
ou une réparation.
5 N’UTILISEZ PAS le cordon d’alimentation
comme poignée, pour porter ou pour
tirerl’aspirateur.
6 NE DÉBRANCHEZ PAS l’appareil en tirant sur
le cordon d’alimentation. Pour le débrancher,
tirez sur la fiche et non sur le cordon.
7 NE MANIPULEZ PAS la fiche ou l’aspirateur
avec les mains mouillées.
8 NE FAITES PAS ROULER l’aspirateur sur
son cordon. Ne coincez jamais le cordon
d’alimentation dans une porte et ne le
placez pas près de rebords tranchants.
9 L’utilisation d’une rallonge n’est
pasrecommandée.
10 NE LAISSEZ PAS l’aspirateur branché
sanssurveillance.
11 Gardez le cordon d’alimentation loin des
surfaces chaudes.
12
Éteignez toujours l’appareil avant de brancher
ou débrancher la brosse motorisée.
UTILISATION GÉNÉRALE
13 Utilisez cet appareil uniquement aux fins
décrites dans ce manuel.
1 4 Gardez le lieu de travail bien éclairé.
15 Gardez l’aspirateur en mouvement
sur le tapis en tout temps afin d’éviter
d’endommager les fibres.
16 NE PLACEZ PAS l’aspirateur sur des
surfaces instables comme des chaises ou
des tables.
17
N’INSÉREZ PAS d’objets dans les ouvertures.
N’UTILISEZ PAS l’aspirateur si des ouvertures
sont bouchées; assurez-vous qu’il n’y a pas
de poussière, de charpie, de cheveux ou tout
autre objet pouvant réduire le débit d’air.
23
1-800-798-7398
Page 25

VEUILLEZ CONSERVER CES DIRECTIVES
VEUILLEZ LIRE LES DIRECTIVES ATTENTIVEMENT
18
NE LAISSEZ PAS les enfants se servir de
l’appareil. Une étroite surveillance est nécessaire
lorsque le produit est utilisé à proximité
d’enfants. Cet appareil n’est pas un jouet.
19 N’UTILISEZ PAS l’appareil sans bac à
poussière ou sans filtre.
20 N’UTILISEZ PAS si le débit d’air est
bloqué. Si le passage d’air de la buse de
plancher est obstrué, éteignez l’aspirateur
et débranchez-le de la prise électrique.
Retirez toutes les obstructions avant de
remettre l’appareil en marche.
21 Tenez la buse éloignée des cheveux, du
visage, des doigts, des pieds déchaussés
ou des vêtements amples.
2 2 Utilisez les accessoires recommandés par
le fabricant seulement.
RÉCIPIENT À POUSSIÈRE/FILTRES/
ACCESSOIRES
Avant de mettre l’aspirateur en marche:
23
Assurez-vous que tous les filtres sont
complètement secs après le nettoyage courant.
24 Assurez-vous que le bac à poussière
et tous les filtres sont en place après
l’entretien courant.
25 Assurez-vous que toutes les brosses
rotatives sont libres de toute obstruction en
retirant les cheveux et les fibres du tapis.
26 Utilisez uniquement les filtres et les
accessoires de marque Shark (manquer à
cette règle annulera la garantie).
NETTOYAGE GÉNÉRAL
27 N’ASPIREZ PAS d’objets de grande taille.
28 N’ASPIREZ PAS d’objets durs ou pointus
comme de la vitre, des clous, des vis
ou des pièces de monnaie susceptibles
d’endommage l’aspirateur.
29 N’ASPIREZ PAS de poussière de
placoplâtre, de cendres du foyer ou des
braises et n’utilisez pas cet appareil comme
accessoire pour des outils motorisés pour
la collecte de poussière. Ces applications
présentent des risques d’incendie.
30
N’ASPIREZ PAS d’objets brûlants ou
fumants comme de la braise très chaude,
des mégots de cigarettes ou des allumettes.
31 N’ASPIREZ PAS des matières inflammables
ou combustibles (par ex.: de l’essence à
briquet, de l’essence ou du kérosène) et
n’utilisez pas l’aspirateur dans des endroits
où ces matières peuvent être présentes.
32 N’ASPIREZ PAS de substances toxiques (par
ex.: de l’eau de Javel, de l’ammoniaque ou
des produits débouchants).
33 N’UTILISEZ PAS l’appareil dans un
espace clos où il y a présence de vapeurs
provenant de la peinture, de diluant
à peinture, de produits de traitement
antimite, de poussière inflammable ou
d’autres matières toxiques ou explosives.
34 N’ASPIREZ PAS de matières liquides.
35 NE PLONGEZ PAS l’appareil dans l’eau ou
dans d’autres liquides.
36 Redoublez de prudence lors du nettoyage
des escaliers.
37 Retirez la brosse rotative de l’appareil avant
de la rincer.
FICHE POLARISÉE
Pour réduire le risque de décharge électrique,
cet aspirateur est muni d’une fiche polarisée
(une lame est plus large que l’autre). À des fins
de sécurité, cette fiche s’insère dans une prise
polarisée dans un seul sens. Si la fiche ne s’insère
pas entièrement dans la prise, inversez-la. Si elle
ne s’insère toujours pas, communiquez avec un
électricien qualifié. N’INSÉREZ PAS la fiche dans
la prise de force et ne tentez pas de la modifier.
FRANÇAIS
sharkclean.com
24
Page 26

APPRENDRE À CONNAÎTRE L’ASPIRATEUR À TÊTE
MOTORISÉE SHARKMD ROCKET
BIENVENUE!
Félicitations pour votre
achat. Utilisez ce mode
d’emploi pour en
apprendre davantage
sur les caractéristiques
fantastiques de votre
nouvel aspirateur.
De l’assemblage à
l’utilisation, en passant
par l’entretien, vous
trouverez tous les
renseignements que
vous cherchez ici.
UNITÉ PRINCIPALE
A Commutateur mise en marche/LO/HI
B Crochet d’enroulement du haut
C Tube
D Filtres en amont du moteur
E Crochet d’enroulement du bas
F Bac à poussière
G Pédale de libération du bac à poussière
H Témoin lumineux de la brosse rotative
I Sélecteur de puissance d’aspiration
J Bouton de libération du boîtier de la brosse rotative
K Grille de ventilation/filtre en aval du moteur
L Lumières à l’avant
MD
25
1-800-798-7398
ACCESSOIRES
M Brosse rotative pour toutes les surfaces
N Brosse rotative pour le nettoyage en douceur des
planchers à surface dure
O Fourreau de la brosse rotative
Page 27

FRANÇAIS
A
M
B
N
C
O
D
E
F
G
H
J
I
K
L
sharkclean.com
26
Page 28

ASSEMBLAGE
DE L’ASPIRATEUR
IMPORTANT : Assurez-
vous que les câbles ne
sont pas endommagés
avant l’assemblage.
LE SAVIEZ-VOUS?
La buse de plancher est dotée
de lumières à DEL à l’avant
qui permettent d’éclairer la
surface du plancher à nettoyer.
Les lumières s’allument
automatiquement, peu importe
le réglage de la vitesse.
ÉTAPE 1
27
1-800-798-7398
1 Insérer la partie supérieure du tuyau dans la partie inférieure
jusqu’à ce qu’un déclic se fasse entendre. Assurez-vous de
ne pas pincer les câbles.
Page 29

ÉTAPE 2 ÉTAPE 3
FRANÇAIS
2 Ouvrez le collet du fourreau en appuyant
sur «Press to detach holster» (appuyer
pour détacher le fourreau).
Fixez le collet au-dessus du crochet
d’enroulement du bas.
Fermez le collet. Un déclic se fera entendre.
3 Ouvrez le fourreau en serrant les
deux bouts, puis insérez la brosse
rotative de rechange. Fermez avant
d’utiliserl’aspirateur.
sharkclean.com
28
Page 30

RÉGLAGE
DE VITESSE
REMARQUE : Veuillez
suivre les instructions de
nettoyage préconisées
par le fabricant avant de
passer l’aspirateur sur
les moquettes ou les
tapisdélicats.
Moins de puissance
d’aspiration
ouvert
Plus de puissance
d’aspiration
fermé
RÉGULATEUR D’ASPIRATION
Cet appareil est muni d’un
sélecteur coulissant de
puissance d’aspiration
pour faciliter le passage de
l’aspirateur sur les tapis aux
poils longs et pour réduire la
puissance d’aspiration lors
du nettoyage des carpettes.
Ouvrez pour réduire la
puissance d’aspiration.
Fermez pour maximiser la
puissance d’aspiration.
29
1-800-798-7398
La poignée de la tête motorisée est munie d’un interrupteur
coulissant à deux vitesses.
LO – La brosse rotative tourne lentement.
HI – La brosse rotative tourne rapidement.
Page 31

SÉLECTIONNEZ LA BROSSE ROTATIVE
ET LE RÉGLAGE APPROPRIÉS
FRANÇAIS
BROSSE ROTATIVE TOUTES
SURFACES
La brosse rotative toutes surfaces peut être
utilisée sur tous les types de parquets. Elle
est optimisée pour le nettoyage des tapis
en profondeur.
LO – Pour le nettoyage en douceur des
parquets et des carpettes.
HI – Pour le nettoyage des tapis en
profondeur et le retrait de la saleté incrustée.
1 Branchez l’appareil dans une prise électrique.
2 Faites glisser l’interrupteur en position
«LO» pour le nettoyage en douceur des
parquets et des carpettes. La brosse
rotative se mettra à tourner lentement.
3 Faites glisser l’interrupteur en position
«HI» pour nettoyer les tapis en profondeur
et aspirer la saleté incrustée. La brosse
rotative se mettra à tourner rapidement.
REMARQUE : Pour le nettoyage des tapis en
profondeur conformément à la norme ASTM F608
(saleté incrustée dans les tapis), réglez la brosse rotative
toutes srfaces à la position «HI», tout en vous assurant
que le sélecteur de puissance d’aspiration est fermé.
BROSSE ROTATIVE POUR LE
NETTOYAGE EN DOUCEUR DES
PLANCHERS À SURFACE DURE
La brosse rotative pour nettoyage en douceur
des planchers à surface dure peut être
utilisée sur tous les types de parquets. Elle
est optimisée pour une performance de
nettoyage supérieure des parquets.
LO – Pour aspirer les débris lourds et de
grande taille.
HI – Pour aspirer la poussière et les débris
fins ou incrustés.
1 Branchez l’appareil dans une prise
électrique.
2 Faites glisser l’interrupteur en position
«LO» pour aspirer les débris lourds et de
grande taille. La brosse rotative se mettra à
tourner lentement.
3 Faites glisser l’interrupteur en position
«HI» pour aspirer la poussière et les débris
fins ou incrustés. La brosse rotative se
mettra à tourner rapidement.
sharkclean.com
30
Page 32

UTILISATION DE L’ASPIRATEUR
CONSEIL : Pour accéder
rapidement au cordon, faites
faire une rotation de 180° au
crochet du haut, et dérouler
le cordon. Faites tourner le
crochet de nouveau pour
ranger le cordon.
QUE SIGNIFIE LE TÉMOIN
LUMINEUX DE LA
BROSSE ROTATIVE?
Vert fixe
La brosse rotative est en
marche et fonctionne comme
elle se doit.
Rouge fixe
Une obstruction a été
détectée dans la zone de
la brosse rotative. Éteignez
l’aspirateur, et retirez l’élément
qui cause l’obstruction.
Rouge clignotant*
La buse de plancher
surchauffe. Éteignez l’aspirateur
et laissez-le refroidir.
1 Brancher le câble d’alimentation dans la prise électrique.
Appuyez légèrement sur la buse de plancher avec le pied,
puis tirez sur le tube. Sélectionnez le réglage souhaité,
et commencez le nettoyage. Veuillez noter que la brosse
rotative ne fonctionnera pas à moins que le tube soit incliné.
* Consultez la section de dépannage pour
obtenir des instructions supplémentaires.
31
1-800-798-7398
Page 33

RANGEMENT
FRANÇAIS
2 Enrouler le câble d’alimentation autour des crochets.
sharkclean.com
32
Page 34

ENTRETIEN
AVERTISSEMENT :
Pour réduire les
risques de décharge
électrique et de mise
en marche involontaire,
éteignez et débranchez
l’aspirateur avant tout
entretien.
REMARQUE : Nettoyez
le filtre du bac à poussière,
au besoin.
REMARQUE : L’appareil
fonctionne uniquement
lorsque le bac à poussière
est enclenché.
REMARQUE : Videz le
bac à poussière lorsque
les débris atteignent la
ligne de remplissage
«MAX» indiquée à
l’intérieur de ce dernier.
ÉTAPE 1
33
1-800-798-7398
VIDANGE DU BAC À POUSSIÈRE
1 Détachez le bac à poussière amovible de la buse de
plancher en appuyant sur la pédale de libération du bac à
poussière située sur le côté gauche, près de la buse.
Page 35

ÉTAPE 2 ÉTAPE 3
FRANÇAIS
2 Une fois le bac libéré, tenez-le par la poignée
et soulevez-le pour le retirer de la buse.
3 Tenez le bac au-dessus d’un bac à ordures, et
appuyez sur le bouton de vidange «EMPTY».
Le couvercle inférieur s’ouvrira pour permettre
au bac de se vider de ses débris.
sharkclean.com
34
Page 36

FILTER
ACCESS
ENTRETIEN
AVERTISSEMENT :
Laver les filtres à
la main avec de
l’eau seulement afin
d’éviter les dommages
causés par les
produits chimiques
de nettoyage. Laissez
TOUS les filtres sécher
complètement avant
de les remettre dans
l’aspirateur afin
d’empêcher tout
contact entre l’eau
et les composants
électriques.
HORAIRE RECOMMANDÉ
POUR LE NETTOYAGE
DES FILTRES :
Trousse de filtre
pré-moteur
(feutre et mousse)
XFFH400
Nettoyez une fois par mois.
Filtre post-moteur
XEXFH400
Nettoyer une fois par année.
Languette de dégagement
de la porte du filtre
Mousse
Feutre
35
1-800-798-7398
NETTOYAGE DES FILTRES
Filtres pré-moteur
Pour accéder aux filtres pré-moteur, appuyez sur la languette
de dégagement de la porte du filtre (FILTER ACCESS) située
sur le dessus du bac à poussière. Retirez et rincez les filtres de
feutre et de mousse avec de l’eau. Tapotez les filtres entre les
lavages, au besoin, pour retirer la saleté. Une fois le séchage
terminé, insérez d’abord le filtre en feutre, puis le filtre en
mousse sur ce dernier.
Page 37

FRANÇAIS
Filtre post-moteur
Le filtre post-moteur se trouve sur la buse de plancher. Retirez le filtre et rincez-le avec de l’eau.
sharkclean.com
36
Page 38

ENTRETIEN
AVERTISSEMENT :
Pour réduire les
risques de décharge
électrique et de
mise en marche
involontaire, éteignez
et débranchez
l’aspirateur avant tout
entretien.
IMPORTANT : Retirez la
brosse rotative avant de
procéder au rinçage.
IMPORTANT : NE
LAVEZ PAS la brosse
rotative au lave-vaisselle et
ne la séchez pas dans la
sécheuse. NE PLONGEZ
PAS la brosse rotative
dans l’eau.
IMPORTANT :
L’utilisation d’une brosse
rotative mouillée dans la
buse de plancher annulera
la garantie.
ÉTAPE 1
ÉTAPE 3
ÉTAPE 4ÉTAPE 2
LE SAVIEZ-VOUS?
Le bouchon de la brosse
rotative est amovible pour
permettre le retrait facile
des cheveux et des débris.
Pour réassembler, assurezvous que le bouchon est
pressé fermement sur la
brosserotative.
37
1-800-798-7398
ACCÈS ET NETTOYAGE
DE LA BROSSE ROTATIVE
1 Faites glisser les boutons
de dégagement du boîtier
de la brosse rotative vers
l’extérieur.
2 Tirer vers le haut pour
ouvrir le boîtier de la brosse
rotative.
3 Soulevez le bouchon de
la brosse rotative pour
le retirer de la buse de
plancher.
4 Retirez les cheveux, les
fibres ou les débris qui
sont enroulés autour
de la brosse. La rainure
intégrée à la brosse permet
l’utilisation de ciseaux pour
couper les débris sans
endommager les poils.
Page 39

ÉTAPE 5 ÉTAPE 6 ÉTAPE 7
FRANÇAIS
5 La brosse rotative peut être
rincée sous l’eau courante.
Laissez la brosse rotative
sécher complètement
avant de la remettre dans
l’aspirateur.
6 Pour réassembler, tenez
la brosse rotative par son
bouchon, puis alignez
l’autre extrémité avec le
mécanisme. Placez la
brosse rotative dans la
buse de plancher en vous
assurant que le bouchon
fait face vers le haut.
7 Fermez le boîtier de la
brosse rotative. Attendez
qu’un déclic se fasse
entendre et assurezvous que les boutons
de dégagement sont
complètement fermés.
REMARQUE : La brosse rotative
tournera uniquement lorsque son
couvercle est complètement fermé
et verrouillé.
sharkclean.com
38
Page 40

GUIDE
DE DÉPANNAGE
AVERTISSEMENT : Pour réduire les risques de décharge électrique et de mise en
marche involontaire, éteignez et débranchez l’aspirateur avant tout entretien.
L’aspirateur ne ramasse pas la poussière. L’aspirateur ne ramasse pas la poussière ou ne
l’aspire que légèrement.
(Consulter la section d’entretien pour plus de renseignements.)
• Vérifiez les filtres pour voir s’ils doivent être nettoyés. Suivez les instructions de rinçage et de séchage
des filtres avant de les remettre dans l’aspirateur.
• Le récipient à poussière pourrait être plein; videz-le si tel est le cas.
• Vérifiez la buse de plancher pour voir si elle est obstruée. Retirez toute obstruction, au besoin.
• Retirez les ficelles, fibres de tapis ou cheveux qui pourraient être entourés autour de la brosse rotative.
L’aspirateur soulève les tapis de surface.
• La succion est puissante. Faites attention lorsque vous passez l’aspirateur sur les carpettes et les tapis à
bordure cousue fragile.
• Éteignez l’appareil pour désactiver la brosse rotative, et rallumez-le avec l’interrupteur coulissant.
• Ouvrez le sélecteur coulissant de puissance d’aspiration situé sur la buse de plancher pour réduire la
puissance d’aspiration.
La brosse rotative ne tourne pas.
• Si le voyant de l’indicateur du rouleau à brosse devient rouge, la brosse rotative a cessé de fonctionner.
Éteignez l’appareil immédiatement, et débranchez-le pour retirer l’obstruction. Rebranchez l’appareil dans
une prise électrique, puis rallumez l’aspirateur.
• Si le témoin lumineux de la buse de plancher s’allume en vert, cela signifie que l’obstruction a été retirée.
Sile témoin continue de s’allumer en rouge, communiquez avec le service à la clientèle au 1-800-798-7398.
• Assurez-vous que la brosse rotative a été replacée correctement si elle a été retirée.
• Assurez-vous que le boîtier de la buse de plancher est complètement fermé.
• Pendant que l’appareil est en marche, inclinez le tube pour activer la brosse rotative.
Le boîtier de la brosse rotative ne ferme pas.
• Assurez-vous que la brosse rotative a été réinsérée correctement et que l’indication «PULL» (tirer) sur le
bouchon fait face vers le haut.
La brosse rotative ne peut être réinsérée à l’intérieur de la buse.
• Assurez-vous que le bouchon de la brosse rotative est pressé fermement dans celle-ci.
Le bac à poussière ne peut pas s’enclencher dans la buse de plancher.
• Assurez-vous que le boîtier de la brosse rotative et l’accès au filtre sont complètement fermés. Appuyez
fermement sur le centre du bac à poussière de la buse de plancher jusqu’à ce qu’un déclic se fasse
entendre. L’appareil ne fonctionnera pas jusqu’à ce que le bac à poussière soit fermé et verrouillé.
L’aspirateur s’éteint tout seul ou le témoin lumineux clignote en rouge.
Cet aspirateur est muni d’un thermostat de protection du moteur qui coupe l’alimentation de l’aspirateur
lorsque celui-ci surchauffe. Dans cette éventualité, veuillez suivre les étapes suivantes pour redémarrer le
thermostat:
1. Éteignez l’aspirateur et débranchez-le.
2. Videz le récipient à poussière et nettoyez les filtres (consultez la section Entretien).
3. Vérifiez la présence d’obstruction sur la brosse rotative, puis retirez les cheveux et les fibres de tapis.
4. Laissez refroidir l’appareil pendant au moins 45minutes.
5. Branchez l’aspirateur et mettez-le en marche.
39
1-800-798-7398
Page 41

GARANTIE LIMITÉE
DE CINQ (5) ANS
La garantie limitée de 5 ans s’applique aux achats effectués auprès des détaillants autorisés de SharkNinja Operating
LLC. La garantie s’applique uniquement au premier propriétaire et au produit original et n’est pas transférable.
SharkNinja garantit ce produit contre toute défectuosité de matériau ou de main-d’œuvre pour une période de 5
ans à compter de la date d’achat, pour utilisation dans le cadre d’un usage domestique normal et si le produit est
entretenu conformément aux exigences décrites dans ce mode d’emploi, sujet aux conditions, aux exclusions et
aux exceptions ci-dessous.
Que couvre la garantie?
1. L’unité d’origine ou les composantes inusables considérées comme défectueuses, à la seule discrétion de
SharkNinja, seront réparées ou remplacées pour 5 ans à compter de la date d’achat initiale.
2. Dans les rares cas où un appareil est remplacé, la garantie prendra fin six mois après la date de réception de
l’appareil de remplacement ou le reste de la période de garantie existante, selon la période la plus longue. Si
l’appareil est remplacé, SharkNinja se réserve le droit de le remplacer par un appareil de valeur égale ou supérieure.
Qu’est-ce qui n’est pas couvert par la garantie?
Nos spécialistes de produits ou du service à la clientèle sont à votre disposition pour vous fournir toutes les options du
service de la garantie offertes, y compris la possibilité de l’améliorer et de choisir nos options de garantie de service
VIP disponibles pour certaines catégories de produits.
1. L’usure normale des pièces d’usure comme les filtres mousse, les filtres HEPA, les tampons, etc., qui
nécessitent un entretien ou un remplacement périodiques afin d’assurer le bon fonctionnement de votre
appareil n’est pas couverte par cette garantie.
2. La garantie ne s’applique pas aux appareils utilisés de façon abusive ou à des fins commerciales.
3. SharkNinja assumera les frais de retour de l’appareil à nos sites par le consommateur en vue de la réparation
ou du remplacement de l’appareil. Un montant de 19,95 $ pour les frais de retour de l’appareil sera facturé
au moment de l’expédition de l’appareil réparé ou remplacé. Nos spécialistes de produits ou du service à
la clientèle sont à votre disposition pour vous fournir toutes les options du service de la garantie offertes, y
compris la possibilité de l’améliorer et de choisir nos options de garantie de service VIP disponibles.
4. Dommages causés par une mauvaise utilisation, des abus, de la négligence lors de la manipulation ou une
mauvaise manipulation pendant le transport.
5. Dommages indirects et accessoires
6. Défauts survenus pendant l’expédition, les réparations, l’entretien ou la modification du produit ou des pièces
de celui-ci, qui ont été effectués par un réparateur non autorisé par SharkNinja.
7. Produits achetés ou utilisés à l’extérieur de l’Amérique du Nord.
Problèmes avec l’appareil et réparations sous garantie
Si votre appareil ne fonctionne pas comme il le devrait lors d’un usage domestique normal pendant la période de
garantie, rendez-vous sur le site www.sharkclean.com pour obtenir de l’information sur l’entretien du produit. Pour
obtenir de l’assistance avec les options du service de la garantie ou avec le produit, veuillez appeler notre service à la
clientèle et nos spécialistes de produits au 1-800-798-7398.
Comment présenter une demande de service sous garantie
Vous devez d’abord activer votre garantie en enregistrant votre appareil en ligne à sharkclean.com/customersupport.
(Remarque : les achats effectués directement auprès de SharkNinja sont automatiquement enregistrés et la garantie
est activée.) Vous pouvez également appeler le 1-800-798-7398 pour demander l’aide d’un spécialiste du service à
la clientèle. Veuillez noter que vous devez appeler le 1-800-798-7398 pour amorcer une demande de service sous
garantie. Les directives d’emballage et de retour de l’appareil vous seront fournies à ce moment-là.
Le service à la clientèle est ouvert du lundi au samedi, de 7 h à 23 h HE et le dimanche de 9 h à 20 h HE.
Vous pouvez faire l’achat de pièces de rechange en visitant le site sharkclean.com. Pour obtenir plus de
renseignements sur ce qui est qualifié de pièces d’usure et inusables, visitez le SharkWarranty.com.
Cette garantie vous confère des droits juridiques particuliers selon la loi; vous pouvez aussi bénéficier d’autres droits
qui varient d’une province ou d’un état à l’autre.
Certains états ou certaines provinces canadiennes n’acceptent pas l’exclusion ou la limitation de dommages
accessoires ou indirects, auquel cas cette disposition ne s’appliquerait pas.
FRANÇAIS
sharkclean.com
40
Page 42

GRACIAS
por comprar la aspiradora Shark® Rocket
REGISTRE SU COMPRA
sharkclean.com
1-800-798-7398
®
CONSEJO: El número de
modelo se encuentra en
la etiqueta que indica la
capacidad, ubicada en la
parte de atrás de su unidad.
CONSEJO: El código de
fecha se ubica en una de
las patas del enchufe del
cable de alimentación.
REGISTRE LA SIGUIENTE INFORMACIÓN
Número de modelo: ����������������������������������
Código de fecha: ������������������������������������
Fecha de compra (conserve su recibo): �����������������
Tienda de compra: �����������������������������������
ESPECIFICACIONES TÉCNICAS
Voltaje: 120V, 60Hz
Vatios: 600W
Amperios: 5A
LEA ATENTAMENTE ESTE MANUAL Y
CONSÉRVELO PARA FUTURAS REFERENCIAS.
Estas instrucciones están diseñadas para ayudarle
a entender completamente el funcionamiento de su
nueva aspiradora Shark Rocket.
41
1-800-798-7398
Si tiene alguna pregunta, llame a la línea de servicio
al cliente al 1-800-798-7398.
Page 43

ÍNDICE
ESPAÑOL
Instrucciones importantes de seguridad . . . . . . . . . . . . . . . . 43
Nociones básicas sobre su aspiradora Shark® Rocket® . . . . 45
Montaje de la aspiradora . . . . . . . . . . . . . . . . . . . . . . . . . . . . . . 47
Configuración de velocidad . . . . . . . . . . . . . . . . . . . . . . . . . . .49
Control de succión � � � � � � � � � � � � � � � � � � � � � � � � � � � � � � � � � � � � � � 49
Selección de la configuración y
el cepillo giratorio adecuados . . . . . . . . . . . . . . . . . . . . . . . . . .50
Cepillo giratorio multisuperficies � � � � � � � � � � � � � � � � � � � � � � � � � � 50
Cepillo giratorio suave para pisos duros � � � � � � � � � � � � � � � � � � � 50
Utilización de la aspiradora . . . . . . . . . . . . . . . . . . . . . . . . . . . . 51
¿Qué significa la luz indicadora del cepillo giratorio? � � � � � � � � 50
Almacenamiento . . . . . . . . . . . . . . . . . . . . . . . . . . . . . . . . . . . . . 52
Mantenimiento . . . . . . . . . . . . . . . . . . . . . . . . . . . . . . . . . . . . . . . 53
Vaciado del recipiente para el polvo � � � � � � � � � � � � � � � � � � � � � � 53
Limpieza de los filtros � � � � � � � � � � � � � � � � � � � � � � � � � � � � � � � � � � � 55
Acceso y limpieza del cepillo giratorio � � � � � � � � � � � � � � � � � � � � 57
Guía de solución de problemas . . . . . . . . . . . . . . . . . . . . . . . . . 59
Notas . . . . . . . . . . . . . . . . . . . . . . . . . . . . . . . . . . . . . . . . . . . . . . .60
Garantía . . . . . . . . . . . . . . . . . . . . . . . . . . . . . . . . . . . . . . . . . . . . . 62
sharkclean.com
42
Page 44

INSTRUCCIONES IMPORTANTES DE SEGURIDAD
PARA USO DOMÉSTICO ÚNICAMENTE
ADVERTENCIA
Para reducir el riesgo de lesiones, incendios, electrocución y daños a la
propiedad como resultado del uso incorrecto del aparato, siga atentamente
las siguientes instrucciones. Esta unidad contiene conexiones eléctricas y
piezas móviles que presentan un riesgo potencial para el usuario.
LA BOQUILLA DE PISO, EL
VÁSTAGO Y EL MANGO CONTIENEN
CONEXIONES ELÉCTRICAS:
• Estas no son piezas reparables.
• No las utilice para aspirar ningún líquido.
• No las sumerja en agua.
•
Si el mango/vástago está dañado,
suspenda el uso.
1 Revise que el enchufe y el cable de
alimentación no estén dañados antes de
usar. NO use la aspiradora si tiene el cable
o el enchufe dañados. Apague todos los
controles antes de enchufar o desenchufar
la aspiradora. Guarde la aspiradora con el
cable de alimentación bien sujeto alrededor
de los dos ganchos para cable.
2 NO use la aspiradora al aire libre ni sobre
superficies mojadas; úsela únicamente
sobre superficies secas.
3 Desenchufe la aspiradora del tomacorriente
cuando no la esté utilizando y antes de
realizarle mantenimiento.
4 Si la aspiradora no funciona como debería
o se ha caído, dañado, dejado al aire libre
o caído al agua, devuélvala a SharkNinja
Operating LLC para su revisión, reparación
o ajuste.
5 NO tire de la aspiradora ni la transporte por
el cable, y no use el cable como mango.
6 NO desenchufe la aspiradora tirando
del cable; para desenchufarla, agarre el
enchufe, no el cable.
7 NO manipule el enchufe ni la aspiradora
con las manos mojadas.
8 NO pase la aspiradora por encima del
cable de alimentación, cierre una puerta
por la que pasa el cable ni tire del cable en
esquinas filosas.
9 No se recomienda el uso de cables de
extensión.
10 NO deje la aspiradora sin supervisión
cuando esté enchufada.
11 Mantenga el cable alejado de las
superficies calientes.
12
Apague siempre la aspiradora antes de
conectar o desconectar el cabezal motorizado.
USO GENERAL
13 Use la aspiradora únicamente según se
describe en este manual.
1 4 Mantenga su área de trabajo bien
iluminada.
15 Mantenga la aspiradora en movimiento
sobre la alfombra en todo momento para
evitar dañar las fibras de la alfombra.
16 NO coloque la aspiradora sobre superficies
inestables como sillas o mesas.
17 NO coloque ningún objeto en las aberturas.
NO use la aspiradora si tiene alguna
abertura obstruida; manténgala libre de
polvo, pelusas, pelos y cualquier cosa que
pueda disminuir el flujo de aire.
18 NO permita que los niños usen el aparato.
Es necesario prestar mucha atención
cuando se use la aspiradora cerca de los
niños. Esto no es un juguete.
43
1-800-798-7398
Page 45

CONSERVE ESTAS INSTRUCCIONES
LEA ATENTAMENTE ESTE MANUAL ANTES DE USAR
ESPAÑOL
19 NO use la aspiradora sin el recipiente para
el polvo y/o los filtros puestos.
20 NO use la manguera si el flujo de aire se
encuentra restringido; si se obstruyen los
pasos de aire o la boquilla de piso, apague la
aspiradora y desenchúfela del tomacorriente.
Retire todas las obstrucciones antes de
volver a encender la unidad.
21 Mantenga la boquilla lejos de pelo, cara,
dedos, pies descalzos o ropa suelta.
2 2 Use únicamente aditamentos
recomendados por el fabricante.
RECIPIENTE PARA EL POLVO/FILTROS/
ACCESORIOS
Antes de encender la aspiradora:
23 Asegúrese de que todos los filtros estén
completamente secos después de la
limpieza de rutina.
24 Asegúrese de que el recipiente para el
polvo y todos los filtros estén puestos
después del mantenimiento de rutina.
25 Asegúrese de que los cepillos giratorios
estén libres de bloqueos eliminando pelo y
fibras de alfombra.
26 Use únicamente filtros y accesorios de
marca Shark (no hacerlo anulará la garantía).
LIMPIEZA GENERAL
27 NO recoja objetos de gran tamaño.
28 NO recoja objetos duros o filosos como
vidrio, uñas, tornillos o monedas que
podrían dañar la aspiradora.
29 NO use la aspiradora para recoger polvo
de yeso, cenizas de chimenea o brasas,
ni la use para acoplar a herramientas
eléctricas para juntar polvo. Estos usos
presentan un riesgo de incendio.
30 NO recoja objetos humeantes o ardientes
como carbones calientes, colillas de
cigarrillo o fósforos.
31 NO recoja materiales inflamables o
combustibles (p.ej., líquido de encendedor,
gasolina o querosén), ni use la aspiradora
en áreas en las que estos puedan estar
presentes.
32
NO recoja soluciones tóxicas (p.ej., cloro,
amoníaco o limpiador de drenaje).
33 NO use la aspiradora en un espacio
cerrado en el que se encuentren presentes
vapores de pintura, solventes o sustancias
antipolillas, polvo inflamable, u otros
materiales explosivos o tóxicos.
34 NO aspire ningún líquido.
35 NO sumerja la aspiradora en agua ni en
otros líquidos.
36 Tenga extremo cuidado cuando limpie en
escaleras.
37 Retire el cepillo giratorio de la unidad antes
de enjuagarlo.
ENCHUFE POLARIZADO
Para reducir el riesgo de electrocución, esta
aspiradora cuenta con un enchufe polarizado
(un terminal es más ancho que el otro). Como
característica de seguridad, este enchufe
entra de una sola manera en el tomacorriente
polarizado. Si el enchufe no entra por completo
en el tomacorriente, invierta el enchufe. Si aun
así no entra, comuníquese con un electricista
calificado. NO lo fuerce en el tomacorriente ni
trate de modificarlo para que entre.
sharkclean.com
44
Page 46

NOCIONES BÁSICAS SOBRE SU ASPIRADORA
SHARK® ROCKET
¡BIENVENIDO!
Felicitaciones por
su compra. Use
este manual de
instrucciones para
conocer las excelentes
características de su
nueva aspiradora.
Desde el armado hasta
el mantenimiento,
encontrará todo aquí.
®
UNIDAD PRINCIPAL
A Interruptor de encendido/LO/HI
B Gancho superior para cable
C Vástago
D Filtros anteriores al motor
E Gancho inferior para cable
F Recipiente para el polvo
G Pedal de liberación del recipiente para
polvo
H Luz indicadora del cepillo giratorio
I Control de succión
J Liberación de la cubierta del cepillo
giratorio
K Rejilla de escape/Filtro posterior al motor
L Faros
45
1-800-798-7398
ACCESORIOS
M Cepillo giratorio multisuperficies
N Cepillo giratorio suave para pisos duros
O Estuche del cepillo giratorio
Page 47

ESPAÑOL
A
M
B
N
C
O
D
E
F
G
H
J
I
K
L
sharkclean.com
46
Page 48

CÓMO ARMAR
SU ASPIRADORA
IMPORTANTE: Antes
del montaje, inspeccione
siempre los cables en
busca de daños.
¿SABÍA QUE...?
La boquilla de piso tiene faros
LED que iluminan la superficie
del piso que se está limpiando.
Las luces se encienden
automáticamente en cualquier
configuración de velocidad.
PASO 1
47
1-800-798-7398
1 Inserte la parte superior del vástago en la parte inferior
hasta oír un clic. Asegúrese de no pellizcar los cables.
Page 49

PASO 2 PASO 3
ESPAÑOL
2 Abra la abrazadera del estuche pulsando
Press to detach holster (pulsar para
separar estuche).
Coloque la abrazadera de modo que descanse
encima del gancho inferior para cable.
Cierre la abrazadera. Oirá un clic.
3 Abra el estuche introduciendo los dos
extremos e inserte el cepillo giratorio
de repuesto. Cierre antes de utilizar
laaspiradora.
sharkclean.com
48
Page 50

CONFIGURACIÓN
DE VELOCIDAD
NOTA: Antes de pasar la
aspiradora por alfombras
o tapetes delicados,
consulte las instrucciones
de limpieza recomendadas
por el fabricante.
Menos succión
abierto
Más succión
cerrado
CONTROL DE SUCCIÓN
Esta unidad tiene una guía
de deslizamiento de control
de succión para ayudar a
empujar/jalar en alfombras
voluminosas y para disminuir la
succión al pasar la aspiradora
por tapetes. Abra para
minimizar la succión. Cierre
para una succión máxima.
49
1-800-798-7398
La aspiradora tiene en el mango un interruptor deslizante de
dos velocidades.
LO: El cepillo giratorio gira despacio.
HI: El cepillo giratorio gira deprisa.
Page 51

SELECCIÓN DE LA CONFIGURACIÓN Y EL CEPILLO
GIRATORIO ADECUADOS
ESPAÑOL
CEPILLO GIRATORIO
MULTISUPERFICIES
El cepillo giratorio multisuperficies puede
usarse en todos los tipos de piso. Está
optimizado para la limpieza profunda de
alfombras.
LO: Para la limpieza suave de pisos duros
y tapetes.
HI: Para la limpieza profunda de alfombras
y eliminar suciedad incrustada.
1 Enchufe la unidad a un tomacorriente.
2 Ponga el interruptor en la posición LO para
limpiar suavemente pisos duros y tapetes.
El cepillo giratorio girará despacio.
3 Ponga el interruptor en la posición HI
para la limpieza profunda de alfombras
y eliminar suciedad incrustada. El cepillo
giratorio girará deprisa.
NOTA: Para la limpieza profunda de alfombras según la
norma ASTM F608 (suciedad incrustada en alfombras),
use el cepillo giratorio multisuperficies para alfombras en
la posición HI con el control de succión cerrado.
CEPILLO GIRATORIO SUAVE PARA
PISOS DUROS
El cepillo giratorio suave para pisos duros
puede usarse en todos los tipos de piso.
Está optimizado para la limpieza mejorada
de pisos duros.
LO: Para aspirar residuos grandes y
pesados.
HI: Para suciedad y residuos sueltos y
adheridos.
1 Enchufe la unidad a un tomacorriente.
2 Ponga el interruptor en la posición LO para
limpiar residuos grandes y pesados. El
cepillo giratorio girará despacio.
3 Ponga el interruptor en la posición HI
para limpiar suciedad y residuos sueltos y
adheridos. El cepillo giratorio girará deprisa.
sharkclean.com
50
Page 52

UTILIZACIÓN DE LA ASPIRADORA
CONSEJO: Para acceder
rápidamente al cable, gire
el gancho superior hacia
abajo y retire el cable.
Vuelva a girarlo hacia arriba
para almacenar el cable.
¿QUÉ SIGNIFICA LA
LUZ INDICADORA DEL
CEPILLO GIRATORIO?
Verde continuo
El cepillo giratorio está
encendido y funciona
correctamente.
Rojo continuo
Hay un atasco en el área del
cepillo giratorio. Apague la
aspiradora y retire la obstrucción.
Rojo intermitente*
La boquilla de piso se
recalentó. Apague la aspiradora
y espere a que se enfríe.
1 Enchufe el cable de alimentación a un tomacorriente. Pise
sobre la boquilla del piso y jale del vástago hacia atrás.
Seleccione la configuración de aspiración adecuada y
comience la limpieza. Tenga en cuenta que el cepillo
giratorio no girará a menos que el vástago se encuentre
reclinado.
*Para más instrucciones, consulte la
sección de solución de problemas.
51
1-800-798-7398
Page 53

ALMACENAMIENTO
ESPAÑOL
1 Enrolle el cable de alimentación alrededor de los ganchos para cables.
sharkclean.com
52
Page 54

MANTENIMIENTO
ADVERTENCIA: Para
reducir los riesgos
de electrocución
y de puesta en
funcionamiento
accidental, apague y
desenchufe la unidad
antes de realizarle
mantenimiento.
NOTA: Limpie la pantalla
del interior del recipiente
para el polvo según
seanecesario.
NOTA: La unidad solo
funcionará cuando el
recipiente para el polvo
esté fijo en su lugar.
NOTA: Vacíe el recipiente
para el polvo cuando los
residuos alcancen la línea
de llenado MÁX.
PASO 1
53
1-800-798-7398
CÓMO VACIAR EL RECIPIENTE PARA EL POLVO
1 Separe el recipiente extraíble del polvo de la boquilla de piso
presionando el pedal de liberación del recipiente situado a la
izquierda junto a la boquilla.
Page 55

PASO 2 PASO 3
ESPAÑOL
2 Una vez liberado el recipiente, sujételo por
el mango y súbalo para separarlo de la
boquilla de piso.
3 Sujete el recipiente para el polvo sobre una
papelera y pulse el botón EMPTY (VACIAR).
La lengüeta inferior se abrirá dejando caer
los residuos.
sharkclean.com
54
Page 56

FILTER
ACCESS
MANTENIMIENTO
ADVERTENCIA: Lave
los filtros a mano con
agua, así impedirá
cualquier daño de
productos químicos
de limpieza. Deje
secar por completo
TODOS los filtros
antes de volver a
colocarlos en la
aspiradora a fin de
evitar que penetre
líquido en las partes
eléctricas.
Pestillo de acceso al filtro
CRONOGRAMA
RECOMENDADO PARA
LA LIMPIEZA DE LOS
FILTROS:
Kit de filtros anterior al
motor
(espuma y fieltro)
XFFH400
Limpiar una vez al mes.
Filtro posterior al
motor
XEXFH400
Limpiar una vez al año.
Espuma
Fieltro
CÓMO LIMPIAR LOS FILTROS
Filtros anteriores al motor
Acceda a los filtros anteriores al motor presionando el pestillo
FILTER ACCESS (ACCESO A FILTRO) de la parte superior
del recipiente para el polvo. Retire y enjuague con agua los
filtros de espuma y fieltro. Dé golpecitos para sacar la tierra
de los filtros entre los lavados, según sea necesario. Una
vez completamente secos, inserte primero el filtro de fieltro y
después coloque el filtro de espuma encima de él.
55
1-800-798-7398
Page 57

ESPAÑOL
Filtro posterior al motor
Acceda al filtro posterior al motor en la parte superior de la boquilla de piso. Retire y enjuague
con agua.
sharkclean.com
56
Page 58

MANTENIMIENTO
ADVERTENCIA: Para
reducir los riesgos
de electrocución
y de puesta en
funcionamiento
accidental, apague y
desenchufe la unidad
antes de realizarle
mantenimiento.
IMPORTANTE: Retire el
cepillo giratorio antes de
enjuagarlo.
IMPORTANTE: NO
coloque el cepillo giratorio
en el lavaplatos para
lavarlo ni en la secadora
para secarlo. NO sumerja
el cepillo giratorio en agua.
IMPORTANTE: Utilizar
un cepillo giratorio
húmedo en la boquilla de
piso anulará la garantía.
PASO 1
PASO 3
PASO 4PASO 2
¿SABÍA QUE...?
Se puede extraer el tapón
final del cepillo giratorio para
ayudar a quitar pelo/suciedad.
Asegúrese de acoplar
firmemente el tapón final al
cepillo giratorio al volver a
montarlo.
57
1-800-798-7398
ACCESO Y LIMPIEZA
DEL CEPILLO GIRATORIO
1 Deslice hacia fuera los
botones de liberación del
compartimiento del cepillo
giratorio.
2 Jale hacia arriba para abrir
el compartimiento del
cepillo giratorio.
3 Suba el tapón final del
cepillo giratorio para retirarlo
de la boquilla de piso.
4 Retire cualquier pelo, fibra o
basura que se encuentren
enredados alrededor del
cepillo giratorio. La ranura
en el cepillo giratorio permite
cortar con tijeras los residuos
sin dañar las cerdas.
Page 59

PASO 5 PASO 6 PASO 7
ESPAÑOL
5 El cepillo giratorio puede
enjuagarse con agua
corriente. Deje secar por
completo el cepillo giratorio
antes de volver a colocarlo
en la aspiradora.
6 Para volver a montar, sujete el
cepillo giratorio por el tapón
final y alinee el otro extremo
con el engranaje. Coloque el
cepillo giratorio en la boquilla
de piso con el tapón final
mirando hacia arriba.
7 Cierre el compartimiento
del cepillo giratorio. Espere
a oír un clic y asegúrese
de que los botones de
liberación están totalmente
cerrados.
NOTA: El cepillo giratorio
únicamente girará si la tapa del
cepillo giratorio está totalmente
cerrada y bloqueada.
sharkclean.com
58
Page 60

MANUAL DE SOLUCIÓN DE PROBLEMAS
ADVERTENCIA: Para reducir los riesgos de electrocución y de puesta en
funcionamiento accidental, apague y desenchufe la unidad antes de realizarle
mantenimiento.
La aspiradora no recoge la basura. No hay succión, ni siquiera leve.
(Consulte la sección Mantenimiento para obtener más información.)
• Revise los filtros para controlar si es necesario limpiarlos. Siga las instrucciones para enjuagar y
secar los filtros antes de reinsertarlos en la aspiradora.
• El recipiente para el polvo puede estar lleno; vacíe el recipiente para el polvo.
• Compruebe que la boquilla de piso no esté bloqueada; despeje los bloqueos en caso necesario.
• Elimine cualquier hilo, fibra de alfombra o cabello que pueda estar enredado alrededor del cepillo giratorio.
La aspiradora levanta los tapetes pequeños.
• La succión es potente. Tenga cuidado cuando aspire tapetes pequeños o tapetes con bordes con
costuras delicadas.
• Apague la unidad para desconectar el cepillo giratorio y vuelva a encenderla con el botón de encendido.
• Abra la guía de deslizamiento del control de succión en la boquilla de piso para disminuir la
potencia de succión.
El cepillo giratorio no gira.
• Si la luz indicadora del cepillo giratorio, que se encuentra en la boquilla de piso, se pone roja, el
cepillo giratorio ha dejado de girar. Apague la aspiradora de inmediato, desenchúfela y despeje el
bloqueo. Vuelva a enchufar la unidad a un tomacorriente y encienda la aspiradora.
• Si la luz indicadora del cepillo giratorio es verde, es señal de que el bloqueo se ha solucionado
correctamente. Si la luz sigue roja, comuníquese con el servicio al cliente al 1-800-798-7398.
• Asegúrese de haber vuelto a colocar correctamente el cepillo giratorio en caso de haberlo extraído.
• Asegúrese de que el compartimiento del cepillo giratorio de la boquilla de piso está completamente cerrado.
• Con la aspiradora encendida, recline el mango, lo cual encenderá el cepillo giratorio de manera automática.
El compartimiento del cepillo giratorio no se cerrará.
• Asegúrese de haber vuelto a insertar correctamente el cepillo giratorio con la palabra PULL (JALAR)
del tapón final mirando hacia arriba.
El cepillo giratorio no calza bien en la boquilla.
• Asegúrese de que el tapón final está acoplado firmemente al cepillo giratorio.
El recipiente para el polvo no se acopla de vuelta a la boquilla de piso.
• Asegúrese de que tanto el compartimiento del cepillo giratorio como el acceso al filtro estén
completamente cerrados. Presione firmemente en el centro del recipiente para el polvo de la
boquilla de piso hasta oír un clic. La unidad no funcionará hasta haber cerrado y bloqueado el
recipiente para el polvo.
La aspiradora se apaga sola o la luz indicadora titila en rojo.
Esta aspiradora cuenta con un termostato que protege el motor, por lo que se apagará en caso de
sobrecalentamiento. Si esto sucediera, lleve a cabo los siguientes pasos para reiniciar el termostato
del motor:
1. Apague y desenchufe la aspiradora.
2. Vacíe el recipiente para el polvo y limpie los filtros (consulte la sección Mantenimiento).
3. Compruebe si hay bloqueos en el cepillo giratorio y elimine pelo y fibras de alfombra.
4. Deje que la unidad se enfríe durante, como mínimo, 45minutos.
5. Enchufe y encienda la aspiradora.
59
1-800-798-7398
Page 61

NOTAS
ESPAÑOL
sharkclean.com
60
Page 62

NOTAS
61
1-800-798-7398
Page 63

GARANTÍA LIMITADA
DE CINCO (5) AÑOS
La garantía limitada por 5 años se aplica a compras realizadas a vendedores minoristas autorizados de SharkNinja
Operating LLC. La cobertura se aplica solo al propietario original y al producto original, y no puede transferirse.
SharkNinja garantiza que la unidad estará libre de defectos de materiales y de mano de obra durante un período de 5 años
desde la fecha de compra, cuando se use en condiciones domésticas normales y se conserve de acuerdo con los requisitos
descritos en este manual de instrucciones, con sujeción a las siguientes condiciones y exclusiones.
¿Qué cubre mi garantía?
1. La unidad original y/o los componentes que no se gastan que se consideren defectuosos, a sola discreción de
SharkNinja, serán reparados o reemplazados durante un período máximo de 5 años desde la fecha de compra original.
2. En el raro caso de que se entregue una unidad de reemplazo, la cobertura de la garantía termina seis meses
después de la fecha de recepción de la unidad de reemplazo o cuando termine el plazo restante de la garantía
vigente, lo que sea mayor. Si se reemplaza la unidad, SharkNinja se reserva el derecho de reemplazar la unidad con
una unidad de igual o mayor valor.
¿Qué no cubre mi garantía?
Nuestros especialistas de atención al cliente y de productos están a su disposición para proporcionar todas las
opciones de servicio de garantía disponibles para usted, incluida la posibilidad de mejorar su garantía a nuestras
opciones de servicio de garantía VIP para categorías de productos exclusivas.
1. Esta garantía no cubre el desgaste normal de las partes que se gastan, como los filtros de espuma, filtros HEPA,
almohadillas, etc., que requieren mantenimiento regular y/o reemplazo para asegurar el funcionamiento adecuado
de su unidad.
2. Cualquier unidad que haya sido alterada o usada con fines comerciales.
3. SharkNinja cubrirá el costo de envío de la unidad por parte del cliente para ser reparada o reemplazada. Se cobrará
una tarifa de 19,95 USD para cubrir el costo de envío al momento de realizar el envío para devolver la unidad
reparada o reemplazada. Nuestros especialistas de atención al cliente y de productos están a su disposición para
proporcionar todas las opciones de servicio de garantía disponibles para usted, incluida la posibilidad mejorar su
garantía a nuestras opciones de servicio de garantía VIP.
4. Daños causados por el uso incorrecto, el abuso, la manipulación negligente o el mal trato durante el transporte.
5. Daños emergentes o incidentales.
6. Defectos causados por daños provocados en el transporte o las reparaciones, el servicio, o alteraciones al
producto o a cualquiera de sus partes que hayan sido realizadas por un técnico no autorizado por SharkNinja o que
resulten de estos.
7. Productos comprados, usados u operados fuera de Norteamérica.
Problemas con su unidad/Cómo solicitar el servicio
Si su electrodoméstico no funciona adecuadamente cuando se usa en condiciones domésticas normales dentro del
período de garantía, visite www.sharkclean.com para obtener instrucciones de cuidado/mantenimiento del producto
que usted mismo pueda llevar a cabo. Nuestros especialistas de atención al cliente/productos también están a su
disposición llamando al 1-800-798-7398 para brindarle asistencia para el producto y opciones de servicio de garantía.
Cómo iniciar un reclamo de garantía
Primero, debe activar su garantía registrando su unidad en línea en sharkclean.com/customersupport. (Nota: Las
compras realizadas directamente a SharkNinja se registran automáticamente y se activa la garantía). De manera
alternativa, puede llamar al 1-800-798-7398 para que un especialista de atención al cliente lo ayude. Tenga en cuenta
que debe llamar al 1-800-798-7398 para iniciar un reclamo de garantía. Las instrucciones de devolución y embalaje se
proporcionarán en ese momento.
La línea de atención al cliente está abierta de lunes a sábado de 7 a. m. a 11 p. m. hora oficial del este (eastern
standard time, EST) y el domingo de 9 a. m. a 8 p. m. EST.
Se pueden comprar piezas de reemplazo disponibles en sharkclean.com. Para obtener más información sobre lo que
se clasifica como partes que se gastan y partes que no se gastan, visite SharkWarranty.com.
Esta garantía le otorga derechos legales específicos, y usted también puede tener otros derechos que varían según el estado.
Algunos estados no permiten la exclusión o la limitación de los daños incidentales o emergentes, por lo que lo anterior
puede no ser aplicable para usted.
ESPAÑOL
sharkclean.com
62
Page 64

SharkNinja Operating LLC
US: Newton, MA 02459
CAN: Ville St-Laurent, QC H4S 1A7
1-800-798-7398
sharkclean.com
Illustrations may differ from actual product. We are constantly striving to improve
our products; therefore the specifications contained herein are subject to change
withoutnotice.
Shark and Rocket are registered trademarks of SharkNinja Operating LLC.
For SharkNinja U.S. Patent information visit
sharkninja.com/USPatents
SharkNinja Operating LLC
É.-U. : Newton, MA 02459
CANADA : Ville St-Laurent QC H4S 1A7
1-800-798-7398
sharkclean.com
Les illustrations peuvent différer du produit réel. Nous tentons constamment d’améliorer
nos produits; par conséquent, les spécifications indiquées dans le présent guide
peuvent être modifiées sans préavis.
Shark et Rocket sont des marques déposées de SharkNinja Operating LLC.
Pour obtenir de l’information sur les brevets de SharkNinja aux É.-U.,
visitez sharkninja.com/USPatents.
SharkNinja Operating LLC
EE. UU.: Newton, MA 02459
CANADÁ: Ville St-Laurent, QC H4S 1A7
1-800-798-7398
sharkclean.com
Las ilustraciones pueden diferir del producto real. Nos esforzamos constantemente
por mejorar nuestros productos, por lo que las especificaciones que se incluyen en el
presente pueden cambiar sin previo aviso.
Shark y Rocket son marcas comerciales registradas de SharkNinja Operating LLC.
Para obtener información sobre las patentes de SharkNinja en los EE.UU.,
visite sharkninja.com/USPatents
© 2016 SharkNinja Operating LLC
AH452�IB�E�F�S�160418
PRINTED IN CHINA / IMPRIMÉ EN CHINE / IMPRESO EN CHINA @sharkcleaning
 Loading...