

Shark KLIK N' FLIP S6001UK Quick Start Manual
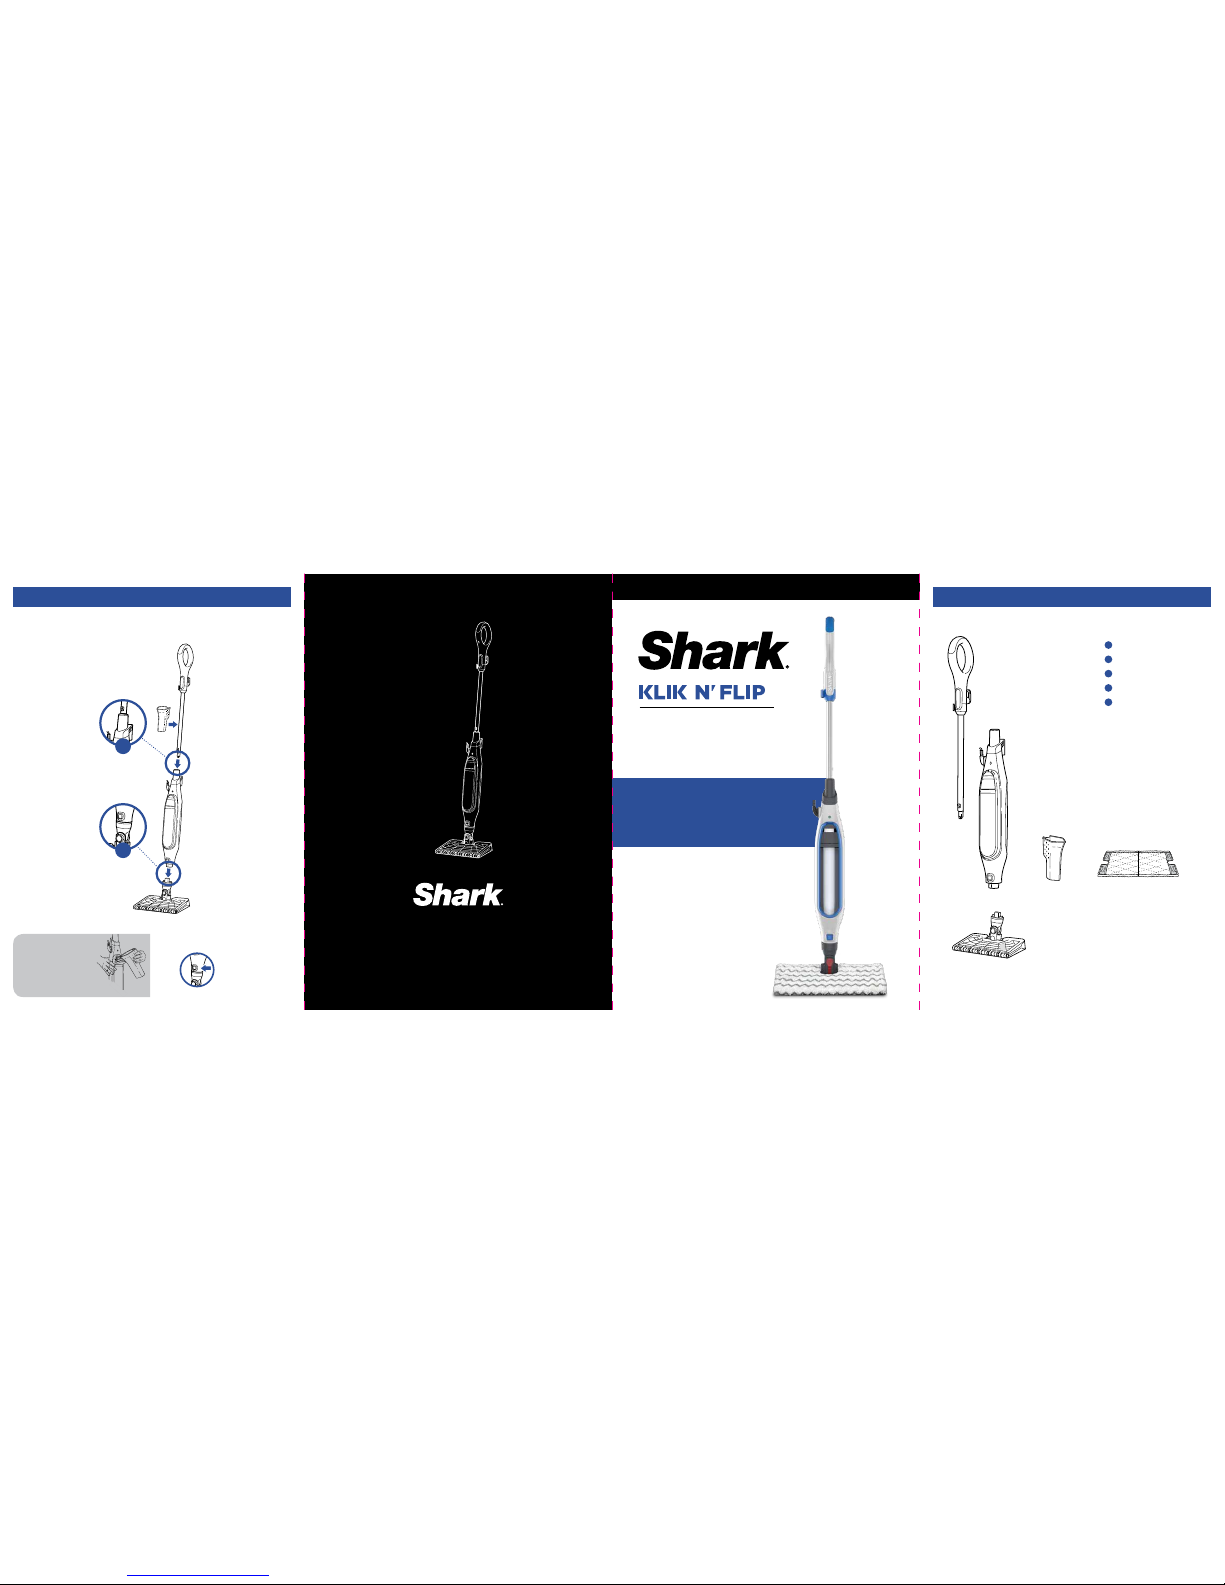
WHAT’S INSIDE:
For additional part s and accessories, visit sharkclean .eu
QUICK
START
GUIDE
ASS EM B LY
STEAM POCKET® MOP
Use this Quick Start Guide to
learn about your new Shark
Klik n’ Flip Steam Mop’s
great features.
A
Steam Mop Handle
B
Steam Mop Body
C
Klik n’ Flip Mop Head
D
Filling Flask
E
Dirt Grip™ Pad (x2)
A
B
D
C
E
Steam Pocket® Mop Assembly
1
(Click)
2
(Click)
Filling the Water Tank
Pull down on the water tan k
cap to open.
Use the filling flask to po ur
water into the tank. Do n ot
overfill. Press the wate r tank
cap firmly to close it.
TO REMOVE the Mop Head, press the release
button on the front of the mop body.
Please be sure to read the enc losed Owner’s Guide prior to using you r unit.
For questions or to register your product, contact us at:
0800 862 0453 or visit us online at sharkclean.eu
S6001UK_161006
STEAM BL ASTER
KLIK N’ FLIP MOP HEAD TECHNO LOGY
IDEAL FOR SEALED FLOORS TROUBLESHOOTING
DIRT GRIP™ PA DS
TOUCH-FREE CLEANING PAD ATTACHMENT
USING YOUR STEAM POCKET MOP
With the Klik n’ Flip Mop Head, you can quickly and easily attac h and release the Dirt Grip™ Pads
without touching them . No more wrestling with dirty, wet pads . The Dirt Grip Pads are
double sided, wash able and reusable. For pad at tachment and removal instru ctions, see
the following page.
Your Steam Mop is ideal for dee p cleaning and cutting t hrough
dirt and grime in hig h-traffic areas.
Plug into an electrical outl et. The blue light will illuminate.
It takes approximately 30 secon ds for the mop to heat up
and the steam to be ready.
Pump the handle a few times in a downward motion.
This pumping action will relea se steam as you mop, and
allows you to customize the amount of steam you want.
Begin mopping with a forwar d and backward motion.
The natural motion of moppin g will produce steam.
2
3 4
SETTING
IDEAL FOR
THESE SEALED
SURFACES
RECOMMENDED USAGE
MANUAL
Laminate
Hardwood
Marble
Tile
Stone
Cleaning most sealed surfaces and large areas
Basic, everyday cleaning
Removing spots and smaller messes
Cleaning moderate and heavy-traffic areas
STEAM
BLASTER
For an extra burst of steam, you can use the Steam Blaster feature. Follow the
instructions found in the “Steam Blaster” section to the right.
PROBLEM POSSIBLE REASONS & SOLUTIONS
The Steam Mop
isn’t producing
any steam.
The Steam Mop should be securely plugged into an electrical outlet.
Check your fuse or circuit breaker or try a different outlet.
Make sure the water tank is full, the unit is plugged in, and the blue
light is illuminated steadily.
If the blue light is not illuminated, try a different electrical outlet.
Pump the handle a few times to activate steam.
If after following the above steps the Steam Mop still does not
produce any steam, contact Customer Service at 0800 862 0453.
The Steam Mop
is producing
intermittent
steam.
Make sure the water tank is full.
I am getting
streaky/cloudy
floors.
The Dirt Grip™ Pad might be dirty. If it is, flip it over to the clean side
or change it entirely. If you washed the Dirt Grip Pad with powdered
detergent, then it could be damaged and require replacement.
This could also be an indication of soap or grease residue that has
accumulated on the floor. As the Steam Mop uses only a small amount of
water, it may not be enough to rinse off the accumulation of residue that
the steam is bringing to the surface. We suggest rinsing the floor with
nothing but water, letting it dry, and then steam mopping again with a clean
Dirt Grip Pad. One or more rinses will generally remove the residue.
A more stubborn case may require you to rinse the floor with a mix of
one part vinegar and two parts water* (but DO NOT put any cleaning
solutions or chemicals into the Steam Mop’s water tank.)
* Please consult your flooring manufacturer’s care and maintenance
instructions before applying any cleaning products or solutions.
It’s really hard
for me to
push/pull the
Steam Mop.
The Steam Mop might be hard to push/pull if the Dirt Grip Pad isn’t wet
enough. It should get easier to push/pull the Steam Mop after it’s been
running for a few minutes.
An overly dirty pad could also result in a harder push/pull experience.
We recommend flipping the pad over or using a clean pad.
DOUBLE SIDED, WASHABLE, REUSABLE
Our washable Dirt G rip Pads are made with fibers spe cially designed to absorb and tr ap dirt.
This gives your floors an am azing clean, with minimal strea king and short dry times .
For best cleaning re sults, we recommend r eplacing your
Dirt Grip Pads fol lowing 20 normal uses .
CLEANING PAD CARE
Machine wash the Dir t Grip Pads separately with warm
water using liquid deterge nt.
NEVER USE BLE ACH, POWDERED DETERG ENT,
OR FABRIC SOFTENE RS as they may damage
the Dirt Grip Pads.
You can purchase replaceme nt Dirt Grip Pads
and other accessories by vi siting sharkclean.eu
or calling 0800 8 62 0453.
Some parts may be availa ble at your local retailer.
Contact Customer S ervice for any other servicin g.
When you need an extra burst
of steam to clean tough, dried
messes and stuck-on stain s,
use the Steam Blaster.
1. Flip the Mop Head over so
that it is behind
the mop body.
2. Tilt the mop handle
back. This will cause the
Steam Blaster to emit
a concentrated blast of
steam onto the floor.
3.
To stop the Steam Blaster
spray, simply tilt the mop
handle forward.
4. Flip the Mop Head
back into its
original position and
continue cleaning.
1. Li ft the mop straight up by the handl e
until the Mop Head is hanging straight
down. Cen ter the Mop Head above the
pad. Press the release button on the back
of the mop body, and both sides of the
mop head will drop open.
1. L ift th e mop straight up by the
handle until the Mop Head is
hanging straight down . Press
the pad release button , and both
sides of the head will drop op en,
releasing the pad.
3. Gently press the Mop Head to the floor on
one side of the pad, and that side will click
into place.
4. Flip the other side of the head over onto
the floor to click into place.
REMOVING THE CLEANING PAD
2. Slip the mop head’s 4 corner tabs into the
4 corner pockets of the Dirt Grip™ Pad.
1
21
3
4
 Loading...