

Shark BR-304037,BR-442537,BR-373537,BR-353237,BR-455037E,BR-404027 Operating Instructions And Parts Manual
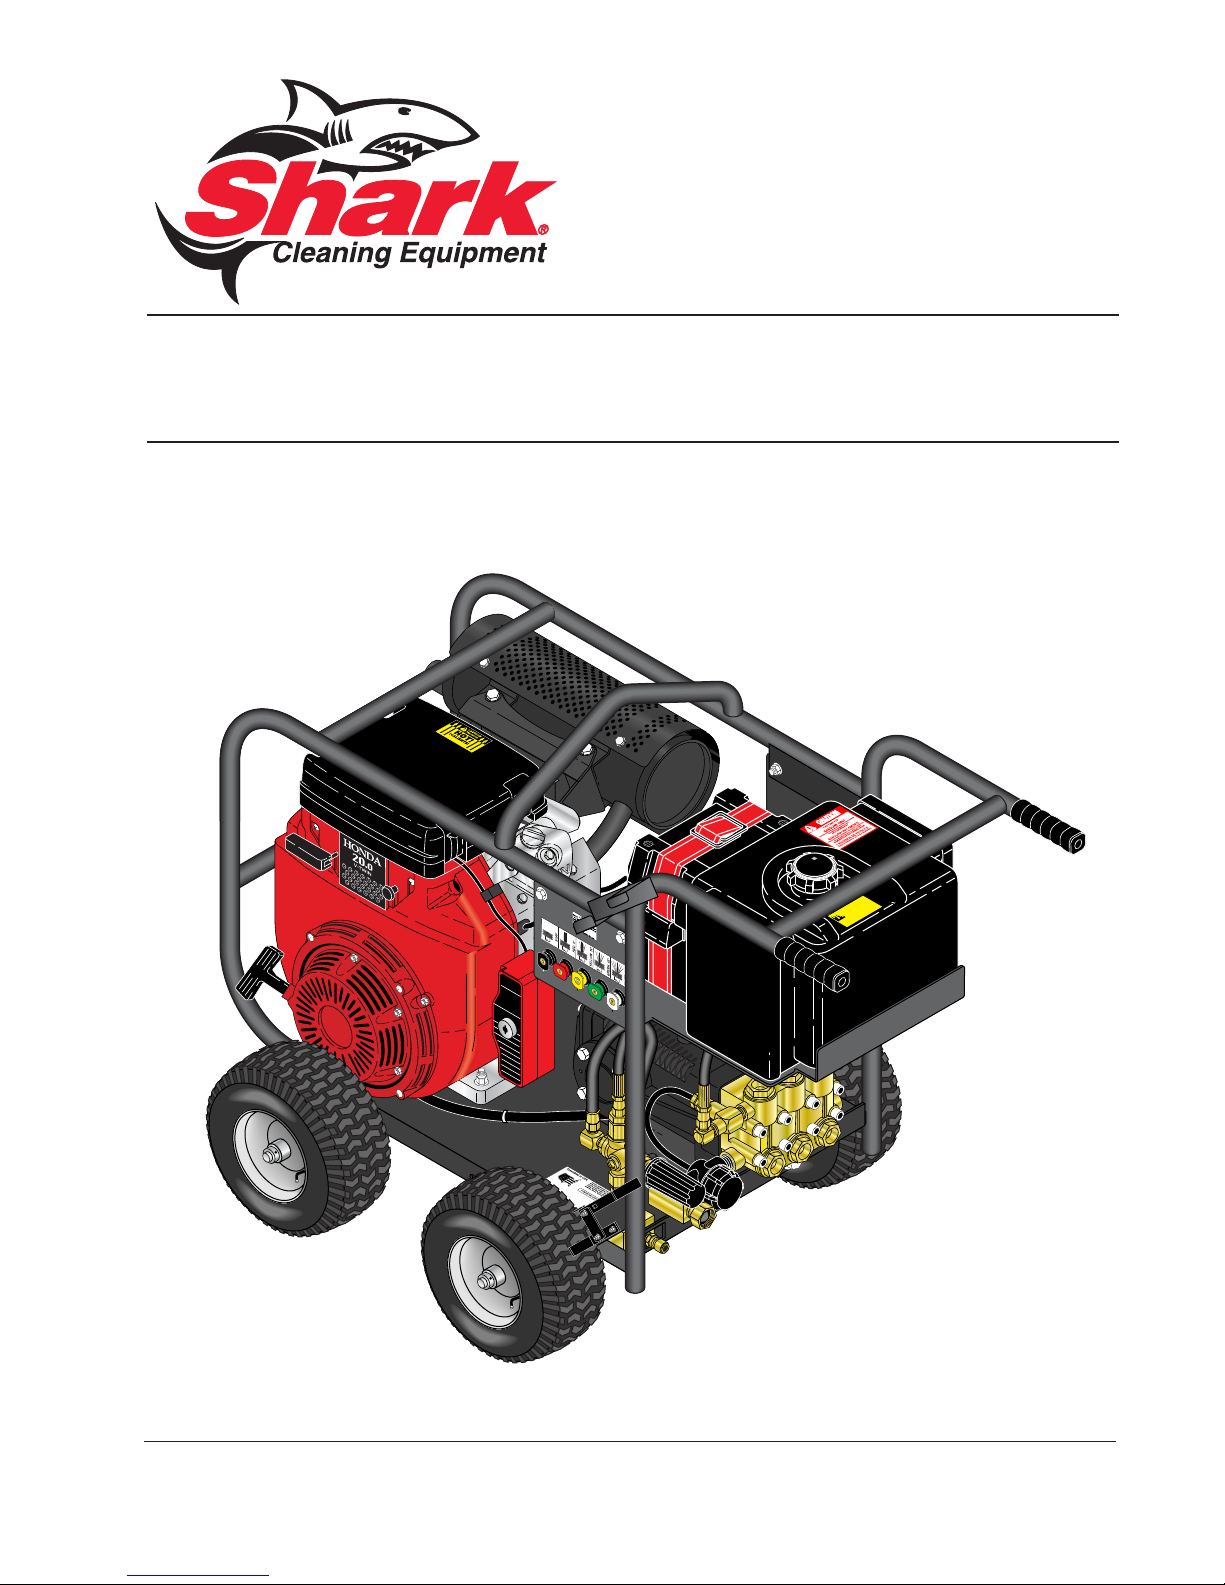
MODEL: BR
OPERATING INSTRUCTION
AND PARTS MANUAL
■ BR-304037 ■ BR-442537 ■ BR-353237
■ BR-373537 ■ BR-404027 ■ BR-455037E
For technical assistance or the SHARK dealer nearest you,
visit our website at www.shark-pw.com
97-723

Important Safety Information 4-5
Component Identifi cation Small 6
Component Identifi cation Large 7
Assembly Instructions 8
Operating Instructions 9-10
Applying Detergent and General Operating Techniques 11
Shut Down and Clean-Up 12
Storage 12
Troubleshooting 13-14
Preventative Maintenance 15
Oil Change Record 15
Exploded View - Large 16
Exploded View Parts List 17-19
Exploded View - Small 20
Exploded View Parts List 21-22
Hose and Spray Gun Assembly 23
SM Series Pump Exploded View & Parts List 24-25
ST 4035 Pump Exploded View & Parts List 26-27
SX 5050 Pump Exploded View & Parts List 28-29
VB Unloader Exploded View & Parts List 30
AR-AL Unloader Exploded View & Parts List 31
Specifi cations 32-33
Warranty
CONTENTS
Model Number _________________________________
Serial Number _________________________________
Date of Purchase _______________________________
The model and serial numbers will be found on a decal at tached
to the pressure washer. You should record both serial number and
date of purchase and keep in a safe place for future ref er ence.
3
Shark BR 97-723 • REV. 3/07
INTRODUCTION & IMPORTANT SAFETY INFORMATION
Thank you for purchasing this Pressure Washer.
We reserve the right to make changes at any time
without incurring any obligation.
Owner/User Responsibility:
The owner and/or user must have an understanding of
the manufacturer’s operating instructions and warnings
before using this pressure washer. Warning information
should be emphasized and understood. If the operator
PRESSURE WASHER
is not fl uent in English, the manufacturer’s instructions
and warnings shall be read to and discussed with
the operator in the operator’s native language by the
purchaser/owner, making sure that the operator comprehends its contents.
Owner and/or user must study and maintain for future
reference the manufacturers’ instructions.
The operator must know how to stop the machine
quickly and understand the operation of all controls.
OPERATOR’S MANUAL
Never permit anyone to operate the engine without
proper instructions.
This manual should be considered a permanent
part of the machine and should remain with it if
machine is resold.
When ordering parts, please specify model and
serial number. Use only identical replacement
parts.
This machine is to be used only by trained operators.
IMPORTANT SAFETY
INFORMATION
WARNING: To reduce the risk of
injury, read operating instructions carefully before using.
1. Read the owner's manual
thoroughly. Failure to follow
instructions could cause mal-
READ OPERATOR’S
MANUAL THOROUGHLY
PRIOR TO USE.
2. Know how to stop the machine and bleed pressure
quickly. Be thoroughly familiar with the controls.
3. Stay alert — watch what you are doing.
4. All installations must comply with local codes.
Contact your electrician, plumber, utility company
or the selling distributor for specifi c details.
function of the machine and
result in death, serious bodily
injury and/or property damage.
WARNING
WARNING: Risk of asphyxiation.
Use this product only in a well
ventilated area.
5. Avoid installing machines in
small areas or near exhaust
RISK OF
ASPHYXIATION. USE
THIS PRODUCT ONLY IN
A WELL
VENTILATED AREA.
fans. Exhaust contains poisonous carbon monoxide
gas; exposure may cause loss
of consciousness and may
lead to death. It also contains
chemicals known, in certain quantities, to cause
cancer, birth defects or other reproductive harm.
WARNING
WARNING: Risk of fi re. Do not
add fuel when the product is
operating.
WARNING: Risk of explosion —
do not spray fl ammable liquids.
RISK OF FIRE.
DO NOT ADD FUEL
WHEN OPERATING
MACHINE.
6. Do not place machine near
fl ammable objects as the engine is hot.
7. Allow engine to cool for 1-2 minutes before refueling. If any fuel is spilled, make sure the area is
dry before testing the spark plug or starting the
engine. (Fire and/or explosion may occur if this is
not done.)
Gasoline engines on mobile or portable equipment
shall be refueled:
a. outdoors;
b. with the engine on the equipment stopped;
c. with no source of ignition within 10 feet of
the dispensing point; and
d. with an allowance made for expansion of the
fuel should the equipment be exposed to a
higher ambient temperature.
In an overfi lling situation, additional precautions are
necessary to ensure that the situation is handled
in a safe manner.
WARNING: Risk of injury. Disconnect battery
ground terminal before servicing.
8. Transport/repair with fuel tank EMPTY or with fuel
shut-off valve OFF.
WARNING
WARNING: Keep wand, hose, and
water spray away from electric
wiring or fatal electric shock may
result.
9. Do not spray water on or near
electrical components.
KEEP WATER
SPRAY AWAY FROM
ELECTRICAL WIRING.
4
Shark BR 97-723 • REV. 3/07

IMPORTANT SAFETY INFORMATION
PRESSURE WASHER
WARNING
WARNING: Flammable liquids
can create fumes which can ignite, causing property damage
or severe injury.
WARNING: Risk of explosion
— Do not spray fl ammable liq-
RISK OF EXPLOSION:
DO NOT SPRAY
FLAMMABLE LIQUIDS.
uids.
10. Keep operating area clear of all persons.
WARNING
WARNING: This machine exceeds
85 db appropriate ear protection
must be worn.
EAR PROTECTION
MUST BE WORN
WARNING
WARNING: High pressure spray
can cause paint chips or other
particles to become airborne
and fl y at high speeds. To avoid
personal injury, eye, hand and
foot safety devices must be
USE PROTECTIVE
EYE WEAR
AND CLOTHING
WHEN OPERATING
THIS EQUIPMENT.
worn.
11. Eye, hand, and foot protection
must be worn when using this
equipment.
WARNING
WARNING: Grip cleaning wand
securely with both hands before
starting. Failure to do this could
result in injury from a whipping
wand.
TRIGGER GUN KICKS
BACK - HOLD WITH
BOTH HANDS
12. To reduce the risk of injury,
close supervision is necessary
when a machine is used near
children. Do not allow children
to operate the pressure washer. This machine
must be attended during operation.
WARNING
WARNING: High pressure devel-
oped by these machines will
cause personal injury or equipment damage. Keep clear of
nozzle. Use caution when operating. Do not direct discharge
RISK OF INJECTION
OR SEVERE INJURY
TO PERSONS. KEEP
CLEAR OF NOZZLE.
stream at people, or severe injury or death will result.
13. Never make adjustments on machine while in operation.
Shark BR 97-723 • REV. 3/07
14. Be certain all quick coupler fi ttings are secured
before using pressure washer.
WARNING
WARNING: Protect machine from
freezing.
15. To keep machine in best
operating conditions, it is
important you protect machine
from freezing. Failure to protect
PROTECT FROM
FREEZING
machine from freezing could
cause malfunction of the
machine and result in death,
serious bodily injury, and/or property damage. Follow storage instructions specifi ed in this manual.
16. The best insurance against an accident is precaution and knowledge of the machine.
WARNING
WARNING: Be extremely careful
when using a ladder, scaffolding
or any other relatively unstable
location. The cleaning area
should have adequate slopes
and drainage to reduce the pos-
RISK OF INJURY
FROM FALLS WHEN
USING LADDER.
sibility of a fall due to slippery
surfaces.
17. Do not overreach or stand on unstable support.
Keep good footing and balance at all times.
18. Do not operate this machine when fatigued or under
the infl uence of alcohol, prescription medications,
or drugs.
19. Inlet water must be clean fresh water and no hotter
then 90°F.
20. Manufacturer will not be liable for any changes
made to our standard machines or any components
not purchased from us.
21. Do not allow acids, caustic or abrasive fl uids to pass
through the pump.
22. Never run pump dry or leave spray gun closed
longer than 1-2 minutes.
Follow the maintenance instructions speci-
fi ed in the manual.
OPERATOR’S MAN U AL
5
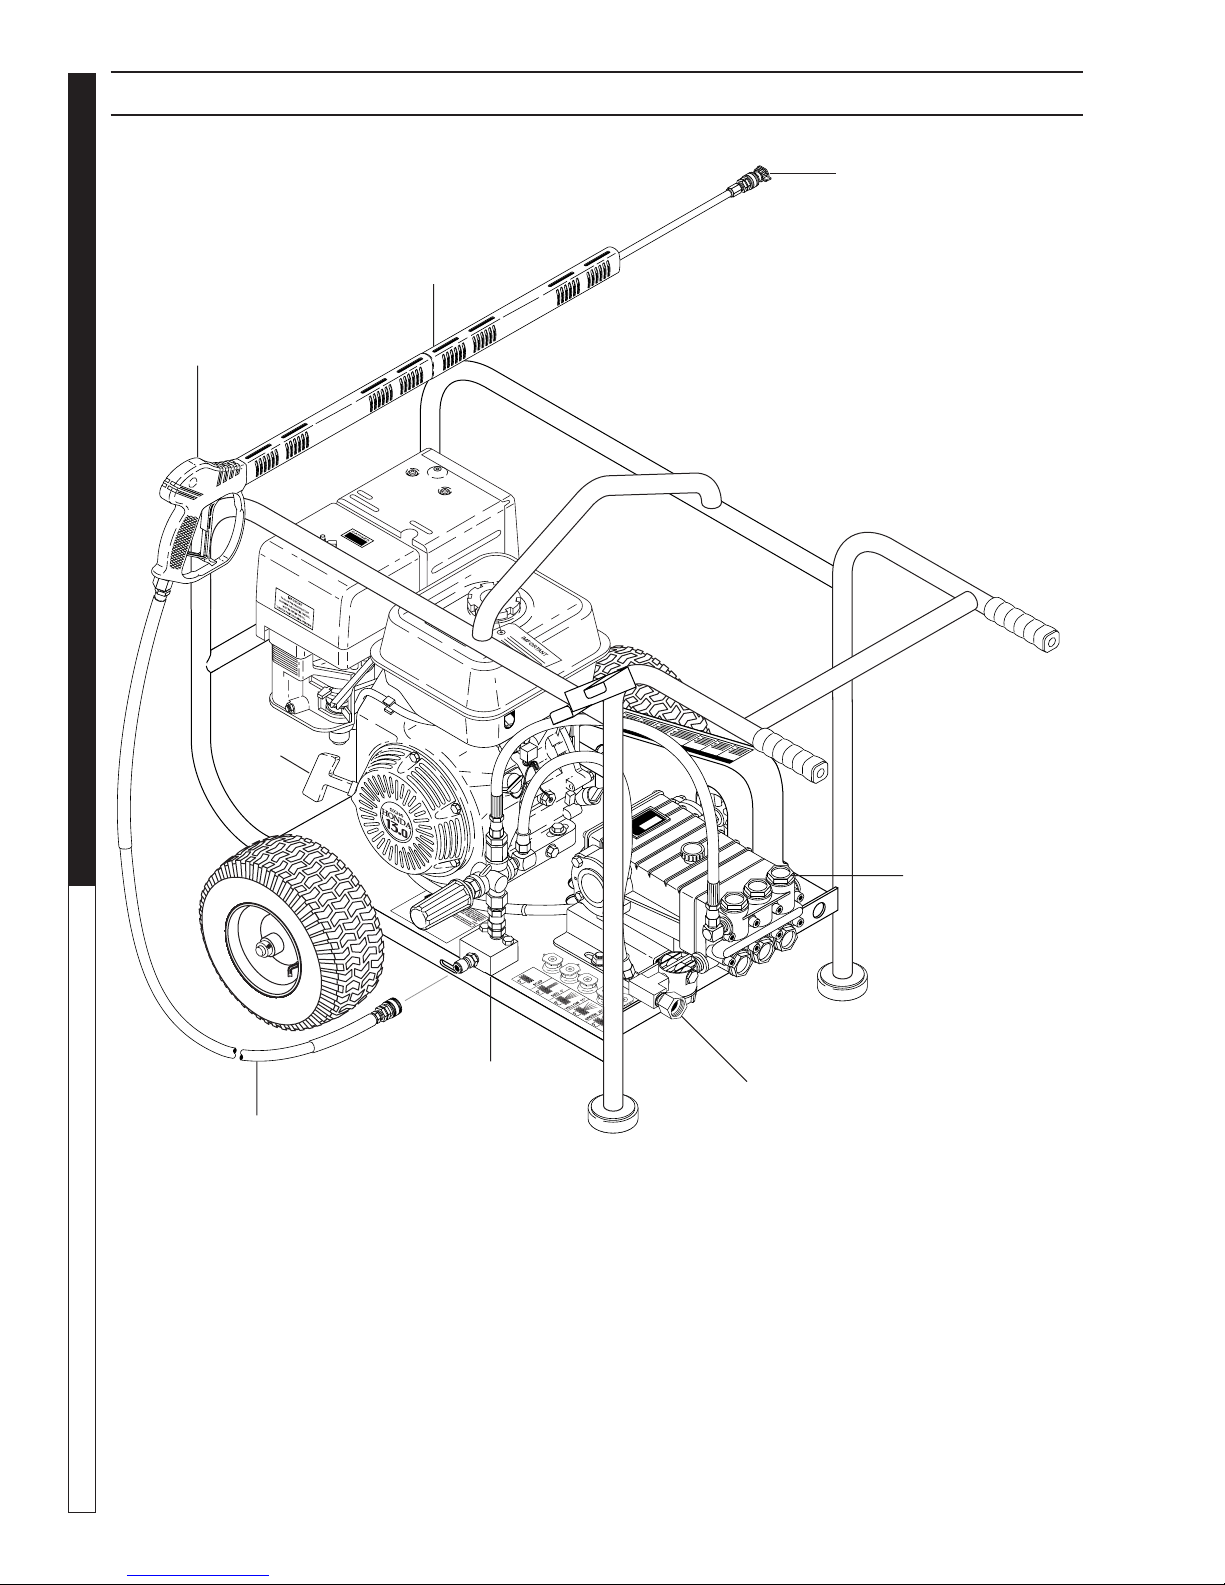
COMPONENT IDENTIFICATION — SMALL MODELS
Nozzle
Wand
PRESSURE WASHER
OPERATOR’S MANUAL
Spray Gun
Starter
Grip
Pump
High Pressure
Hose
Pump — Develops high pressure.
Starter Grip— Used for starting the engine man u al ly.
Spray Gun — Controls the application of water and
de ter gent onto cleaning surface with trigger device.
In cludes safe ty latch.
Detergent Injector — Allows you to siphon and mix
detergents (not shown).
6
High Pressure
Discharge
Shark BR 97-723 • REV. 3/07
Water Inlet
Wand — Must be connected to the spray gun.
High Pressure Hose — Connect one end to water
pump dis charge nipple and the other end to spray
gun.
Note: If trigger on spray gun is released for more
than 2 minutes, water will leak from valve. Warm
water will dis charge from pump protector onto fl oor.
This sys tem pre vents internal pump dam age.
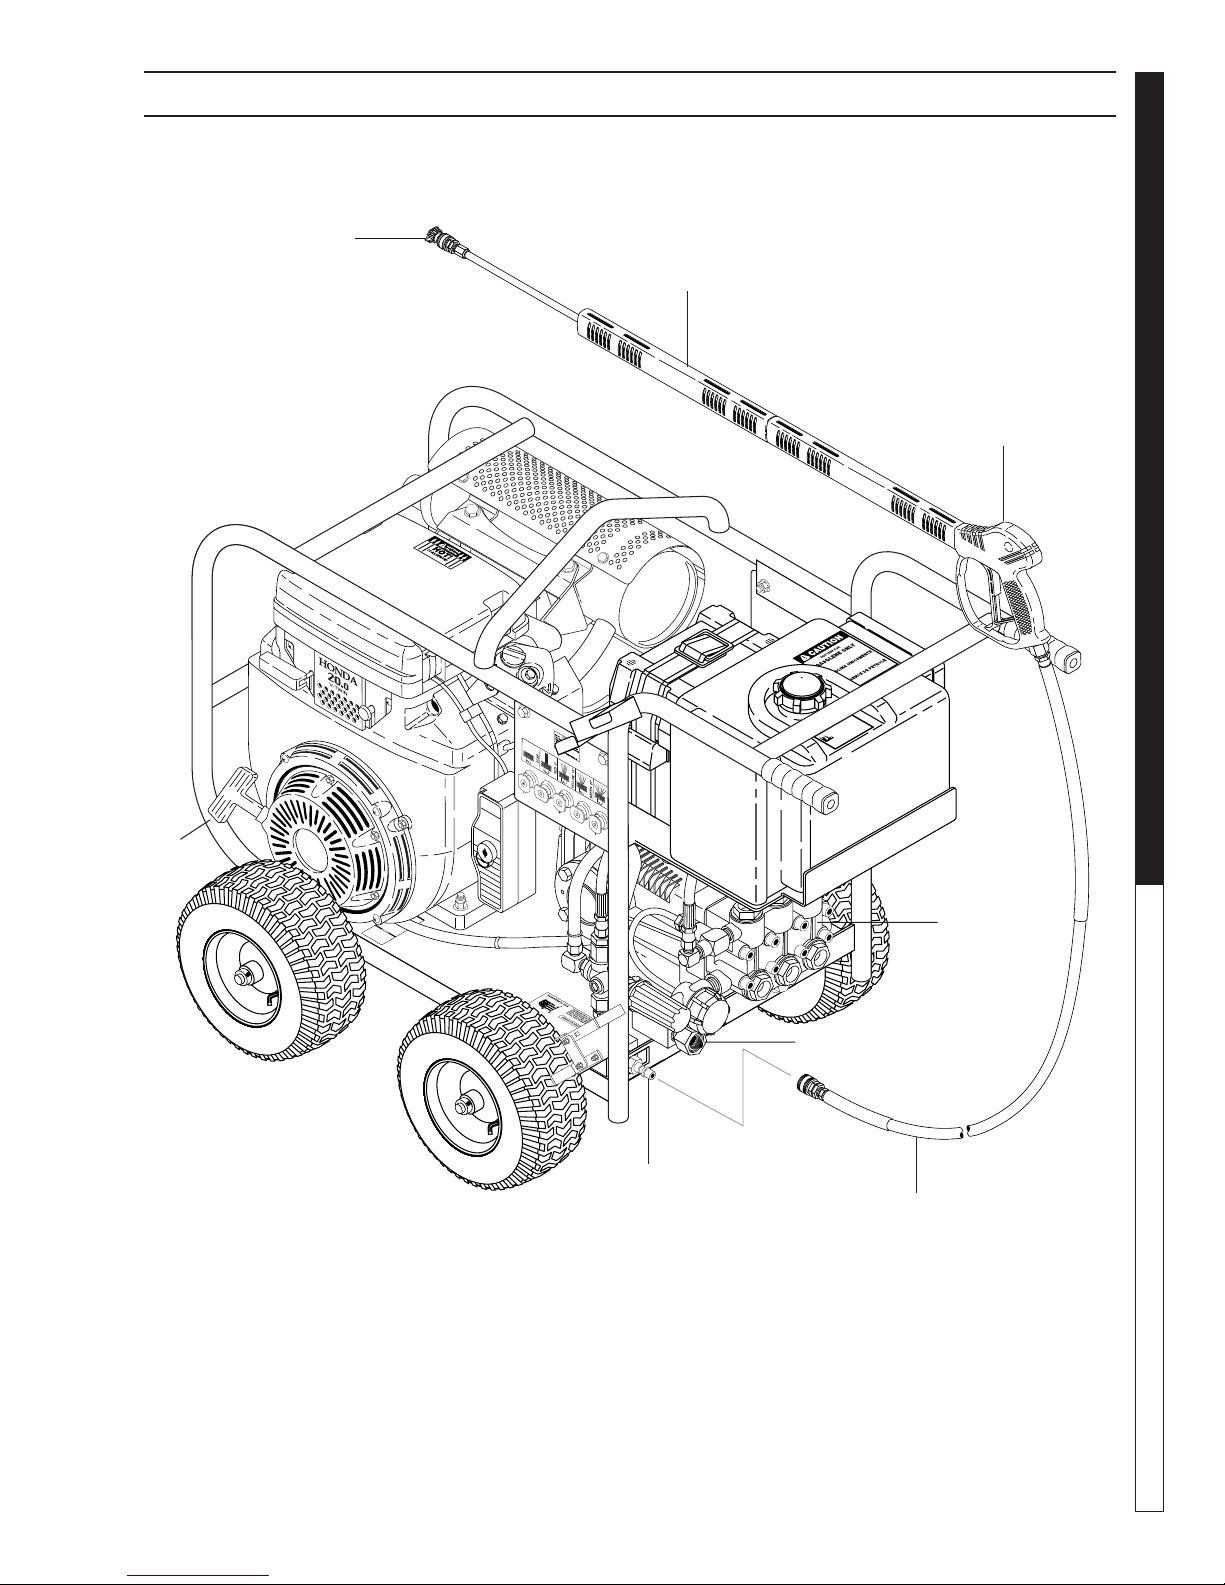
COMPONENT IDENTIFICATION — LARGE MODELS
Nozzle
Wand
Spray Gun
PRESSURE WASHER
OPERATOR’S MAN U AL
Starter
Grip
High Pressure
Discharge
Pump
Water Inlet
High Pressure
Hose
7
Shark BR 97-723 • REV. 3/07
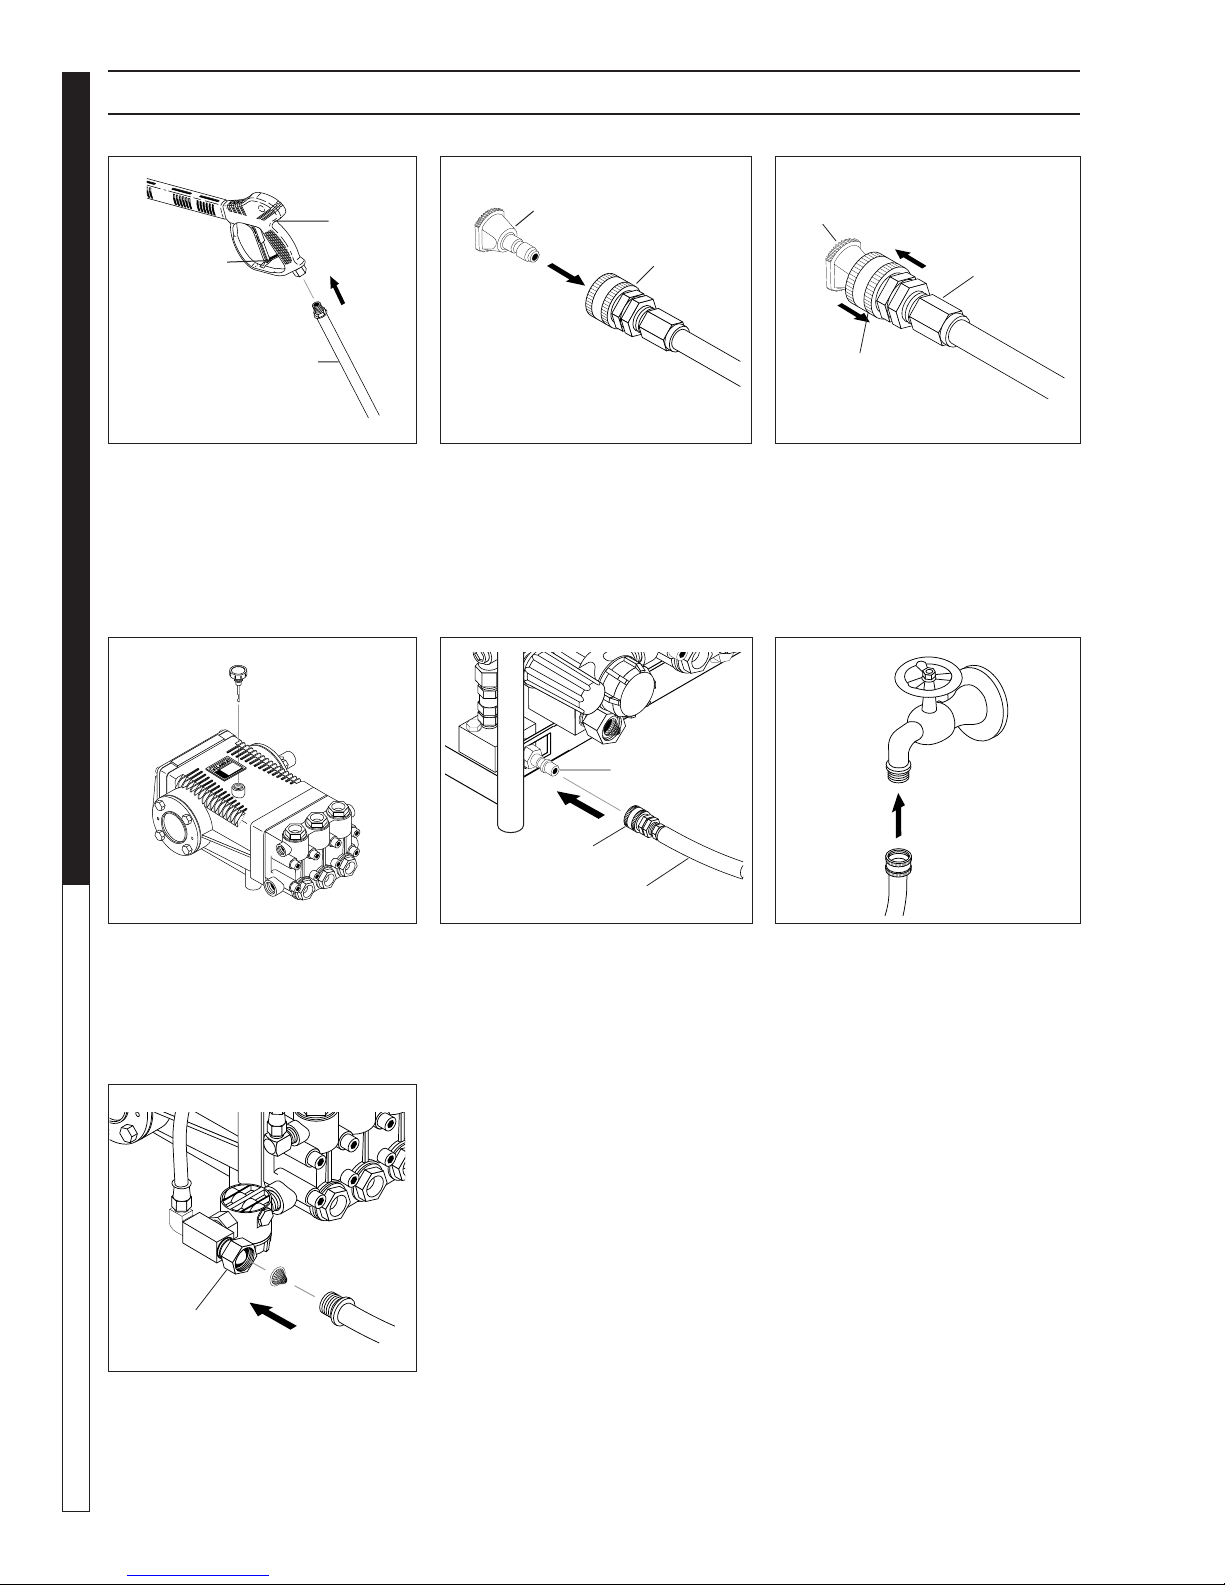
ASSEMBLY INSTRUCTIONS
Spray
Gun
Safety
Latch
PRESSURE WASHER
High Pressure
Hose
STEP 1: Attach the high pres sure
hose to the spray gun using tefl on
tape on hose threads.
OPERATOR’S MANUAL
Dipstick
Pressure
Nozzle
Wand
Coupler
STEP 2: Pull the spring-load ed col-
lar of the wand coupler back to in sert
your choice of pres sure noz zle.
Discharge
Nipple
Pressure
Nozzle
Wand
Coupler
Wand
Collar
STEP 3: Release the coupler col lar
and push the nozzle until the collar
clicks. Pull the nozzle to make sure
it is seat ed properly.
Cold
Water
Source
STEP 4: Remove shipping cap and
install oil dipstick. Check pump oil
level by using dipstick or observe
oil level in oil window (if equipped).
Use 30 wt. non detergent oil.
Pump
Water Inlet
STEP 7: Check inlet fi lters, remove
debris, then connect garden hose
to pump wa ter in let. CAU TION: Do
not run the pump with out wa ter or
pump dam age will result.
8
Garden
Hose
Coupler Collar
High Pressure Hose
STEP 5: Connect the high pres sure
hose to the pump discharge nipple.
Push coupler collar forward until
se cure.
Shark BR 97-723 • REV. 3/07
Garden
Hose
STEP 6: Connect garden hose to
the cold water source.

OPERATING INSTRUCTIONS
Engine
Oil
Dipstick
PRESSURE WASHER
Gas
Tank
OPERATOR’S MAN U AL
STEP 1: Check engine oil level. Oil level should be level with the bottom
of the oil fi ller neck. Be sure the ma chine is level when checking the oil
level. (Refer to the en gine's op er at ing manual included with machine.) We
rec om mend that the oil be changed after the fi rst 5 hours of use, then once
every 50 hours. Note: Im prop er oil levels will cause low oil sensor to shut
off engine. IMPORTANT! Do not run engine with high or low oil levels
as this will cause engine damage.
Cold
Water
Source
Garden
Hose
STEP 3: Connect garden hose
to the cold water source and turn
wa ter on completely. Never use
hot wa ter.
STEP 4: Trigger the spray gun to
elim i nate trapped air then wait for a
steady fl ow of water to emerge from
the spray noz zle.
STEP 2: Fill gas tank with un lead ed
gasoline. Do not use leaded gas o line.
Fuel
Valve
STEP 5: Rotate the fuel shut-off valve to the "On"
po si tion. Slide the fuel valve lever to the "ON" position.
When the engine is not in use, leave the fuel valve in
the "OFF" position.
STEP 6: Pull the choke knob out to the "Choke" po si tion
(on a warm engine, when in the run po si tion, leave the
choke knob in). Push the choke knob to the "Closed"
po si tion. To restart a warm engine, leave the choke knob
in the "Open" position.
Shark BR 97-723 • REV. 3/07
Choke
Knob
9
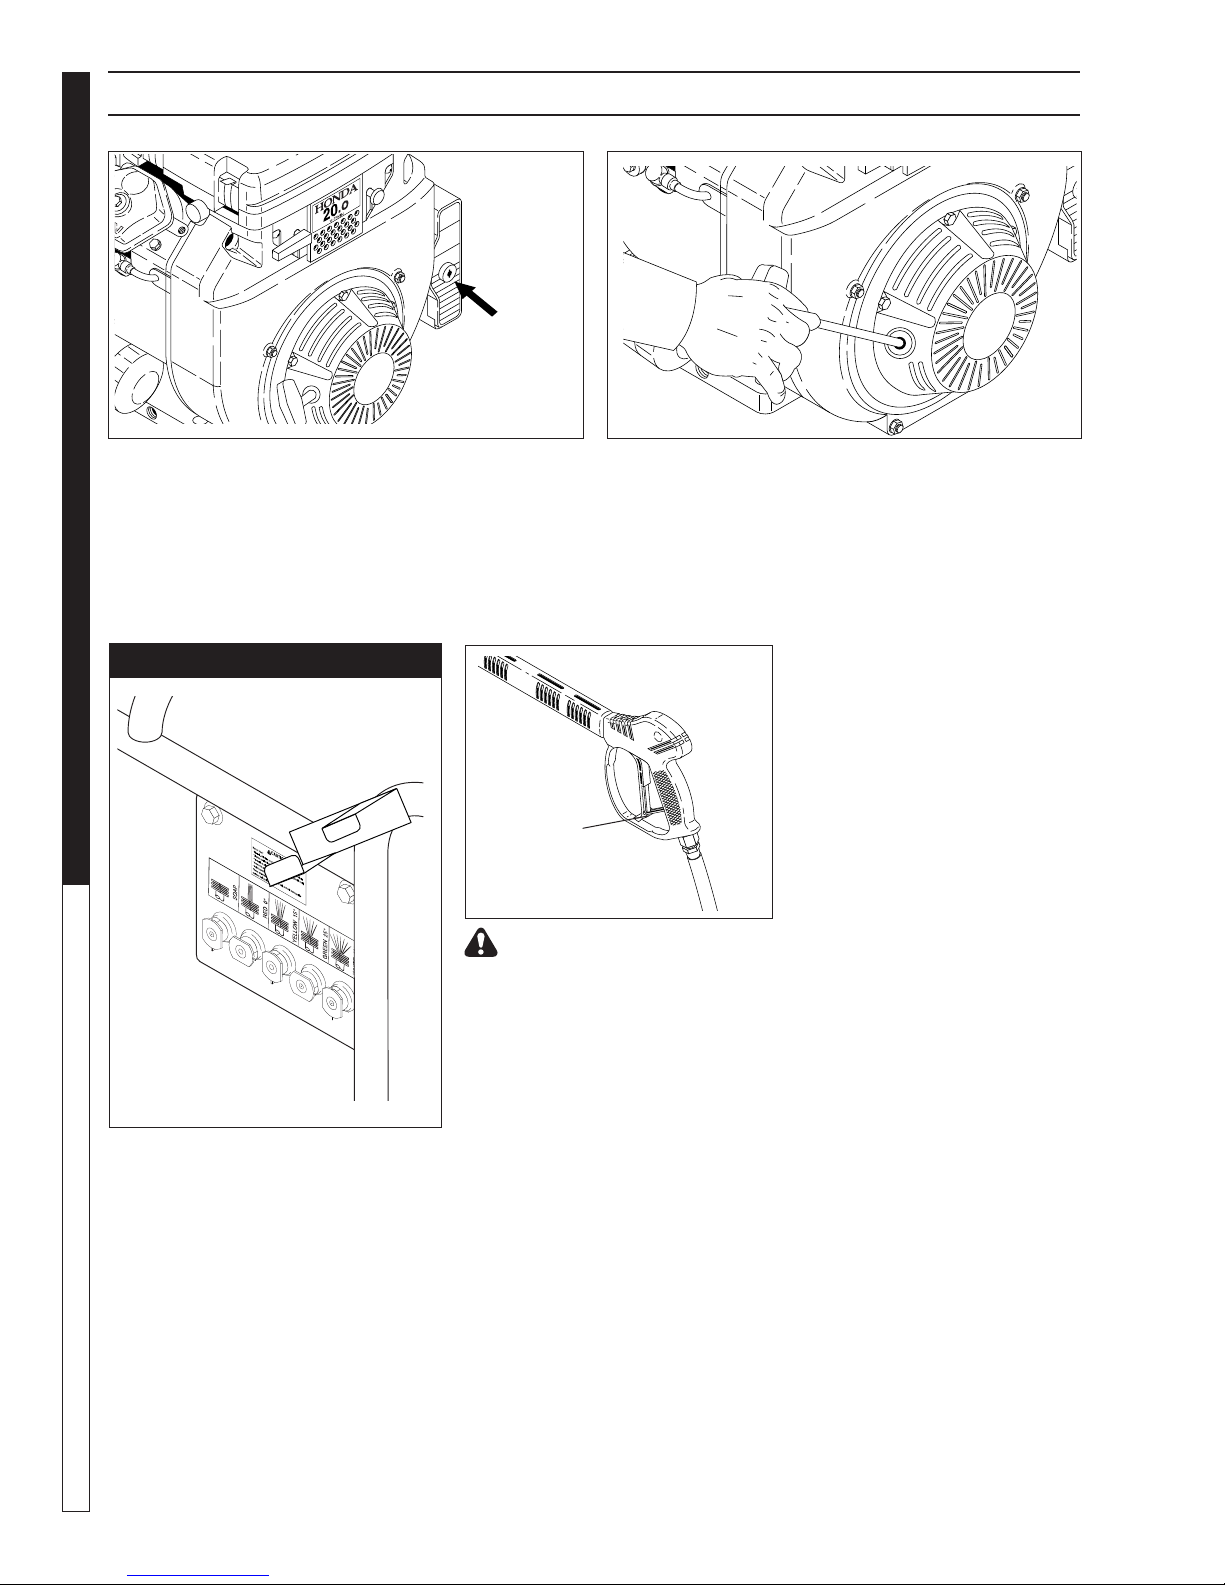
OPERATING INSTRUCTIONS (CON'T)
On-Off
PRESSURE WASHER
STEP 7: Turn the engine switch to "ON" position. STEP 8: Pull the starter grip. If the engine fails to start
OPERATOR’S MANUAL
NOZZLES
Switch
after 2 pulls, squeeze the trigger gun to release pres sure
and repeat step. Return start er gently. After the en gine
warms up enough to run smoothly, move choke to run
position and throt tle to fast position.
CAUTION: Small engines may kick back. Do not hold
pull starter grip tightly in hand.
The fi ve color-coded quick con nect
noz zles provide a wide array of spray
widths from 0° to 45° and are easily accessible when placed in the con ve nient
rubber nozzle holder, which is provided
on the front of the ma chine.
NOTE: For a more gentle rinse, se lect
the white 40° or green 25° noz zle. To
scour the surface, select the yellow 15°
or red 0° nozzle. To apply de ter gent
select the black noz zle.
Safety
Latch
WARNING! Never replace
noz zles without engaging the
safe ty latch on the spray gun
trig ger.
10
Shark BR 97-723 • REV. 3/07
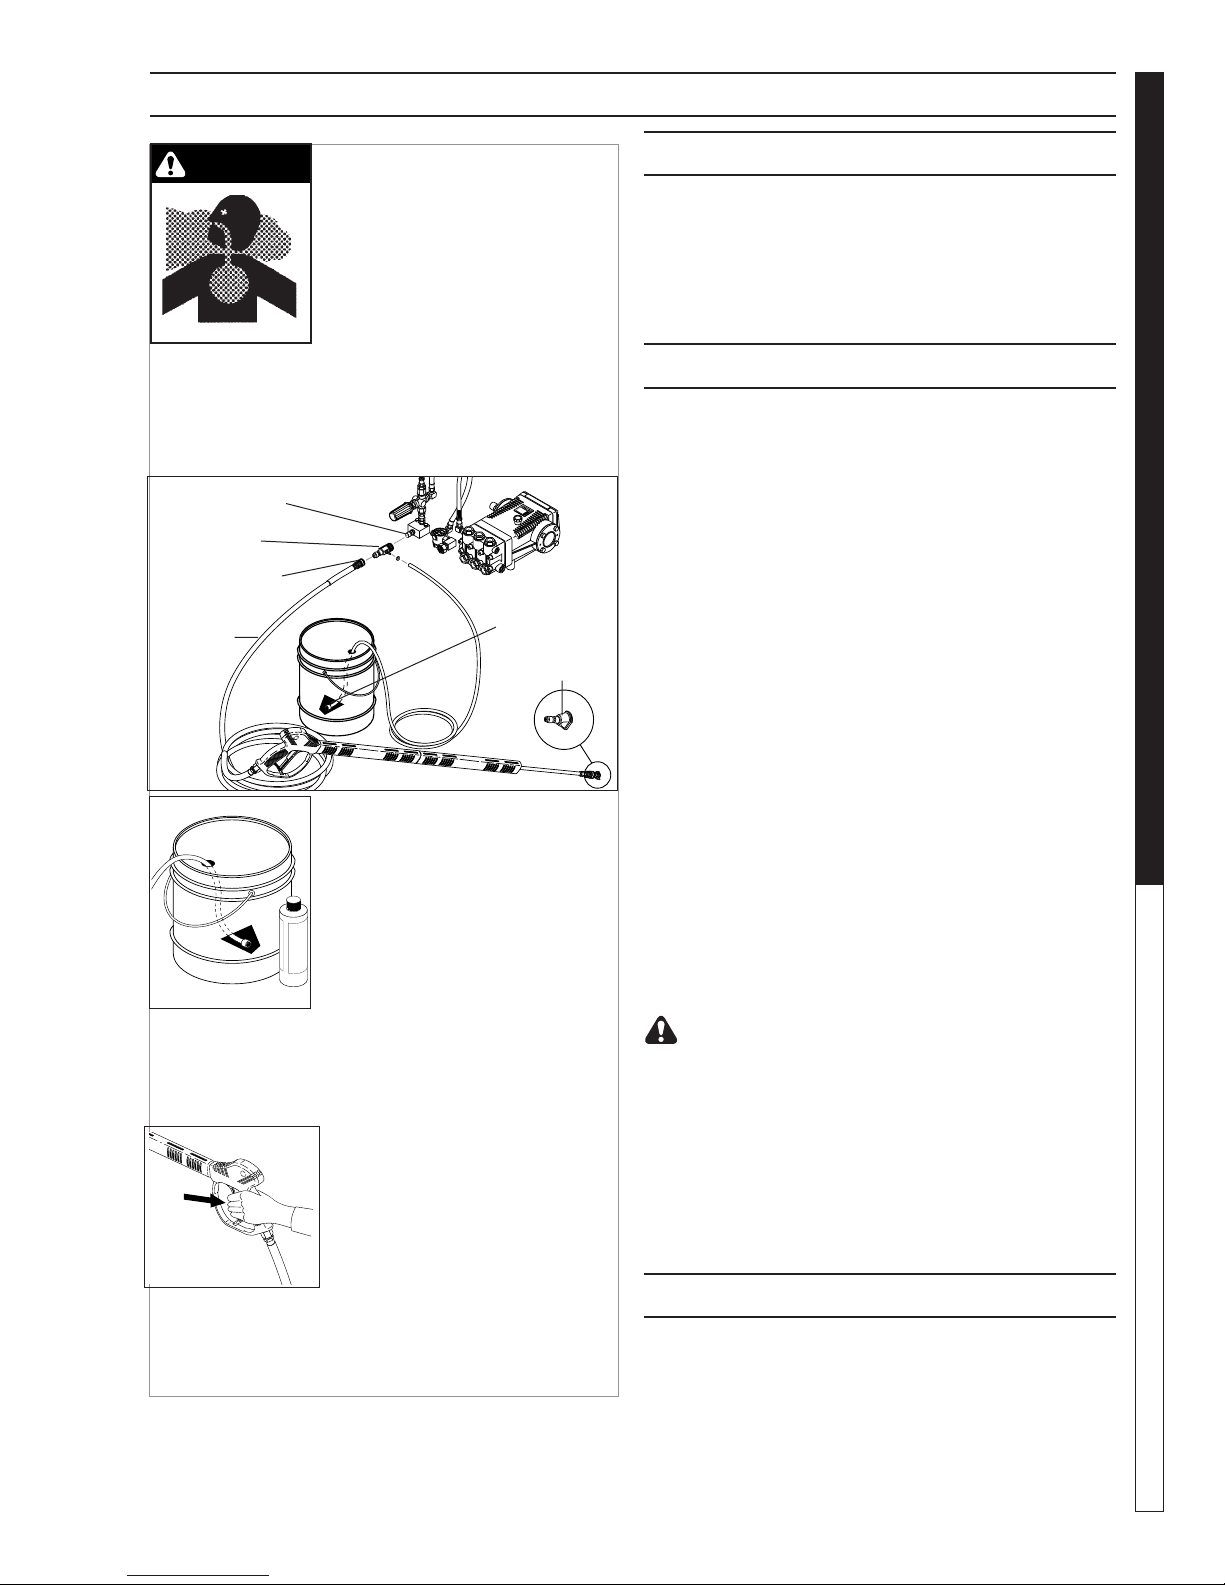
APPLYING DETERGENT AND GENERAL CLEANING TECHNIQUES
PRESSURE WASHER
WARNING
STEP 1: Connect detergent in jec tor to discharge nipple
on machine. Connect high pressure hose to in jec tor
with quick coupler. (Check to make sure locking cou pler
sleeves are in proper position before ap ply ing wa ter
pres sure).
Discharge
Nipple
Detergent
Injector
Quick Coupler
High
Pressure
Hose
WARNING: Some de ter gents
may be harm ful if in haled or
in gest ed, caus ing severe nau sea, fainting or poi son ing. The
harm ful el e ments may cause
prop er ty dam age or severe
injury.
Filter
Soap
Nozzle
THERMAL PUMP PROTECTION
If you run the engine on your pres sure wash er for 3-5
min utes with out pressing the trig ger on the spray gun,
cir cu lat ing water in the pump can reach high tem per a tures. When the water reach es this tem per a ture, the
pump pro tec tor engages and cools the pump by dis charg ing the warm water onto the ground. This ther mal
de vice pre vents internal dam age to the pump.
CLEANING TIPS
Pre-rinse clean ing surface with fresh water. Place de ter gent suc tion tube di rect ly into clean ing solution and
ap ply to sur face at low pressure (for best re sults, lim it
your work area to sec tions ap prox i mate ly 6 feet square
and al ways ap ply de ter gent from bottom to top). Allow
de ter gent to re main on sur face 1-3 min utes. Do not al low de ter gent to dry on sur face. If sur face appears to
be drying, sim ply wet down sur face with fresh water. If
need ed, use brush to re move stub born dirt. Rinse at
high pres sure from top to bottom in an even sweep ing
mo tion keep ing the spray nozzle ap prox i mate ly 1 foot
from clean ing sur face. Use over lap ping strokes as you
clean and rinse any sur face. For best surface clean ing
action spray at a slight an gle.
OPERATOR’S MAN U AL
STEP 2: Use detergent de signed
spe cifi cal ly for pres sure washers.
House hold de ter gents could dam age the pump. Pre pare detergent
so lu tion as required by the man u fac tur er. Fill a container with pres sure washer de ter gent. Place the
fi lter end of detergent suction hose
into the de ter gent container.
STEP 3: With safety latch on spray gun engaged,
se cure black soap noz zle into quick cou pler.
NOTE: De ter gent can not be ap plied using red, yellow,
green or white noz zles.
STEP 4: With the engine run ning,
pull trig ger to op er ate ma chine.
Liq uid detergent is drawn into the
ma chine and mixed with water.
Apply de ter gent to work area.
Do not al low de ter gent to dry on
sur face.
IMPORTANT: You must fl ush the detergent in jec tion
sys tem after each use by plac ing the suction hose
into a buck et of clean wa ter, then run the pres sure
wash er in low pres sure for 1-2 minutes.
Recommendations:
• Before cleaning any surface, an inconspicuous
area should be cleaned to test spray pattern and
dis tance for maximum cleaning results.
• If painted surfaces are peeling or chipping, use
ex treme caution as pressure washer may re move
the loose paint from the surface.
• Keep the spray nozzle a safe distance from the
sur face you plan to clean. High pressure wash a
small area, then check the surface for damage. If no
dam age is found, continue to pressure wash ing.
CAUTION - Never use:
• Bleach, chlorine products and other corrosive
chem i cals
• Liquids containing solvents (i.e., paint thinners,
gas o line, oils)
• Tri-sodium phosphate products
• Ammonia products
• Acid-based products
These chemicals will harm the machine and will dam age the surface
being cleaned.
RINSING
It will take a few sec onds for the de ter gent to clear.
Apply safe ty latch to spray gun. Re move black soap
noz zle from the quick cou pler. Select and in stall the
de sired high pres sure noz zle. NOTE: You can also stop
de ter gent from fl ow ing by sim ply re mov ing de ter gent
si phon hose from bottle.
11
Shark BR 97-723 • REV. 3/07
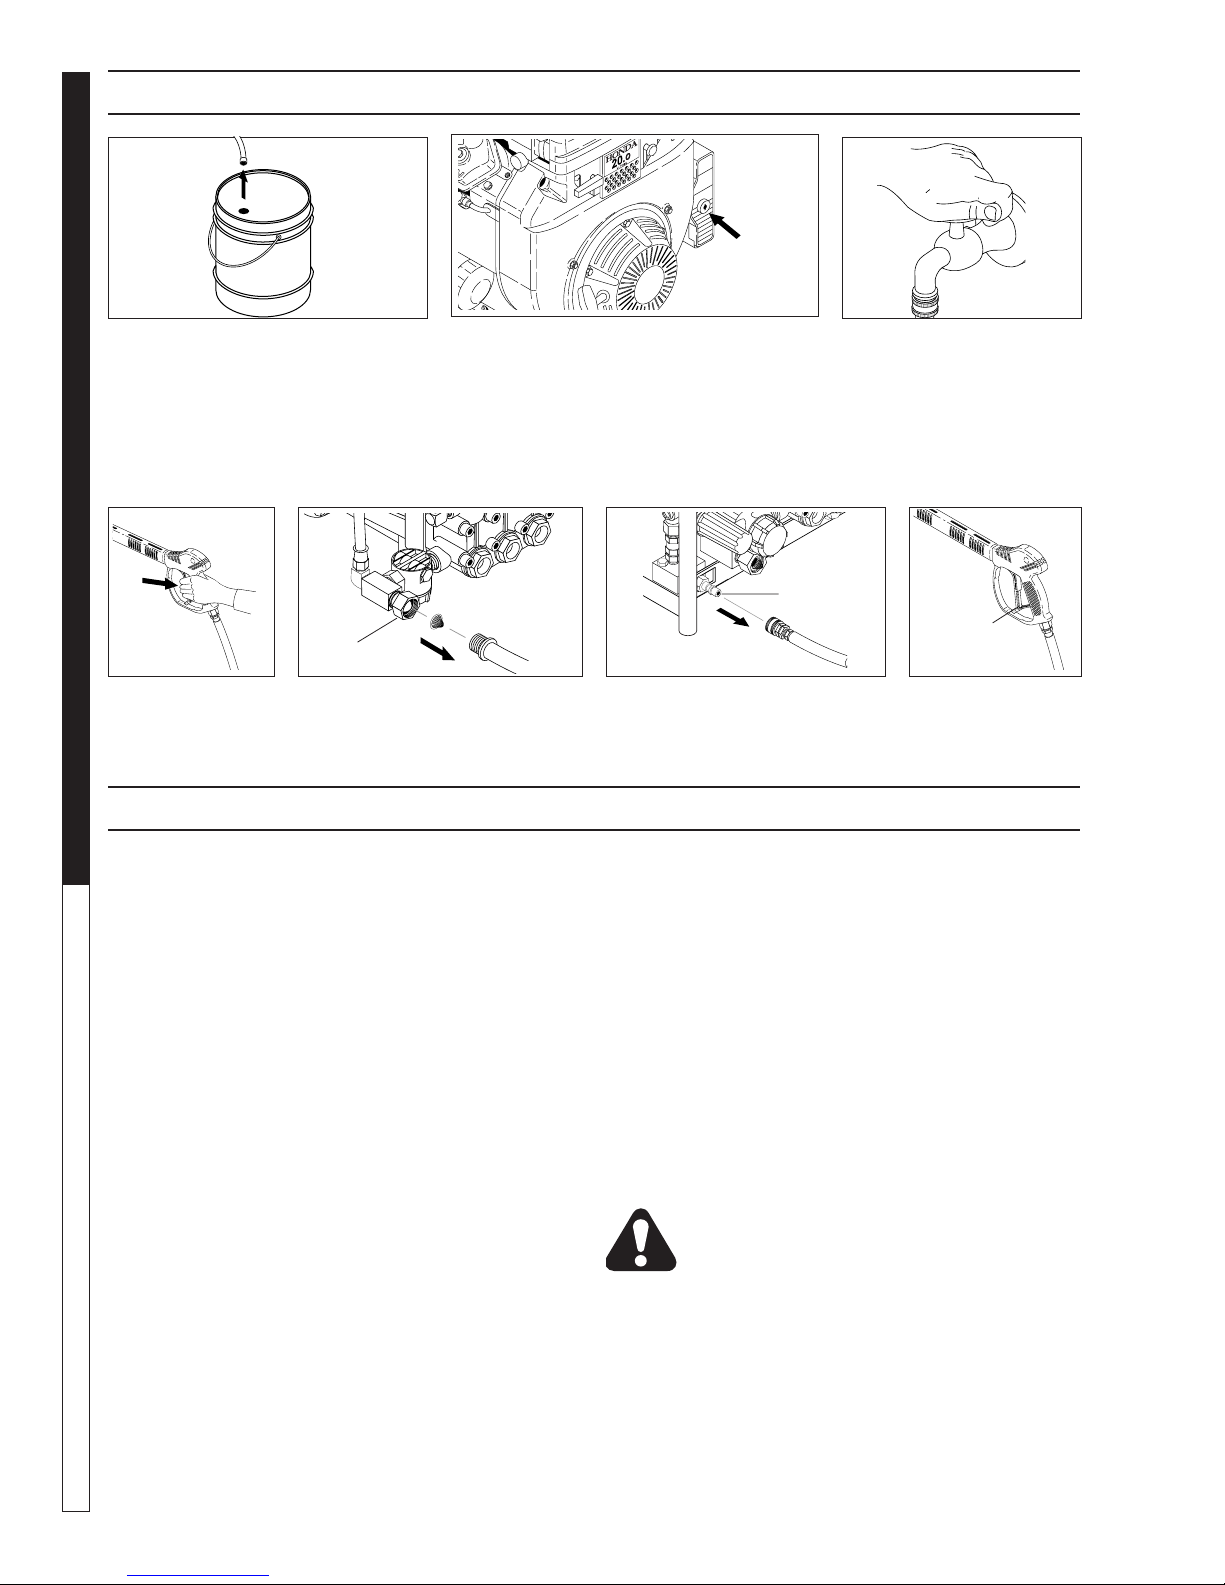
SHUTTING
DOWN
AND CLEAN-UP
On-Off
Switch
STEP 1: Remove detergent suc tion
PRESSURE WASHER
tube from container and insert into
one gallon of fresh water. Slide noz zle
for ward for low pressure or to con nect
black detergent nozzle. Pull trig ger
on spray gun and si phon water for
one minute.
OPERATOR’S MANUAL
Water
Inlet
STEP 4: Press trig-
ger to re lease wa ter
pres sure.
CAUTION: Al ways store your pressure washer in a
lo ca tion where the temperature will not fall be low
32°F (0°C). The pump in this machine is sus cep ti ble
to permanent dam age if fro zen. FREEZE DAM AGE
IS NOT COV ERED BY WARRANTY.
1. Stop the pressure washer, squeeze spray gun trig ger to release pressure.
2.
Detach water supply hose and high pressure hose.
3. Turn on the machine for a few seconds, until re main ing water exits. Turn engine off im me di ate ly.
4. Drain the gas and oil from the engine.
5.
Do not allow high pressure hose to become
kinked.
6. Store the machine and accessories in a room which
does not reach freezing temperatures.
CAUTION: Fail ure to follow the above di rec tions will
result in dam age to your pres sure washer.
When the pres sure washer is not being operated or is
be ing stored for more than one month, follow these
in struc tions:
1. Replenish engine oil to up per level.
2. Drain gas o line from fuel tank, fuel line, fuel valve
and carburetor.
3. Pour about one teaspoon of engine oil through
12
the spark plug hole, pull the starter grip several
STEP 5: Disconnect the garden
hose from the water inlet on the
machine.
STEP 2: Turn engine switch to "OFF"
position.
Shark BR 97-723 • REV. 3/07
STEP 6: Disconnect the high
pres sure hose from the discharge nipple.
STORAGE
times and re place the plug. Then pull the starter
grip slow ly until you feel increased pressure which
indicates the pis ton is on its compression stroke and
leave it in that position. This closes both the intake
and ex haust valves to prevent rusting of cylinder.
4. Cover the pressure washer and store in a clean, dry
place that is well ventilated away from open fl ame
or sparks. NOTE: The use of a fuel additive, such
as STA-BIL®, or an equivalent, will minimize the
for mu la tion of fuel deposits during storage. Such
ad di tives may be added to the gasoline in the fuel
tank of the engine, or to the gasoline in a storage
con tain er.
After Extended Storage
Engine Maintenance
During the winter months, rare atmospheric conditions
may develop which will cause an icing con di tion in the
car bu re tor. If this de vel ops, the engine may run rough,
lose power and may stall. This temporary condition can
be overcome by defl ecting some of the hot air from the
en gine over the carburetor area. NOTE: Refer to the
en gine man u fac tur er's manual for service and main te nance of the engine.
STEP 3: Turn off water
sup ply.
Discharge
Nipple
Safety
Latch
STEP 7: En gage
the spray gun safe ty
lock.
CAUTION: Prior to restarting, thaw out any
pos si ble ice from pressure washer hos es,
spray gun or wand.
 Loading...