

Page 1

1
Lithium Jump Starter
& Portable Power Supply
User Guide
MODEL: Shark EPS-203
CAPACITY: 10000 mAh
FULLY CHARGE IMMEDIATELY AFTER PURCHASE.
Fully recharge after each jump starting, or every 3 months to ensure long
battery life.
Please read and understand all important safety and operating instructions before using this
item. In addition, please read and follow all vehicle and battery manufacturers’ instructions
and cautionary markings.
Page 2

2
What’s In The Box.
• EPS-203 Lithium Jump Starter & Portable Power Supply
• 100-240V AC Charging Adapter
• 15V/1A DC Charging Adapter
• Smart Jumper Clamps
• USB Cable
• Laptop Input Tips
• 12V Cigarette Lighter Socket
• User Guide
IMPORTANT SAFETY INSTRUCTIONS
1) Use the EPS-203 for jump starting a 12V LEAD-ACID battery only. Do not attempt to
jump-start a vehicle with a non-rechargeable or defective battery.
2) Working in vicinity of a lead-acid battery is dangerous. Batteries generate explosive
gases during normal operation. Use in well-ventilated area. Battery acid can cause
permanent blindness. Avoid touching eyes while working near battery.
3) Do not smoke, strike a match, or cause a spark in vicinity of battery or engine. Avoid
explosive gas, flames and sparks.
4) Remove all personal jewelry, such as rings, bracelets, necklaces, and watches before
jumpstarting operations. These items may produce a short-circuit that can cause severe
burns.
5) To avoid damage to the vehicle’s electrical system, do not use the EPS-203 on a vehicle
that has no battery installed.
6) Use of an accessory not recommended or sold by the manufacturer may result in a risk
of fire, electric shock or injury to persons. Do not operate with damaged accessory(s).
7) Locate the EPS-203 as far away from battery as jumper cables permit.
8) Do not expose to rain or wet conditions.
9) To reduce the risk of damage to electric plug and cord, pull by the plug rather than the
cord when disconnecting.
10) Operate with caution if the jump starter has received direct hit of force or been dropped.
Have it checked and repaired if damaged.
11) Any repair must be carried out by the manufacturer or an authorized repair agent in
order to avoid danger.
Page 3
3
Battery Type
Lithium-ion Polymer
Battery Capacity
10000mAh
Starting Current
200A
Peak Current
400A
Jump Start
up to 3.0L Gas engine
USB Output
5V/1A, 5V/2A
LED Flashlight
5W
12V Output
10A Max
19V Output
3.5A
Operating Temperature
-20℃ ~ +50℃
Charging Temperature
0℃ ~ +45℃
ABOUT EPS-203 10000MAH
It features low voltage protection (for EPS-203 itself), spark proof, reverse polarity
protection and short circuit protection. This item can instantly jump start most single
battery vehicles, up to 30+ (over 30) times on a fully charge. The EPS-203 is also equipped
with USB power output, LED flash light, 19VDC power output and 12VDC power output.
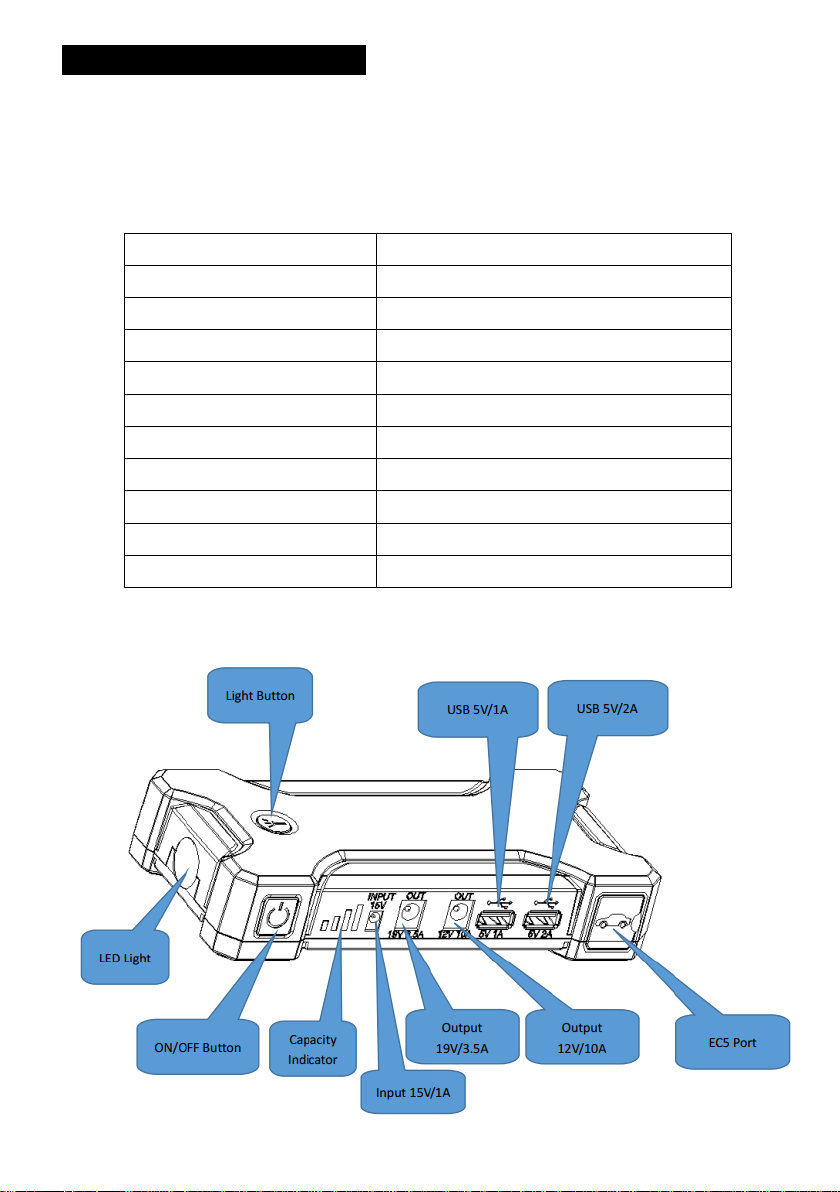
Technical Specification:
Product Layout:
Page 4

4
No.
Red LED
Green LED
Buzzer Sound
Condition
1
On
Off
One sound
Jumper cable and EPS-203
are connected.
2
Off
On
One sound
Jumper cable and vehicle
battery are connected.
Ready to start the engine.
Negative Clamp
EC5 Plug
BOOST Button
Red LED
Positive Clamp
Green LED
ABOUT SMART JUMPER CLAMPS
“BOOST” Mandatory Operations:
1) If with correct connection between Jump Starter and vehicle battery (Red LED keeps on
and green LED is off), press and hold BOOST button for 3 seconds (after a buzzer sound,
the green LED is on and red LED is off). Usually this is because the vehicle battery
capacity is rather low.
2) Start the engine (same method as the normal operations in Page 6).
Cautions:
1) Under normal circumstances, do not use the mandatory operations.
2) The spark proof, reverse polarity protection and short circuit protection features are
disabled after Boost button is pressed. Pay very close attention to the polarity of the battery
before using this mode. Do not allow the positive and negative battery clamps to touch or
connect to each other as the item will generate sparks and high heat if not used properly.
LED and Buzzer Communication:
Page 5

5
3
Slow flash
Off
No buzzer
Lithium battery voltage in
EPS-203 is rather low.
4
Slow flash
Off
No buzzer
Have not turned on the
ignition switch within the
regulated time. To resolve
this, you need remove
clamps from vehicle
battery, and connect again
when No.1 condition
occurs.
5
Fast flash
Off
Fast buzzer
Red and black clamps are
connected with each other.
6
Fast flash
Off
Fast buzzer
Reverse connection of
clamps. 7 Off
Fast flash
No buzzer
Engine is started.
8
Off
Fast flash
No buzzer
Vehicle’s battery voltage is
higher than Jump Starter’s.
CONNECTING TO THE BATTERY
1) Identify polarity of battery posts. The positive battery terminal is typically marked by
these letters or symbol (POS,P,+). The negative battery terminal is typically marked by
these letters or symbol (NEG,N,-).
2) Do not make any connections to the carburetor, fuel lines, or thin metal parts.
3) Identify if you have a negative or positive grounded vehicle. This can be done by
identifying which battery post (NEG or POS) is connected to the chassis.
4) For a negative grounded vehicle (most common): connect the RED POSITIVE jumper
clamp first to the positive battery terminal, then connect the BLACK NEGATIV jumper
clamp to the negative battery terminal or vehicle chassis (if you are unsure about vehicle
chassis, just connect to battery terminal).
5) For a positive grounded vehicle (very uncommon): connect the BLACK NEGATIV
jumper clamp first to the negative battery terminal, then connect the RED POSITIVE
jumper clamp to the positive battery terminal or vehicle chassis (if you are unsure about
vehicle chassis, just connect to battery terminal).
6) When disconnecting, disconnect in the reverse sequence, removing the negative first (or
positive first for positive ground systems).
Page 6

6
JUMP STARTING
1) This unit is only for emergency use, not for frequent commercial use! ENGINE START
socket is ALWAYS activated! Do not attempt to jump start your vehicle when the EPS-203
battery capacity is below 25% (battery status indicator: 1 solid LED lit).
2) Turn off the vehicle ignition and all accessories (radios, lights, air conditioners, etc.),
and disconnect electronic devices.
3) Connect the jumper clamps to the correct polarity battery terminals.
4) Connect the EC5 plug of jumper cables to the ENGINE START socket of EPS-203.
5) Try starting the vehicle (turn on the ignition switch). Most vehicles will immediately
start. Stop if the vehicle does not start after 5 seconds of engine cranking. The jumpstart
feature is designed for short term operation only, and more than 5 seconds may cause
damage to the unit. Allow the jump starter to cool down for at least 3 minutes after each
jumpstarting.
6) Disconnect the cable from the EPS-203 immediately after engine starts, and then
remove from battery terminals.
CHARGING
This product is partially charged from the manufacturer. Fully charge the unit immediately
after purchase. In order to prolong the product life, be sure to fully recharge the unit after
each jump staring, or every 3 months even if this unit has not been used. If battery voltage
in the EPS-203 is too low, this item will shut off to prevent damage to itself. Recharge the
unit as soon as possible to be activated and fully charge it to ensure long battery life. In
addition, we recommend not to charge and discharge the unit at the same time.
AC Charging:
1) Insert AC charging adapter into charging jack of the unit.
2) Plug the other end of AC charging adapter into a wall socket.
3) Fully charge the unit.
4) When charging is complete, unplug the AC charging adapter from the wall socket first,
then from the charging jack on the EPS-203.
DC Charging in Your Vehicle:
1) Turn the vehicle engine on.
2) Insert the DC charging adapter into the charging jack of the unit.
3) Plug the other end of DC charging adapter into vehicle’s cigarette lighter socket.
4) Fully charge the unit. Engine must keep running during entire charge.
5) When charging is completed, unplug the DC charging adapter from the vehicle first,
Page 7

7
Indicator
LEDs
Unit
1
Flashing
1
Solid
2
Solid
3
Solid
4
Solid
Storage
Level
0%
˂ 5%
5% ~
25%
25% ~
50%
50% ~
75%
75% ~
100%
then from the charging jack on the EPS-203.
Battery Status Indicator:
The indicator LEDs will flash one by one during the period of charging. Different number
of indicator LEDs shows different storage level of EPS-204.
USB POWER
Connect the USB device to the EPS-203 with either the original cable or the included
multi-tip cable (better use original cable of Apple® for Apple® products). Press Power
button to start USB power. When disconnected, the EPS-203 will automatically shut off.
The number of times you can recharge a USB device will vary between devices.
FLASHLIGHT
Press Flashlight button to start flashlight. Press once to switch lighting modes: Steady On –
Strobe – SOS – Off.
SUPPLY TO 12V DEVICES
The EPS-203 can run/charge 12VDC appliances that draw 10 amps or less. Connect the
EPS-203 to 12V devices with optional accessory (This item does not include the
accessory). Press Power button to start 12V power. When disconnected, the EPS-203 will
automatically shut off.
WARRANTY
1) This product is warranted to the original purchaser for a period of one (1) year from the
original shipping date, to be free of defects in material and workmanship.
2) Warranty Performance: During the above one (1) year warranty period, a product with a
defect will be replaced with a new one when the product is returned to the manufacturer.
The replacement item will be in warranty for the balance of the original one (1) year
warranty period.
3) This warranty is void if the product has been damaged by accident, in shipment,
Page 8

8
unreasonable use, misuse, neglect, improper service, commercial use, repairs by
unauthorized personnel or other causes not arising out of defects in materials or
workmanship.
Official Distributor
ASP Group s.r.o.
Staroplzenecka 290
326 00, Letkov
Czech Republic
tel.: +420 378 21 21 21
E-mail: info@aspgroup.cz
www.aspgroup.eu
 Loading...