

Page 1
Instruction Manual
Please read the instructions carefully before operating
the machine.
Model
EURO-PRO Operating LLC, 94 Main Mill Street, Door 16, Plattsburgh, NY 12901 Tel.: 1 (800) 361-4639
5 YEAR LIMITED WARRANTY
EURO-PRO Operating LLC warrants this sewing machine for a period of 5 years from date of the
original purchase, to be free of defective parts due to imperfections in the workmanship and materials,
subject to the following conditions, exclusions and exceptions.
EURO-PRO Operating LLC will, at its option, repair or replace this sewing machine free of charge if it
fails to operate according to specifications due to factory defects in materials or workmanship within one
year of purchase date. For 5 years from date of purchase, EURO-PRO Operating LLC will repair or
replace defective sewing machine head parts; owner pays for labor charges. The sewing machine must
be shipped freight and insurance prepaid to:
US: EURO-PRO Operating LLC, 94 Main Mill Street, Door 16, Plattsburgh, NY 12901
Canada: EURO-PRO Operating LLC, 4400 Bois Franc, St. Laurent, Qc, H4S 1A7
A copy of your sales receipt and $15.95 for handling and return packaging/shipping charges must be
included.*
The electrical equipment (motor, rheostat, control, light, electronic parts, etc.) are warranted from defects
in material and workmanship for a period of two years from the date of original purchase. Non-durable
parts including, without limitation, needles, belts, bobbins, bulbs, bobbin cases, shuttles, springs and
parts which normally require replacement are specifically excluded from this warranty.
This warranty is in effect provided the sewing machine is used only for normal household use by the
original purchaser when new, and is given reasonable good care and proper maintenance in accordance
with the accompanying instruction manual. The manufacturer is not held responsible for damage,
normal wear, accident, abuse, neglect, negligence or if the machine has been repaired by unqualified
personnel.
This warranty is extended to the original purchaser of the unit and excludes all other legal and/or
conventional warranties. The responsibility of EURO-PRO Operating LLC if any, is limited to the specific
obligations expressly assumed by it under the terms of the limited warranty. In no event is EURO-PRO
Operating LLC liable for any indirect, incidental or consequential damages of any nature whatsoever.
Some states do not permit the exclusion or limitation of incidental or consequential damages, so the
above may not apply to you.
This warranty gives you specific legal rights, and you may also have other rights which vary from state to
state or province to province.
*Important: Carefully pack the item to avoid damage during shipping. We recommend you insure the
package (as damage in shipping is not covered by your warranty). Be sure to include a copy of your
sales receipt and attach a tag to the machine with your name, address and telephone number. Please
include $15.95 to cover return shipping and handling.
-----------------------------------------------------------------------------------------------------------------------------------
OWNERSHIP REGISTRATION CARD
Please fill out and mail the product registration card within ten (10) days of purchase. The registration will
enable us to contact you in the unlikely event of a product safety notification. By returning this card, you
acknowledge to have read and understood the instructions for use, and warnings set forth in the
accompanying instructions.
Return to:
US: EURO-PRO Operating LLC, 94 Main Mill Street, Door 16, Plattsburgh, NY, 12901
Canada: EURO-PRO Operating LLC, 4400 Bois Franc, St. Laurent, Qc, H4S 1A7
___________________________________________________________________________________
Appliance Model
___________________________________________________________________________________
Date Purchased Name of Store
___________________________________________________________________________________
Owner’s Name
___________________________________________________________________________________
Address City State/Prov. Zip/Postal Code
412N
Page 2

Matching needle / fabric / thread
NEEDLE,FABRIC,THREAD SELECTION GUIDE
NEEDLE SIZE
FABRICS
THREAD
9-
11(65-75)
12(80)
14(90)
16(100)
18(
110)
Lightweight fabrics-thin cottons.voile,
serge,lilk,muslin,Qiana,interlocks,cotton
knits,tricots,jerseys,crepes,woven
polyeste
r,shirt& blouse fabrics.
Light-duty
thread in cotton,
nylon or polyeste
r.
Medium weight fabrics-cotton,satin,
kettlecloth,sailcloth,double knits,
lightweight woollens.
Most threads old are
medium size and
suitable
for these fabrics
and needle sizes.Use
pollyester threads on
synthetic materials and
cotton
on natural woven
fabrics for best results.
Always use the same
thread on top and
bottom.
Medium weight fabrics-cotton duck,
woolen,heavier knits,terrycloth,
denims.
Heavy duty thread,carpet
thread,(Use heavy foot
pressure-large numbers.)
Heavyweight
fabrics-canvas,woolens,
outdoor tent and quilted fabrics,
denims,upholstery material (light to
medium).
Heavy woollens,overcoat fabrics,
upholstery
fabrics,some leathers and
vinyls.
IMPROTANT: Match needle size to thread size and weight of fabric.
14
IMPORTANT SAFETY INSTRUCTIONS
When using an electrical appliance, basic safety instructions should always be
followed, including the following:
“Read all instructions before using this sewing machine.”
“DANGER - To prevent the risk of electric shock:” A sewing machine should
never be left unattended when plugged in. Always unplug this appliance from
the electric outlet immediately after using and before cleaning.
“WARNING - To reduce the risk of burns, fire, electric shock, or injury to
persons:”
1. Do not allow to be used as a toy. Close attention is necessary when this
sewing machine is used by or near children.
2. Use this appliance only for its intended use as described in this manual.
Use only attachments recommended by the manufacturer as contained in
this manual.
3. Never operate this appliance if it has a damaged cord or plug, if it is not
working properly, if it has been dropped or damaged or dropped into water.
Return the appliance to EURO-PRO Operating LLC for examination, repair,
electrical or mechanical adjustment.
4. Never operate this appliance with any air openings blocked. Keep
ventilation openings of the sewing machine and foot controller free from the
accumulation of lint, dust and loose cloth.
5. Never drop or insert any object into any opening.
6. Do not use outdoors.
7. Do not operate where aerosol (spray) products are being used or where
oxygen is being administered.
8. To disconnect, turn all controls to the “Off” position, then remove the plug
from the electrical outlet.
9. Do not unplug by pulling on the power cord. To unplug, grasp the plug not
the cord.
10. Keep fingers away from all moving parts. Special care is required around
the sewing machine needle.
11. Always use the proper needle plate. The wrong plate can cause the
needle to break.
12. Do not use bent needles.
13. Do not pull or push fabric while stitching. It may deflect the needle causing
it to break.
14. Switch the sewing machine “Off” when making any adjustment in the
needle area, such as threading the needle, changing the needle, threading
the bobbin or changing the presser foot., etc.
15. Always unplug the sewing machine from the electrical outlet when
removing the cover, lubricating or when making any other user servicing
adjustments mentioned in the instruction manual.
16. This appliance has a polarized plug (one blade wider than the other). To
reduce the risk of electric shock, this plug is intended to fit into a polarized
outlet only one way. If the plug does not fit fully in the outlet, reverse the
plug. If it still does not fit, contact a qualified electrician to install the porper
outlet. Do not modify the plug in any way.
SAVE THESE INSTRUCTIONS
1
Page 3
Trouble shooting guide
Problem Cause
Correction
Upper thread
breaks
1.The machine is not threaded correctly
2.The thread tension is too tight
3.The thread is too thick for the needle
4.The needle is not inserted correctly
5.The
thread is round wo und the spool
pin
6.The needle is damaged.
1.Rethread the machine
2.R educe
the threa d tens ion (low er
number)
3.Select a larger needle
4.Remove and reinsert the needle (flat
side towards the back)
5.Remove the reel and wind thread onto
reel
6.Replace the needle
Lower thread
breaks
Skippe
d
stitches
Needle
breaks
Loose
stitches
Seams
pucking
The machine
is noisy
The machine
jams
1.The
lower thread is not threaded correctly
2.The upper thread tension is too loose
1.Check the threading carefully
2.Adjust the upper thread tension
1.The needle is not inserted correctly
2.The needle is damaged
3.The wrong size needle has been used.
4.The foot is not attached correctly
1.
Remove a nd reinsert needle (flat si de
towards the back)
2.Insert a new needle
3.Choose a needle to suit the thread and
fabric
4.Check and attach correctly
1.The needle is damaged
2.The needle is not correctly inserted
3.
Wrong needle size for the fabric
4.The wrong foot is attached.
1.Insert a new needle
2.Insert
the needle correc tly (fl at side
towards the back)
3.Choose a needle to suit the thread and
fabric
4.Correct the thread tension
1.The machine is not correctly threaded
2.The bobbin case is not correctly threaded
3.Needle/fabric/thread combination is wrong
4.Thread tension wrong
1.Check the threading
2.Thread the bobbin case as illustrated
3.The
needle size must suit the fabric and
thread
4.Correct the thread tension
1.The needle size is too large for fabric
2.The stitch length is wrong
ly adjusted
3.The thread tension is too tight
1.Select a finer needle
2.Readjust the stitch length
3.Loosen the thread tension
1.Poor quality thread
2.The bobbin is wrongly threaded
3.Fabric has been pulled
Uneven stitches,
uneven feed
1.The machine must be lubricated
2.Flu
ff or iil have collected on the hook or
needle bar
3.Poor quality oil has been used
4.Fabric has been pulled
1.Thread is caught in the bobbin case
1.Select a finer needle
2.Remove
bobbin case and rethread and
insert correctly
3.Do not pull on the fabric while sewing,
let it be taken up by the machine.
1.Lubricate as described
2.C lean
the hook a nd fee d dog as
described
3.Only use good quality sewing machine
oil
4.Replace the needle
1.Cut the tip of the thread, remove the
bobbin, tidy up the caught thread
13
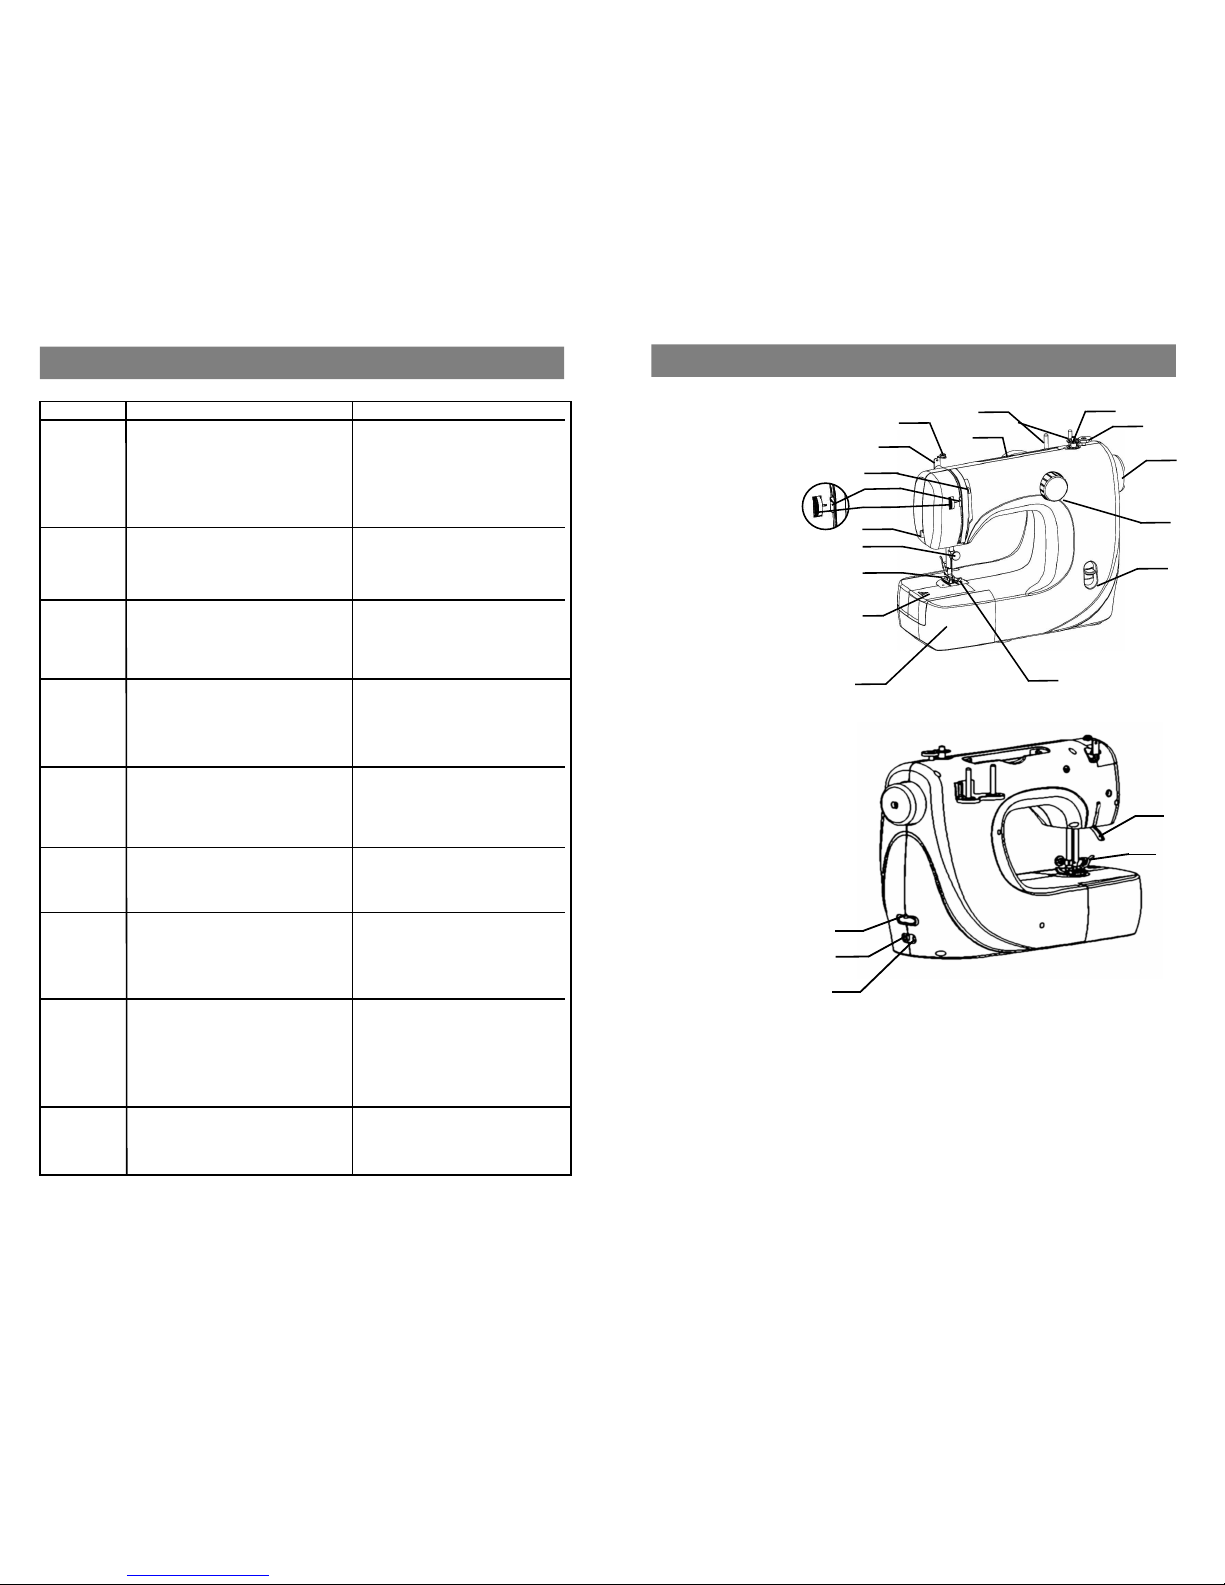
Details of the machine
1
2
3
4
5
6
7
8
9
10
11
12
13
14
15
17
19
20
21
23
22
1.Reverse sewing lever
2.Pattern selector dial
3.Hand wheel
4.Bobbin stopper
5.Bobbin winder
6.Spool pin
7.Handle
8.Winding thread guide
9.Upper thread guide
10.Thread take-up lever
11.Thread tension
release bar
12.Thread tension dial
13.Thread cutter
14.Needle clamp screw
15.Presser foot
16.Needle plate
17.Sewing table
18.Feed dogs
19.Presser foot lever
20.Presser foot holder
21.ON/OFF Switch
22.Foot control receptacle
23.AC/DC adaptor
2
16
18
Page 4

Accessories
Fitting the snap-in sewing table
1.Keep the snap-in sewing table
horizontal, and pull it out from
the machine as photo(1)
2.The bobbin holder and accessory
bag are put into the inside of the
sewing table.
3.Pull the side cover to open it as
photo (2)
1
2
3
Blind hem
1. Fo ld the f ab ri c as
illustrated in figure (1)
2.Place
the fabric under
the foot. Turn the
handwheel
forwards
until
the needle sewings
to
the left.It should just
picrce
the fold of the
fabric. If it doesn’t ,
reposition
the fabric
under the foot.(2)
3.Sew
slowly, guiding the
fabric carefully
4.After sewing ,open the
fold and press with an
iron.
3-step zig-zag
1. Sewin g o n l ace a nd
elastic,patching,mending,
reinforcing edges.
2.Set machine as illustrated.
3.Place patch in position and
sew around the edges.
4.When mending tears,it is
advisable to use a piece
of backing fabric
to reinforce.
5.Fisrst
sew over the center
and then overlap on both
sides. Depending on the
type
of fabric and damage,
sew between 3 and 5 rows.
12
9 10
8
Foot control
Adaptor
Brush
Screwdriver
Buttonhole foot
Zipper
foot
Button sewing
plate
Regular sewing
foot
Twin needle
Needles (x2)
Threader
Spool pin
Bobbins (x2)
Page 5

Connecting the machine to the power source
1.Connect plug "A" to the machine and plug "B" into the mains socket.
2.Turn on power switch "ON"
3.Connect the foot control ‘C’ to the machine.
4.The speed of the machine can be regulated by applying pressure to
the foot controller.
Sewing light
Press main switch "ON" for power and light on.
Attaching the presser foot holder
4
Buttonholes
Preparation
1.Raise
the presser foot lever, remove the metallic presser foot, and replace
on
a buttonhole foot.(note: Before setting buttonhole foot, turn the handwheel
and make sure that the feed dogs is below the needle plate and the needle
have to be about 5MM above the needle plate.)
2.Make sure the diameter of the button and add 3mm(1/8") for the bartacks.
3.If you have a very thick button, add more to the diameter measurement.
4.Mark the position and length of the buttonhole on the fabric.
5.Position the fabric so that the needle is on the mark that is the furthest from
you.
6.Pull the buttonhole foot towards you as far as it will go.
7.Lower the foot.
a)
Turn the pattern selector dial to .Sew at moderate spe ed until
you reach the end mark.
b)Turn the pattern selector dial to and sew 5-6 bartacks stitches.
c)
Tur n the p atter n selector dia l to and sew the left side of the
buttonhole to the mark that is further from you (beginning of buttonhole).
d)Turn the pattern selector dial to and sew bartacks stitches.
Remove
the fabric from under the foot. Draw the upper thread through the
backside
of the fabric and knot upper and lower threads. Cut the center of
the buttonhole with the seam ripper, being careful not to cut the stitches
on either side.
Tips:
1. Slightly
reduce t he
upper
thread tension
to produce better results.
2.Use backing material
for
fine and stretchy
fabrics.
3.It
is advisable to use a
gimp
cord for stretch or
knit fabrics.The zigzag
should
sew over the
gimp
.
4.Install buttonhole foot
from back to front.
Pattern
Sewing step
11
A
B
C
1.Raise the presser foot clamp "a" (1) Attach the presser foot holder "b"
as illustrated.
Attaching the presser foot
Lower the presser foot holder "a" until the cut-out "c" is directly above
the pin"d"(2)
Raise
the lever, the presser foot ‘d’ insert into the floor ‘c’. Lower the lever
‘e’
,the presser foot is fixed on the presser foot floor, and the presser foot
“f” will engage automaticall
y.
Removing the presser foot
Raise the presser foot. (3)
Raise the lever "e" and the foot disengages.
a
b
a
e
d
c
f
e
1
2
3
Page 6

Winding the bobbin
Place empty bobbin on winding spindle ,and place spool on the spool pin.
Wind thread a few times by hand round the empty bobbin in a clockwise
direction . press the foot control till the bobbin full. Remove the bobbin by
cutting the thread with cutte
r.
Inserting the bobbin
When inserting or removing bobbin, the needle must be fully raised.
Open the hook cover:
insert the bobbin in the bobbin case, so that the thread runs in a clockwise
direction.
Attention: Turn power switch to "off" position !
1
2
3
4
5
Zigzag/Overlock stitching
1.There are 4 patterns of zigzag for selecting . Turn the pattern selector
dial to the stitch trace you need(4 - 7).
10
Notice :
1.When turning the pattern selector dial, assure the needle tipis at the
upper
position, otherwise, it will be bent or damaged ,or fail to sewing
2.When
selecting the pattern dial, set the position corectly, otherwise,
it will hurt the needle ,or sew over the selected stitch trace. It will be
di
fferent from the selected pattern.
Thread tension for
zigzag stitch
Right side
Back
side
Zigzag foot
Pattern selector dial
4 5 6 7
Page 7

Straight stitching
1.There are three kinds of straight stitch for your choice. Turn the pattern
selector dial to the one you need.
2.Set the needle at the highest position by turning hand wheel
anticlockwise.Gently
pull both threads (about 10cm) towards rear ,raise
the presser foot ,place the fabric under the presser foot
3.Gently
press down the foot control to start sewing. Guide fabric gently
by hand.
4.Stop
the needle in its top position ,and thread can be pulled out easily.
5.Raise
the presser foot, and remove the fabric. Use thread cutter to cut
down the thread.
Notice :
1.When
turning the pattern selector dial, assure
the
needle tip is at the upper position, otherwise,
it will be bent or damaged ,or fail to sewing.
2.When selecting the pattern dial, set the position
corectl
y, otherwise, it will hurt the needle ,or sew
over the selected stitch trace. It will be different
from the selected pattern.
A
Pattern selector dial
9
Thread cutter
Cutting the thread:
Hold the threads behind the presser foot with
both hands, guide them to the lsit "A" and
press down.
1 2 3
Inserting the needle
1
2
Needles must be in perfect condition.
Needles with photo(2) can cause
problems:
A. bent needles
B. blunt needles
C. damaged points
Change
the needle regularly,especially
if it is showing signs of wear and
causing problems.
Insert the needle as illustrated as
follows:
A. Loose the needle clamp screw and
tighten again after inserting the new
needle.(1)
B. The flat side of the needle should
be
towards the back. Insert the needle
as far up as it will go.
Attention:
Turn power switch to "off"
position !
A
B
A
B
C
Thread tension
The lower thread tension is fixed ,it
needn’t adjust in generally .For the
upper thread ,turn the dial to the next
number
up, it will increase the tension.
If turn the dial to the next number down
,it is reduced.
A. normal thread tension
B. thread tension too loose
C. thread tension too tight
A
B
C
6
Page 8

Bring up the lower thread
1.Raise the presser foot , hold the upper thread with the left hand ,turn
the handwheel anticlockwise until the needle is raised.
2.Pull on the upper thread to bring the lower thread up, pull both thread
to the back under the presser foot, pull out 10cm.
Reverse sewing
At the end of seam,press down
reverse sewing lever ,sew a few
reverse stitches ,fix the trace to
avoid loosing. The reverse trace
shouldn’t beyond 5cm.
Release the lever and the machine
will sew forward again.
8
Removing the fabric
1. Turn the handwheel towards to bring
the thread take up lever to its highest
position, raise the presser foot.
2. Push thread tension release bar to left
and remove fabric toward back.
Threading the upper thread
1.Take the thread through the guide from right to left.
2.Push thread tension release bar to left, then guide the thread down
between the tension disc making sure that the thread has been inserted
into the tension disc.
3.Continue to draw the thread down ,and around the thread pulling bar
fixed holder spring from left to right.
4.Draw the thread up, around the take-up lever draw from left to right.
5.Continue to draw the thread down through the upper guide from front
to back.
6.Drawing down the thread and through the lower guide from back to front.
7.Finally thread the needle from front to back.
1
2
3
4
5
7
2
4
3
7
6
5
6
7
 Loading...