

Shaper Origin S01-NN Product Manual

www.shapertools.com
Product Manual
S01-NN

TM

shapertools.com 1
Congratulations on your purchase of Shaper
Origin! We know you’re excited to start cutting and
carving, but please make sure to read all of the
operating instructions, warnings, and safety notes
detailed in this booklet before operating Origin.
To get started with Origin navigate to the link
below for a complete walk-through and some
demos to get you acquainted.
shapertools.com/start
Welcome

TM
2
support.shapertools.com
Here, you’ll nd answers to frequently asked
questions about using Origin: choosing router
bits, working with different materials, effectively
clamping and securing your workpiece, maintaining
Origin, and more. We highly recommend you read
these tips before getting started. You’ll also nd
contact info for Shaper customer support.
tutorials.shapertools.com
For written and video tutorials that will walk you
through Origin’s many features and capabilities,
visit our tutorials site. In addition to clearly
explaining various features, tutorial videos also
walk you through the creation of projects that
you’ll nd on Shaper Hub.
hub.shapertools.com
When you’re ready to make your rst project,
check out Shaper Hub for an array of ready-to-cut
projects with detailed instructions, material lists,
and design les.

shapertools.com
3
Table of Contents
What’s Included
Overview
Basics
Using ShaperTape™
Safety & Care
Compliance
4-5
6-7
8-10
11-13
14-24
25

TM
4
Shaper Origin
dust collection hose
ShaperTape™
What’s Included

shapertools.com
5
4mm T handle
hex wrench
1/4 in upcut
router bit
1/8 in upcut
router bit
nger guard
engraving
bit
19mm wrench
What’s Included

TM
6
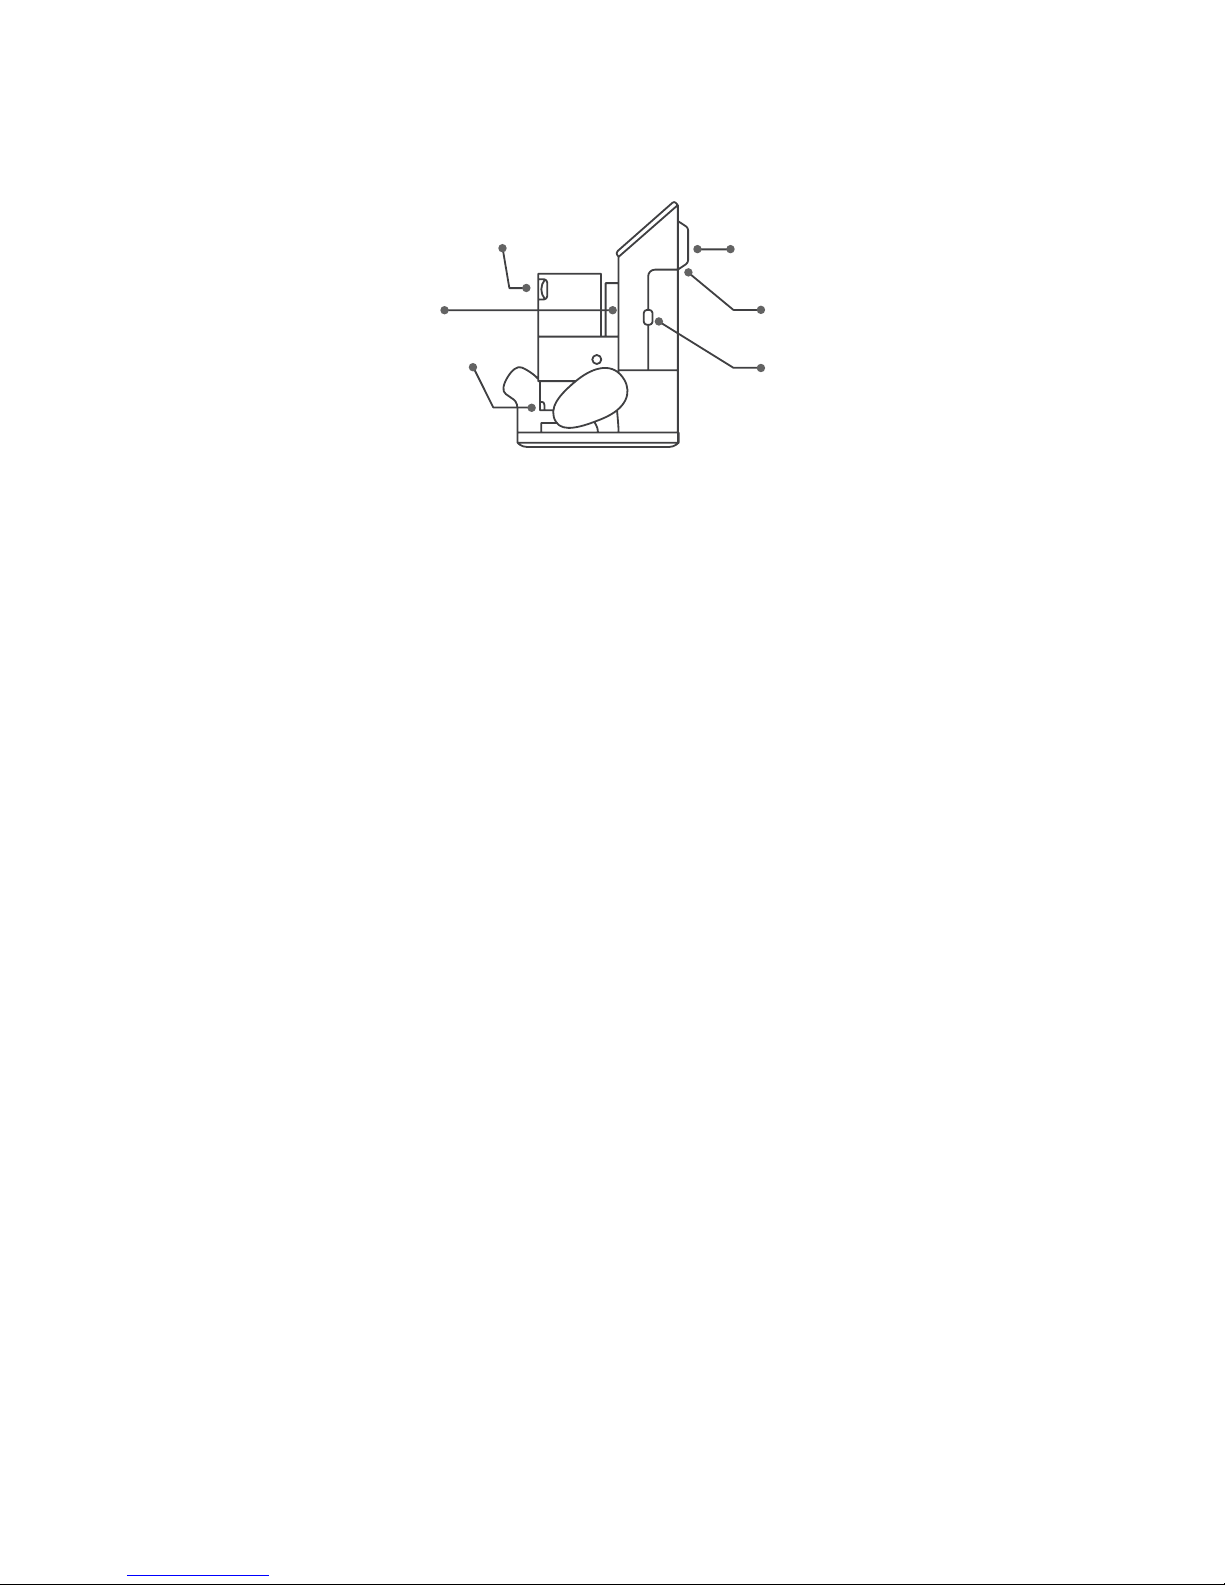
Overview
Touchscreen: Use Origin’s 5in multi-touch display
to control Origin’s many features.
SM1 Spindle: Origin is equipped with a powerful
720-Watt motor. It features variable speed control
and on-board electronics to deliver soft start,
thermal and overload protection, and constant
speed under load.
Dust Port: Origin is intended to be used with a
dust extraction system. Origin’s dust port accepts
many common vacuum hose sizes, or you may use
the hose that’s included with Origin.
Spindle Switch: You’re in control. For your
safety, Origin’s SM1 Spindle will never turn on
automatically. Use the spindle switch to turn on
the spindle when you’re ready to start cutting.
Spindle Mount: The SM1 Spindle is designed to be
removable from Origin for easy and safe router bit
changing operations. After loosening the spindle
mount bolt, simply remove or insert the SM1
Spindle.
Handles: Always rmly grasp both handles when
operating Origin. The buttons on each handle map
to the functions shown on the screen.
touchscreen
spindle
dust port
spindle switch
spindle mount
handle
shapertools.com
7
Overview
Speed Control: The SM1 Spindle has adjustable
speed from 10,000 to 26,000 RPM, with the lowest
speed mapped to 1 on the dial, and the highest
speed mapped to 6. Use this dial to adjust the
spindle rotation speed. For a list of recommended
cut speeds for various materials and applications,
visit support.shapertools.com.
Z-Axis: Origin’s Z-Axis is responsible for plunging
and retracting the SM1 Spindle.
Collet Lock: Press the collet lock and use the
included 19mm wrench to change router bits in
the SM1 Spindle.
Back Handle: On the go? Carry Origin using its back
handle.
Camera: Origin uses a computer vision system
to track its location on your workpiece. Keep the
camera unobstructed and the lens cover glass
clean to ensure the best cutting experience.
USB Port: No network? No problem. If your Origin
is not in range of a Wi-Fi network, you can also
transfer design les using a USB ash drive.
speed control
z-axis
collet lock
back handle
camera
usb port

TM
8
Basics
Remove the transport lock before operating Origin,
and retain for future use. Reinstall the transport
lock to keep the spindle stationary during transit.
To enable unobstructed access to change the
router bit, the SM1 Spindle must be removed from
Origin. IMPORTANT: Always unplug the SM1 Spindle
from Origin before removing the spindle from the
spindle mount. Use the included 4mm T-handle
hex wrench to loosen the spindle mount bolt.
Once loosened, lift the spindle to remove it.
Removing the Transport Lock
Removing and Installing the SM1 Spindle
 Loading...