

Page 1
Fable
User guide
v.1.4.3
Page 2

Contents
Chapter 1: Fable at a glance 2!
The Fable System 2!
Fable Hub 5!
Joint Module 6!
Spin Module 8!
PC Software 11!
Interface of the PC Software 12!
Chapter 2: Get started 13!
Install Fable Blockly 13!
Install Fable Blockly on Windows 14!
Install Fable Blockly on Mac 15!
Install Fable Blockly on iOS for iPad 16!
Install the Hub Driver (Windows 7 & 8) 17!
How to write a program 18!
Chapter 3: Basics 19!
Turning the Joint Module On/Off 19!
Turning the Spin Module On/Off 19!
Battery Management 20!
Wireless communication 21!
Chapter 4: Troubleshooting 22!
Hub not found 22!
Module not found 23!
Module overloaded 23!
Unable to connect Fable Face to Hub 23!
Chapter 5: Safety, handling and support 24!
Important Safety and Handling Information 24!
Fable Support 25!
1
Page 3
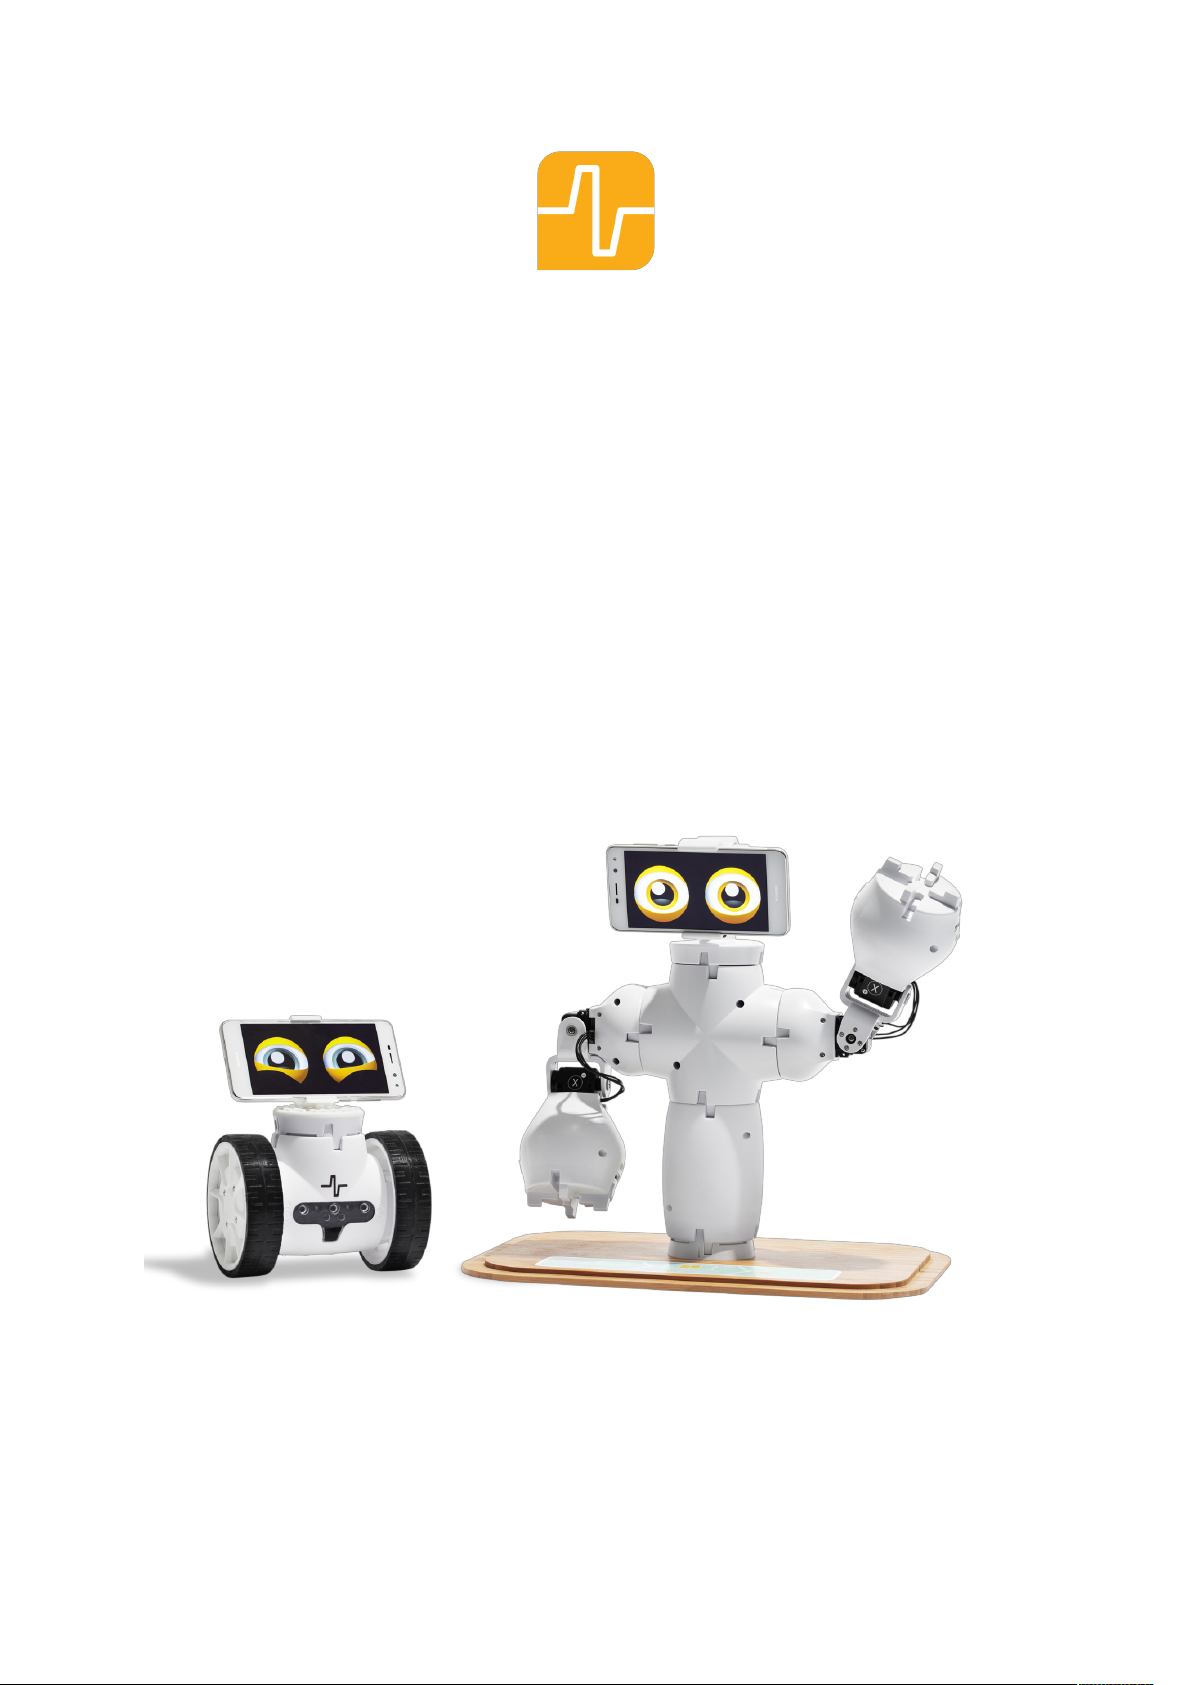
Chapter 1: Fable at a glance
The Fable System
The Fable Robot System is a modular robotic system that makes it easy and fun for anybody
to build their own robots. While creating robots, students can learn about mathematics,
physics, programming, innovation, engineering and more.
The Fable system consists of the components shown below.
2
Page 4
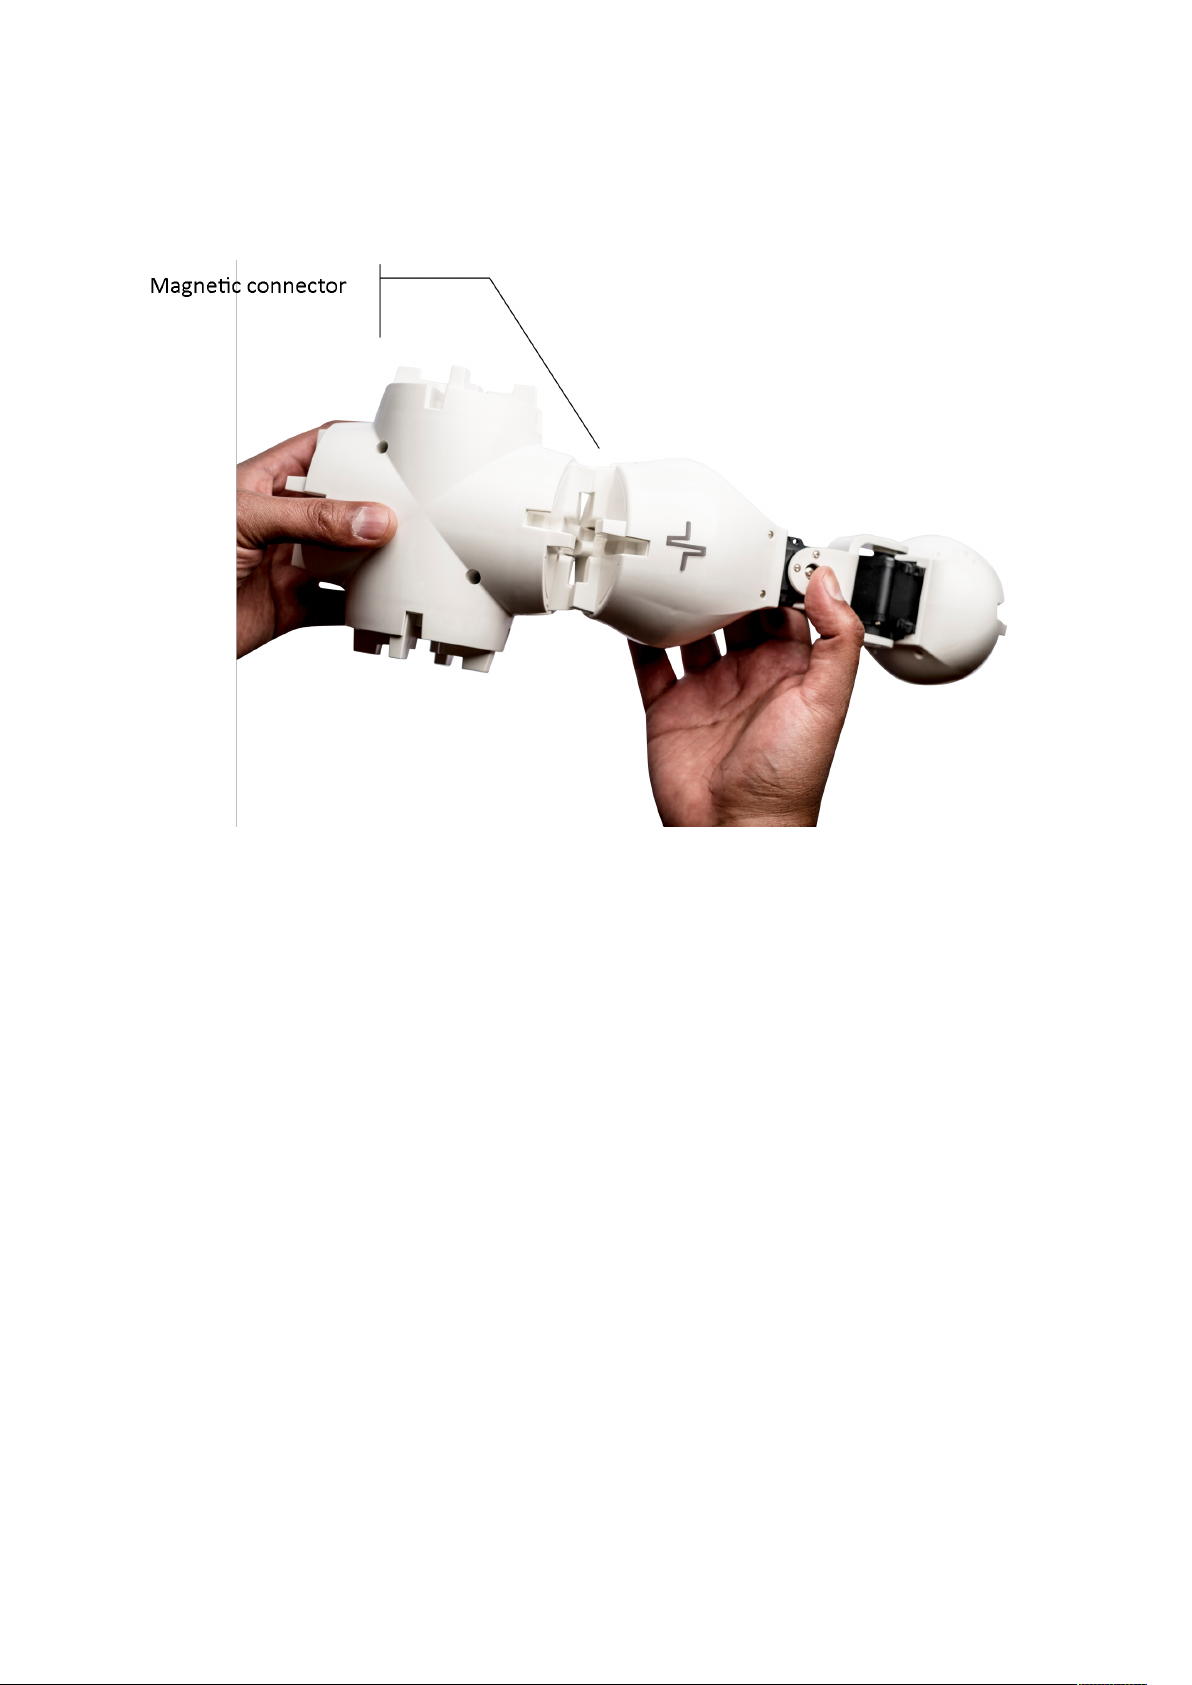
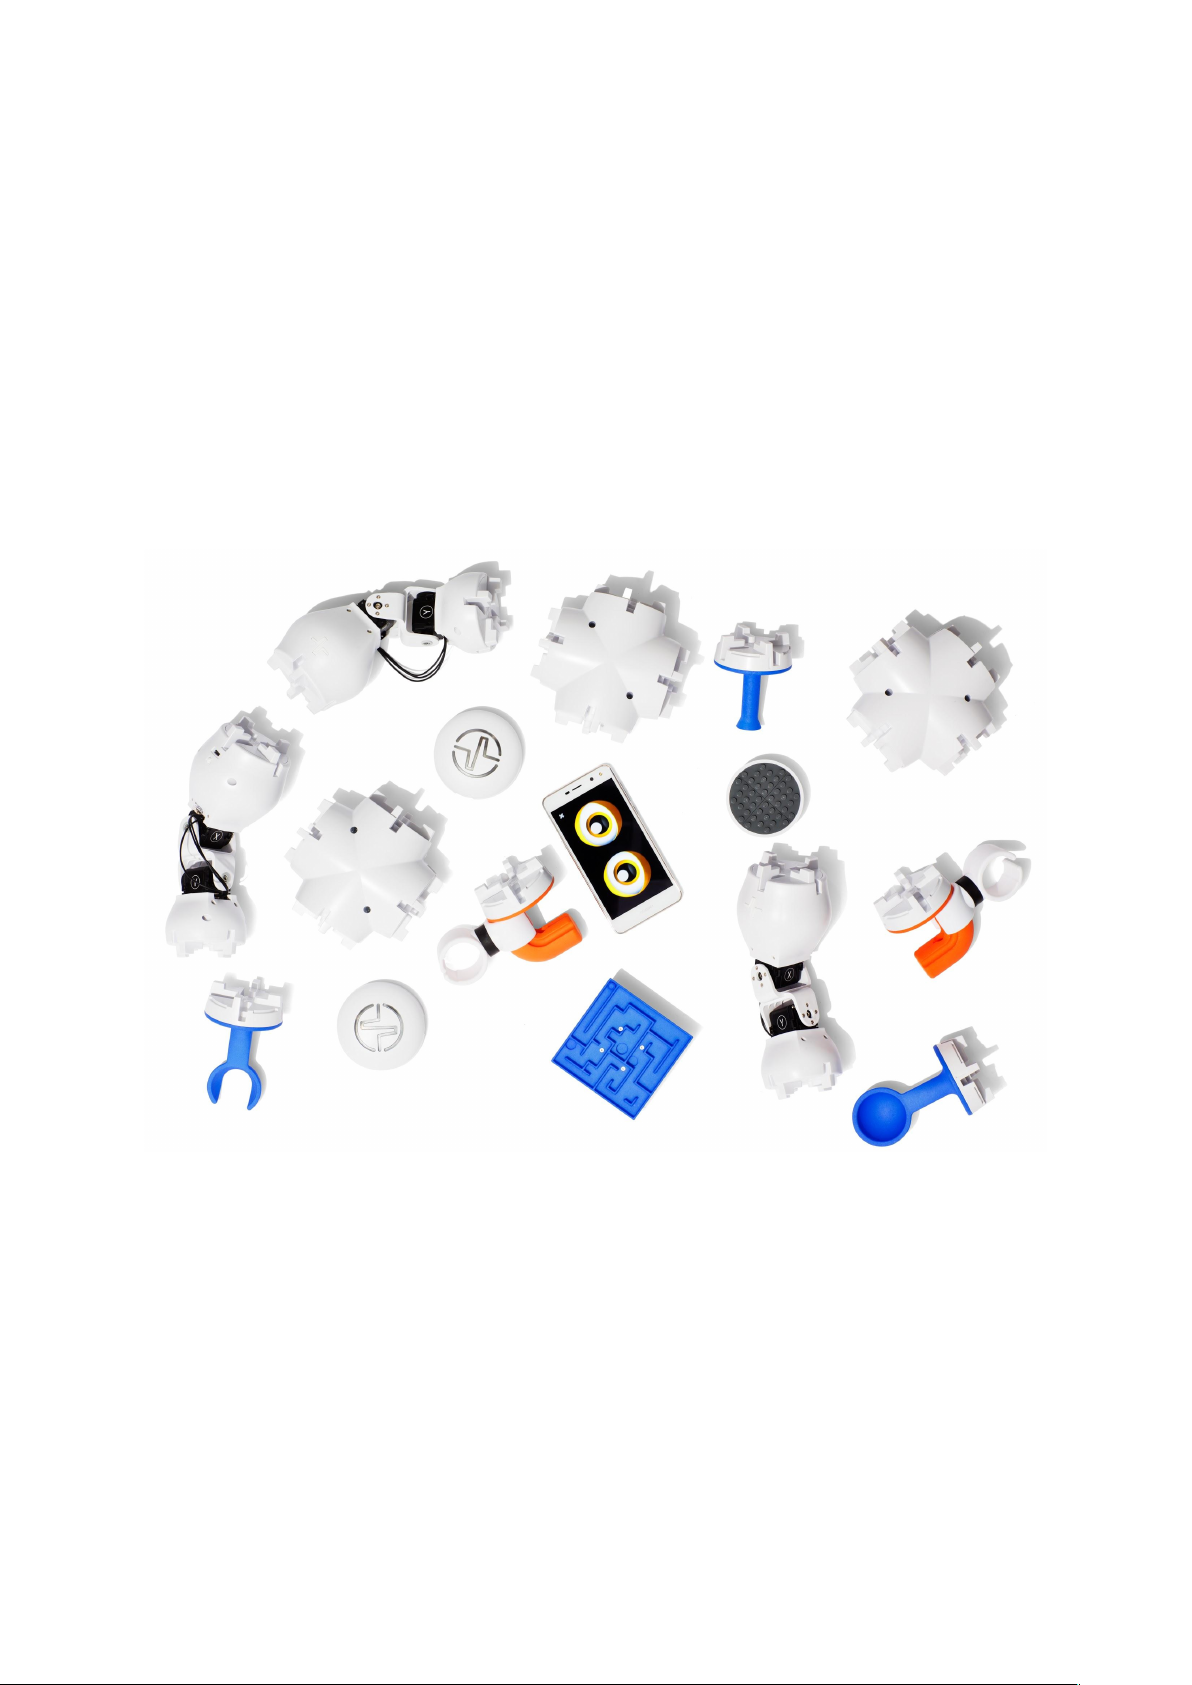
Construction System
The Fable modules are either passive (containing no electronics) or active (containing
electronics, motors, sensors) and can be assembled using a strong magnetic connector
system.
Figure 1 - Assemble your custom robots by snapping various modules together.
3
Page 5
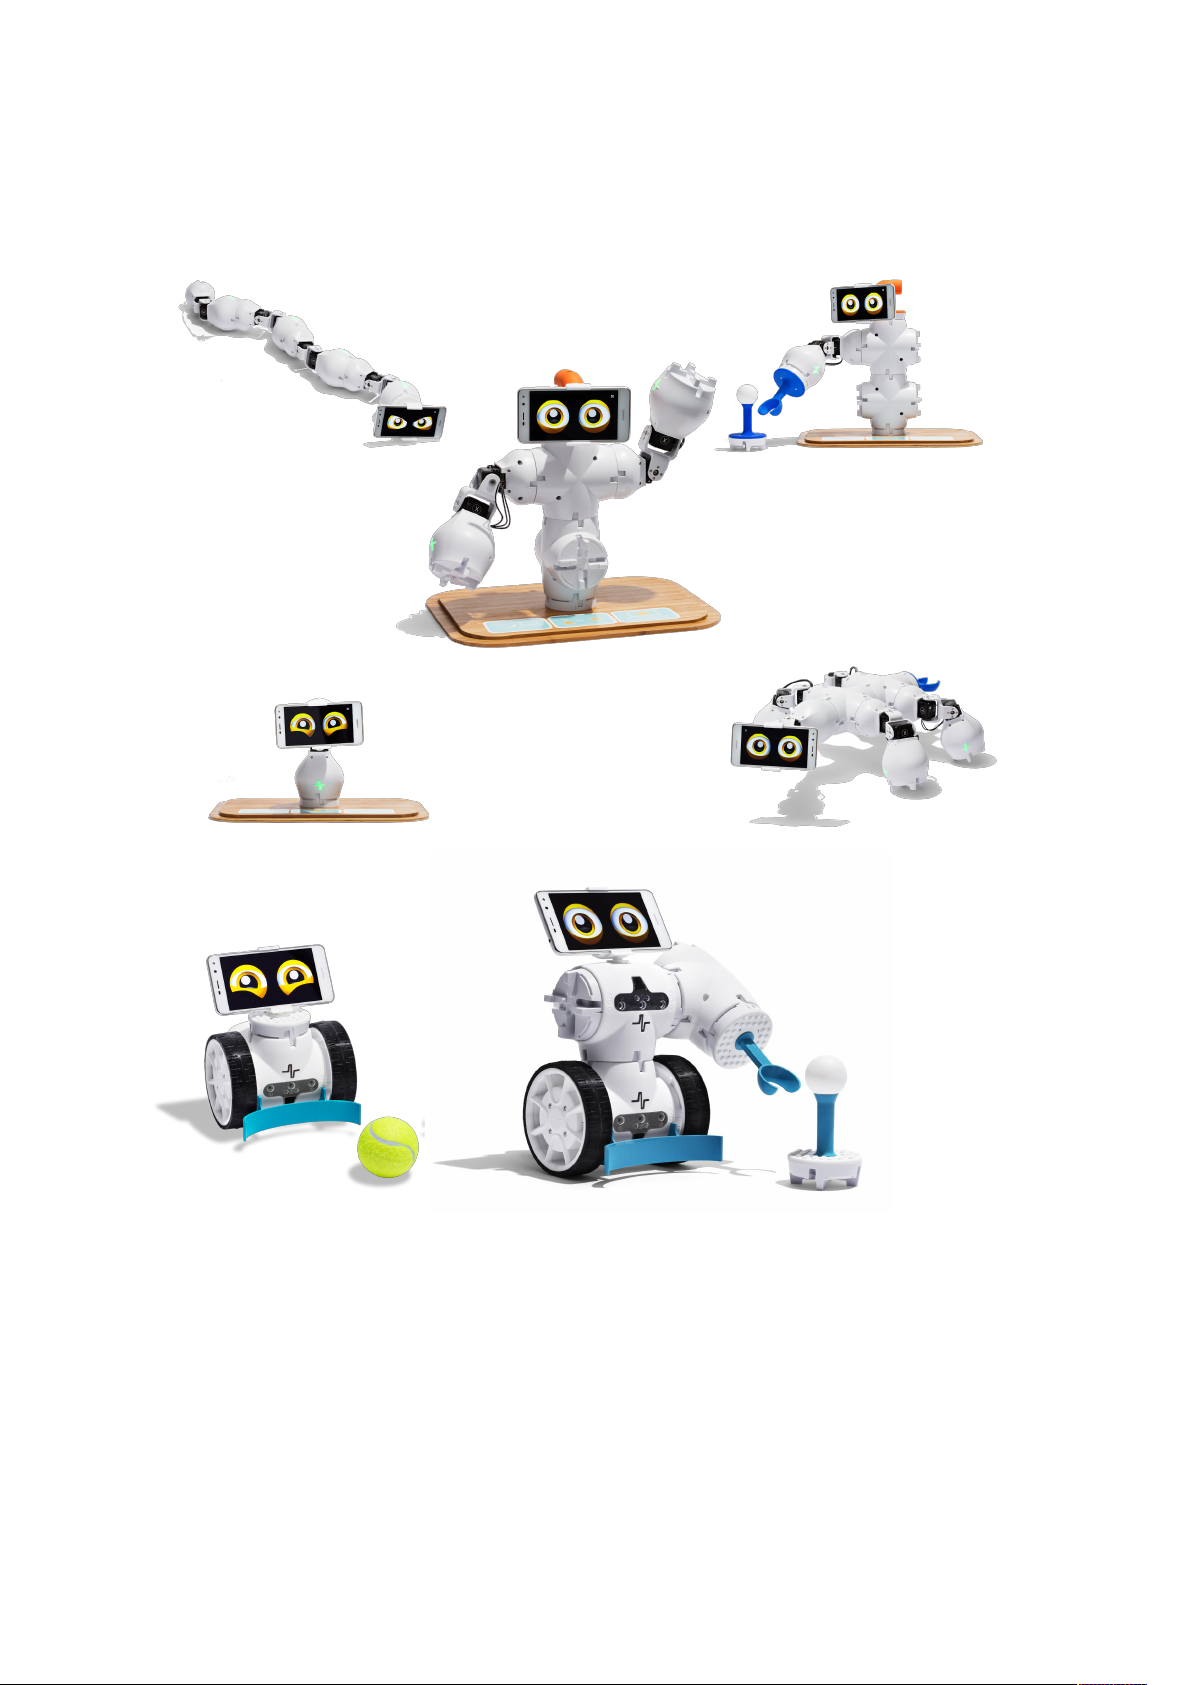
Fable Robots
Different types of robots can be assembled in seconds by snapping various Fable modules
together.
4
Page 6
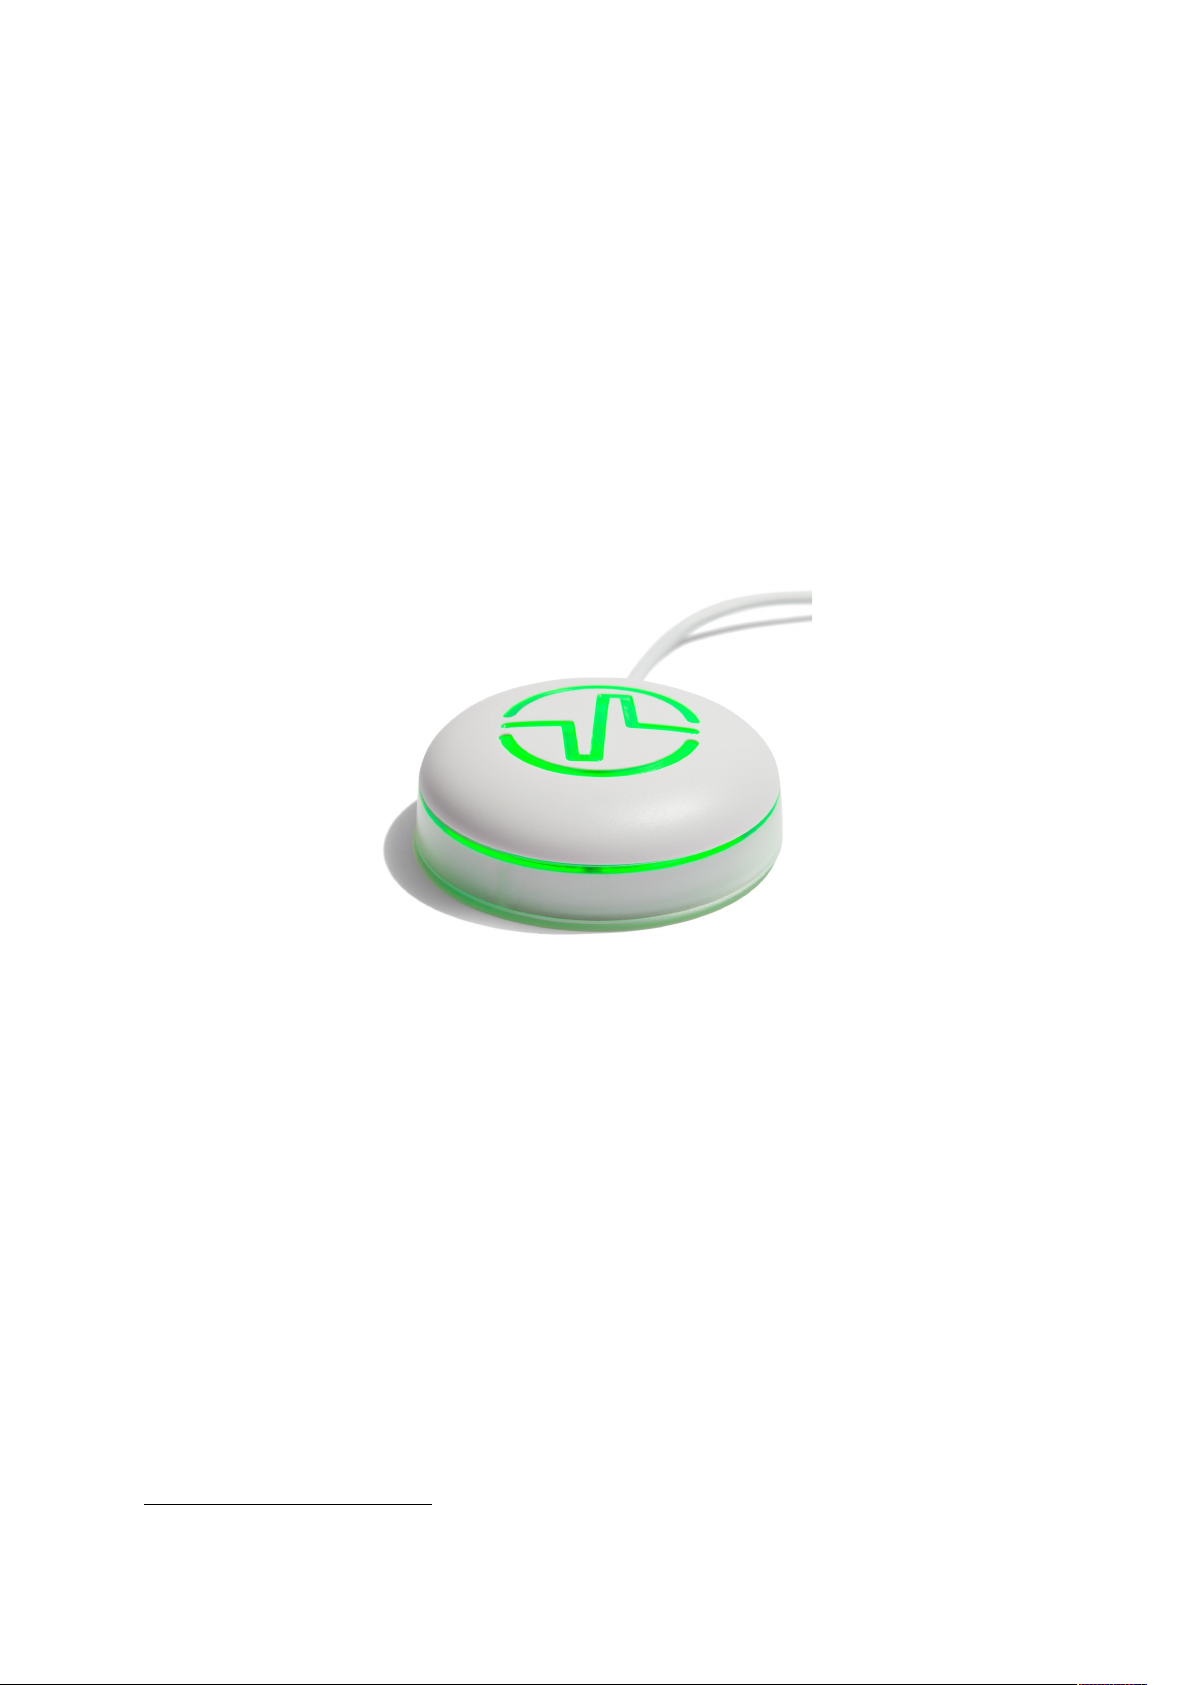
Fable Hub
1
Fable Hub provides wireless communication between the PC, iPad or smartphone and one or
several modules. It is a required component for executing programs.
PC: To use on a PC, the Hub must be connected to it via USB cable1. A driver must be installed
for the Hub to work on Windows 7 and Windows 8.
iPad: To use with an iPad or smartphone, the Hub must first be powered by using a USB
charger or connecting it to a PC. The iPad or smartphone can then connect via Bluetooth.
Pairing: To pair any active module with a Hub, users must ensure both the Hub and the
module have the same light color. This is achieved by pressing the color selector buttons on
both until they share colors.
Figure 2 – Fable Hub.
All USB cables used must be shorter than 3 meters in length.
5
Page 7
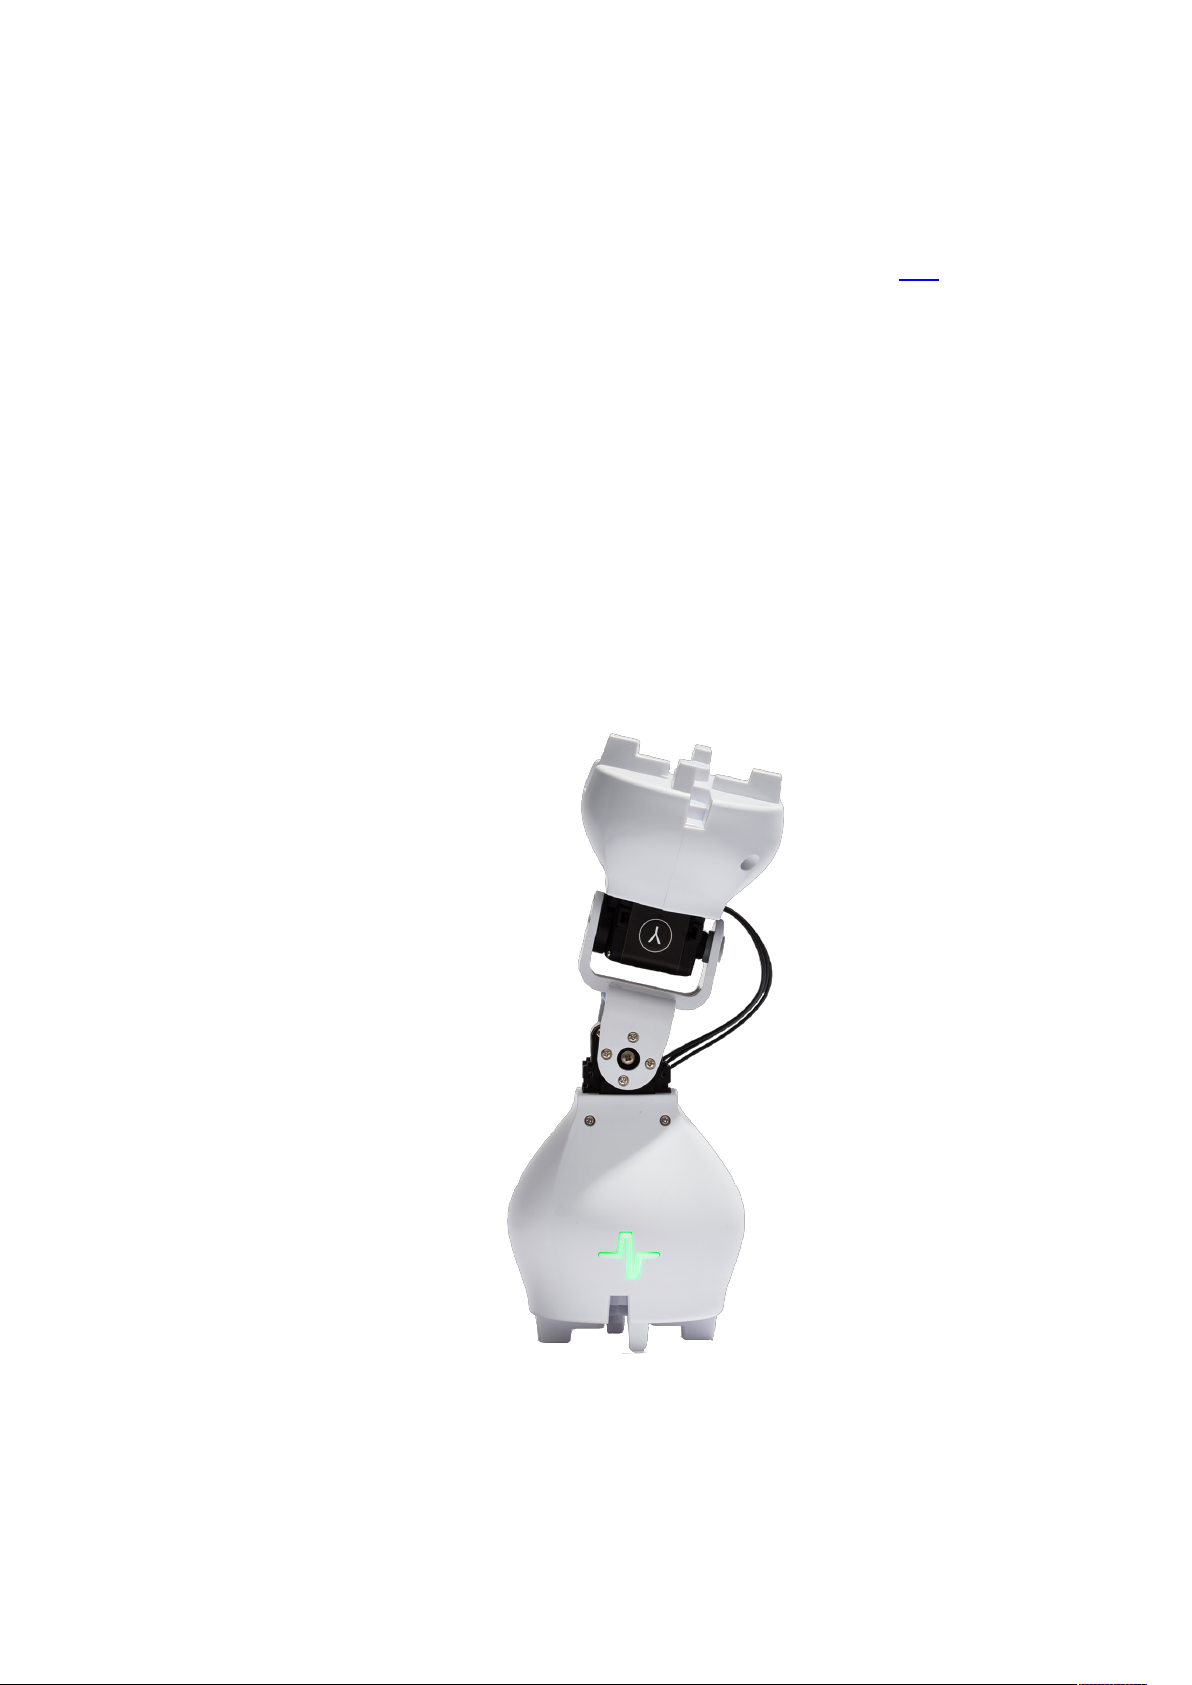
Joint Module
The Fable Joint Module provides movement to Fable robots using two motors: X and Y.
Wireless Communication: Joint modules are controlled wirelessly using the Hub.
Servo motors: The two servos are identified as X and Y and their position can be set to
anything between -90 and +90 degrees. The speed of movement can be controlled, and the
angle can be measured at any time.
Pairing: Joint Modules have a button which, if pressed, will change the LED color. The color
of the light indicates whether a Hub would be able to detect and pair with the module. Only
matching colored devices are able to communicate with each other, e.g. red Joint modules
with red Hubs.
Self-protection: Joint Modules continuously monitor the load and temperature on the motors
and the battery level. As a self-protection mechanism, Joint modules will automatically turn off
if an overload or low battery level event is detected. You should avoid overloading, blocking
or pulling locked motors as they can be damaged.
Figure 3 - Front side of a Joint Module.
6
Page 8
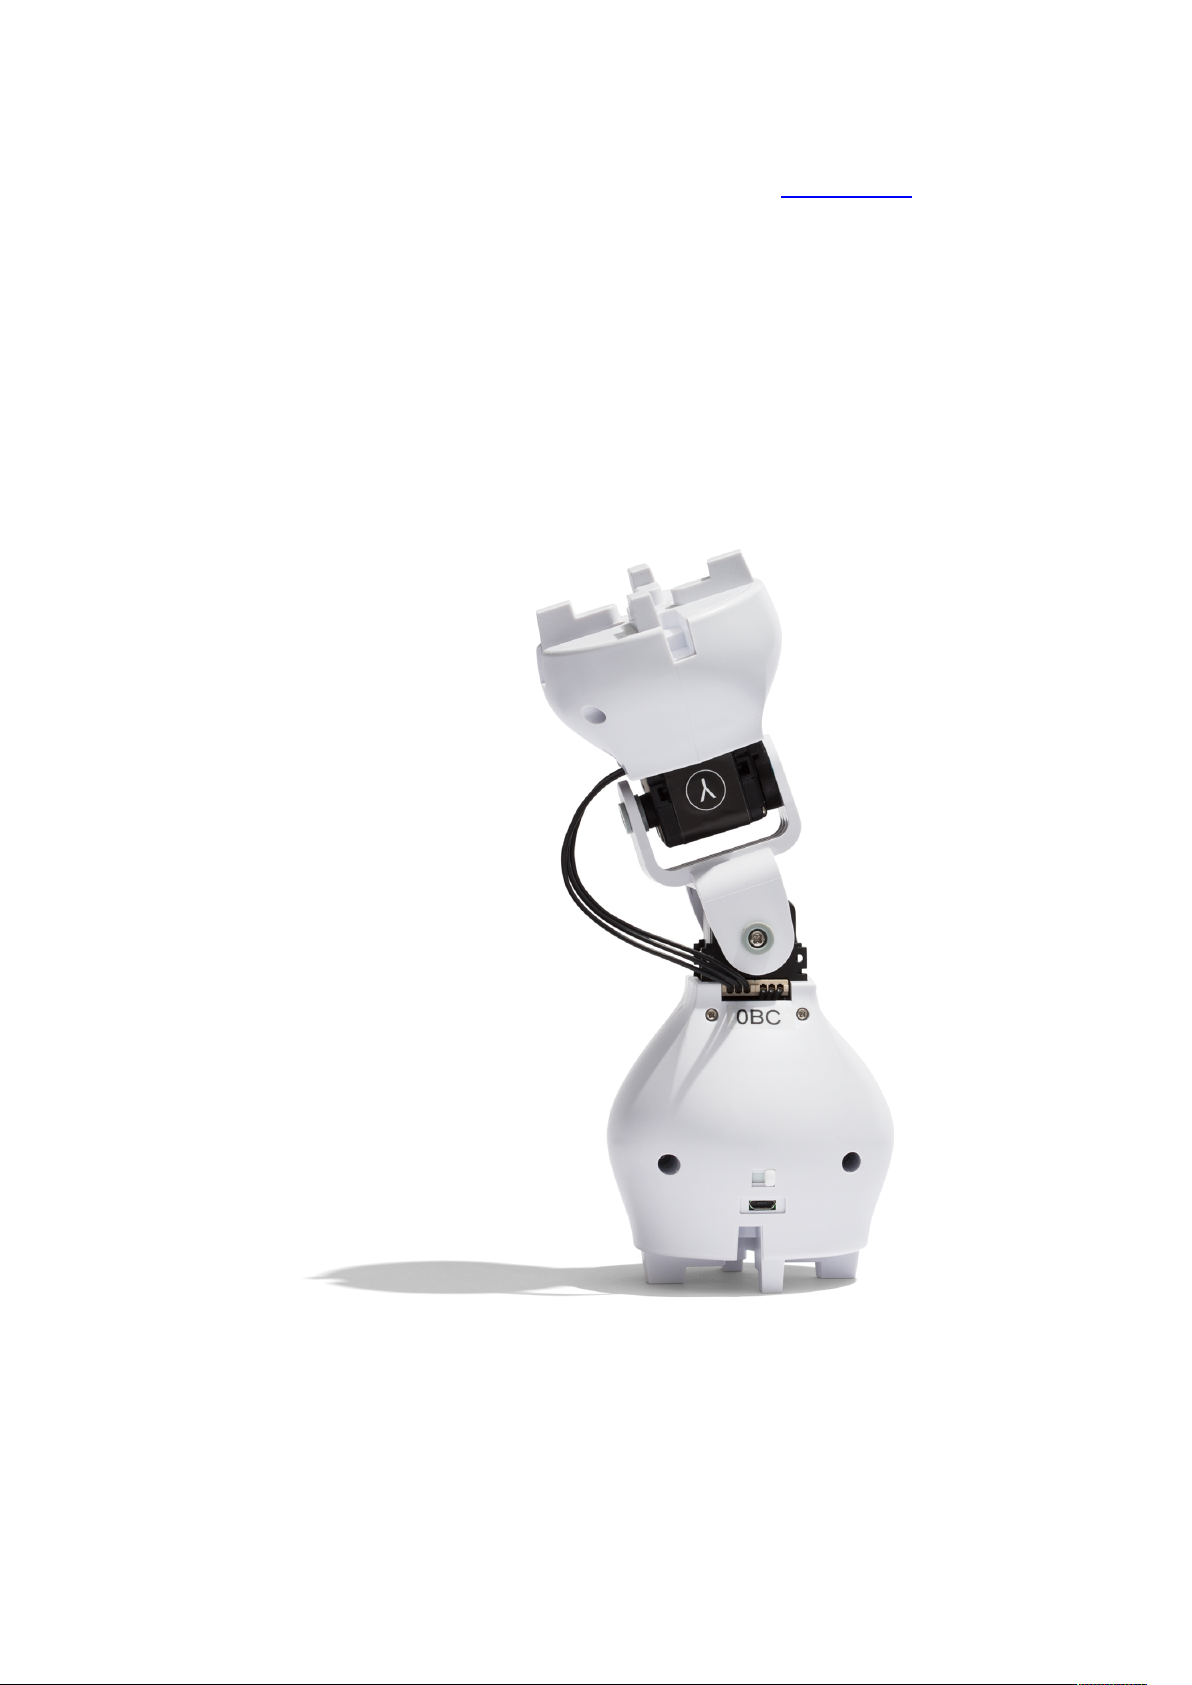
ID: Each Joint module has a unique ID written on the back of the module. This ID is used to
identify the module when using the Fable programming software, Fable Blockly.
On/Off: A switch is located on the back of the module. Using it will turn the Joint module on
or off.
Battery: The Joint module contains a rechargeable battery capable of 2-3 hours of normal
operation.
Charging: The battery is charged using a standard Micro-USB charger. Charging can take
several hours depending on how depleted the battery is and the type of charger used.
Figure 4 - Joint Module shown from the back.
7
Page 9

Spin Module
The Fable Spin Module allows the system to drive around on wheels. This is accomplished
with the help of two motors: A and B. It also provides sensor monitoring by utilizing ten sensors:
three light sensors, three color sensors, three proximity sensors, and an infrared sensor.
Wireless Communication: Spin modules are controlled wirelessly using the Hub.
DC motors: The two motors are identified as A and B and their position can be set to anything
between -32,768 and +32,767 degrees, marking a complete revolution every 360 degrees in
each direction. The direction of the two motors is mirrored, which means that to move in the
same direction, one of the motors has to be set to an angle opposite of the other. The speed
of movement of each motor can be controlled, and the angle can be measured at any time.
Headlights: The module has two headlights on the front (the side with the glass protector on
it). These can be turned off or on by the user.
Figure 5 - Front side of a Spin Module.
Light sensors: The Spin module contains three light sensors, allowing users to detect light
sources in the surrounding area (e.g. time of day, room lights) or directed light (e.g. phone
camera flash). The intensity of these light sources can be measured in percentage, from 0 (no
light) to 100 (strong light). The sensors can be measured at any time.
Color sensors: The Spin module also contains three color sensors, allowing users to detect
a color that is positioned close to them (up to 3 centimeters away). The color is represented
in a red-green-blue (RGB) scale. The observed color is strongly sensitive to light. We
recommend you turn on the headlights (see above) before trying to detect a color. The sensors
can be measured at any time.
8
Page 10
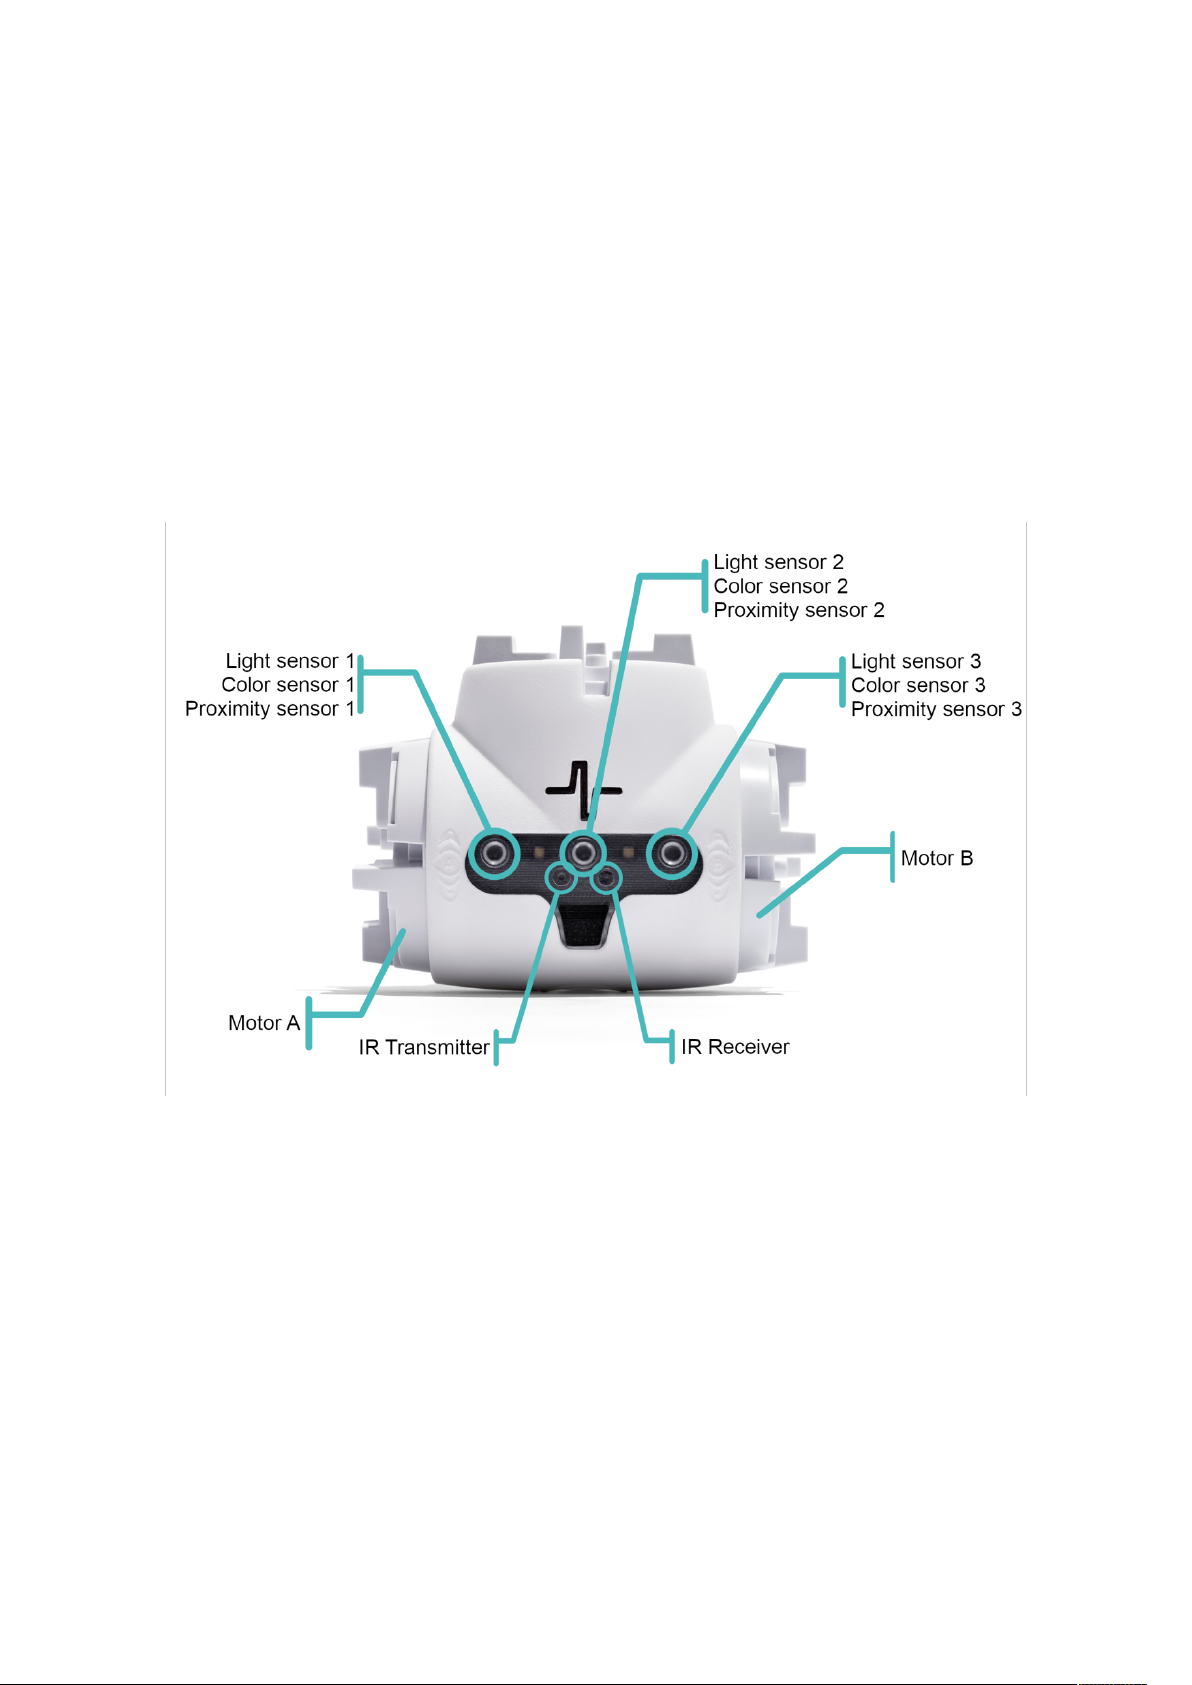
Proximity sensors: Three more sensors are available on the Spin, which can detect objects
in front of the module. The sensors work similar to the parking assistance system in cars,
where it can alert about obstacles in the way. The proximity of a foreign object can range from
0 (no obstacles detected) to 100 (obstacle detected very close to the module). The proximity
sensors can be measured at any time.
IR sensors: The two infrared sensors allow communication between multiple Spin modules.
A Spin module can be instructed to transmit a message through the IR Transmitter sensor,
while other modules can be instructed to listen for a message through the IR Receiver sensor.
If the module receives a message, an action can be triggered by the user, e.g. spin around
and go closer to the transmitting Spin module. Alternatively, another action can be triggered if
a message stops being received., e.g. goal line detection to spot a ball passing the goal line.
Figure 6 - Front side of a Spin Module.
Pairing: Spin Modules have a button which, if pressed, will change the LED color. The color
of the light indicates whether a Hub would be able to detect and pair with the module. Only
matching colored devices are able to communicate with each other, e.g. red Spin modules
with red Hubs.
Self-protection: Spin Modules continuously monitor the load and temperature on the motors
and the battery level. As a self-protection mechanism, modules will automatically turn off if an
overload or low battery level event is detected. You should avoid overloading, blocking or
pulling locked motors as they can be damaged.
9
Page 11

ID: Each Spin module has a unique ID written on the back of the module. This ID is used to
identify the module when using the Fable programming software, Fable Blockly.
On/Off: A button is located on the front of the module, over the glass protector. Pressing and
holding it for 3 seconds will turn the Spin module on or off.
Battery: The Spin module contains a rechargeable battery capable of 3 hours of normal
operation.
Charging: The battery is charged using a standard Micro-USB charger. Charging can take
several hours depending on how depleted the battery is and the type of charger used.
10
Page 12

PC Software
2
3
Users can program their robots by using the Fable software, Fable Blockly. The interface
supports block-2 and text-3 based programming:
The software supports three complexity levels:
Simple: Block-based programming for beginners or younger pupils. A limited number of
blocks makes the interface easily accessible.
Advanced: Block-based programming for more experienced users or older pupils. It supports
more advanced features such as math, functions, logic and variables.
Python: Text-based programming using the Python programming language.
Figure 7 – Short visual comparison between the different complexity levels.
Based on Google Blockly
Based on Python
11
Page 13

Interface of the PC Software
Main menu
Programming Categories
Programming Area
Status Bar
Python Code
Plotting Area
Figure 8 showcases the different sections of the main interface. These are as follows:
Contains buttons for:
• running a program (or stopping that program),
• project setup - starting a new project, loading, saving, or opening an example
• a settings menu,
• turning on the camera (which can be used for some programs),
• reading the Getting Started guide, and
• switching between block-based (Blockly) and text-based programming (Python).
Visible when using block-based programming. All of the available
blocks are sorted and placed in a category based on their function, e.g. all available arithmetic
operations are placed in the Math category.
Drag blocks from the categories section to this workspace. These
blocks will now be a part of the program that will be executed when the user presses the Run
button (see Main menu). The application uses vertical order to determine which block gets
executed first. If in Python mode, this area is replaced by a big space that allows code editing.
Shows the connected Hub and all of the active modules that are paired with it.
If a program is executed and has errors, those will be shown here.
All of the available blocks correspond directly to Python code, which makes
the transition to text-based programming a bit easier. This section visualizes how the
constructed program in the Programming Area will look like if it were written in Python.
Some blocks allow users to plot data, e.g. the data read from a sensor. The
result is shown in this section of the app.
Figure 8 – Main interface of Fable Blockly
12
Page 14

Chapter 2: Get started
Install Fable Blockly
The newest version of the software can be downloaded and installed from our website -
www.shaperobotics.com/download
Supported Operating Systems:
● Windows 7, 8 and Windows 10
● Mac OS starting with Mac OS X 10.10 Yosemite
● iOS for iPad
Please note that:
• On Windows 7: You need a driver for the Fable Hub. Please refer to the section Install
the Hub Driver.
• On Windows 8: You need a driver for the Fable Hub. Please refer to the section Install
the Hub Driver.
• On iPad: Some of the features are not available.
• On iPad: If you are using an older Hub (purchased before spring 2019), you might
need a firmware update to make it compatible with iPads. Please contact Shape
Robotics support for more information at support@shaperobotics.com.
13
Page 15

Install Fable Blockly on Windows
Click on the download button, then the Save File button on the popup window (Windows
version only).
Once the download is complete, go to the destination folder and double click on the FableSetup icon.
Once you have double clicked the Fable-Setup icon you should see a dialog box with a
progress bar indicating the status of the installation process.
Plug in a Fable Hub to your PC’s USB port. If you’re running Windows 7 or 8 see the following
section: Install the Hub Driver (Windows 7 & 8).
Start the PC Program by clicking this icon located in your Desktop.
14
Page 16
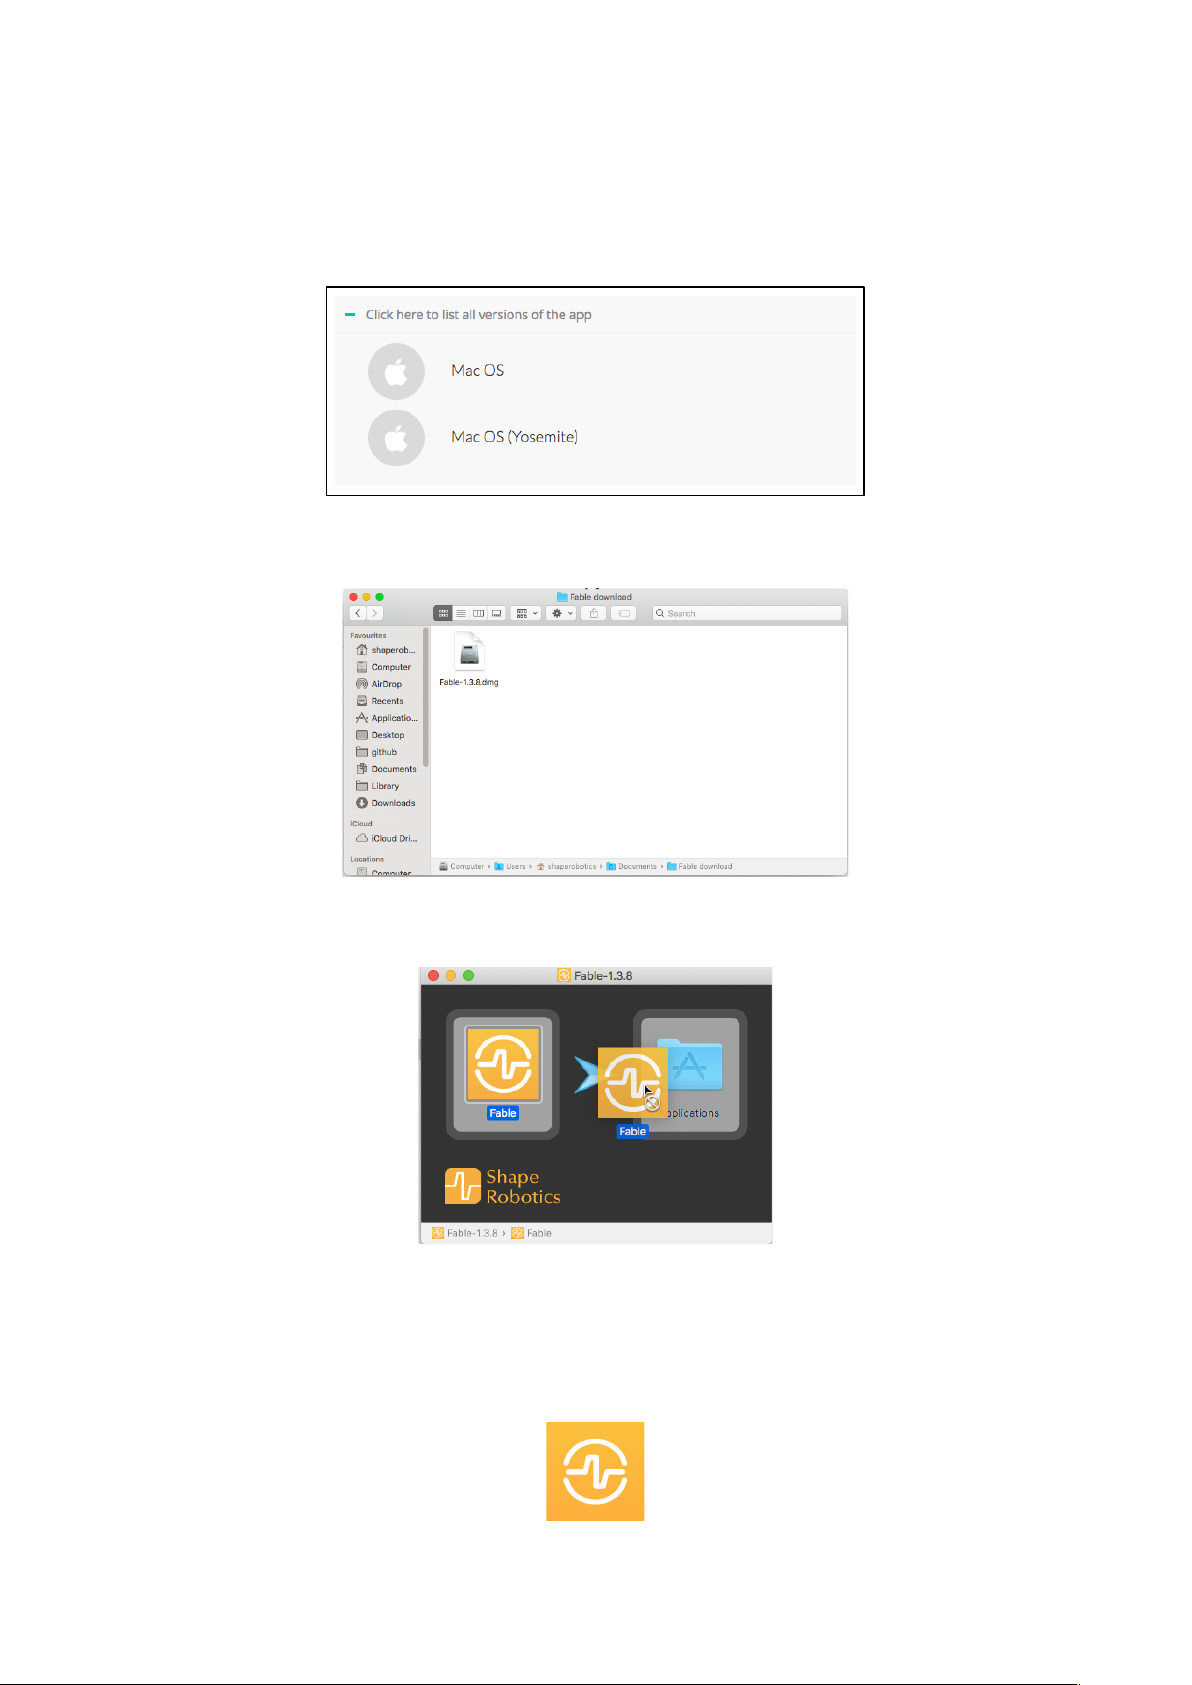
Install Fable Blockly on Mac
On Yosemite, download the version of the software specifically made for that version of Mac
OS. Otherwise, download the standard Mac OS version.
Open the downloaded file to start the installation process.
Drag the Fable icon on top of Applications. This will install the app.
Plug in a Fable Hub to your Mac’s USB port.
Fable Blockly can be started from the Launchpad or the list of applications.
15
Page 17

Install Fable Blockly on iOS for iPad
Launch the AppStore and find Fable Blockly.
Press the install button.
Once downloaded, plug in the Hub either to a computer’s USB port or to a power supply.
16
Page 18

Install the Hub Driver (Windows 7 & 8)
A driver for the Hub only needs to be installed on Windows 7 & 8.
Step 1: Windows will alert you that the driver is not installed. Once this happens, download
the driver from www.shaperobotics.com/download and unzip/extract in a folder. (See picture
1 below).
Step 2: Locate the Hub within Windows’ Device Manager application. It will be located under
the “Other devices” section with the name “Fable Dongle 1.0”. Right click it and select “Update
Device Software”. (See picture 2).
Step 3: Select the option “Browse my computer for driver software”. Then point folder
containing the driver that you downloaded you select it. Click “Accept” if Windows warns you
that the driver is unsigned. (See picture 3).
Step 4: The Hub driver should now be installed. It can be checked under the “Ports” section
in Device Manager. The Hub will automatically be assigned as a COM port. (See picture 4).
17
Page 19

How to write a program
To get started with programming Fable, follow these instructions:
1. Start Fable Blockly.
2. Turn on a Joint Module.
3. Pair the Fable Hub with the module.
4. Create a small test program as the one shown below:
5. Press the Run button located in the software’s main menu section.
6. If done correctly, the Joint Module should move back and forth between two positions
at 1 second intervals.
7. You can stop the program by pressing the Stop button. You can experiment with this
program by changing the example code.
18
Page 20

Chapter 3: Basics
Turning the Joint Module On/Off
The on/off switch can be found on the back of the module, as highlighted in Figure 9. Flick the
switch left and right to turn the Joint module on or off.
On: When the module is on, the module’s button will light up and the color will change when
pressing the button. This allows wireless programming of the Joint module.
Off: When the module is off, the colored light is off, unless it is being charged or the button is
being pressed. If the button is pressed while the module is off, the light will turn on to display
the level of the battery. See Battery Management for the color indicators of the battery level.
Turning the Spin Module On/Off
Fable Spin can be put into Sleep Mode by using the Shape logo button, as highlighted in
Figure 9. Press and hold the button for 3 seconds to turn on or off.
On: Similar to the Joint Module, when the module is on, the module’s button will light up and
the color will change when pressing the button.
Off: When the module is off, the colored light is off, unless it is being charged or the button is
being pressed. If the button is pressed while the module is off, the light will turn on to display
the level of the battery. See Battery Management for the color indicators of the battery level.
Figure 9 - Turn the switch left and right to turn the Joint module on or off (left).
For Fable Spin press and hold on the Shape logo for 3 seconds to turn off (right).
19
Page 21

Battery Management
Both the Joint Module and the Spin Module contain a rechargeable LiPo Battery.
Recharging: Charge the module using the supplied USB cable, similar to charging a phone.
It can be charged regardless of whether it is on or off.
Timeout: To save battery, the module will automatically turn off after being inactive for 10
minutes. To turn it on again, press the Shape logo button once (Joint and Spin), or flip the
on/off switch (Joint only).
Battery level:
When charging, the color of the module button will indicate the current battery level.
Alternatively, if the module is turned off, pressing the button on it will trigger the same action.
The battery level is indicated in a scale: Green = full level, yellow = medium level, red = low
level.
Self-protection: To protect the battery, the module will automatically power down if the
battery level becomes too low. Recharge the module to make it functional again.
Lifetime: To maximise battery lifetime, avoid full battery depletion before recharging.
Storage: If a module is to be stored for months without being used, it should be charged to
at least medium level (corresponding to a yellow glow) before being stored.
Figure 10 - Joint Modules being charged by using a charging station.
Each module shows a different battery level. Green depicts full battery, yellow is
medium level, and red is low level.
20
Page 22

Wireless communication
Fable Hub communicates with active modules wirelessly by using radio signals.
Channels: The radio signals can be on different channels, each of the channels
corresponding to a different LED color on both the Hub and the active modules. When a Hub
and a group of modules are on the same channel, i.e. same color, they are able to
communicate.
Color pairing: As stated above, the color on the modules and Hub indicates the radio
channel they are sending or receiving signals on. To pair modules with a Hub, simply match
the color by pressing their buttons. Figure 11 shows two paired modules, as they share the
same LED color (green).
Interference: Several Hubs and modules can be on the same channel. However,
performance will gradually decrease due to interference. In environments where many users
work with Fable robots, interference can be reduced by distributing evenly on different
channels.
Figure 11 - Paired Joint Module with a Fable Hub.
21
Page 23

Chapter 4: Troubleshooting
Hub not found
Symptoms: The Hub is not detected by the computer/software. The issue can be confirmed
by inspecting the status window in the PC software.
Possible issues and suggested solutions:
● Hub is frozen - plug out the Hub from the USB port and plug it back in
● Port is frozen - restart the computer
● Operating system is not supported - check list of supported OSs
● Driver not installed (Windows 7 & 8) - install driver and inspect Device Manager to
verify. See Install Hub Driver in Chapter 2.
● USB Cable broken - replace cable
● Hub broken - contact Shape Robotics
22
Page 24

Module not found
Symptoms: The Joint or Spin module does not show up with its ID in the graphical user
interface.
Possible issues and suggested solutions:
● The Hub is not connected (see Hub not found section above).
● The module is not turned on. Even if it has a color, it may be charging while turned
off. Verify that the module is turned on by following the instructions in Chapter 3.
● Ensure the Hub and the module are on the same channel.
● The module has crashed - try restarting the module by switching it off and then on
again.
● The module is broken - contact Shape Robotics.
Module overloaded
Symptoms: The Joint or Spin module blinks red and stops moving for a period of time.
Possible issues and suggested solutions:
● A motor on the module has been overloaded, i.e. commanded to perform a
movement which it does not have the strength to perform.
To solve, modify the program and/or robot configuration to avoid damaging the
motor.
● A motor has overheated.
To solve, let motor cool down.
Unable to connect Fable Face to Hub
Symptoms: The Face module is unable to find a Hub or fails to connect to it.
Possible issues and suggested solutions:
● On Android, the location permission needs to be provided in order to use Bluetooth
on any app. You need to ensure this is the case. Use the phone’s settings menu.
● If no devices are found and permissions are enabled, make sure Bluetooth is turned
on.
● Wait sufficient time before restarting the search or stopping the connection to a Hub.
23
Page 25

Chapter 5: Safety, handling and support
Important Safety and Handling Information
This device complies with part 15 of the FCC Rules. Operation is subject to the following two
conditions: (1) This device may not cause harmful interference, and (2) this device must
accept any interference received, including interference that may cause undesired operation.
Notice: Any changes or modifications not expressly approved by Shape Robotics for
compliance could void the user's authority to operate the equipment.
Warning: Failure to follow these safety instructions could result in fire, electric shock, injury,
or damage to Fable or other property. Read all the safety information below before using
Fable.
Not a toy: Fable is intended for use for educational purposes in schools and other
pedagogical contexts under the surveillance of an adult instructor. Do not let children use
Fable without supervision.
Handling: Handle Fable with care. It is made of plastic and has sensitive electronic
components inside. Fable can be damaged if dropped, stalled, pulled, overloaded, burned,
punctured, or crushed, or if it comes in contact with liquids. Do not use a damaged or
malfunctioning Fable module.
Repairing: Do not open any Fable modules, nor should you attempt to repair Fable yourself.
Disassembling Fable may damage it or may cause injury to you. If Fable is damaged,
malfunctions, or comes in contact with any liquids, contact Shape Robotics.
Battery: Don’t attempt to replace the battery in a Fable module yourself - you may damage
the battery or module, which could cause overheating and injury. The lithium-ion battery in
the module’s should be replaced only by Shape Robotics.
Charging: Charge Fable with the included USB cable and power adapter, or with another
certified USB charger or cable, with a maximum rating 5 V and 2.1 A. The USB cable should
have a maximum of 3 m in length. Using damaged cables or chargers, or charging when
moisture is present, can cause fire, electric shock, injury, or damage to Fable or other
property.
Denmark. If another power adapter is used other than the one delivered with the unit, the
used power adapter must have a built-in fuse (Danish National Condition, §5.6.1)
Medical device interference: Fable contains magnets, electronic components and radios
that emit electromagnetic fields. These fields may interfere with pacemakers, defibrillators, or
other medical devices. Maintain a safe distance of separation between your medical device
and Fable. Consult your physician and medical device manufacturer for information specific
24
Page 26

to your medical device. If you suspect Fable is interfering with your pacemaker, defibrillator,
or any other medical device, stop using Fable.
Extreme risks: Fable is not intended for use where the failure of the device could lead to
death, personal injury, or environmental damage.
Choking hazard: Some Fable accessories may present a choking hazard to small children.
Keep these accessories away from small children.
Operating climatic conditions: Fable is designed to work only in an indoor environment
with ambient temperatures between 0° and 35° C and stored in temperatures between 0°
and 45° C. Fable should not be used in high humidity environments, e.g. wet environments.
Fable can be damaged and battery life shortened if stored or operated outside of these
temperature ranges. Avoid exposing Fable to dramatic changes in temperature or humidity.
When you’re using Fable or charging the battery, it is normal for Fable to get warm.
Fable Support
Support information is available online at http://shaperobotics.com
For personalized support contact Shape Robotics at: support@shaperobotics.com
25
 Loading...