

Shanghai Leisheng Dynamics VIVANA Owner's Manual

Carried Standard: GB17761-1999
Owner’s Manual
(Battery Type: Lithium Battery)
Shanghai Leisheng D y nam ic s Technology Co.,L td.
Address: No.5788, Huyi Road Jiading District Shanghai
Phone:021-59583532
Website: www.shanghaileisheng.com

II
Contents
1. Notes .......................................................................................................................... 1
2. Bicycle type & use condition ..................................................................................... 1
3. Structure figure of E- bicycle ..................................................................................... 2
4. Safety height mark ..................................................................................................... 3
5. Before the first ride .................................................................................................... 4
6. Before every ride ........................................................................................................ 6
7. Night riding ................................................................................................................ 6
8. Braking system ........................................................................................................... 7
9. Shifting gears ........................................................................................................... 11
10. Reflectors ............................................................................................................... 14
11. Use of battery pack ................................................................................................ 16
12. Main technical parameters ..................................................................................... 18
13. Charging ................................................................................................................. 19
14. Charging warnings ................................................................................................. 20
15. Start the bicycle & adjust PAS ............................................................................... 20
16. Other notes ............................................................................................................. 21
17 Simple trouble shooting .......................................................................................... 21
18. Maintenance ........................................................................................................... 22
19. Tips ......................................................................................................................... 24
20. Important reminders ............................................................................................... 24

III
Congratulations on your purchase of Vivana electric bicycle.
Dear users! For your and others’ safety and also for ensuring the excellent and
stable performance of the bicycle, please ride your bicycle only after your careful
reading this manual.
The daily form and maintenance knowledge offered in this manual will enable you
to be familiar with the steering of the bicycle. Any improper operation may damage
your bicycle.
Owing to the constant technical improvements to the bicycle, the material object
may be a little different from the explanations presented in this manual. Therefore,
everything is subject to the material object.
Please read carefully and observe the contents indicated by the symbol“ ”.

1
1. Notes
Before riding, for your riding safety, please read the manual careful ly and check
the components are functioning properly. Contact your dealer if there are
problems.
Please observe traffic regulations; slow down in rain, snow and icy conditions;
increase the braking distance to guarantee your safety when to brake.
This bicycle is rain and snow proof, but not water-proof. Pay great attention to
that the inner circuits of the whole bicycle could be short circuited and the electric
instruments are damaged when the hub of the rear wheel motor is submerged in
water.
The battery adopted by the bicycle belongs to safe power supply, but more than
two hard contacts on the output end of the battery rack cannot be touched with
wet hands at the same time, much less with the metals. Otherwise, great
short-circuit current may be caused, which, in turn, may result in accidents.
Please pay more attention to this point!
Do not dismantle the components by yourself. For replacing the components,
please purchase the standard ones from our company.
For the safety of other people, please do not lend the bicycle to anyone who is
unfamiliar with it so as to avoid accidents.
2. Bicycle type & use condition
There is a wide range of electric bicycles. Ours are LEV (light electri c vehicles).
Each type of the electric bicycle is designed and assembled in accordance to the
particular purpose and use condition. The bicycles (or components) may go wrong if
they bear the ultimate pressure. The use condition for the electric bicycles is presented
in this section. Please consult your dealer when you are not sure of the bicycle type
you are using.
Use condition
Bikes designed for riding on a paved surface where the tires do not lose ground
contact.
Bikes designed for riding on smooth gravel roads and improved trails with
moderate grades where the tires do not lose ground contact.
The maximum weight of the rider is about 300 lbs (136 kg).
2
3. Structure figure of E- bicycle
(1) Frame
(2) Front Fork
(3) Saddle
(4) Seat Post
(5) Handlebar
(6) Handlebar Stem
(7) Grip
(8) Gear Lever
(9) Brake Lever
(10)Bell
(11) Console
(12) Front Hub
(13) Rim
(14) Tyre
(15) Front Brake
(16) Front Mudguard
( 17) Spokes
(18) Tire Valve
(19) Mudguard Stay
(20) Rear Mudguard
(21)Chain Guard
(22)Crank Arm
(23)Kickstand
(24)Chain
(25)Pedal
(26)Rear Derailleur
(27)Freewheel
(28)Hub Motor
(29)Rear Rack Stay
(30)Rear Rack
(31) Battery Pack
(32) Seat Post Clamp
(33) Rear Brake
(34)Frame Pullback Spring

3
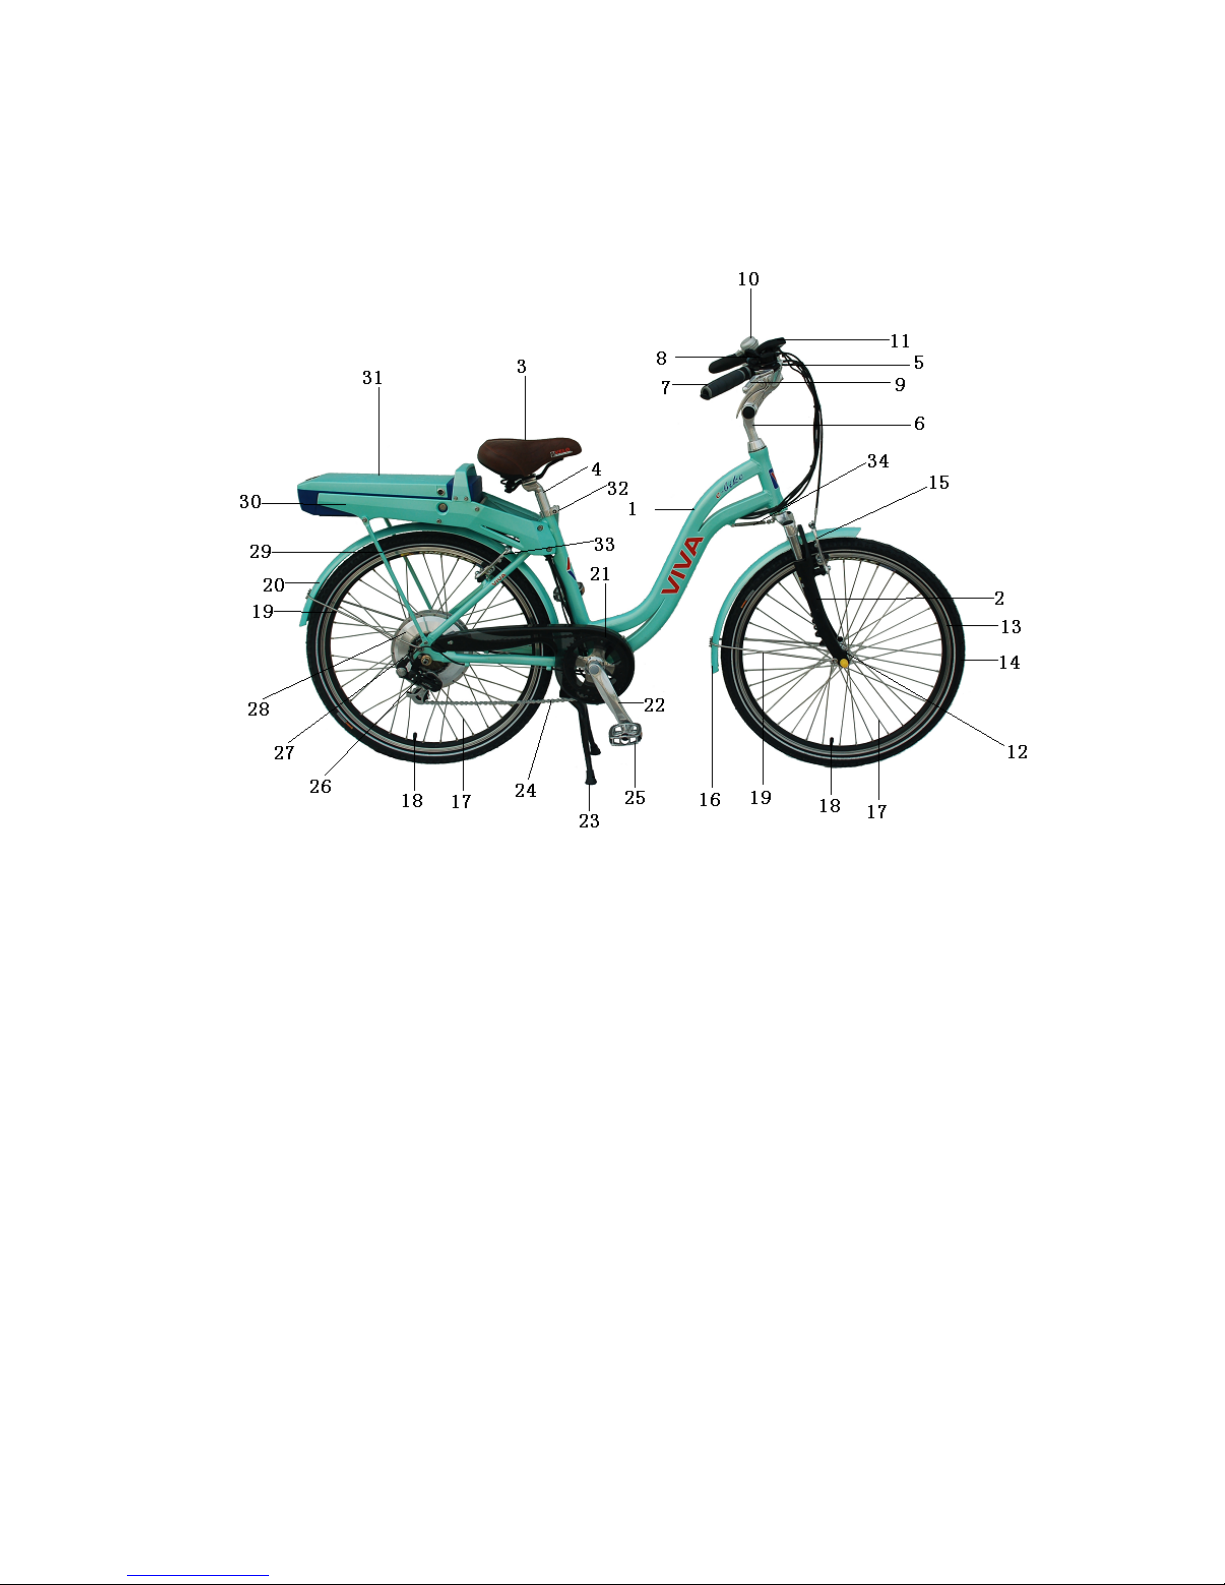
4. Safety height mark
Saddle position
When you sit on the saddle, your legs can slightly straighten with both feet on the
ground, and then the saddle height is the most suitable. If your feet can not touch the
ground when riding, you may fall. Therefore, you must adjust the saddle height
carefully.
Seat post MAX mark, also insertion mark, c an not be raised beyond the quick
release collar. If improperly used, serious injury may be caused to the rider (See
Figure 1).
Saddle angle: for preventing the rider leaning forward when riding, the front end
of the saddle is preferably upwarped slightly; adjust the saddle forward or
backward according to your height, generally, it is preferable that the seat post is
fixed in the middle of the saddle.(see Figure 2)
Handlebar stem height
Handlebar stem height can be adjusted according to your preference, but the
4
maximum height mark should be invisible. If improperly used, serious injury may be
caused to the rider. (See Figure 3)
5. Before the first ride
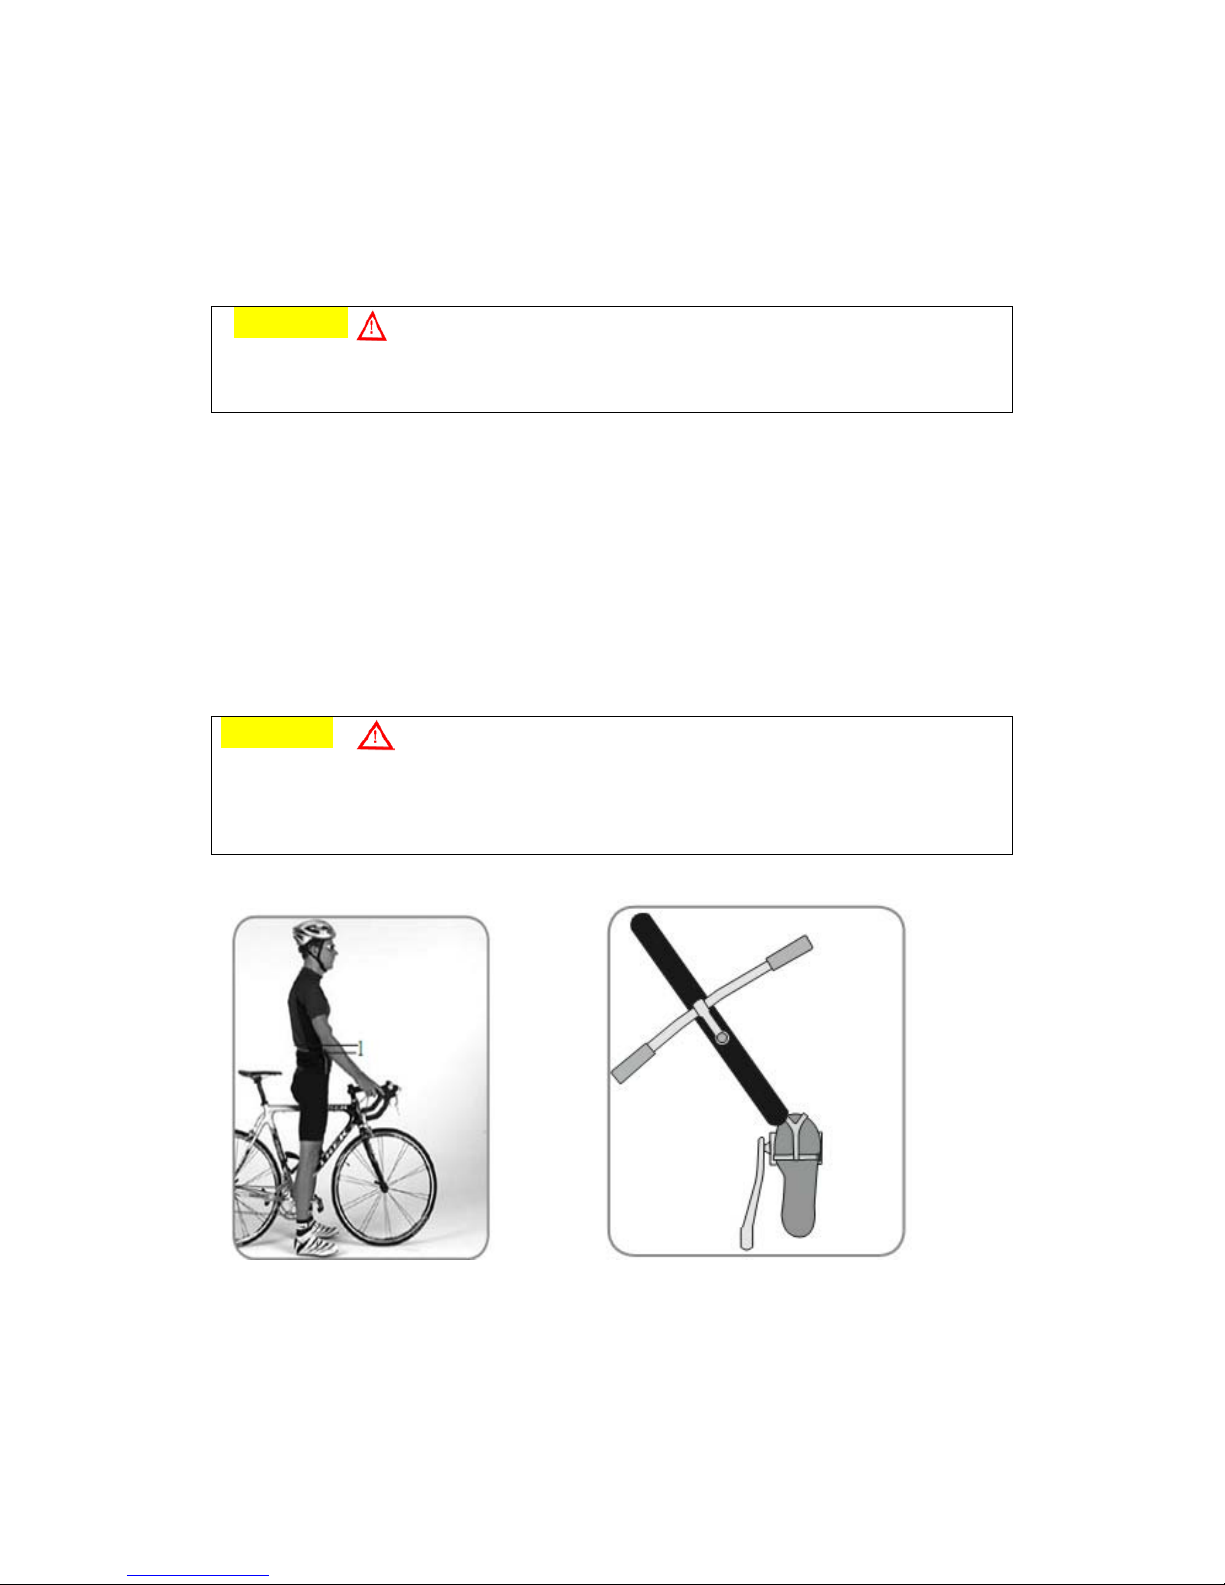
Make sure the bicycle fits
Your dealer should fit you with the proper size of bicycle. There should be at least
1inch (25 mm) clearance between the top tube and the rider when standing over the
bicycle (Figure 4). For mountain bikes, 2-3 inches (50-75 mm) clearance is
recommended. The seat and handlebar may be adjusted to offer the best comfort and
performance.
Know how the bicycle performs
The features of your bicycle, if misused, may cause you to lose control of the bike.
Before riding fast or in more difficult conditions, learn the function and performance
of all the mechanisms of your bike by riding at slower speeds in a flat, empty parking
lot.
If you want your bicycle to perform differently, or if you have special needs that
require different parts for the safe operation of your bike, consult your dealer.
Learn the power of your brakes
The stopping power on bikes varies according to the intended use of the bike. If you
would like your bike to have more, or less, stopping power, consult your dealer about
brake adjustments or other brake options for your bicycle.
WARNING
Misuse of the braking system, including over-use of the front brake, can cause you
to lose control and fall. Avoid improper braking by understanding and practicing
proper application of your brakes as explained in this manual.
5
Avoid your feet touch the front mudguard
When riding slowly, do not pedal if the handlebar is turned. It may be possible that
at very slow speeds, when the handlebar is turned, your feet may contact the front
wheel or mudguard (Figure 5). At normal riding speeds, the handlebar does not turn
enough for this to occur.
WARNING
Contact between your feet and the front wheel or mudguard can cause you to lose
control and fall. Avoid pedaling when turning at slow speed.
Stop riding, if the frame or front fork has problems
Occasionally riders experience problems with their frame or fork. If a frame or fork
has any problem, do not ride the bicycle.
As an example, in very rare cases, some riders may experience a “shimmy” or
“harmonic oscillation” or “frame vibration” at certain speeds. If you are experiencing
a shimmy, slow down immediately. Take your bicycle directly to a dealer for
inspection and repair.
WARNING
A shimmy, or steering wobble, can cause you to lose control and fall. If you
experience a shimmy, slow down immediately. Take your bicycle to your dealer for
inspection and repair.
Figure 4 Minimum stand-over height Figure 5 Toe-clip overlap
1 = 1" (25 mm) for most bicycles
2-3" (50-75 mm) for mountain bicycles

6
6. Before every ride
Checks before riding
For your riding safety, checks before riding should include the following items below:
Check tyre pressure.
Check the front and rear wheels are tightened. The torque setting of the front
wheel clamp nut is not less than 19.6 Nm and that of the rear wheel cl amp nut is
not less than 30 Nm.
The torque setting of the clamp nuts of handlebar and handlebar stem is not less
than 19.6Nm. The inserted part of the handlebar stem should be no less than 2.5
times the length of the diameter of handlebar stem(that is to say, the safety line
around the handlebar stem should be invisible).
The torque setting of the clamp nuts of saddle and seat post is not less than
19.6Nm. The inserted part of the seat post should be no less than 2.5 times the
length of the diamet er of seat post(that is to sa y, the safety line around the seat
post should be invisible).
There should be between 5-10 mm total vertical movement of the chain.
The brake should be adjusted to be reliable and flexible. Increase the braking
distance in rain and snow.
Check to ensure the quick releases for the bicycles that can be folded are
tightened!
7. Night riding
Riding a bicycle at night is many times more dangerous than riding during daylight
hours. It can be more difficult for motorists and pedestrians to see you while riding
your bicycle at night. However, a lighting system does not provide the same amount
of light as daylight and therefore we remind you to ride at your own risk. We do
advise that children should never ride at dawn, at dusk or at night and adults ride at
their own discretion.
If you choose to ride under conditions of poor visibility, always check to ensure
you comply with local laws pertaining to riding a bicycle at night and take the
following strongly recommended additional precautions:
Make sure your bicycle’s lighting system is operating properly, is correctly
positioned and securely mounted.
Always wear reflective and brightly coloured clothing and accessories such as
reflective vest, reflective arm and leg bands, and reflective strips on your helmet.
 Loading...