

Page 1
USER’S MANUAL
Mobile Printer
BTP-P35
Shandong New Beiyang Information Technology Co., Ltd.
Page 2

BTP-P35 User’s Manual
-1-
Contents
1 Introduction..................................................................................................... -1-
1.1Outline.......................................................................................................-1-
1.2Main features........................................................................................... -2-
2 Main technical specification......................................................................... -3-
2.1 Technical specification............................................................................-3-
2.2 Paper specification.................................................................................-5-
2.2.1 Parameters of continuous paper..................................................-5-
2.2.2 Parameters of black marked paper..............................................-6-
2.2.3 Recommended paper.....................................................................-7-
2.3 Print and tear-off position......................................................................-7-
2.3.1 Print position.................................................................................... -7-
2.3.2 Tear off position............................................................................... -8-
3 Appearance and components......................................................................-9-
3.1 Apperance and components.................................................................-9-
3.2 Accessories introduction..................................................................... -10-
4 System function and settings.....................................................................-15-
4.1 Explanation of panel............................................................................ -15-
4.1.1 Appearance panel.........................................................................-15-
4.1.2 Button function.............................................................................. -15-
4.2 System menu:.......................................................................................-16-
4.3 Main parameter setup..........................................................................-20-
4.4 Buzzer function.....................................................................................-24-
4.5 Swipe card function..............................................................................-25-
5 Printer communication interface............................................................... -26-
5.1 USB interface........................................................................................-26-
5.2 WIFI interface........................................................................................-26-
Page 3

BTP-P35 User’s Manual
-2-
6 Installation printer........................................................................................ -28-
6.1 The host accessories...........................................................................-28-
6.2Precautions for using the printer........................................................ -28-
6.3 Power cable connection......................................................................-29-
6.4 Paper roll installation........................................................................... -31-
6.4.1 Confirmation of printing paper.................................................... -31-
6.4.2 Install / replace the paper roll......................................................-31-
6.5 Printer connecting installation............................................................ -33-
6.5.1 Printer belt clip installation.......................................................... -33-
6.5.2 Shoulder strap connection (optional configuration)................ -34-
6.6 Printer power on and self-test............................................................-34-
6.6.1 Power on the printer.....................................................................-34-
6.6.2 Print the self-test page.................................................................-34-
6.7 Connect the communication interface..............................................-35-
6.7.1 USB interface connection............................................................-35-
6.7.2 WIFI connection............................................................................ -35-
7 Routine maintenance..................................................................................-36-
7.1 Cleaning print head and platen roller................................................-36-
7.2 Cleaning marked sensor..................................................................... -37-
7.3 Remove paper jam...............................................................................-37-
8 Troubleshooting........................................................................................... -38-
8.1 Printer doesn’t work.............................................................................-38-
8.2 LCD alarm and buzzer alarm.............................................................-38-
8.3 Problems during printing.....................................................................-39-
9 Appendix........................................................................................................-40-
9.1 Printer driver installation on windows............................................... -40-
9.2 WIFI connection....................................................................................-40-
9.3 FCC STATEMENT................................................................................-40-
Page 4

BTP-P35 User’s Manual
-3-
Declaration
Information in this document is subject to change without notice.
SHANDONG NEW BEIYANG INFORMATION TECHNOLOGY CO., LTD.
(hereinafter referred to as “SNBC”) reserves the right to improve product as
new technology, components, software, and firmware become available. If
users need further data about this product, please feel free to contact your
dealer or the manufacturer.
No part of this document may be reproduced or transmitted in any form or
by any means, electronic or mechanical, for any purpose without the
express written permission of SNBC.
Copyright
Copyright © 2016 by SNBC.
PrintedinChina.
Version 1.0.
Tr ademark
Our registered trademark: .
Warning and caution
Warning: Items shall be strictly followed to avoid any damages to
body and equipment;
Caution: Items with important information and prompts for operating
the printer.
Page 5

BTP-P35 User’s Manual
-4-
SNBC has passed the following certifications:
ISO9001 Quality Control System Certification
ISO14001 Environmental Management System Certification
OHSAS18001 Occupational Health and Safety Management System
Certification
IECQ QC 080000 Hazardous Substance Process Management System
Certification
BTP-P35 has passed the following certifications:
Warning
This is class A product. The product may cause radio
interference in the working environment. Users need to take
feasible measures
Page 6

BTP-P35 User’s Manual
-5-
General Safety Information
Before installing and using the printer, please read the following items
carefully.
Safety instructions
Warning: Don’t touch the tear bar of printer.
Warning: The print head is a thermal element and it is at high temperature
during printing or just after operation. Therefore please do not touch it
and its peripherals for safety reasons.
Warning: To prevent static electricity damages print head, do not touch
either print head or connecting parts.
Warning: Replace the battery with the wrong type. There is a danger of
explosion. Dispose of the battery in accordance with the instructions.
Caution
1) There are reserved space around the printer for operation and
maintenance;
2) Keep the printer away from water source, and avoid direct exposure to
sun light, strong light and heat of fire.
3) Do not use or store the printer in a place exposed to high temperature,
moisture and serious pollution.
4) Do not place the printer on a place exposed to vibration or impact.
5) No dew condensation is allowed to the printer. In case of such
condensation, do not turn on the power until it has completely
evaporated.
6) Connect the power adapter to an appropriate grounding outlet. Avoid
Page 7

BTP-P35 User’s Manual
-6-
sharing a single electrical with large power motors and other devices
that may cause the fluctuation in voltage.
7) The power outlet should be close to the printer for easy connection
8) Do not let the water or t he electric materials (like metal) go into the
printer. If this happen, turn off the power.
9) The printer cannot print in the state without paper, otherwise it will
seriously damage the print head.
10) In order to ensure the print quality and lifetime, you should use
recommended paper or its equivalents.
11) When inserting or disconnecting each interface, you must turn off the
power, otherwise it may cause damage to the printer control circuit.
12) The printer should only be disassembled or repaired by a technician,
who is certified by the manufacturer.
13) Do not use the battery soaking in water. Do not disassemble
squeezing, strike or put it into the fire. In case of serious bulging, do
not continue to use. Do not put it in high temperature environment.
14) Keep this manual safe and at hand for ready reference.
Page 8

BTP-P35 User’s Manual
-7-
Page 9

BTP-P35 User’s Manual
-1-
1 Introduction
1.1 Outline
BTP-P35 is a thermal mobile receipt printer with high print quality, fast
speed, stable performance, long standby time and small portability. It is
widely used in retail, government, law enforcement, insurance, logistics
and other fields.
The product is mobile printer supporting for POS, BPLC command sets,
and provide characters, graphics, barcode and other printing functions. The
printer supports continuous paper, black marked paper (you need to
configurate with optional transmissive sensor) and other consumables. The
width of consumables is 60mm or 80mm. The printer supports automatic
calibration, standard configuration USB interface. You can select two kinds
of communication interfaces like WIFI. We provide man-machine
interaction interface composed of OLED screen, four buttons and buzzer.
The printer supports firmware updating. Software supports Windows,
Android, IOS, Linux, OPOS, JPOS and other system applications.
This product provides 2600mAh large capacity battery, and have
power-saving mode. This product supports automatic sleep, wake-up and
auto power off function.
This product loads paper easily on structure design, the appearance of
modules using double material injection molding process. The housing is
rubberization for resisting vibration and dropping.
This product configurates with power adapter, belt clip, USB cable and
other accessories, and optional magnetic card/IC POS machine point of
sale machine, battery charger, vehicle-bone charger, IP54 protection case
Page 10

BTP-P35 User’s Manual
-2-
(Waist bag) shoulder strap, and other accessories.
1.2 Main features
Easy paper loading
Simple operation and easy maintenance
Printing supports continuous paper and marked paper
Compatible with a variety of width paper
Alarm when paper end
Communication interface is optional
The printer firmware program can be upgraded online
Page 11

BTP-P35 User’s Manual
-3-
2 Main technical specification
2.1 Technical specification
The parameters are under the standard test paper conditions.
Model
BTP-P35 mobile printer
Print method Thermal
Print resolution 203dpi
Print width (Max.) 72mm
Print speed
Max.102mm/s.
Factory default value is 76.2mm/s
Print length 10-1000mm
Paper out method Tear-off mode
Memory 64MB RAM, 4MB Flash
Communication interface
Standard configuration : USB 2.0 (12Mbit/s)
Optional configuration: WIFI
IC card/magnetic card reader Optional configuration
CPU RISC CPU of 32 bits
Anomaly detection
Paper end detection, power shortage detection, open
cover detection, print head high temperature protection
Electricity saving mode Automatic sleep mode, automatic wake-up mode
Operation panel 4 buttons, standard configuration OLED screen, buzzer
Character support (ESC/POS
command)
Character Set (ESC/POS): built-in standard ASCII
character (9X17,12X24), user-defined characters,
standard configuration of Chinese (24 × 24) supports
simplified Chinese (2312), English (ASCII), optional
configuration supports simplified Chinese (18030 or
GBK), traditional Chinese, the United States, Britain,
Japan and Korea. Users can download fonts to FLASH
or RAM
Page 12

BTP-P35 User’s Manual
-4-
1D barcode (ESC/POS
command)
UPC-A, UPC-E, JAN13 (EAN13), JAN 8 (EAN8),
CODE39, ITF, CODABAR, CODE93, CODE128
2D barcode (ESC/POS
command)
PDF417, QRCODE, MAXICODE, GS1
Graphic format
Plain bitmap in binary system. HEX, PCX, BMP and
IMG.
Image files can be downloaded to FLASH, RAM
Command set ESC/POS, BPLC
Application
software
Driver Windows, OPOS, JPOS, Linux CUPS
Tool
Printer configuration tool, supports Windows system,
POS command, WIFI / USB, WIFI configuration tool
Paper
specification
Paper type
black marked paper, continuous paper
Paper
thickness
0.06mm ~ 0.16mm
paper roll ID 12.5mm
paper roll OD Max. 50mm
Paper width
60mm/80mm+0.5mm
Battery
Battery
capacity
2600mAh, lithium battery
Charging
method
Can be charged without take out the battery
Charging time 3.5 hours
Continuous
printing time
Not less than 30min
Full-power
printing
distance
190 meters
Input voltage AC100-240VAC/50~60Hz
Page 13

BTP-P35 User’s Manual
-5-
Output
voltage
12VDC±5%, 2.0A
Environmental
condition
Working
temperature
Temperature:-20~50℃,
Humidity:10~90% non-condensation
Storage
temperature
Temperature:-20~60℃,
Humidity: 10~90% non-condensation
Accessory
Standard
configuration
Battery, power adapter, operation guide, test paper roll,
USB data cable, belt bag
Optional
configuration
Single battery charger, vehicle-bone charger, sheath,
shoulder strap and so on
Protection
standard
Ratings dust
and water
resistance
IP54 (With waist bag)
Ratings
dropping
resistance
1.5 meters (bare printer)
ESD
Air discharge 10KV
Contact discharge 8KV
Vibration
resistance
can work normally under vibration condition (carry-on or
vehicle travel may have vibration)
Physical
features
Reference
size
113.5mm×165.5mm×61.5mm (W×L×H)
Reference
weight
About 500g (contain battery)
2.2 Paper specification
2.2.1 Parameters of continuous paper
Paper width: 80±0.5mm/60±0.5mm
Maximum paper roll OD: Φ50mm
Page 14
BTP-P35 User’s Manual
-6-
Paper thickness: 0.06—0.1mm
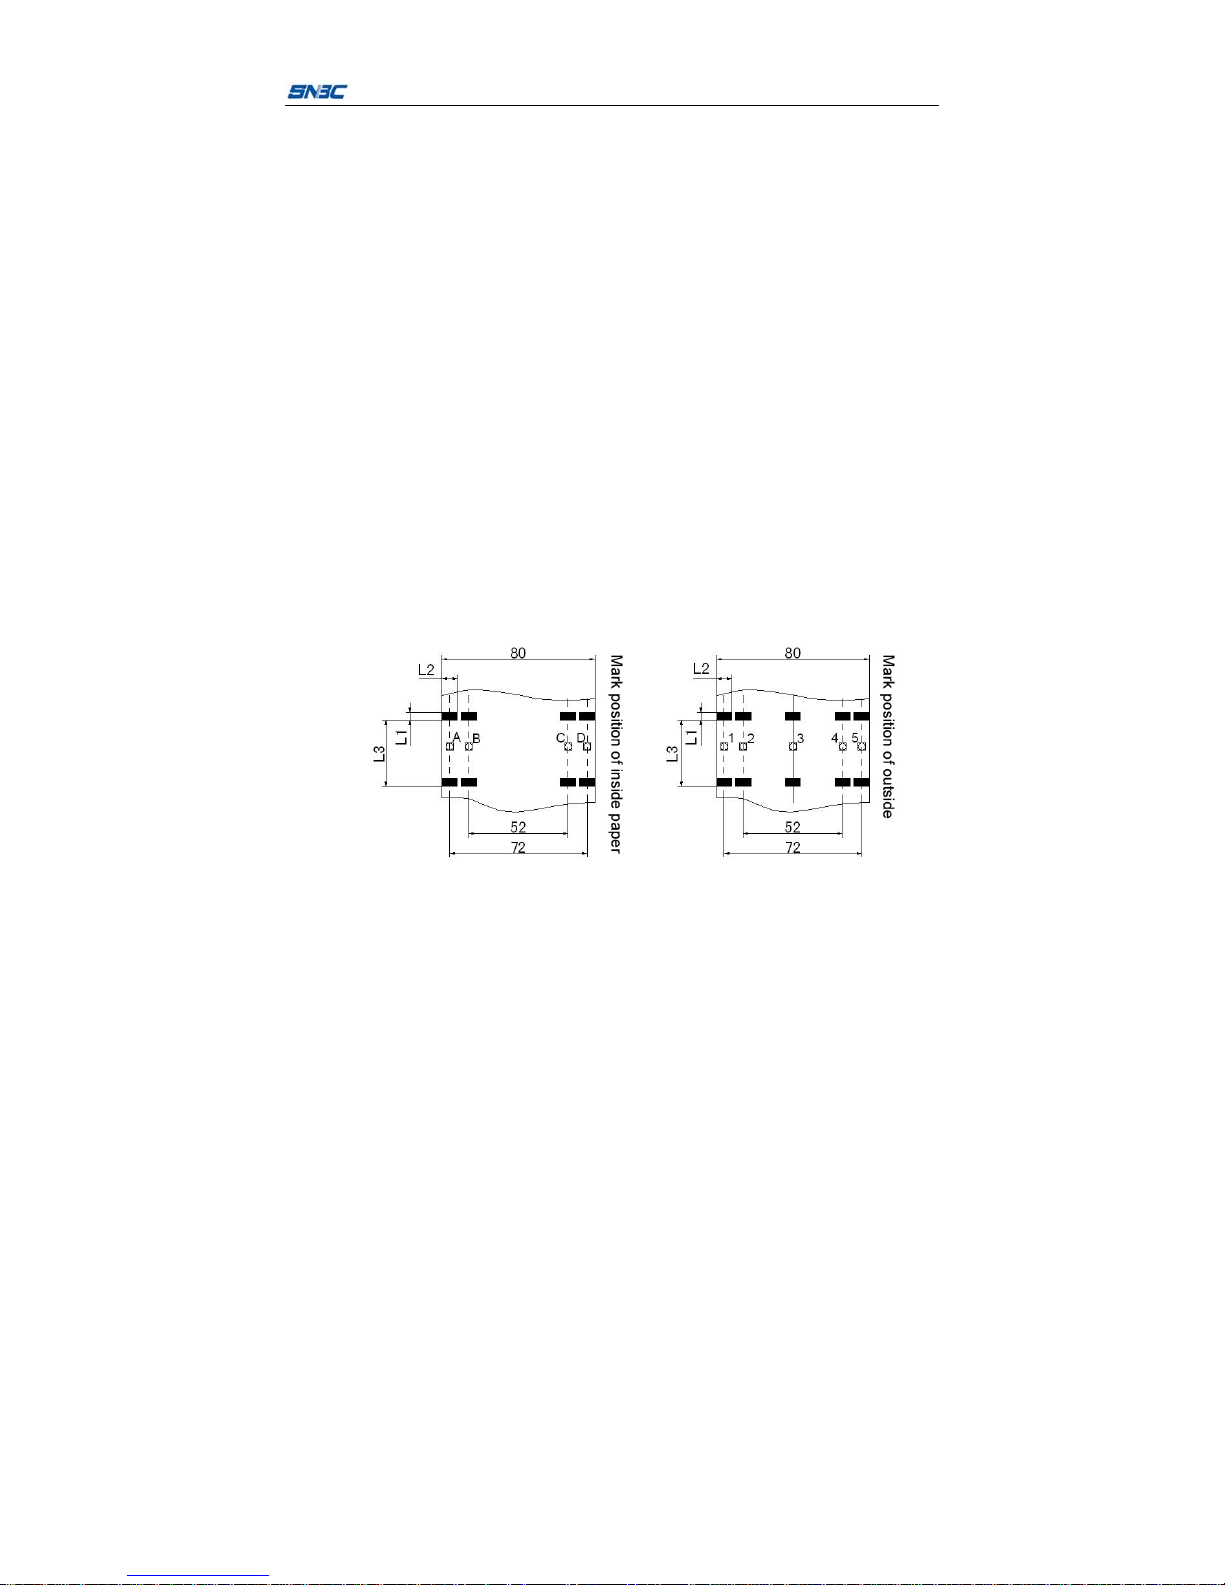
2.2.2 Parameters of black marked paper
The marked paper should meet the following requirements:
1) Mark position
There are nine positions installed mark sensors which can detect the
mark on the front or back of the paper. A to D position of sensor to
detect the inner mark of the paper roll. 1 to 5 position of sensor detect
the outer mark of the paper roll. The position of the sensor is shown in
the figure.
When the printer leave the factory, we can add the mark sensor and
position configuration according to the requirement. The mark sensor
is located on the left side (paper feed direction) of the paper by default,
and is used to detect the mark of paper front with width of 80 mm,
Figure 1 shows the position.
2)
When select the mark paper, we recommended following paramether:
L1 mark height: 2mm≤L1≤8mm
L2 mark width: 8mm≤L2≤paper width
Page 15

BTP-P35 User’s Manual
-7-
L3 space between marks: 10mm≤L3≤1000mm
3) The reflectivity of the mark part is less or equa l t o 15%, and the
reflectivity of the other part of the paper in the direction of the paper feeding
mark width is more than or equal to 85%. There should be no any pattern in
theareabetweenthetwomarkslikeadvertisement.
Caution:
Please use the same quality paper, otherwise it will affect the print
quality and even reduce the lifetime of the print head and tear-off bar;
Do not stick paper to the paper roll core.
2.2.3 Recommended paper
Use paper of the same quality or higher quality as the random paper roll,
otherwise this may affect print quality and even reduce the lifetime of the
print head and tear-off bar.
2.3 Print and tear-off position
2.3.1 Print position
L1: Paper width
L2: Print width
L3: Distance from the print content to the left edge
L4: Distance from the print content to the right edge
For different paper width (L1), the print width (L2) and the distance from
print content to left and right edges L3 / L4) will change according to the
Page 16
BTP-P35 User’s Manual
-8-
following table:
Paper
width (L1)
Print
width
(L2)
Distance from the print
content to the left
edge(L3)
Distance from the print
content to the right
edge(L4)
80mm 72mm 4mm 4mm
60mm 52mm 4mm 4mm
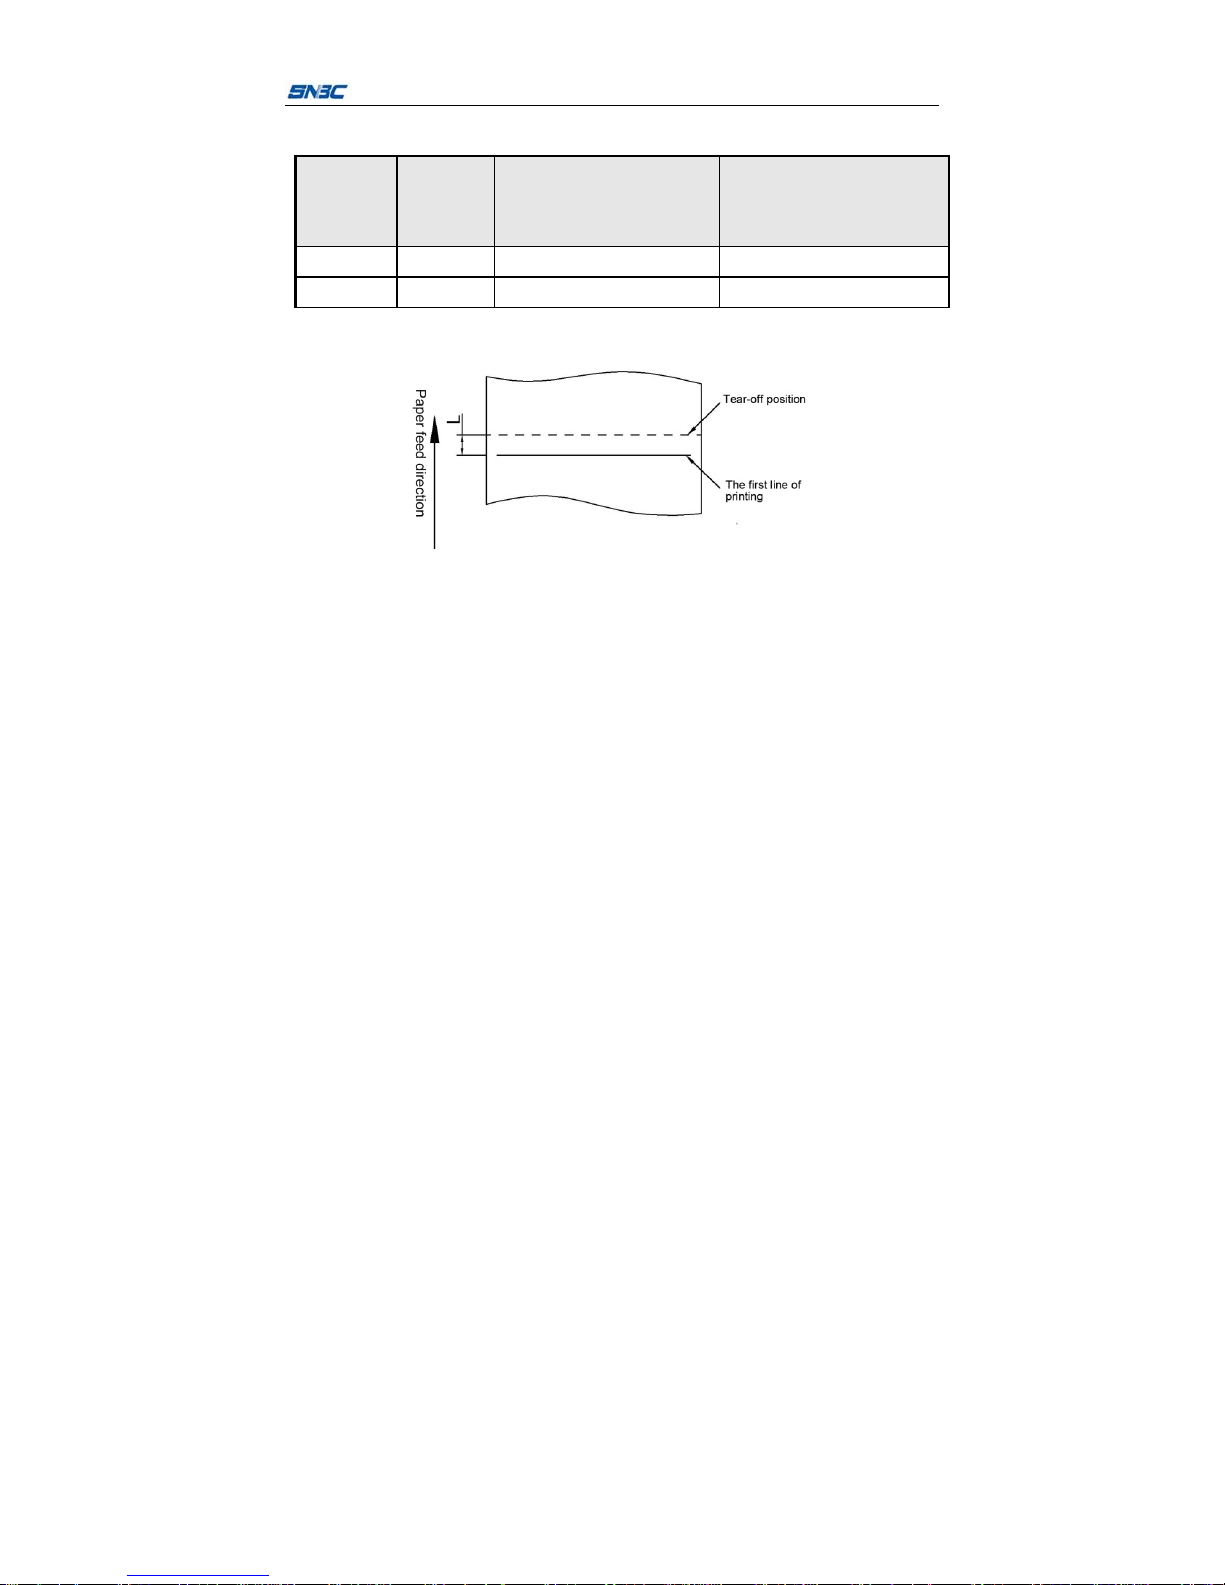
2.3.2 Tear off position
Page 17

BTP-P35 User’s Manual
-9-
3 Appearance and components
3.1 Apperance and components
1——Bottom cover 2——Top cover of
paper cabinet
3——Top cover
4——Liquid crystal button 5——LCD 6——Shoulder strap
7——Communication interface
sealed cover
8——Paper cabinet
button
9——Belt clip
10——Battery 11——Print platen
roller
12——Transmissive
sensor 1
13——Print channel board 14——Reflective
sensor(optional
configuration)
15——Print module
16——Paper cabinet torque spring 17——Paper guide 18——Paper cabinet
Page 18

BTP-P35 User’s Manual
-10-
19——Tear-off bar 20——Reflective
sensor(standard
configuration)
21——Mechanism
bracket
22——Platen roller pothook 23——Transmissive
sensor 2
24——Print head
25——Swipe
card module
(optional
configuration)
Caution:
Paper guide is an indispensable part which adjusts the width of paper.
You should pay attention to the proper use.
3.2 Accessories introduction
The following contents are introduction and pictures of accessories like
battery, power cable, power adapter, battery charger, vehicle-bone charger,
IP54 protective cover, shoulder strap.
Name Picture Explanation
Lithium battery Power supply
Page 19

BTP-P35 User’s Manual
-11-
2A Power
adapter
(Chinese
standard)
1. Chinese
standard area use
2. Charge the
printer
3.Matchupa
lithium battery
charging cradle to
charge a single
lithium battery
2A Power
adapter (US
standard)
1. US standard
area use
2. Charge the
printer
3. Match up a
lithium battery
charging stand to
charge a single
lithium battery
2A Power
adapter (UK
standard)
1. UK standard
areas use
2. Charge the
printer
3.Matchupa
lithium battery
charging cradle to
charge a single
Page 20

BTP-P35 User’s Manual
-12-
lithium battery
2A Power
adapter (EU
standard)
1. EU standard
area use
2. Charge the
printer
3.Matchupa
lithium battery
charging cradle to
charge a single
lithium battery
Lithium battery
charging cradle
Use for charging a
lithium battery
5A Power
adapter
Connect power
connector
and lithium battery
charging cradle
and charge four
lithium batteries at
thesametime
Page 21

BTP-P35 User’s Manual
-13-
AC power cord
(Chinese
standard)
1. Chinese
standard area use
2. 5A Power
adapter AC power
cord
AC power cord
(US standard)
1. US standard
area use
2. 5A Power
adapter AC power
cord
AC power cord
(UK standard)
1. UK standard
areas use
2. 5A Power
adapter AC power
cord
AC power cord
(EU standard)
1. EU standard
area use
2. 5A Power
adapter AC power
cord
One pin
transfers into
four pins power
connector
Connect 5A power
adapter and lithium
battery charging
cradle and charge
four lithium
batteries at the
Page 22

BTP-P35 User’s Manual
-14-
same time
Vehicle-bone
charger
1. Charge the
printer
2.Matchupa
lithium battery
charging stand to
charge a single
lithium battery
Protection
case(waist bag)
This is optional
accessory used for
BTP-P35 mobile
printer
Shoulder strap This is optional
accessory used for
BTP-P35
Page 23

BTP-P35 User’s Manual
-15-
4 System function and settings
4.1 Explanation of panel
4.1.1 Appearance panel
4.1.2 Button function
Button Function Explanation
Power button
1. On / off
2. Sleep / wake-up
state
In the power on state, press [Power] button
for a long time to turn off the printer.
In the power off state, press the [Power]
button for a long time to turn on the printer.
In the working stat, press [Power] button
for a short time to enter the sleep mode.
In the sleep state, press the [Power] button
for a short time to exit the sleep mode.
In the power off state, press the [Power]
button for a short time for no response.
Configuration
button
1. Enter the
configuration
Press [Configuration] button in the idle or
pause state
The printer enters the configuration state
and allows menu configuration
1. Go to the
submenu
2. Enter parameter
configuration
3. Switch the
parameter position
4. Confirm the
configuration
5. Execute menu
operation
Press [Configuration] button in
configuration state
1. When the current menu has sub-menu,
select it and enter the current sub-menu
2. The current menu has no sub-menu but
there is parameter adjustment, enter the
parameter configuration
3.You need to adjust the cursor position
when the parameters to be adjusted have
many bits
4.Confirm the current parameter
configuration and return to the parent
menu
Page 24

BTP-P35 User’s Manual
-16-
5. When the current menu has no
submenu and no parameter adjustment,
the current menu operation is selected and
executed
Paper feed
button/ up button
Paper feed
Press the [Feed] button in the idle state:
paper feed
Pause printing
Press the [Feed] button in the working
state: pause printing
Resume printing
Press the [Feed] button in the pause state:
1. If you paused a print job before, resume
printing
2. If there is no pause print job, return to
the main page
1. Page up
2.Ajust parameter
up
Press the [UP] button in the configuration
state:
1. Select the previous menu
2. Increase the a djustment parameter by
degree when the parameter is adjusted
Pause
button/Down
button
Pause
Press the [Pause] button in the
non-configuration state
The printer enters pause state
1. Page down
2. The parameter
is adjusted
downward.
Press the [Down] button in the
configuration state
1.Select the next menu when select the
menu
2.Decrease the adjustment parameter by
degree when the parameter is adjusted
4.2 System menu:
First class menu Second class menu Third class menu
Fourth
class menu
Number Content Number Content Number Content Content
1 Setup 1 Print setup
1 Print mode
Rewind
mode,
tear-off
mode,
2
Sensor
selection
Standard
configuration
reflective
sensor,
Page 25

BTP-P35 User’s Manual
-17-
optional
configuration
reflective
sensor,
optional
transmmisive
sensor
3
Print
darkness
00~30
4
Print
speed
02~04 IPS
5
Paper feed
when start
up
No feeding.
Start
calibration.
Fix position
to label
6
Close
cover and
feed paper
No feeding.
Start
calibration.
Fix position
to label
7
retract
paper
setup
Enabled;
Disabled
Back to
second
class
menu
2
Paper setup
1 Paper type Continuous
paper;
Page 26

BTP-P35 User’s Manual
-18-
marked
paper;
continuous
paper
2Left
margin
0~49mm
3 Right
margin
0~49mm
4 Label
length
0~8000
5 Label
width
0~5000
6Horizontal
offset
0~800
7 Vertical
offset
0~199
8 Tear-off
position
0~199
9 Detect
paper
when idle
Enabled;
Disabled
10 Back to
previous
level
3
Sensor setup
Code setup
1 Paper
sensor
threshold
0~255
2Mark
sensor
threshold
0~255
Page 27

BTP-P35 User’s Manual
-19-
3 Label light
strength
0~255
4Marklight
strength
0~255
5 Sensor
information
Display the
information
of sensor
6Backto
previous
level
4
WLAN
configuration
1 IPaddress IPaddress
2 Subnet
mask
Subnet mask
3 Gateway Gateway
4 IP protocol TCP UDP
5 WLAN port WLAN port
setup
6WLAN
information
Port
information
7BTcode
8BT
information
9Backto
previous
level
5
Other
configurations
1 Sleep time Not sleep
10~60s
2 The time of
automatic
power off
Not power off
5~40min
Page 28

BTP-P35 User’s Manual
-20-
3 Language
setup
Chinese
English
4 Command
language
ESC/POS
BPLZ/BPLE
5 Buzzer
volume
High
Low
6Button
buzzer
On
Off
7 USB mode API mode
Class mode
6 Factory reset Reset outgoing parameter
7 Save /Exit Whether save the current setup or not
2
Print
self-test
Printer information output
3
Print
calibration
Calibrate the current light strength of sensor
4
Cancel
print
Cancel caching data of printing
5 Exit Exit menu
4.3 Main parameter setup
1) The display when start up
Indicating the printer is ready for task (Firmware version is according to
outgoing printer configuration)
2) Main parameter setup
When the printer is ready for task, please press [Setup] button, the
interface will display:
Page 29

BTP-P35 User’s Manual
-21-
Use the “Up / Down” button to select the “Setup” menu item.
Print mode
Set the print mode in the “Setup / Print setup / Print mode Setup” menu
item.
Use the “Up / Down” button to select the mode. Optional modes are
“tear-off mode”, “rewind mode”.
Print darkness setup
Set the print darkness in the “Setup / Print Setup / Print darkness” item.
Use the “Setup” button to select the ones place and the tens place. The
Up / Down button to increases or decreases the darkness value. The
maximum value is 30 and the minimum value is 0.
Print speed setup
Set the print speed in the “Setup / Print Setup / Print Speed” menu item.
Optional speed: 2 IPS~4IPS
Page 30

BTP-P35 User’s Manual
-22-
Paper type selection
In the menu "Setup / Paper setup / Paper type", set the current paper
type. The optional type: "continuous paper", "marked paper".
Wireless configuration
In the "Setup" menu item, select "Setup / Wireless configuration", you
can set the printer's network configuration. Such as a protocol type, IP
address configuration, gateway configuration, and port configuration.
Page 31

BTP-P35 User’s Manual
-23-
System language type setup
In the "Configuration / Other Configuration / Language Setup" menu
item, set the system language type
Command set type selection
In the "Configuration / Other Configuration / Command Language"
menu item, set the command language type
System sleep time setup
In the "Configuration / Other configuration / Sleep t ime" menu item, set
sleep status. When enabling sleep, enter the sleep delay time. Delay time
is10m~60m.
Print self-test
Press "Setup" button to enter the first level menu, select "Print self-test",
you can print out the system configuration information.
Print calibration
Page 32

BTP-P35 User’s Manual
-24-
When the paper roll is loaded in the paper cabinet, a print calibration is
made. The paper and sensor calibration are made. Press the "Setup"
button to enter the first level menu, and select "print calibration" to set.
Status explanation of the printer
Status explanation LCD
Print status
Charging status
Open the paper cabinet
Paper end status
NO print head
4.4 Buzzer function
Page 33

BTP-P35 User’s Manual
-25-
Status Explanation
Music when starts up Prompt music of on and off
Ring for a long time The printer has a fatal error.
Ringforashorttime
1. The printer has a general error or an alert
2. The button prompt sound
Caution:
The printer adopts thermal resistor to detect the temperature of print
head. If the print head temperature is too high, the printer will stop
printing.
4.5 Swipe card function
The BTP-P35 supports magnetic card and IC card swipe function.
When the device receives the swipe card command via the communication
interface, slide the magnetic card or insert the IC card according to the
directions of the magnetic card and the IC card on the device. Then it
sends the reading data command to the device.
Caution:
1. Ensure that the IC card chip is outward when insert the IC card (Face
one side that someone swipes card).
2. Related commands of magnetic card and IC card refer to software
command set of BTP-P35
Page 34

BTP-P35 User’s Manual
-26-
5 Printer communication interface
This BTP-P35 can be connected via USB, WIFI interface and other
devices.
5.1 USB interface
USB interface supports USB1.1 protocol.
The interface socket using MINI USB B-type standard socket:
Interface signal definition:
Pin Cable
1VCC
2DATA-
3DADA+
4ID
5GND
5.2 WIFI interface
1) Features
Support 802.11b / g / n communication
support 9100 port print, LPR print
Support status return
Support parameter configuration
Support firmware updating online
Page 35

BTP-P35 User’s Manual
-27-
Support HTTP function
2) Support protocols
IP
ARP
ICMP
TCP
UDP
DHCP
TFTP
HTTP
Page 36

BTP-P35 User’s Manual
-28-
6 Installation printer
6.1 The host accessories
This product configures with standard power adapter, belt clip, USB
cable and other accessories, and optional configuration is magnetic card/IC
POS machine point of sale machine, battery charger, vehicle-bone charger,
IP54 protective cover, shoulder strap and other accessories.
When unpacking, check the packing list whether has the missing or
damaged items. If any of the above phenomena occurs, please contact
your dealer or manufacturers.
6.2 Precautions for using the printer
When the battery leaves factory, the battery is not installed in the printer.
Please insert the battery into the battery cabinet as shown below.
Remarks
For the first time, it needs to be fully charged. After long-term storage of
the battery, it needs to be fully charged. And the battery will achieve the
best results.
Caution:
When install the battery, ensure that the battery is inserted into the
cabinet correctly to avoid falling down.
Page 37

BTP-P35 User’s Manual
-29-
6.3 Power cable connection
1) Pin definition
1: Positive (+12V)
2: Negative (GND)
3: Negative (GND)
2) Interface type
Printer usage: socket in the following figure in the left
User usage: socket in the following figure in the right
As shown in the figure, insert the power adapter plug into the power socket,
DC plug into the printer’s charging interface.
Page 38

BTP-P35 User’s Manual
-30-
Input voltage: AC100-240VAC / 50 ~ 60Hz
Caution:
Do not remove the battery during charging; When charge the battery,
theprintercanprinttask.
Should use the manufacturer recommended power adapter or its
equivalents;
When plugging the plug of power adapter, you should hold the
connector cover of the plug, do not pull the cable;
Avoid dragging the power adapter cable, or it will damage the cable
and cause fire disaster and electric shock.
Avoid placing the power adapter around an overheated device, or the
cable surface will melt causing fire disaster and electric shock.
If the printer is not used for a long time, disconnect the printer power
adapter.
Page 39

BTP-P35 User’s Manual
-31-
6.4 Paper roll installation
6.4.1 Confirmation of printing paper
Before installing the paper roll, you should first check the paper type
used by the printer. The default paper type is continuous paper. If you need
to set marked paper, please calibrate it.
6.4.2 Install / replace the paper roll
1) Press the [Open] button of paper top cover, open the top cover.
2) Hold the paper guide and rotate it upward and forward, then uninstall
it .
3) When the printer is leaving factory, the left and right paper guide is
located at the outermost slot of the paper cabinet to fit the 80mm width
paper roll. When using 60mm width paper roll, insert the left and right
paper guide vertically into the inner slot of paper cabinet.
Page 40

BTP-P35 User’s Manual
-32-
Remarks:
When the printer is printing, the paper guide should center the paper roll in
the paper cabinet.
4) Make sure the paper head is flush and place the paper roll in the paper
cabinet as shown in the figure below. After pulling out the paper head
for a distance along the direction of paper out, close the back cover
and tear off the excess paper head. Then finish installing paper roll.
Caution:
Adjust the paper guide according to the width of paper roll
The paper roll should meet the requirements shown below:
Page 41

BTP-P35 User’s Manual
-33-
The paper roll should be wrapped tightly. Otherwise, it may cause
paper jam or other errors.
The paper roll should be placed in the paper house smoothly, avoid tilt,
otherwise it may affect the printing and paper feeding;
The edge of the paper head cannot deviate from the paper out exit.
6.5 Printer connecting installation
When the printer is leaving the factory, the default connection is the belt
clip. If you need to attach the shoulder strap, consult your dealer or factory
manufacturer.
6.5.1 Printer belt clip installation
When the printer is leaving the factory, the belt clip is not installed in the
printer. Please install the belt clip in the printer according to the figure.
Remarks
When fastening screw, rotate the belt clip to one side so as not to block
the screw mounting hole.
The mounting screws are supplied with the belt clip package.
① belt clip cradle 2 ② belt clip ③ ST2.9× 8-F-Hpan head
self-tapping screw
Page 42

BTP-P35 User’s Manual
-34-
6.5.2 Shoulder strap connection (optional configuration)
When the printer is leaving the factory, the shoulder strap is not installed in
the printer. Pleas e install the shoulder strap in the printer according to the
figure.
6.6 Printer power on and self-test
6.6.1 Power on the printer
1) Make sure the printer battery is fully charged and install in place;
2) Press the [power] button for more than two seconds. The printer will turn
on and initialize.
6.6.2 Print the self-test page
1) Make sure the printer battery is fully charged and installed in place, and
install the paper roll;
2) Press the "configuration" button while the printer is idle. The printer
enters the configuration menu.
Page 43

BTP-P35 User’s Manual
-35-
3) Press "Up" or "Down" to select "2. SELFEST" or "2.SELFTEST" and
press CONFIRM to confirm;
4) The printer begins printing the self-test page.
6.7 Connect the communication interface
BTP-P35 has two communication modes:
Wired communication: USB interface
Wireless communication: WIFI;
6.7.1 USB interface connection
1) Insert the USB interface cable into the suitable interface;
2) Connect the other end of the interface cable to the host.
6.7.2 WIFI connection
See appendix 9.3 for the detailed operation of WIFI connection (WIFI
can only be used under POS command for the present).
Page 44

BTP-P35 User’s Manual
-36-
7 Routine maintenance
Caution:
Before starting routine maintenance, ensure that turn off the printer
Do not use organic solvents like gasoline or acetone.
When cleaning the sensors, do not turn on the printer power until the
pure alcohol has completely evaporated.
It is recommended that the maintenance cycle should not be longer
than one month.
7.1 Cleaning print head and platen roller
When any of the following cases occur, the print head and platen roller
should be cleaned.
1) Printout is not clear;
2) Paper feeds or retracts with big noises;
3) Other objects on the print head and platen roller.
To clean the print head and platen roller, follow steps given below.
1) Turn off the power;
2) Press the cover open button to open the top cover of printer. Refer to
following Figure;
3) Use soft cotton cloth dipped with neutral cleaner (it should be wrung out)
Page 45

BTP-P35 User’s Manual
-37-
to wipe off the dust and stains on the surface of the print head and
platen roller when the top cover of the paper cabinet is open;
4) Close the top cover of paper cabinet after the neutral cleaner
evaporates completely.
7.2 Cleaning marked sensor
When any of the following cases occur, the marked sensor should be
cleaned.
1)
The printer alarms the paper end during printing.
2)
The printer does not alarm when paper end.
3)
The printer cannot read the mark effectively.
The cleaning steps are as follows:
1)
Turn off the power.
2)
Press the cover open button to open the top cover of printer.
3)
Wipe off the dust and stains on the surface of the print head and platen
roller with alcohol cotton ball (it should be wrung out);
4)
Close the top cover of printer until the alcohol evaporates completely.
7.3 Remove paper jam
When any of the following cases occur, remove paper jam.
1)
The printer cannot paper out normally.
2)
Paper feeds with big noises
To remove paper jam, follow steps given below:
1)
Turn off the power.
2)
Press the cover open button to open the top cover of printer.
3)
Check if there is any jammed paper in the paper path. If it exists,
please remove the paper folds, and cut the paper head.
4)
Close the paper cover of the printer and remove the jammed paper.
Page 46

BTP-P35 User’s Manual
-38-
8 Troubleshooting
When the printer has any problem, refer to this chapter for solution.
If the problem still cannot be solved, please contact your local dealer or
manufacturer for assistance.
8.1 Printer doesn’t work
Problem Possible causes Solution
The printer does not
work.
The battery has no
power.
Please charge the battery or
replace the battery.
The battery does not
connect well.
Take out the battery and re-install it.
Circuit board is damaged.
Contact your local dealer or
manufacturer.
8.2 LCD alarm and buzzer alarm
LCD prompt
information
Causes Solution
Print head voltage is
abnormal
Print head voltage is
abnormal
Close the printer, check the battery
voltage
Print head is
abnormal
The print head is too
heat
Wait for the temperature of print
head to come down.
Printer head bad dot Printer head bad dot
Contact your local dealer or
manufacturer.
Paper end Paper end Replace with new paper roll.
Paper cabinet is not
closed.
Uplift the top cover Close the top cover.
Power is low. Power is low.
Replace with new battery or charge
the battery.
Mark check failed
Cannot find the mark.
Wrong paper type
Replace with matched paper roll or
start the forcing calibration
Calibration fails
Calibration fails
Wrong paper type
Replace with matched paper roll or
start the forcing calibration
The printer is busy The printer is busy Wait for idle status
System updates
The printer is updating
system
Wait for completing System
updating
Pause
The printer is in pause
status
Press the feed paper button, recover
normal status
Page 47

BTP-P35 User’s Manual
-39-
8.3 Problems during printing
Problem
Possible
causes
Solution
Paper feed
continuously when
printing
Wrong paper
type
Replace with matched paper roll
Marked
sensor errors
Contact your local dealer or manufacturer.
Paper cannot be sent
out normally.
Paper jam
Open the top cover, check the paper
feeding path and clear the jammed paper.
Vertical print content is
missing.
Print head
error
Contact your local dealer or manufacturer.
Page 48

BTP-P35 User’s Manual
-40-
9Appendix
9.1 Printer driver installation on windows
BTP-P35 provides Windows 2000/Windows XP/Windows Server
2003/Windows Vista/Windows Server 2008/2012/Windows 7/Windows 8/
Windows 10 operating systems drivers.
9.2 WIFI connection
1) Connect the BTP-P35 printer with windows system via WIFI. Turn
on the Internet setup tool of windows system
2) After turning on successfully, read the right parameter of WIFI;
3) Click “on” to set communication mode, such as infrastructure mode.
Other information setup: remark: The printer is regarded as
terminal device connected with router when the status is
infrastructure mode.
4) AD-Hocmode: remark: The printer is regarded as router providing
other terminal inserting it when the status is AD-Hocmode:
5) Recover the default value (recover to the factory parameter setup
right now):
Page 49

BTP-P35 User’s Manual
-41-
Page 50

BTP-P35 User’s Manual
-42-
Page 51

BTP-P35 User’s Manual
-43-
FCC STATEMENT :
This device complies with Part 15 of the FCC Rules. Operation is subject to the
following two conditions:
(1) This device may not cause harmful interference, and (2) This device must accept
any interference received, including interference that may cause undesired operation.
Warning: Changes or modifications not expressly approved by the party responsible for
compliance could void the user's authority to operate the equipment.
NOTE: This equipment has been tested and found to comply with the limits for a Class
B digital device, pursuant to Part 15 of the FCC Rules. These limits are designed to
provide reasonable protection against harmful interference in a residential installation.
This equipment generates uses and can radiate radio frequency energy and, if not
installed and used in accordance with the instructions, may cause harmful interference
to radio communications. However, there is no guarantee that interference will not occur
in a particular installation. If this equipment does cause harmful interference to radio or
television reception, which can be determined by turning the equipment off and on, the
user is encouraged to try to correct the interference by one or more of the following
measures:
Reorient or relocate the receiving antenna.
Increase the separation between the equipment and receiver.
Connect the equipment into an outlet on a circuit different from that to which the
receiver is connected.
Consult the dealer or an experienced radio/TV technician for help.
RF warning statement:
The device has been evaluated to meet general RF exposure requirement. The device
can be used in portable exposure condition without restriction.
 Loading...