

Shandong New Beiyang Information Technology BTP7400 User Manual

USER’S MANUAL
Industrial Barcode printer
BTP-7400
Shandong New Beiyang Information Technology Co., Ltd
- 1 -
Declaration
Information in this document is subject to change without notice.
SHANDONG NEW BEIYANG INFORMATION TECHNOLOGY
CO., LTD. (hereinafter referred to as “SNBC”) reserves the right
to improve products as new technology, components, software,
and hardware become available. If users need further data
about these products, please feel free to contact SNBC or our
local dealer.
No part of this document may be reproduced or transmitted in
any form or by any means for any purpose without the express
written permission of SNBC.
Copyright
Copyright © 2016 by SNBC
Printed in China
Version 1.0
Trademark
Warning and caution
Warning: Items shall be strictly followed to avoid injury or
damage to body and equipment.
Caution: Items with important information and prompts for
operating the printer.
BTP-7400 User’s Manual
Our Registered trademark :

BTP-7400 User’s Manual
- 2 -
SNBC has passed the following certifications:
ISO9001 Quality Control System Certification
ISO14001 Environmental Management System Certification
OHSAS18001 Occupational Health and Safety Management
System Certification
IECQ QC 080000 Hazardous Substance Process Management
System Certification
BTP-7400 User’s Manual
- 3 -
Safety Instructions
Before installing and using the printer, please read the
following items carefully.
1 Safety warning
The print head is a thermal element and it is at a high
temperature during printing or just after operation,
therefore do not touch it or its peripherals for safety’s
sake
.
The print head is an ESD-sensitive device. To prevent
damage, do not touch either its printing parts or
connecting parts.
2 Cautions
1) Install the printer on a flat and stable surface;
2) Reserve adequate space around the printer so that
convenient operation and maintenance can be performed;
3) Keep the printer far away from water source, and do not
expose the printer to direct sunlight, strong light and heat;
4) Do not use or store the printer in a place exposed to high
temperature, high humidity or serious pollution;
5) Do not place the printer in a place exposed to vibration or
impact;
6) No condensation is allowed to the printer. In case of such
condensation, do not turn on the power until it has
completely gone away;
7) Connect the printer power to an appropriate grounding
outlet. Avoid sharing one electrical outlet with large power

BTP-7400 User’s Manual
- 4 -
motors or other devices that may cause the fluctuation of
voltage;
8)
Disconnect the power when the printer is deemed to idle
for a long time;
9)
Don’t spill water or other electric materials into the printer
(e.g. metal). In case this happens, turn off the power
immediately;
10)
Do not allow the printer to start printing when there is no
recording paper installed; otherwise the print head and
platen roller will be damaged;
11)
To ensure quality print and normal lifetime, use
recommended paper or its equivalent;
12)
Shut down the printer when connecting or disconnecting
interfaces to avoid damages to control board;
13)
Set the print darkness to a lower grade as long as the print
quality is acceptable. This will help to keep the print head
durable;
14)
Avoid turning on and off the printer frequently when using
the printer and turn on the printer at least 2 seconds after it
is turned off;
15)
Do not disassemble the printer without permission of a
technician, even for repairing purpose;
16)
Keep this manual safe and at hand for reference purpose.

BTP-7400 User’s Manual
Contents
1 Product introduction........................................................................... - 1 -
1.1 Introduction.................................................................................. - 1 -
1.2 Unpacking and checking........................................................... - 2 -
1.3 Appearance and modules..........................................................- 3 -
1.4 Introduction of main modules....................................................- 4 -
2 Printer installation...............................................................................- 5 -
2.1 Installation position..................................................................... - 5 -
2.2 Printer host connection.............................................................. - 5 -
2.3 Communication cable connection............................................ - 5 -
2.4 Paper roll installation (tear-off mode)...................................... - 6 -
2.5 Ribbon installation...................................................................... - 7 -
2.6 Starting the printer....................................................................- 10 -
2.6.1 Power-on and self-test..................................................... - 10 -
2.6.2 Print the self-test page......................................................- 11 -
2.7 Driver setup................................................................................- 11 -
3 Printer operation...............................................................................- 13 -
3.1 Print head pressure and pressure position adjustment..... - 13 -
3.2 Sensor position adjustment.....................................................- 15 -
3.3 Function of indicator light, button and LCD..........................- 17 -
3.3.1 Function of indictor light................................................... - 18 -
3.3.2 Function of Button.............................................................- 20 -
3.3.3 Function of LCD.................................................................- 23 -
3.4 Function of calibration..............................................................- 24 -
3.4.1 Manual calibration.............................................................- 24 -
3.4.2 Automatic calibration.........................................................- 25 -
3.5 Print settings..............................................................................- 26 -
3.5.1 Paper type.......................................................................... - 26 -
3.5.2 Print mode.......................................................................... - 27 -
- 5 -

BTP-7400 User’s Manual
3.5.3 Print method....................................................................... - 29 -
3.5.4 Print width........................................................................... - 29 -
3.5.5 Speed settings...................................................................- 30 -
3.5.6 Darkness settings..............................................................- 31 -
3.5.7 Action when power on / press down the print head.... - 32 -
3.5.8 Print position adjustment..................................................- 34 -
3.6 Physical distance setting.........................................................- 37 -
3.7 Serial interface settings........................................................... - 38 -
3.8 Network Settings.......................................................................- 39 -
3.9 Parallel interface settings........................................................ - 44 -
3.10 Date and time..........................................................................- 45 -
3.11 Offline printing......................................................................... - 46 -
3.12 Service......................................................................................- 47 -
3.13 Consumables library.............................................................. - 48 -
3.14 File operation...........................................................................- 50 -
3.15 Printer debugging...................................................................- 52 -
3.16 Sensor settings....................................................................... - 53 -
4 Routine maintenance...................................................................... - 55 -
4.1 Cleaning the print head........................................................... - 55 -
4.2 Cleaning the sensor................................................................. - 55 -
4.3 Cleaning the platen roller........................................................ - 57 -
5 Troubleshooting................................................................................- 59 -
5.1 Abnormity and solution............................................................ - 59 -
5.2 Print quality problems.............................................................. - 61 -
5.3 Ribbon problems.......................................................................- 62 -
5.4 Positioning and calibration problems.................................... - 62 -
Appendix............................................................................................... - 63 -
Appendix 1 Technical specification...............................................- 63 -
Appendix 1.1 Main technical specifications............................ - 63 -
Appendix 1.2 Technical specifications of ribbon.................... - 65 -
- 6 -

BTP-7400 User’s Manual
Appendix 1.3 Technical specifications of paper.....................- 66 -
Appendix 2 Self-test page..............................................................- 68 -
Appendix 3 Print and paper output position................................- 70 -
Appendix 4 Communication interface.......................................... - 71 -
Appendix 4.1 Serial interface.................................................... - 71 -
Appendix 4.2 Parallel interface................................................. - 72 -
Appendix 4.3 USB interface...................................................... - 73 -
Appendix 4.4 Ethernet interface............................................... - 74 -
Appendix 4.5 Wireless LAN interface...................................... - 75 -
Appendix 5 Guide for paper loading under peel-off mode....... - 76 -
Appendix 6 Guide for paper loading under label rewinding mode- 77 -
Appendix 7 Guide for paper loading under cutter mode...........- 78 -
Appendix 8 Menu on human-machine interface........................ - 79 -
Appendix 9 FCC statement........................................................... - 85 -
- 7 -

BTP-7400 User’s Manual
1 Product introduction
1.1 Introduction
BTP-7400 industrial barcode printer, with high performance, is the
ideal office barcode label printing equipment. It is suitable for
real-time label printing / batch product label printing / transportation
and logistics label printing /ticket printing at railways, airports and
stations / postal bag tag printing, etc.
BTP-7400 industrial barcode printer can be connected with external
devices via USB, serial or other interfaces and can provide common
drivers for operating systems such as Windows XP / 2000 /
se rver 2003 / 200 8 / Win7 / Win8 / W in1 0 and SDK based on
DLL.
The printer system adopts Linux platform with abundant resources
and it is easy for follow-up function extensions, such as the use of
standard function of off-line printing via adopting a scanner,
keyboard, SD card, U disk and other input devices, and it also can
be developed with functions like UHF tag reading and writing,
BASIC explainer, etc.
Main features:
Thermal / Thermal transfer printing;
Low noise, high speed printing;
Reliable, support continuous 7×24 hours standby operation;
Easy paper loading, convenient operation;
Intelligent and high effective, embedded Linux operating system
- 1 -
BTP-7400 User’s Manual
Adopting heat history and auto temperature adaptation control;
Adopting industrial print head with long lifetime and high printing
quality;
Supporting continuous paper, label paper, marked paper,
perforated paper, etc.
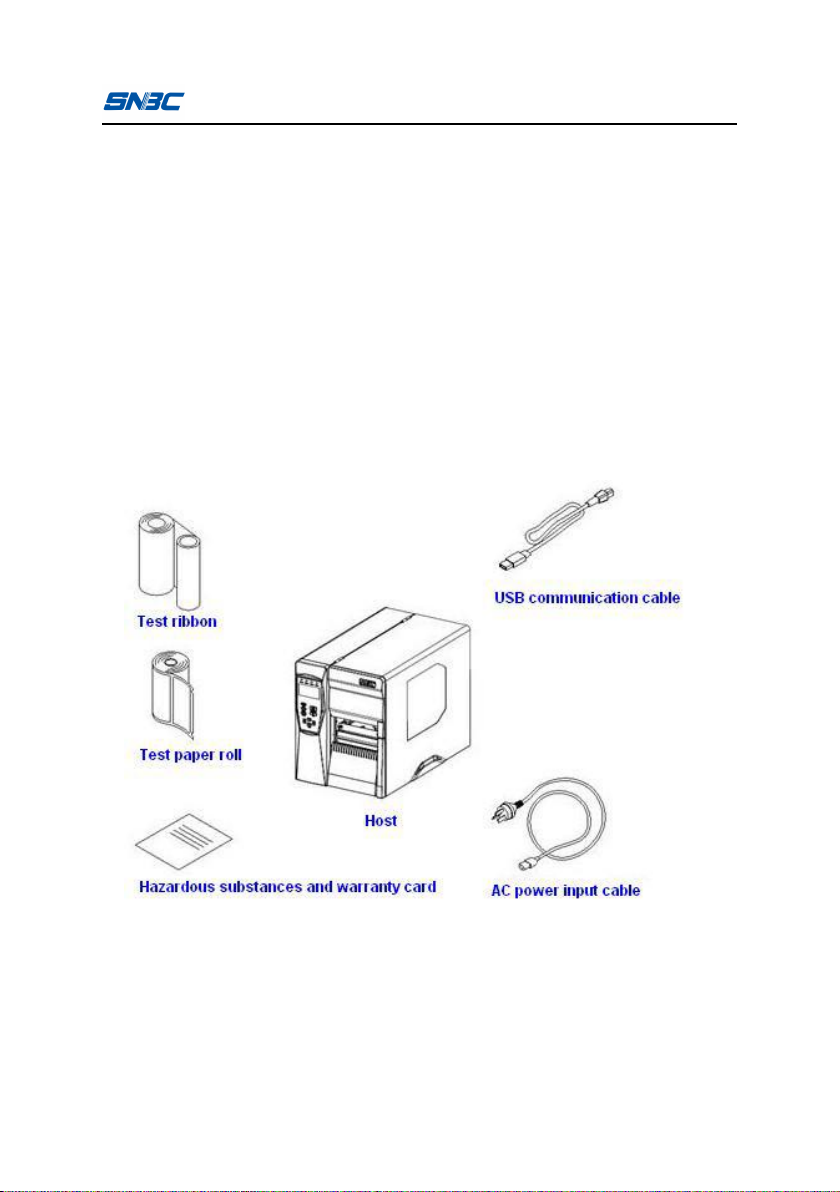
1.2 Unpacking and checking
Open the packaging and check the items according to the packing
list. Please contact your local dealer or the manufacturer if there is
any shortage or damage.
Fig. 1.2.1
- 2 -
BTP-7400 User’s Manual
Fig.1.3.3
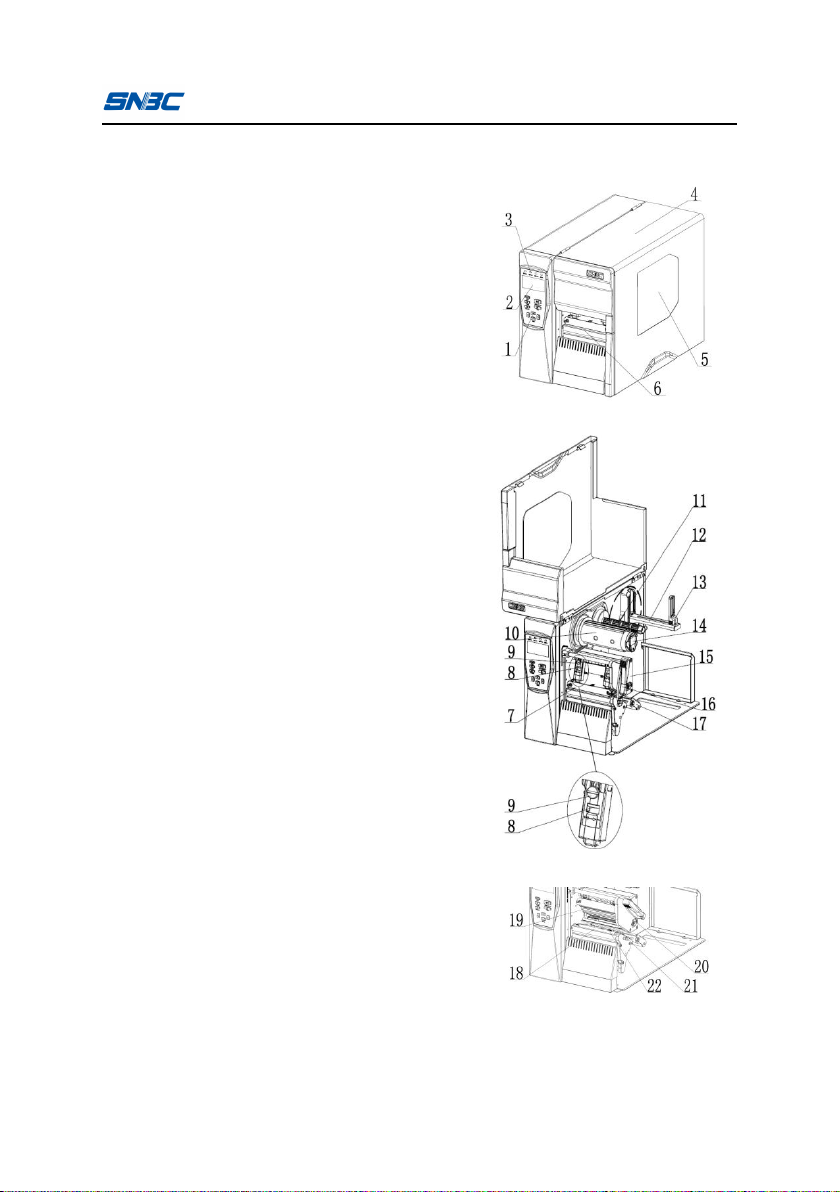
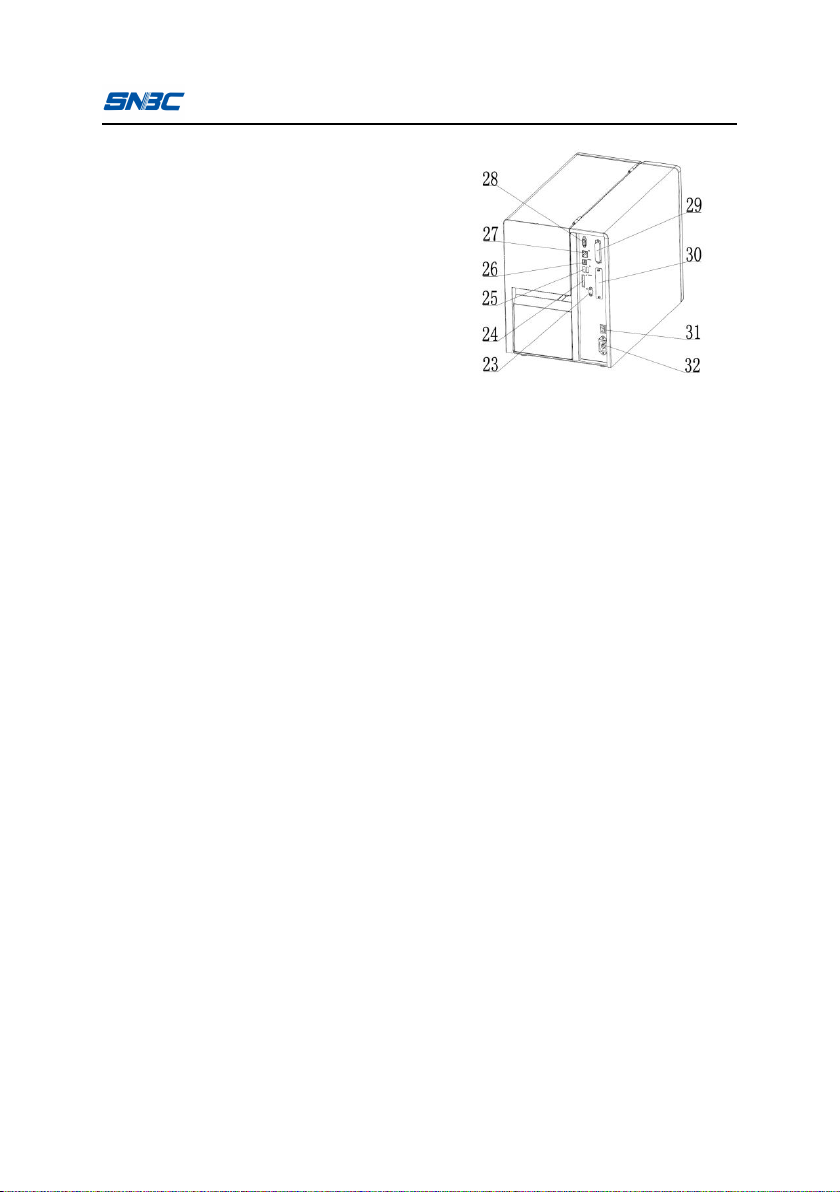
1.3 Appearance and modules
1—Button
2—LCD
3—Indicator light
4—right cover
5—Transparent window
6—Tear-off bar, Peel-off bar
7—Ribbon peel-off plate
8—Pressure adjustment knob
9—Pressure position lock knob
10—Ribbon retraction roller
11—Ribbon release shaft
12—Paper holder
13—Right paper guide
14—Ribbon release spanner
15—End cover of upper path
16—Print head uplifting spanner
17—Buffer module
18—Platen roller
19—Print head
20—Print head adjustment block
21—Sensor module
22—Moveable paper guide
23—Wireless interface (optional)
24—SD card interface (optional)
Fig.1.3.1
Fig.1.3.2
- 3 -
BTP-7400 User’s Manual
25—USB A interface
26—USB B interface
27—Ethernet interface
28—Serial interface
29—Parallel interface
30—Expansion interface (optional)
31—Power switch
32—Power interface
1.4 Introduction of main modules
1) Buttons, LCD and indicator light (1,2,3): indicates the printer
status, complete the print function;
2) Power switch (31): press "O" to turn off the power, press"-" to
turn off the power;
3) Paper holder (12) and right paper guide (13): supports the paper
roll, prevent the paper roll shake;
4) Moveable paper guide (22): prevent the paper moving from side
to side in the paper path;
5) Sensor module (21): calibrate, detect and position the black
mark paper, label paper and other media;
6) Print head uplifting spanner (16): control the print head status of
lifting up/ pressing down.
Fig. 1.3.4
- 4 -

BTP-7400 User’s Manual
2 Printer installation
2.1 Installation position
Flatly place the printer on the operation table, which must be
waterproof, moisture proof and dustproof. The maximal tilted angle
should not exceed 15° during installation.
2.2 Printer host connection
1) Ensure the printer is turned off;
2) Connect one end of the AC power input cable with the printer
host;
3) Connect the other end of the AC power input cable with the 220V
power socket.
Caution:
If the printer will not be used for a long time, please turn off the printer
power.
2.3 Communication cable connection
1) Ensure the printer is turned off;
2) Insert the communication cable into the suitable interface of
printer, and fix it with screw or latch spring of the plug;
3) Connect the other end of the communication cable to the host.
Caution:
Don’t connect or disconnect the communication cable when the power has
not been turned off.
- 5 -

2.4 Paper roll installation (tear-off mode)
1) Open the right cover of printer, turn the print head uplifting
spanner (16) backward to the angle shown in the figure, and turn
the right paper guide (13) to horizontal position (see Fig. 2.4.1);
Fig. 2.4.1
2) Install the paper roll leftward on the paper holder, pull out and
place the paper head flatly in the paper path, align it leftward and
slightly tighten the paper with the movable paper guide (see Fig.
2.4.2);
Fig. 2.4.2
BTP-7400 User’s Manual
- 6 -
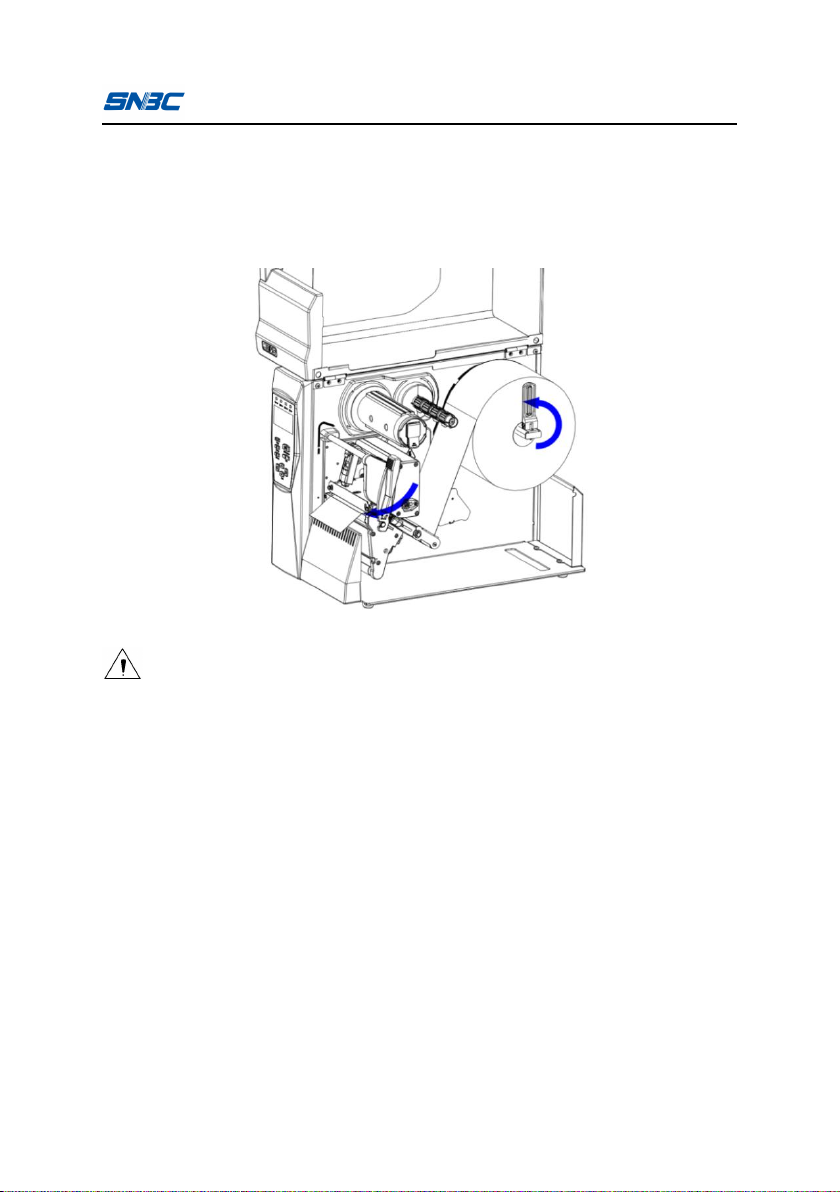
BTP-7400 User’s Manual
3) Turn the right paper guide (13) leftward to make it vertically and
abut the paper roll (ensure the paper roll can rotate smoothly),
and turn the print head uplifting spanner (16) forward to press
down the print head. Detail operation refers to the Fig. 2.4.3.
Fig. 2.4.3
Caution:
The print side of paper is upward. If marked paper is used, the black mark is
downward. Continuous paper with the black mark on the print side is not
supported.
2.5 Ribbon installation
1) Open the right cover of printer, turn the print head uplifting
spanner (16) backward to the angle shown in the figure (see
Fig.2.5.1);
2) Install the ribbon on the ribbon release shaft (11) in the direction
shown in the figure (pay attention to the outward/inward ribbon);
- 7 -
lead the ribbon head go under the print head module and wind
the ribbon on the ribbon rewinding roller from its underside; rotate
the roller to tighten the ribbon (see Fig. 2.5.1);
Fig. 2.5.1
3) Turn the print head uplifting spanner forward to press down the
print head and lead it to lock status. Detail operation refers to
Fig.2.5.2;
BTP-7400 User’s Manual
- 8 -
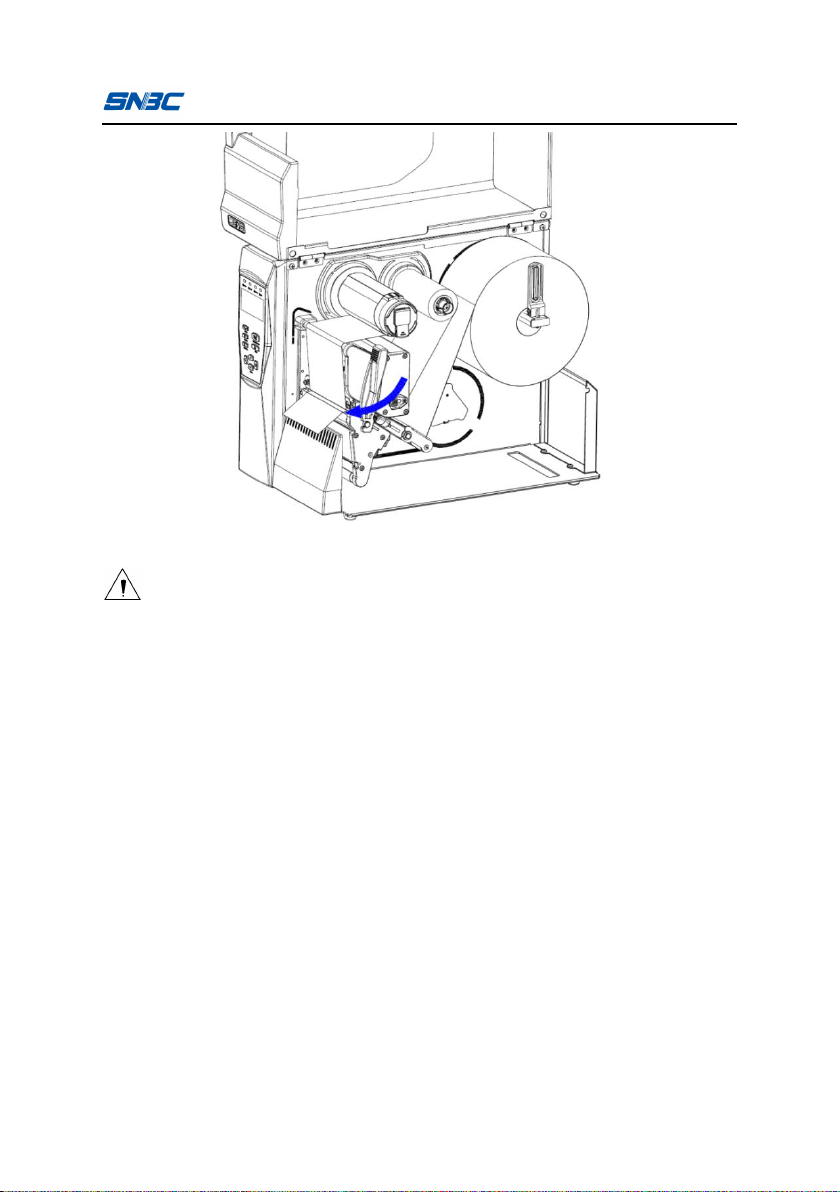
BTP-7400 User’s Manual
Fig. 2.5.2
Caution:
Determine the print method: If thermal transfer printing is selected, the
ribbon needs to be installed; if thermal printing is selected, the ribbon does
not need to be installed.
Under normal condition, the selected ribbon should be wider than the print
media.
Keep the ribbon as flat as possible during ribbon installation in case the
ribbon is cockled or damaged during printing. If ribbon is cockled, please
adjust the pressure position of print head or ask for support from the
customer service.
- 9 -

BTP-7400 User’s Manual
2.6 Starting the printer
2.6.1 Power-on and self-test
1) Ensure the power adapter and the communication cable are
connected correctly, and turn on the printer;
2) The printer starts the self-test. After the self-test is finished, the
LCD screen displays the manufacturer LOGO and status
information or product model;
3) If power-on action is set, the printer will perform power-on action.
Note:
Power-on action refers to the actions performed automatically after the
printer being turned on, including feeding one label, starting calibration
automatically (only valid under discontinuous paper mode). The power-on
action can be set by commands or human-machine interface.
- 10 -

BTP-7400 User’s Manual
Caution
If the printer cannot be started or cannot work normally after it is started,
please contact your local dealer or the manufacturer in time.
2.6.2 Print the self-test page
1) Installed the media, turn on the power switch, click on the
'Menu / Set' button to enter the menu, select "Self-test", and
click "Menu / Set" button, then the printer will feed the paper
and print the self-test page (sample refers to Appendix 2.1)
(functions of indicator light and button refers to section 3.3.
2) The self-test page lists the current printer configuration
information.
2.7 Driver setup
1) Run “Setup.exe” in the driver package, and read the related
software license agreement carefully. If you accept the items in
the license agreement, please click “I accept the items in the
software license agreement”, and then click “Next” button;
2) Select the printer type and model to be installed. If you want to
set the printer as default printer, please check “Set As Default
Printer” and click “Next”;
3) Select the setup type, and click “Next”;
The driver supports Windows XP / 2000 / server 2003/2008 / Win7 /
Win8 / Win10 and Vista system. It is stored in one CD delivered with
the printer, and the customer can also download it from the website
www.snbc.cn.
Driver installation method:
- 11 -

BTP-7400 User’s Manual
4) Select the current system type, and click “Next”;
5) Set the printer port. “LPT1” is set as the default print port, but
users can select it according to actual needs. If it is a serial port
driver in Windows 2000 or above system, please select
“BYCOMx” (x equals to 1, 2, 3, 4, 5, 6, 7 or 8), and then click
“Install” to end the installation.
- 12 -

BTP-7400 User’s Manual
3 Printer operation
Caution
The printer parameter settings are subject to the last settings. The printer
parameters can be set via the menu of printer operation interface, user
software (including drivers and the third-party software), printer commands,
etc. For example, the printer menu and the printer drivers in computer can
be used to set the print speed. Although the print speed has been set via
the printer menu, it will be updated to the speed set by the driver in the
computer after using the printer driver in computer to print.
3.1 Print head pressure and pressure position
adjustment
The print head pressure adjustment device is equipped with two
print head pressure adjustment knobs (8), and each knob can adjust
the print head pressure steplessly. Turn the knob leftward, the print
head pressure will increase (see Fig.3.1.1). The pressure position
lock knob (9) can adjust the pressure position and lock the pressure
size.
- 13 -
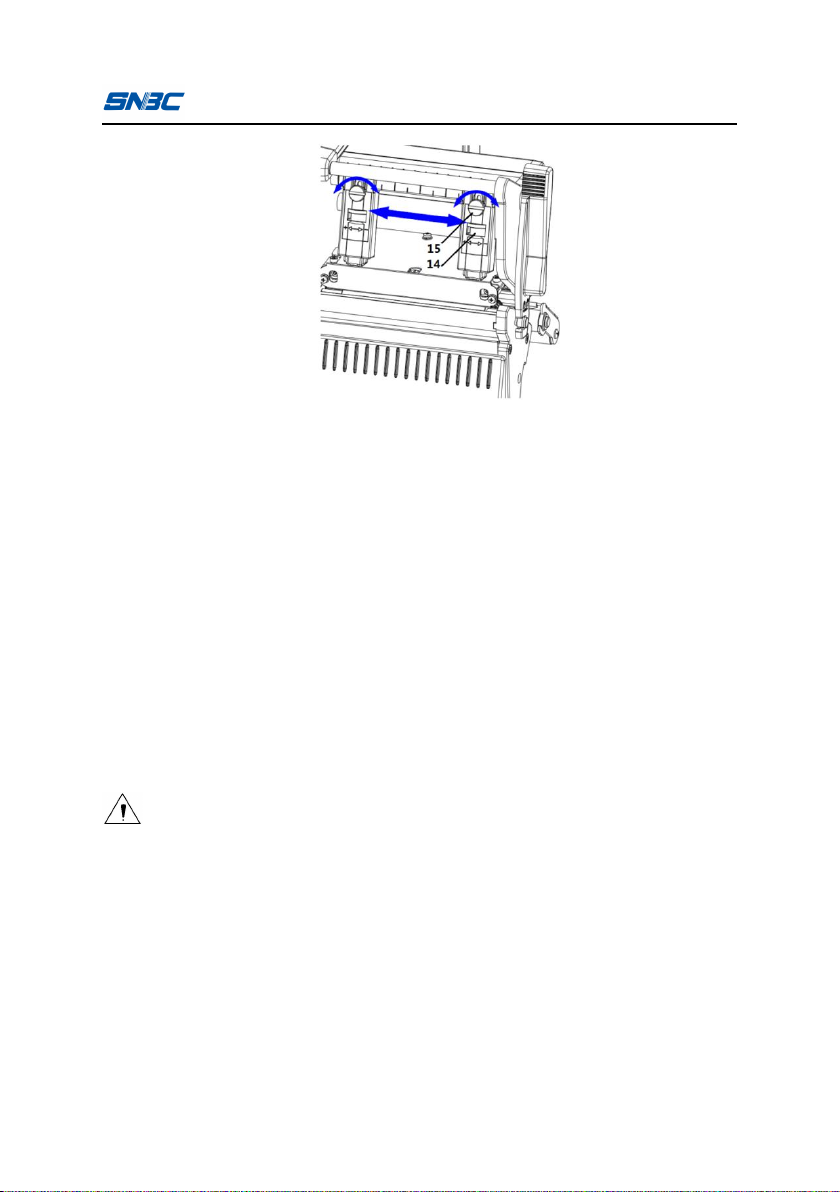
Fig. 3.1.1
The pressure needs to be adjusted under the following conditions:
1) When the print head pressure cannot meet the requirement (e.g.
the ribbon cannot be rewound smoothly), turn the print head
pressure adjustment knob to increase the pressure;
2) Different pressure size and pressure position can be selected
when use label paper with different widths for printing. The two
print head modules are symmetrical with the print contents.
3) If the print quality does not meet the requirements when adopts
thicker media, the print head pressure can be increased
appropriately.
Caution
Set the print head pressure to a lower level as long as the print quality is
acceptable;
If ribbon crack occurs when print at a low temperature environment, the
operation of increasing the print head pressure is the priority measure, and
the operation of reducing the print darkness or print speed can also be
taken when meet the use requirements.
BTP-7400 User’s Manual
- 14 -
BTP-7400 User’s Manual
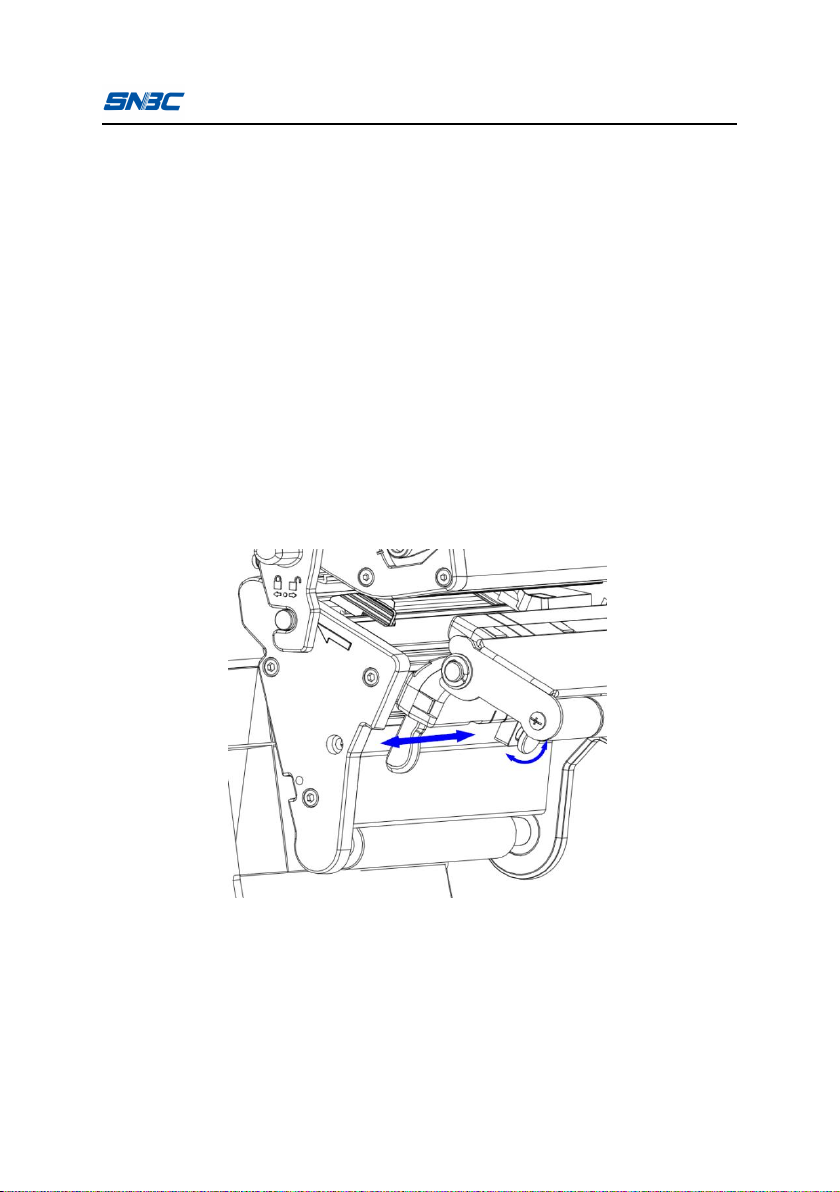
3.2 Sensor position adjustment
When the paper width is changed, the sensor position can be
adjusted according to the following steps:
1) Counter-clockwise rotates the thumb knob to loosen the sensor
position limitation block (refer to the curved arrow in Fig. 3.2.1);
2) Observe the mark position, and move the sensor to the position
below the mark;
3) Pull the sensor spanner and move the sensor to the required
position(refer to the arrow direction in Fig. 3.2.1);
4) Clockwise rotate the thumb knob to lock the sensor position
limitation block.
Fig. 3.2.1
- 15 -
Fig. 3.2.2
BTP-7400 User’s Manual
- 16 -
BTP-7400 User’s Manual
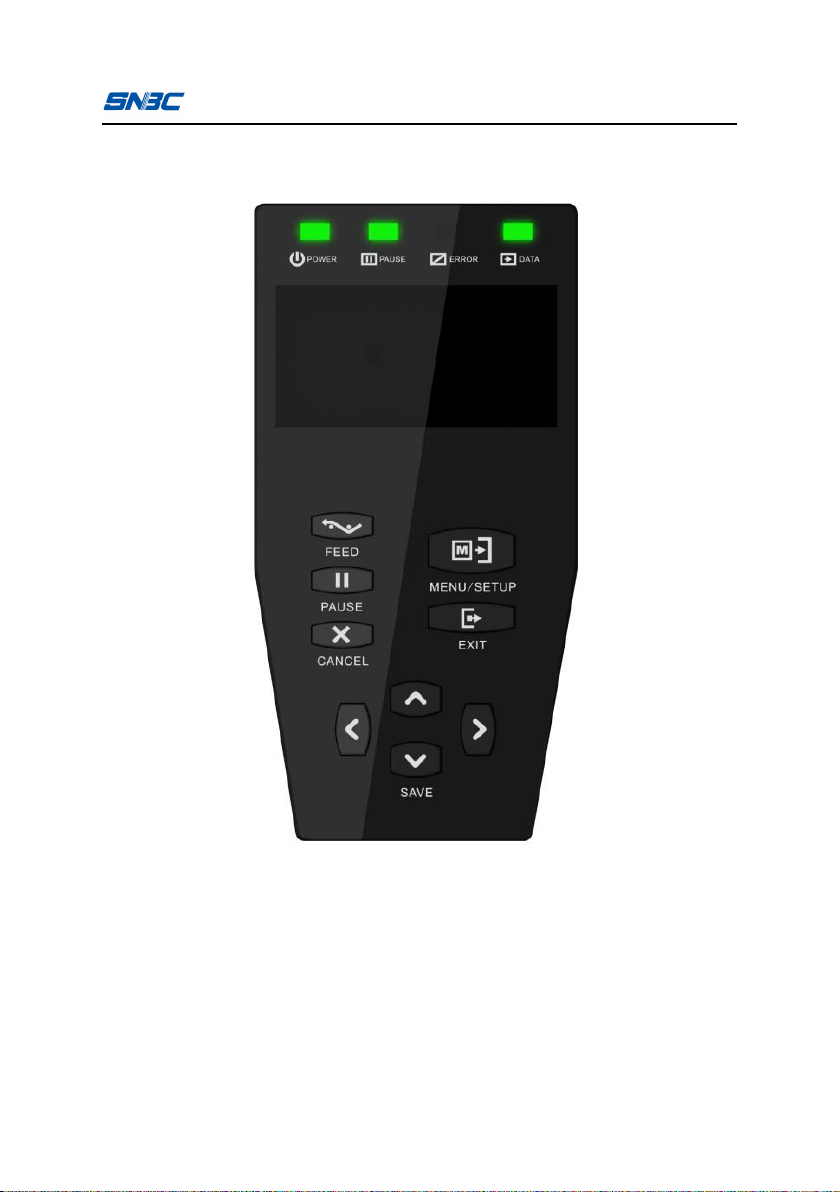
3.3 Function of indicator light, button and LCD
- 17 -
3.3.1 Function of indictor light
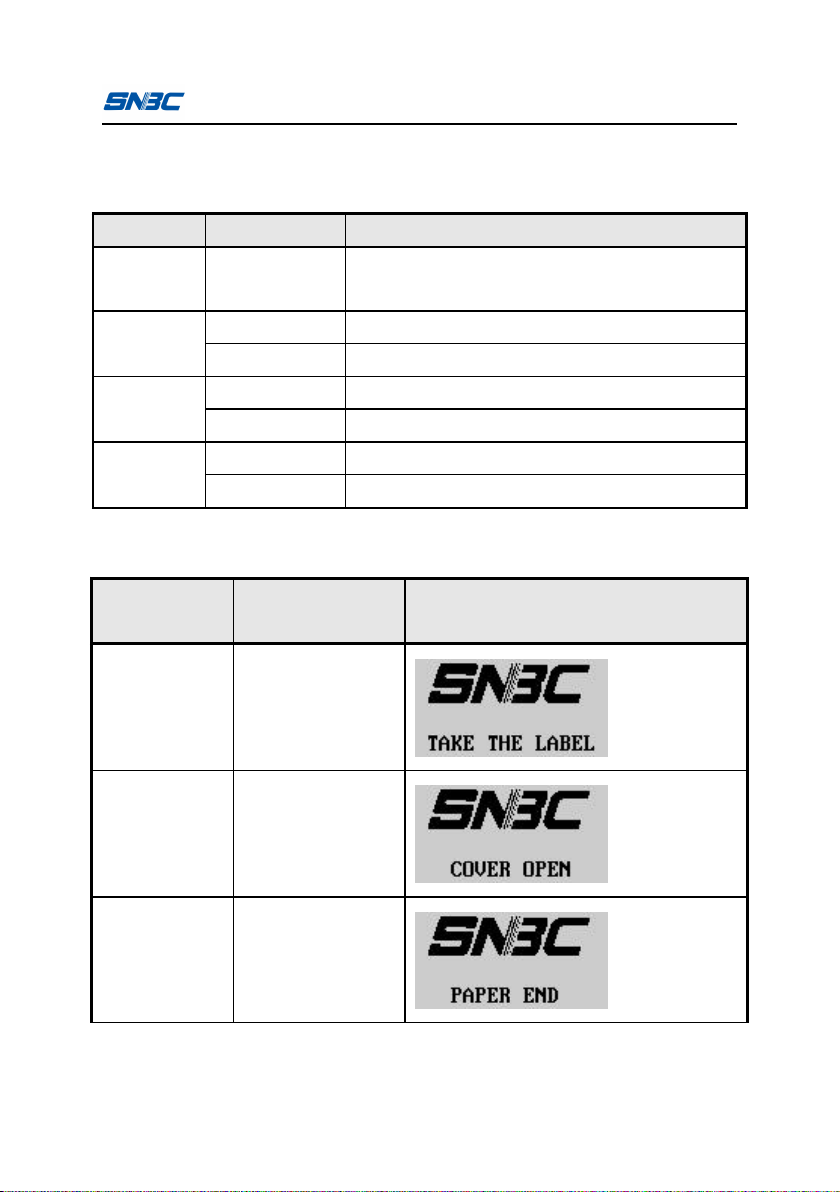
1) Function of indicator light
LED Name
Status
Explanation
Power LED
(Green)
Always on
Printer is already turned on.
Pause LED
(Yellow)
Always off
Printer is not in pause status.
Always on
Printer is in pause status.
Error LED
(Red)
Always off
Printer is not in error status.
Flash
Printer is in error status.
Data LED
(Yellow)
Always off
Printer is not printing.
Always on
Printer is printing.
Table 3.3.1-1
2) Error information and LED status
Error
information
Error LED
LCD
Not take away
the label
Not flash
Print head lifts
up
Circularly flashes
2 times
Printer is out of
paper
Circularly flashes
3 times
BTP-7400 User’s Manual
- 18 -
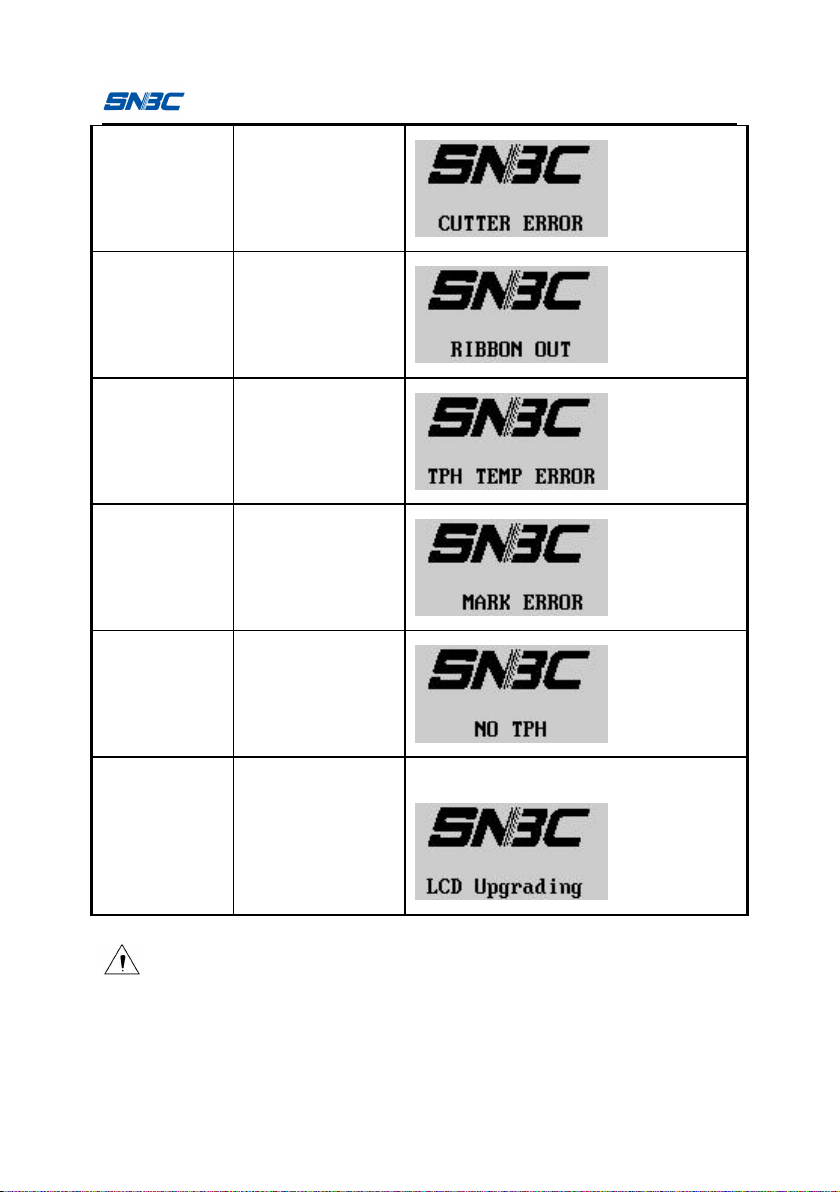
BTP-7400 User’s Manual
Cutter error
Circularly flashes
4 times
Out of ribbon
Circularly flashes
4 times
Print head
temperature is
abnormal
Circularly flashes
5 times
Cannot find
the mark
Circularly flashes
6 times
No print head
Circularly flashes
9 times
Updating
prompt
Always on
“xxx updating” example
Caution
Troubleshooting method refers to section 5.1 “Abnormity and solution”.
Table 3.3.1-2
- 19 -
BTP-7400 User’s Manual
3.3.2 Function of Button
Button
Printer
status
Function explanation
MENU
Standby ①
Under standby status, the user can press [Menu]
button for a short time to enter the menu display
interface.(① -⑥refer to below notes)
Menu ②
In menu display interface, the [menu] and
navigation buttons can be cooperated to perform
relevant configuration or query operation.
Text input ③
When the printer is in the status of text input, e.g.
input wireless SSID, the user can press [Menu]
button for a short time to select the current
characters, and press [Menu] button for a long
time to confirm the input at this time.
FEED
Non-printing
status
When press the [FEED] button, the printer will
feed one label if non-continuous paper is used,
while feed paper for a distance of one label length
if continuous paper is used (the label length
parameter that printer saved).
PAUSE
Non-printing
status
Under standby mode, the printer will enter pause
status by pressing the [Pause] button, and the
printer will return to standby status if press the
[Pause] button again.
Printing
status ④
The printer will stop the current print job
temporarily if press the [Pause] button during
printing, and it will continue the previous print job
if press the [Pause] button again.
- 20 -
BTP-7400 User’s Manual
CANCEL
Printing
status
Press [Pause] button to stop the current print job
temporarily, and then press the [Cancel] button to
cancel the print job.
EXIT
Menu
Press [Exit] button for a short time to exit for one
menu level, and press [Exit] button for a long time
to exit directly.
Menu
When exit to the standby interface, there will give
a prompt that save or not if the printer
configuration is changed, you can press the [Exit]
button to exit directly without saving.
Text input
Under text input status, press the [Exit] button for
a short time to delete the current characters.
Press the [Exit] button for a long time to give up
the input and return to the previous menu.
Up
navigation
Menu
When the operation interface is the menu bar, the
user can move up one menu configuration.
Digital input
⑤
When the operation interface is Leaf-menu ⑥
digital input interface, press [navigation up] button
can add 1 to the current configuration number or
switch the positive and negative number.
Down
navigation
(save
button)
Menu
When the operation interface is the menu bar, the
user can move down one menu configuration.
Digital input
When the operation interface is Leaf-menu digital
input interface, press [navigation down] button
can subtract 1 to the current configuration number
or switch the positive and negative number.
Menu
When exit to the standby interface, there will give
a prompt that save or not if the printer
configuration is changed, you can press this
- 21 -
 Loading...