

4X6 HUNTING BLIND
(50) - 1” Washer head screw
Assembly Instructions
(4) - 3” Pan head screw
Tools Needed: Tin Snips • Cordless Drill • #2 Square Drive Bit •
Tape Measure • Caulk Gun • 3/8” Staple Gun • Hammer • Marker
(30) - 2” Flat head screw
(165) 3/4” pan head screw
Plus, (60) in window kit bag
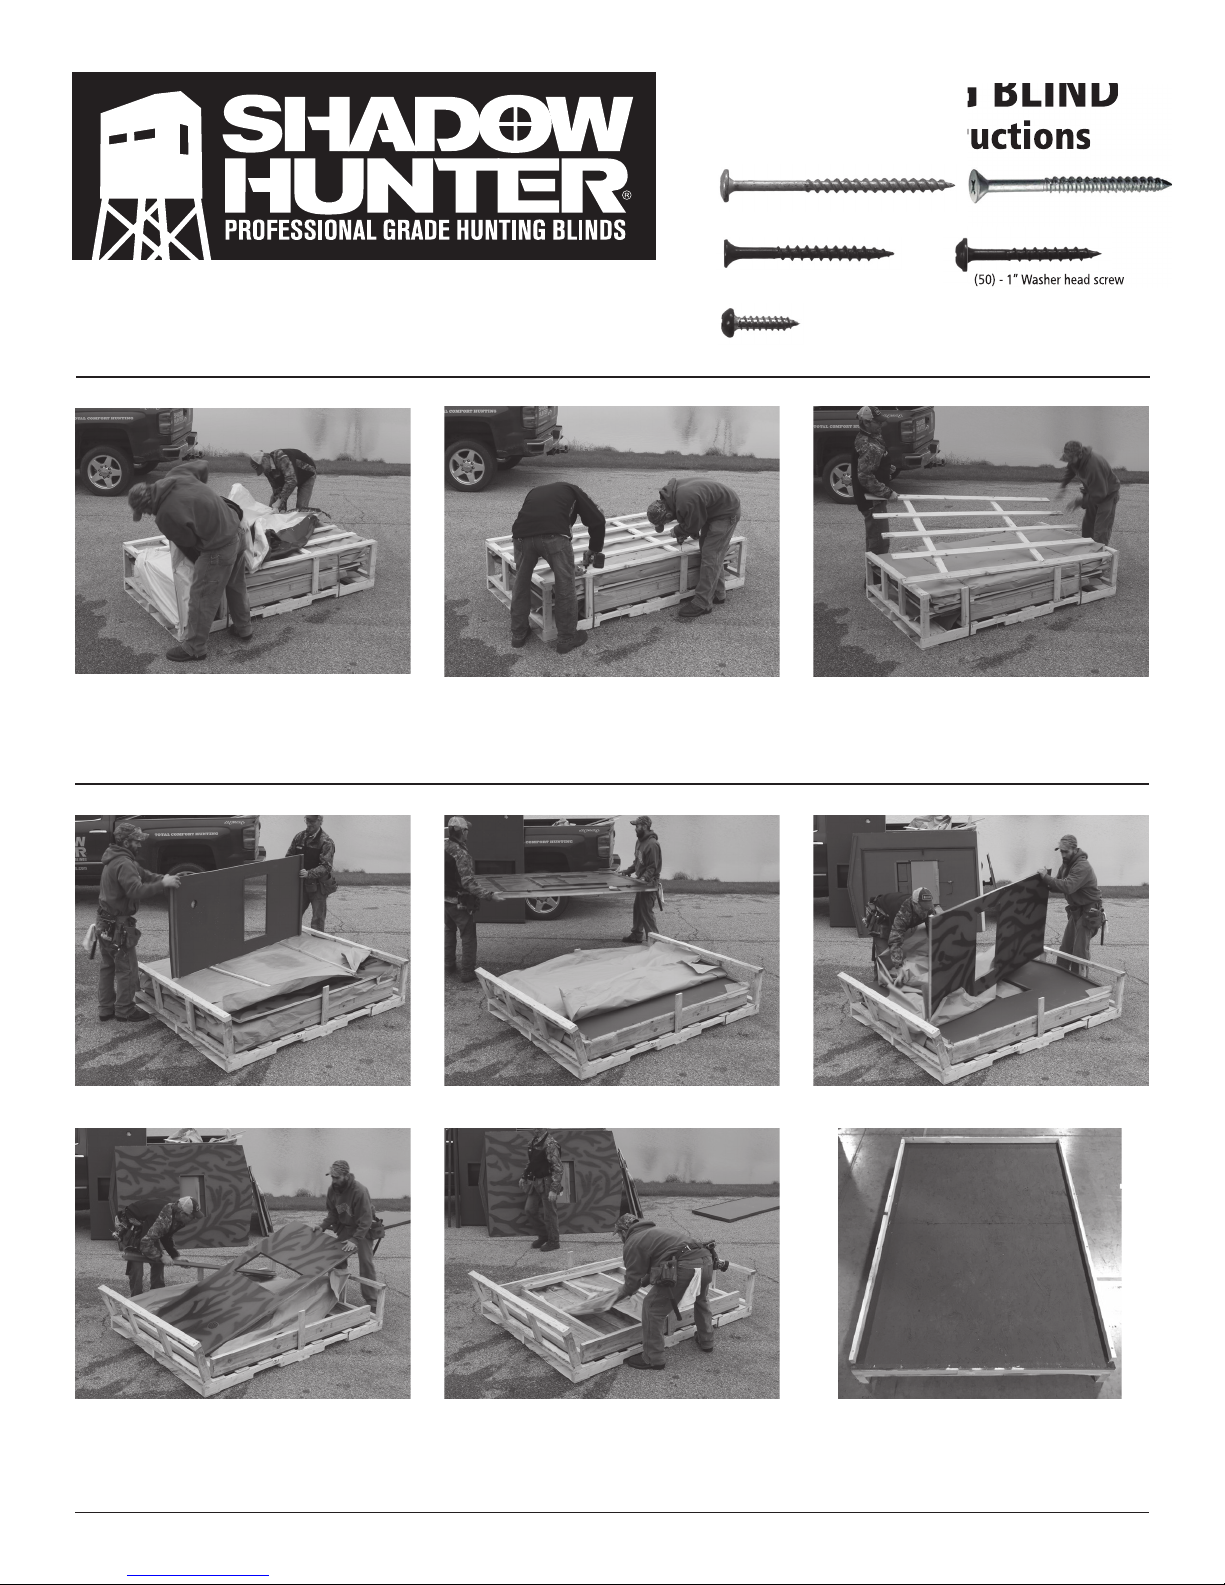
Step 1 - Disassemble shipping container:
Disassemble shipping container by pulling off Tyvek wrap and unscrewing all screws from the protective wooden top.
(2) - 3” Flat head screw
(50) - 1” Washer head screw
in window kit bag
Step 2 - Remove all parts of the hunting blind:
Remove all parts, walls and the roof to expose the fl oor of the hunting blind. Separate all items for easy assembly.
3a
3b
3b
3b3a
3c
3e
3g
3c
3e
3d
3f
3h
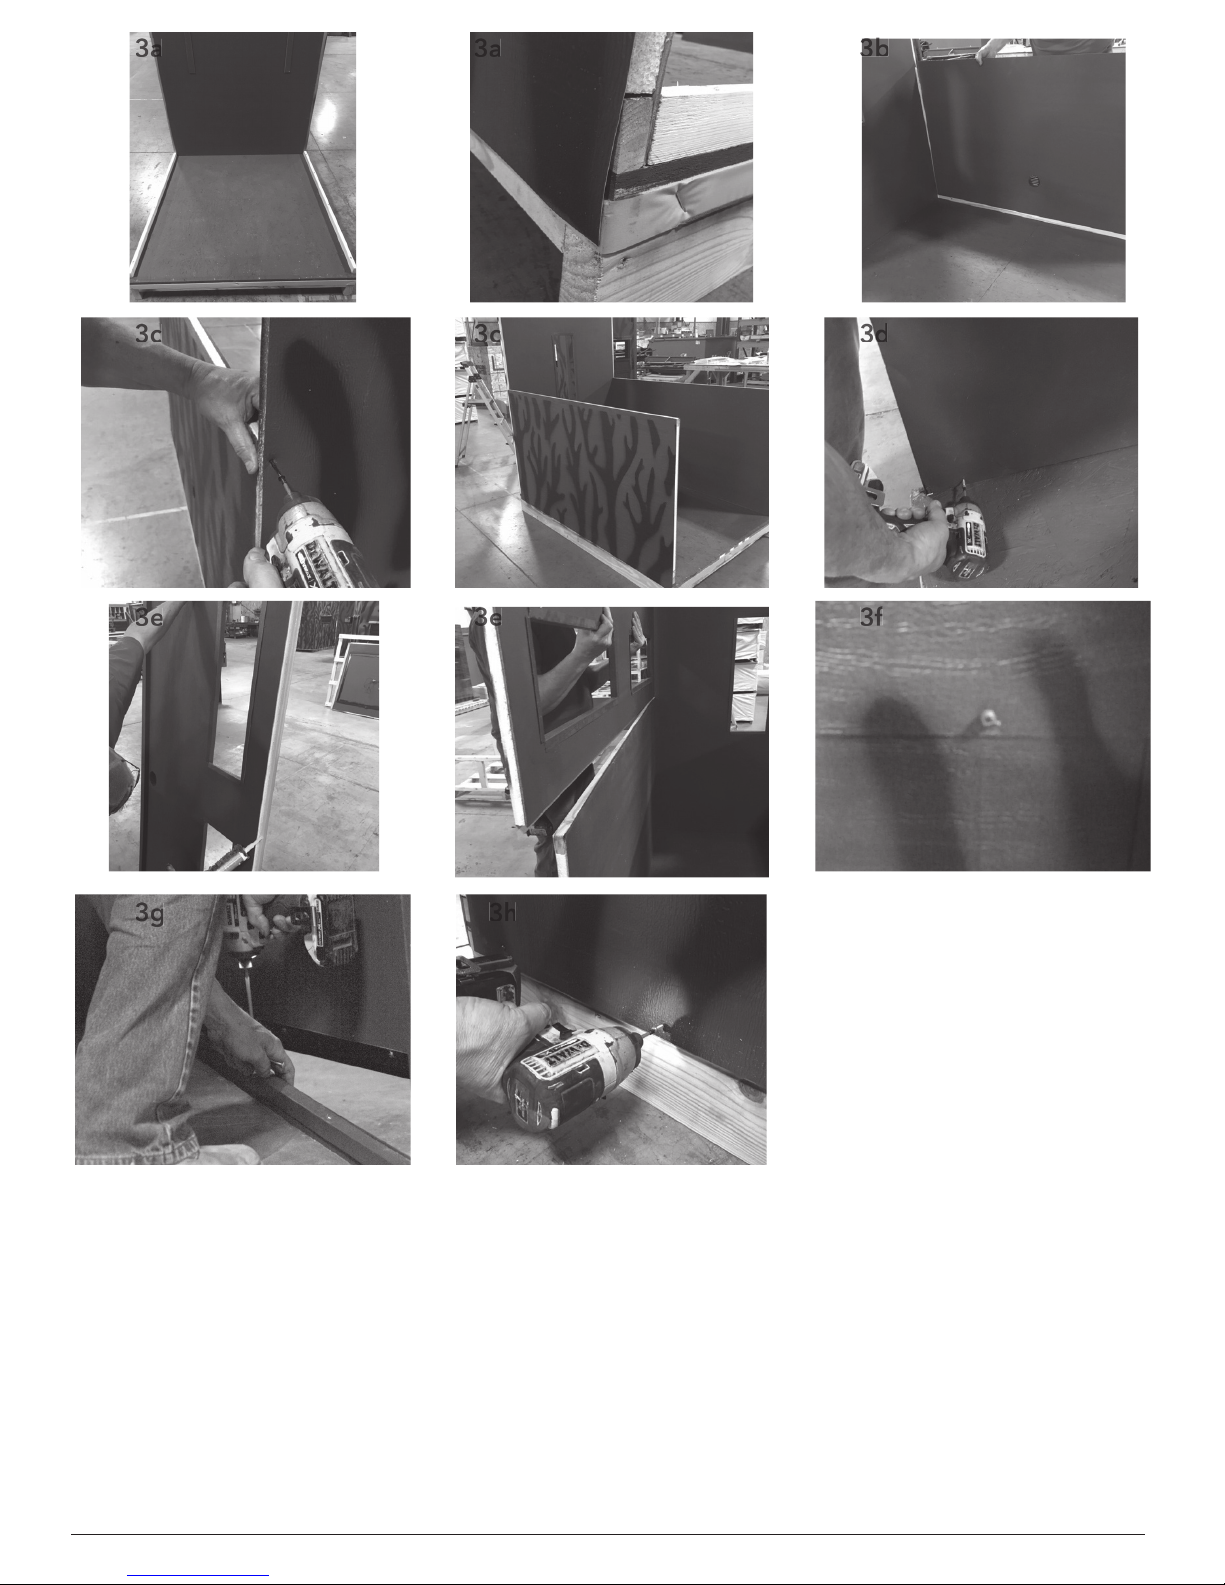
Step 3 - Assemble door and wall panels:
3a) Install the backwall panel to the hunting blind fl oor. Slide the backwall panel over the fl oor cleat ensuring that the wall sits fl ush with the fl oor, it is
centered and the aluminum overhang is on the outside of the bug-guard tape. Use Caution when handling the aluminum walls as the edges can be sharp.
3b) Next, install the lower half wall panel with the air vent on bottom to the right side of the blind (the left and right side of blind is determined when facing
the door from the outside of blind). Slide the side wall over the cleat and center on the fl oor. 3c) Use a 2” black fl at head screw to attach the wall in the
middle into the pre-drilled hole. Slowly drive the screw drive into the lower half side wall (be careful not to crush the aluminum panel). Repeat for opposite
side lower wall. 3d) Drive (3/4”) green screws evenly spaced into inside bottom half of both side walls (9 screws each wall ) and back wall (5 screws) 1 inch
up from the bottom of the fl oor. 3e) Caulk the seam on upper side wall and place on top of lower half wall. Use a 2” black fl at head screw to attach to back
wall in the top pre-drilled hole. 3f) Drive a (3/4”) green screw into the middle of the two side panels (between the window openings) and at each end (3”
from the ends). Repeat for other side. 3g) Now center the door on the fl oor. Ensure it is fl ush with the fl oor and with one person holding the door panel in
place, fasten the door panel to the fl oor with the four (3“) pan head screws using the four pre-drilled holes in the bottom of door panel. Do not overtighten.
Install 2” black fl at head screws into the top pre-drilled holes to secure the side walls to the door. 3h) From outside of blind, drive (3/4”) green screws 3/4”
from bottom of wall. Evenly space 9 screws into the back wall, 11 screws into the front wall and 17 screws into each side wall.

Step 4 - Installing roof core panels:
Install the two-insulated roof cores in place on top of the blind over the wall cleats. You may need to loosen outside top 2” wall screws to fi t in place. Make sure roof panel is fl ush on all four sides and fasten the
side walls fi rst with three 2” screws through the pre-drilled holes. Now secure the roof cap from the front
with four 2” screws and fi nally the back with four 2” screws. Push down on the roof cores when driving
the screws into the cores. *Be careful not to crush the aluminum panel by over-tightening.
5a 5b 5c
Step 5 - Installing corner molding:
5a) Caulk the four corner moldings with caulk provided with a generous bead 1/4” from the side of the trim piece on both sides. 5b) Attach corner molding
fl ush to the bottom of the blind to and fasten with six (3/4”) green screws (per side) starting from the middle to the top and then middle to the bottom in
pre-drilled holes. 5c) Push in on corner molding when driving screws to ensure corners are drawn in tight.
6a
6a
6b
Step 6 - Installing interior center 2” X 2” roof support board:
6a) Install the wooden center roof support board in the center of the ceiling fastening the 2” black fl at head screws in the pre-drilled holes. Ensure that the
screw connects with the roof core and draws down and that the screws do not protrude out the top of the roof core as this could puncture the aluminum
roof panel when installed in step 7. 6b) Install the two (3”) fl at head screws into each end of the support board through the top center pre-drilled front and
back panels.
7a 7b 7c
7c 7d 7d
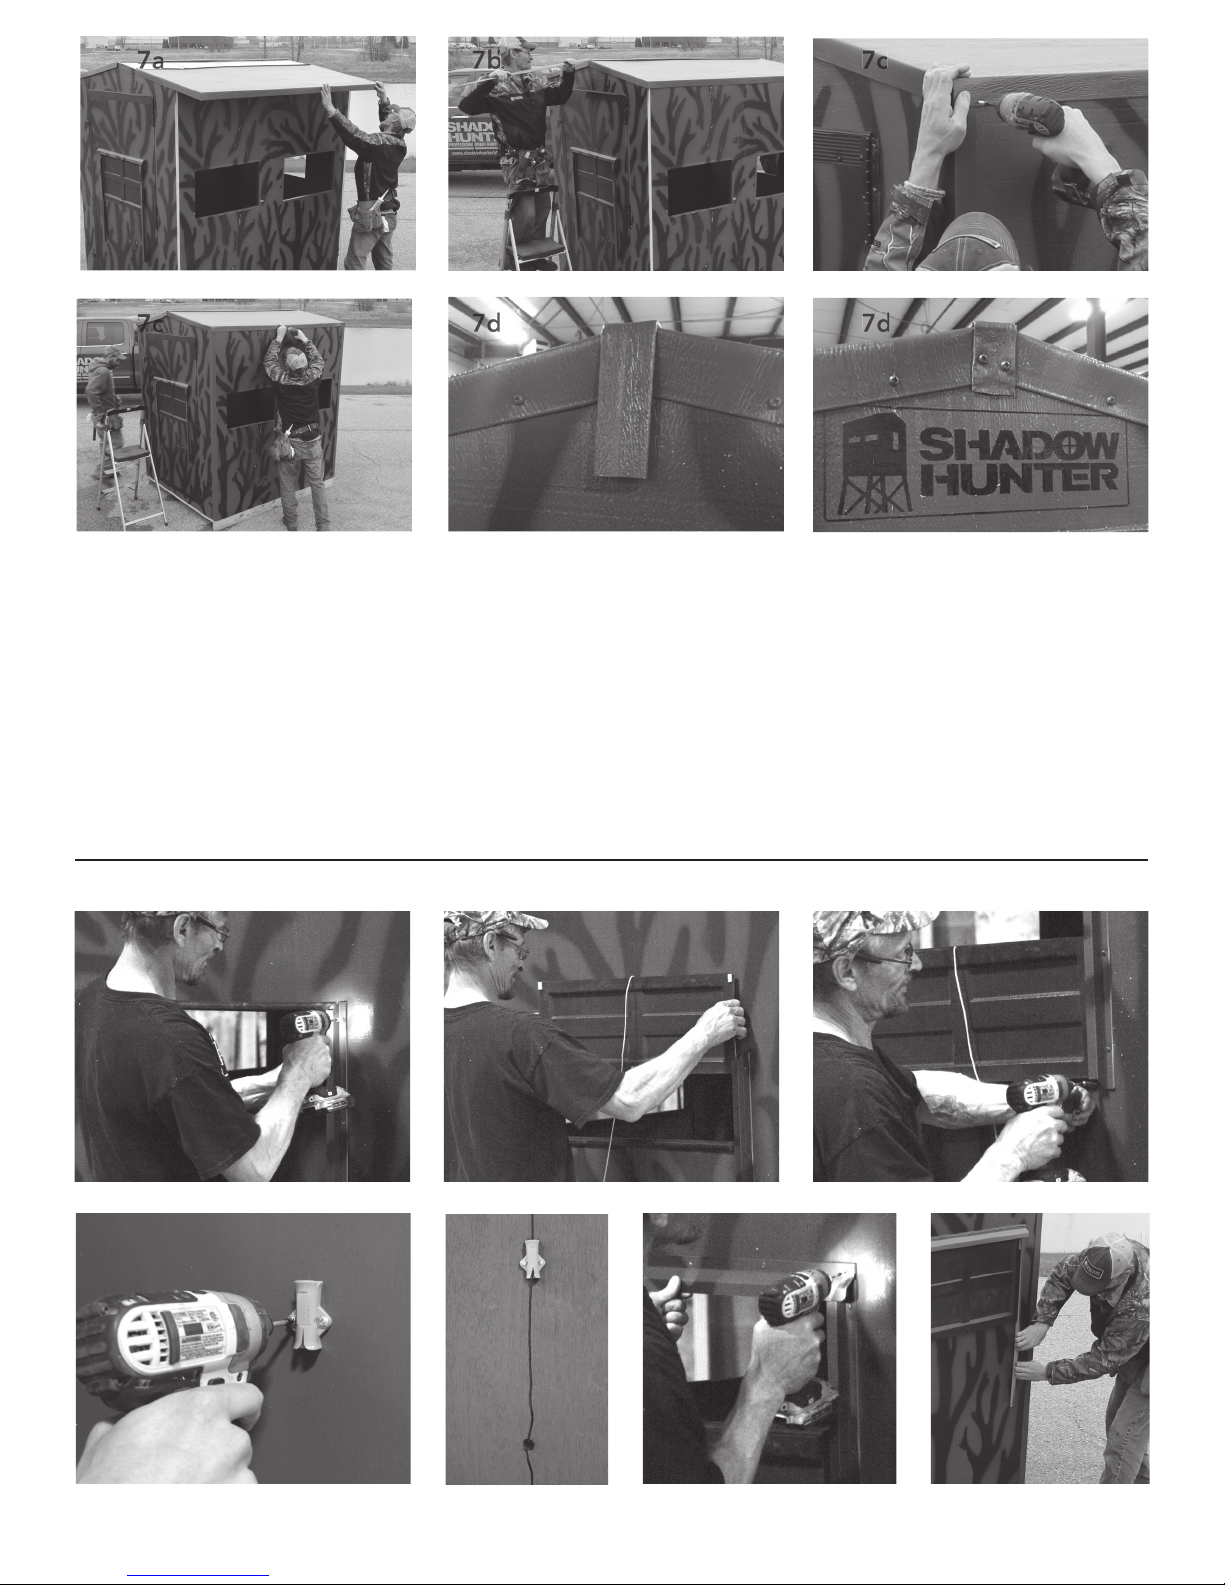
Step 7 - Installing aluminum roof panels:
7a) Place the two aluminum roof caps over the top of the blind. 7b) Once the metal roof panels are in place, slide the center connecting strip between the
two tracks on the roof panels which will secure the two roof panels together. Be careful when pushing the connecting strip across the 2 panels so not to
bend. Use two hands to work the connecting strip carefully across the panels from one end of the blind. Leave the same amount of overhang on each end of
blind.
7c) Starting from the top of the roof fasten the metal roof to the walls of the blind using the (3/4”) green screws. Push down on the roof cap while driving
in the screws ½” up from the bottom of the roof edge. The 2 blind sides will use eight screws and the front and back will use six. Make sure all four corners
have a screw in each side. Start in center and move to the outside.
7d) Bend down the overhang from the center connecting strip fl ush with front wall and back wall. Trim the aluminum connector so it’s even or slightly past
the roof cap and fasten down with two (3/4”) green screws.

Step 8 - Installing Windows (see pre-installed door window as an example):
INSTALL THE EXTERIOR SHIELD TRACKS: On each of the 8” sides, measure over 1-7/8” at the top and bottom corners. Be sure to mark all four spots.
Using the marks as a guide, position the fi rst exterior shield track along one side of the window opening. Raise the channel about 1 /8” above the top of the
window. Use one (3/4”) green screw to hold the exterior track in place. Repeat step on the opposite side.
Make sure each track is aligned at the top and bottom of the window opening. Use a total of three (3/4”) green screws to fasten each track in place.
INSTALLING THE EXTERIOR SHIELD: Drop the exterior shield into place behind the exterior shield tracks. The cord hole should be on the bottom of the
shield.
INSTALLING THE EXTERIOR DRIP CAP: Begin by making guide marks 1-9/16” above the window. Secure the drip cap on the right side with one (3/4”)
green screw. Then, make sure the drip cap is level and rests on the marks. If so, secure with another (3/4”) green screw. Use fi ve evenly spaced (3/4”) green
screws to fi nish securing the drip cap. Use a total of fi ve evenly spaced (3/4”) green screws on the gun window to fi nish securing the drip cap. Use 3 on the
bow window cap.
INSTALLING THE INTERIOR DRAW CORD CINCH LOCK: Pull the shield up and down a few times to center the cord in the window. Once you have found
the center. let the shield down. Measure 15-1 /2” down from the center and mark the position. Peel the tape protection off the back of the orange speed
cinch and secure the top of speed cinch to your mark. Make sure you set correctly with the notch at the bottom (as shown in picture) as the tape is very
aggressive and diffi cult to remove once adhered to wall. Secure the cinch with two (1”) washer head screws. Run the cord through the speed cinch tube. Then
thread the cord through the rubber shield stop. Tie a knot at the end of the cord directly beneath the rubber stop. You may need to adjust the knot to make
sure the shield is at or just below the window. Note: If the shield does not slide down smoothly with cord, from the outside of blind, lightly bend out the
exterior shield tracks until shield slides smoothly.
Step 9 - INSTALLING THE INTERIOR LUAN, STRIP, TRACK AND GLASS:
Install the luan wood strip even with the side of window opening and even with the top j-channel (see pic). Use staple gun and a minimum 3/8” staple to
hold in place. Slide the plastic glass tracks onto each side of glass panel fi rmly. Hold the glass and tracks over the window opening, making sure it is even on
both sides and on top of wooden luan board strip. Using (1”) washer head screws, secure one track on the right side of the window (top and bottom). On the
left side of the window, place one washer head screw in the top hole of the opposite track. Lower the glass to make sure it is level and will slide smoothly.
Then fasten the remaining three (1”) washer head screws. Secure the half piece of glass track in the middle of the window of the side walls, back wall and
door wall making sure it is even with the top of window opening. Secure with two 1” washer head screws. This will hold window in place when in upright
position.
Step 10 - Caulking:
Caulk the top of the door drip, all the corner moldings, roof corner
seams and wall seams.
4X6 - Hunting Blind
7201 Engle Road, Fort Wayne, IN 46804 • Toll Free: 1-888-446-4868 Fax: 260-483-2070
www.shadowhunterblinds.com
 Loading...