

Shadow Endpin Socket,NanoFlex,NanoFlex 6,PanaFlex Installation Manual

Installation manual for
Endpin Socket Mono or Stereo, w. integrated switch
NanoFlex Monophonic pickup
NanoFlex 6 Hexaphonic pickup
PanaFlex Stereo panoramic pickup
© Shadow Elektroakustik, Peter-Haendel-Str. 2, DE-91334 Hemhofen / Germany Page 1/1
Introduction
Thank you and congratulations for choosing a Shadow pickup system. Shadow preamps are known for the most reliable, user-friendly and best
sounding products on the market. As a result of an enormous research and development effort over three years, Shadow releases a revolutionary
pickup system. The hexaphonic pickup Nanoflex-6 unites six Nanoflex pickups in one – one for each string.
Pickup Variants
We offer flexible pickups with different features. Pay attention to choose the correct one to be mounted in the guitar. We have the monophonic
(standard) pickup in two different widths: 2.3mm and 2.8mm depends on how is the bridge slot.
Note: Almost all new guitars are using 2.3mm. NanoFlex 6 and PanaFlex pickups are available in 2.3mm width only.
If you are using a NanoFlex 6 or a PanaFlex: Before you install the pickup: Check the correct string spacing!
11.8mm for classical guitars with nylon strings. (Needed for some baritone-guitars too!)
11.0mm for acoustical guitars with steel strings.
If you are not sure if you can install it by yourself, we suggest contacting a luthier in your area!
Damaged pickups or other parts which were damaged by mishandling are out of the warranty.
Endpin Installation
Take off the strings and remove original strap nut and increase hole up to 12.5mm diameter.
Remove endpin strap nut, hexagon nut and washer from the endpin.
(Fig.1): Mount the endpin as shown. Pay attention on the washer! Adjust the inside nut so that the larger threads end just below the surface of the
instrument (Fig.2, arrow). Put a small screwdriver or similar in the two side holes of the endpin socket to lock it during screwing the hexagon nut.
Put the washer from the outside on the endpin jack and tighten the hexagon nut with 12mm wrench and screw endpin strap nut on.
Laying the cable in that way that it may not produce noise during vibration!
Fig.1
Fig.2
Pickup Installation
Remove the original saddle and drill a 3.1mm diameter hole in the corner of the saddle slot at the bass string side (Fig.3 D).
The hole has to be drilled in an angle of 30°-45°. Check your bracing before drilling the hole to avoid damage.
Clean up the saddle slot and eliminate the wood dust and chips. Lead the NFX pickup through the hole in the bridge and place it into the bridge slot
showing “NFX top” up towards the saddle.
Fig.3: To accommodate the height of the original bridge reduce the height of the saddle. The thickness of the Nanoflex is around 0.8mm. Important:
The bottom side has to be absolutely flat! Insert the saddle and secure it temporarily with a piece of tape.
Fig.4: Use the single wire clip (if supplied) to secure the wire from the pickup to the underside of the top and secure the cable into it. Failing to secure
the wire may produce feedback and other bizarre audio consequences.
Also fix this area to avoid noise or feedback. You may use adhesive material to fix it. Connect the 3-pin cable of the pickup and the 4-pin cable from
the endpin to the bottom of the preamp.
Fig.3
Fig.4
Fig.5: During reassembling the strings, pay attention to the saddle! If needed press it back to the correct upright position. See Fig.6. Otherwise it is
easy to cause feedback!
Fig.7: Perfect bridges are using an inclination of around 13° to 15°. This is best for the sound quality, because the string vibrations are transferred
perfect to the pickup.
Fig.5
Fig.6
Fig.7
Update information may be found on our website: http://shadow-electronics.com
There you can find manuals in different languages too. E.g. in German!
Errors and omissions excepted - Subject to change without prior notice!
Endpin-Socket
Strap Nut
Outside Washer
Inside Nut
Hexagon NutInside Washer
Holes
Top of Instrument
Instruments's bottom
Block
0.8 mm
bridge saddle
bridge
strings
pickup
saddle
Wrong!
bridge
strings
pickup
saddle
OK
bridge
strings
pickup
saddle
Correct inclinated guitar bridge
Owner's Manual for
SH Onboard Tuner Universal chromatic Auto-Tuner
kt14-03-18 © Shadow Elektroakustik, Peter-Haendel-Str. 2, DE-91334 Hemhofen / Germany Page 1/1
Introduction
Thank you and congratulations for choosing a Shadow product. As result of research and development efforts over many years, Shadow is pleased to
announce our newest automatic chromatic Tuner.
Please read this manual carefully. If you still have questions please contact our online support.
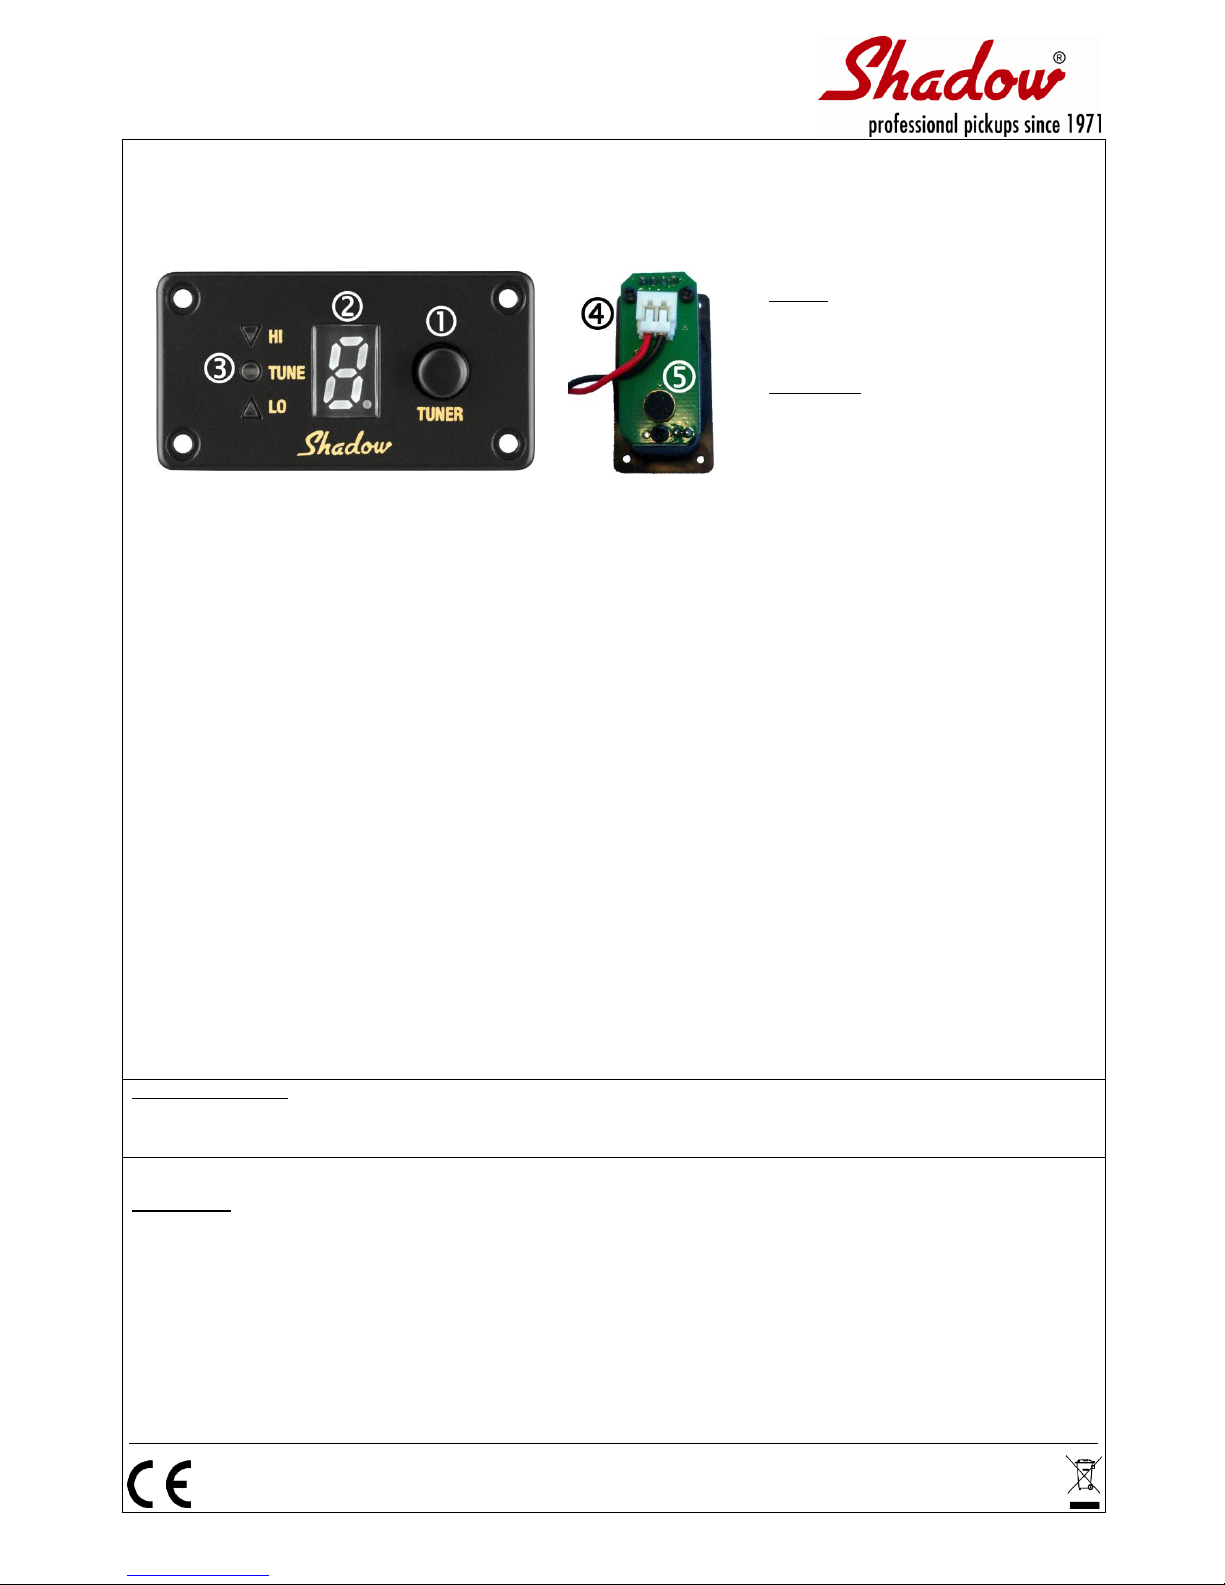
Controls:
1. On/Off Switch
2. Tone Display
3. Status LEDs
Bottom Side:
4. Battery connector
5. Microphone
Installation:
Note: First install the pickup and the endpin-socket. The Installation instructions for the pickup and endpin-socket are provided in separate docu-
ments.
Find the right position for the battery-holder and glue it with its hook-and-loop tape (E.g. Velcro®).
A good position that won’t affect your sound is on or near the neck block.
To install the tuner, mill or saw the cutout in the rib. Check the dimensions again before you start to cut!
To change the batteries you can remove the holder from its hook-and-loop tape.
Connect battery holder to the tuner and secure the unit with the four screws (included). Be careful not to use too much force – this may damage the
instrument or the tuner!
Operation:
TUNER Switch
Use this switch (1) to switch the tuner on and off.
TUNER Display
Press the switch, to start the tuner operation. The display shows the note played. The dot in the display shows a semi-tone. E.g. "A" and "b/#" together means "A sharp".
The two red LEDs HI or LO showing how close it is to the correct pitch (in relation to 440Hz).
If you reached the final pitch the green LED TUNE lights up. Press the switch (1) again, to end the tuner operation.
If the tuner is not in use (no input signal) for ~90 sec. the display will be switched off to save battery energy. This is shown by the flashing red LO LED.
Battery change
Remove the battery holder and remove the two batteries. Use two new good quality CR2032 batteries.
Pay attention to get the correct polarity! The plus-pole is should be facing up.
*Notes of battery disposal:
For EU: The crossed-out wheeled bin implies that used batteries should not be put to the general household waste!
There is a separate collection system for used batteries, to allow recycling and proper treatment in accordance with legislation.
For other countries: The used battery is to be returned to the selling point. Or contact your local authority for correct method of disposal of used batteries.
Technical Data
WxHxD : 42x22x28 [mm]
Cutout : 35x16 [mm]
Frequency : 62Hz up to 1700Hz
Batteries : 2x CR2032 (3V)
Update information may be found on our website: http://shadow-electronics.com
There you can find manuals in different languages too. E.g. in German!
Errors and omissions excepted - Subject to change without prior notice!
 Loading...