

Page 1

Page 2

W A R R A N T Y :
Upon receipt of your Sirius, please check to ensure you have received all of the parts.
NOTE: Wind damage is not covered under any manufacturer’s warranty.
5 Year Limited Warranty includes the Libra, Astral-TC, Orion, Galaxy, Sirius and
Polaris styles. This includes the mast, boom, head fitting, elbow, center pole/sidepost,
arms, ribs, top and bottom hub and stainless steel hardware only. If there is damage
under the warranty, Shademaker will replace and/or repair any item listed in this
category at its discretion. Labor charges are not covered under this limited warranty.
10 Year Limited Warranty includes the Sunbrella
®
awning & marine grade Fabric
Collection. Visit www.sunbrella.com/warranty for more details. Labor charges are not
covered under this limited warranty.
The 5 Year Limited Warranty applies to Sunbrella Firesist
®
, Sunbrella Firesist®PLUS
and Sunbrella
®
Furniture Grade, and O’bravia®awning fabrics. Labor charges are not
covered under this limited warranty.
1 Year Limited Warranty covers base wheels and the powder coat finish on all bases.
If the powder coat finish flakes, bubbles, peels or loses color; Shademaker will re-finish
or replace the defective bases at its discretion. Normal wear and tear is not covered
under this limited warranty. Labor charges are not covered under this limited warranty.
Exclusions: Wind damage, acts of nature (such as, but not limited to, freezing or any
type of extreme weather). Failures caused by abusive use and normal wear and tear
are not covered under this warranty. Any Galaxy style that does not have any spacer
buttons installed is not covered by warranty.
Parts can be ordered under warranty at no charge, if found that the damage is a
manufacture defect and/or purchased out of warranty to make them whole again.
Those filing warranty claims will be responsible for all shipping, handling and freight
charges on all claims to Shademaker in Baldwin Park, CA. All warranty claims must be
submitted with the original proof of purchase, date of purchase, name of dealer and the
description of the damage. An authorized Shademaker RA# must be listed on all
products being returned. The Shademaker warranty is not transferable. Shademaker
reserves the right to repair, replace and/or redesign any product that is returned under a
warranty claim.
For current warranty information, please visit www.shademakerusa.com.
T O P R O P E R L Y F O L D C A N O P Y
The 100% solution dyed canopy will last longer if you fold it as it was packed and
shipped. This technique is similar to the way a parachute is folded and is especially
important when folding the canopy for seasonal storage or when left in the closed
position for an extended period of time.
Using this technique at all times will significantly extend the life of
the canopy.
1. When the canopy has been fully lowered, stand in front of the
canopy structure and begin the folding process by pulling out
two panels opposite the mast.
Pull the two panels together and roll tight into the canopy.
2. Once rolled tight, pull adjacent panels out one at a time and
fold to the center, alternating sides until all the panels have
been pulled out from the arms and folded into the center.
3. Strap the canopy to the mast with the strap.
P R O T E C T I V E C O V E R
1. Screw rods together and insert into slit of the cover.
2. Unzip cover.
3. Using the rod as a guide, slide cover over your umbrella.
4. Pull on string to zip down your cover and tie.
M A I N T A I N I N G F R A M E & F I T T I N G S
1. Hose frame with water periodically, more often if installation is in a salty or industrial
environment.
2. Inspect the installation fitting on a regular basis and tighten if necessary.
M A I N T A I N I N G C A N O P Y F A B R I C
1. Clean up spills and stains right away. Spills can be removed by using a clean,
absorbent cloth.
2. For general maintenance, use a soft brush to remove dust and dry soil or wash
down with clean, warm water (i.e. garden hose) every so often so dirt does not
become engrained. Allow the fabric to dry naturally before closing the canopy.
3. If a thorough cleaning is necessary, sponge over the fabric using a mild soap
solution (2% solution). Rinse well with plenty of water to remove all soap residue.
4. Never use detergents, cleaning fluids, or solvents. Grease and oil stains may be
removed by using turpentine or similar with an absorbent cloth.
5. We recommend giving the canopy a good clean on a more frequent basis if
installed in a location where the canopy is likely to become soiled.
R E M O V A L & R E P L A C E M E N T O F C A N O P Y
Follow these instructions should you choose to replace your canopy with a new canopy.
1. Lower the canopy to the closed position.
2. Remove the button/screw at the end of each arm.
3. Separate the Velcro strap along the main canopy arm and remove the canopy from
the structure.
4. To replace the canopy, reverse the above process.
Page 3

2
I M P O R T A N T :
Please read this entire manual before installing or operating your Sirius umbrella.
S I R I U S W I N D R E S I S T A N C E G U I D E L I N E S :
Light to Moderate Winds (if used with mount kits)
When installed properly, the Sirius is engineered to handle light to moderate wind
conditions in the open canopy position. Please adhere to these wind guidelines:
1. If winds are present, the Sirius should be closed.
2. Do not keep the Sirius in a tilt position if you are experiencing windy conditions.
3. As winds get stronger or, in anticipation or uncertain/severe weather conditions,
the canopy should be lowered to the folded position and strapped to the mast.
4. The Sirius should always be left in the folded and strapped position when
unattended or not in use.
5. In anticipation of, and during extremely severe weather conditions, it is
advisable to remove and store the entire Sirius structure to protect it from
storm-related debris.
Page 4
3
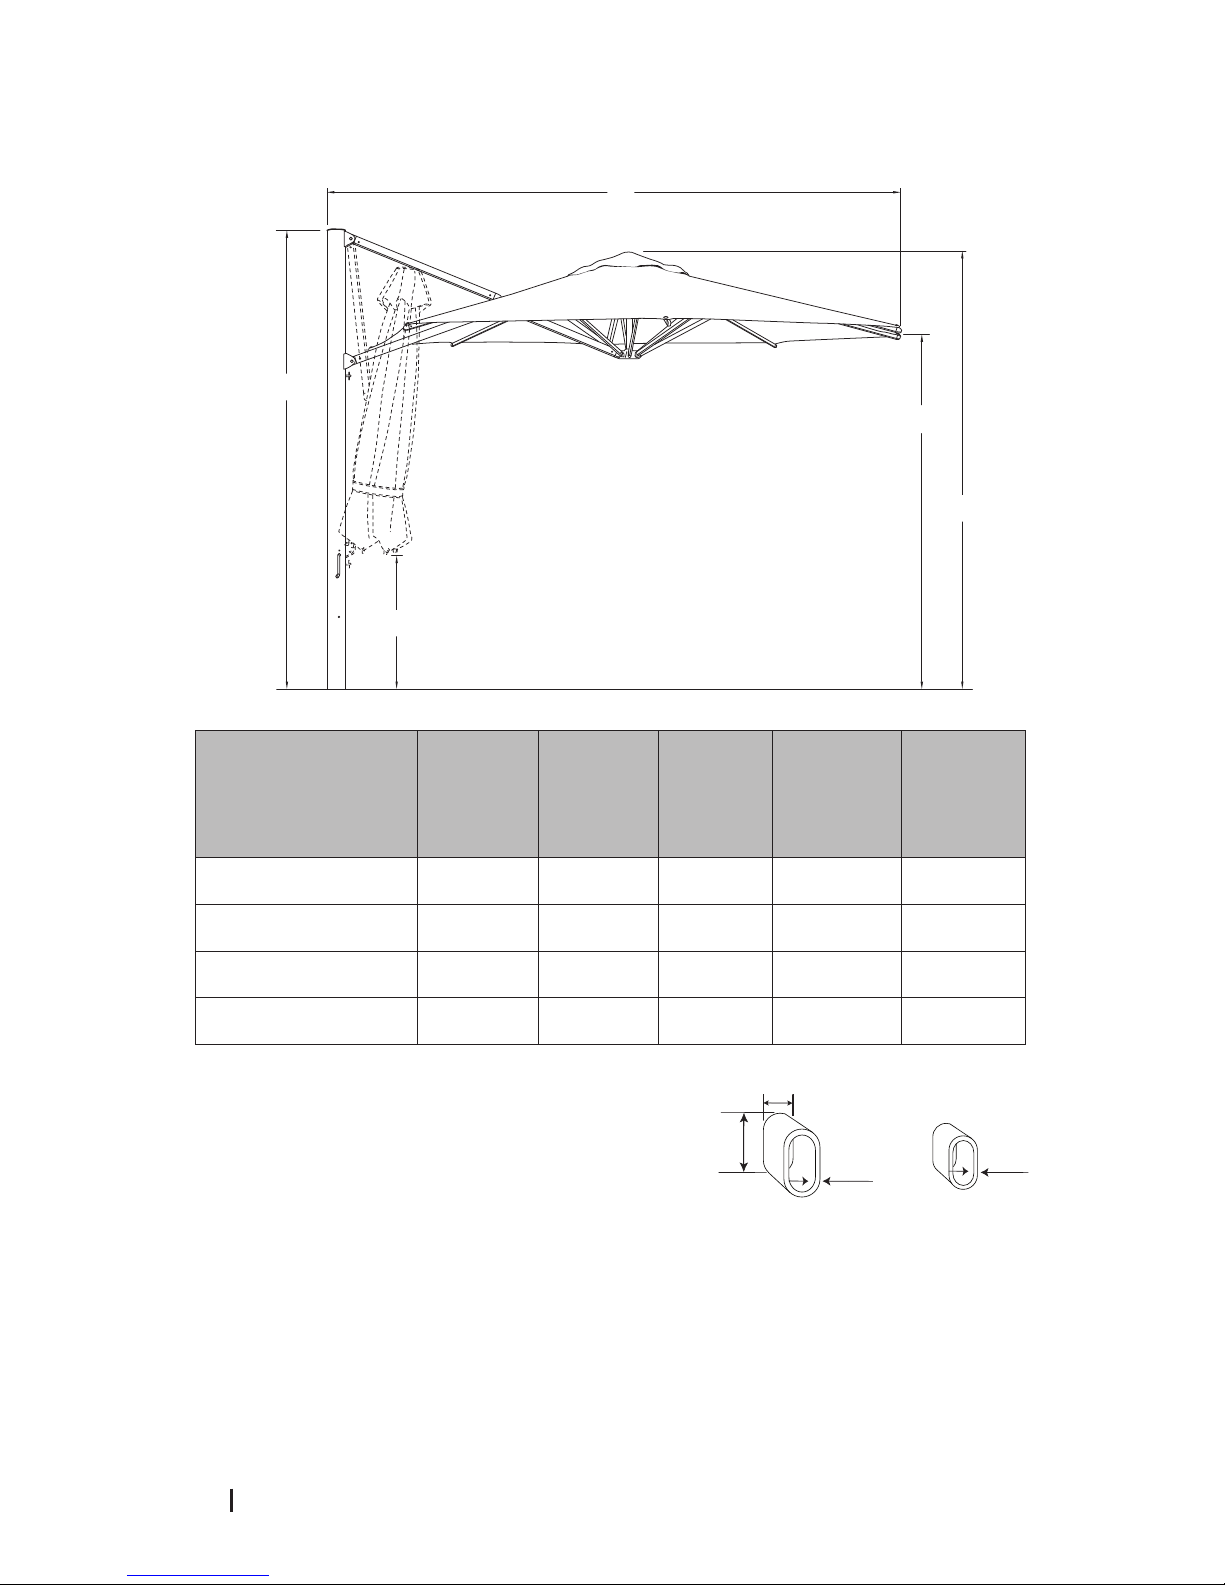
S P E C I F I C A T I O N S
E
B
C
D
A
.051”
.125”
4.375”
2.75”
Arm
Mast
Weight: Approx. 83-103 lbs.
Mast Shape & Diameter: 2.75” x 4.375” Oval
Mast Thickness: .125”
Arm Thickness: .051”
Item No.
A
Canopy to
Mast Width
B
Total HeightCHeight to
Arm
D
Canopy
Clearance
Closed
E
Height to
Canopy Top
SR-27S 9’11” 8’9” 6’8” 2’ 8’5”
SR-30S 11’ 9’ 6’8” 1’7” 8’5”
SR-30 10’5” 8’11” 6’11” 3’5” 8’5”
SR-35 11’9” 8’11” 7’ 2’10” 8’5”
Positions
0 Closed position
1 Tilt position 1 – blocks extremely angular sun
2 Tilt position 2 – blocks moderately angular sun (square is lower than octagon)
3 Horizontal position
NOTE – DO NOT USE the tilt positions in windy condition
O P E R A T I N G I N S T R U C T I O N S
Remove all packaging from umbrella.
To Open and Tilt Canopy
The following instructions will walk you through the sequential progression of opening
the Sirius canopy structure. At any time, you may skip a position and open to the
desired position.
Open to the first position:
1. Remove the strap that holds the Sirius to the mast when in the closed position and
loosen arms. CAUTION: NEVER FORCE THE ARMS. If you experience any
resistance, make sure all arms are freed manually to facilitate opening.
2. Pull slider car stop pin out and turn counter clockwise to disengage.
3. Insert crank handle into gear. Begin turning the crank handle clockwise until the slider
car stop pin auto locates into the lowest predetermined hole. Continue cranking until
the canopy is taut. The canopy will now be in Tilt position 1.
Open to the second position:
1. Crank handle counter-clockwise for a few rotations to release the
pressure.
2. Disengage slider car stop pin (horizontal position) and guide the
slider car upward until the pin locates in the next predetermined
hole. It may be necessary to turn the winder a few times until the
pin locates. Once the pin is located in the hole, continue cranking
handle until the canopy is taut. The canopy will now be in Tilt
position 2.
Page 5

4
1. Internal Stem 6. Crank Handle 11. Canopy
2. Internal Stem Cover (optional) 7. Slider Car Stop Pin 12. Strut
3. Bore Holes 8. Slider Car 13. Lower Hub
4. Turning Handle 9. Main Support Arm 14. Light Adapter
5. Mast 10. Upper Hub 15. Arm
91112
5
6
7
8
1
2
4131033
3
14
15
D I A G R A M & P A R T S L I S T
Page 6
5
I
N S T A L L A T I O N O P T I O N S A N D G U I D E L I N E S
There are four standard installation options which provide the best stability for the Sirius.
Depending on your situation, you will have requested one or more of the Sirius base options
at the time of your order.
1. CONCRETE MOUNT KIT - This kit includes a base plate, four (4) plate bolts, and
one (1) allen wrench.
2. IN-GROUND MOUNT KIT - This kit includes in-ground fitting, four (4) plate bolts,
and one (1) allen wrench.
3. STEEL BASE WEIGHT - 213 lbs. Square steel base weight is available (SM PLATE
required). We recommend a minimum of 400-600 lbs. of steel base weights for this
umbrella (depending on the size of your umbrella).
4. FREE STANDING STEEL FRAME - You may opt to use a free standing base for
your Sirius umbrella. We recommend a minimum of a 350-450lbs. base weight for
this umbrella (depending on the size of your umbrella). NOTE: If using a free-standing
steel frame, wind guidelines change from light to moderate winds to light winds only.
NOTE: REFER TO BASE WEIGHT MATRIX AND SEPARATE
MANUAL FOR BASE ASSEMBLY PRIOR TO PROCEEDING.
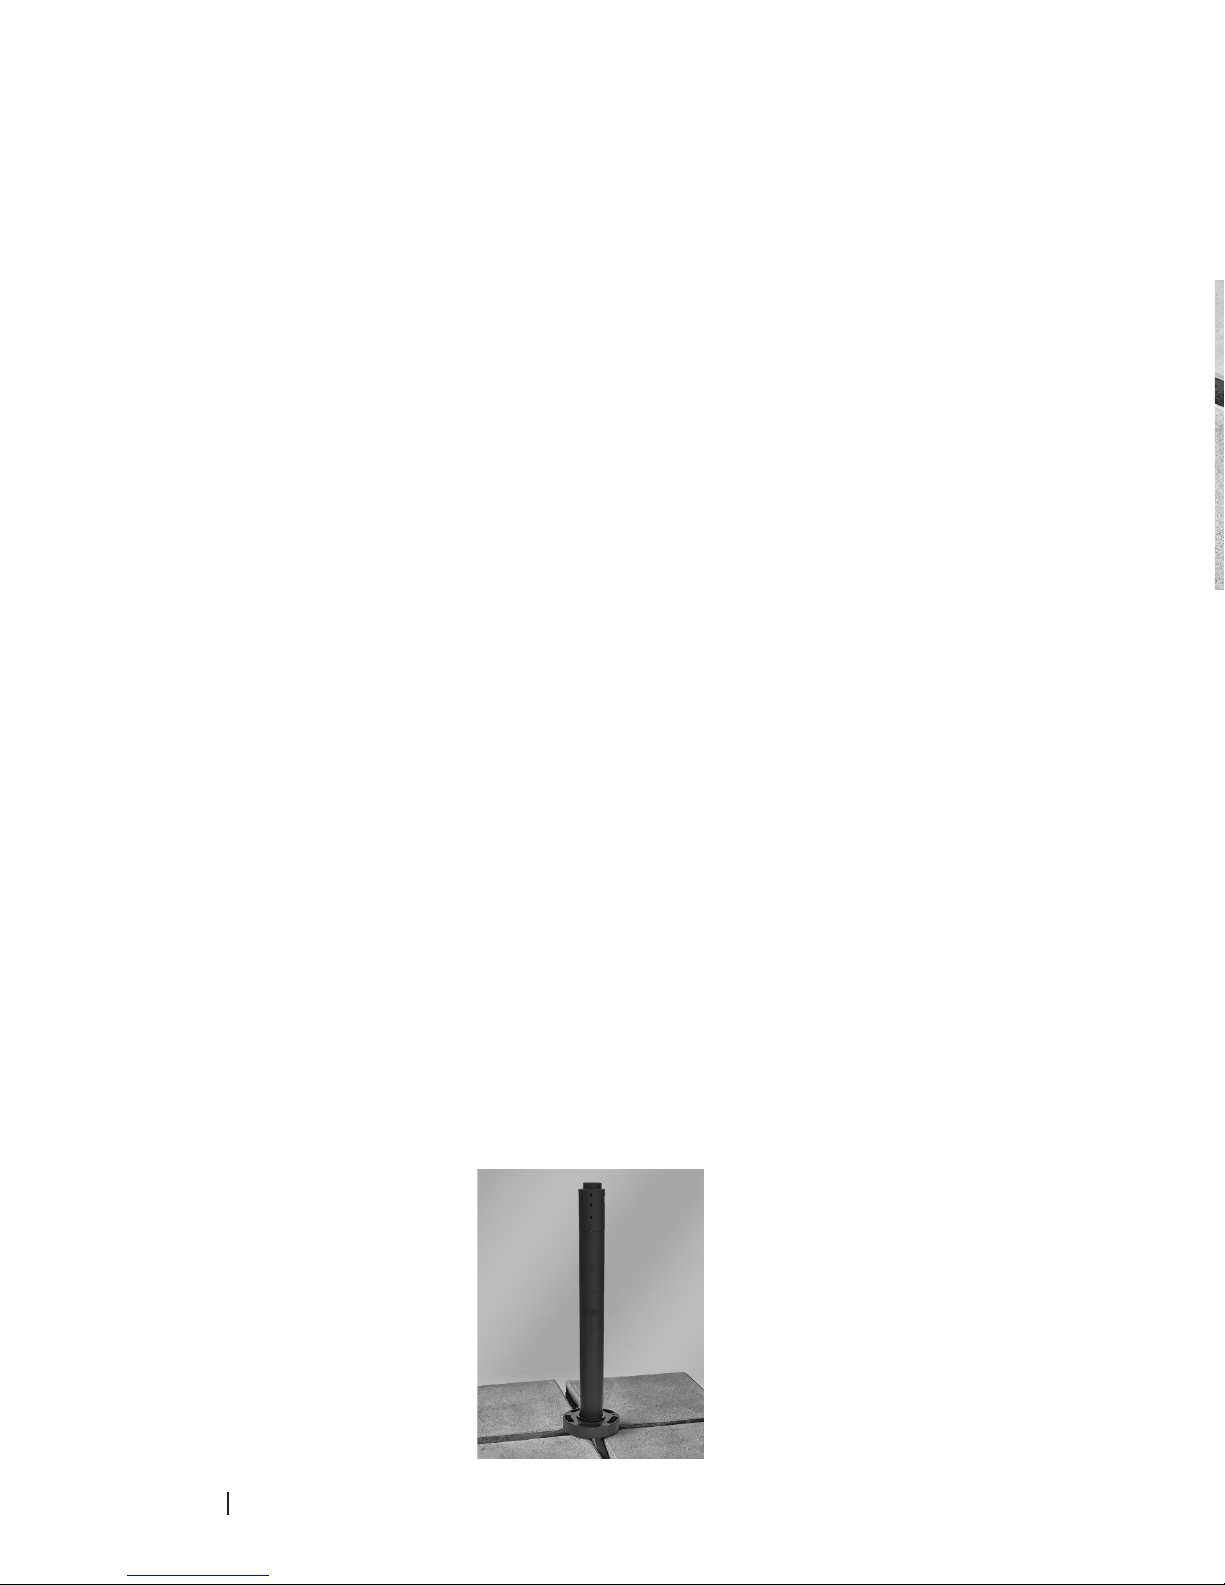
(Astral-TC Internal Stem shown)
Installing Internal Stem
Option A: If you wish to use optional internal stem cover, proceed below.
Otherwise, if you wish to not use cover and for a quicker installation, skip to
Option B on page 7.
Remove internal stem from bottom of mast by removing the two round bolts
underneath the turning handle. Install internal stem onto mount kit, SM PLATE or steel
base frame with supplied 5 bolts and washers using allen wrench. Do not completely
tighten. Note: Do not use power drill. May cause damage to umbrella.
A S S E M B L Y I N S T R U C T I O N S
Two-person team is recommended for assembly.
By now, you have installed your mount kit, SM PLATE onto your steel base weight, or
have set up your steel base frame with recommended base weight.
(Astral-TC Internal Stem shown)
Slide internal stem cover over bottom of Sirius mast. Using a two person team, lift
umbrella with cover and insert bottom of mast onto internal stem. Tighten 5 bolts to
secure umbrella in place with allen wrench. Note: Do not use power drill. May cause
damage to umbrella. Slide internal stem cover down to cover internal stem. Once
complete, proceed to page 7.
Attaching Sirius to Internal Stem
Lift rotating handle from mast. Rotate Sirius mast until the bore holes for the locking
screws in the internal stem line up in the mast. Tighten locking screws into the mast
and internal stem to secure. Note: Do not use power drill. May cause damage to
umbrella. Once complete, proceed to “Leveling Umbrella” on page 7.
Page 7
6
(Astral-TC Internal Stem shown)
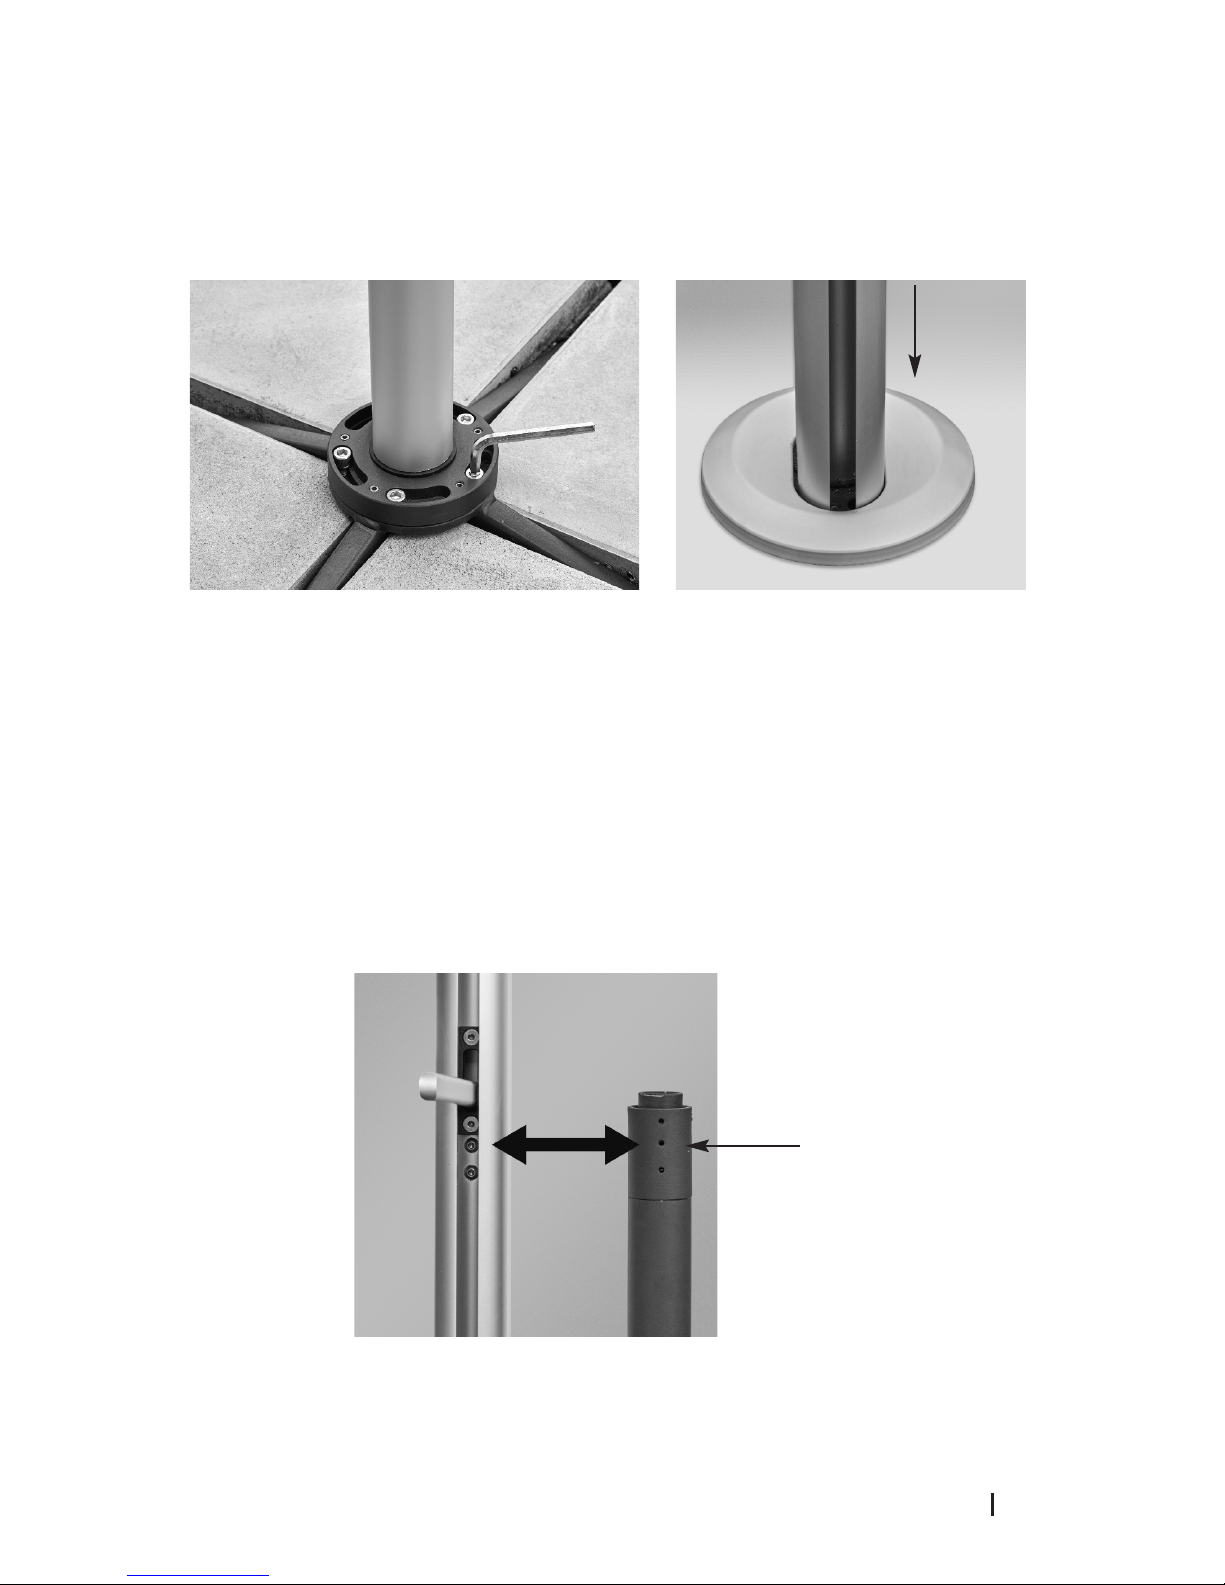
Slide internal stem cover over bottom of Sirius mast. Using a two person team, lift
umbrella with cover and insert bottom of mast onto internal stem. Tighten 5 bolts to
secure umbrella in place with allen wrench. Note: Do not use power drill. May cause
damage to umbrella. Slide internal stem cover down to cover internal stem. Once
complete, proceed to page 7.
Internal Mast Stem Cover Installed
Attaching Sirius to Internal Stem
Lift rotating handle from mast. Rotate Sirius mast until the bore holes for the locking
screws in the internal stem line up in the mast. Tighten locking screws into the mast
and internal stem to secure. Note: Do not use power drill. May cause damage to
umbrella. Once complete, proceed to “Leveling Umbrella” on page 7.
Bore Holes
Page 8
7
1. Internal Stem 6. Crank Handle 11. Canopy
2. Internal Stem Cover (optional) 7. Slider Car Stop Pin 12. Strut
3. Bore Holes 8. Slider Car 13. Lower Hub
4. Turning Handle 9. Main Support Arm 14. Light Adapter
5. Mast 10. Upper Hub 15. Arm
91112
5
6
7
8
1
2
4131033
3
14
15
D I A G R A M & P A R T S L I S T
You are now ready to operate your umbrella!
Option B: If you wish not
to use optional internal stem cover, proceed below.
Using a two person team, lift umbrella with attached internal stem and install umbrella
onto mount kit, SM PLATE on your steel base weight. Tighten 5 bolts to secure
umbrella in place with allen wrench. Once complete, proceed below.
(Astral-TC Internal Stem shown)
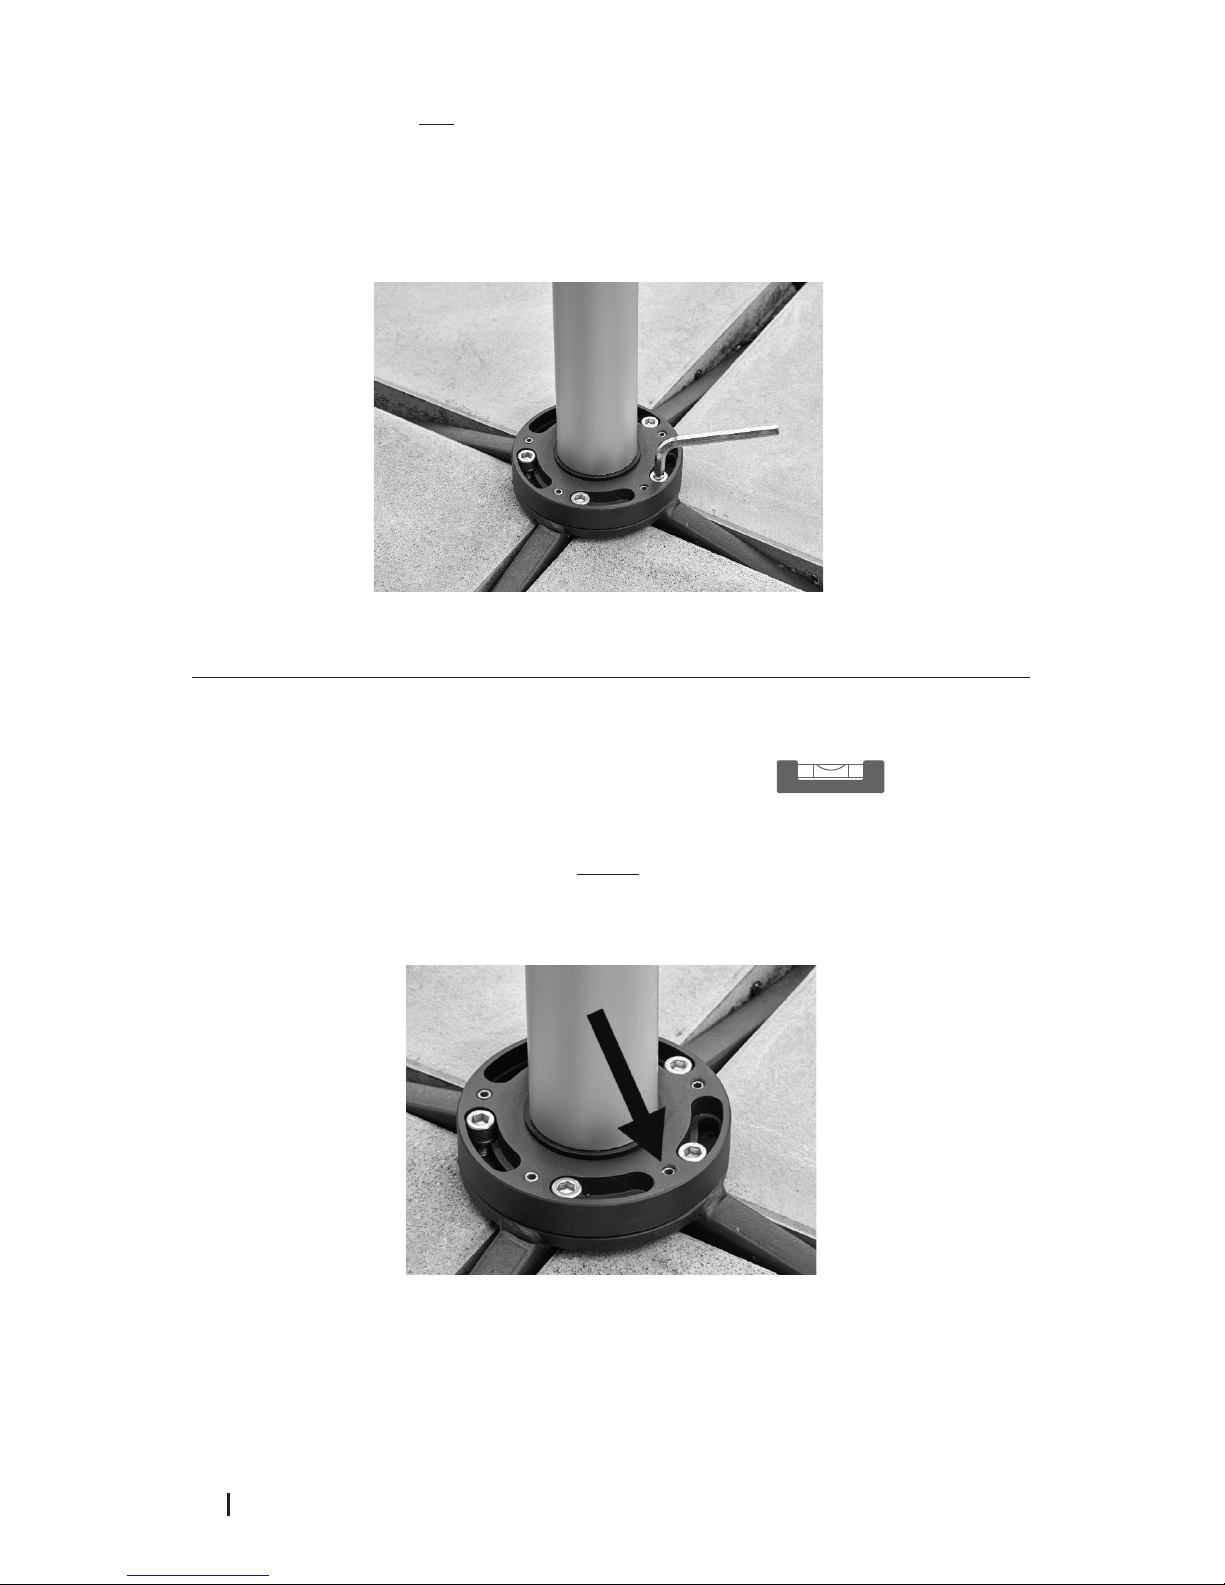
Leveling Umbrella
Check the vertical position of the umbrella with a level tool.
If the umbrella is not level, lift optional internal stem cover to access internal stem.
Untighten the 5 bolts with 1-2 rotations (do not
completely untighten bolts!). The internal
stem can rotate without applying force. Correct the vertical level position with leveling
screws.
Once leveled, re-tighten the 5 bolts with allen wrench on internal stem. Note: Do not
use power drill. May cause damage to umbrella. Slide optional internal stem cover
down and cover internal stem.
Page 9
8
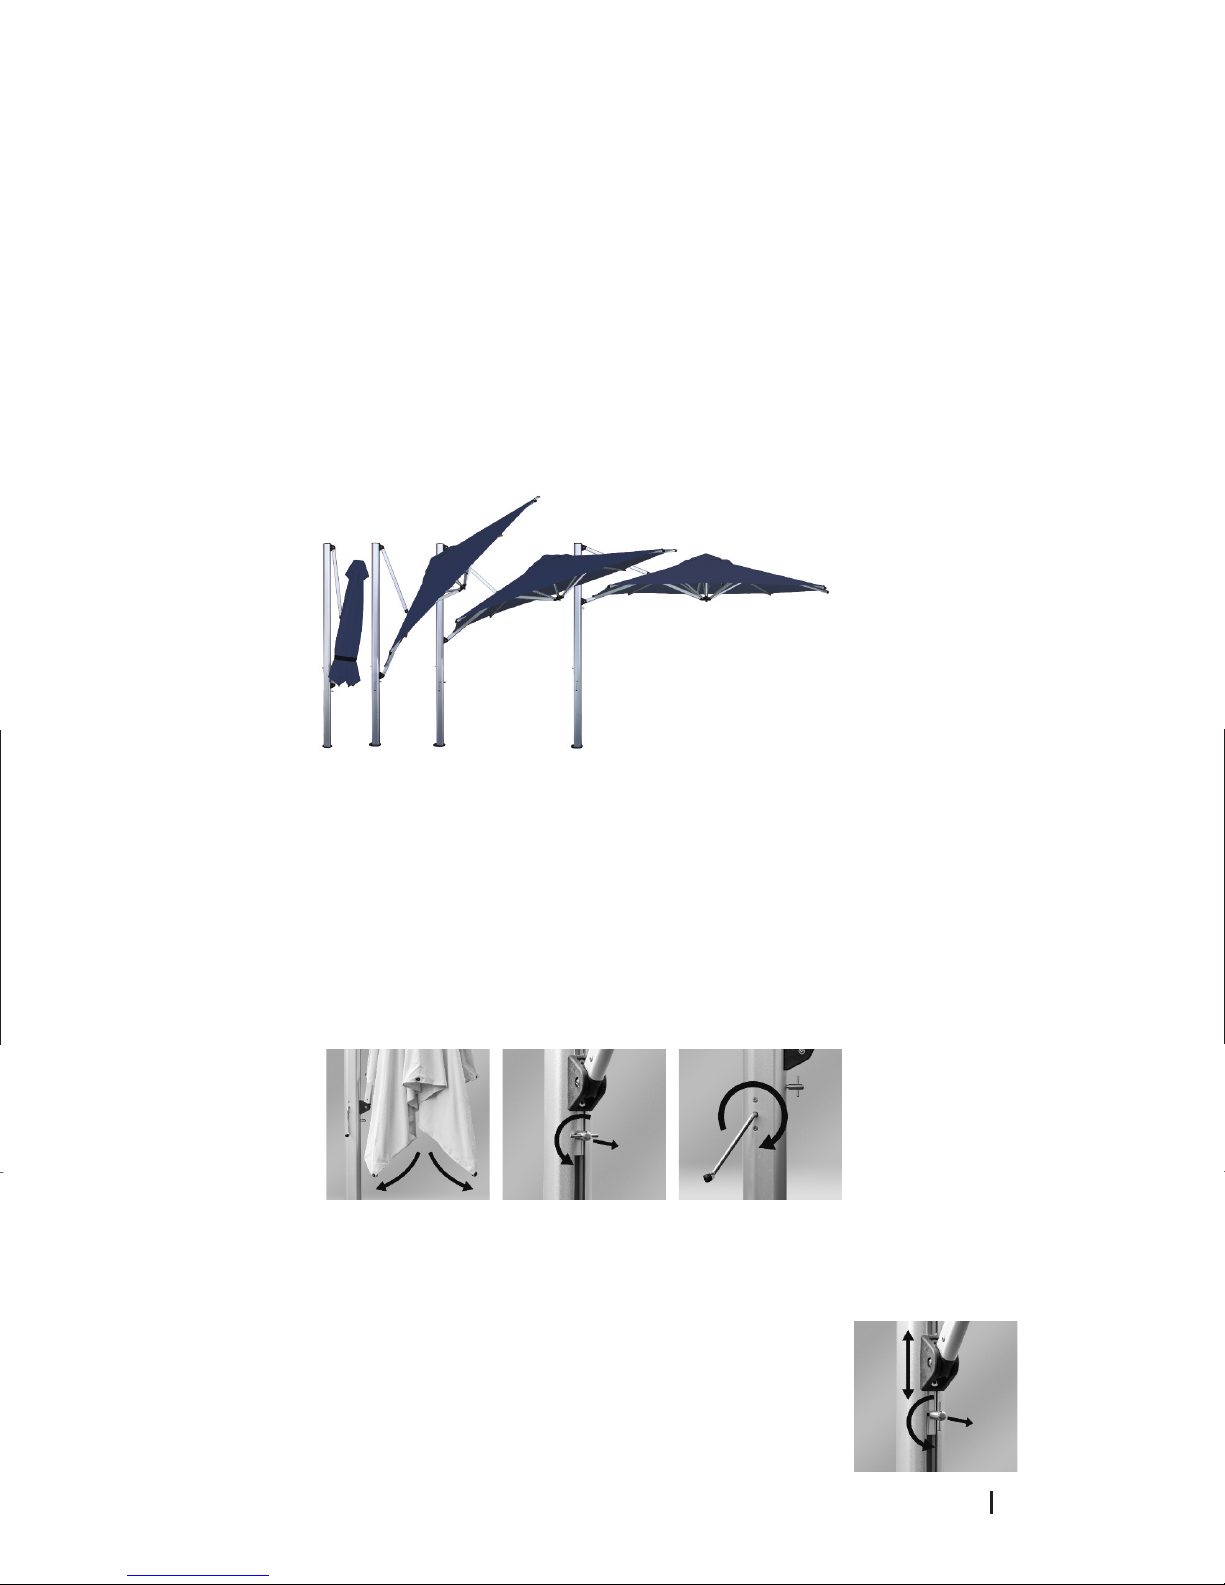
Positions
0 Closed position
1 Tilt position 1 – blocks extremely angular sun
2 Tilt position 2 – blocks moderately angular sun (square is lower than octagon)
3 Horizontal position
NOTE – DO NOT USE the tilt positions in windy condition
0 1 2 3 P O S I T I O N S
O P E R A T I N G I N S T R U C T I O N S
Remove all packaging from umbrella.
To Open and Tilt Canopy
The following instructions will walk you through the sequential progression of opening
the Sirius canopy structure. At any time, you may skip a position and open to the
desired position.
Open to the first position:
1. Remove the strap that holds the Sirius to the mast when in the closed position and
loosen arms. CAUTION: NEVER FORCE THE ARMS. If you experience any
resistance, make sure all arms are freed manually to facilitate opening.
2. Pull slider car stop pin out and turn counter clockwise to disengage.
3. Insert crank handle into gear. Begin turning the crank handle clockwise until the slider
car stop pin auto locates into the lowest predetermined hole. Continue cranking until
the canopy is taut. The canopy will now be in Tilt position 1.
Open to the second position:
1. Crank handle counter-clockwise for a few rotations to release the
pressure.
2. Disengage slider car stop pin (horizontal position) and guide the
slider car upward until the pin locates in the next predetermined
hole. It may be necessary to turn the winder a few times until the
pin locates. Once the pin is located in the hole, continue cranking
handle until the canopy is taut. The canopy will now be in Tilt
position 2.
Page 10
9
I M P O R T A N T :
Please read this entire manual before installing or operating your Sirius umbrella.
S I R I U S W I N D R E S I S T A N C E G U I D E L I N E S :
When installed properly, the Sirius is engineered to handle light to moderate wind
conditions in the open canopy position. Please adhere to these wind guidelines:
1. If winds are present, the Sirius should be closed.
2. Do not keep the Sirius in a tilt position if you are experiencing windy conditions.
3. As winds get stronger or, in anticipation or uncertain/severe weather conditions,
the canopy should be lowered to the folded position and strapped to the mast.
4. The Sirius should always be left in the folded and strapped position when
unattended or not in use.
5. In anticipation of, and during extremely severe weather conditions, it is
advisable to remove and store the entire Sirius structure to protect it from
storm-related debris.
To Close Canopy
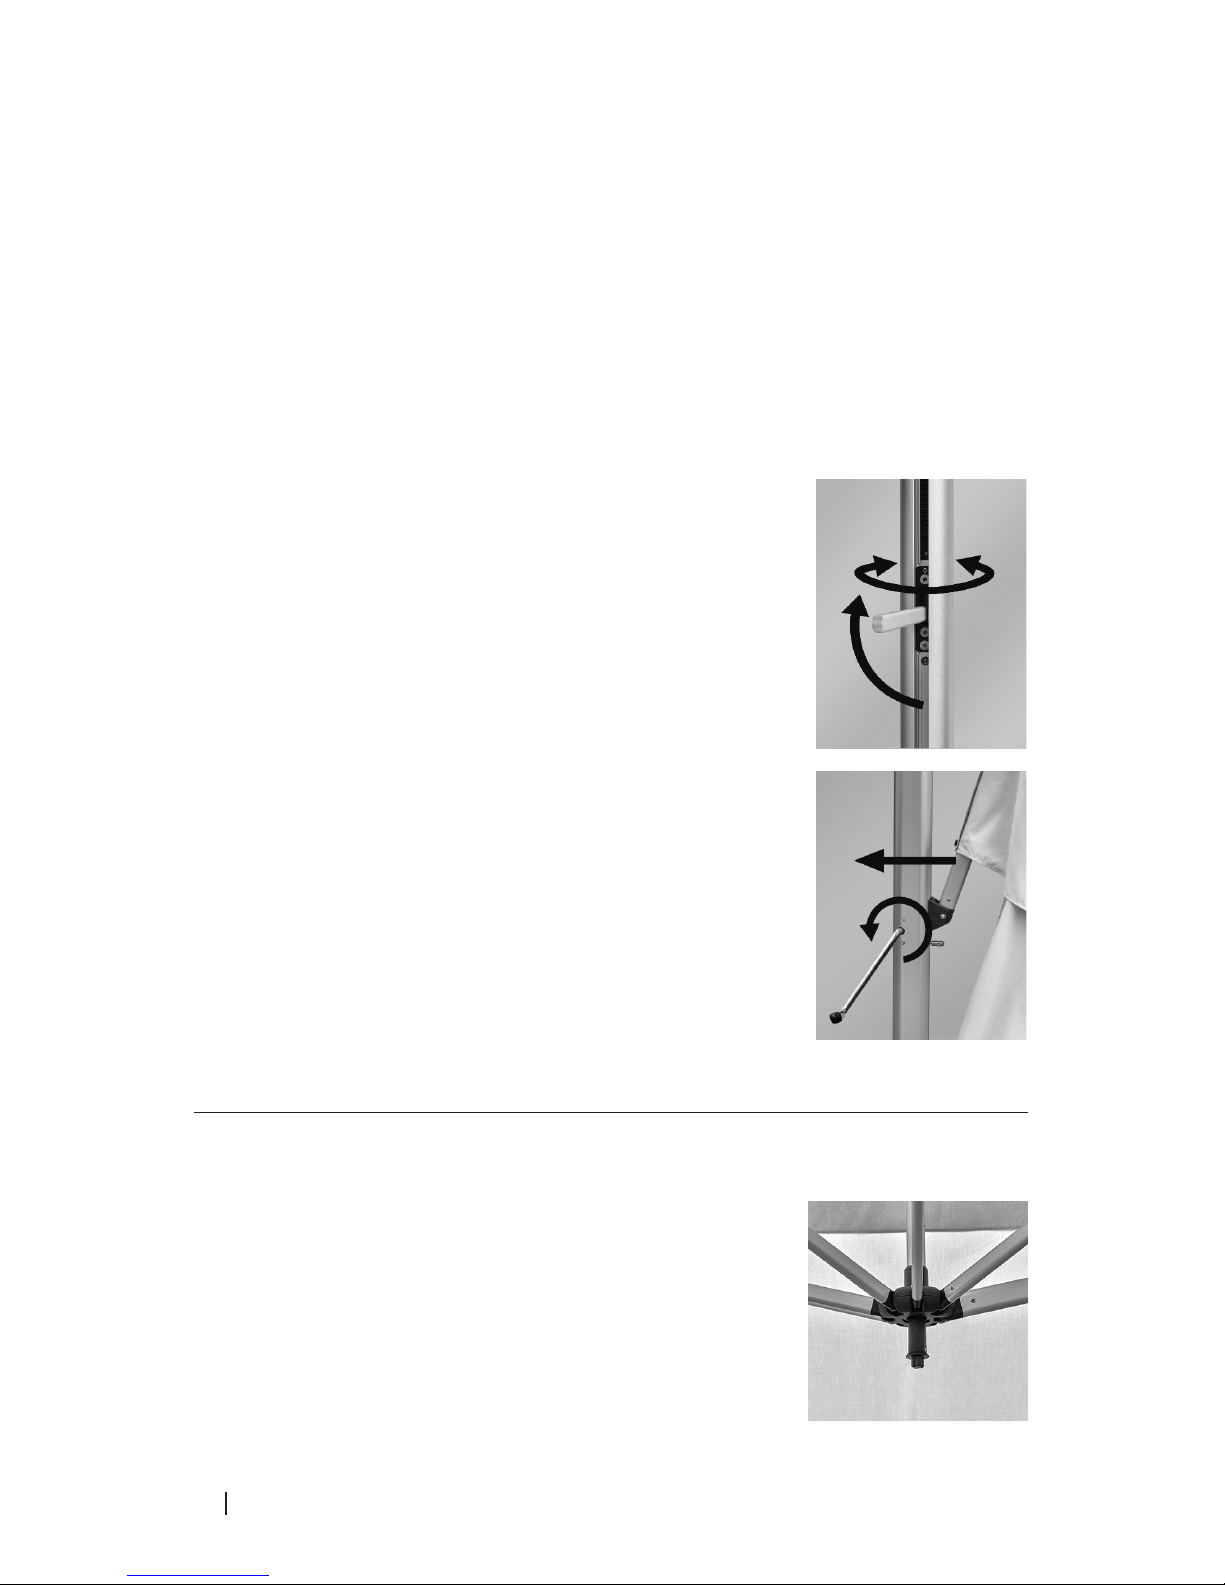
1. Pull slider car stop pin and turn counter clockwise to
vertical position so the slider car can move freely move
down mast. At the same time, guide slider car downward
with your other hand. Release slider car stop pin to lock in
place.
2. Insert crank handle into gear. Stand behind umbrella and
turn crank handle counter-clockwise canopy is lowered.
3. Strap canopy to the mast with supplied strap.
L I G H T A D A P T E R
To open light adapter:
Loosen light adapter built into the umbrella runner by turning
counter-clockwise. After loosening, pull down light adapter
post and attach umbrella light (sold separately).
To close light adapter:
Gently push up the light adapter post back into umbrella
runner and tighten turning clockwise NOTE: It is not
necessary to remove light to close umbrella.
To Rotate 360°
1. There are (8) 45° locking rotating positions. Raise the
turning handle above 90° and rotate mast to one of the
8 preset positions.
2. Lower handle to lock into place.
Open to the third position:
1. Repeat steps 1-3 outlined on previous page.
2. The canopy will now be in the Horizontal position.
HELPFUL HINT: At any time, you may skip a position and open to the desired position
by turning the slider car stop pin parallel with the mast. In this position, the pin will NOT
auto locate as it passes over the predetermined holes. If you choose to pass the tilt
position(s) and go directly to the horizontal canopy position, you may move the pin into the
parallel position and continue winding, but be sure to turn the pin back to the horizontal
position before the horizontal canopy position is attained. If you pass the top hole, take the
tension out of the canopy and then pull the slider car stop pin down and into the top hole.
Page 11
10
T O P R O P E R L Y F O L D C A N O P Y
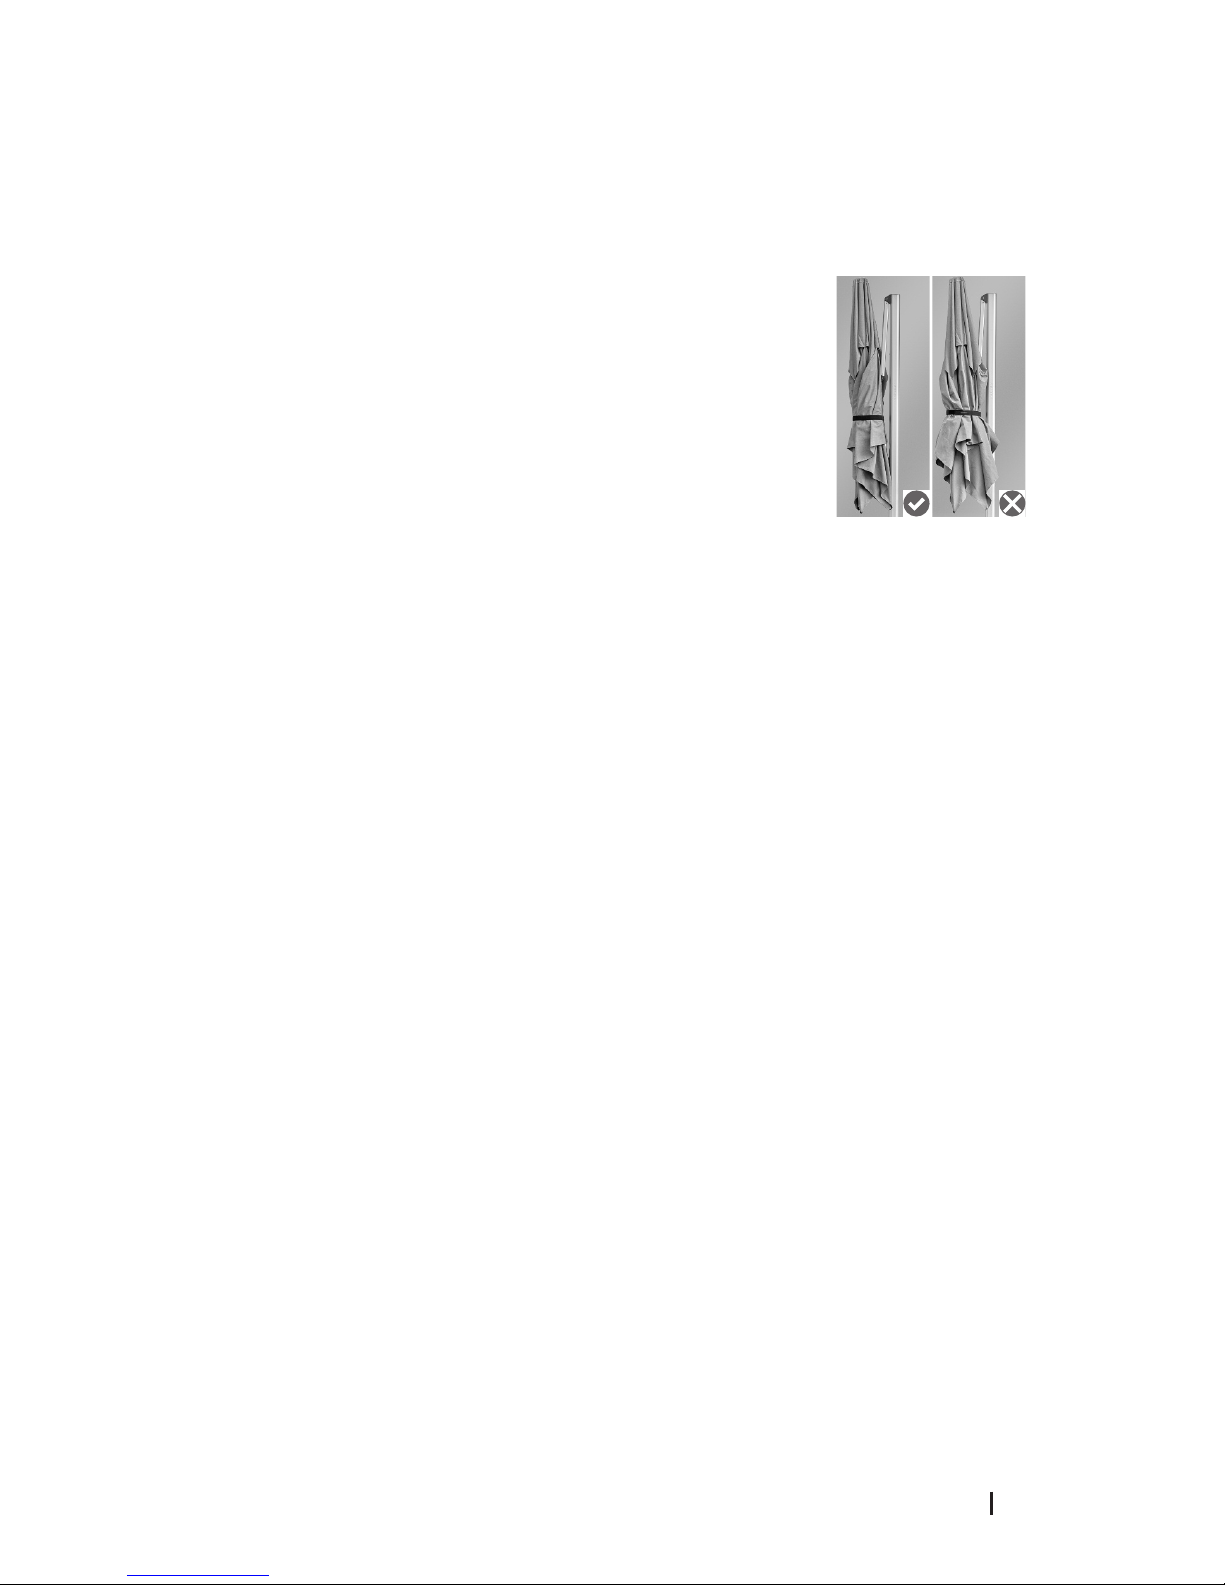
The 100% solution dyed canopy will last longer if you fold it as it was packed and
shipped. This technique is similar to the way a parachute is folded and is especially
important when folding the canopy for seasonal storage or when left in the closed
position for an extended period of time.
Using this technique at all times will significantly extend the life of
the canopy.
1. When the canopy has been fully lowered, stand in front of the
canopy structure and begin the folding process by pulling out
two panels opposite the mast.
Pull the two panels together and roll tight into the canopy.
2. Once rolled tight, pull adjacent panels out one at a time and
fold to the center, alternating sides until all the panels have
been pulled out from the arms and folded into the center.
3. Wrap provided strap around canopy to secure.
P R O T E C T I V E C O V E R
1. Screw rods together and insert into slit of the cover.
2. Unzip cover.
3. Using the rod as a guide, slide cover over your umbrella.
4. Pull on string to zip down your cover and tie.
M A I N T A I N I N G F R A M E & F I T T I N G S
1. Hose frame with water periodically, more often if installation is in a salty or industrial
environment.
2. Inspect the installation fitting on a regular basis and tighten if necessary.
M A I N T A I N I N G C A N O P Y F A B R I C
1. Clean up spills and stains right away. Spills can be removed by using a clean,
absorbent cloth.
2. For general maintenance, use a soft brush to remove dust and dry soil or wash
down with clean, warm water (i.e. garden hose) every so often so dirt does not
become engrained. Allow the fabric to dry naturally before closing the canopy.
3. If a thorough cleaning is necessary, sponge over the fabric using a mild soap
solution (2% solution). Rinse well with plenty of water to remove all soap residue.
4. Never use detergents, cleaning fluids, or solvents. Grease and oil stains may be
removed by using turpentine or similar with an absorbent cloth.
5. We recommend giving the canopy a good clean on a more frequent basis if
installed in a location where the canopy is likely to become soiled.
R E M O V A L & R E P L A C E M E N T O F C A N O P Y
Follow these instructions should you choose to replace your canopy with a new canopy.
1. Lower the canopy to the closed position.
2. Remove the button/screw at the end of each arm.
3. Separate the Velcro strap along the main canopy arm and remove the canopy from
the structure.
4. To replace the canopy, reverse the above process.
Page 12

13401 Brooks Drive
Baldwin Park, C A 91706
p 626.338.8810
f 62 6 . 3 3 8 . 8 8 1 6
shademakerusa.com
©2017 Shademaker. All rights reserved. SMOM-SIRIUS-1017
 Loading...