


SGP Technologies SA
Blackphone BP1
EVALUATION USER GUIDE version 1.0
Blackphone Overview
BLACKPHONE USER GUIDE
1

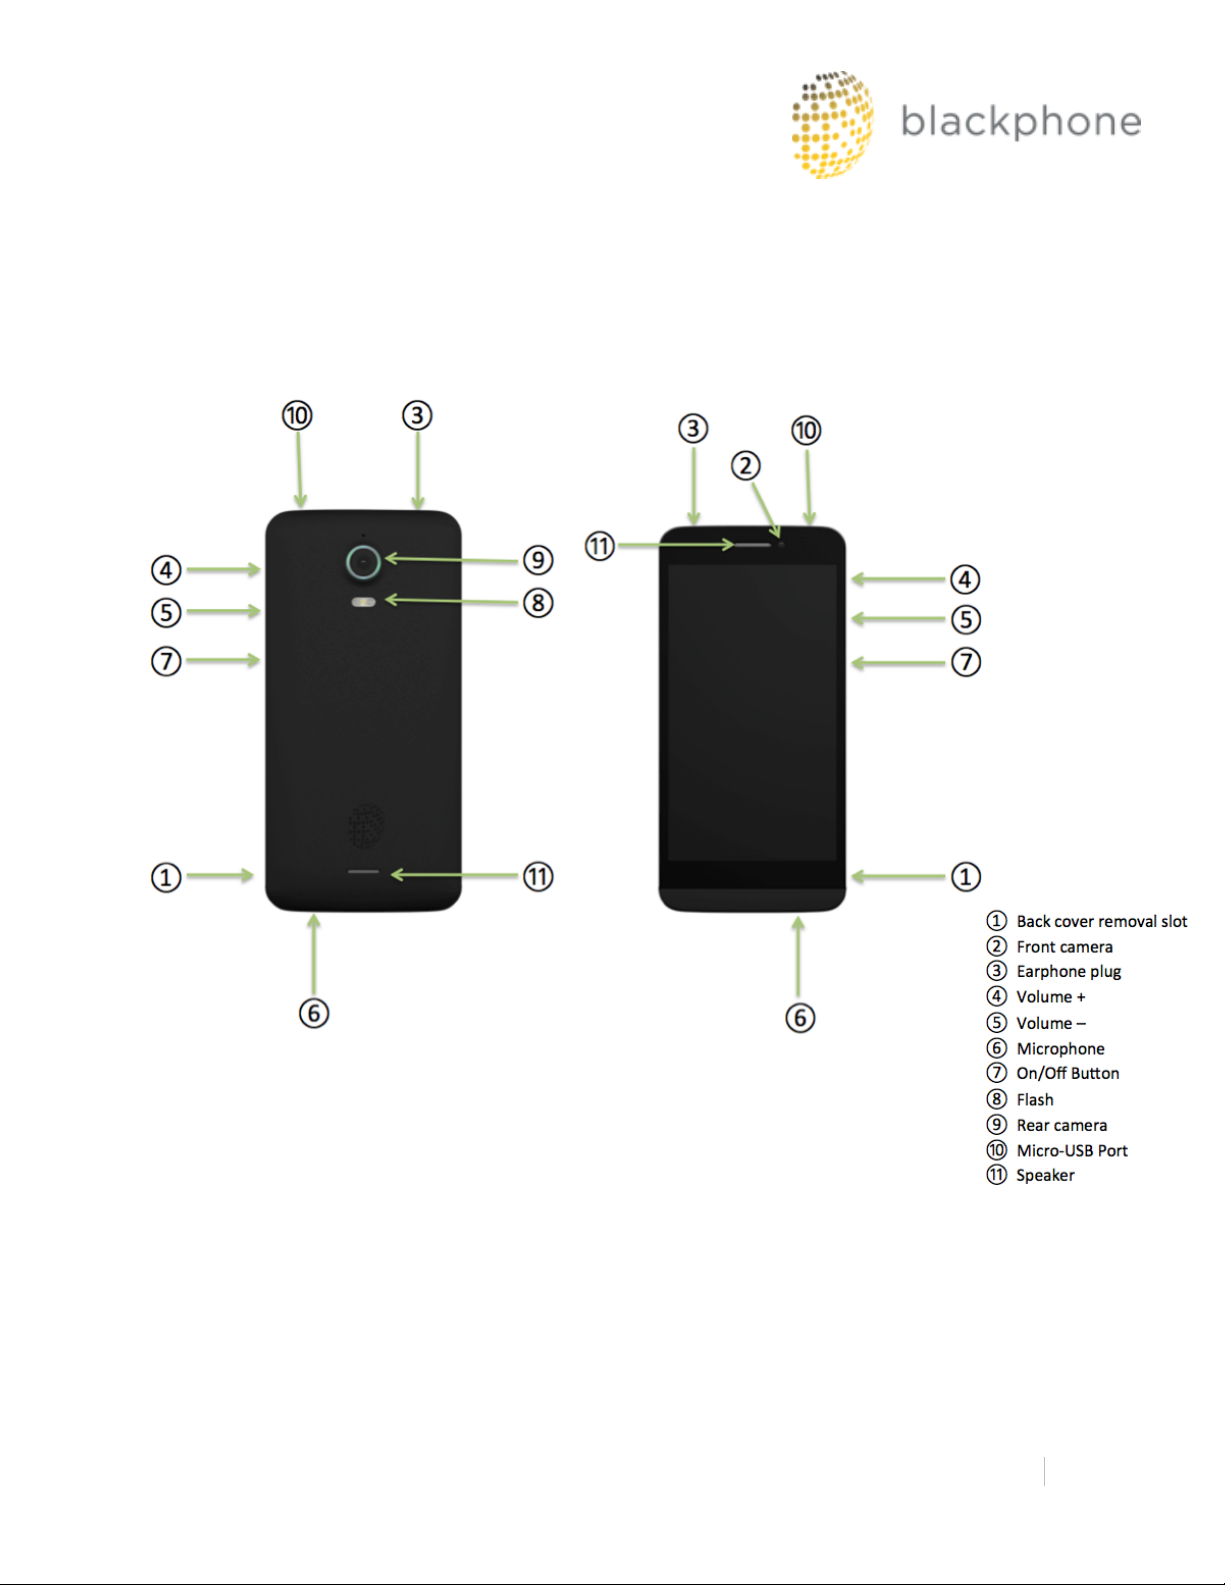
Blackphone Technical Specifications
SCREEN
Screen Size: 4.7” (1280 * 720)
Display Technology: IPS HD, Capacitive >4 point multi-touch
CAMERA
Sensor:
Main camera 8MP AF(auto-focus)
Front camera 5MP
Flash: Flash LED
CONNECTIVITY
Single micro-SIM slot
Bluetooth Class 4.0 LE
Wi-Fi 802.11b/g/n
Micro USB 3.5mm audio jack
DIMENSIONS
Approximately 141 x 69 x 9 mm (rear camera housing - additional 2 mm)
WEIGHT
Approximately 119 grams or 4.2 ounces
HARDWARE
Processor: NVIDIA Tegra 4i Quad-core 2GHz SoC (System on Chip)
STORAGE
16GB on-board storage
RAM: 1GB LPDDR3
Single microSD slot
DATA NETWORK
Rest Of World (Region1)
GSM: 850 / 900 / 1800 / 1900 MHz
HSPA+/WCDMA: 850 / 900 / 1900 / 2100 MHz (42 Mbps)
LTE FDD bands 3/7/20 * (Cat. 3 100 Mbps)
North America (Region2)
GSM: 850 / 900 / 1800 / 1900 MHz
HSPA+/WCDMA: 850 / 1700 / 1900 / 2100 MHz (42 Mbps)
LTE FDD bands: 4/7/17 * (Cat. 3 100 Mbps)
* LTE Cat. 4 (150 Mbps) under development
BLACKPHONE USER GUIDE
2

SENSORS
Gravity sensor, light sensor, proximity sensor, magnetic sensor GPS WEIGHT
ENERGY
Lithium Polymer Battery 2000mAh
BLACKPHONE USER GUIDE
3

Basic Operations
Turning your Blackphone On or Off
When your Blackphone is powered off, pressandhold the Powerbuttonto turn it
on.The phone will vibrate for a moment when it begins to boot.
When your Blackphone is powered on, pressandhold the Powerbuttonto open
the “Power off”menu.Choose“Power Off” toturnoffyour Blackphone,“Reboot”
to reboot it, or tap anywhere outside of the menu to cancel.
Note: If your display has turned off due to inactivity, briefly press the Power
button to wake it up.
Touchscreen Operation
Use your fingers to manipulate icons, buttons, menus, the on-screen keyboard,
and other items on the touchscreen. To select or activate something, tap it.
To type something, such as a name, password, or search term, just tap where you
want to type. An on-screen keyboard will pop up allowing you to enter text.
Other common gestures include:
Touch & hold to drag: Touch & hold an item on the screen by touching it and not
lifting your finger until an action occurs. For example, touch an icon on the Home
screen and hold it. When the Remove icon is shown on the screen, dragging the
selected icon to the “Remove” area will remove it from the Home screen. You can
also use touch and hold to reposition items on the Home screen.
Swipe or slide: Quickly slide your finger across the surface of the screen without
pausing. For example, you can slide a Home screen left or right to view adjacent
Home screens.
Double-tap: Tap quickly twice on a webpage or other screen to zoom. For example,
double tap a webpage in Browser to zoom in and double-tap again to zoom out.
Pinch: In some apps, you can zoom in and out by placing two fingers on the screen
BLACKPHONE USER GUIDE
4

at once and pinching them together to zoom out or spreading them apart to zoom
in.
Rotate the screen: In most applications, the orientation of the screen rotates with
your device as you turn it. (This does not work on the main home screen.) You can
disable or enable this behavior in the Display section of your device’s system
settings.
Important Areas of the Touchscreen
Status icons (top of screen) are used to display the current status of your device’s
network connections, battery level, volume, and system time.
All Apps (bottom center home screen): Tap this to see all of your apps and
widgets. To open an application or widget, tap its icon.
Improving Battery Life
The battery icon in the status bar shows the remaining amount of battery power.
To extend the battery life of your Blackphone, go to Settings in the applications
area and click on Display. Set the brightness of your screen and the display sleep
time (the point of time at which the display will turn off due to inactivity) to a
reasonable level. You can also make screen and the display sleep time (the point
of time at which the display will more advanced changes in the Power saving
section of the Settings.
Charging your Blackphone
Charge your Blackphone before the battery icon is empty. Your Blackphone
should be charged with a typical 5v USB DC charger.
surface of the device to be warm to the touch
Note that it is normal for the
BLACKPHONE USER GUIDE
5

Settings
From the all apps screen, tap the Settings icon to enter the system settings:
a) Wi-Fi: Turn the device’s Wi-Fi capabilities on or off by touching the slider.
When you turn Wi-Fi on, your Blackphone will scan for available networks.
By choosing the desired Wi-Fi listing and typing the correct password, you
can use the selected network.
b) Bluetooth: Turn Bluetooth functionality on or off by touching the slider.
Blackphone can automatically scan for available Bluetooth devices. By
pairing your Blackphone with another device, you can transmit data
between the paired devices. Data usage: tap this area to see detailed
information about your device’s data usage.
c) Sound: tap to set Volume levels, Ringtones, your Default notification sound,
Tap sounds, Screen lock sounds and various other audio options.
d) Display: tap to make changes to your settings for Brightness, Wallpaper,
Screen rotation, Sleep time, or font size.
e) Storage: tap to view settings for your on-board storage and your micro-SD
card.
f) Battery: tap to check the status of the battery.
g) Power saving: tap to activate the Dynamic Backlight, Processor
performance and nSaver settings.
h) Apps: tap to see the lists of Downloaded, Running and All apps installed on
your device.
i) Location: tap to view or change your Location settings.
j) Security: tap to set or manage lock screen settings, encryption and other
security related settings.
k) Language & input: tap to set your default language and keyboard.
l) Backup & reset: tap to access the option to factory reset your device. Note
that this will erase all data!
m) Add account: tap to add an account to your device.
n) Date & time: tap to set the system time and date if needed, these are
typically set by your carrier automatically.
o) Accessibility: tap to access various accessibility settings for your
Blackphone.
p) About phone: tap to view basic information about your Blackphone,
including system status and the current version of PrivatOS.
BLACKPHONE USER GUIDE
6

Troubleshooting
Blackphonewill not turn on
Connect Blackphone tothechargertoensure that the battery has sufficient charge.
Note that if your battery is completely discharged, it may take some time before
you can turn the device back on.
Blackphone is displaying text in the wrong language
Pleasemakesurethatyouhaveselectedthecorrect default language for your
device.Set the default languageinSettings =>Language&input
Audio files can’t be played
Blackphonecannotplayaudiofilesthatarecopyprotected with digital rights
management
(DRM).PleaseensurethatonlyfilesthatcontainnocopyprotectionaretransferredtoBla
ckphone.
A webpage will not display
Please ensure that you have an active WCDMA/GSM/LTE data connection or
active Wi-Fi connection.
SUPPORT
For support options please visit support.blackphone.ch
BLACKPHONE USER GUIDE
7

Blackphone Bundled Applications
Blackphone Activation Wizard
What is Activation Wizard
Activation Wizard is one exclusive Blackphone application that is guiding the user step by step
through the set up process of the phone. The application will help to set up some security features
as device encryption and PIN/Password. In top of that, Activation Wizard will easily provision
Silent Phone, Silent Text and Disconnect applications.
How Activation Wizard Works
Activations Wizard will be launch automatically the first time the user switches BP1 on and right
after inserting the SIM card PIN code. The Activation Wizard includes 7 different steps to help the
user start using Blackphone
Setting up Activation Wizard
• Step 1: Select the language. If the user does not insert a SIM card, default language will be
English. If the user inserts a SIM card before switch the device on, this will auto automatically
will switch to the language corresponding the SIM.
• Step 2: PIN/Password set up. The user has to set up a PIN code (different that the SIM one) or a
Password to protect the device when the screen is turned off. This step is mandatory and cannot
be skipped.
BLACKPHONE USER GUIDE
8

• Step 3: Device Encryption. The user is encouraged to encrypt the device. For doing that the
device have to be plugged in and the battery should have at least an 80% battery charge, if not,
encryption cannot be performed. Although the device will remember the user to perform this
action every three days. The encryption process will take approximately 25 minutes. This
process WILL NOT encrypt the microSD card (Android limitation).
BLACKPHONE USER GUIDE
9

• Step 4: Data Connectivity. The user is invited to connect to a data network. He/she can select to
connect to one WiFi network (WPS feature is not available in this step) or to the cellular
network (If a SIM with a data subscription is in the phone).
Important note: please bear in mind that a data connection is needed to activate the
Blackphone application suite licenses in next step. A WiFi connection is preferred.
Important note: In the initial setup you will need an open, wep, or wpa-psk network
(preferably wpa-psk) for the initial setup. Youcan later configure any network.
Specifically, it cannot be wpa-enterprise (peap, ttls, etc.) or behind a captive portal,
because there is no way to provision certificates or run a browser during the first stages
of setup.
BLACKPHONE USER GUIDE
10

• Step 5: Scanning the QR code. If a data connection is available, the user will be invited to scan
the QR code included in Blackphone’s box. Scanning the QR will provision Silent Phone, Silent
Text and Disconnect licenses.
If this step is skipped or the data connection is not good enough to download automatically the
licenses, the user may activate the licenses manually. Please
contact
https://support.blackphone.ch
in such a case.
BLACKPHONE USER GUIDE
11
 Loading...