

SEWOO LK-P20II, LK-P20 Technical Manual

2-inch Label
Mobile Printer
Mobile PrinterMobile Printer
Mobile Printer
Technical Manual
Technical ManualTechnical Manual
Technical Manual
SEWOO TECH
SEWOO TECHSEWOO TECH
SEWOO TECH CO., LTD
CO., LTD CO., LTD
CO., LTD
www.miniprinter.com
www.miniprinter.comwww.miniprinter.com
www.miniprinter.com
Rev 1.0
2008.07.24

2
2-inch Label Technical Manual
TABLE OF CONTENTS
1. Programming Introduction
5
2. Printer Commands
6
A. Printer Commands
B. PRINT Command
C. FORM Command
D. JOURNAL Command
E. UNITS Command
F. Using Commend
6
7
7
7
8
9
3. TEXT
10
A. TEXT Command
B. FONT-GROUP(FG) Command
C. TEXT CONCATENATION Command
D. MULTILINE(ML) Command
E. COUNT Command
F. SETMAG Command
10
11
12
13
14
14
4. Linear Bar Codes
15
A. BARCODE Command
B. BARCODE-TEXT Command
15
16
5. Two-Dimensional Bar Codes
17
A. PDF417 (PORTABLE DATA FILE)
B. MAXICODE
17
18
6. Graphics
20
A. BOX Command
B. LINE Commands
C. INVERSE-LINE Commands
D. PATTERN Command
E. GRAPHICS Commands
F. PCX Commands
20
20
21
21
22
23

3
2-inch Label Technical Manual
7. Advanced Commands
24
A. CONTRAST Command
B. TONE Command
C. JUSTIFICATION Commands
D. PAGE-WIDTH Command
E. PACE Command
F. NO-PACE Command
G. WAIT Command
H. SPEED Command
I. SETSP Command
J. ON-OUT-OF-PAPER Command
K. ON-FEED Command
L. PREFEED Command
M. POSTFEED Command
N. COUNTRY/CODE PAGE Command
O. USING FORMAT FILES
P. BEEP Command
24
24
24
25
26
26
26
27
27
27
28
28
29
29
30
30
8. Line Print Mode
31
A. SETLP Command
B. SETLF Command
C. Moving With X and Y Coordinates
D. LMARGIN Command
E. SETBOLD Command
F. SETSP Command
G. PAGE-WIDTH Command
H. PAGE-HEIGHT Command
I. Special ASCII Characters
J. SETFF Command
K. SET-TOF Command
L. SETLP-TIMEOUT
31
31
31
32
32
32
33
33
33
33
34
34

4
2-inch Label Technical Manual
9. Advanced Utilities
35
A. VERSION Utility
B. CHECKSUM Utility
C. DEL Utility
D. DIR Utility
E. DEFINE-FILE(DF) Utility
F. TYPE Utility
G. BAUD Utility
H. TIMEOUT Utility
I. ON-LOW-BATTERY Command
J. LT Command
K. SET-TIME Utility
L. GET-TIME Utility
M. SET-DATE Utility
N. GET-DATE Utility
O. Printing a Time Stamp
P. Printing a Date Stamp
Q. PAPER-JAM Utility
35
35
35
35
36
36
36
37
37
37
38
38
38
39
39
39
40
10. Printer Escape Commands
41
A. SET AND READ CODE Command
B. STATUS/INFORMATION
C. POWER OFF Command
41
41
42
11. Configuration/Control Commands
43
A. Command Format
B. Commands/Parameters
43
43

5
2-inch Label Technical Manual
1. Programming introduction
This manual details the various commands in the CPCL language which allow the programmer to utilize
the built in text, graphics, bar code printing and communications capabilities. The following notation
conventions are used throughout this manual.
{}
Required item
[]
Optional item
()
Abbreviated command
<>
Literal item
A space character is used to delimit each field in a command line.
Getting Printer Information
The printer can print a report containing information about the application resident in the printer memory.
This information can be printed by following these procedures.
1. Turn off the printer
2. While holding the FEED key down, turn the printer on.
3. When printing begins, release the FEED key.
The printing will contain information about printer model, ROM version, serial number, baud rate, USB, Bluetooth,
font extra information which has been saved in the printer. In addition, certain amount of ASII hex codes will be
printed to check the printing quality.
If you require to set for communication Diagnostic Mode, press FEED button again after printing information by
following the steps above. The printer then indicates received information with hexadecimal.
LabelMaker
As LaberMaker has similar interface as general graphic edit tool, you can design readily without specific expertise
for programming and print the data through LUKHAN Portable Printer. Moreover, you are able to save the label
image into your PC with LBL file format. Saved label file can be reopening and edited.
Apart from the function of designing, you can save the file by communicating with printer, reopen saved file or see
the state information of the printer.

6
2-inch Label Technical Manual
2. Printer commands
A label file always begins with the “!” character followed by an “x” offset parameter, “x” and “y” axis
resolutions, a label length and finally a quantity of labels to print. The line containing these parameters is
referred to as the Command Start Line.
A label file always begins with the Command Start Line and ends with the “PRINT” command. The
commands that build specific labels are placed between these two commands.
☞☞☞☞ NOTE:
NOTE: NOTE:
NOTE: Every line in the command session must be terminated with both carriage-return and line –feed
characters. All printer Commands must be in uppercase character ONLY.
A. PRINTER Commands
Form
<!> {offset} <200> <200> {height} {qty}
<!>
Session start
{offset}
The value of label horizontal offset
<200>
Horizontal resolution
<200>
Vertical resolution
{height}
Maximum value of Label Height
The Maximum height of the label is the numerical value deducted 1/16” (1.5mm) from the value which
is measured from first bar (or gap) to the next bar (or gab). (In dots: 12donts on 203 dpi).
The quantity of label. The maximum value is 1024
7
2-inch Label Technical Manual
B. Print command
The print command terminates and prints the file. This must always be the last command (except
when in Line Pint Mode). Upon execution of the Print command, the printer will exit from a control
session. Be sure to terminate this and all commands with both carriage-return and line-feed characters.
Format
Format
{command}
Command & option
{command}
PRINT
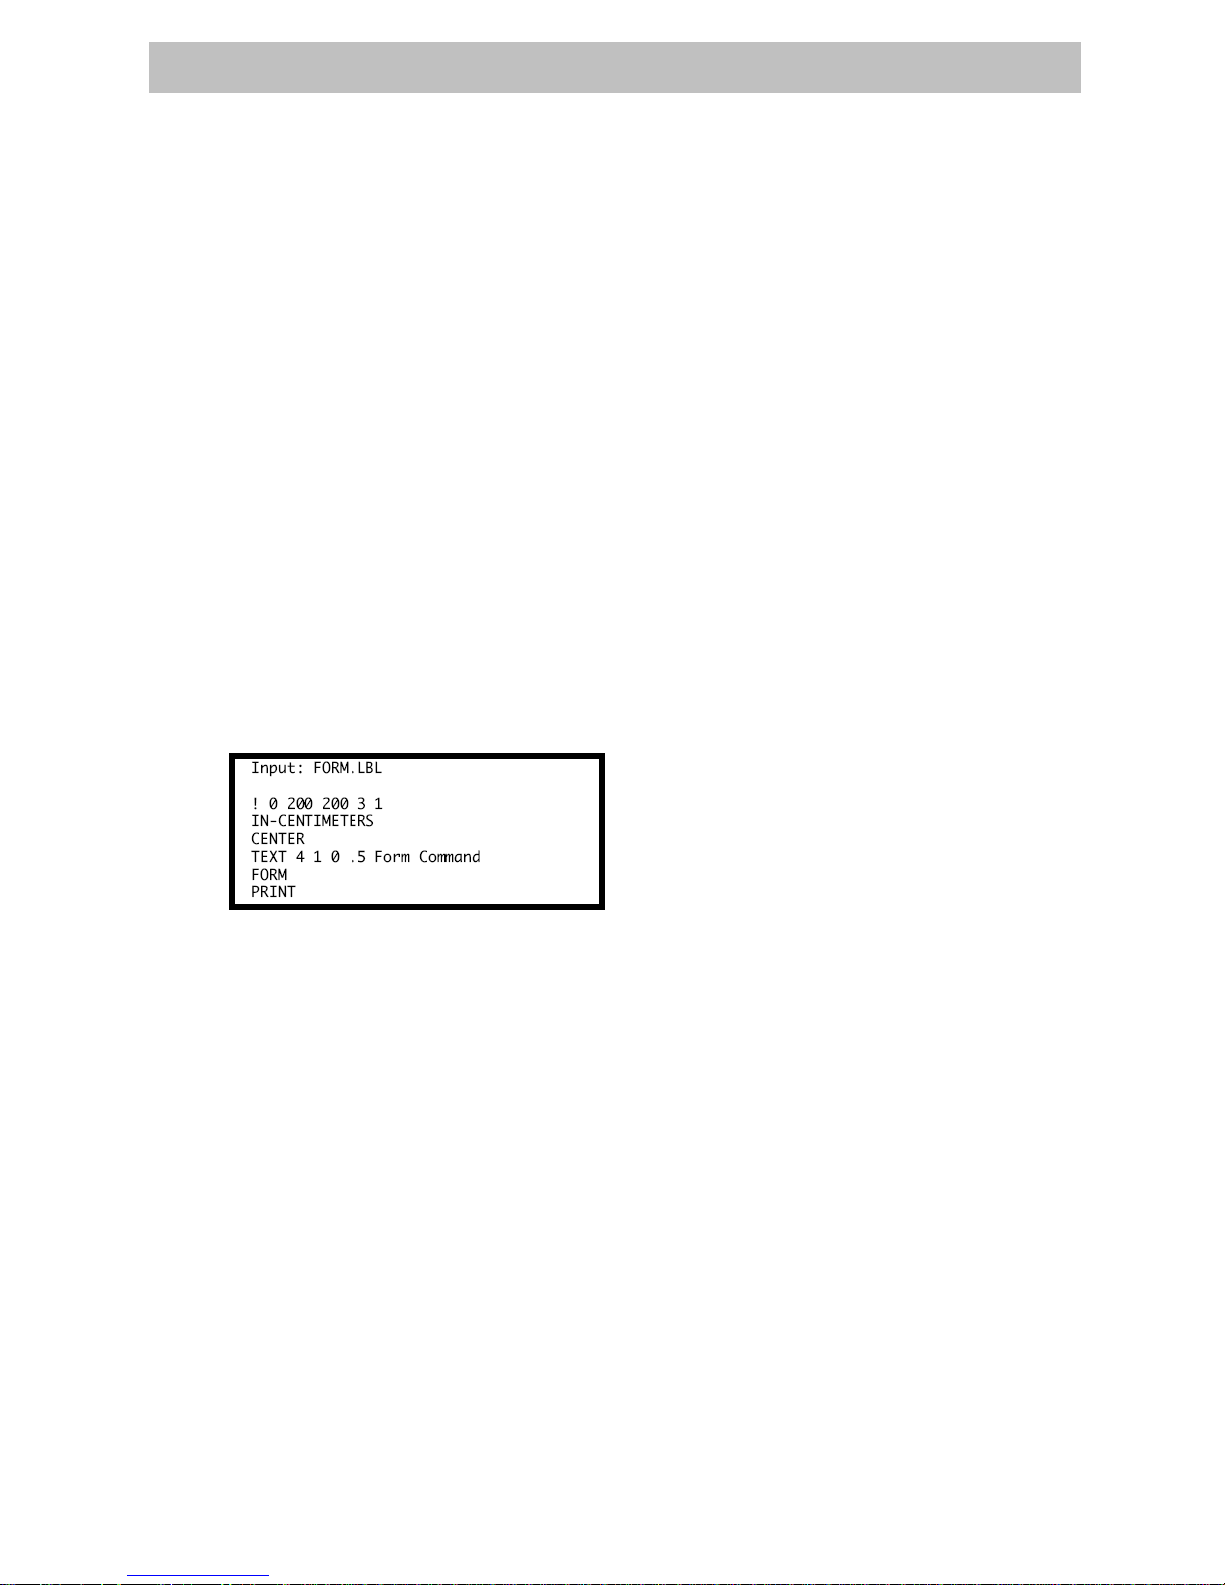
C. FORM Command
The Form command will execute a form feed after the label is printed and instructs the printer to feed
to top of form after printing.
Format
{command}
Command & option
{command}
FORM
D. JOURNAL Command
Be default, the printer will check for correct media alignment if it encounters the eye-sense mark
during a print cycle. If necessary, the Journal command can be used to disable this automatic
correction feature.
Format
{command}
Command & option
{command}
JOURNAL
8
2-inch Label Technical Manual
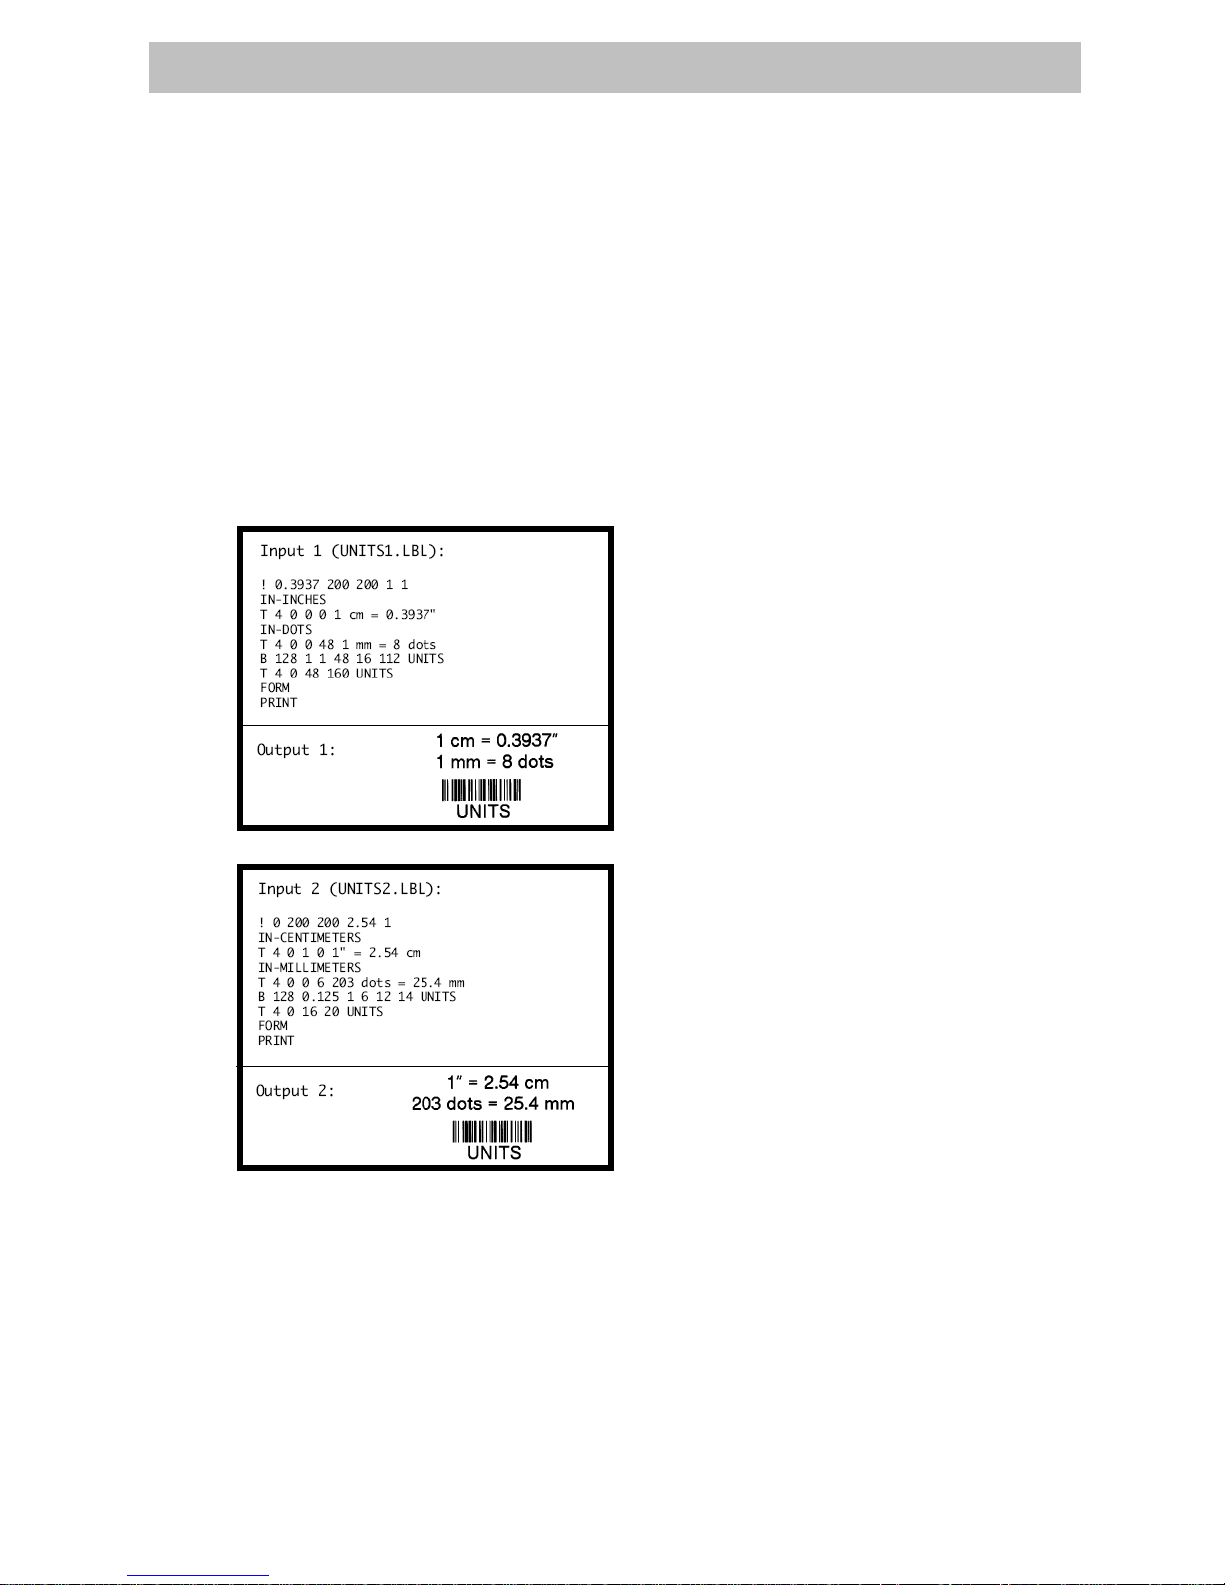
E. UNITS Command
The Units commands are used to specify a measurement system for all subsequent command fields
in a control session. Coordinates, widths, and heights for all control commands can be entered with
precision for four decimal places. The printer measurement system will default to dots until a units
command is issued.
Format
{command}
Command & option
IN-INCHES Measurement in inches.
IN-CENTIMETERS Measurement in centimeters
IN-MILLIMETER Measurement in millimeters.
{command}
IN-DOTS Measurement in dots

9
2-inch Label Technical Manual
F. Using Comments
Comments can be added between the first line of a command start line and the print command.
A comment is placed in the file by starting a line with the ‘;’ character in the first column. Any
remaining text to the end of the line will be ignored. Comments are illegal between the CONCAT and
ENDCONCAT commands.

10
2-inch Label Technical Manual
3. TEXT
A. TEXT Commands
The TEXT command is used to place text on a label. This command and its variants control the
specific font number and size used, the location of the text on the label.
Format
{command} {font} {size} {x} {y} {data}
Command & option
TEXT (or T) Prints text horizontally
VTEXT (or VT) Prints text (vertically) rotated 90degrees counterclockwise
TEXT90 (or T90) Same as VTEXT above.
TEXT180 (or T180) Prints text (upside down) rotated 180 degrees
counterclockwise
{command}
TEXT270 (or T270) Prints text (vertically) rotated 270 degrees
counterclockwise
{font}
font의 Name/number
{size}
font의 size
{x}
Horizontal starting position
{y}
Vertical starting position
{data}
The text to be printed
11
2-inch Label Technical Manual
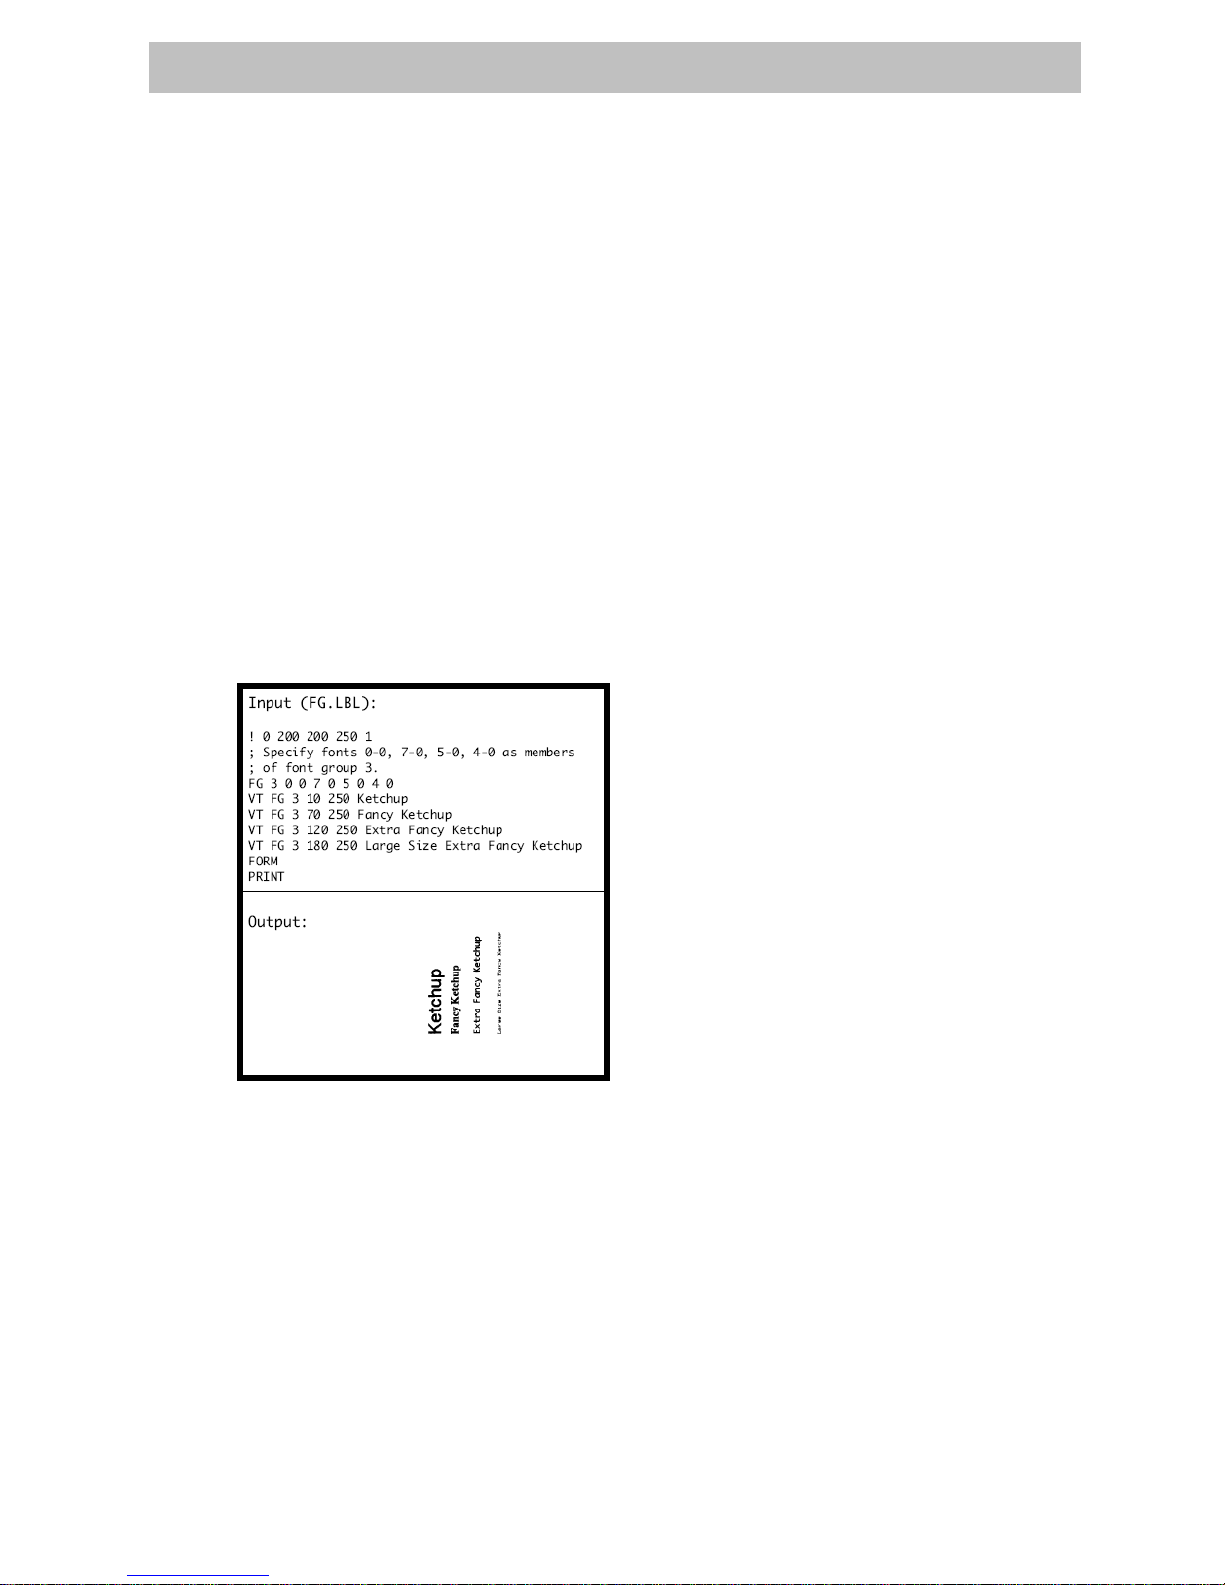
B. FONT-GROUP(FG) Command
The FG command gives a user the ability to group up to 10 pre-scaled font files into a single group. A
user can later specify the font group in a TEXT command. If a font group is used in a text command,
the printer will use the largest font specified in the font group that will produce the required text data
and still remain within the available width of the label the text. When specified in the TEXT command,
the {font} parameter is specified as FG, and the {size} parameter is specified as the {fg}. Note that a
user can also specify an FG command within a CONCAT/ENCONCAT command.
Format
{command} {fg fn fs} {fn, fs} …
Command & option
{command}
FG
{fg}
Font group number. Up to 10font groups can be specified, Valid font groups
rage from 0 to 9.
{fn}
Number of the font
{fs}
Size identifier for the font
☞☞☞☞ NOTE:
NOTE: NOTE:
NOTE: Up to 10 font number/font size pairs can be assigned to a font group.
12
2-inch Label Technical Manual
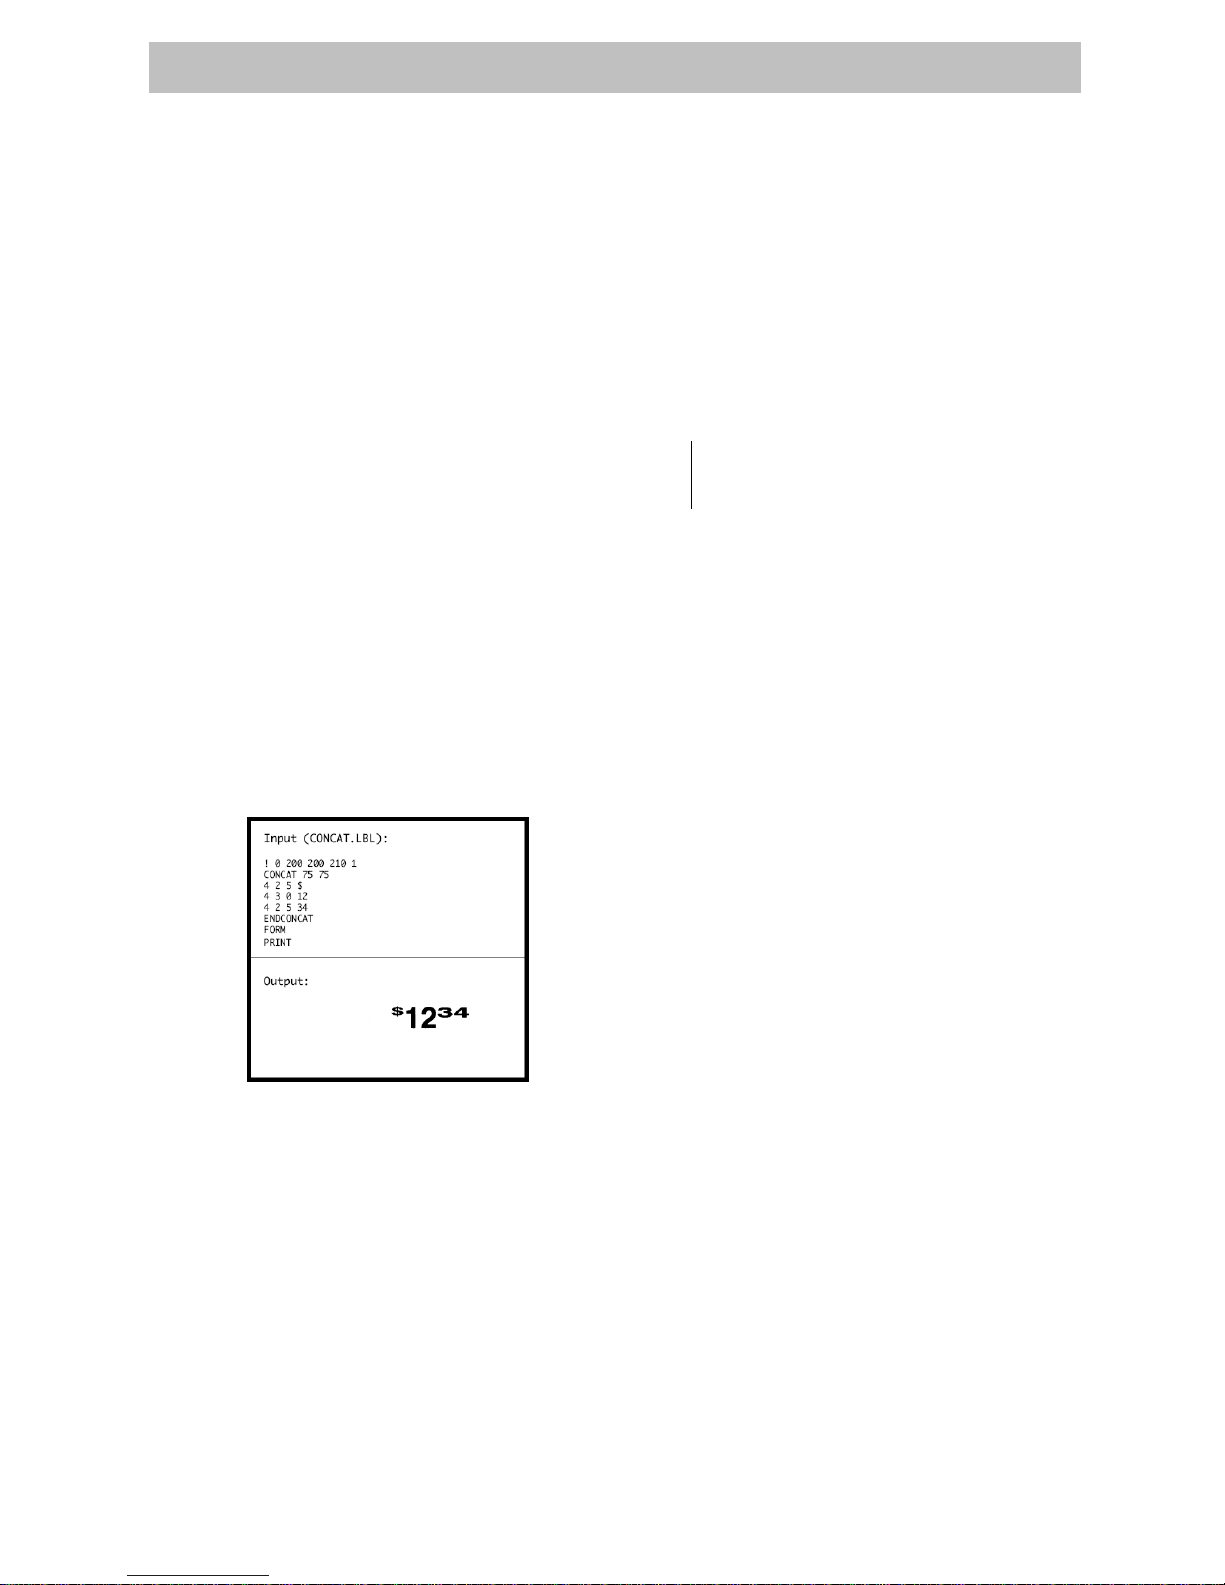
C. TEXT CONCATENATION Command
Text concatenation allows you to assign different character styles to strings, printing them with
uniform spacing on the same text line. This command should be used in combination with CONCAT
Command and ENDCONCAT Command.
Format
{command} {x} {y}
{font} {size} {offset} {data}
…………
{font} {size} {offset} {data}
<ENDCONCAT>
Command & option
CONCAT Horizontal concatenation
{command}
VCONCAT Vertical concatenation
{x}
Horizontal starting position.
{y}
Vertical starting position
{font}
font의 Name/number.
{size}
Name/number of the font
{offset}
Unit-value to offset text from the starting position. Used to align individual text
strings or create superscript/subscript characters
{data}
Text to be printed
<ENDCONCAT> Terminates concatenation
13
2-inch Label Technical Manual
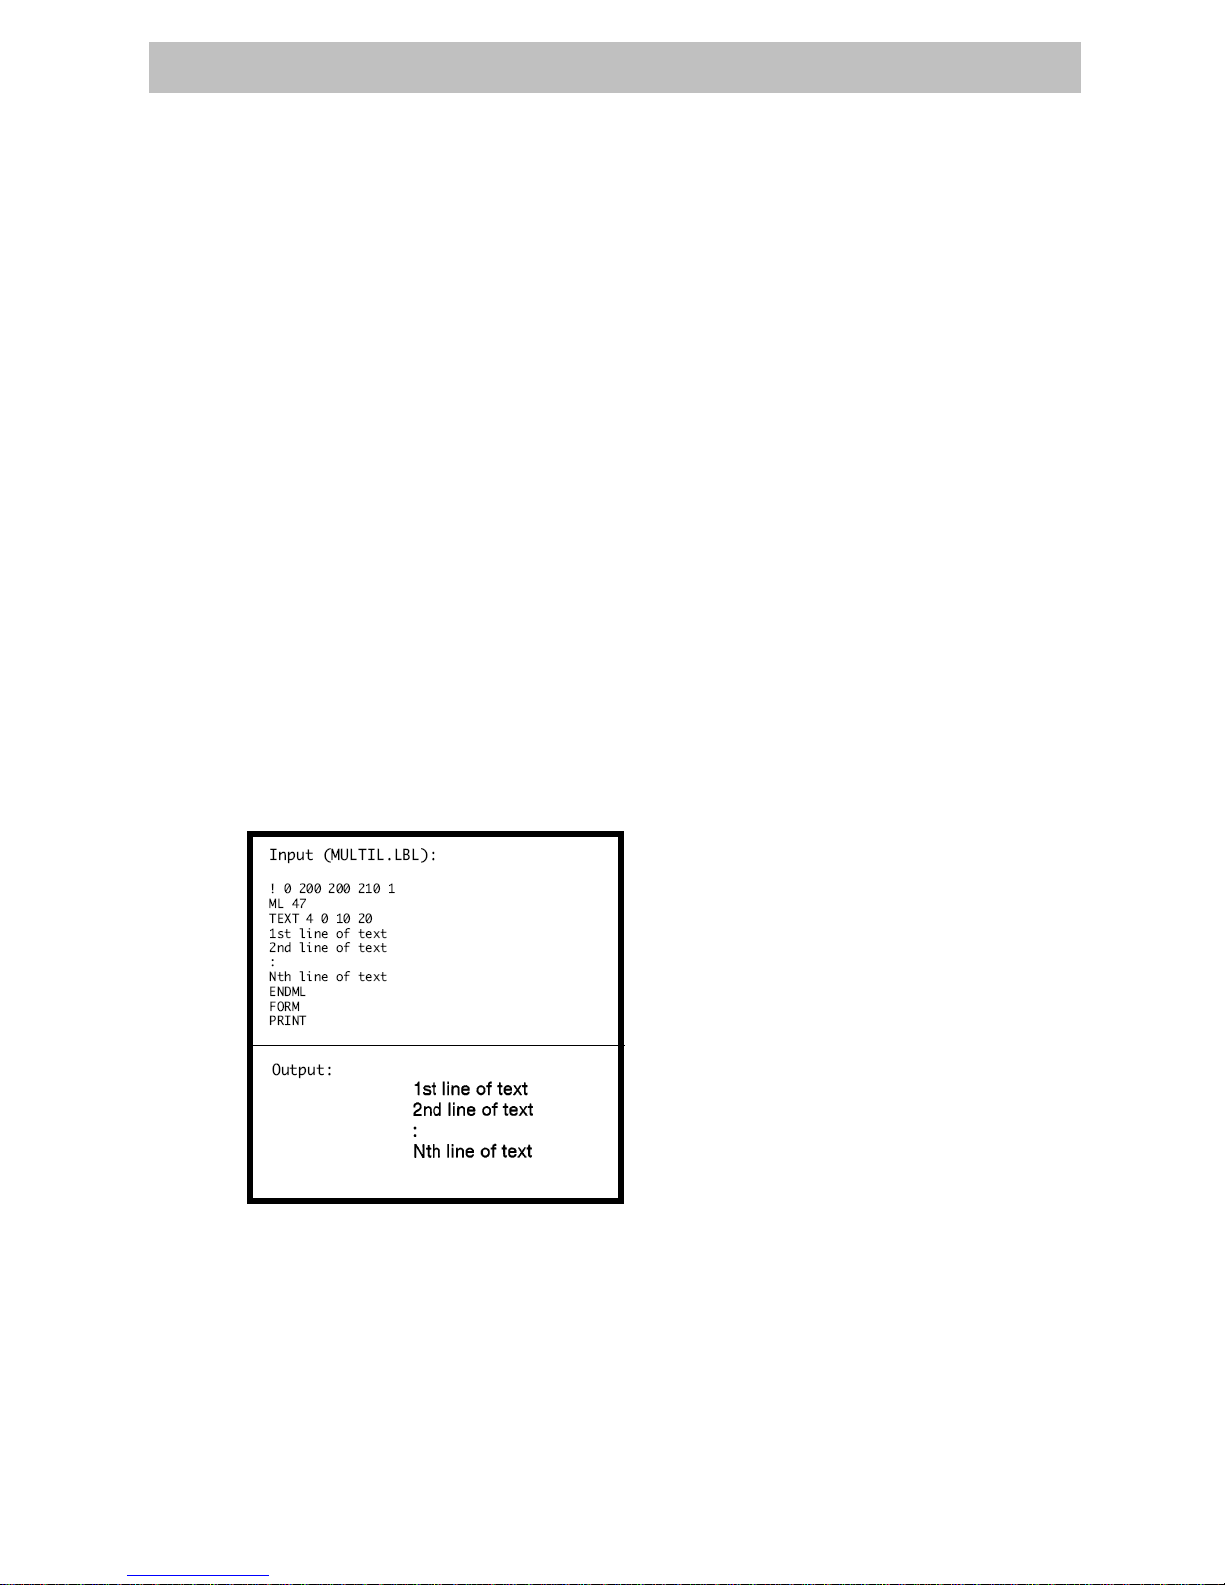
D. MULTILINE(ML) Command
MULTILINE (ML) allow you to print multiple lines of text using the same number of font and
line-height.
Format
{command} {height}
{text} {font} {size} {x} {y}
{data}
………
{data}
<ENDMULTILINE>
Command & option
{command}
MULTILINE (or ML) MULTILINE Prints multiple lines of text.
{height}
Unit-height for each line of text
{text}
Text command (TEXT, VTEXT, etc.)
{font}
Name/number of the font
{size}
Size identifier for the font
{x}
Horizontal starting position.
{y}
Vertical starting position
{data}
Text to be printed
<ENDMULTILINE>
(or ENDML)
Terminates NULTILINE

14
2-inch Label Technical Manual
E. COUNT Command
The COUNT command is used for printing multiple labels where a numeric text field or numeric data
encoded in a bar code is to be incremented or decremented for each label. The TEXT/BACODE
command string must contain this numeric data as the last characters of the string. The numeric data
portion can be up to 20characters, and can be preceded by the ‘-’ sign. Incrementing or decrementing
the numeric data thru ‘0’ is not allowed, Leading Zeros will be retained. Up to 3 COUNT commands can
be used in a label file.
Format
{command} {numeric value}
Command & option
{command}
COUNT
{numeric value}
Any integer value up to 20 characters. The value can be preceded by a ‘ – ’
sign if decrementing of the TEXT/BARCODE value is desired, Leading zeros will
be retained in the output.
F. SETMAG Command
The SETMAG command magnifies a resident font to the magnification factor specified.
Format
{command} {w} {h}
Command & option
{command}
SETMAG
{w}
Width magnification of the font (1~16)
{h}
Height magnification of the font (1~16)
☞☞☞☞ NOTE:
NOTE: NOTE:
NOTE: The SETMAG command stays in effect after printing a label. To cancel any SETMAG values and allow
the printer to use its default font sizes, use “SETMAG 0 0”.

15
2-inch Label Technical Manual
4. Linear Bar Codes
A. BARCODE Command
The BARCODE command prints bar codes in both vertical and horizontal orientations at specified
widths and heights.
Standard Bar Codes
ormat
{command} {type} {width} {ratio} {height} {x} {y} {data}
Command & option
BARCODE (or B) Prints bar code horizontally
{command}
VBARCODE (or VB) Prints bar code vertically
UPC-A UPCA, UPCA2, UPCA5
UPC-E UPCE, UPCE2, UPCE5
EAN/JAN-13 EAN13, EAN132, EAN135
EAN/JAN-8 EAN8, EAN82, EAN 85
Code 39 39, 39C, F39, F39C
Code 93/Ext. 93 93
Interleaved 2 of 5 I2OF5
Interleaved 2 of 5
with checksum
I2OF5C
German Post Code I2OF5G
Code 128 (Auto) 128
UCC EAN 128 UCCEAN128
Codabar CODABAR, CODABAR16
MSI/Plessy MSI, MSI10, MSI1010, MSI1110
Postnet POSTNET
{type}
Symbology
FIM FIM
{width}
Unit-width of the narrow bar.
{ratio}
Ratio of the wide bar to the narrow bar
20 = 2.0:1 26 = 2.6:1
21 = 2.1:1 27 = 2.7:1
22 = 2.2:1 28 = 2.8:1
23 = 2.3:1 29 = 2.9:1
24 = 2.4:1 30 = 3.0:1
{height}
Unit-height of the bar code
{x}
Horizontal starting position
{y}
Vertical starting position
{data}
Bar code data
 Loading...