

SewingMachinesPlus QF00007-12, QF00007-10 Assembly Instructions Manual
King Quilter Frame
#QF00007-12 and QF00007-10
Assembly Instructions
Table of Contents
Parts List ..........................................page 2
Preparation: Batting Bar Bracket Assembly, Do this First! ....page 7
Step 1: End Leg Assembly ..............................page 8
Step 2: Table Assembly ...............................page 14
Step 3: Center Leg Assembly ...........................page 15
Step 4: End Leg to Table Assembly ......................page 17
Step 5: Precision-Glide Track Assembly .................. page 22
Step 6: Front Pole Carrier / Rear Pole Carrier Arm Assembly . page 25
Step 7: Bungee Cleat Assembly .........................page 26
Step 8: Leveling the Frame .............................page 27
Step 9: Pole Assembly ................................page 28
Step 10: Adding Pole Ends .............................page 29
Step 11: Pole to Frame Assembly ....................... page 31
Step 12: Rubber End Cap Assembly ......................page 32
Step 13: Bungee Clamp Assembly .......................page 33
Step 14: Hook and Loop Strips on Poles Assembly ..........page 34
Step 15: Attach Leaders ..............................page 35
NOVEMBER 2018
King Quilter Frame Assembly 1
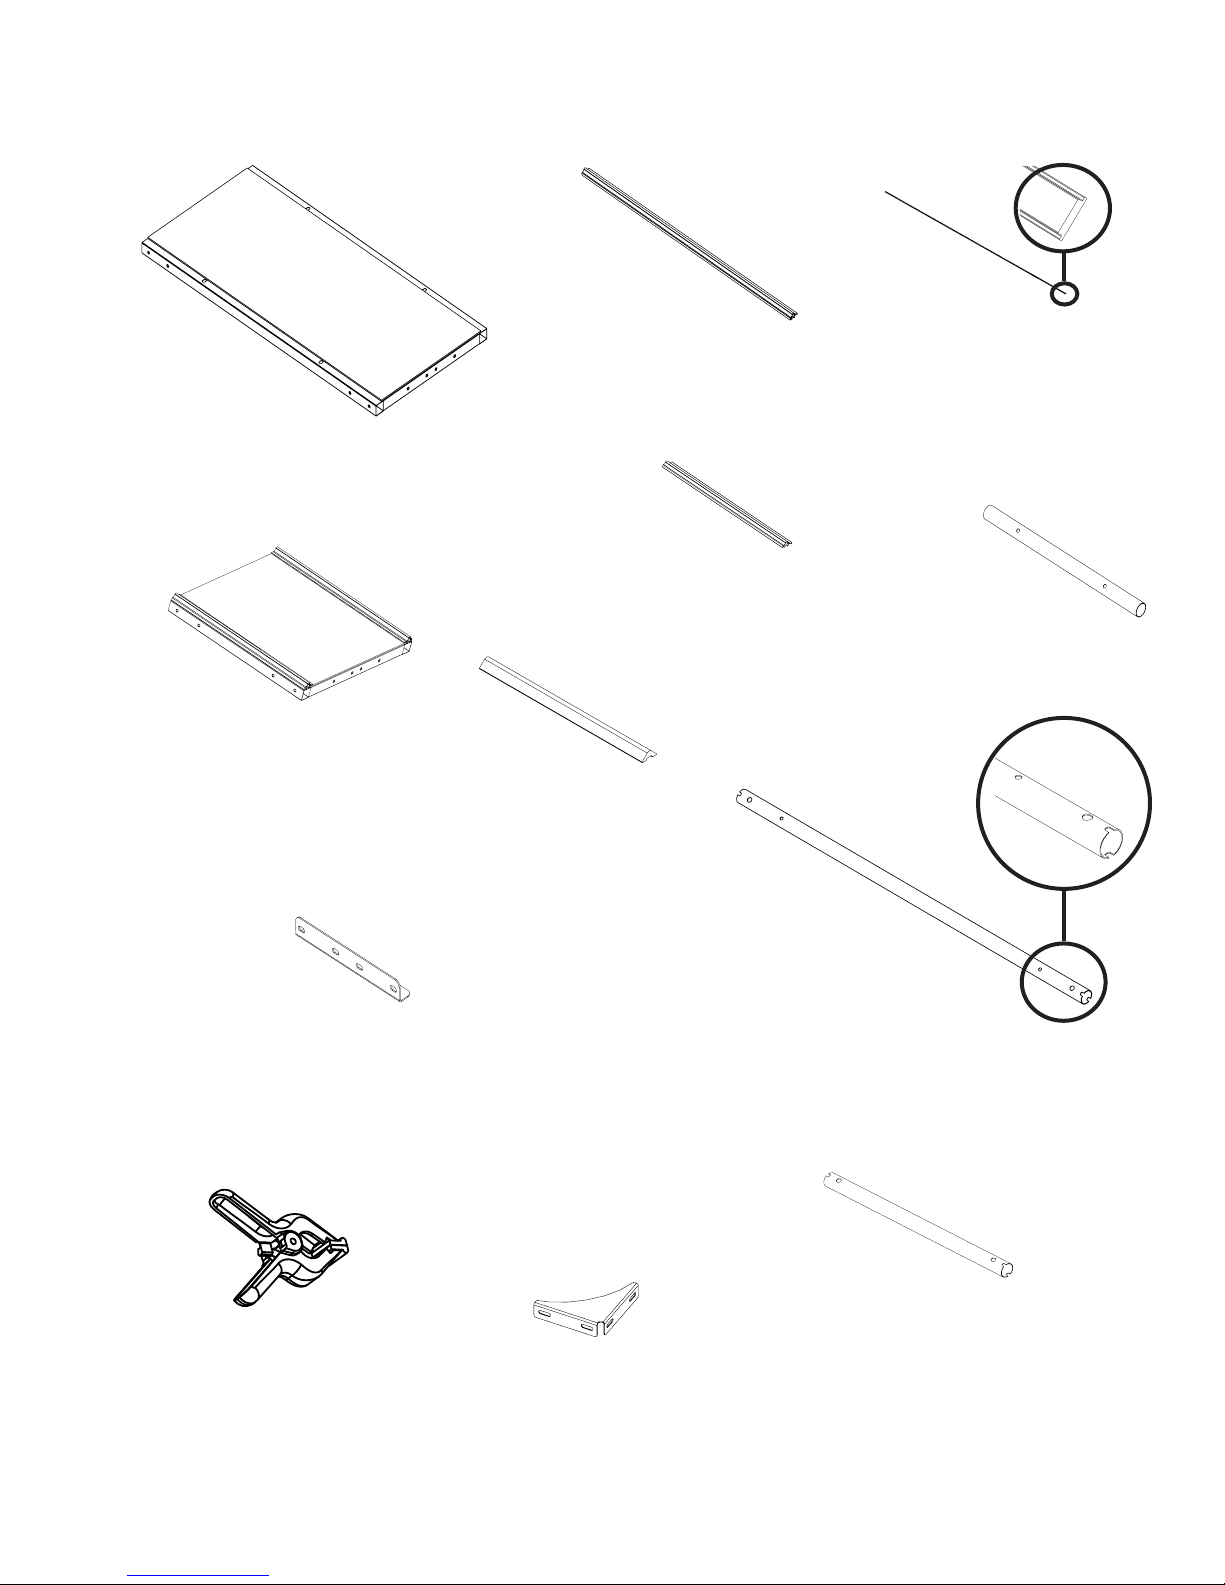
SMP QF00007-12 and QF00007-10 Frame Parts List
12-foot Black Plastic Track (4)
4 Foot Track Support Section
(6) For 12’ frame, (4) for 10’ frame
Part# QF09318-04
Four Foot Table Section
(3) For 12’ frame,
(2) for 10’ Frame
Part# QF00007-301
BOX 1 & 4
Two Foot Table Section (1) with
10’ Frame Only
Part# QF00007-302
BOX 4
Part# QF09318-02
BOX 1 & 4
(2) For 10’ frame only, (0) come with 12’ Frame
2 Foot Track Support Section
Part# QF09318-02
BOX 4
Track Support Coupler (4)
Part# QF09318-03
BOX 3
Fifteen come with 12’ frame and ten come with
BOX 3
2-Foot Coupler (10)
Part# QF09318-702
BOX 2
Table Splice Brace (4)
Part# QF09318-05
BOX3
Bungee Clamp (4)
Part# QF09318-110
BOX 3
Leaders - No Image
11’ Leaders for 12’ Frame (1)
9.5’ Leaders for 10’ Frame (1)
Part# QF09580
Part# QF09851
or
BOX 4
Front Gusset Bracket (2)
Part# QF00007-413
BOX 3
4-foot Pole Section
10’ frame.
Part# QF0007-701
BOX 2 & 4
Five come with 10’ frame only,
2-foot Pole Section
None come with 12’ frame
Part# QF0007-703
BOX 4
2 King Quilter Frame Assembly

SMP QF00007-12 and QF00007-10 Frame Parts List
Inside Left
Upper Beam Left Hand Side Leg (1)
QF00007-503
BOX 1
Inside Right
Upper Beam Right Hand Side Leg (1)
QF00007-403
BOX 1
Lower Beam (Both Sides) (2)
QF00007-401
BOX 1
Inside Left Inside Right
Rear Leg Upper Left (1)
QF00007-508
BOX 3
Rear Leg Upper Right (1)
QF00007-408
BOX 3
Upright Beam Both Sides (2)
QF00007-402
BOX 1
Rear Leg Lower (Both Sides) (2)
QF00007-409
BOX 3
King Quilter Frame Assembly 3

SMP QF00007-12 and QF00007-10 Frame Parts List
Lower Gusset Bracket (1 per side=2 total)
QF00007-406
BOX 3
Outer Side Bracket Left (2 per side= 4 total)
QF00007-405
BOX 3
Upper Gusset Bracket (1 per side=2 total)
QF00007-407
BOX 3
Outer Side Bracket Right (2 per side=4 total)
QF00007-404
BOX 3
Pole Cradle (3)
QF11038
BOX 3
4 King Quilter Frame Assembly
Screw, M4x18SKC ZN (9)
QF10870
BOX 3
Washer, M4x10 Flat ZN (9)
QF00007-417
BOX 3
SMP QF00007-12 and QF00007-10 Frame Parts List
Front Left Pole Carrier (1)
QF00007-511
BOX 3
Rear Pole Carrier Arm (2)
QF00007-410
BOX 3
Bungee Cleat Bar (2)
QF00007-412
BOX 3
Front Right Pole Carrier (1)
QF00007-411
BOX 3
Upper Middle Leg
(2) for 12’ frame, (1) for 10’ frame
QF005300-602
BOX 3
Lower Middle Leg
(2) for 12’ frame, (1) for 10’ frame
QF05300-601
BOX 3
Batting Bar Bracket (2)
QF00007-414
BOX 3
King Quilter Frame Assembly 5
SMP QF00007-12 and QF00007-10 Frame Parts List
SHORT BOLT RATCHET WHEEL
QF09318-730
QF09318-730
LONG BOLT RATCHET WHEEL
QF09318-730
LONG BOLT RATCHET WHEEL
RATCHET STOP HOLDER
QF09318-205
Fig. 10-2
QF09318-105
BUNGEE HOLDER SPACER
QF09318-103
RATCHET STOP
QF09318-203
RATCHET STOP HOLDER
QF09318-205
CONNECTOR BOLT
QF09318-204
RAIL BEARING SNAP
QF09318-105
RAIL BEARING SNAP COVER
QF09318-106
Fig. 10-2
QF09318-105
Screw M8 x 1.25 x 16 SBHCS (98)
Part# QF09318-07
BOX 3
Ratchet Left Hand (1)
Part# QF11035
BOX 3
Large washer head
screw M6 x 12mm
(26 total)
Part# QF09318-303
BOX 3
Ratchet Right Hand (2)
Part# QF11034
BOX 3
Button Head Cap
Screw M5 x 8mm
(SBHCS) (24 total)
Part# QF09318-304
BOX 3
Ratchet Thumb Shifter
(3)
Part# QF11023
BOX 3
Large washer head
screw M6 x 50mm
(SBHCS) (4 total)
Part# QF00007-200
BOX 3
Ratchet Idler End Cap (3)
Part# QF11036
BOX 3
Spg Lded Idler End Cap (4)
Part# QF11037
BOX 3
Hand Wheel Insert (1)
May be pre-assembled
with Hand Wheel.
Part# QF09318-713
BOX 3
Hand Wheel Assembly (1)
Part# QF09325
BOX 3
Leveling Foot (8)
Part# QF09318-108
BOX 3
6 King Quilter Frame Assembly
5mm Allen Wrench (1)
Part# QF09318-113
BOX 3
M8 Flat Washer (1)
Part# QF09318-702
BOX 3
4mm Allen Wrench (1)
Part# QF09318-112
BOX 3
M8 Lock Nut (1)
Part# QF09318-08
3mm Allen Wrench (1)
Part# QF09318-111
BOX 3
BOX 3
Rubber End Cap (2)
Part# QF09318-716
BOX 3
17/13/16mm Wrench (1)
Part# QF09318-114
BOX 3
Preparation: Batting Bar Brackets
left side
Parts Needed
2 - upright beams
2 - batting bar brackets
2 - screws, M8 x 16mm SBHCS
Tools Required
5mm Allen wrench (provided)
Prep-1: Insert an M8 x 16mm SBCHS
into the batting bar bracket on the left
side of the frame.
right sideinside view of
upright beam
Do this Preparation rst!
Prep-2: Slide the bracket towards the
center of the frame until it touches the
leg and there is no gap. Fully tighten
the screw with the M5 Allen tool
provided.
Prep-3: Repeat the process for the
batting bar bracket on the right side of
the frame.
King Quilter Frame Assembly 7

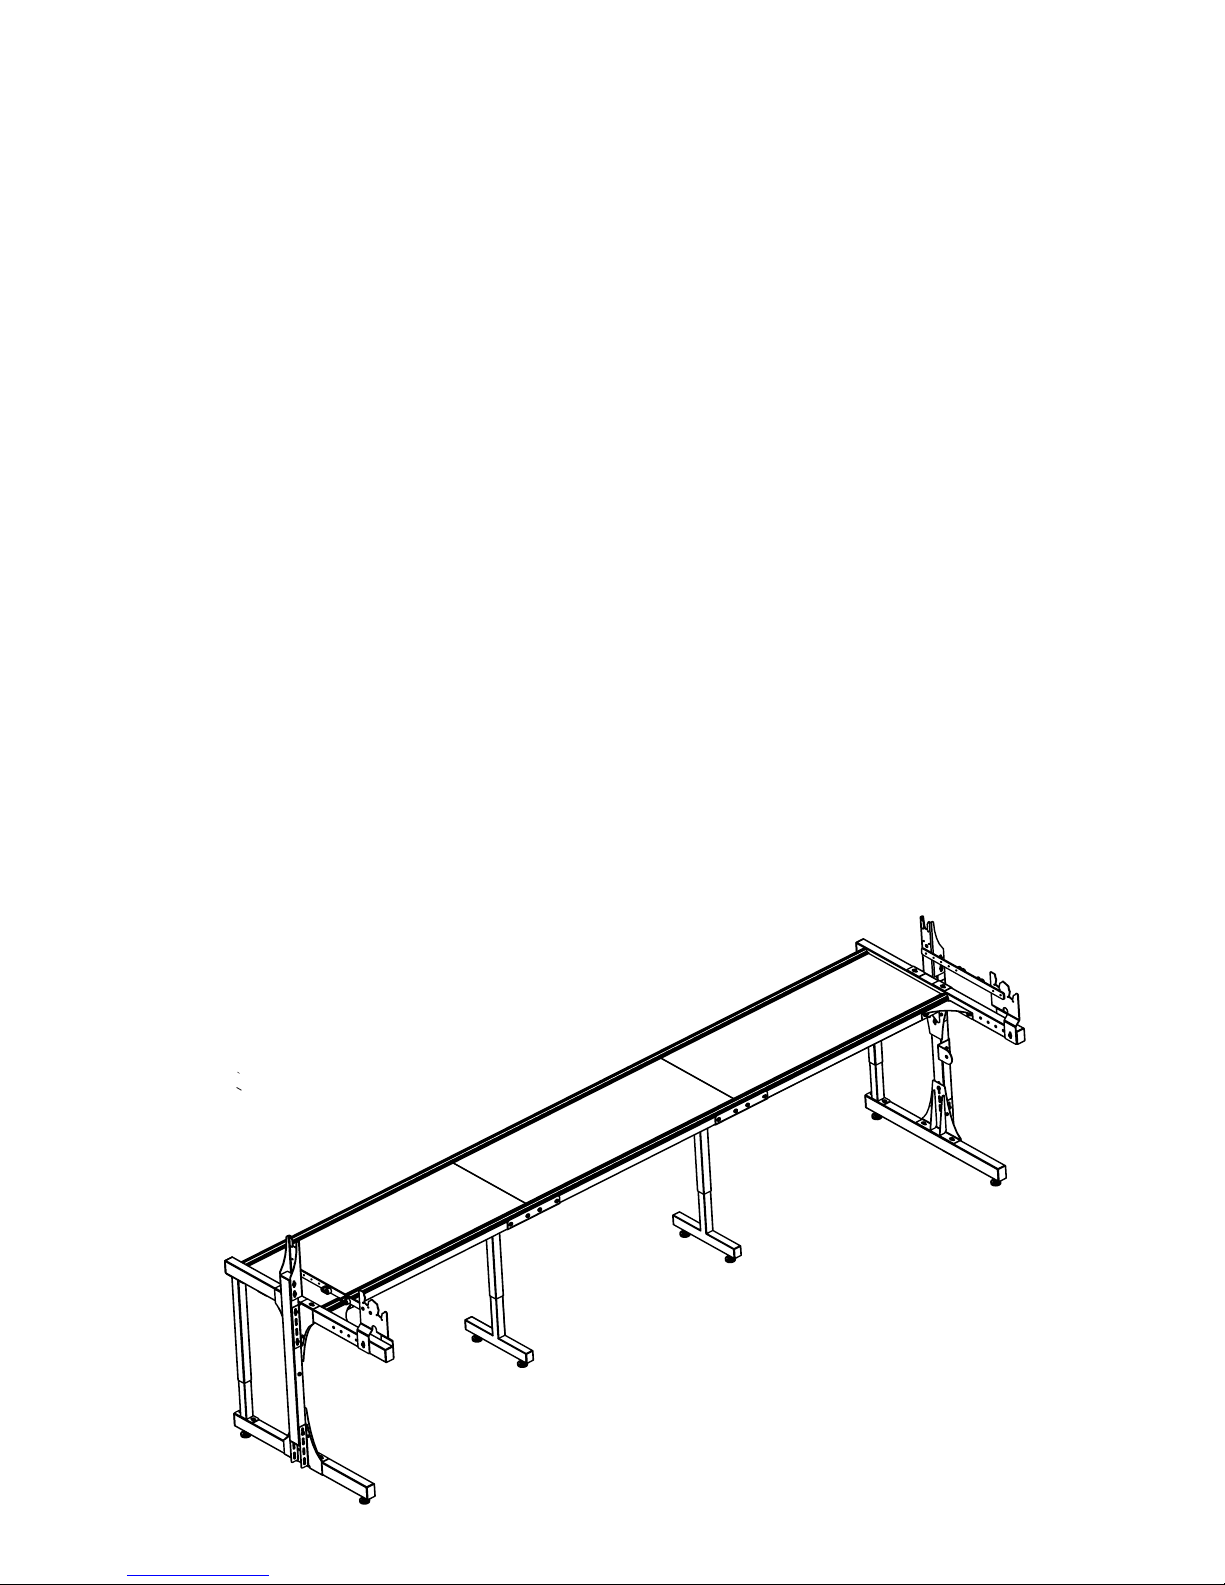
Step 1: End Leg Assembly
NOTE: Assembly is easiest if all
connections are nger-tightened rst,
as instructed, while assembling the
frame. Tighten with the wrench only
when instructed.
Why is this important? If you tighten
as you go, you may have trouble
getting all the parts to align properly.
NOTE: Protect your frame
and work surface. To avoid any
damage to your frame parts and
work surface, place a protective
material on the oor or work surface
to prevent scratches and other
damage
Parts Needed
1 - left rear leg upper
1 - right rear leg upper
2 - rear leg lower
2 - lower leg beam
1 - upper beam left hand side leg
1 - upper beam right hand side leg
2 - upright leg beam
4 - outer side bracket right
4 - outer side bracket left
2 - lower gusset bracket
2 - upper gusset bracket
4 - leveling feet
58 - screw M8 x 16mm SBHCS
8 - screw M6x12 SH ange
Tools Required
5mm Allen wrench (provided)
4mm Allen wrench (provided)
17/13/16 wrench (provided)
NOTE: Height Adjustment
Be aware that there are two rivnuts
inside the leg to facilitate continuous
graduated table top height
adjustment from approximately 28”
to 34”; set both center legs using the
same height rivnut to avoid leveling
problems later on.
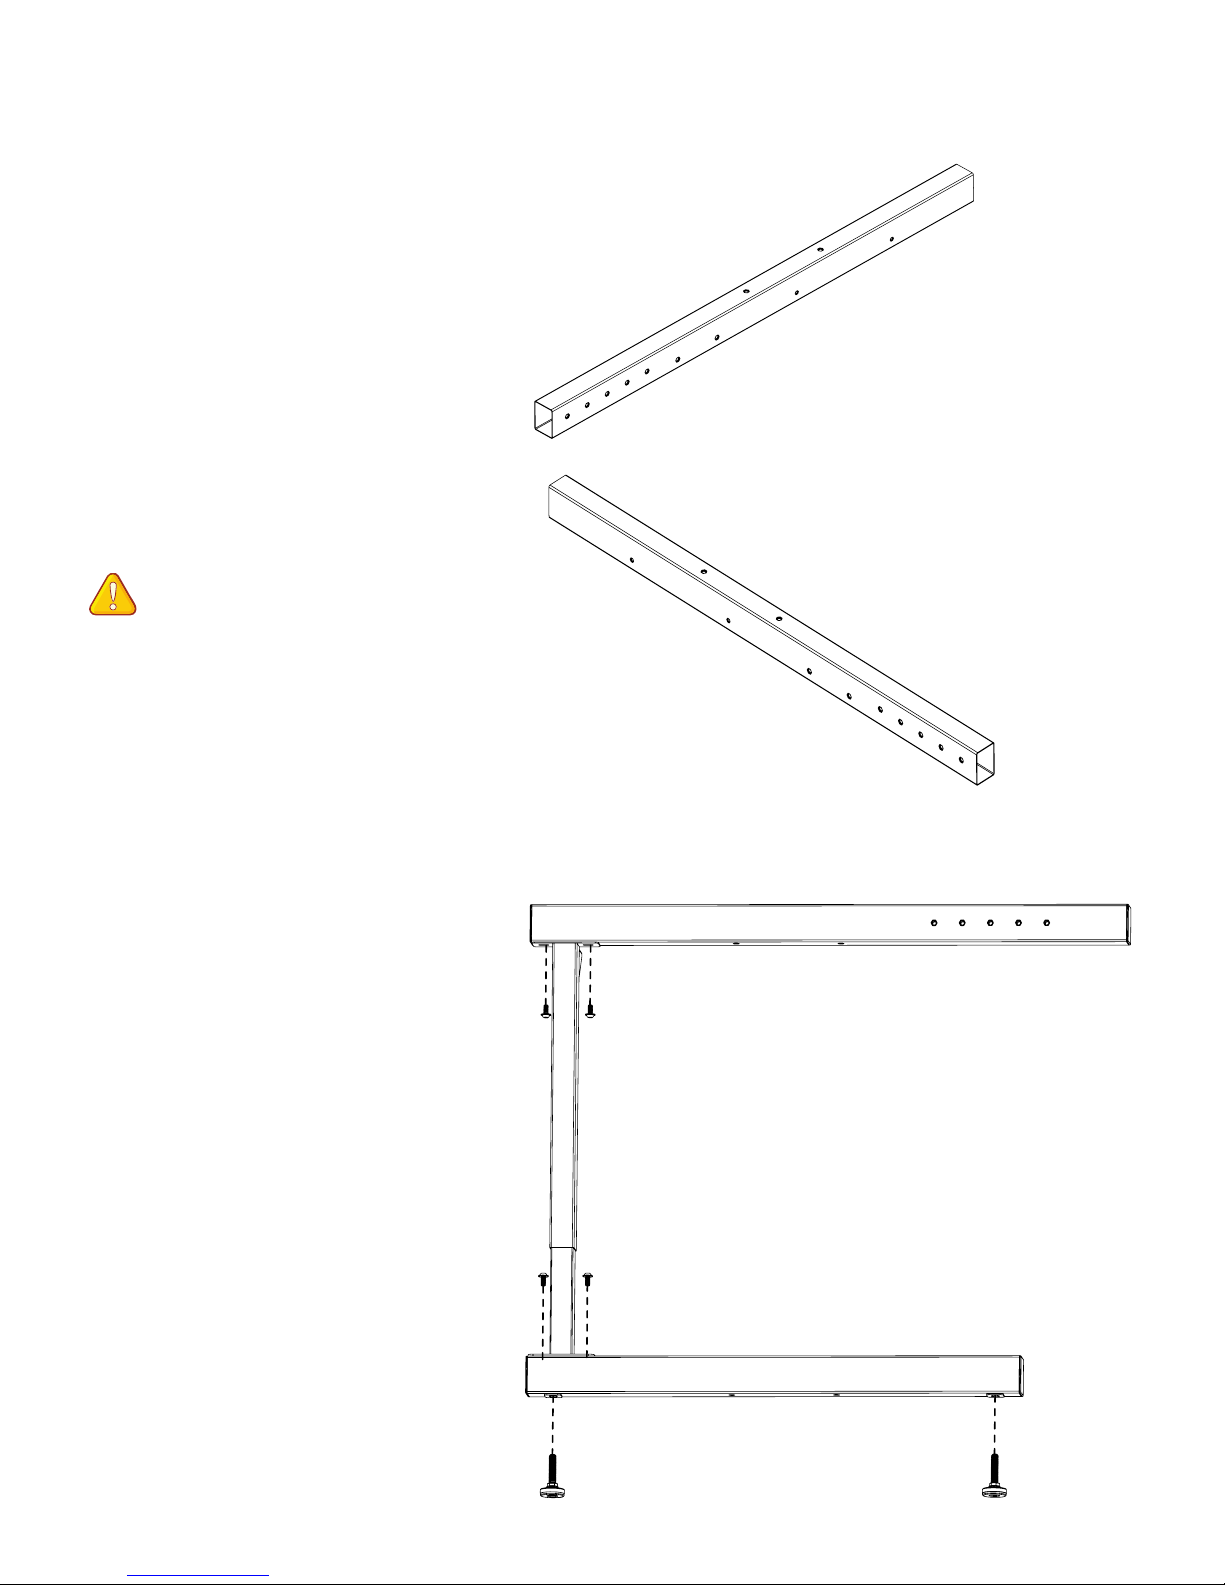
Left Rear Leg Upper
The lower leg is
xed to upper leg
with one M8 X 16
SBHCS per leg
1-1: Determine how high you want your table
top. One way to estimate the desired height is to
measure the distance from your elbow to the oor
with your arms bent at the elbow at 90 degrees
and hands in front of you. Next subtract 16 to 18
inches. This will give you the approximate table
top height for comfortable quilting, depending if
you like your table a little higher or a little lower.
The machine’s needle plate is about six inches
higher than the table top. The handlebars will be
approximately six to nine inches higher than the
needle plate. Most are comfortable with their arms
bent at 90 degrees and forearms horizontal, parallel
to the oor when free-motion quilting.
Note: To determine the approximate table
top height: Add ve inches to the height of the
leg assembly to compensate for the bottom tube
height, the leveling foot height and the table top
tube height. The frame will be leveled later on,
which may alter the height slightly.
Right Rear Leg Upper
Rear Leg Lower
8 King Quilter Frame Assembly
Step 1: End Leg Assembly (continued)
1-2: Slide the left rear leg upper down
over the rear leg lower to the desired
height and insert the M8x16 screw
into one of the two holes that best
corresponds to your desired height.
Fully tighten this height screw now to
maintain the desired height.
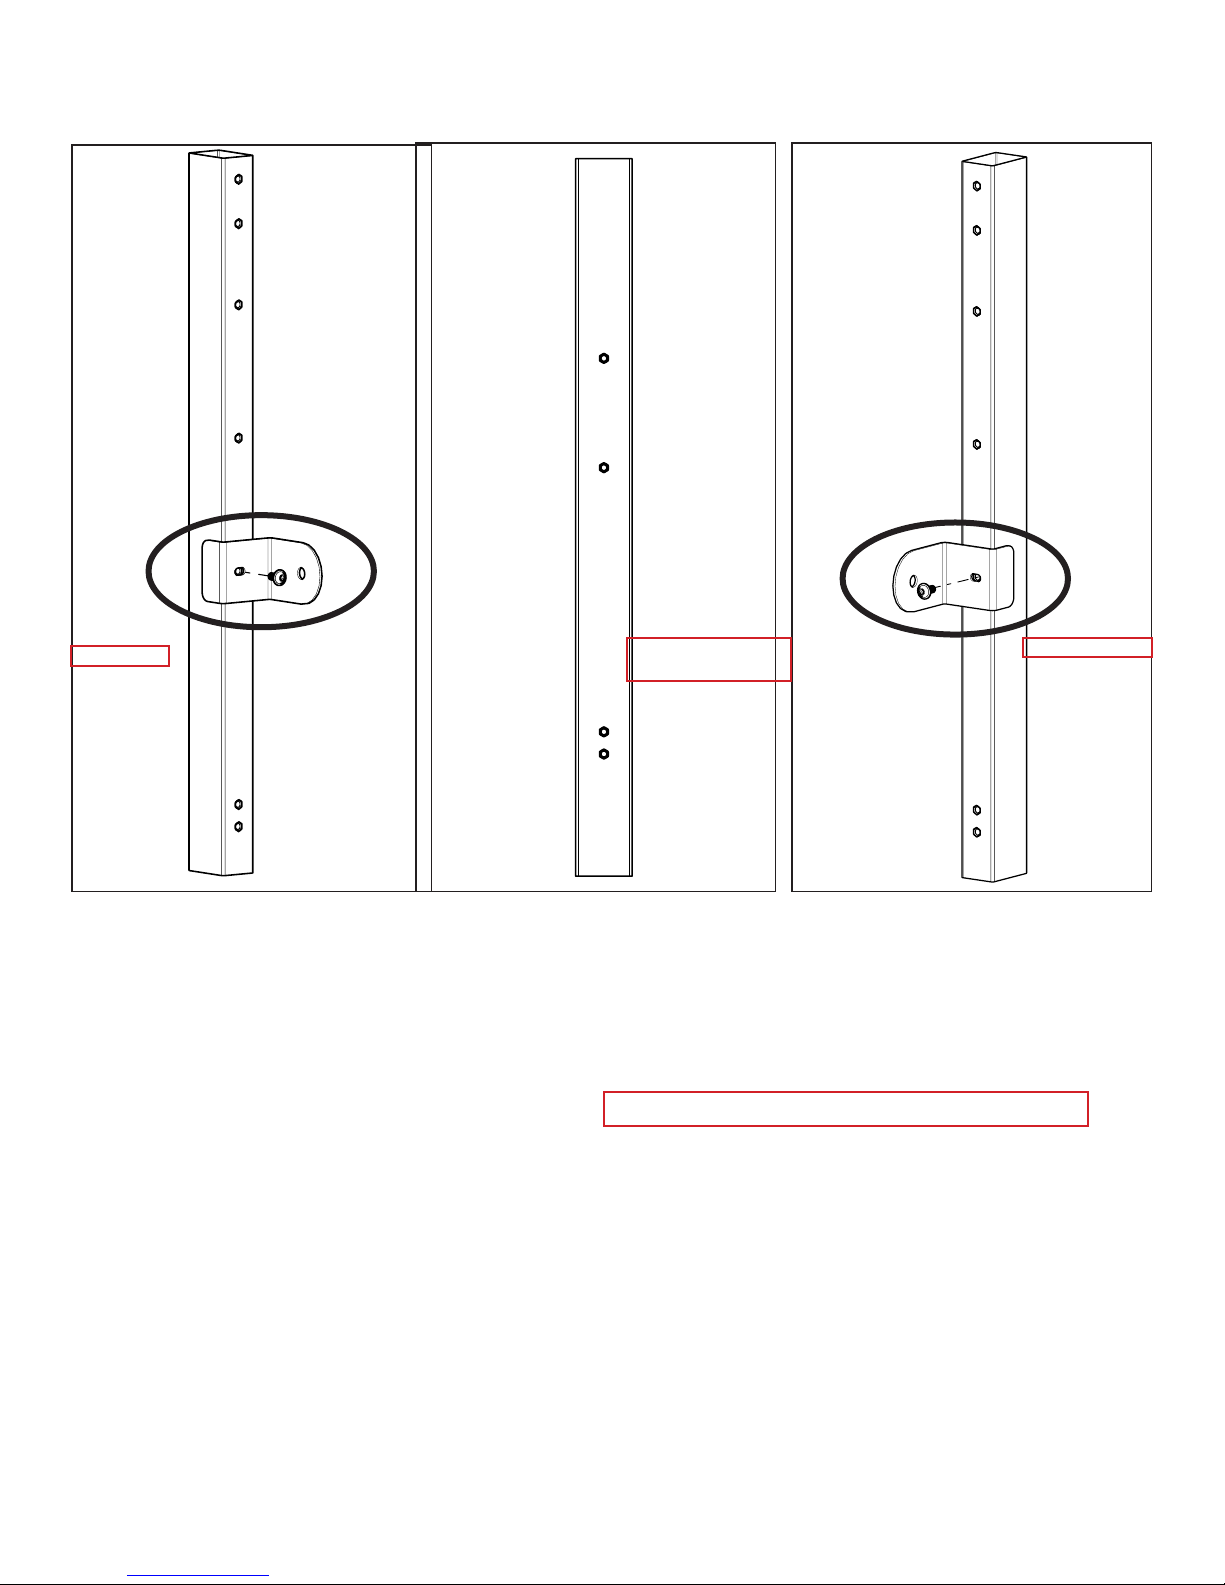
1-3: Identify the top beam for the
left and right side legs, which have
different inside rivnut hole locations.
The side with the most rivnuts goes to
the inside of the frame.
NOTE: When a screw goes into a
slotted/elongated hole the normal rule
is for the slotted hole to be centered
on the screw if possible.
Inside view of upper beam
right hand side leg
Inside view of upper beam
left hand side leg
1-4: Place the left upper beam above
the vertical rear leg assembly and the
lower leg beam below and insert the
four M8x16 SBHCS screws. Align the
back edge of the bracket with the end
of the upper beam and lower beams.
Finger tighten the screws only for now.
1-5: Thread the levelers into the
bottom of the lower beam about half
way. This will facilitate leveling the
frame later. Use the 17/13/16 wrench
if needed to adjust the levelers.
Outside view of
left hand leg assembly
King Quilter Frame Assembly 9
Step 1: End Leg Assembly (continued)
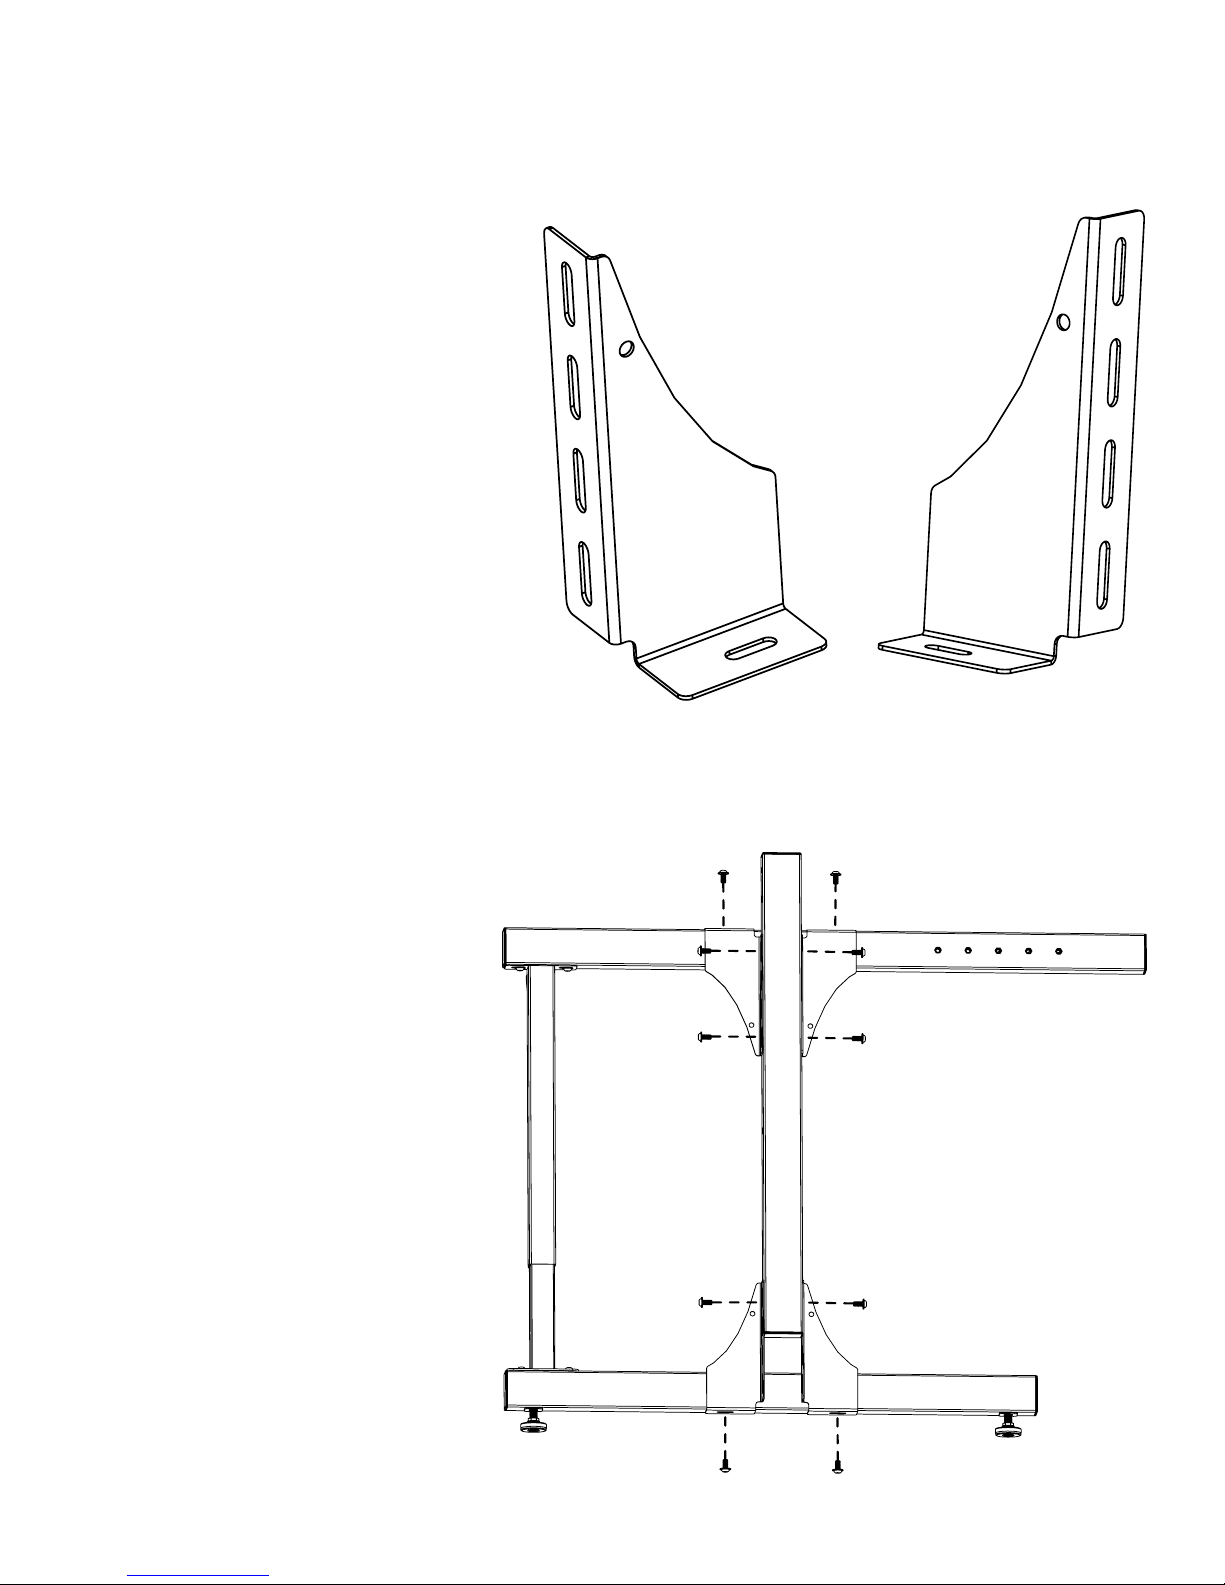
1-6: Identify the outer side bracket
right and outer side bracket left.
Two of each bracket are used on the
outside of the leg assembly. On the left
leg assembly the left bracket is used
on the top right and bottom left and
the right bracket is used on the top left
and bottom right.
1-7: Place the brackets into place
and align three M8 x16 SBHCS screws
into each of the top brackets and
two screws into each of the bottom
brackets.
Outer side bracket left Outer side bracket right
10 King Quilter Frame Assembly

Step 1: End Leg Assembly (continued)
1-8: A left and right bracket are used
on the top with three screws in each.
Finger tighten the screws only for now.
1-9: A left and right bracket are used
on the bottom with two screws in
each. Finger tighten the screws only
for now.
Note:
Upright beam
shown in its
highest position.
The frame height
is adjusted at
these lower
brackets with
three screws.
King Quilter Frame Assembly 11
 Loading...