

Seville Classics OFF65803, AirLift S3 Series, OFFK65818, OFF65815, OFFK65822 User Manual
...Page 1

AIRLIFT® S3 Electric Height-Adjustable Standing Desk
Models: OFF65803, 15
Base + Top Kits: OFFK65818, 19, 22, 23, 26, 27
Thank you for choosing Seville Classics! We hope that you enjoy your new sit-to-stand
desk. Please read through this user guide for parts list, instructions, frequently asked
questions and contact information.
3-2018
Page 2

Welcome!
We at Seville Classics® are thrilled that you’ve chosen to go
AIRLIFT®! Our desks are some of the easiest to use, most versatile
and sophisticated electronic desks on the market. With this, you
can stay active throughout the day without sacricing productivity.
Choosing a height-adjustable desk is not just a convenient
upgrade—it’s a healthy one! Too much sedentary behavior can
present a real health risk, even for people who are already
healthy. Simply getting up throughout the day and moving is a
great way to ght the consequences of too much sitting. AIRLIFT®
is here to help.
Please read through this manual for more information regarding
your AIRLIFT® S3 Electric Height-Adjustable Standing Desk.
Thank you for choosing Seville Classics®! We hope you will enjoy
this desk for many years to come.
2
Page 3

Table of Contents
SAFETY INSTRUCTIONS………………………………………………………………
COMPONENT DIAGRAM…………………………………………………………….
PARTS LIST………………………………………………………………………………...
TOOLS & HARDWARE LIST………………………………………………………...
ASSEMBLY INSTRUCTIONS………………………………………………………...
Prepare Workspace…………………………………………………………...
Unpack & Unfold………………………………………………………………..
Install Support Brackets……………………………………………………..
Unlock Beam……………………………………………………………………...
Align Frame………………………………………………………………………..
Mounting Seville Classics® Ergo Table Top………………………...
5
6
7
7
8
8
9
10
11
12
13
Mounting Non-Seville Classics® Top…………………………………..
Installing Feet…………………………………………………………………….
Cable Management…………………………………………………………...
Connect Cables…………………………………………………………………..
Turn Desk Over………………………………………………………………….
INITIALIZATION & USE INSTRUCTIONS……………………………………...
CABLE MANAGEMENT……………………………………………………………….
TROUBLESHOOTING………………………………………………………………….
WARRANTY INFORMATION………………………….…………………………….
MORE FROM SEVILLE CLASSICS®……………….……………………………...
SPECIFICATIONS………………………………………………………………………..
14
15
16
17
18
19
20
21
22
23
24
CUSTOMER SERVICE INFORMATION………………………………………….
3
24
Page 4

4
Page 5

Safety Instructions
FAILURE TO COMPLY WITH OR OBSERVE ALL ASSEMBLY, SAFETY AND
OPERATING INSTRUCTIONS AND WARNINGS REGARDING THE USE OF THIS
PRODUCT MAY RESULT IN SERIOUS BODILY INJURY
Read and understand this manual before attempting to install or
Assure that everyone who uses this product is informed of the contents of this manual. This
is the responsibility of the Purchaser.
Not intended for use by young children or for those persons who require supervision.
Do not open any of the components – legs, control box, or controller. There is a risk of
electric shock.
Assemble desk on a at and level surface.
Use & Liability
Safe use of this product is possible only when the operating instructions are read completely
and the instructions contained are strictly observed. Persons who do not have the necessary
experience or knowledge of this product must not use the product. Persons with reduced
physical or mental abilities should not use this product, unless they are under supervision or
they have been thoroughly instructed in the use of the apparatus by a person who is
responsible for the safety of these persons. Children should be closely supervised to ensure that
they do not play with this product.
Before You Begin
Layout all components and hardware. Visually examine and make sure components are free of
damage. If there is visual damage to any component, it must not be installed.
Two people are needed to turn or move the desk and some of it’s components. When moving or
turning the assembled desk, grab the legs, not the desk top.
Make sure to assemble on a soft and non-abrasive surface to avoid scratches.
Check all connections and cables. Make sure control box is connected to a power outlet.
If the control box makes unusual noises or emits an odor, switch power o immediately.
The desk MUST be INITIALIZED before rst use.
Read the INITIALIZATION chapter prior to operation.
5
Page 6

Component Diagram
Control Box Support Bracket
Support
Bracket
Top
Controller
Legs
Legs
Foot
Support Beam
Foot
6
Page 7

Parts List
A. Top
B. Support Beam (1)
C. Legs (2)
(pre-installed)
D. Support Bracket (2)
Tools & Hardware List
H. Allen wrench - 3mm
I. Allen wrench - 5mm
E. Foot (2)
F. Control Box (1)
(pre-installed)
G. Controller (1)
O. Screw (10)
J. Allen wrench - 6mm
K. M8x25 Bolt (4)
L. M6x16 Bolt (6)
M. M6x40 Bolt (8)
N. M6x6 Bolt (8)
(pre-installed)
P. Bolt Sleeve (4)
Q. Washer (12)
R. Fastener (6)
S. Zip Ties (8)
T. Screwdriver
Please make sure you have all the parts on this list.
Extra washers are included and some may remain unused after assembly.
If you’re missing parts, contact us for replacements at (800) 323-5565 or send an email
7
Page 8

Assembly Instructions: Prepare Workspace
Lay down a blanket and place your Seville Classics® Ergo Table Top (or your
own top) with the bottom side facing up on a soft, at, even surface
beneath the top to protect the surface.
Layout all components and hardware. Examine each and make sure
components are without damage.
Support Beam Legs (x2) (pre-installed) Feet (x2)
Support Bracket (x2)
Control Box (pre-installed) Controller
Examine the location where you'll be
using the desk. Make sure there is a
grounded outlet or power strip nearby.
Assemble frame with CONTROL BOX (F)
on the side of the nearest outlet.
8
110-120V
Page 9
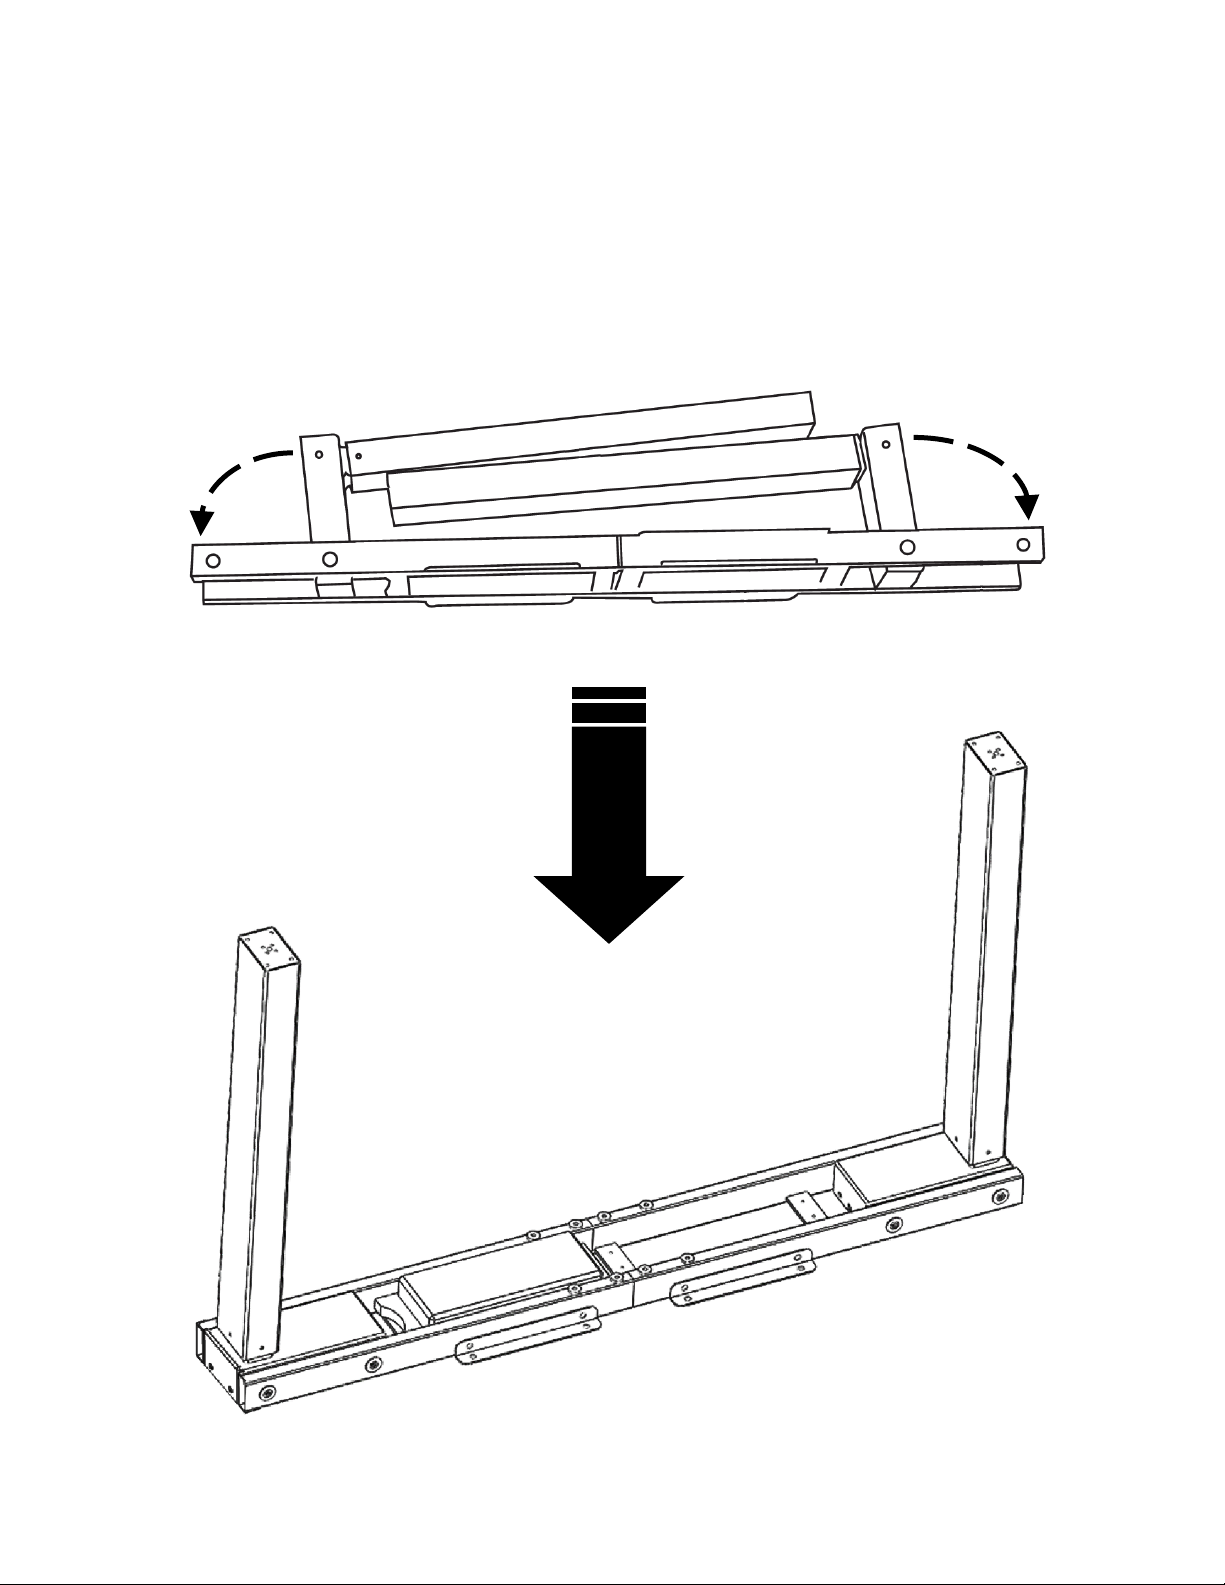
Assembly Instructions: Unpack & Unfold
STEP 1. Remove SUPPORT BEAM (B) from box and set on TOP (A) with
legs facing upward.
STEP 2. Unfold legs until the holes on the legs and beam align.
90°
90°
9
Page 10
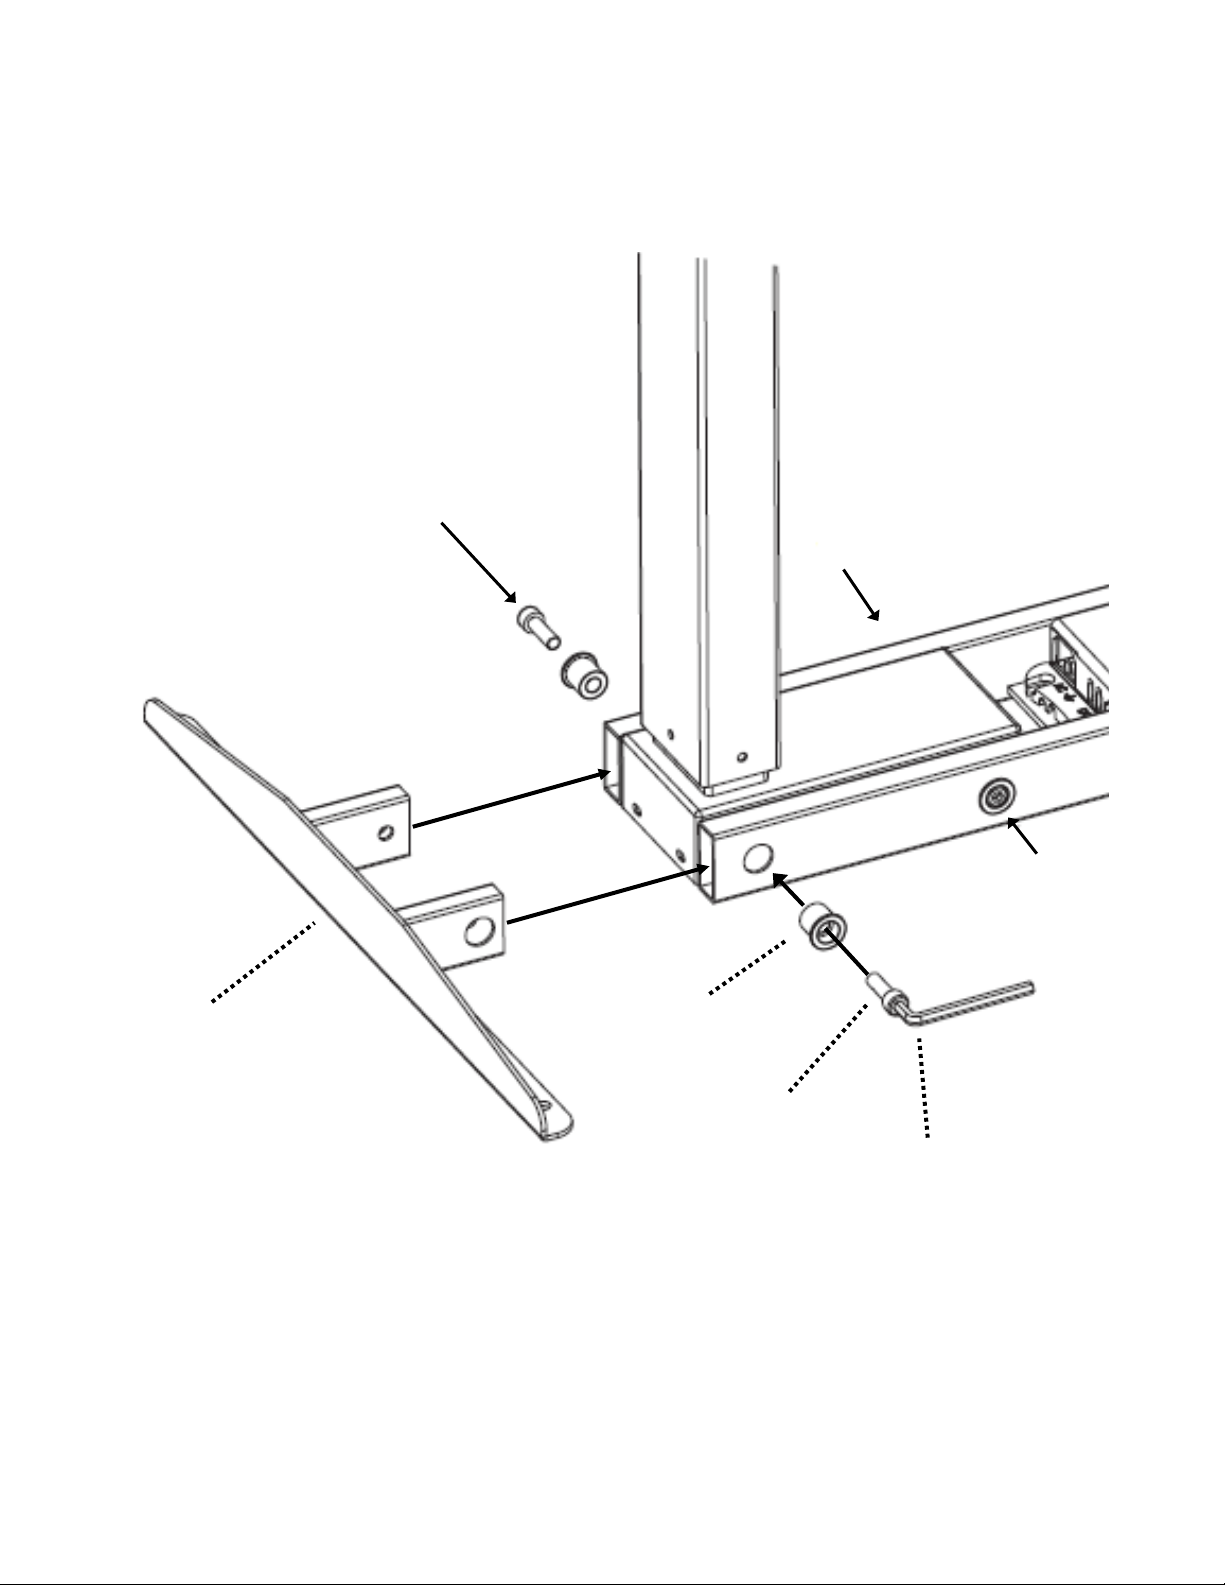
Assembly Instructions: Install Support Brackets
STEP 3. Slide SUPPORT BRACKET (D) into the SUPPORT BEAM (B).
Support
Bracket
Tighten /w 6mm Allen Wrench
Tighten /w 6mm
Allen Wrench
Tighten /w
6mm Allen
Wrench
Bolt Sleeve
M8x25 Bolt
6mm Allen Wrench
Insert BOLT SLEEVES (P) through holes on SUPPORT BEAM (B) and LEG (C).
Insert M8x25 BOLTS (K) into sleeves and tighten with 6mm ALLEN
WRENCH (J).
Then, tighten inner 6mm bolts with a 6mm ALLEN WRENCH (J).
10
Page 11
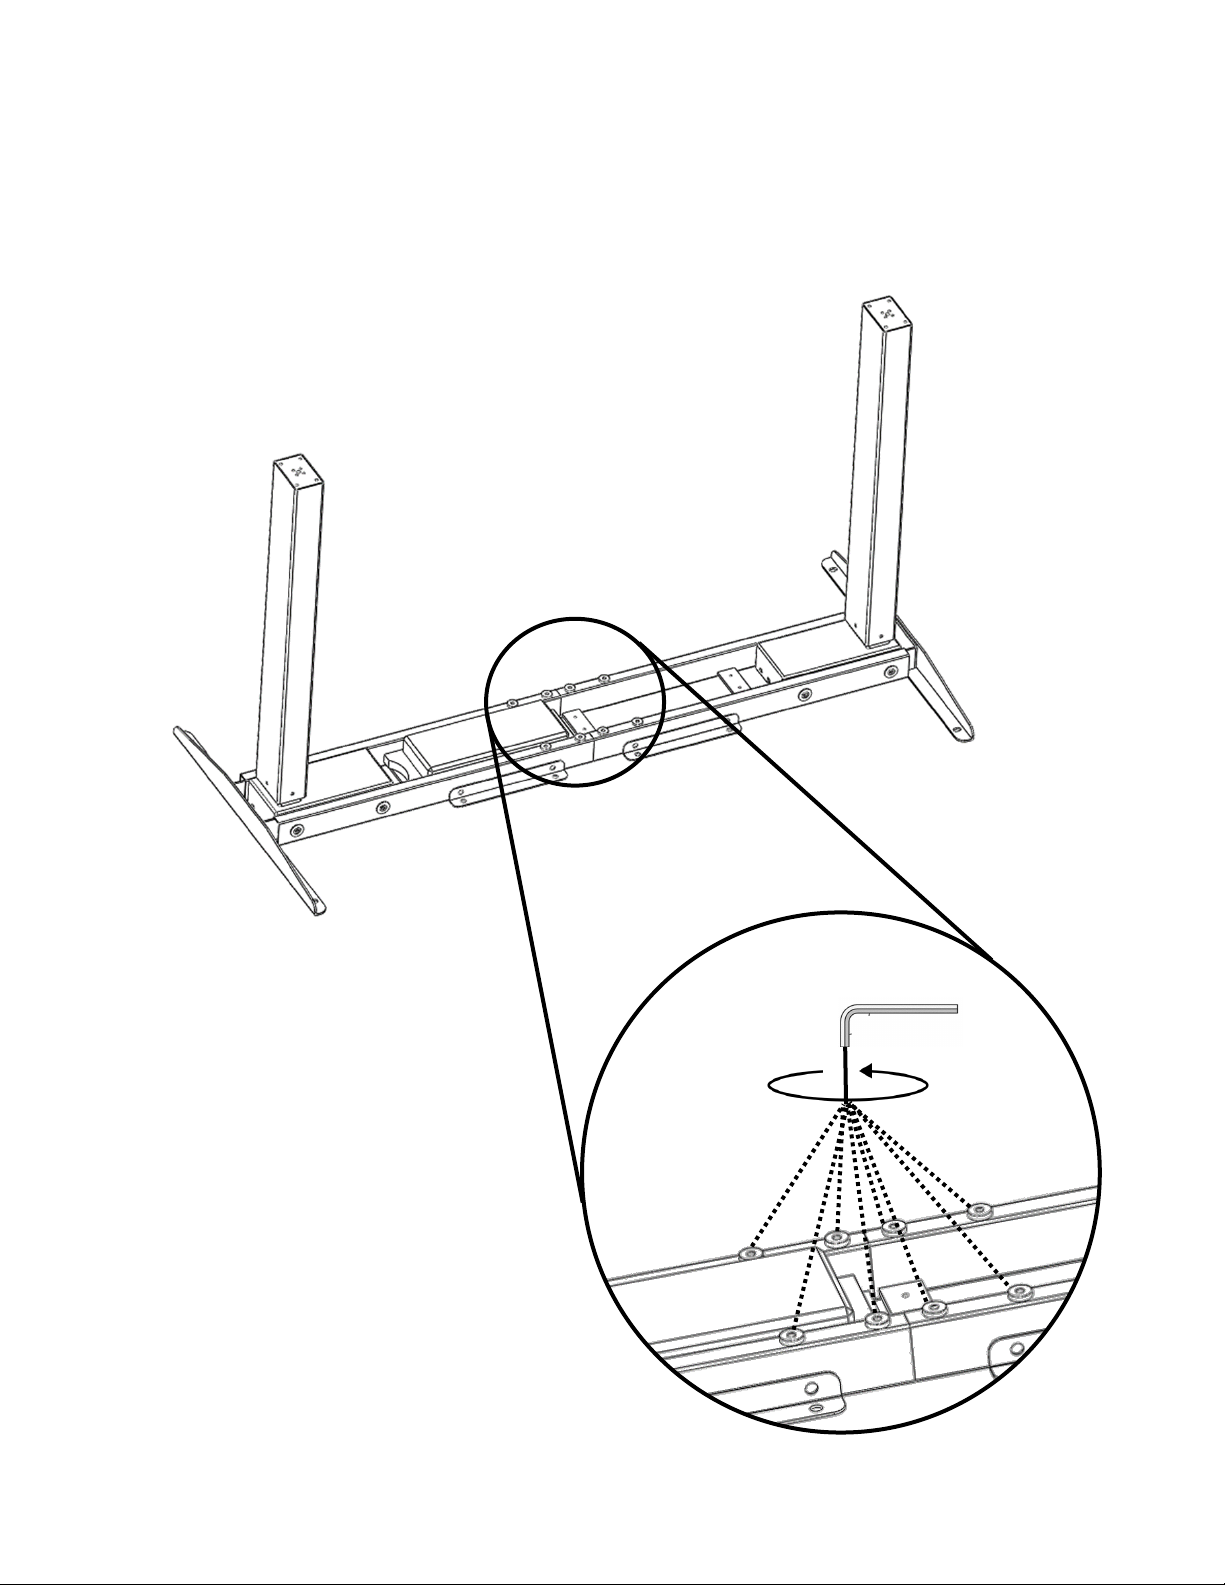
Assembly Instructions: Unlock Beam
STEP 4. Unscrew the eight M6x6 BOLTS (N) mark ed in the diagram
below from SUPPORT BEAM (B) with 3mm ALLEN WRENCH (H).
This unlocks the SUPPORT
BEAM (B) and allows it to be
extended, or shortened to
accommodate dierent sizes of
desk tops.
Screw the bolts back in to apply
tension against the support
beam and lock the top's width
after aligning the base with the
desk top appropriately.
3mm Allen Wrench
Unscrew
11
Page 12
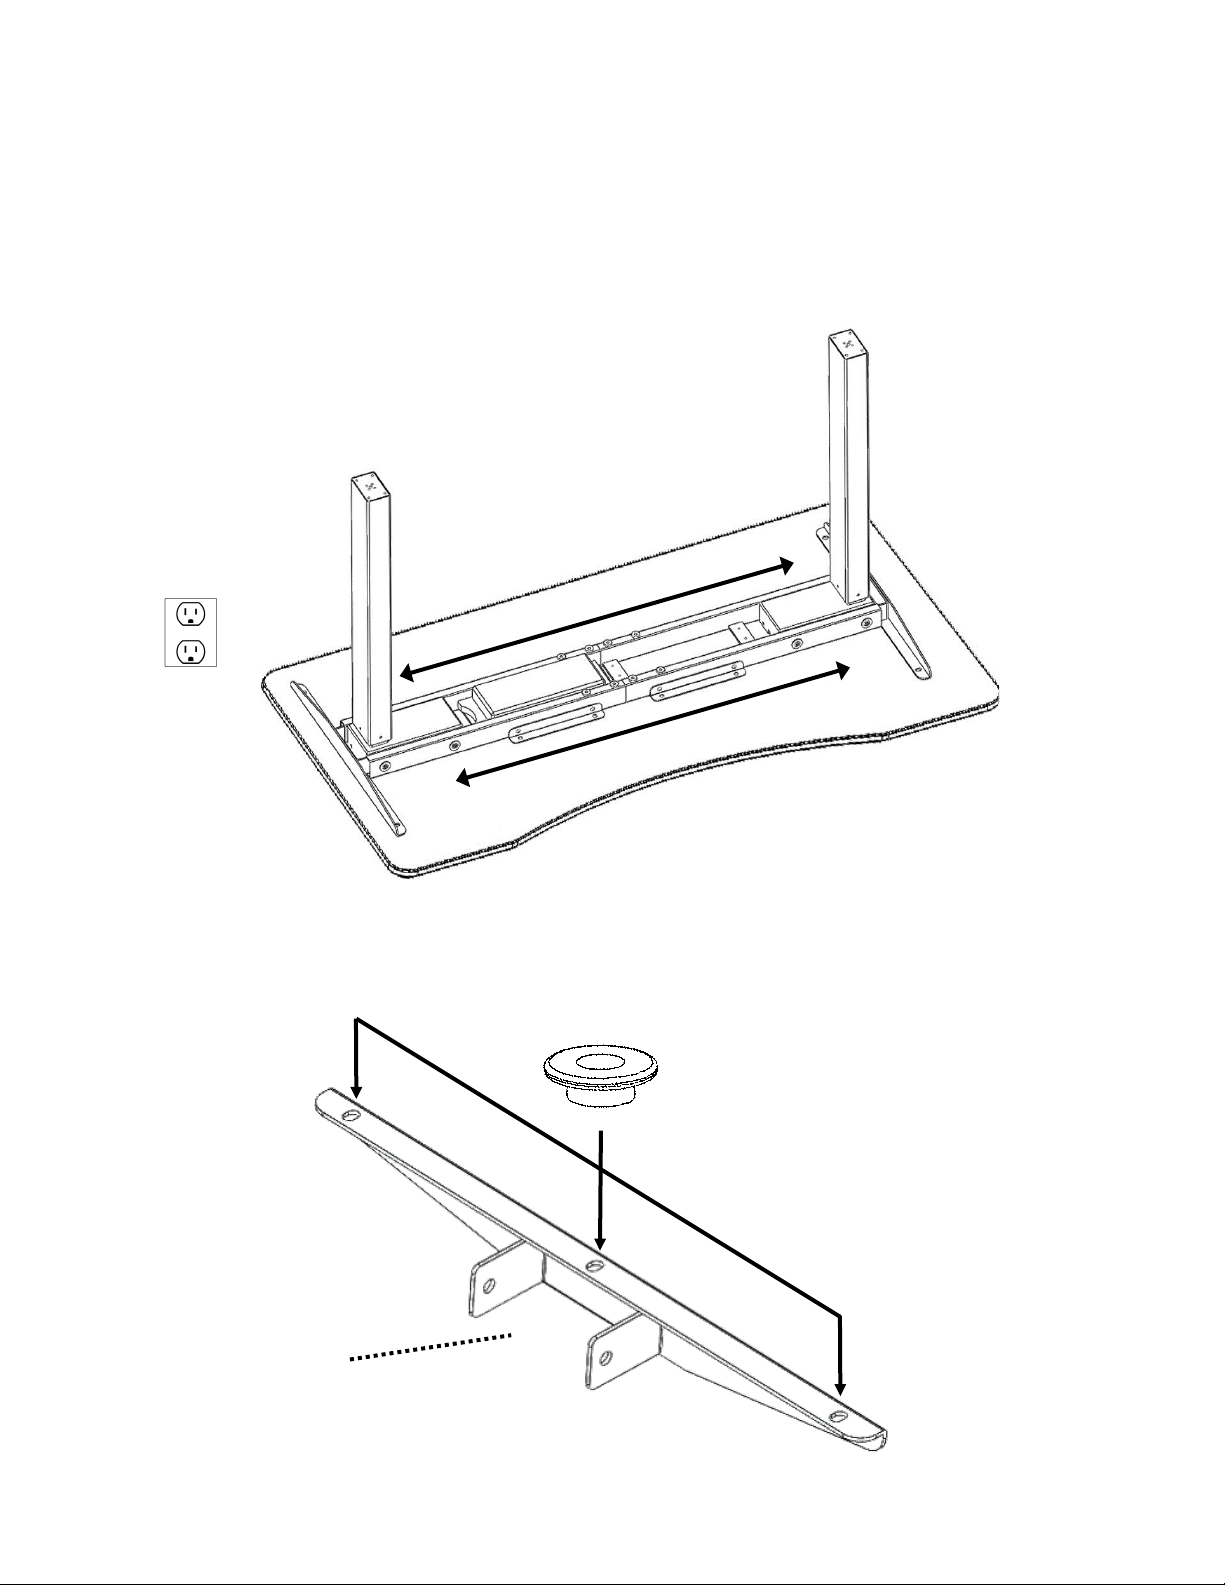
Assembly Instructions: Align Frame
STEP 5. With 2 people, pull or push the SUPPORT BEAM (B) to align the
mounting holes on the SUPPORT BRACKETS (E) with the TOP (A).
Seville Classics® Ergo Table Top features pre-installed mounting anchors.
TIP: Frame is symmetrical and should be installed
so that the CONTROL BOX (F) is near a power outlet.
110-120V
STEP 6. Insert WASHERS (Q) between the SUPPORT BRACKETS (D) and the
TOP (A). Washers t into the three mounting holes on each support bracket.
Washer (x3)
Support
Bracket
12
Page 13
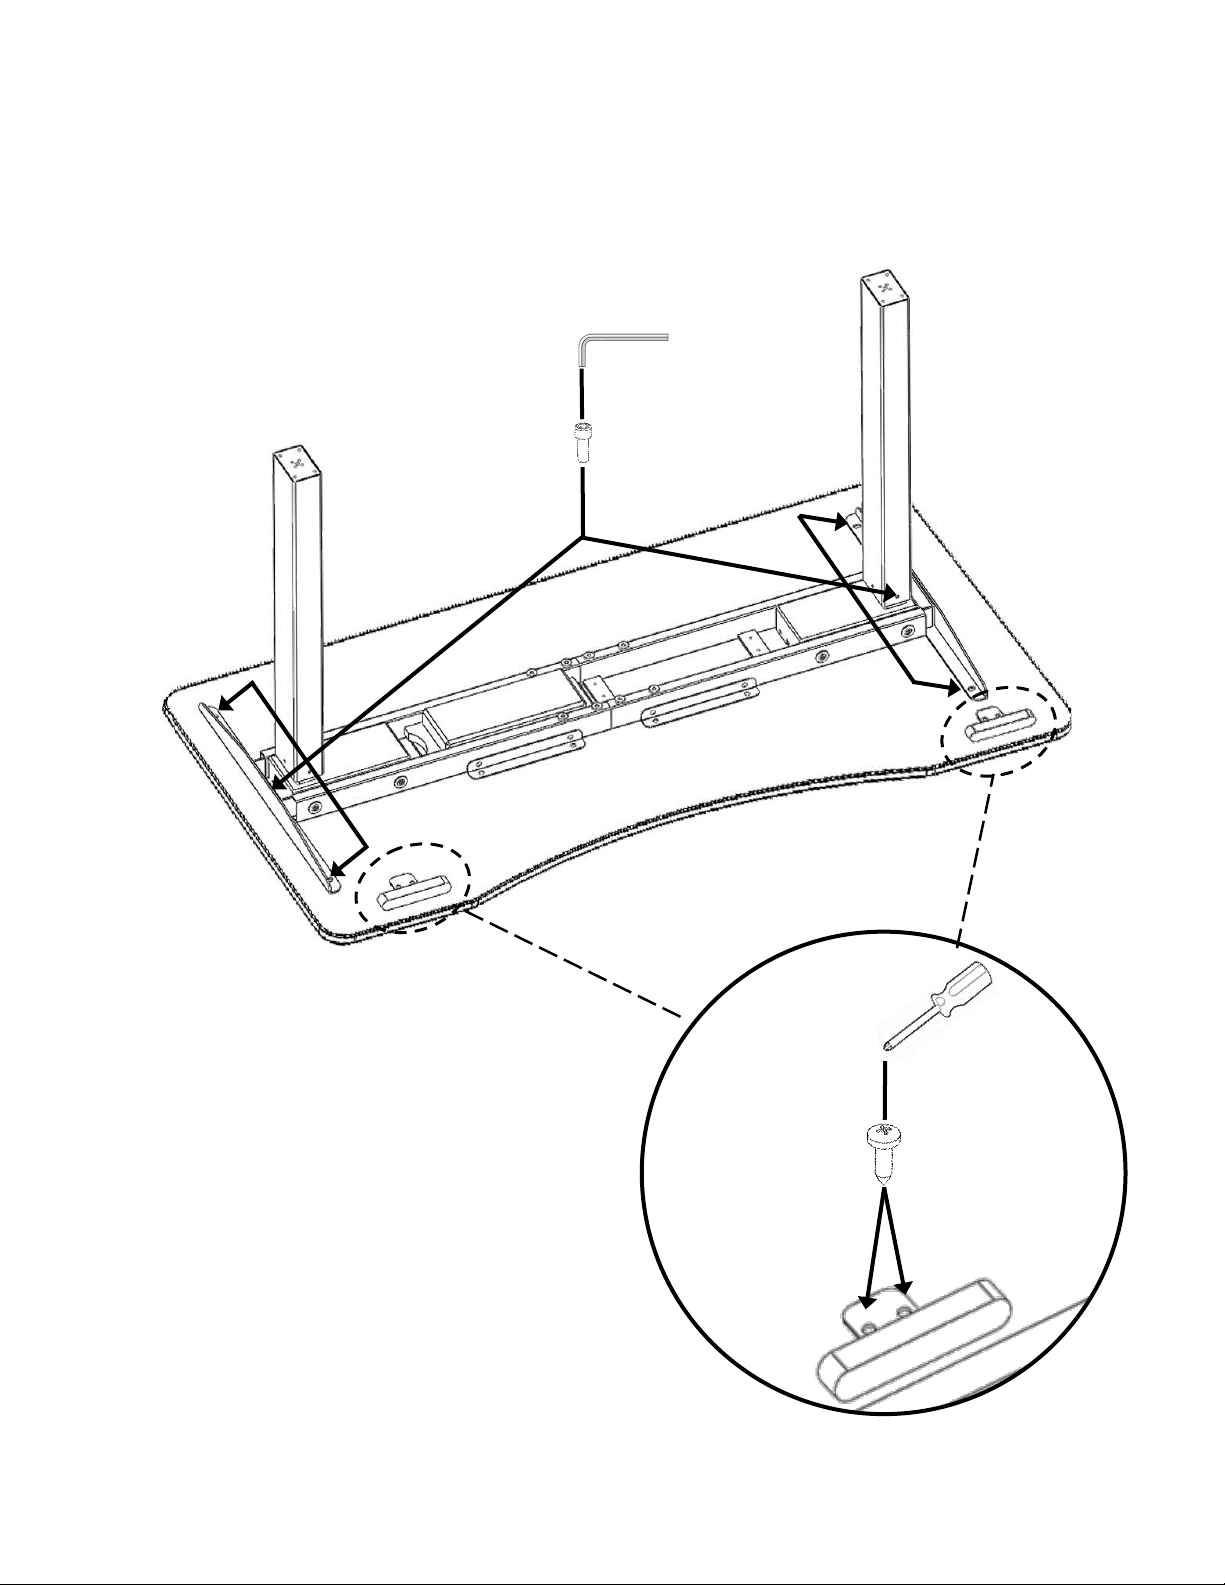
Seville Classics® Top
Assembly Instructions: Mounting Ergo Top
STEP 7A. Use three M6x16 BOLTS (L) to secure each SUPPORT BRACKET
(D) with 5mm ALLEN WRENCH (I).
5mm Allen Wrench
M6x16 Bolt
Install CONTROLLER (G) to side of
table with pre-drilled holes for
controller.
Attach with two SCREWS (O).
TIP: Use an electric screwdriver to
install screws more quickly.
Screwdriver
Screw
13
Page 14
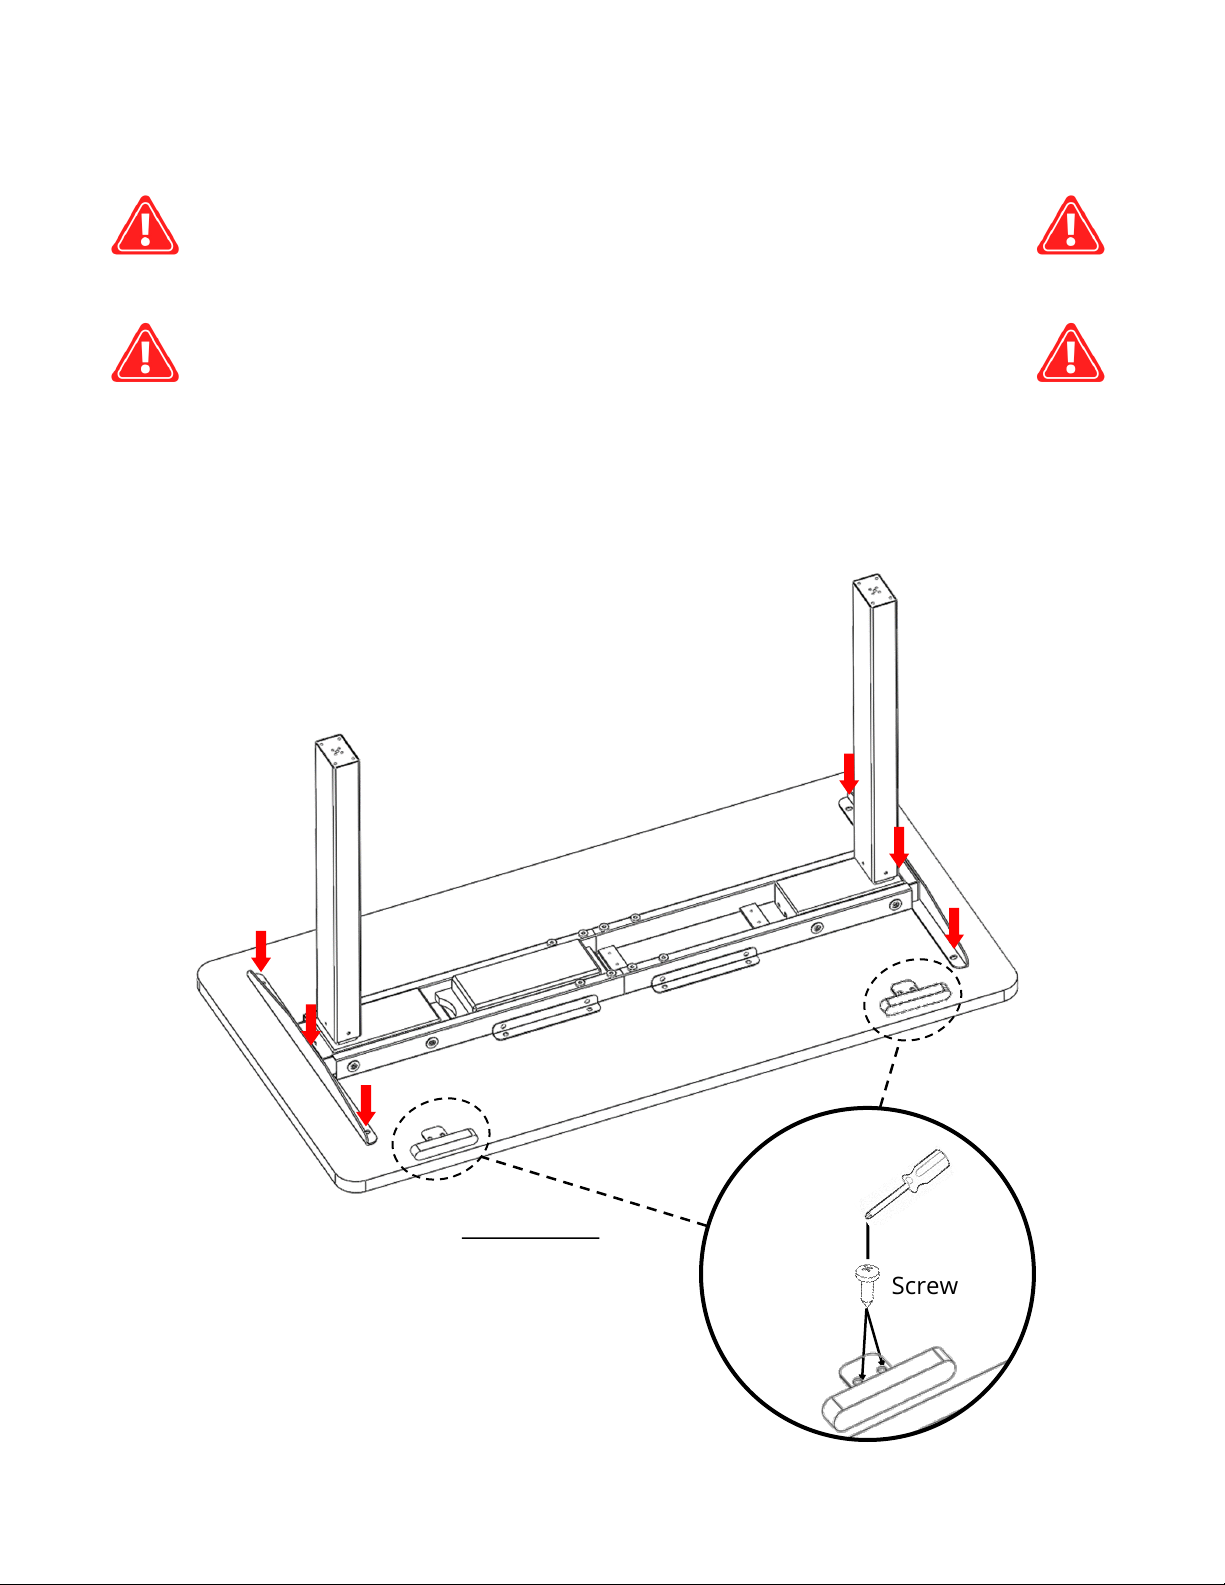
Non-Seville Classics® Top
Assembly Instructions: Mounting Other Top
WARNING: Seville Classics® does not take responsibility for
damage of customer-supplied parts or desk components.
WARNING: Users MUST supply their own wood screws
when installing their own top.
BE SURE screws ARE NOT longer than top depth.
STEP 7B. Pull or push the LEGS (C) on the base frame apart and center
the assembly on the TOP (A) with about 2" to 3" between SUPPORT
BRACKETS (D) and the table edge.
Screw SUPPORT BRACKETS (D) to the top.
Install CONTROLLER (G) to either side
of the desk top with two SCREWS (O).
TIP: Use an electric screwdriver to
install screws more quickly.
Screwdriver
Screw
14
Page 15
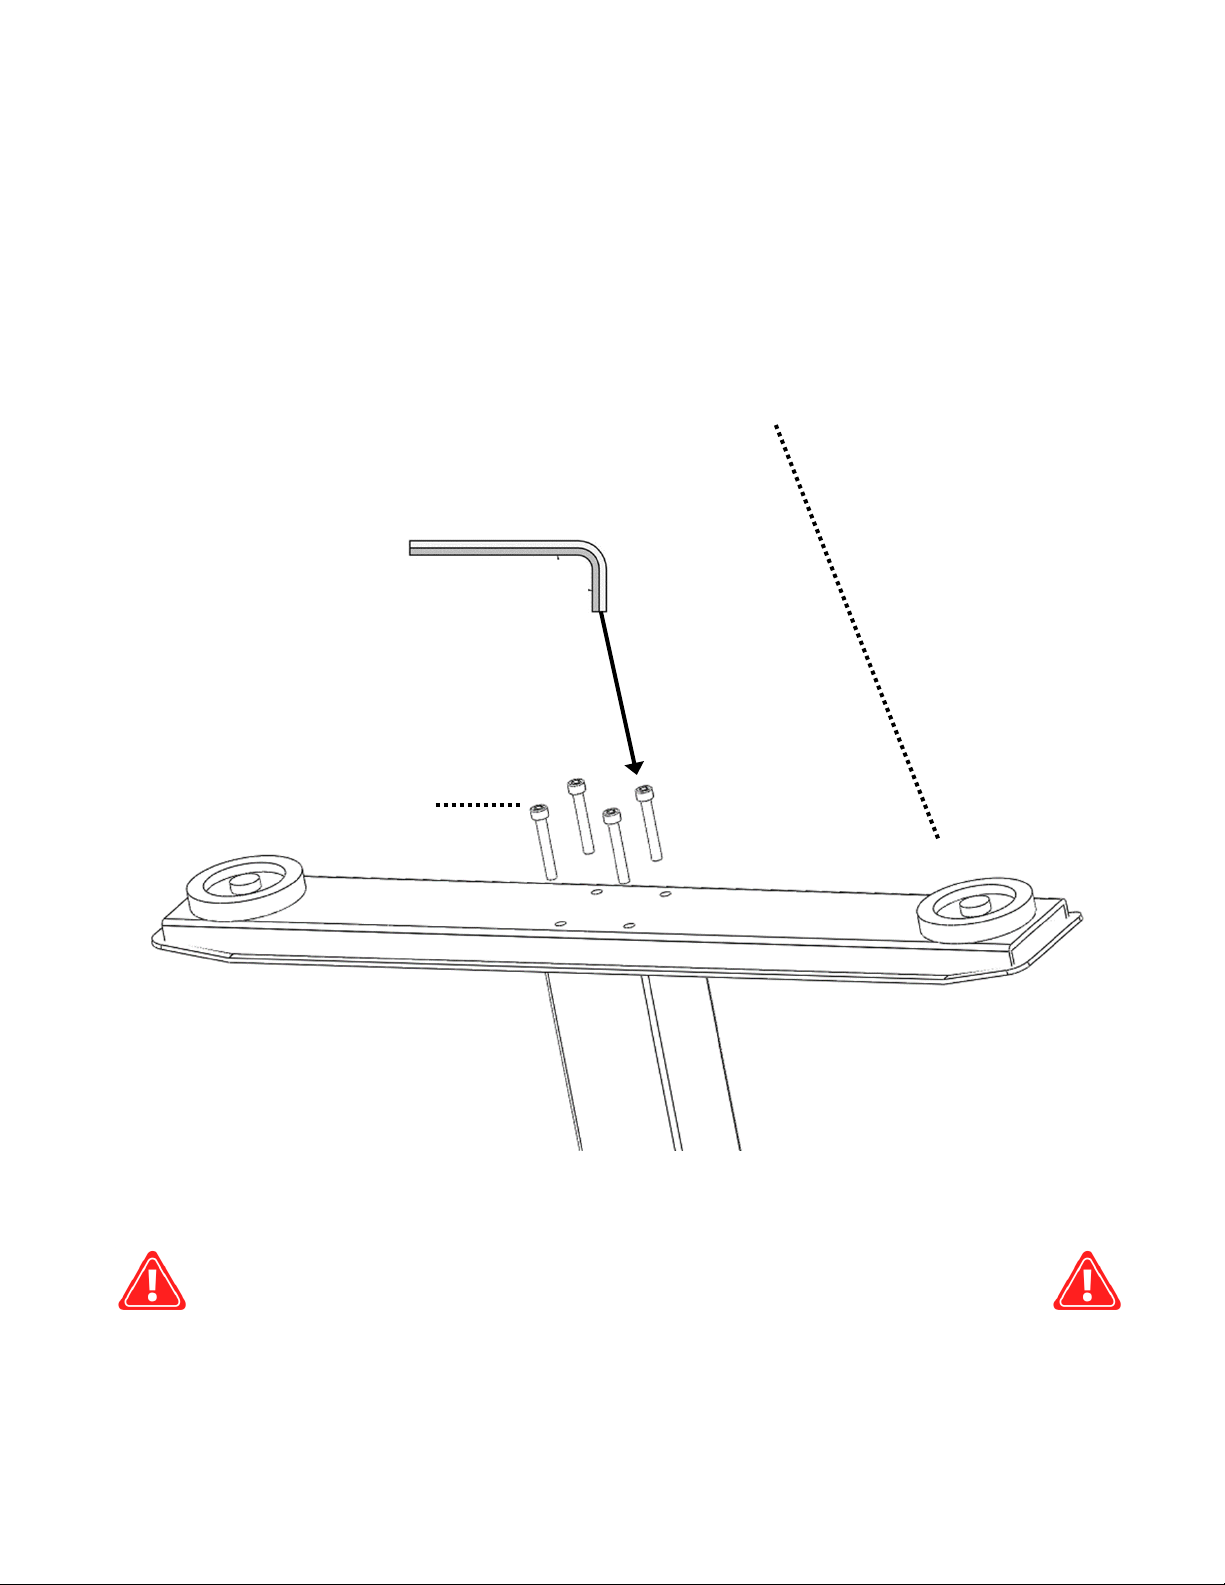
Assembly Instructions: Installing Feet
STEP 8. Attach FEET (E) to the bottom of table legs with four M6x40 BOLTS
(M) and 5mm ALLEN WRENCH (I).
Leveling Foot (pre-installed)
5 mm Allen Wrench
M6x40 Bolts
Take this time to make sure all screws and bolts have been
secured tightly.
15
Page 16
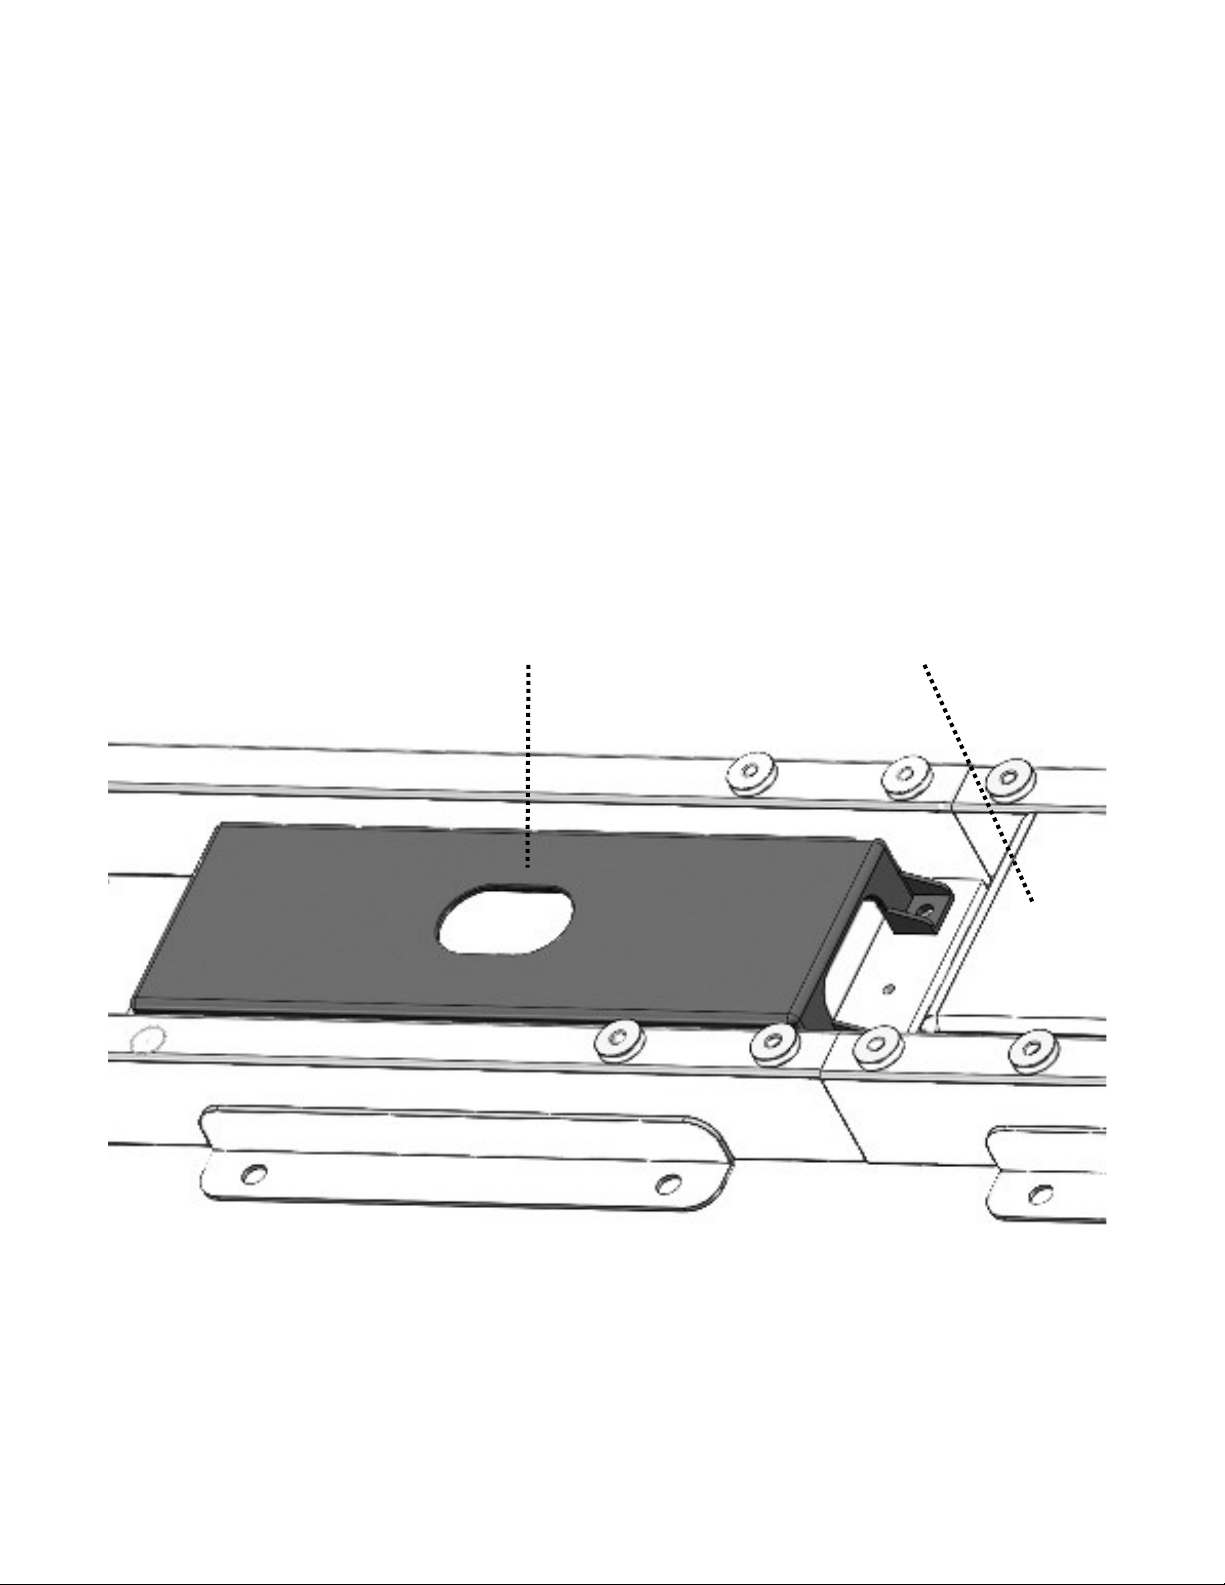
Assembly Instructions: Cable Management
STEP 9. Identify the MOTOR CABLES coming from the LEGS (C).
Identify the CONTROLLER CABLE coming from the CONTROLLER (G).
Guide them through the cable guard toward the CONTROL BOX (F).
Cable Guard Control Box
16
Page 17
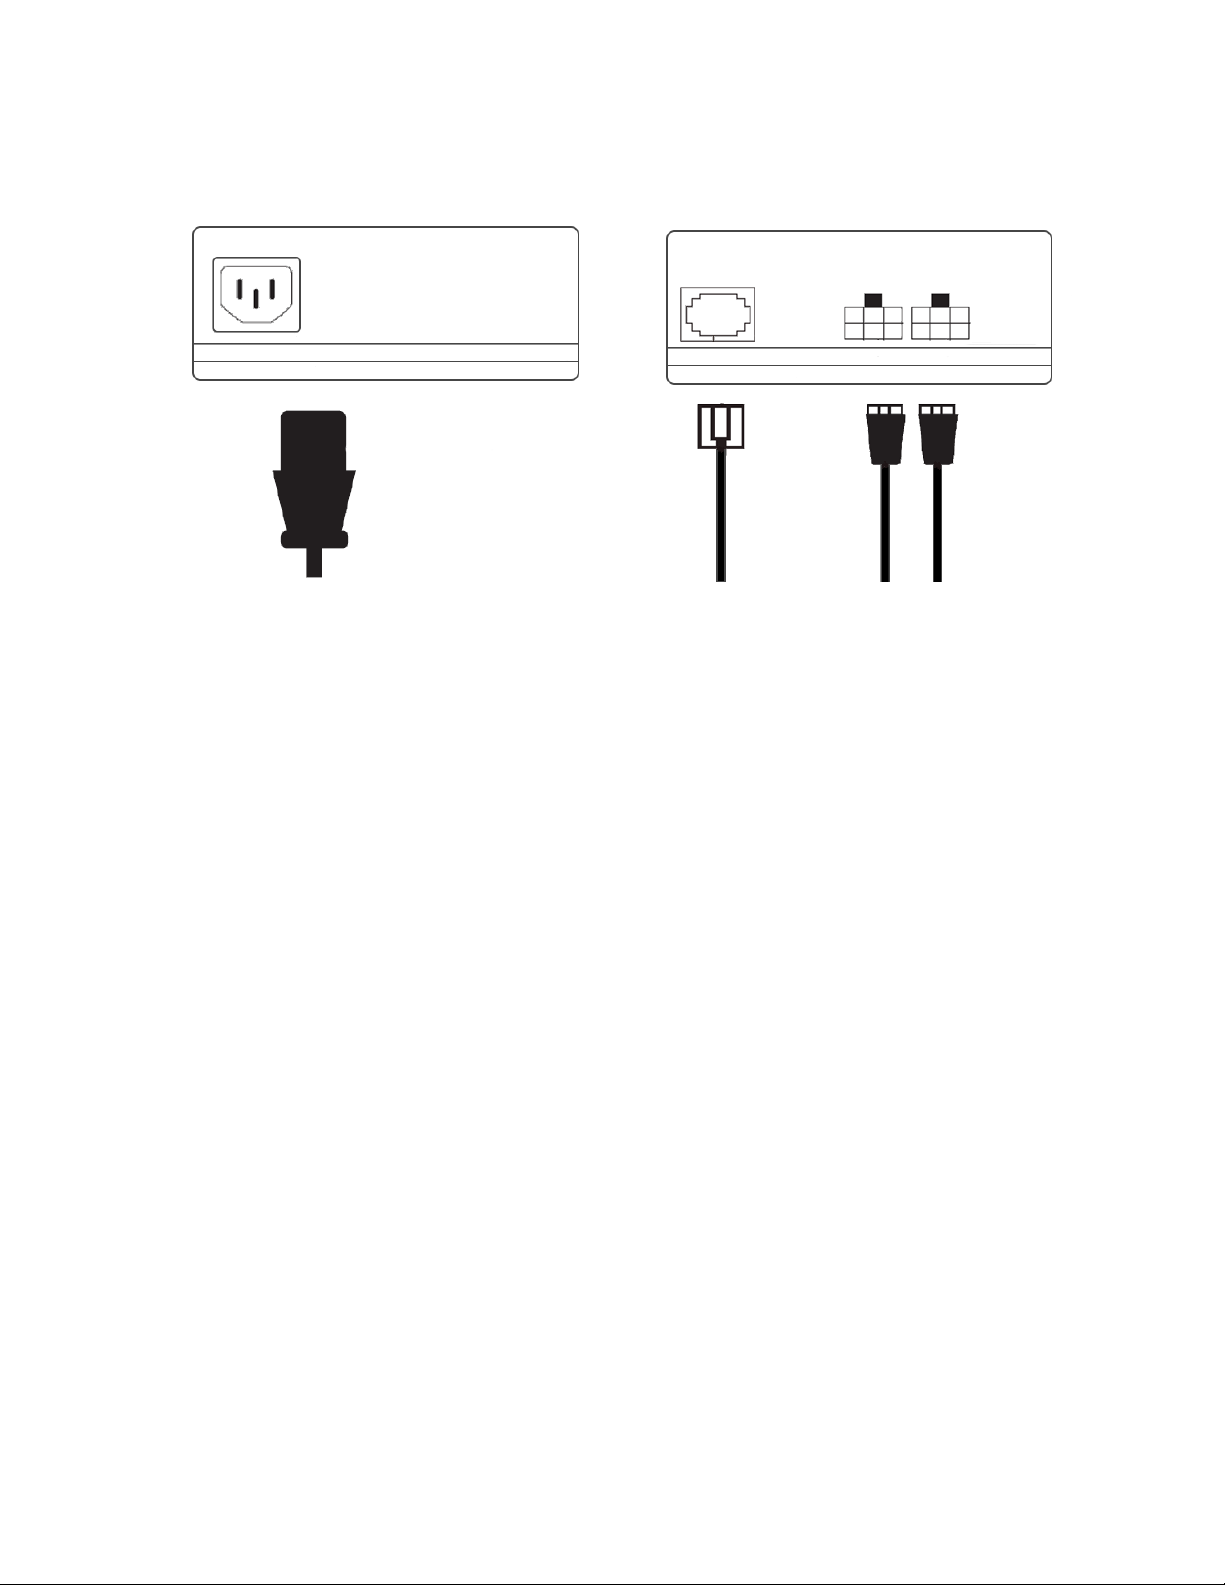
Assembly Instructions: Connect Cables
110-120V Socket
Power
Cable
STEP 10. Plug the cable from the CONTROLLER (G) to the left -side port
on the CONTROL BOX (F).
Then, plug the cables from the motors into the two right-side ports on the
CONTROL BOX (F).
NOTE: Motor cables can connect to either port interchangeably.
Plug Power Cable into the other side of the control box and into a 120V
power outlet.
Controller
Cable
Motor
Cables
DO NOT USE UNTIL INITIALIZATION IS
COMPLETED
17
Page 18
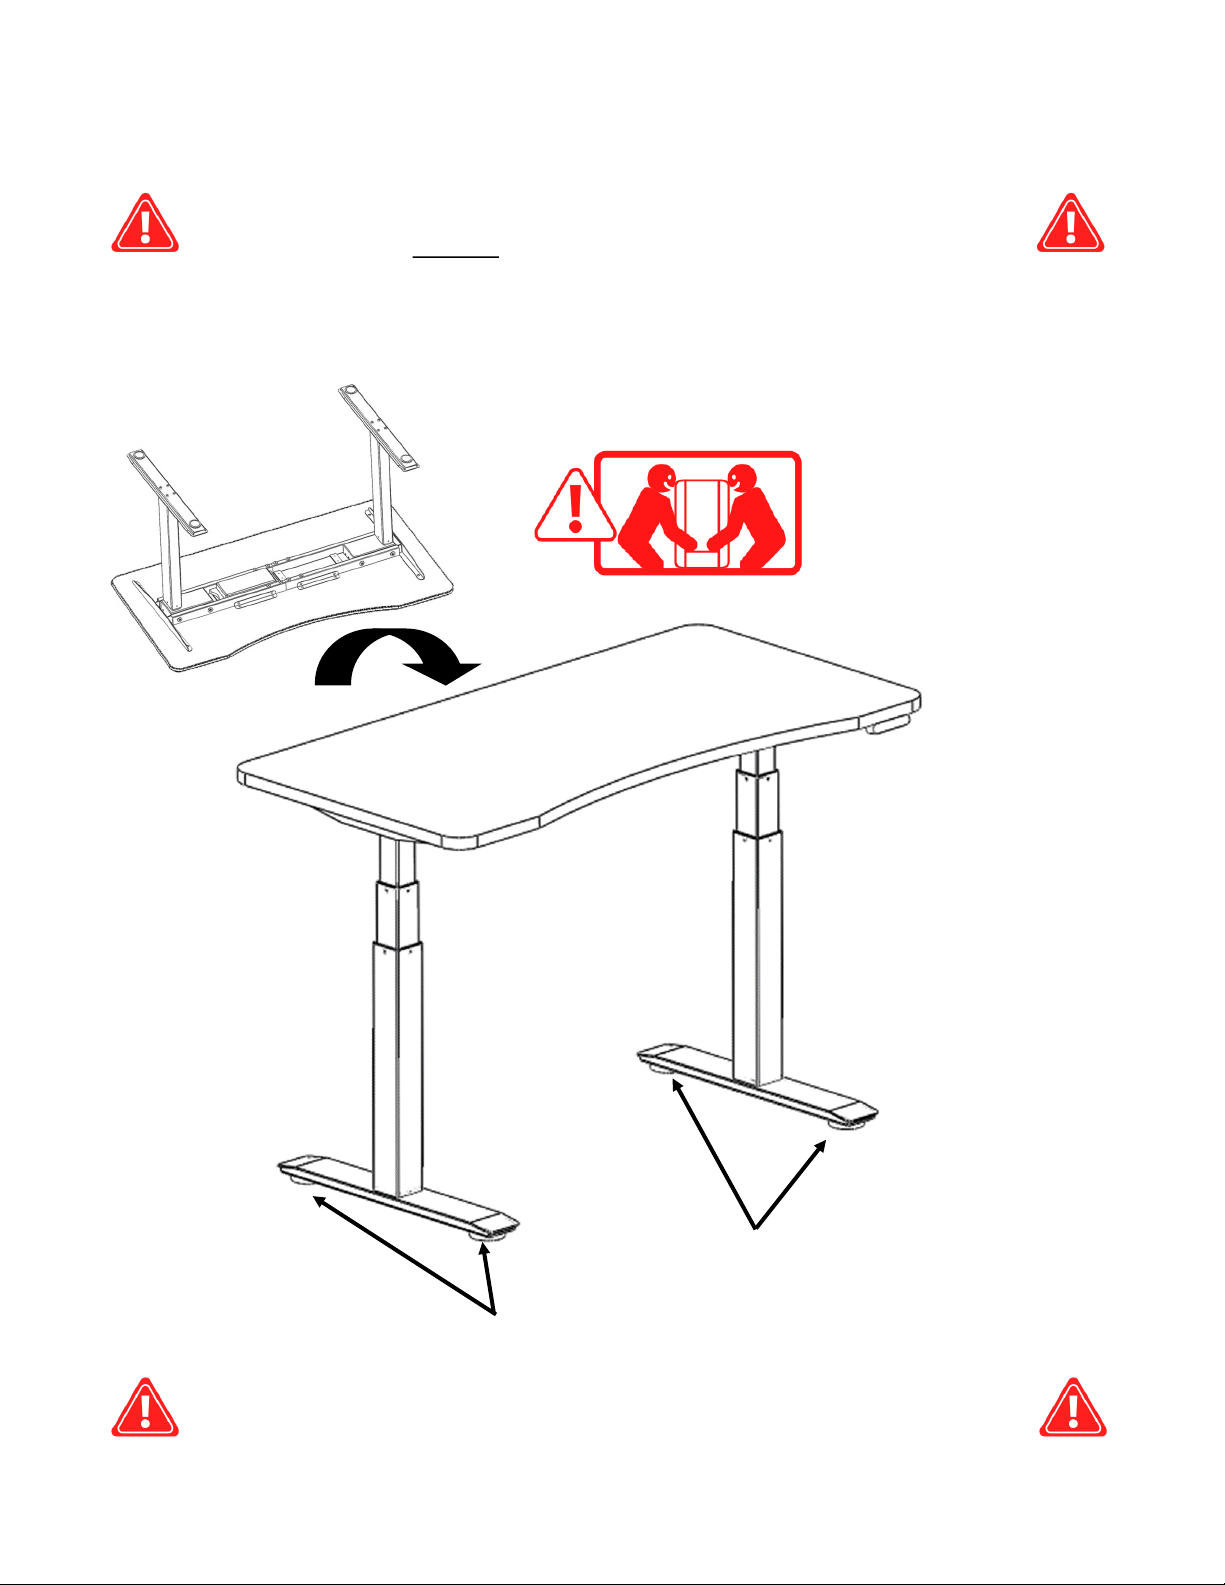
Assembly Instructions: Turn Desk Over
WARNING: TWO PEOPLE ARE NECESSARY TO TURN TABLE.
DESK IS HEAVY. LIFT WITH EXTREME CAUTION.
STEP 11. With the help of at least one other person, turn the desk onto
it's feet. Desk with top weighs approximately 120 lbs.
Lift with 2 people
TIP: Screw the leveling feet in and
out as necessary to ensure the desk
stands level.
DO NOT put weight on desk yet.
18
Page 19
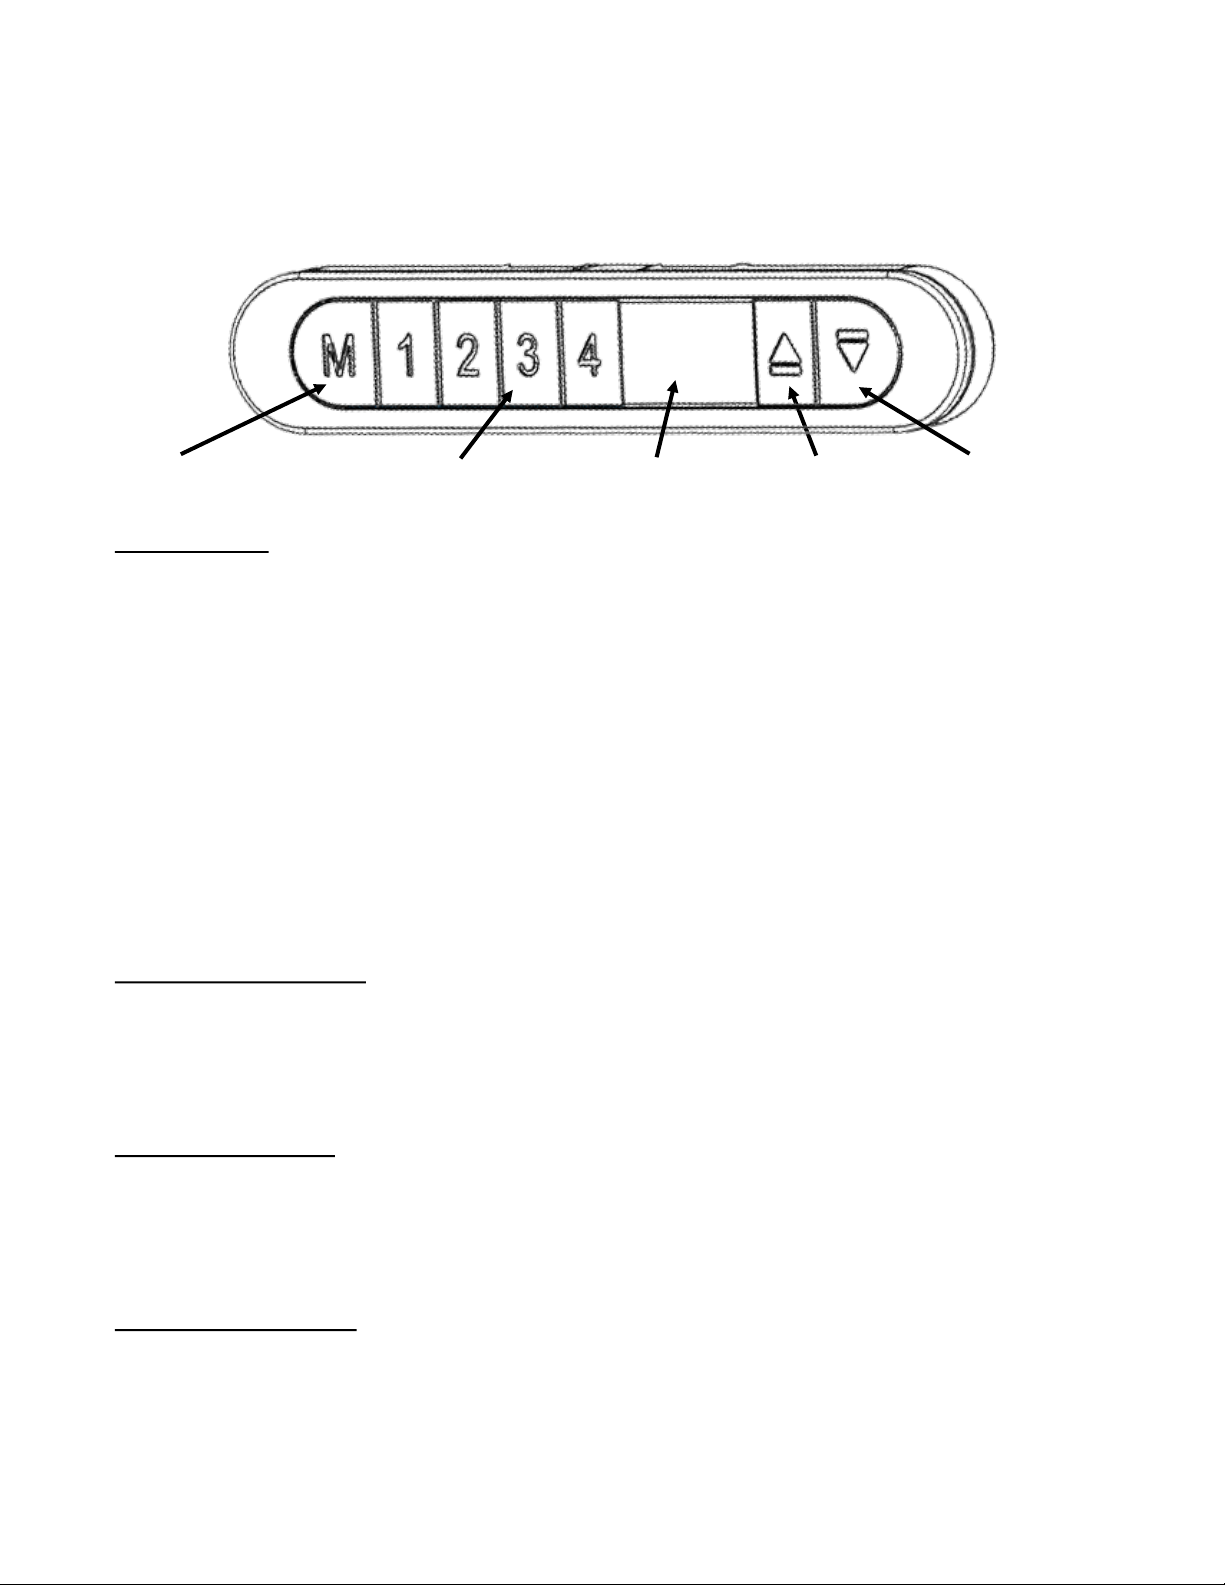
Initialization & Use Instructions
DESK MUST BE INITIALIZED BEFORE YOUR FIRST USE
UP ARROW DOWN ARROW MEMORY 1 / 2 / 3 / 4 SAVE MEMORY DISPLAY
Initialize
Press and hold the UP ARROW and DOWN ARROW simultaneously on the
controller until three blinking zeros appear on the display, then release.
The desk will descend to it's lowest height, then rise to it's highest height,
and then descend to middle-height.
When the number 38 (+/- 1) appears on the display, the desk is ready.
It may be necessary to reinitialize the desk from time-to-time due to power
outages or simply due to use over time.
If necessary, follow the above instructions to re-initialize.
Adjust Height
Press and hold the UP ARROW to lift.
Press and hold the DOWN ARROW button to lower.
Save Height
Press and hold the M button + Number button for 1 to 3 seconds until
the displayed number starts blinking.
Recall Height
Press the desired Number button twice, or press and hold to adjust to the
height stored at that number.
19
Page 20
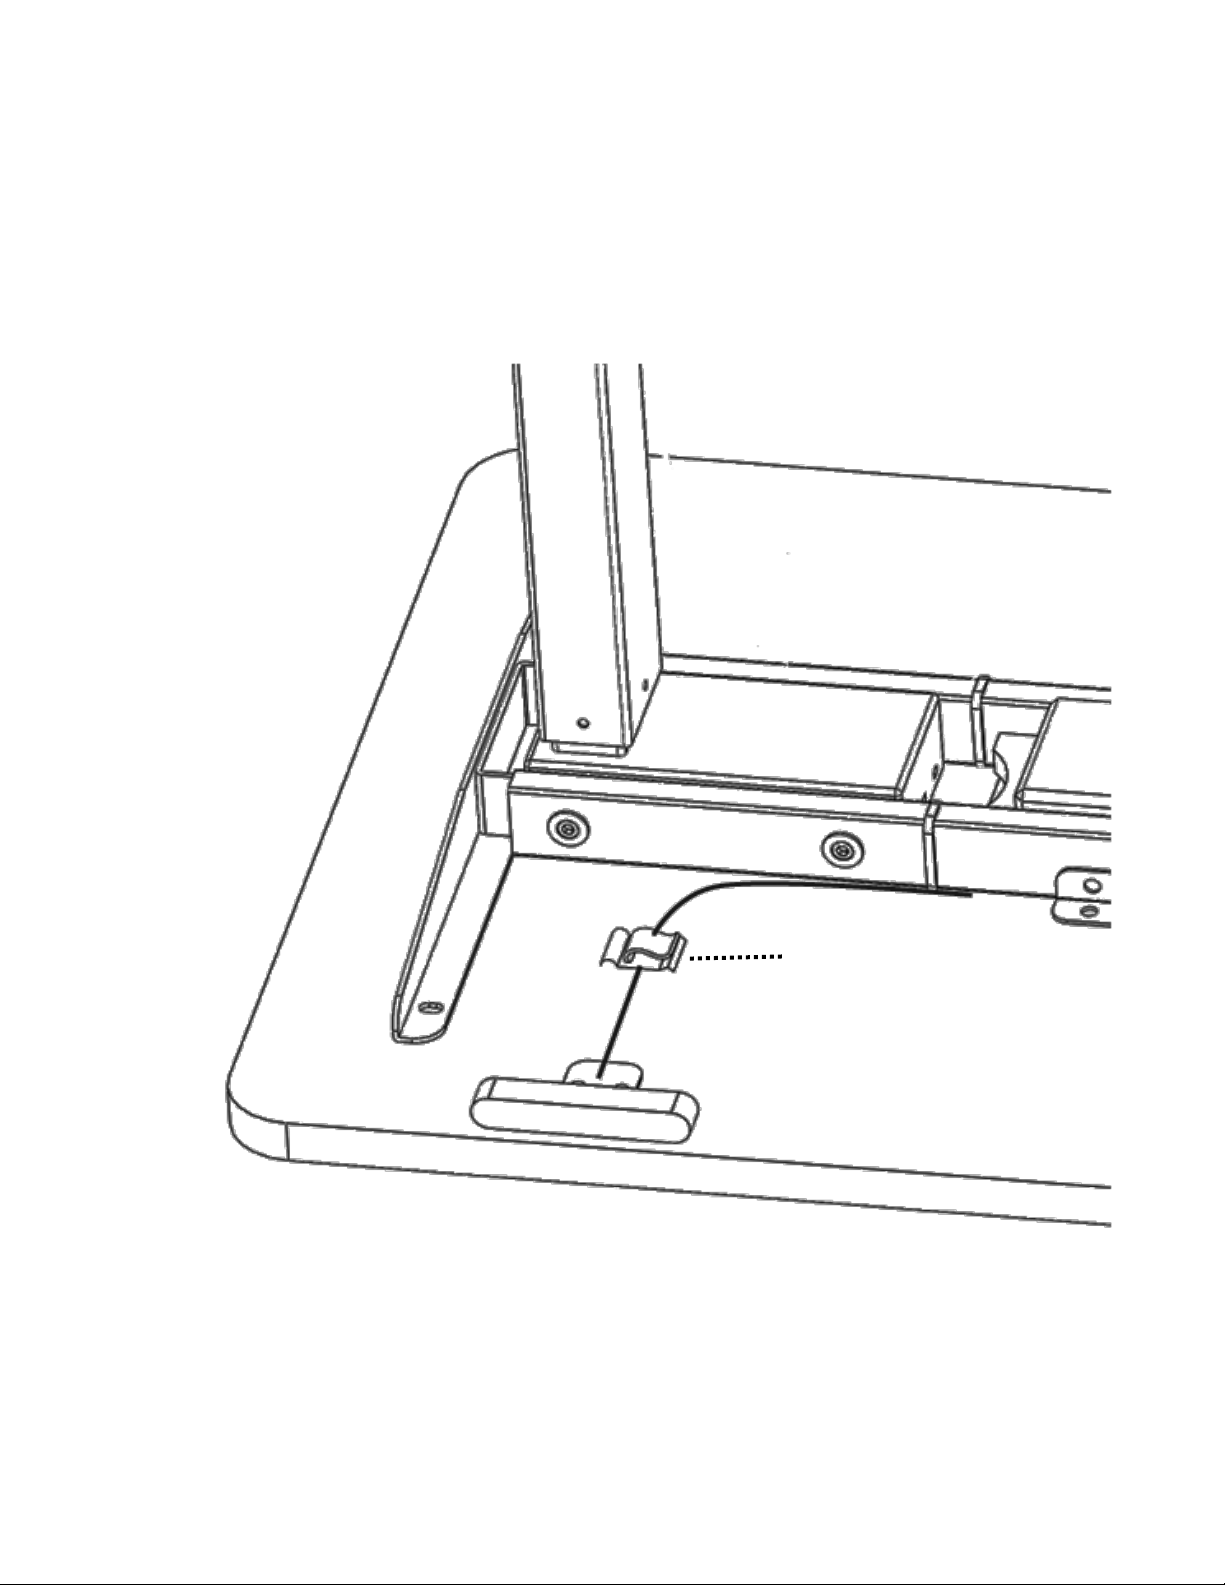
Cable Management
Use ZIP-TIES (S) to a x the cables from the CONTROLLER (G) and
CONTROL BOX (F) to the SUPPORT BEAM (B) so that the cables wont snag
or get in the way as the desk moves up and down.
Fastener
Stick FASTENERS (R) to the underside of the desk top near the
controller. Thread the cable through the clip on the FASTENER (R) to keep
the wires close to the table.
20
Page 21
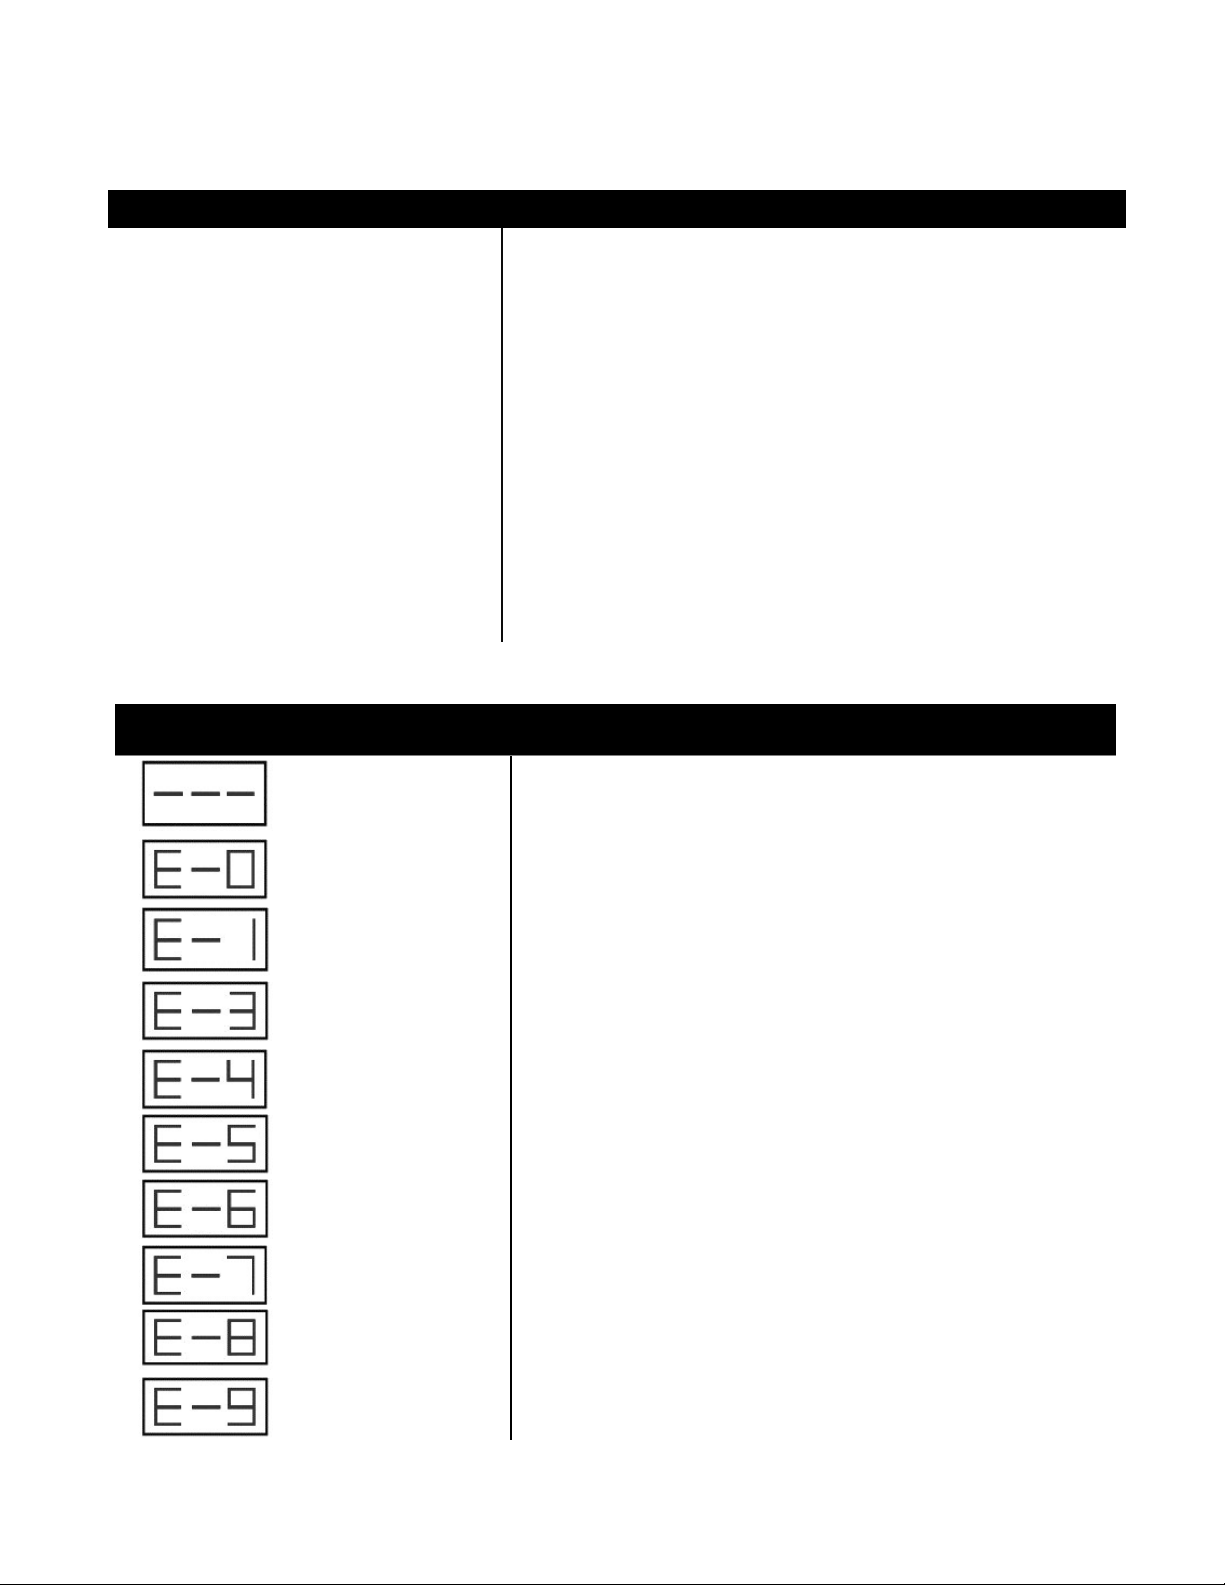
Troubleshooting
Problem Acon
Desk does not go up or down and the controller does not illuminate when any button
is pressed.
Desk does not go up or down and the controller illuminates when any button is
pressed.
Columns do not go up evenly. Unplug the power cord and re-plug after 10 seconds.
Desk wobbles excessively. It is normal that desk moves slightly at standing height when in use. Re-
HOT is displayed on the panel. The desk motors are overheated. Stop using the desk for 10 minutes and
Desk legs are noisy. It is normal that desk makes noise when the stages move past each oth-
Check all connections. Make sure power cord is plugged into the control
box and a power outlet. Press any button on the
controller and make sure it illuminates. Re-initialize the desk.
Unplug the power cord and re-plug after 10 seconds.
Re-initialize the desk. If the problem persists, switch motor cables from
one port to another at control box and re-initialize again.
Re-initialize the desk. If the problem persists, switch motor cables from
one port to another at control box and re-initialize again.
tighten all screws and bolts, and adjust leveling feet to make sure table
stands level.
let them cool down.
er. Apply silicon-based lubricant if it is unusually noisy.
Error Codes
Code Acon
- - - Re-initialize the system.
Control system
malfunction
Voltage irregularity Please contact customer service.
Over-load protection
activated
Overheat or power
supply failure
Irregular Hall signal from
Motor A
Motor A malfunction
Please contact customer service.
Remove weight (load) from desk top until error clears.
Let desk cool down for 10 minutes before using again.
Unplug and re-plug power cord, and reset the desk. If problem
persists, switch motor cables at the control box and re-initialize.
Unplug and re-plug power cord, and re-initialize. If problem persists,
switch motor cables at the control box and re-initialize.
Motor B malfunction
Lose connection or,
irregular Hall signal
Irregular Hall signal on
Motor B
Unplug and re-plug power cord, and re-initialize. If problem persists,
switch motor cables at the control box and re-initialize.
Check all cables and make sure they're connected.
Switch motor cables at the control box and re-initialize.
Unplug and re-plug power cord, and re-initialize. If problem persists,
switch motor cables at the control box and re-initialize.
21
Page 22

Warranty Information
7-Year Non-Electronic Component Warranty
Seville Classics, Inc. warrants to the original retail purchaser that if this product proves to be defective in
material or workmanship, we will replace the aected non-electronic part(s) for a period of seven
years on Seville Classics AIRLIFT® S3 Electric Height-Adjustable Standing Desks from the date of
original purchase.
2-Year Electronic Component Warranty
Seville Classics, Inc. warrants to the original retail purchaser that if this product proves to be defective in
material or workmanship we will replace the aected electronic part(s) for a period of two years on
Seville Classics AIRLIFT® S3 Electric Height-Adjustable Standing Desks from the date of original purchase.
Except for the express warranty set forth above and except to the extent prohibited by applicable law,
Seville Classics grants no other express or implied warranties with respect to the product, its tness for
any purpose, its quality, or its merchantability. The liability of Seville Classics under the warranty shall be
limited to the amount paid by the customer for the product. Seville Classics shall not be liable for any
loss of use of the product, or other incidental or consequential costs, expenses or damages incurred by
the customer or other user.
This warranty covers only the AIRLIFT® S3 Height-Adjustable Standing Desk sold in the United States of
America and Canada. Some states do not allow the exclusion or limitations of implied warranties or
consequential damages, so the above limitations or exclusions may not apply to you. This warranty gives
you specic legal rights, and you may also have other rights that vary from state to state.
During the applicable warranty period, Seville Classics, at its option, will either refund the original purchase price or replace the aected part(s) with comparable part(s) when the aected part(s) are
returned, postage prepaid, to the address below:
Seville Classics Inc.
19401 South Harborgate Way
Torrance, CA 90501 – 1322 U.S.A.
To obtain service under this warranty, you must:
1. Register your product at www.SevilleClassics.com/warranty
2. Contact our customer service at (800) 323-5565 or email [email protected];
3. Return the aected part(s) postage prepaid to Seville Classics pursuant to our customer service
representative; and
4. Include in the package:
A. A copy of the original bill of sale, your charge or credit receipt, or other satisfactory proof of
the date of the original purchase date of the product, and the price paid; and
B. A short detailed description of the problem, the name and phone number of the contact
person.
22
Page 23
More from Seville Classics®
Visit us at www.SevilleClassics.com for additional desk tops, bases, and other home goods.
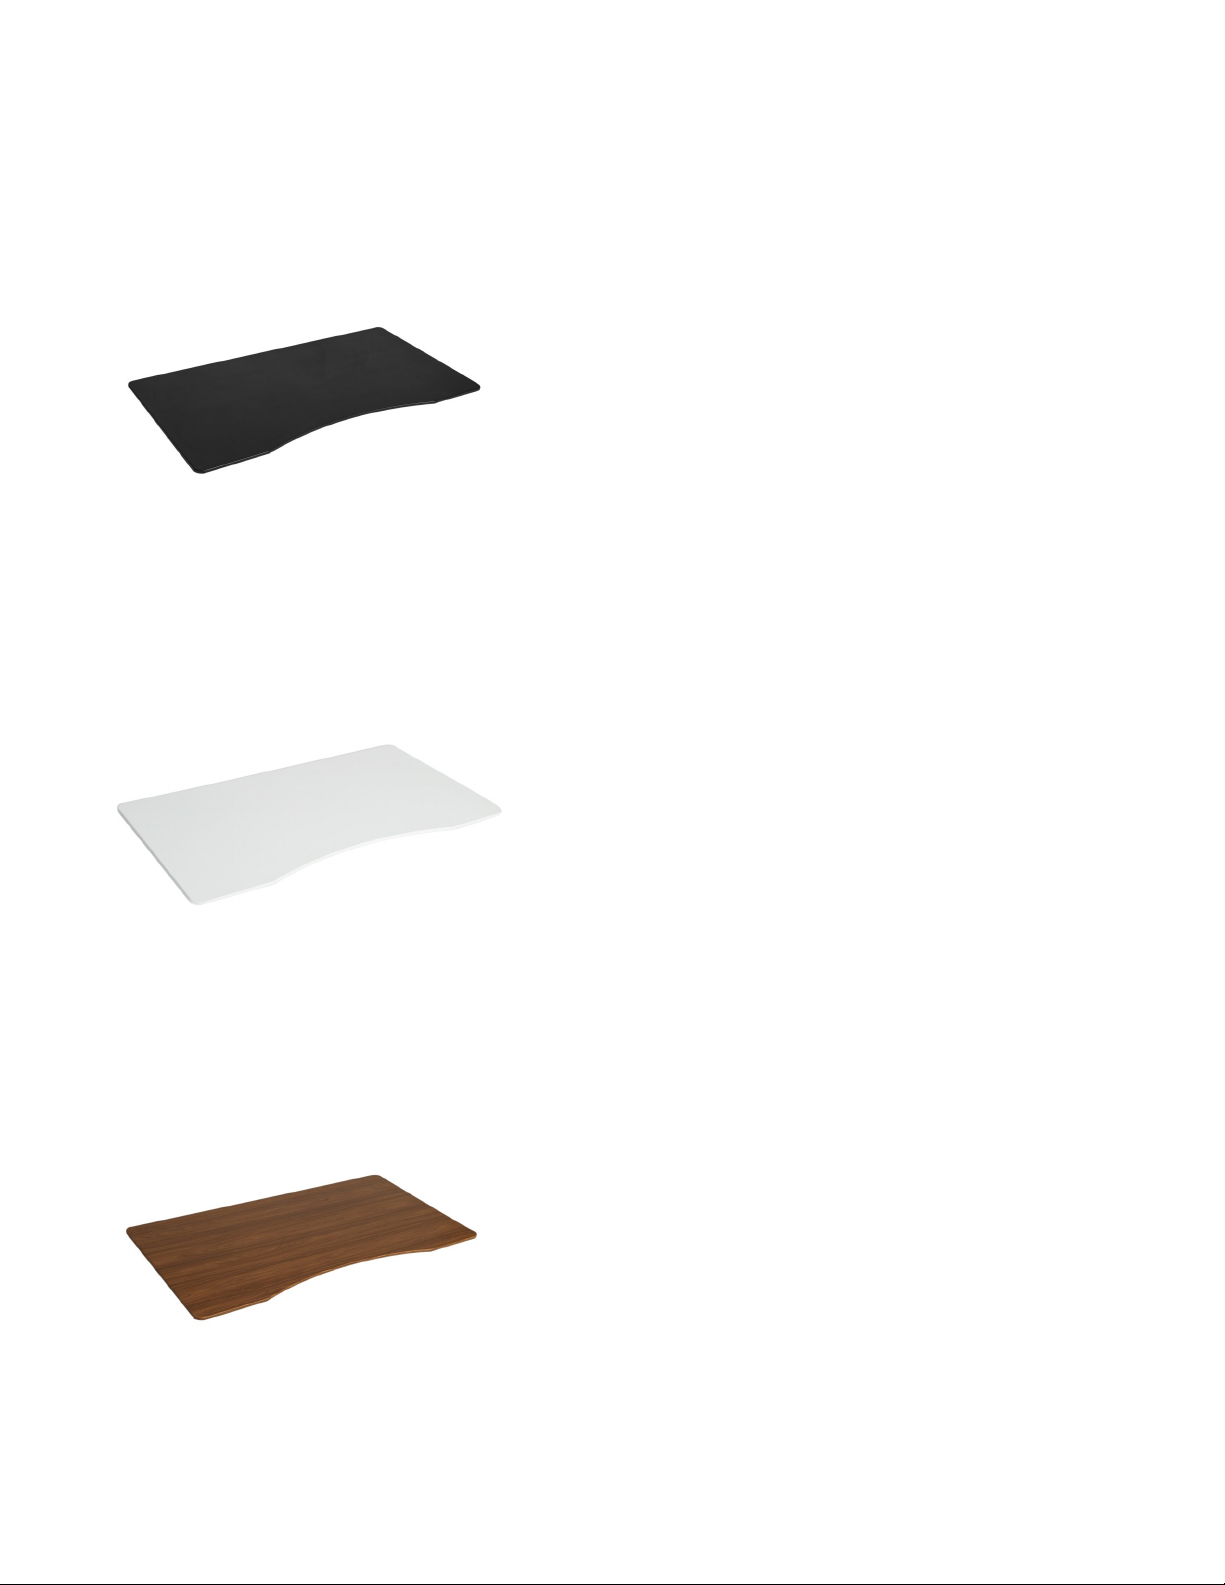
Seville Classics® Ergo Table Top
Choose the desk top that just plain works. Seville
Classics® Ergo Table Tops pair with our AIRLIFT®
Electric Height-Adjustable Standing desk frames
straight out of the box.
Visit us at www.SevilleClassics.com for desk
accessories, as well as home storage and
organization goods.
OFF65811
Black
Live well with features like:
OFF65812
White
Beveled Edges
Desk edges feature an inward bevel for user
comfort, allowing users to lower the desk further
and pull in closer, comfortably.
Durable Construction
Designed to be lightweight and tough, the top is
constructed from MDF and sealed in a 3-D laminate.
Ergonomic Curve
Curved desktop allows you to stand closer while
working for a more "you" focused workspace.
Color Options
Enjoy your desktop in a smooth black nish,
brilliant white, or an earthy walnut hue.
OFF65813
Walnut
23
Page 24

Specications
Maximum Height: 50.6"
Minimum Height: 24.6"
Minimum Width: 45"
Maximum Width: 62.9"
Footprint: 48" W x 23.75" D
Lifting Speed: 1.5" per second
Base Weight: 76 lbs.
Maximum Weight Capacity (with Seville Classics® Ergo Top): 264 lbs.
Customer Service Information
Telephone: (800) 323-5565
Fax: (310) 533-3899
Hours: 8:30 AM – 4:30 PM (PST)
Email: [email protected]
Homepage: www.SevilleClassics.com
24
3-2018
 Loading...