

Page 1
Typ RB7028
Chill.book Seite 1 Dienstag, 8. Dezember 2015 3:13 15
www.severin.com
DE Saugroboter • Gebrauchsanleitung........................................................ 3
GB Robotic vacuum • Instruction manual................................................... 43
FR Aspirateur robot • Mode d'emploi ......................................................... 83
NL Zuigrobot • Bedieningshandleiding..................................................... 123
ES Robot aspirador • Manual de instrucciones........................................ 163
IT Robot aspirapolvere • Istruzioni per l'uso........................................... 203
SE Robotdammsugare • Bruksanvisning ................................................. 243
PL Robot odkurzający • Instrukcja obsługi ............................................. 281
Page 2
Chill.book Seite 2 Dienstag, 8. Dezember 2015 3:13 15
2
Page 3

Chill.book Seite 3 Dienstag, 8. Dezember 2015 3:13 15
Vielen Dank
Liebe Kundin, lieber Kunde,
wir wünschen Ihnen mit dem Qualitätsprodukt aus dem Hause SEVERIN viel Freude und bedanken
uns für Ihr Vertrauen.
Die Marke SEVERIN steht seit über 120 Jahren für Beständigkeit, deutsche Qualität und Entwicklungskraft. Jedes Gerät wurde mit Sorgfalt hergestellt und geprüft.
Mit der sprichwörtlichen Sauerländer Gründlichkeit, Genauigkeit und Ehrlichkeit überzeugt das Familienunternehmen aus Sundern seit der Gründung 1892 mit innovativen Produkten Kunden in aller
Welt.
In den acht Produktgruppen Kaffee, Frühstück, Küche, Grillen, Haushalt, Floorcare, Personal Care
und Kühlen & Gefrieren bietet SEVERIN mit über 250 Produkten ein umfassendes Elektrokleingeräte-Sortiment. Für jeden Anlass das richtige Produkt!
Lernen Sie die SEVERIN-Produktvielfalt kennen und besuchen Sie uns unter
www.severin.com.
Ihre Geschäftsleitung und Mitarbeiter
der SEVERIN Floorcare GmbH
Zu dieser Gebrauchsanleitung
Vielen Dank
DE
Diese Gebrauchsanleitung enthält wichtige Tipps für Ihre Sicherheit sowie zum Gebrauch des Geräts. Bei Nichtbeachtung der Gebrauchsanleitung kann es zu Verletzungen von Personen oder
Schäden am Gerät kommen. Die Gebrauchsanleitung gut aufbewahren. Bei Weitergabe des Geräts
an Dritte die Gebrauchsanleitung mitgeben.
Gebrauchsanleitung vor dem ersten Gebrauch vollständig durchlesen.
Diese Gebrauchsanleitung kann unter www.severin-floorcare.de heruntergeladen werden.
3
Page 4

Chill.book Seite 4 Dienstag, 8. Dezember 2015 3:13 15
Inhaltsverzeichnis
Vielen Dank ................................................................................... 3
Inhaltsverzeichnis
Zu dieser Gebrauchsanleitung .................................................... 3
1 Sicherheitshinweise ..................................................................... 6
2 Technische Daten ....................................................................... 10
3 Gerät kennenlernen .................................................................... 10
Lieferumfang ........................................................................................... 11
Innenliegende Komponenten .................................................................. 12
Unterseite des Roboters ......................................................................... 13
Ladestation im Detail .............................................................................. 14
4 Roboter vorbereiten ................................................................... 15
Bürsten anbringen ................................................................................... 15
Fallsensoren einstellen ........................................................................... 15
Akkupack einsetzen ................................................................................ 16
Bürsten anbringen ................................................................................... 15
5 Fernbedienung laden ................................................................. 19
6 Ladestation aufstellen und anschließen .................................. 20
7 Room Containment aufstellen .................................................. 21
Batterien einsetzen ................................................................................. 21
Room Containment aufstellen ................................................................. 21
4
Page 5

Chill.book Seite 5 Dienstag, 8. Dezember 2015 3:13 15
8 Raum reinigen ............................................................................ 22
Raum vorbereiten .................................................................................. 22
Roboter einschalten ............................................................................... 22
Roboter starten ...................................................................................... 22
Roboter über Control-Panel steuern ...................................................... 24
Roboter über die Fernbedienung steuern .............................................. 27
Rückkehr zur Ladestation ...................................................................... 28
Roboter stoppen .................................................................................... 28
Roboter finden ....................................................................................... 28
9 Uhrzeit und Wochenplan einstellen ......................................... 29
Uhrzeit einstellen ................................................................................... 29
Wochenplan einstellen ........................................................................... 30
Reinigungsmodus für Wochenplan konfigurieren .................................. 30
10 Reinigung und Pflege ................................................................ 31
Staubbehälter entleeren ......................................................................... 31
Bürsten entfernen und reinigen .............................................................. 35
11 Probleme beheben ..................................................................... 36
Ersatz- und Zubehörteile nachbestellen ................................................ 39
Garantie ................................................................................................. 39
12 Entsorgung ................................................................................. 40
Akku ausbauen ...................................................................................... 40
Gerät und Akku separat entsorgen ........................................................ 41
5
Page 6
Chill.book Seite 6 Dienstag, 8. Dezember 2015 3:13 15
1 Sicherheitshinweise
1.1 Sicherheit bestimmter Personengruppen
1 Sicherheitshinweise
– Das Gerät kann von Kindern ab 8 Jahren und älter sowie von Perso-
nen mit reduzierten physischen, sensorischen oder mentalen Fähigkeiten oder Mangel an Erfahrung und/oder Wissen benutzt werden,
wenn sie beaufsichtigt werden oder bezüglich des sicheren Gebrauchs des Gerätes unterwiesen wurden und die daraus resultierenden Gefahren verstanden haben.
– Kinder dürfen nicht mit dem Gerät spielen oder sich auf das Gerät
stellen oder setzen. Reinigung und Benutzer-Wartung dürfen nicht
durch Kinder ohne Beaufsichtigung durchgeführt werden.
– Kinder jünger als 8 Jahre von Gerät und Netzteilkabel fernhalten.
– Verpackungsmaterialien außerhalb der Reichweite von Kindern auf-
bewahren und entsorgen. Anderenfalls besteht Erstickungsgefahr.
1.2 Gerät sicher anschließen
Das Gerät wird mit elektrischem Strom aufgeladen, dabei besteht
grundsätzlich die Gefahr eines elektrischen Schlags. Achten Sie daher
besonders auf Folgendes:
– Netzteil nur an Steckdosen anschließen, die den Angaben auf dem
Typenschild des Netzteils entsprechen.
– Gerät und Netzteil vor dem Benutzen auf eventuelle Beschädigun-
gen kontrollieren. Niemals ein defektes Gerät oder ein Gerät mit de-
fektem Netzteil betreiben.
– Niemals versuchen, das Gerät oder sein Netzteil eigenständig zu re-
parieren. Um Gefährdungen zu vermeiden, dürfen Reparaturen an
Gerät und Netzteil nur durch unseren Kundendienst durchgeführt
werden. Ein defektes Gerät oder Netzteil zur Reparatur an einen
Fachhändler oder den SEVERIN-Kundendienst geben.
6
Page 7

Chill.book Seite 7 Dienstag, 8. Dezember 2015 3:13 15
1 Sicherheitshinweise
– Gerät oder Netzteil nicht in Wasser oder andere Flüssigkeiten tau-
chen. Gerät und Netzteil von Regen und Nässe fernhalten. Gerät
nicht im Freien oder in Räumen mit hoher Luftfeuchtigkeit betreiben.
– Netzteil nicht mit nassen Händen anfassen. Beim Herausziehen des
Netzteils aus der Steckdose immer direkt am Netzteil ziehen.
– Darauf achten, dass das Netzteilkabel nicht geknickt, eingeklemmt
oder überfahren wird oder mit Hitzequellen, Feuchtigkeit oder scharfen Kanten in Berührung kommt. Darauf achten, dass das Netzteilkabel nicht zur Stolperfalle wird.
– Vor dem Reinigen oder Warten des Geräts sowie vor dem Zubehör-
wechsel Gerät ausschalten und sicherstellen, dass das Netzteil nicht
angeschlossen ist.
1.3 Sicherheit beim Umgang mit Akkus
Bei falschem Umgang mit Akkus besteht Verletzungs- und Explosions-
gefahr.
– Sollte es erforderlich sein, den Akku auszutauschen, einen Fach-
händler oder den SEVERIN Kundendienst kontaktieren. Akku niemals selbst ersetzen. Akku niemals durch andere Akkus oder Batterien ersetzen.
– Vor dem Aktivieren, Einsetzen oder Ausbauen des Akkus sicherstel-
len, dass das Netzteil aus der Steckdose gezogen ist.
– Akkus niemals auseinandernehmen, hohen Temperaturen ausset-
zen oder ins Feuer werfen.
– Akkus nicht direktem Sonnenlicht aussetzen.
- Bei einer Lagerdauer von bis zu 3 Monate folgende Temperaturen einhalten: -20 ― +45 °C
- Bei einer Lagerdauer von über 1 Jahr folgende Temperaturen
einhalten: -20 ― +20 °C
7
Page 8

Chill.book Seite 8 Dienstag, 8. Dezember 2015 3:13 15
1 Sicherheitshinweise
– Akkus niemals kurzschließen, d. h. nicht beide Pole zur gleichen Zeit
berühren, insbesondere nicht mit elektrisch leitenden Gegenständen. Akkus so lagern, dass sie auch bei der Lagerung nicht durch
andere Akkus oder Metallgegenstände kurzgeschlossen werden.
– Zum Aufladen des Akkus ausschließlich das mitgelieferte Netzteil
verwenden. Den Akku keinesfalls mit einem anderen Netzteil laden.
Das mitgelieferte Netzteil wiederum ausschließlich zum Aufladen
des Akkus dieses Geräts verwenden.
– Akku nach Gebrauchsende wie beschrieben ausbauen. Akku da-
nach umgehend an eine entsprechende Sammelstelle in Ihrer Nähe
übergeben und so einer sicheren und umweltgerechten Entsorgung
zuführen. Akkus niemals über den Hausmüll entsorgen!
– Bei unsachgemäßem Umgang kann Flüssigkeit aus dem Akku aus-
treten. Akku nicht länger verwenden, wenn er beschädigt ist oder gar
Flüssigkeit austritt.
- Falls Flüssigkeit ausgetreten ist, Kontakt mit der Flüssigkeit vermeiden.
- Falls es zu Kontakt mit der Flüssigkeit gekommen ist, diese umgehend mit reichlich Wasser abspülen. Bei Folgeerscheinungen
(egal welcher Art) einen Arzt aufsuchen.
1.4 Bestimmungsgemäße Verwendung
Das Gerät darf nur im Haushalt eingesetzt werden. Das Gerät darf ausschließlich für das Reinigen auf ebenen, normal verschmutzten Hartböden und kurzflorigen Teppichen eingesetzt werden.
Jede weitere Verwendung gilt als nicht bestimmungsgemäß und ist untersagt.
8
Page 9

Chill.book Seite 9 Dienstag, 8. Dezember 2015 3:13 15
1 Sicherheitshinweise
Um Verletzungen, Bränden und Schäden vorzubeugen, darf das
Gerät nicht eingesetzt werden für das Saugen von:
– Menschen, Tieren oder Pflanzen. Saugöffnung stets von Körpertei-
len, Haaren und Kleidungsstücken fernhalten.
– glühenden, brennenden oder glimmenden Partikeln (wie z. B.
Asche, Kohle, Holzkohle, Zigaretten, Streichhölzer).
– explosiven oder leicht entzündlichen Stoffen oder Toner.
– Wasser und anderen Flüssigkeiten, z. B. feuchten Teppichreinigern.
– spitzen Gegenständen wie Glassplittern, Nägeln oder Bauschutt.
Verboten ist außerdem:
– Selbstständiges Umbauen oder Reparieren des Geräts oder seines
Netzteils.
– Gebrauch, ohne dass Staubbehälter, Filter und Deckel korrekt ein-
gesetzt sind.
– Einsatz in Räumen, in denen zerbrechliche Gegenstände oder sol-
che, die leicht umkippen können, stehen. Räume so vorbereiten,
dass der Einsatz des Geräts keine Schäden hervorrufen kann.
– Gebrauch, Aufbewahrung oder Aufladen im Freien.
– Das Abstellen von Gegenständen auf dem Gerät.
9
Page 10

Chill.book Seite 10 Dienstag, 8. Dezember 2015 3:13 15
2 Technische Daten
2 Technische Daten
Saugroboter Modell RB7028
Akkutyp Lithium-Ionen
Akkukapazität 14,8 V; 2.800 mAh
Akkulaufzeit ca. 90 min
Timerfunktion 30 min ►45 min ►60 min ►max.
Akkuladezeit max. 4 Stunden
Saugleistung 180 mmAq
Reichweite ca. 100 m²
Netzteil Typ GQ30300100AG
Eingang 100–240 V~; 50/60 Hz 1.0 A max.
Ausgang 30 V DC 1A
3 Gerät kennenlernen
10
Page 11
1
2
3
4
5
6
7
8
9
10
11
1
Chill.book Seite 11 Dienstag, 8. Dezember 2015 3:13 15
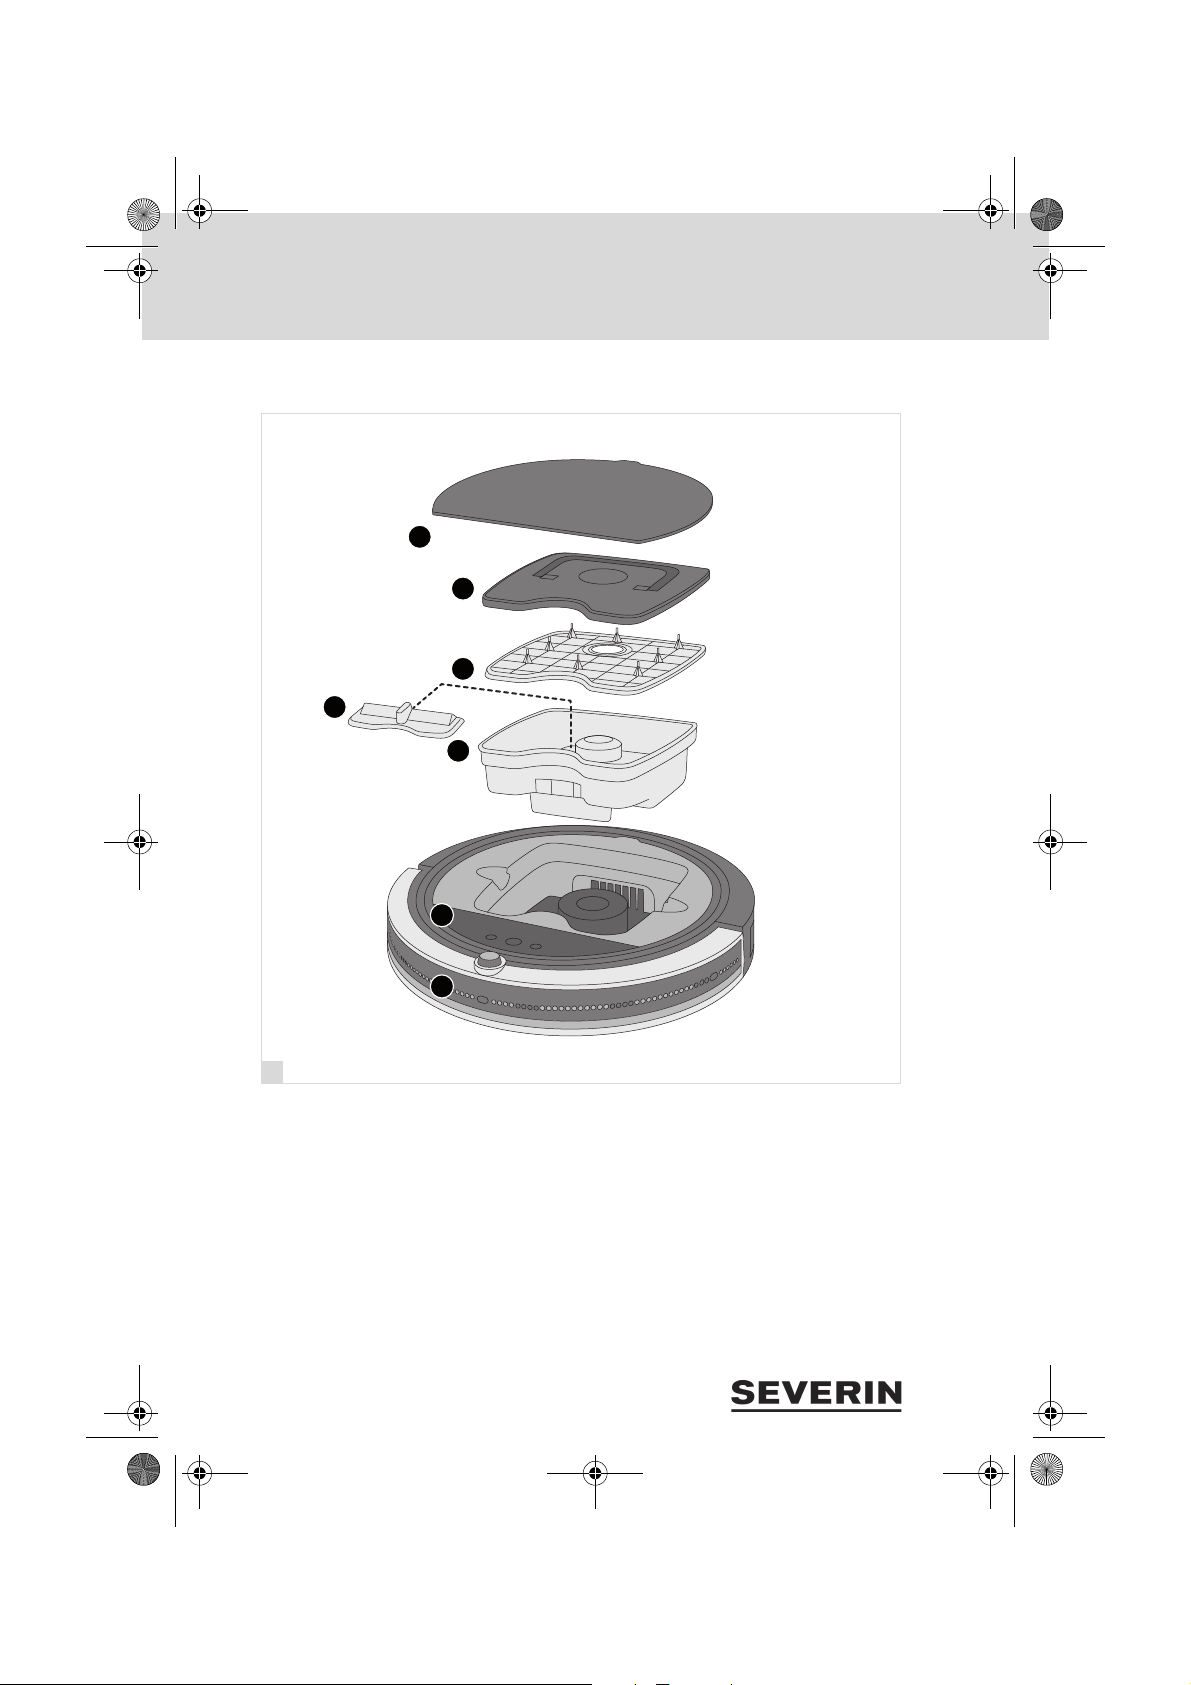
3 Gerät kennenlernen
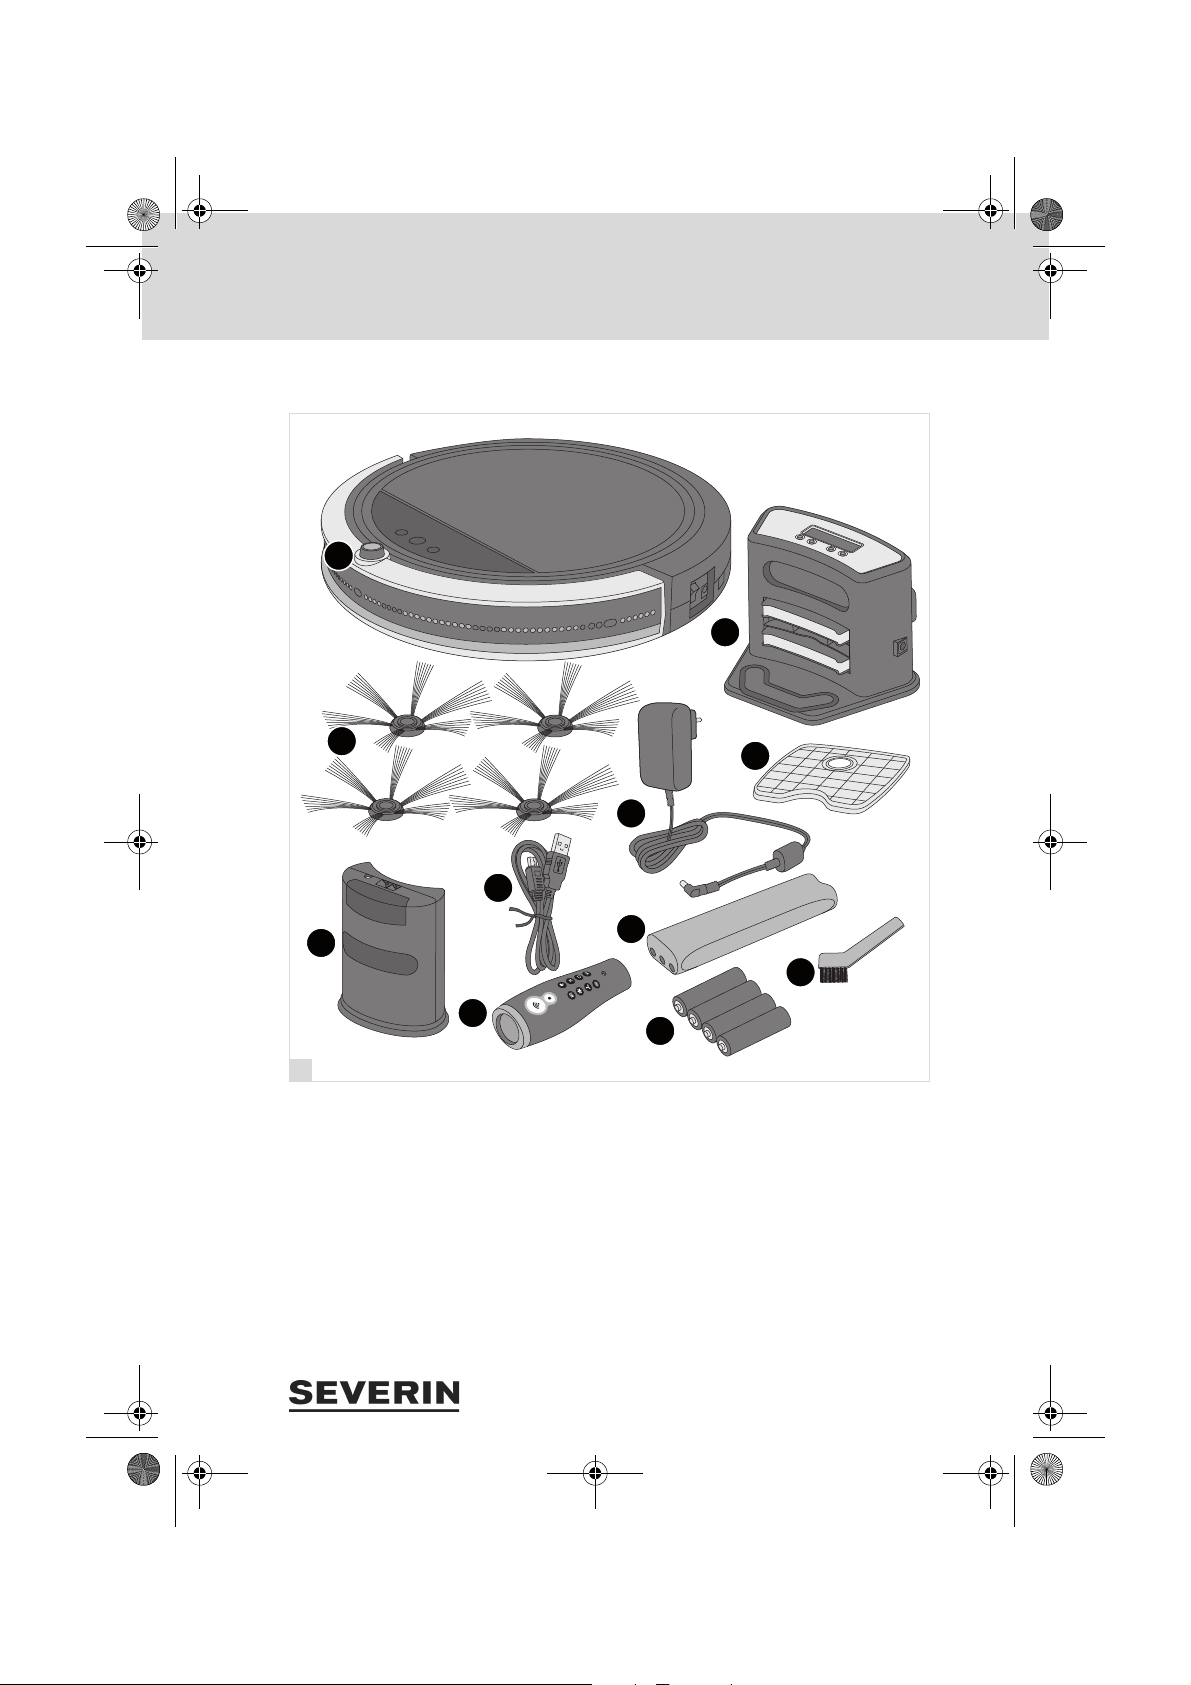
3.1 Lieferumfang
1 Roboter
2 Rundbürsten (4 Stück)
3 Ladestation
4 Ersatzfilter
5 Netzteil
6 USB-Kabel (zum Laden der Fernbedienung)
7 Room Containment
8 Fernbedienung
9 Akkupack
10 Batterien (für Room Containment)
11 Reinigungsbürste
11
Page 12
1
2
3
4
5
6
7
2
Chill.book Seite 12 Dienstag, 8. Dezember 2015 3:13 15
3 Gerät kennenlernen
3.2 Innenliegende Komponenten
1 Abdeckung
2 Staubbehälterdeckel
3 Staubfilter
4 Saugeinlassabdeckung
12
5 Staubbehälter
6 Control-Panel
7 Stoßfänger
Page 13
4
4
5
6
7
3
4
2
1
8
3
Chill.book Seite 13 Dienstag, 8. Dezember 2015 3:13 15
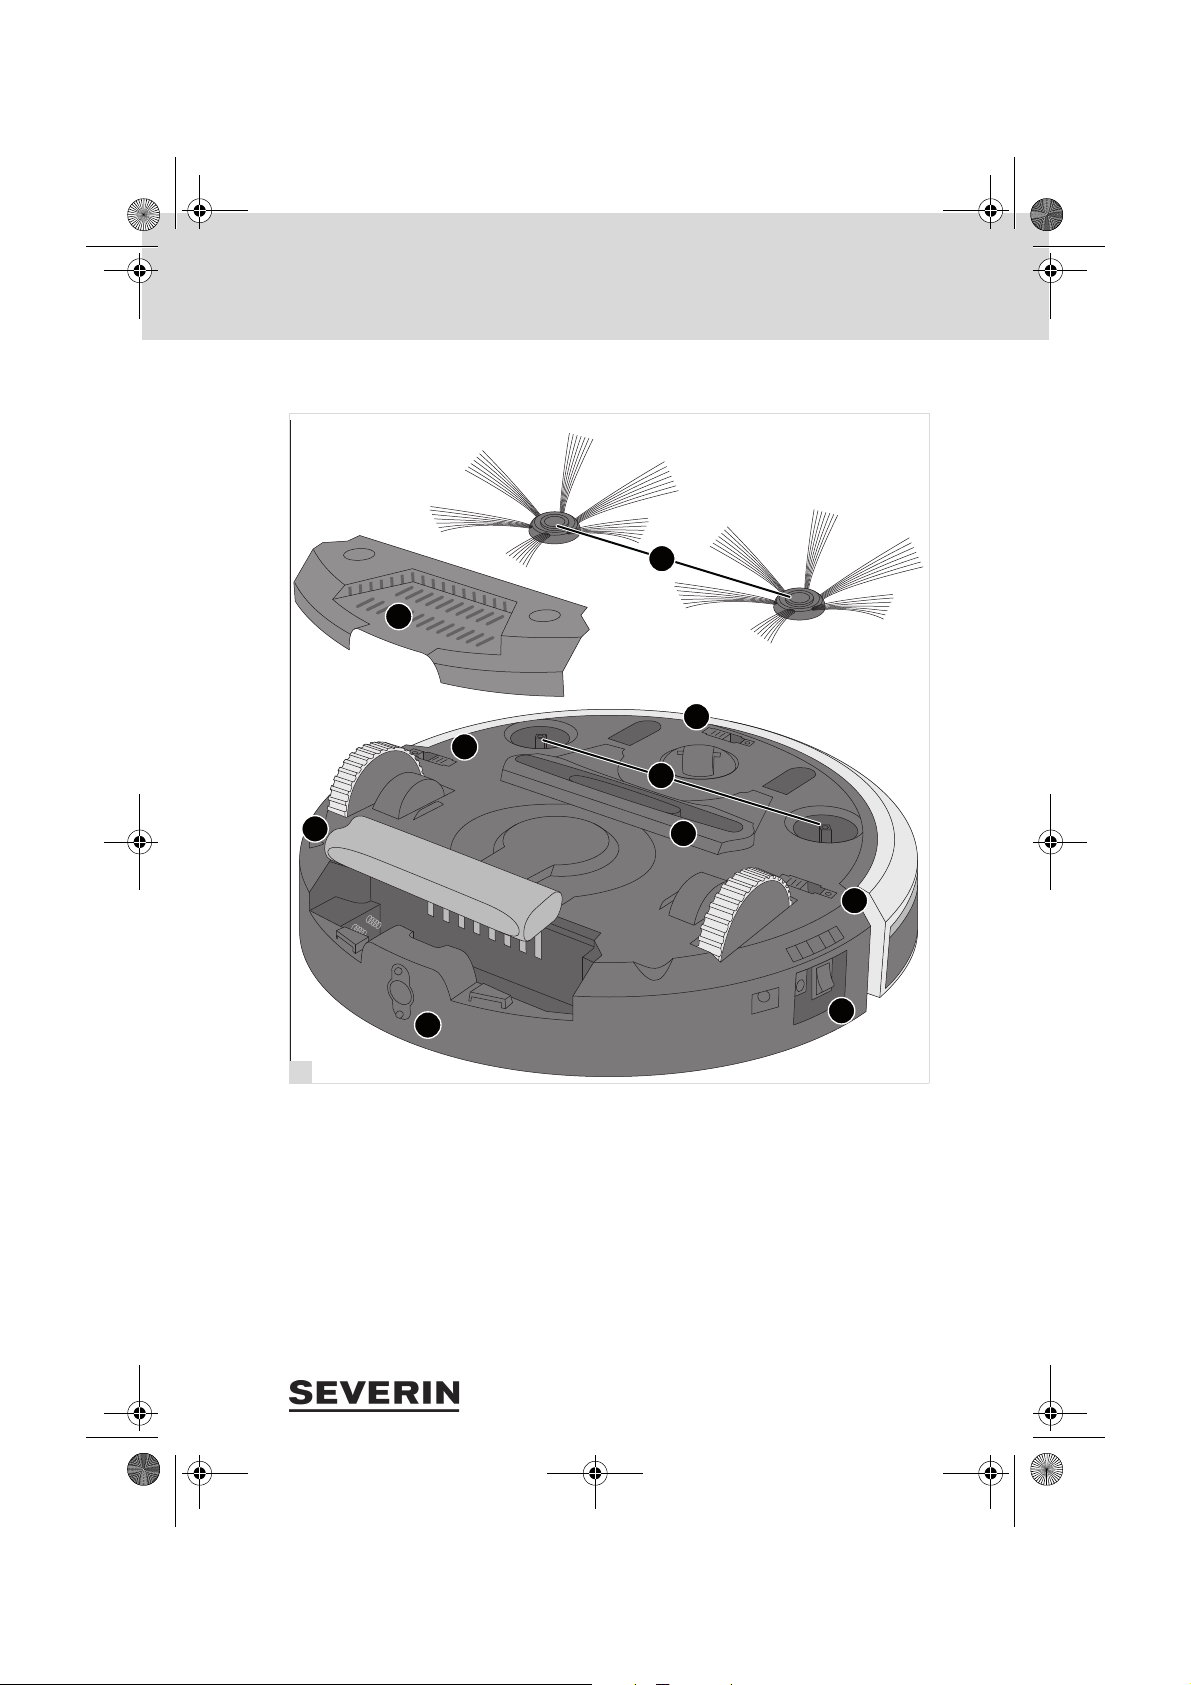
3 Gerät kennenlernen
3.3 Unterseite des Roboters
1 Rundbürsten
2 Bürstenaufnahme
3 Saugeinlass
4 Fallsensoren
5 Ein-/Aus-Schalter/Ladebuchse
6 Ladekontakte
7 Akkupack
8 Akkufachabdeckung
13
Page 14
4
1
2
3
4
5
Chill.book Seite 14 Dienstag, 8. Dezember 2015 3:13 15
3 Gerät kennenlernen
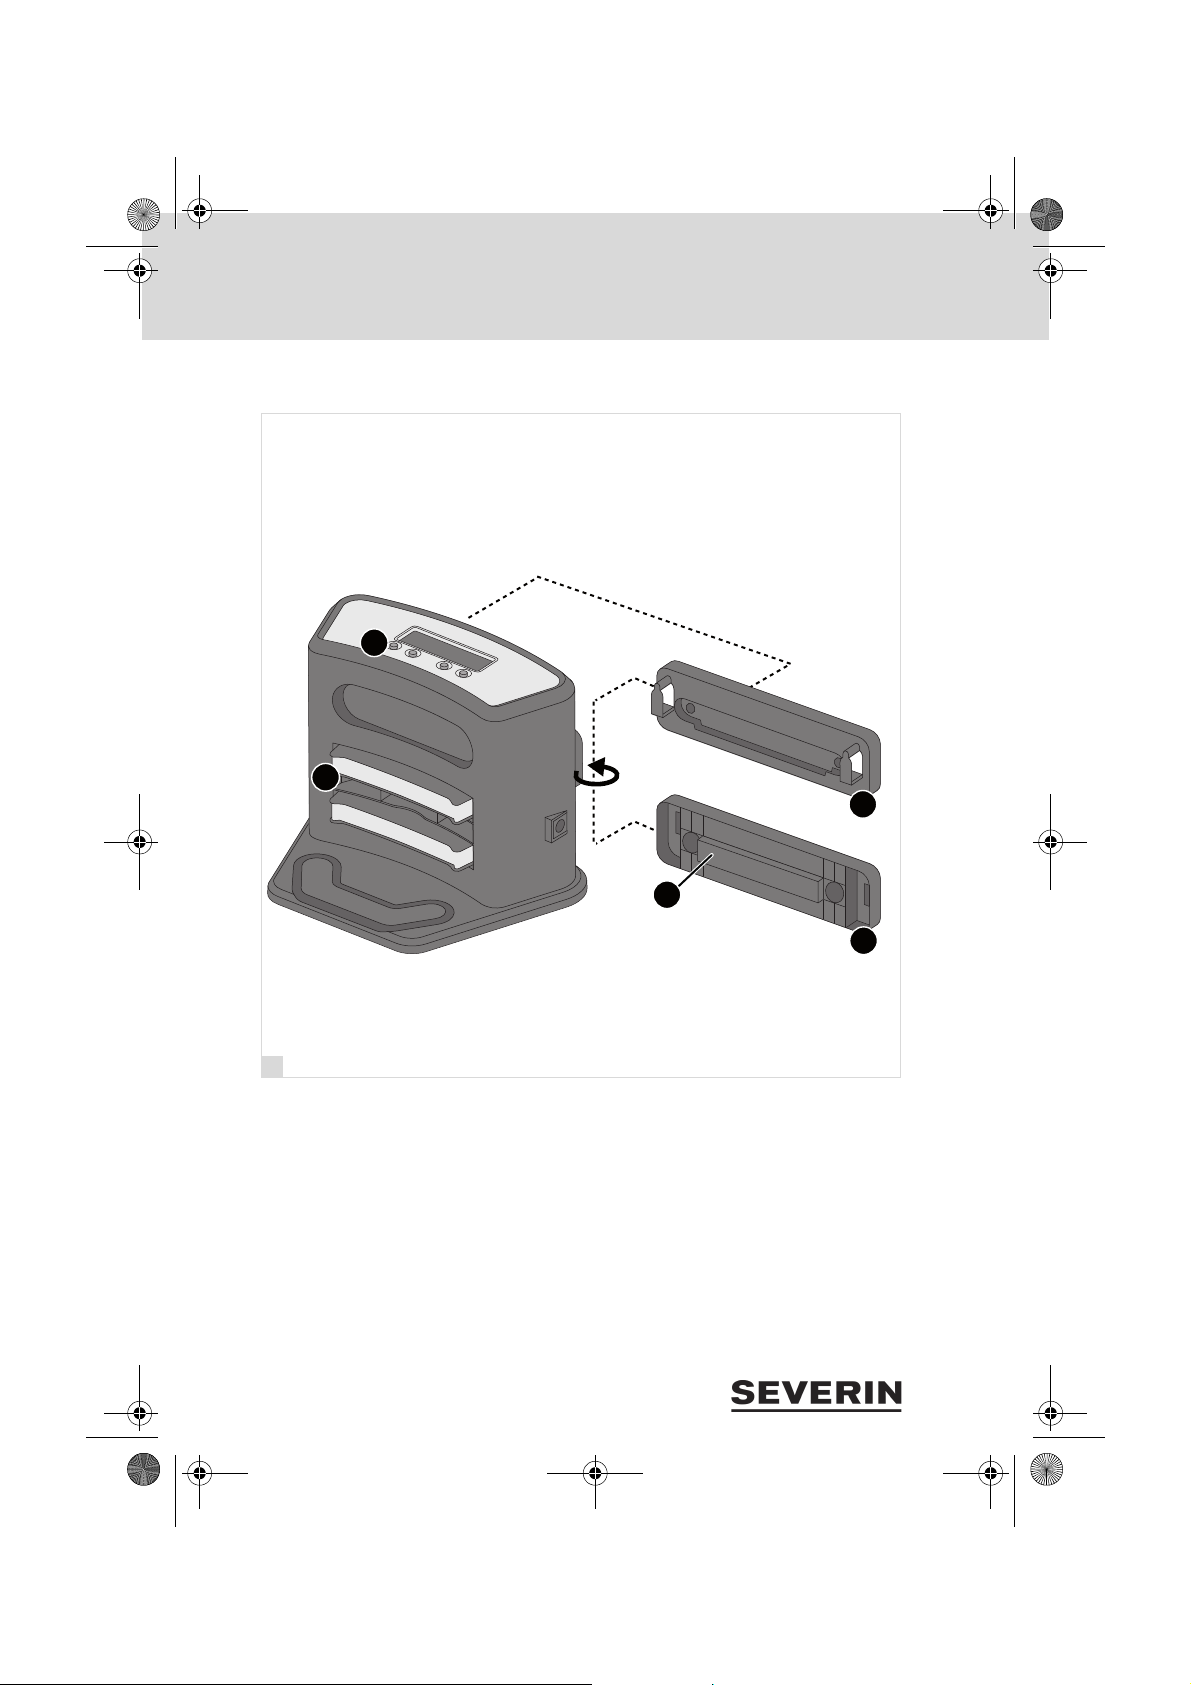
3.4 Ladestation im Detail
1 Ladekontakte
2 Panel (Details Abschnitt „Uhrzeit und Wo-
chenplan einstellen“, Seite 29)
3 Halteplatte für Wandmontage (Vorderseite)
4 Halteplatte für Wandmontage (Rückseite)
5 Klebefläche
14
Page 15
5
6
Chill.book Seite 15 Dienstag, 8. Dezember 2015 3:13 15
4 Roboter vorbereiten
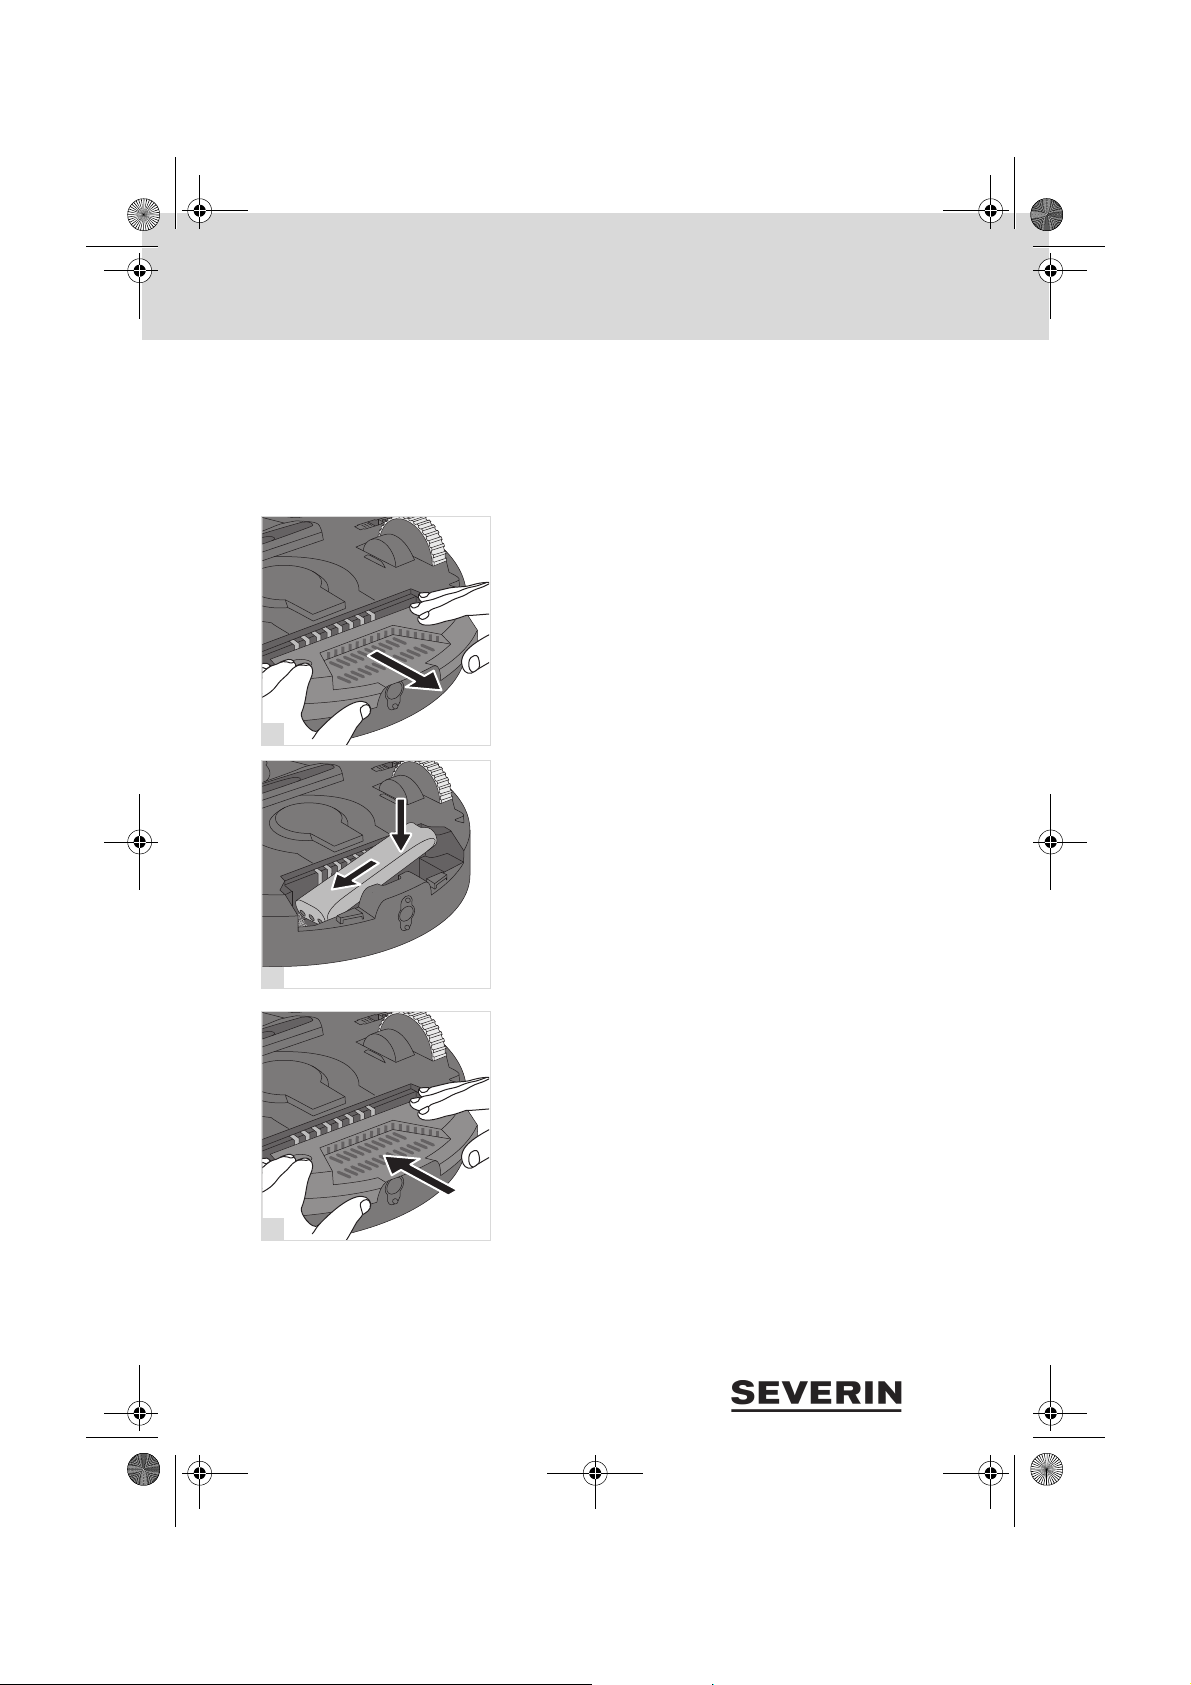
4.1 Bürsten anbringen
4 Roboter vorbereiten
1. Sicherstellen, dass das Gerät ausgeschaltet und das
2. Gerät vorsichtig auf die Oberseite legen, so dass die Un-
3. Bürsten auf die Bürstenaufnahme (Abb. 5) stecken.
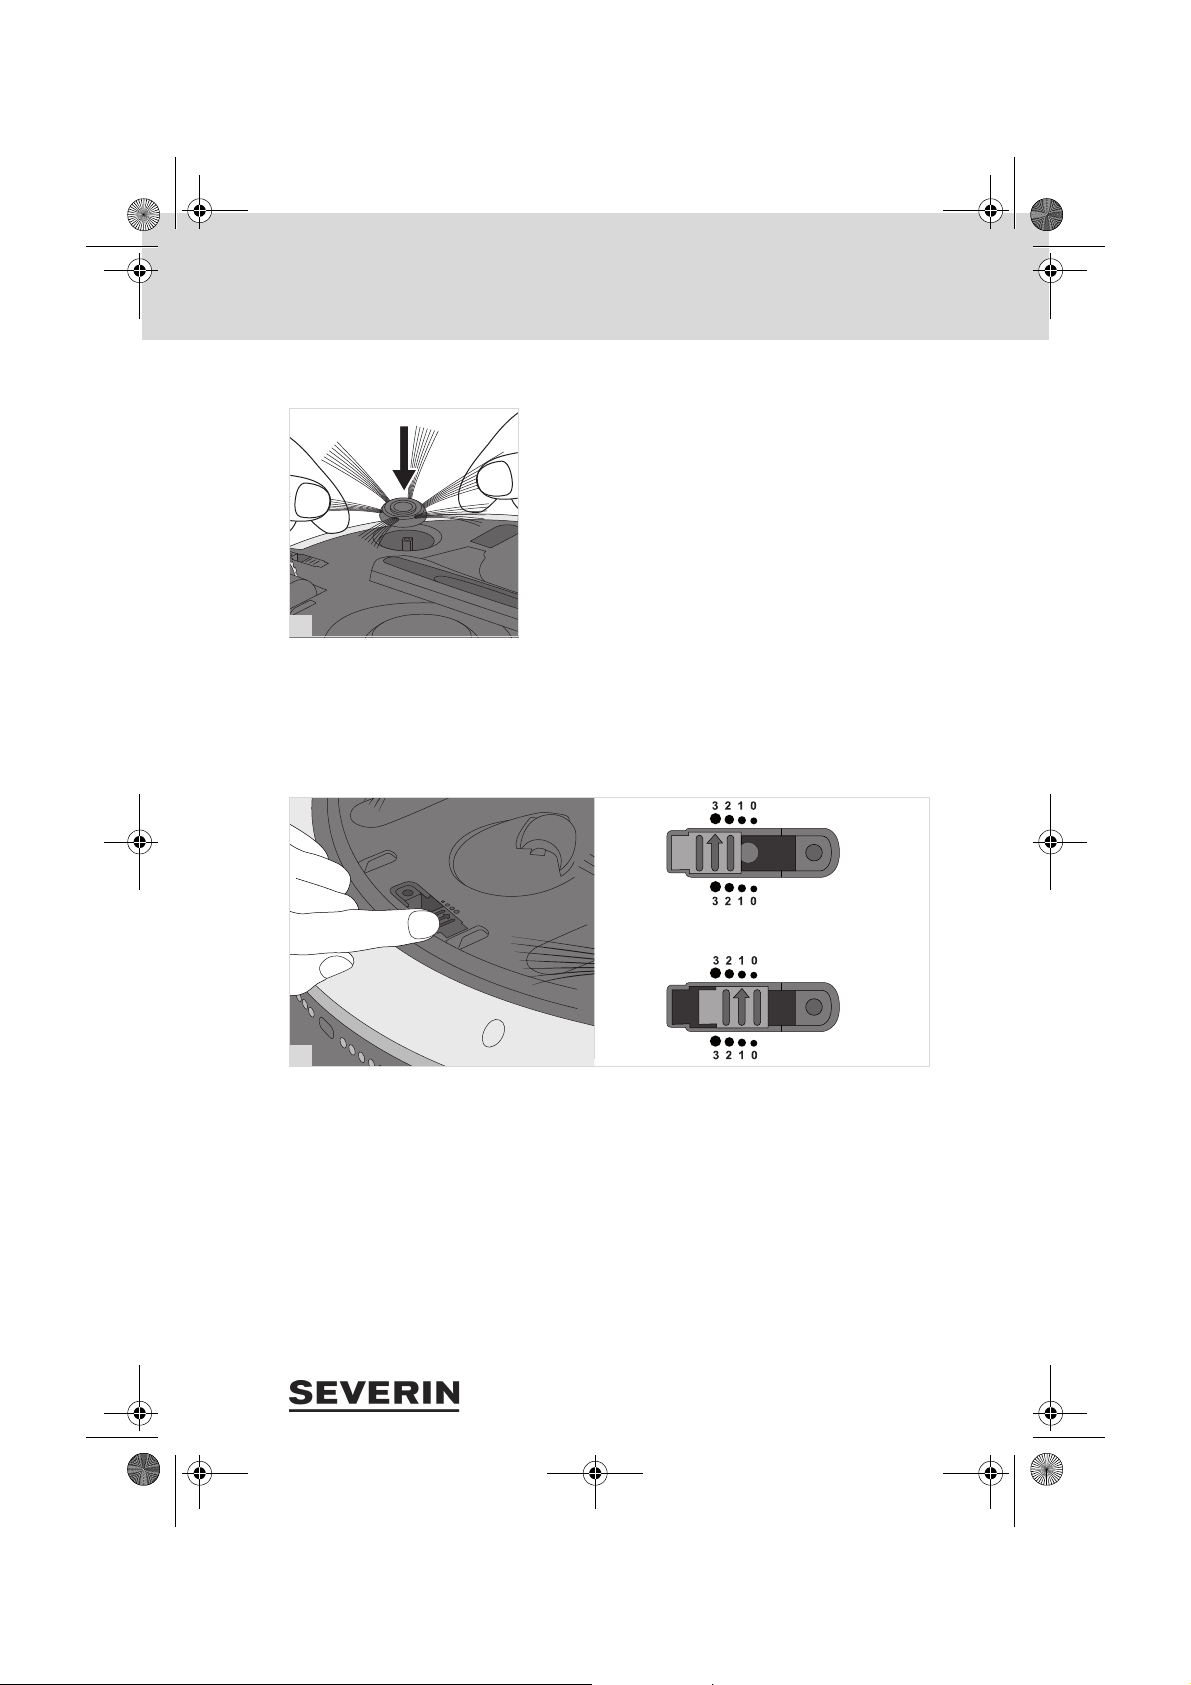
4.2 Fallsensoren einstellen
Durch die Fallsensoren kann der Roboter Stufen und Absätze selbstständig erkennen und fährt diese nicht hinunter. Da
die Fallsensoren den Untergrund prüfen, ist auch die Helligkeit des Fußbodens zur Einstellung der Sensoren wichtig.
Netzteil nicht angeschlossen ist.
terseite zugänglich ist.
1. Sicherstellen, dass das Gerät ausgeschaltet und das
Netzteil nicht angeschlossen ist.
2. Gerät vorsichtig auf die Oberseite legen, so dass die Unterseite zugänglich ist.
3. Alle 3 Fallsensoren in die gleiche Stellung bringen
(Abb. 6):
– bei hellen Böden und flachen Stufen Stellung 0 bis 1
– bei dunklen Böden und hohen Stufen Stellung 2 bis 3
TIPP: Wenn der Roboter auf dunklen Böden andauernd
rückwärts fährt, Einstellung „3“ wählen.
15
Page 16
789
Chill.book Seite 16 Dienstag, 8. Dezember 2015 3:13 15
4 Roboter vorbereiten
4.3 Akkupack einsetzen
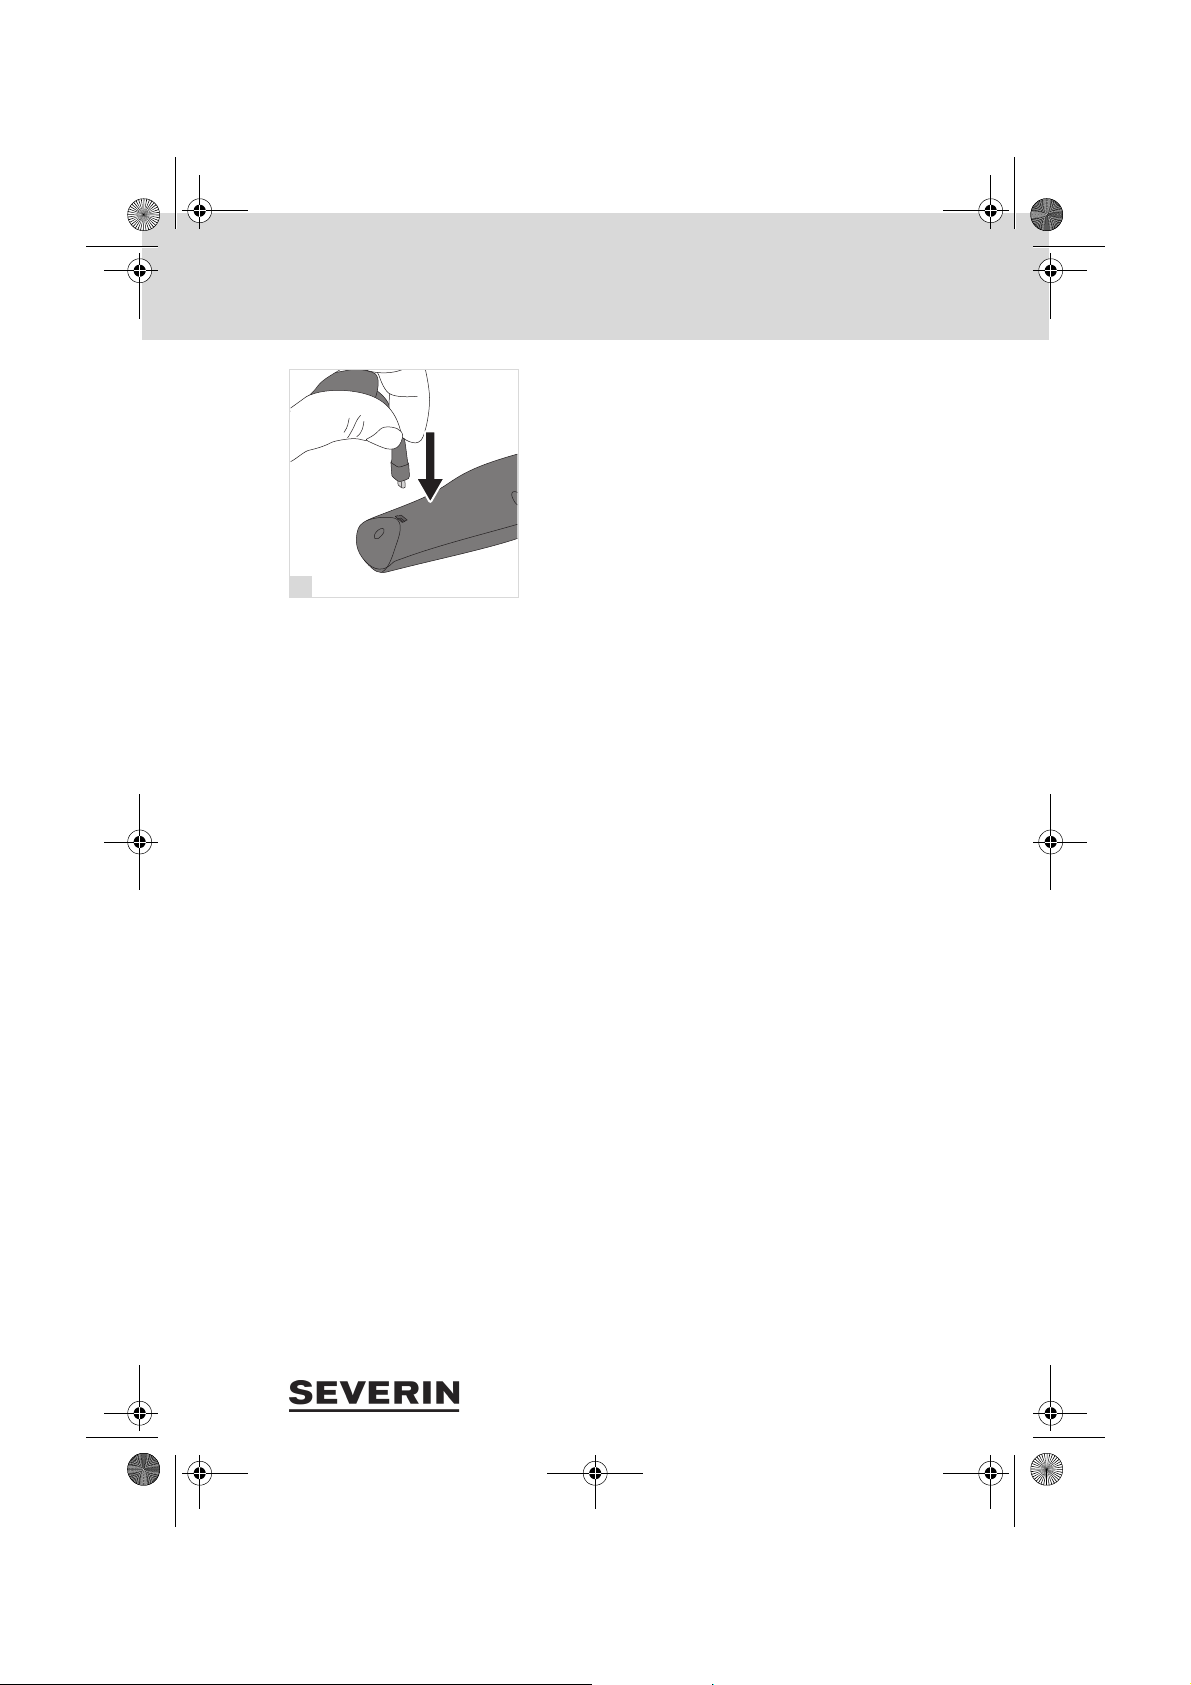
1. Sicherstellen, dass das Gerät ausgeschaltet und das
2. Gerät vorsichtig auf die Oberseite legen, so dass die Un-
3. Verriegelung durch Drücken lösen und Akkufachabde-
4. Akkupack gegen die Federn drücken (Abb. 8).
5. Akkupack nach unten in das Akkufach drücken.
Netzteil nicht angeschlossen ist.
terseite zugänglich ist.
ckung abziehen (Abb. 7).
Dabei darauf achten, dass die „+“-Markierung auf dem
Akku der „+“-Markierung im Akkufach gegenübersteht.
16
6. Akkufachabdeckung wieder kräftig aufschieben, bis diese hör- und spürbar einrastet (Abb. 9).
Der Akku ist nun eingebaut und muss geladen werden
Abschnitt „Roboter laden“, Seite 17.
Page 17
101112
Chill.book Seite 17 Dienstag, 8. Dezember 2015 3:13 15
4 Roboter vorbereiten
4.4 Roboter laden
TIPP: Wenn Sie den Roboter besonders schnell einsetzen
wollen, laden Sie den Roboter über das Netzteil. Dadurch
sparen Sie die Zeit, die sonst zum Aufstellen der Ladestation
benötigt wird.
Akkupack des Roboters am besten vor jedem Gebrauch laden, insbesondere nach längerem Nichtgebrauch.
Dies erhöht die Lebensdauer des Akkus und sorgt für möglichst lange Reinigungszyklen.
Mit dem Netzteil:
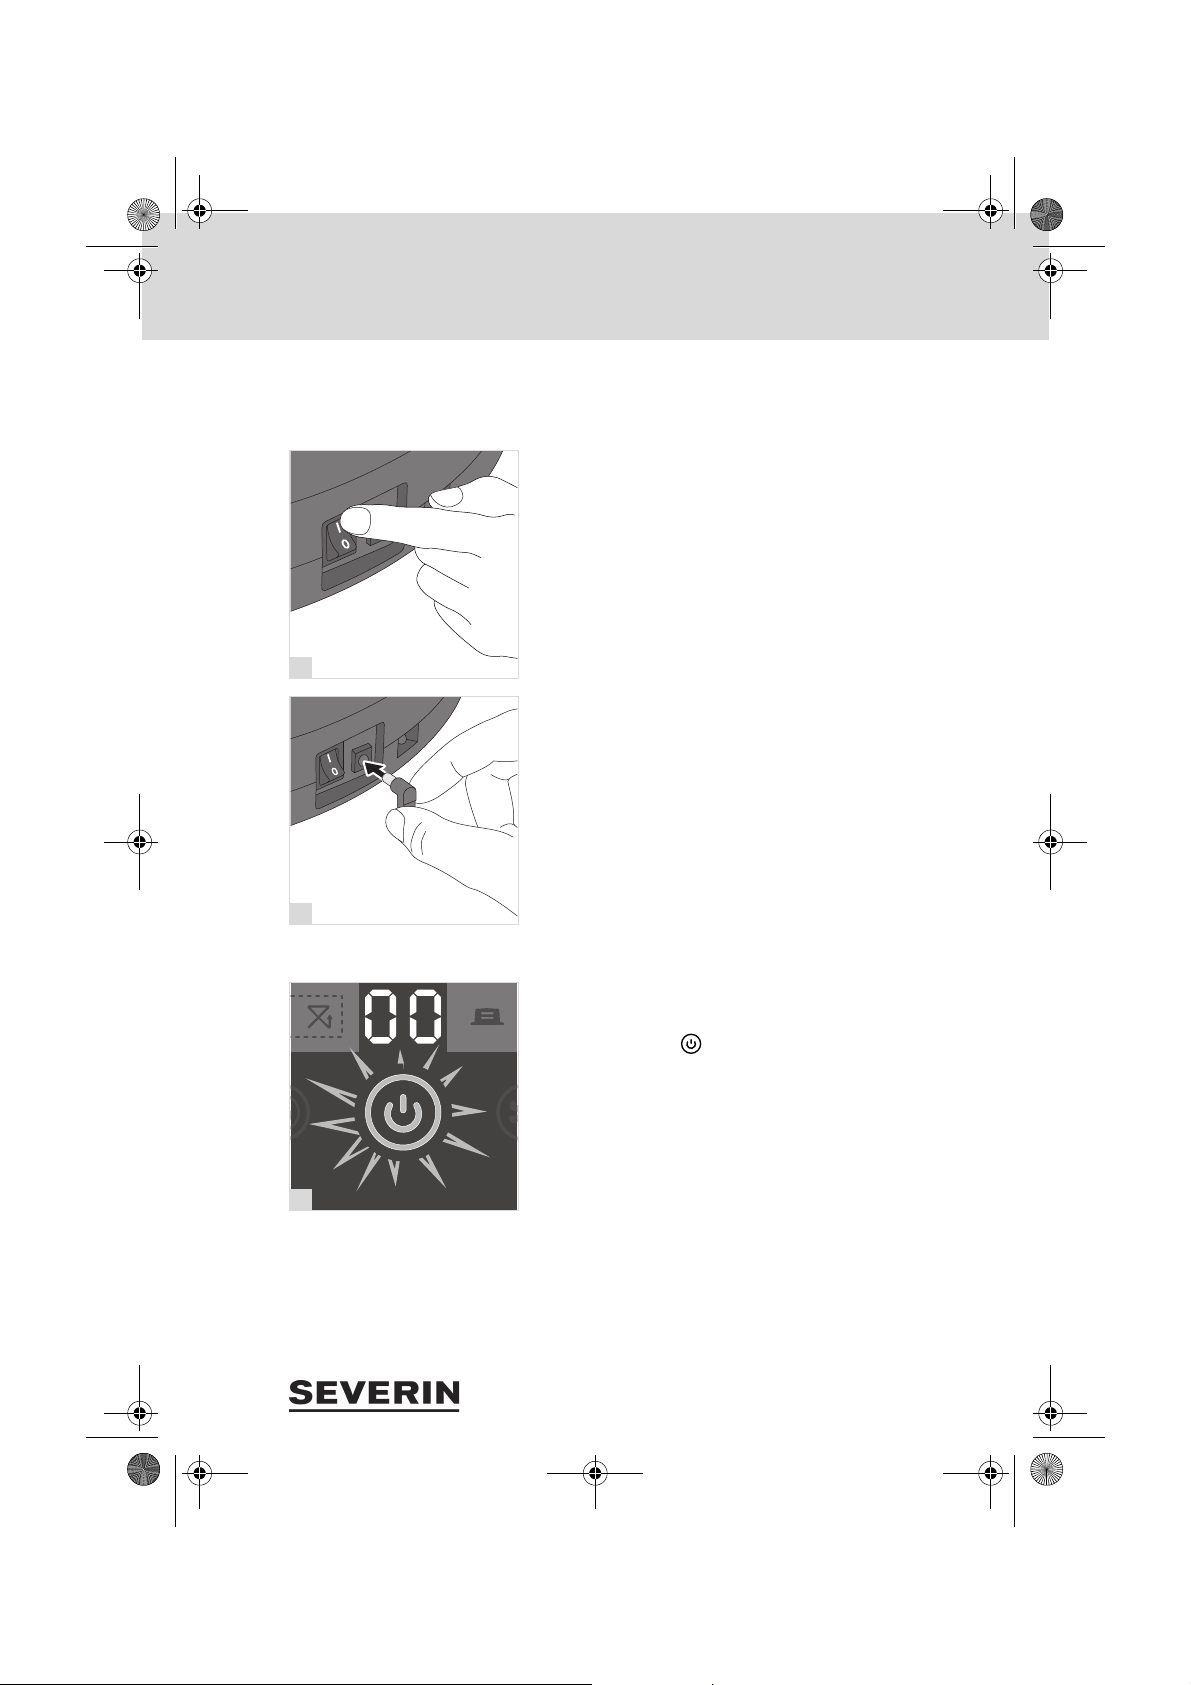
1. Roboter einschalten (Abb. 10).
2. Netzteil ans Gerät anschließen (Abb. 11).
3. Netzteil an Steckdose anschließen.
Mit der Ladestation:
1. Ladestation aufstellen und anschließen Abschnitt „La-
destation aufstellen und anschließen“, Seite 20.
2. Roboter an Ladestation stellen.
Dabei darauf achten, dass die Ladekontakte des Roboters die der Ladestation berühren.
– Im Display erscheint „00“.
– Alle 2,4 Minuten steigt der Ladezustand um 01 an.
– Die Power-LED „ “ blinkt grün.
17
Page 18
13
Chill.book Seite 18 Dienstag, 8. Dezember 2015 3:13 15
4 Roboter vorbereiten
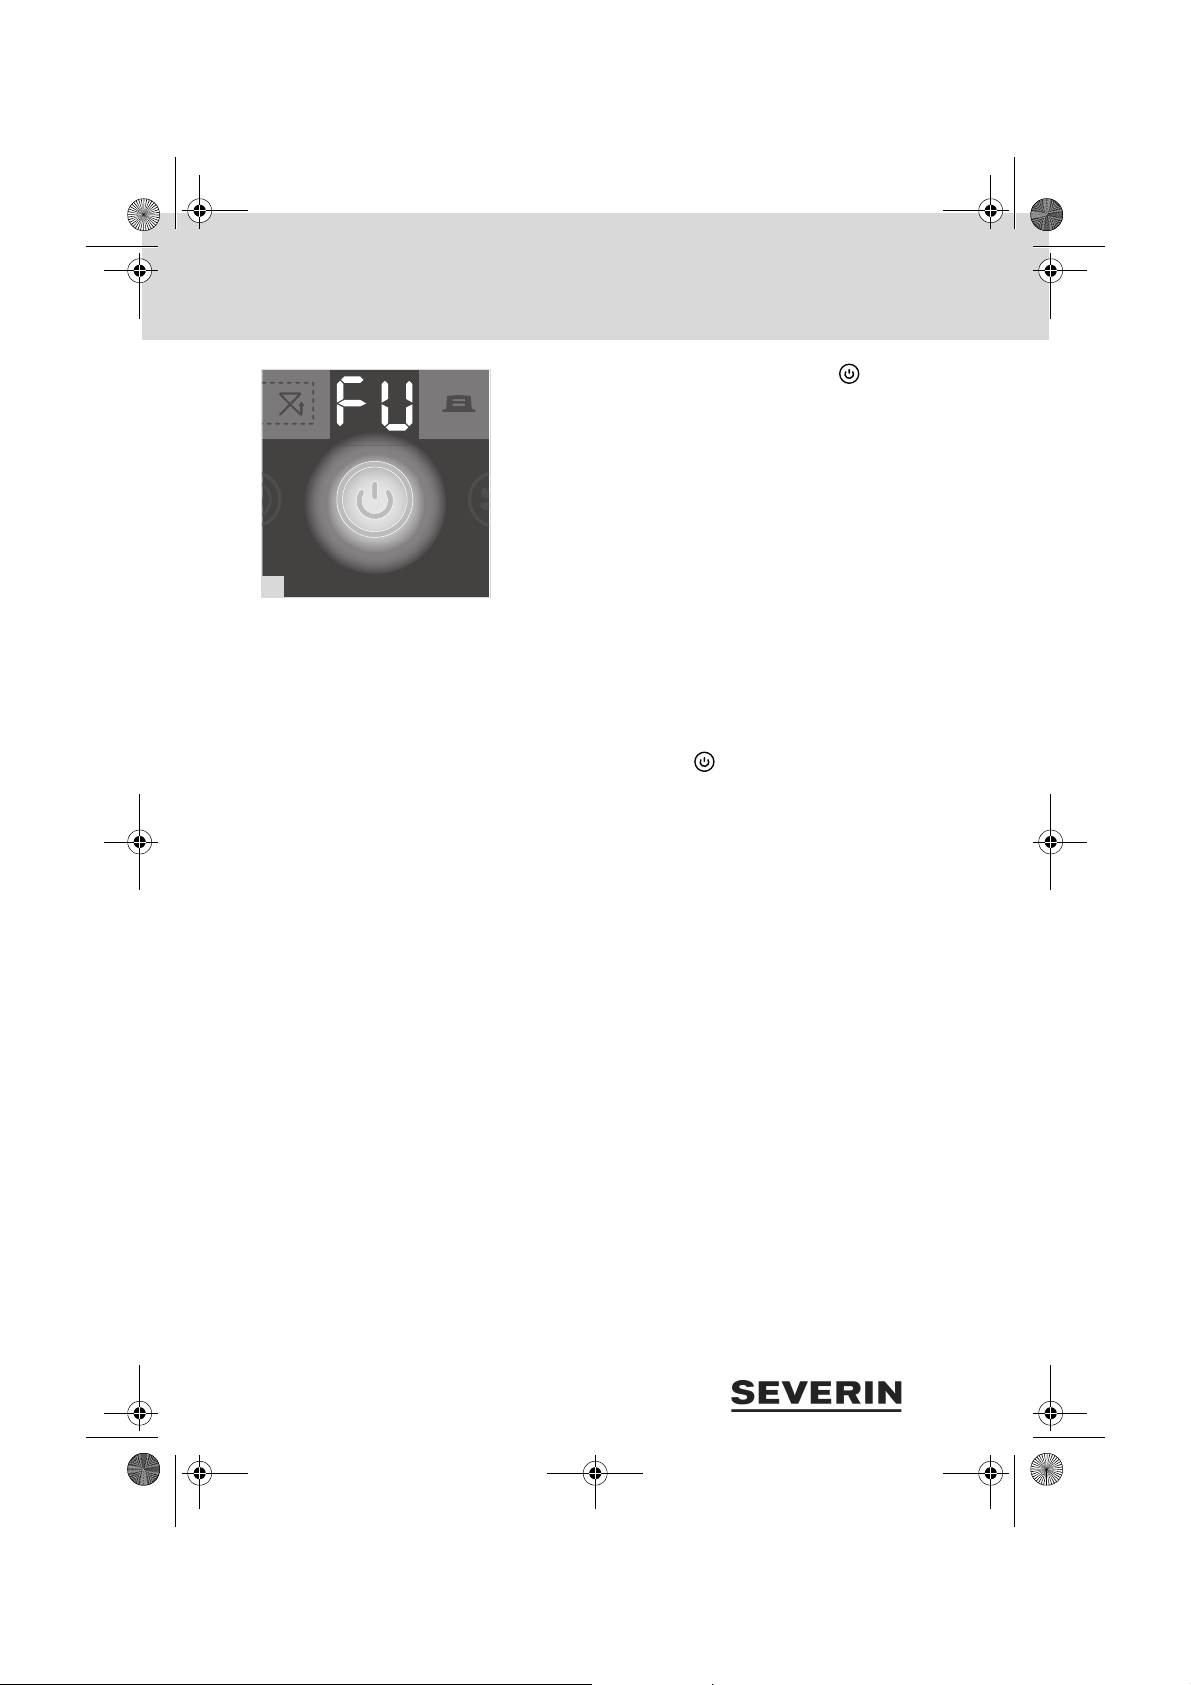
– Nach ca. 4 Stunden leuchtet die Power-LED „ “ dau-
– Im Display erscheint „FU“.
– Das Gerät ist vollständig aufgeladen. Falls der Roboter
TIPP: Damit der Akku immer mit maximaler Ladung betriebsbereit ist, wird er pro Stunde für 15 Minuten geladen, solange
er mit dem Stromnetz verbunden ist. Die Anzeige wechselt
dann von „FU“ zu „93“ und steigt dann wieder alle 2,4 Minuten bis „FU“.
TIPP: Sobald der Ladezustand des Akkus zur Neige geht,
gibt der Roboter drei Signaltöne ab und im Display wird „Lo“
angezeigt. Die Power-LED „ “ leuchtet nun rot. Der Roboter stoppt oder kehrt zur Ladestation zurück, je nach gewählter Einstellung.
erhaft grün.
über das Netzteil geladen wurde: Netzteil aus Steckdose
und Gerät ziehen.
18
Page 19
14
Chill.book Seite 19 Dienstag, 8. Dezember 2015 3:13 15
5 Fernbedienung laden
5 Fernbedienung laden
1. Mitgeliefertes USB-Kabel an Fernbedienung anschlie-
ßen.
2. USB-Kabel an einen USB-Port anschließen.
– LED-Indikator leuchtet und zeigt an, dass die Fernbedie-
nung geladen wird.
– Nach ca. 30 Minuten ist die Fernbedienung vollständig
geladen und der LED-Indikator schaltet sich aus.
3. USB-Kabel von Fernbedienung und USB-Port abziehen.
19
Page 20
15
16
Chill.book Seite 20 Dienstag, 8. Dezember 2015 3:13 15
6 Ladestation aufstellen und anschließen
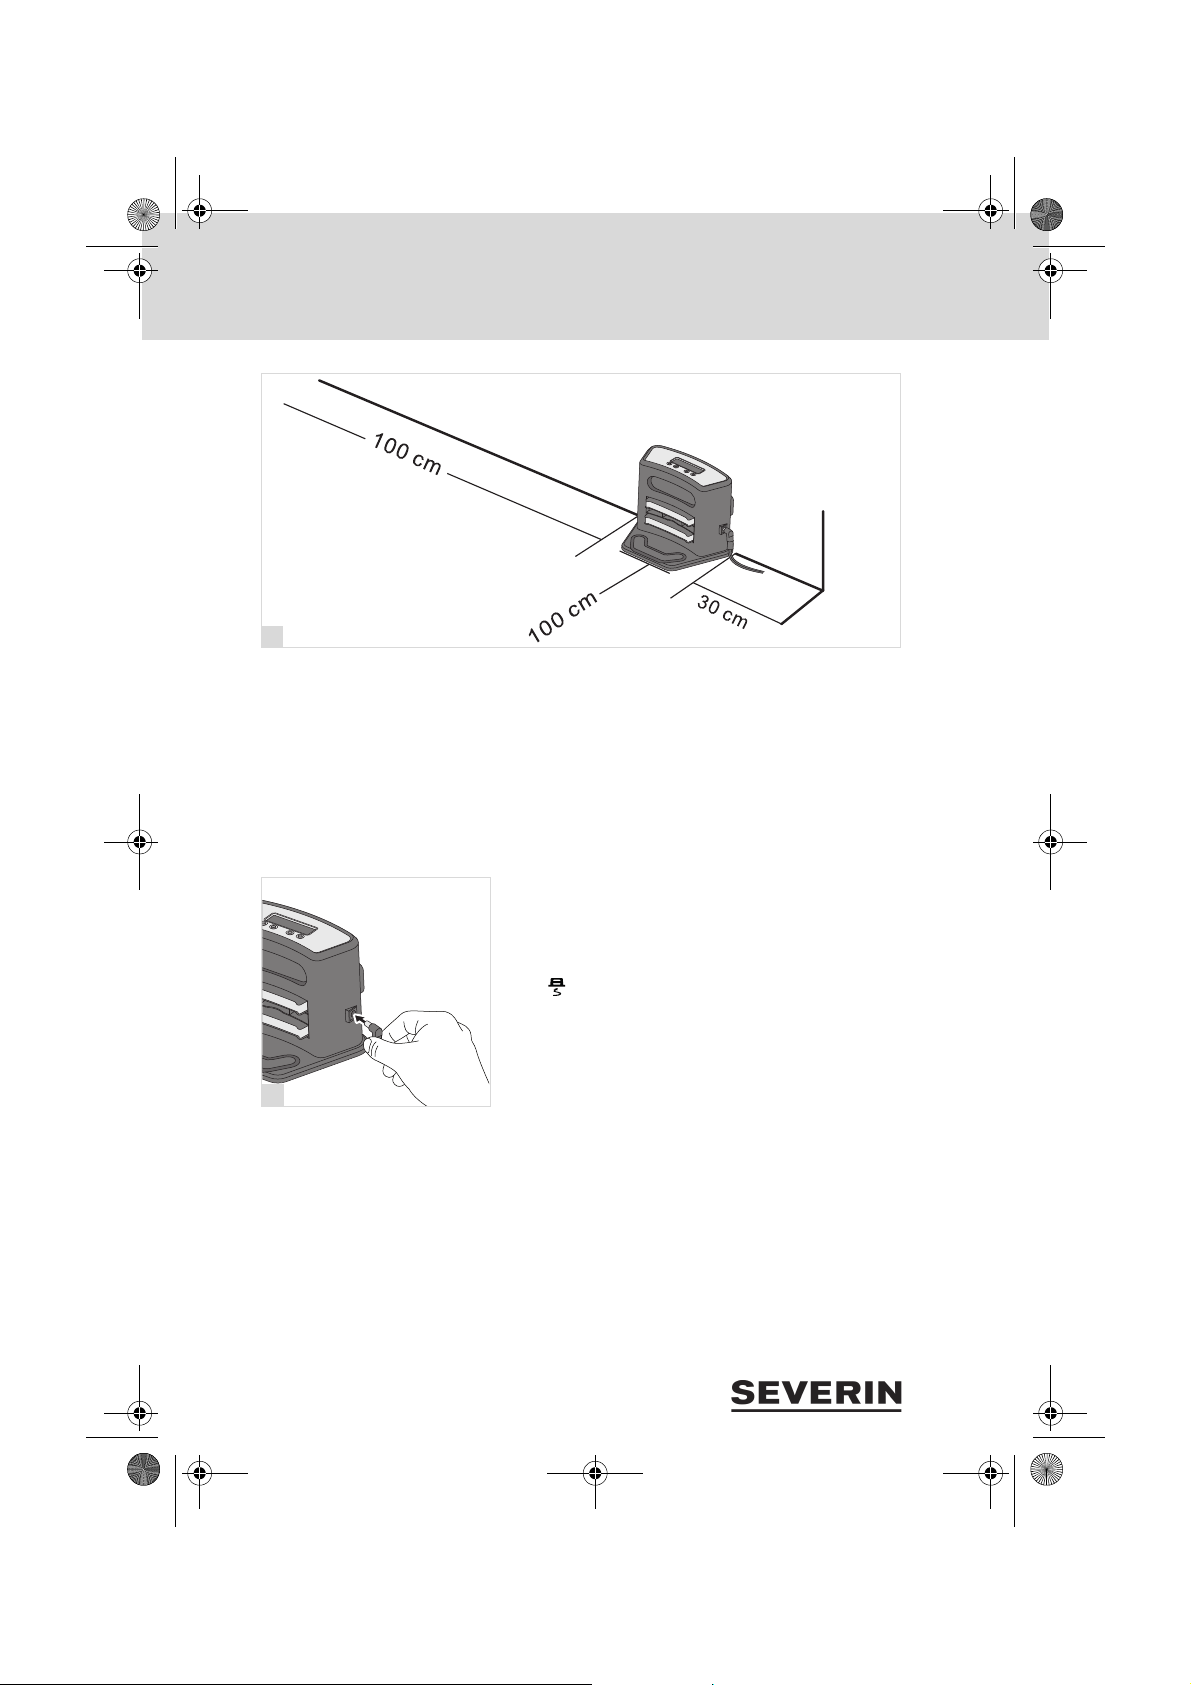
6 Ladestation aufstellen und anschließen
1. Ladestation mit dem in der Abbildung gezeigten Freiraum an einer Wand in Reichweite einer Steckdose aufstellen (Abb. 15).
TIPP: Um die Ladestation zu fixieren, kann die Halteplatte
auf der Rückseite der Ladestation an die Wand geschraubt
oder geklebt werden.
20
2. Netzteil an Ladestation anschließen (Abb. 16).
3. Netzteil an Steckdose anschließen.
TIPP: Es empfiehlt sich, zu überprüfen, ob der Roboter die
Ladestation findet. Dazu den Roboter in den Raum stellen
und „ “ auf der Fernbedienung drücken (Abschnitt „Rei-
nigungsdauer einstellen“, Seite 27). Wenn der Roboter die
Ladestation nicht findet, stellen Sie die Ladestation an einem
zugänglicheren Ort auf.
Page 21
17
18
Chill.book Seite 21 Dienstag, 8. Dezember 2015 3:13 15
7 Room Containment aufstellen
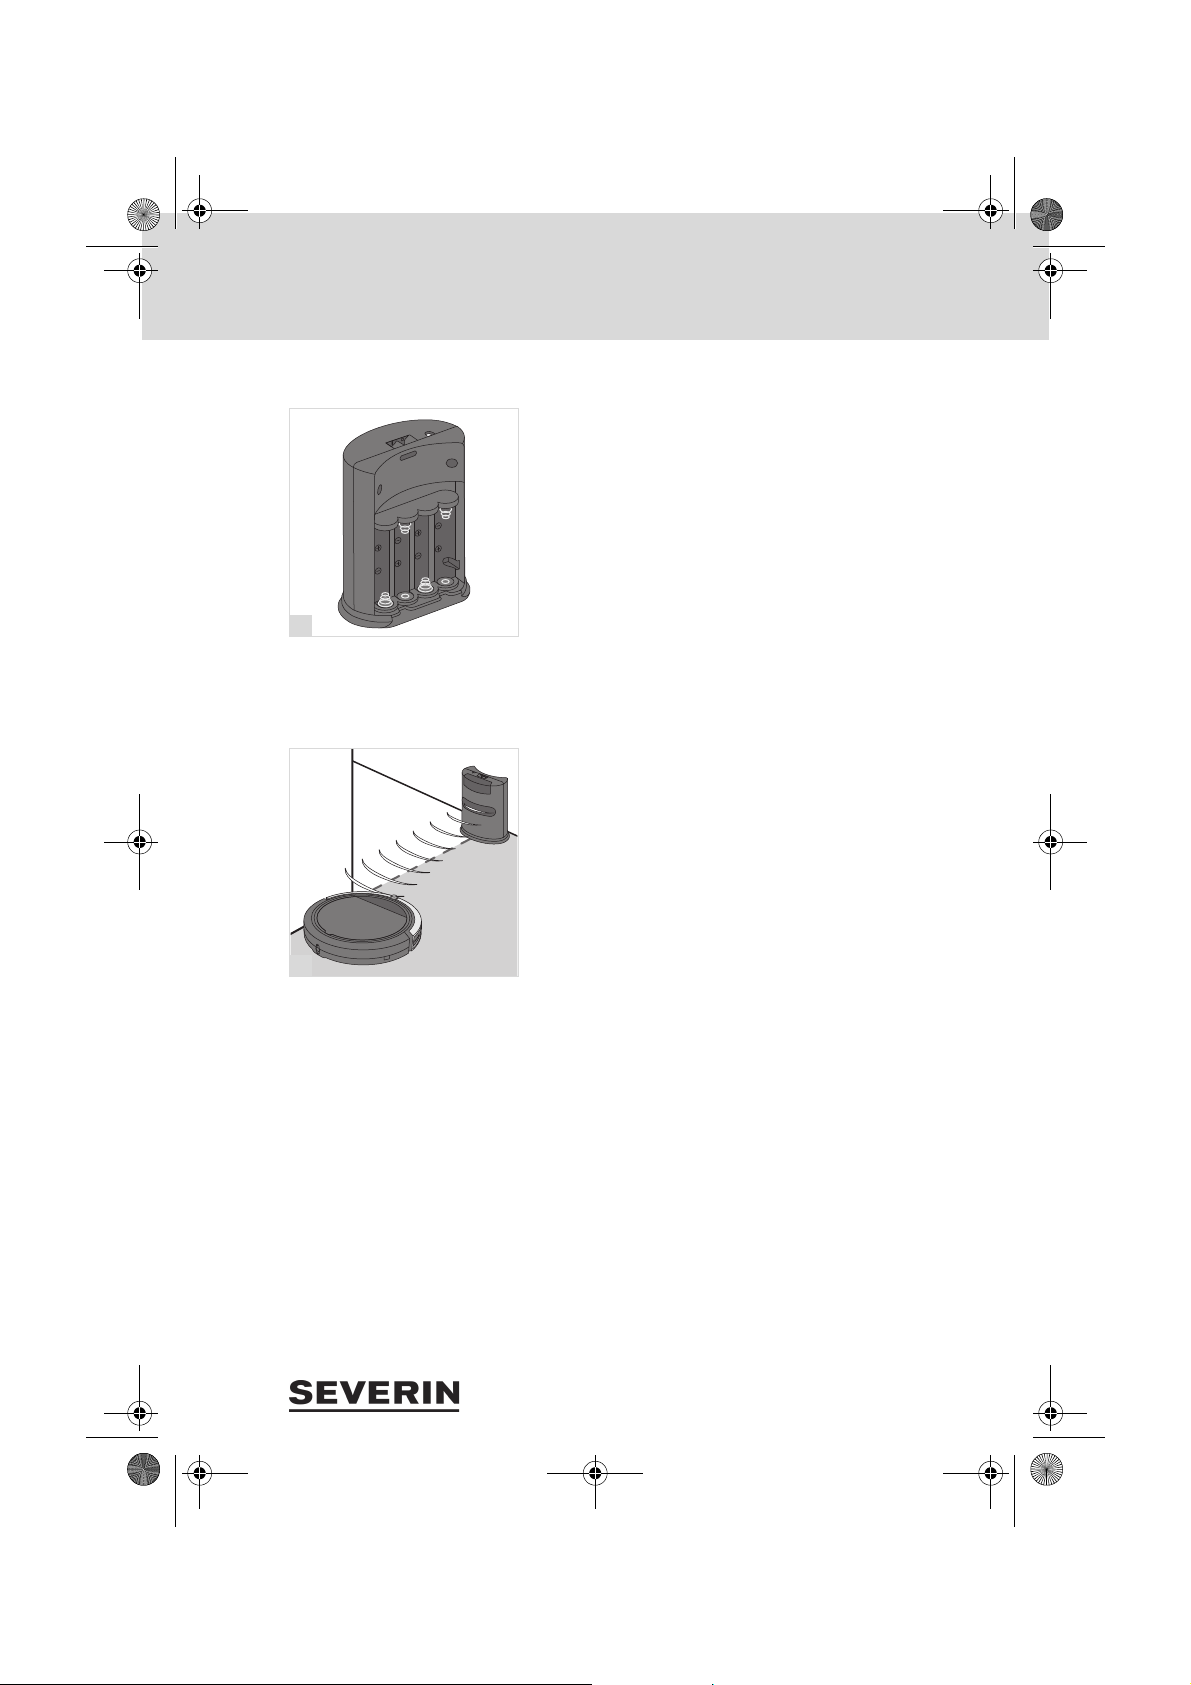
7.1 Batterien einsetzen
7 Room Containment aufstellen
1. Batteriefachabdeckung an Rückseite nach oben schie-
ben.
2. Mitgelieferte Batterien (4xAA) entsprechend den Sym-
bolen im Batteriefach (Abb. 17) einsetzen.
3. Batteriefachabdeckung wieder anbringen.
7.2 Room Containment aufstellen
Mit dem Room Containment lassen sich Durchgänge für den
Roboter sperren.
1. Room Containment mit dem Schiebeschalter auf der
Oberseite einschalten.
2. Raumteiler in Durchgang stellen (Abb. 18).
21
Page 22
19
Chill.book Seite 22 Dienstag, 8. Dezember 2015 3:13 15
8 Raum reinigen
8.1 Raum vorbereiten
8.2 Roboter einschalten
8.3 Roboter starten
8 Raum reinigen
– Lose Gegenstände, die der Roboter vor sich her schie-
ben könnte, wegräumen.
– Kabel, Vorhänge und alles, was sich in den Bürsten ver-
heddern könnte, wegräumen.
– Zerbrechliche Gegenstände oder solche, die leicht um-
kippen können, wegräumen.
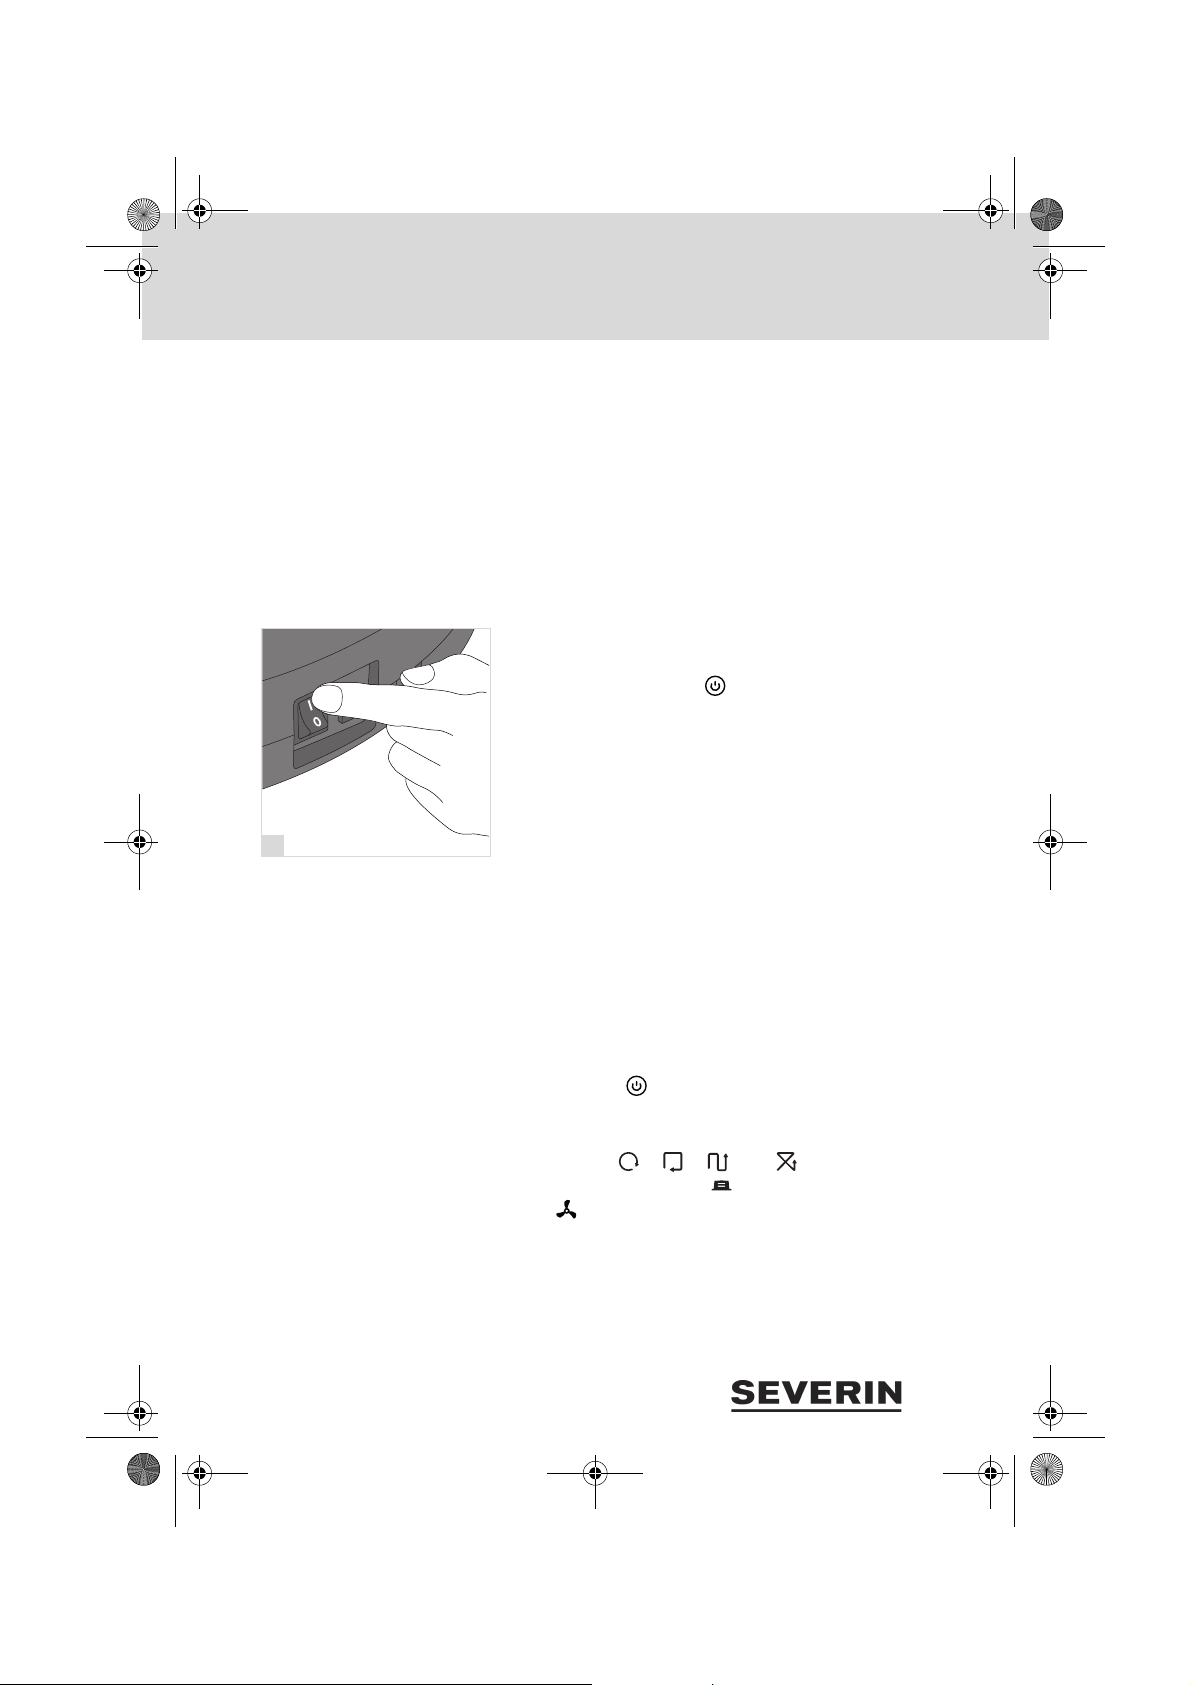
1. Roboter am Ein-/Aus-Schalter einschalten (Stellung „I“)
(Abb. 19).
2. Warten, bis Power-LED „ “ grün leuchtet.
Von einem beliebigen Punkt im Raum aus
starten
Voraussetzung: Roboter muss eingeschaltet sein.
Abschnitt „Roboter einschalten“, Seite 22
22
Am Roboter:
1. Power-LED „ “ drücken, um den Roboter zu aktivieren.
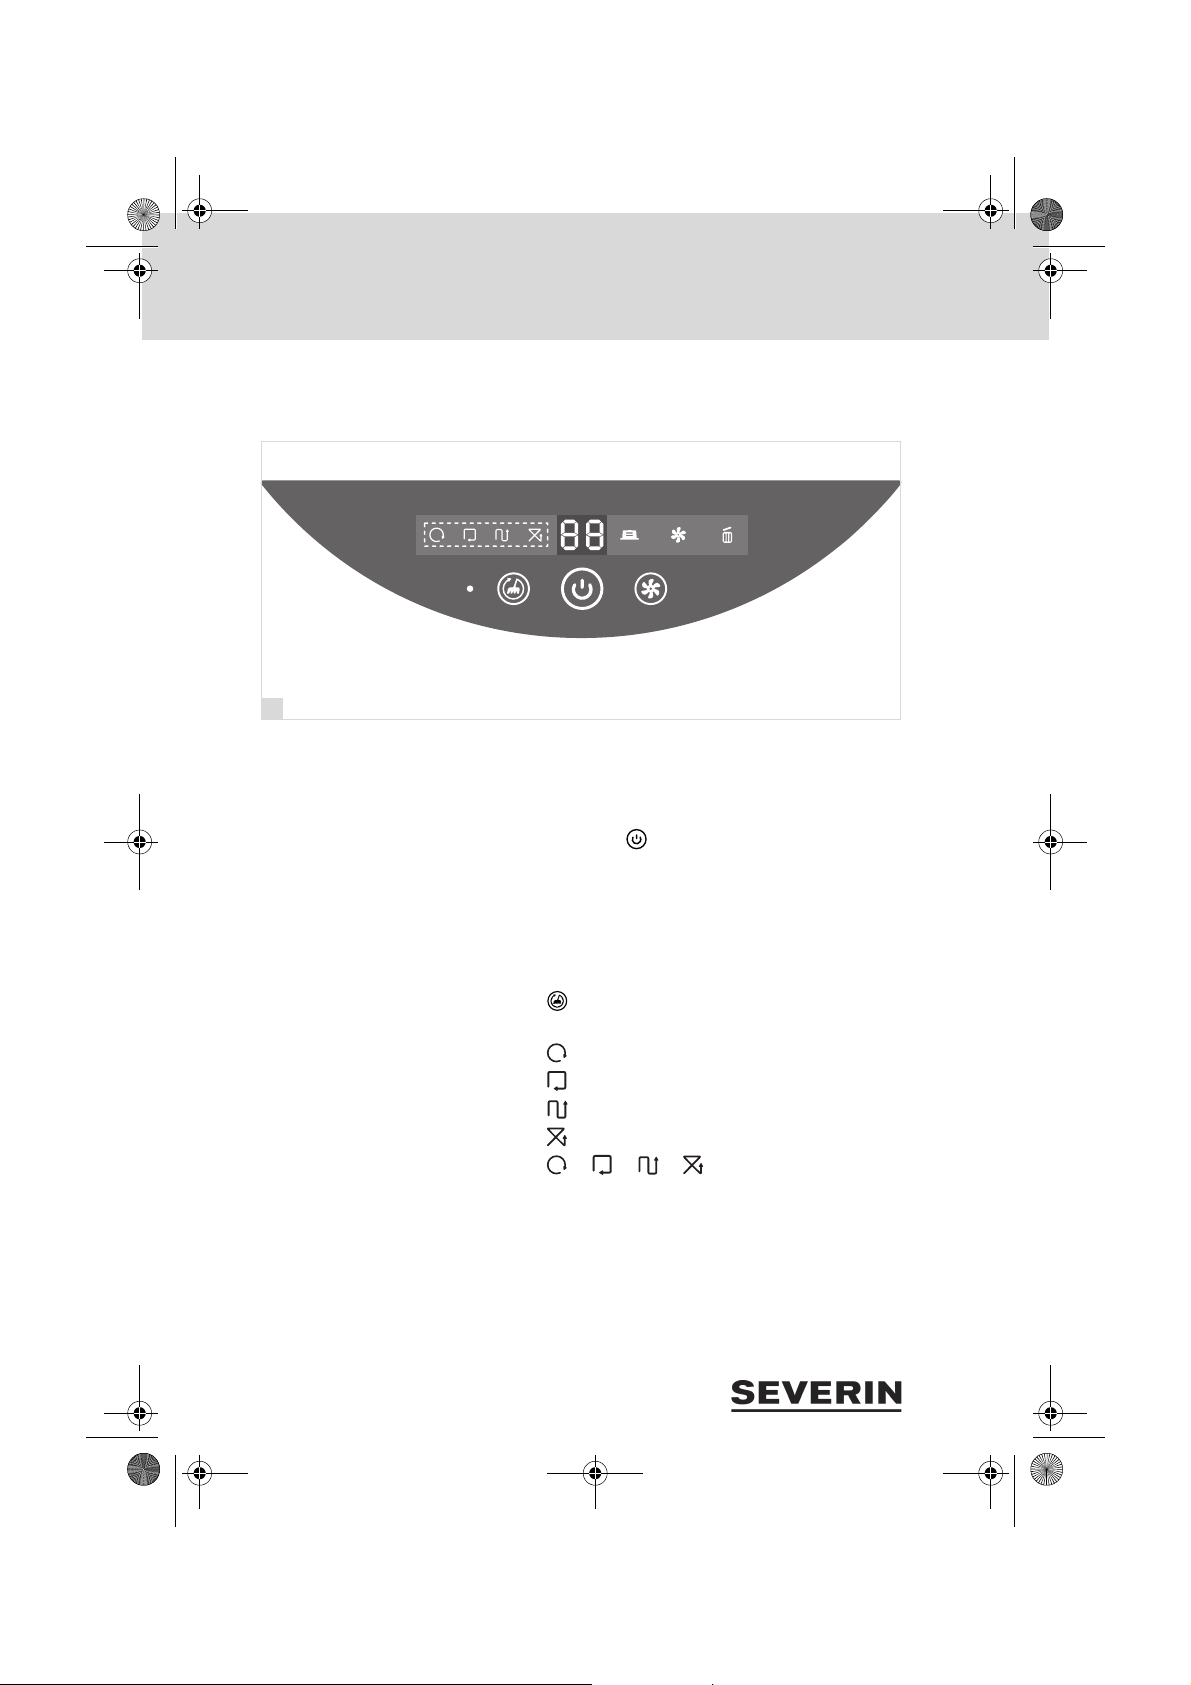
TIPP: Die Voreinstellungen nach dem Anschalten sind: Automatikmodus („ “, „ “, „ “ und „ “ leuchten), maximale Reinigungsdauer („99 “) und normale Saugleistung („ “).
2. Reinigungsmuster einstellen.
Abschnitt „Reinigungsmuster einstellen“, Seite 24
3. Dauer der Reinigung und Rückkehr zur Ladestation
nach Reinigung einstellen.
Abschnitt „Reinigungsdauer einstellen“, Seite 25
Page 23
Chill.book Seite 23 Dienstag, 8. Dezember 2015 3:13 15
8 Raum reinigen
4. Saugleistung einstellen.
Abschnitt „Saugleistung einstellen“, Seite 25
5. 3 Sekunden warten, bis der Roboter mit der Reinigung
beginnt.
Mit der Fernbedienung:
„ “, „ “, „ “ oder „ “ drücken, um den Roboter mit
der gewünschten Option zu starten, oder IntensivreinigungsFunktion zum Starten nutzen. Abschnitt „Intensivreini-
gung“, Seite 27
Roboter von Ladestation starten
Voraussetzung: Roboter muss eingeschaltet sein.
Abschnitt „Roboter einschalten“, Seite 22
Am Roboter:
Power-LED „ “ für 3 Sekunden gedrückt halten.
Mit der Fernbedienung:
Intensivreinigungsfunktion nutzen.
Abschnitt „Intensivreinigung“, Seite 27
Automatischer Start
Wochenplan an der Ladestation erstellen.
Abschnitt „Wochenplan einstellen“, Seite 30
23
Page 24
20
Chill.book Seite 24 Dienstag, 8. Dezember 2015 3:13 15
8 Raum reinigen
8.4 Roboter über Control-Panel steuern
TIPP: Der Roboter bestätigt jede Eingabe mit einem Signal-
ton. Wenn die Einstellung nicht plausibel ist, ertönen 2 Signaltöne.
1. Power-LED „ “ drücken, um Roboter zu aktivieren.
Wird innerhalb von 3 Sekunden keine Taste am Roboter
oder der Fernbedienung gedrückt, beginnt der Roboter die
Reinigung mit den aktuellen Einstellungen.
24
Reinigungsmuster einstellen
1. „ “-Taster wiederholt drücken, bis LED der gewünschten Einstellung leuchtet:
– „ “: Spiralen fahren
– „ “: Wand folgen
– „ “: Bahnen fahren
– „ “: Zufallsmodus
– „ “, „ “, „ “, „ “: Automatikmodus
TIPP: Der Roboter wechselt je nach Situation selbstständig
zwischen den verschiedenen Reinigungsmodi.
Page 25
Chill.book Seite 25 Dienstag, 8. Dezember 2015 3:13 15
8 Raum reinigen
2. Dauer der Reinigung und Rückkehr zur Ladestation
nach Reinigung einstellen.
Abschnitt „Reinigungsdauer einstellen“, Seite 25
3. Saugleistung einstellen.
Abschnitt „Saugleistung einstellen“, Seite 25
4. 3 Sekunden warten, bis der Roboter mit der Reinigung
beginnt.
Reinigungsdauer einstellen
1. Power-LED „ “ wiederholt drücken, bis die ge-
wünschte Reinigungsdauer und die automatische Rück-
kehr zur Ladestation ein-/ausgestellt ist:
– „00 “: Roboter fährt zur Ladestation
– „30“: Roboter saugt 30 Minuten.
– „45“: Roboter saugt 45 Minuten.
– „60“: Roboter saugt 60 Minuten.
– „30 “: Roboter saugt 30 Minuten und kehrt zur La-
destation zurück.
– „45 “: Roboter saugt 45 Minuten und kehrt zur La-
destation zurück.
– „60 “: Roboter saugt 60 Minuten und kehrt zur La-
destation zurück.
– „99 “: Roboter saugt, bis Akku zur Neige geht (90–
120 Minuten) und kehrt dann zur Ladestation zurück.
2. Reinigungsmuster einstellen.
Abschnitt „Reinigungsmuster einstellen“, Seite 24
3. Saugleistung einstellen.
Abschnitt „Saugleistung einstellen“, Seite 25
4. 3 Sekunden warten, bis der Roboter mit der Reinigung
beginnt.
Saugleistung einstellen
1. „ “-Taster wiederholt drücken, bis die gewünschte
Saugleistung eingestellt ist:
– „ “: niedrige Saugleistung
– „ “: hohe Saugleistung
– kein Symbol: AUS
2. Reinigungsmuster einstellen.
25
Page 26
Chill.book Seite 26 Dienstag, 8. Dezember 2015 3:13 15
8 Raum reinigen
3. Dauer der Reinigung und Rückkehr zur Ladestation
4. 3 Sekunden warten, bis der Roboter mit der Reinigung
TIPP: Nach der Reinigung gibt der Roboter einen Signalton
ab und bleibt stehen oder kehrt zur Ladestation zurück, je
nach Einstellung.
Roboter stoppen
– Power-LED „ “ für eine halbe Sekunde drücken, um
– Roboter hochheben. Reinigung wird nach 1 Sekunde
– Roboter am Ein-/Aus-Schalter ausschalten.
Abschnitt „Reinigungsmuster einstellen“, Seite 24
nach Reinigung einstellen.
Abschnitt „Reinigungsdauer einstellen“, Seite 25
beginnt.
Roboter zu stoppen.
gestoppt.
26
TIPP: Drei Minuten, nachdem der Roboter stoppt oder ge-
stoppt wurde, schaltet er in den Schlaf-Modus (Power-LED
„ “ ist aus). Beliebige Taste am Roboter oder an der Fernbedienung drücken, um den Roboter wieder zu aktivieren.
Page 27
21
22
Chill.book Seite 27 Dienstag, 8. Dezember 2015 3:13 15
8 Raum reinigen
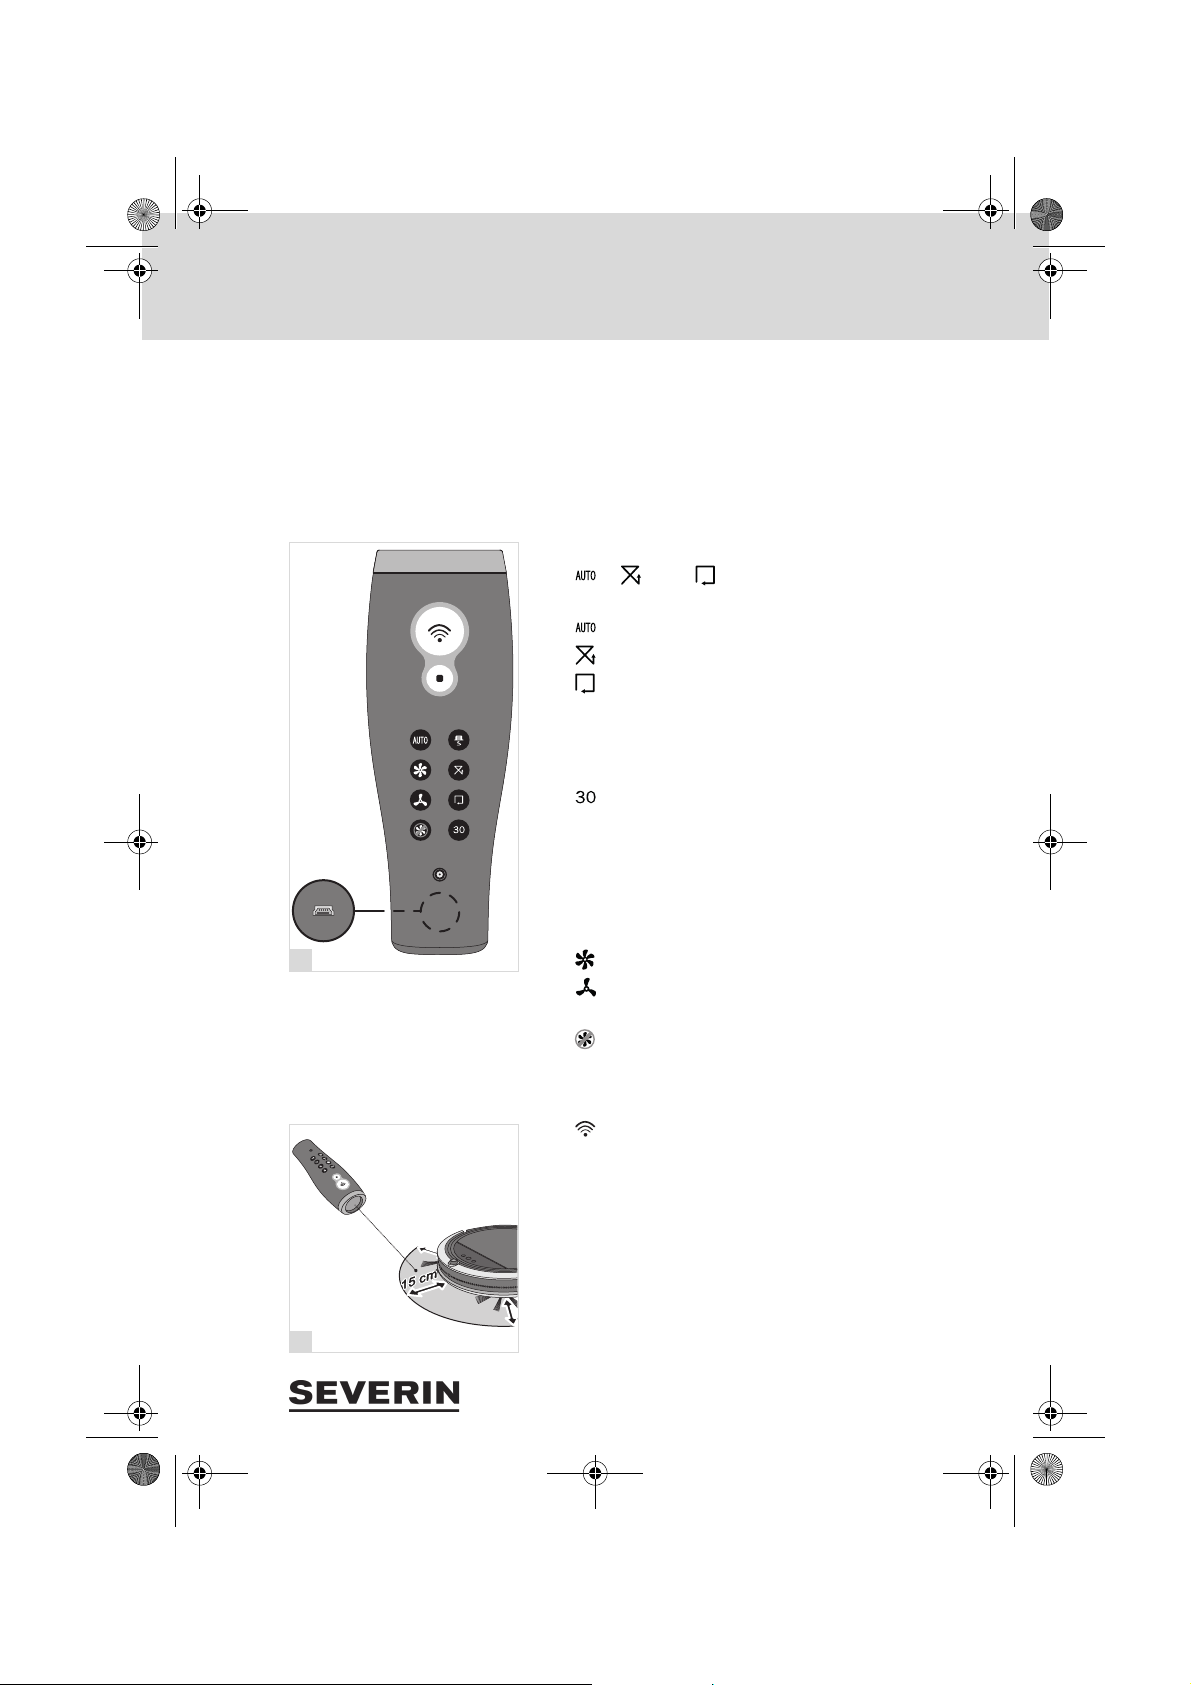
8.5 Roboter über die Fernbedienung steuern
TIPP: Der Roboter bestätigt jede Eingabe mit einem Signal-
ton. Wenn die Einstellung nicht plausibel ist, ertönen 2 Signaltöne.
Reinigungsmuster einstellen
1. Mit der Fernbedienung in Richtung des Roboters zeigen.
2. „ “, „ “ oder „ “ drücken, um das gewünschte
Reinigungsmuster einzustellen.
– „ “: Automatisch
– „ “: Zufällig
– „ “: Wand folgen
Reinigungsdauer einstellen
1. Mit der Fernbedienung in Richtung des Roboters zeigen.
2. „ “ drücken, um die Reinigungsdauer auf 30 Minuten
mit anschließender Rückkehr zur Ladestation zu setzen.
TIPP: Die Einstellung einer längeren Reinigungsdauer muss
am Roboter vorgenommen werden.
Saugleistung einstellen
1. „ “ drücken, um eine hohe Saugleistung einzustellen
2. „ “ drücken, um eine niedrige Saugleistung einzustel-
len
3. „ “ drücken, um den Lüfter auszustellen.
Intensivreinigung
1. „ “ gedrückt halten.
2. Mit rotem Lichtpunkt auf die Stelle vor dem Roboter zei-
gen, welche gereinigt werden soll (Abb. 22).
TIPP: Die Stelle zur Intensivreinigung darf, wenn darauf ge-
zeigt wird, nicht mehr als 15 cm vom Roboter entfernt sein.
27
Page 28
Chill.book Seite 28 Dienstag, 8. Dezember 2015 3:13 15
8 Raum reinigen
Mit der Intensivreinigungsfunktion können Sie den Roboter
auch von der Ladestation starten lassen:
1. „ “ gedrückt halten.
2. Mit rotem Lichtpunkt auf eine Stelle vor den Roboter zei-
3. „ “, „ “ oder „ “ drücken, um den gewünschten
8.6 Rückkehr zur Ladestation
– „ “ drücken, damit der Roboter zur Ladestation zu-
TIPP: Um den Roboter alternativ am Control-Panel zur Ladestation fahren zu lassen, wiederholt die Power-LED „ “
drücken, bis „00 “ angezeigt wird.
gen, bis dieser die Ladestation verlässt. Nach der Intensivreinigung setzt der Roboter die Reinigung im Automatikmodus fort.
Reinigungsmodus einzustellen.
rückkehrt.
8.7 Roboter stoppen
8.8 Roboter finden
28
– „ “ drücken.
TIPP: 3 Minuten, nachdem der Roboter stoppt oder gestoppt
wurde, schaltet er in den Schlaf-Modus (Power-LED „ “ ist
aus). Beliebige Taste am Roboter oder an der Fernbedienung drücken, um den Roboter wieder zu aktivieren.
Klatschen Sie 3 Mal laut. Der Roboter antwortet mit 3 Signaltönen und blinkendem Control-Panel.
Page 29
23
Chill.book Seite 29 Dienstag, 8. Dezember 2015 3:13 15
9 Uhrzeit und Wochenplan einstellen
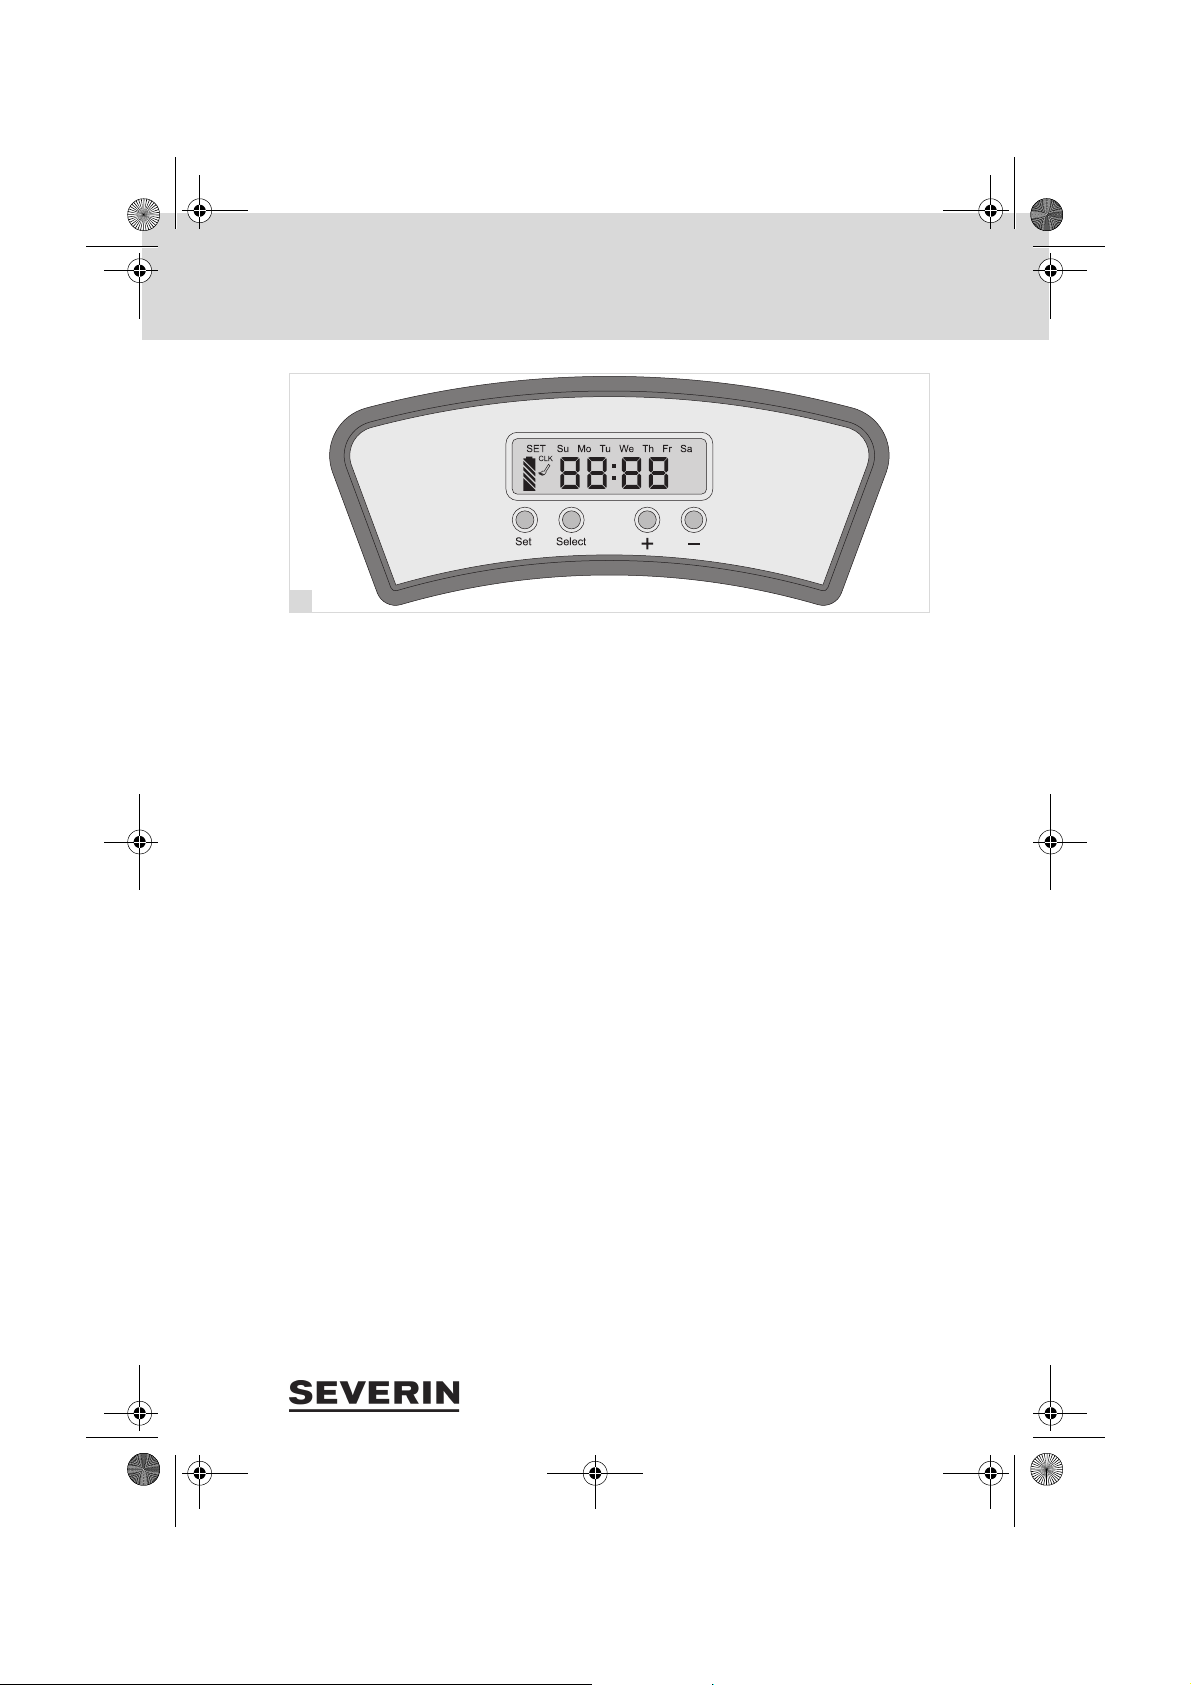
9.1 Uhrzeit einstellen
9 Uhrzeit und Wochenplan einstellen
TIPP: Damit der Wochenplan zu der richtigen Zeit durchgeführt wird, muss die Uhrzeit richtig eingestellt werden.
1. „Set“-Taste wiederholt drücken, bis SET und CLK im
Display blinken (Abb. 23).
2. „Select“-Taste drücken.
3. Mit „+“ und „-“ -Taste Stunde einstellen.
4. „Select“-Taste drücken.
5. Mit „+“ und „-“ -Taste Minute einstellen.
6. „Select“-Taste drücken.
7. Mit „+“ und „-“ -Taste Wochentag einstellen.
8. „Select“-Taste drücken.
29
Page 30
Chill.book Seite 30 Dienstag, 8. Dezember 2015 3:13 15
9 Uhrzeit und Wochenplan einstellen
9.2 Wochenplan einstellen
Mit dieser Einstellung ist es möglich, den Roboter automatisch an festgelegten Wochentagen um eine bestimmte Uhrzeit reinigen zu lassen.
1. „Set“-Taste wiederholt drücken, bis SET und „ “ im
Display blinken.
2. „Select“-Taste drücken.
3. Mit „+“ und „-“ -Taste Stunde einstellen.
4. „Select“-Taste drücken.
5. Mit „+“ und „-“ -Taste Minute einstellen.
6. „Select“-Taste drücken.
7. Wochentag(e) auswählen, an denen der Roboter reinigen soll:
– Ganze Woche (alle Wochentage blinken)
– Montag bis Freitag (Mo, Tu, We, Th und Fr blinken)
– Montag bis Samstag (Mo, Tu, We, Th, Fr und Sa blin-
ken)
– Samstag und Sonntag (Sa und Su blinken)
– einzelner Wochentag (ein Wochentag blinkt)
8. „Select“-Taste drücken.
– „ “-wird angezeigt.
– Wochenplan ist eingestellt.
9.3 Reinigungsmodus für Wochenplan konfigurieren
30
1. Roboter an Netzteil anschließen oder an Ladestation
stellen.
2. Power-LED „ “ drücken.
3. Reinigungsmuster einstellen.
Abschnitt „Reinigungsmuster einstellen“, Seite 24
4. Dauer der Reinigung und Rückkehr zur Ladestation
nach Reinigung einstellen.
Abschnitt „Reinigungsdauer einstellen“, Seite 25
5. Saugleistung einstellen.
Abschnitt „Saugleistung einstellen“, Seite 25
TIPP: Sie können die Einstellungen auch per Fernbedienung
vornehmen.
)
Page 31

24
25
26
Chill.book Seite 31 Dienstag, 8. Dezember 2015 3:13 15
10 Reinigung und Pflege
10.1 Staubbehälter entleeren
10 Reinigung und Pflege
Staubbehälter entleeren, wenn die Saugleistung nachlässt
oder die „ “-LED leuchtet.
1. Sicherstellen, dass das Gerät ausgeschaltet und das
Netzteil nicht angeschlossen ist.
2. Abdeckung abnehmen (Abb. 24).
3. Staubbehälter am Griff aus dem Gerät heben (Abb. 25).
4. Laschen des Staubbehälterdeckels nach außen ziehen
(Abb. 26).
5. Staubbehälterdeckel abnehmen.
31
Page 32

27
28
29
30
Chill.book Seite 32 Dienstag, 8. Dezember 2015 3:13 15
10 Reinigung und Pflege
6. Filter nach oben aus dem Staubbehälter nehmen
7. Saugeinlassabdeckung abnehmen (Abb. 28).
(Abb. 27).
TIPP: Es empfiehlt sich, dabei einen Staubsauger zu benutzen.
Dieser nimmt evtl. austretenden Schmutz direkt auf und
reinigt den Filter ebenfalls effizient.
32
8. Staubbehälter leeren (Abb. 29).
9. Staubfilter mit Bürste reinigen (Abb. 30).
Page 33

31
32
24 h
33
Chill.book Seite 33 Dienstag, 8. Dezember 2015 3:13 15
10 Reinigung und Pflege
10. Saugeinlass mit kleiner Bürste reinigen (Abb. 31).
11. Bei Bedarf Staubbehälter und Filter nass reinigen.
12. Staubbehälter und Filter 24 Stunden trocknen lassen.
33
Page 34

34
353637
Chill.book Seite 34 Dienstag, 8. Dezember 2015 3:13 15
10 Reinigung und Pflege
Staubbehälter einsetzen
1. Saugeinlassabdeckung in Staubbehälter einsetzen
2. Staubfilter einsetzen (Abb. 35).
(Abb. 34).
34
3. Staubbehälterdeckel anbringen (Abb. 36).
4. Staubbehälter in Roboter setzen (Abb. 37).
Page 35

383940
Chill.book Seite 35 Dienstag, 8. Dezember 2015 3:13 15
10 Reinigung und Pflege
Am Saugeinlass (auf der Unterseite des Geräts) befinden
sich 2 Sensoren, die ansprechen, wenn der Saugeinlass
stark verschmutzt ist (Abb. 38).
In diesem Fall den Bereich um den Saugeinlass beispielsweise mit einem Staubsauger gründlich reinigen.
Beim Einsetzten des Staubbehälters und der Abdeckung darauf achten, dass die Sensoren ausgelöst werden (Abb. 38).
5. Abdeckung anbringen (Abb. 39).
10.2 Bürsten entfernen und reinigen
1. Sicherstellen, dass das Gerät ausgeschaltet und das
Netzteil nicht angeschlossen ist.
2. Gerät vorsichtig auf die Oberseite legen, so dass die Un-
terseite zugänglich ist.
3. Bürsten wie gezeigt abziehen (Abb. 40).
4. Haare und Schmutz aus den Bürsten entfernen. Wenn
nötig, dazu vorsichtig eine Schere oder Pinzette benutzen.
5. Bürsten unter Wasser abspülen.
6. Haare und Schmutz von Bürstenaufnahme entfernen.
7. Bürsten wieder anbringen Abschnitt „Bürsten anbrin-
gen“, Seite 15.
TIPP: Falls Borsten abgeknickt sind, können die Bürsten in
heißem Wasser eingeweicht werden, damit sie ihre ursprüngliche Form annehmen.
35
Page 36

Chill.book Seite 36 Dienstag, 8. Dezember 2015 3:13 15
11 Probleme beheben
Anhand nachstehender Tabelle prüfen, ob sich das Problem beheben lässt.
Wenn Fehler im Display angezeigt werden, gibt der Roboter 3 Signaltöne hintereinander ab.
Fehlercode mögliche Ursache / Lösung
E 1 Räder oder Roboter stecken fest.
Roboter ausschalten. Roboter von Hindernissen befreien. Roboter wieder einschalten.
E 2 Abdeckung oder Staubbehälter nicht korrekt installiert.
Abdeckung und Staubbehälter korrekt einsetzen Seite 34, „Staubbehälter
einsetzen“.
E 3 Stoßsensor steckt fest.
Roboter von Hindernissen befreien.
E 4 Roboter wurde länger als 1 Sekunde angehoben.
Roboter auf den Boden stellen.
E 5 Fußboden zu dunkel.
Fallsensoren korrekt einstellen Seite 15, „Fallsensoren einstellen“.
E 6 Ladefehler. Roboter ist ausgeschaltet oder Akkupack ist nicht korrekt installiert.
Akkupack korrekt einsetzen Seite 16, „Akkupack einsetzen“.
Roboter einschalten.
Problem mögliche Ursache / Lösung
Roboter lässt
sich nicht einschalten.
Fernbedienung funktioniert nicht.
Roboter saugt,
aber nimmt keinen Schmutz
auf.
Akku ist nicht korrekt eingesetzt.
Akku korrekt einsetzen Seite 15, „Roboter vorbereiten“.
Akku ist völlig leer.
Gerät einschalten (Stellung „I“) und Akku laden Seite 17, „Roboter laden“.
Akku der Fernbedienung ist leer.
Fernbedienung laden Seite 19, „Fernbedienung laden“.
Roboter und/oder Fernbedienung befinden sich in starkem Licht.
Vorhänge schließen und starke Lichtquellen abschalten.
Roboter zu nah an der Ladestation.
Roboter mindestens 2 Meter von Ladestation entfernt positionieren.
Staubbehälter ist überfüllt oder Filter ist verschmutzt.
Gerät ausschalten (Stellung „0“) und Gerät wie aufSeite 31, „Reinigung und
Pflege“ beschrieben reinigen.
11 Probleme beheben
36
Page 37

Chill.book Seite 37 Dienstag, 8. Dezember 2015 3:13 15
11 Probleme beheben
Problem mögliche Ursache / Lösung
„ “-LED
leuchtet
Staubbehälter ist voll. Staubbehälter entleeren Abschnitt „Staubbehälter ent-
leeren“, Seite 31.
Roboter fährt
nur im Kreis.
Roboter läuft
zwar an, fährt
aber andauernd rückwärts.
Roboter hält
von allein an.
Roboter hat
sich festgefahren.
Roboter fährt
direkt nach
dem Einschalten trotz freier
Fläche keine
geraden Bahnen.
Eine der Rundbürsten dreht
sich nicht
mehr.
Einzelne Borsten der Rundbürsten sind
geknickt.
Roboter lässt
sich nicht laden.
Kabel eines Rads hat sich gelöst.
Radabdeckung öffnen und Kabel wieder einstecken oder an Kundendienst
wenden Seite 319, „Kundendienstzentralen“.
Schieberegler zur Einstellung der Empfindlichkeit der Fallsensoren steht auf einer Stellung für helle Böden, während das Gerät auf einem dunklen Boden eingesetzt wird.
Stellung des Schiebereglers zur Einstellung der Empfindlichkeit der Fallsensoren anpassen Seite 15, „Fallsensoren einstellen“.
Akku muss geladen werden.
Gerät ausschalten (Stellung „0“) und Akku aufladen Seite 17, „Roboter la-
den“.
Von Hand nachhelfen: dem Roboter einen Schubs geben.
Möglicherweise wird eines der Räder durch Verschmutzungen daran gehindert, frei zu drehen.
Rad von Verschmutzungen befreien. Falls erforderlich, hierfür vorsichtig eine
Schere oder Pinzette einsetzen.
Möglicherweise wird diese Rundbürste durch Verschmutzungen daran gehindert, frei zu drehen.
Rundbürste ausbauen (Seite 20, „Ladestation aufstellen und anschließen“)
und von Verschmutzungen befreien. Falls erforderlich, hierfür vorsichtig eine
Schere oder Pinzette einsetzen.
Abnutzungserscheinung.
Bürsten in heißem Wasser einweichen.
Netzteil ist nicht korrekt eingesteckt.
Prüfen, ob Netzteilstecker bzw. Netzteiladapter korrekt in ihren Buchsen sitzen
Seite 17, „Roboter laden“.
Roboter ist nicht eingeschaltet.
Roboter zum Laden einschalten (Stellung „I“).
37
Page 38

Chill.book Seite 38 Dienstag, 8. Dezember 2015 3:13 15
11 Probleme beheben
Problem mögliche Ursache / Lösung
Betriebsdauer
verkürzt sich
zunehmend.
Möglicherweise werden die Räder durch Verschmutzungen daran gehindert,
frei zu drehen.
Rad von Verschmutzungen befreien. Falls erforderlich, hierfür vorsichtig eine
Schere oder Pinzette einsetzen.
Falls Sie das Problem anhand der obigen Tabelle nicht beheben können, rufen Sie unsere Servicehotline (siehe Kontaktdaten im Anhang dieser Gebrauchsanleitung) an.
Gemeinsam mit unseren geschulten Servicemitarbeitern finden wir sicher eine Lösung.
38
Page 39

Chill.book Seite 39 Dienstag, 8. Dezember 2015 3:13 15
11 Probleme beheben
11.1 Ersatz- und Zubehörteile nachbestellen
Artikelnummer Beschreibung
2549048 4er-Set Rundbürsten
0811048 Reinigungsset (Filter + Reinigungspinsel)
11.2 Garantie
Von den nachfolgenden Garantiebedingungen bleiben die gesetzlichen Gewährleistungsrechte gegenüber dem Verkäufer und eventuelle Verkäufergarantien unberührt.
Sollte eine Reparatur erforderlich werden, setzen Sie sich telefonisch oder per Mail mit unserem Kundendienst in Verbindung. Die Kontaktdaten finden Sie im Anhang dieser Gebrauchsanleitung. Wenden Sie sich im Garantiefall direkt an den Händler. Zusätzlich gewährt
SEVERIN eine Herstellergarantie von zwei Jahren ab Kaufdatum. In diesem Zeitraum beseitigen wir
kostenlos alle Mängel, die nachweislich auf Material- oder Fertigungsfehlern beruhen und die Funktion wesentlich beeinträchtigen. Weitere Ansprüche sind ausgeschlossen.
Von der Garantie ausgenommen sind: Schäden, die auf Nichtbeachtung der Gebrauchsanleitung,
unsachgemäße Behandlung oder normalen Verschleiß zurückzuführen sind, ebenso leicht zerbrechliche Teile wie z. B. Glas, Kunststoff oder LEDs. Von der Garantie ausgenommen sind außerdem Batterien und Akkus, die infolge normalen Verschleißes oder unsachgemäßer Handhabung
defekt geworden sind bzw. deren Laufzeit sich verkürzt hat.
Die Garantie erlischt bei Eingriff nicht von SEVERIN autorisierter Stellen.
Ersatzteile oder Zubehör können Sie im Internet unter
https://shop.severin.com/shop/search bequem bestellen.
39
Page 40

41
42
43
Chill.book Seite 40 Dienstag, 8. Dezember 2015 3:13 15
12 Entsorgung
12.1 Akku ausbauen
12 Entsorgung
1. Sicherstellen, dass das Gerät ausgeschaltet und das
Netzteil nicht angeschlossen ist.
2. Gerät vorsichtig auf die Oberseite legen, so dass die Unterseite zugänglich ist.
3. Verriegelung durch Drücken lösen und Akkufachabdeckung abziehen (Abb. 41).
4. Akkupack gegen die Federn drücken.
5. Akkupack aus Akkufach nehmen (Abb. 42).
40
6. Akkufachabdeckung wieder kräftig aufschieben, bis diese hör- und spürbar einrastet (Abb. 43).
Akku und Gerät müssen nun separat voneinander entsorgt
werden Abschnitt „Gerät und Akku separat entsorgen“,
Seite 41.
Page 41

Chill.book Seite 41 Dienstag, 8. Dezember 2015 3:13 15
12 Entsorgung
12.2 Gerät und Akku separat entsorgen
Geräte und Akkus, die mit diesem Symbol gekennzeichnet
sind, müssen getrennt vom Hausmüll entsorgt werden! Geräte und Akkus enthalten wertvolle Rohstoffe, die wiederverwertet werden können. Eine ordnungsgemäße Entsorgung
schützt die Umwelt und die Gesundheit Ihrer Mitmenschen.
Geben Sie das Gerät und den ausgebauten Akku separat zur
Entsorgung an die entsprechenden Sammelstellen.
41
Page 42

Chill.book Seite 42 Dienstag, 8. Dezember 2015 3:13 15
12 Entsorgung
42
Page 43

Chill.book Seite 43 Dienstag, 8. Dezember 2015 3:13 15
Many thanks
Dear Customers,
we hope you will enjoy your high-quality SEVERIN product and thank you for placing your trust in us.
About this instruction manual
This instruction manual includes important hints for your safety and use of the appliance. Failure to
observe the instruction manual can result in personal injuries or damage to the appliance. Keep the
instruction manual safe. If you give or sell the appliance to somebody else, give this person the instruction manual.
Read the instruction manual completely before using the appliance for the first time.
This instruction manual can be downloaded at www.severin-floorcare.de.
Many thanks
EN
43
Page 44

Chill.book Seite 44 Dienstag, 8. Dezember 2015 3:13 15
Table of contents
Many thanks ................................................................................ 43
Table of contents
About this instruction manual .................................................. 43
1 Safety guidelines ........................................................................ 46
2 Technical data ............................................................................ 50
3 Familiarising yourself with the appliance ................................ 50
Scope of delivery .................................................................................... 51
Internal components ............................................................................... 52
Underside of the robot ............................................................................ 53
Detailed view of charging station ............................................................ 54
4 Preparing the robot .................................................................... 55
Fitting the brushes .................................................................................. 55
Setting the drop sensors ......................................................................... 55
Inserting the rechargeable battery pack .................................................. 56
Fitting the brushes .................................................................................. 55
5 Charging the remote control ..................................................... 59
6 Setting up and connecting the charging station ..................... 60
7 Setting up the Room Containment unit .................................... 61
Inserting the battery ................................................................................ 61
Setting up the Room Containment unit ................................................... 61
44
Page 45

Chill.book Seite 45 Dienstag, 8. Dezember 2015 3:13 15
8 Cleaning a room ......................................................................... 62
Preparing the room ................................................................................ 62
Switching on the robot ........................................................................... 62
Starting the robot ................................................................................... 62
Controlling the robot with the control panel ............................................ 64
Controlling the robot using the remote control ....................................... 67
Return to the charging station ................................................................ 68
Stopping the robot .................................................................................. 68
Finding the robot .................................................................................... 68
9 Setting the time and weekly schedule ..................................... 69
Setting the time ...................................................................................... 69
Setting the weekly schedule .................................................................. 70
Configuring the cleaning module for the weekly schedule ..................... 70
10 Cleaning and care ...................................................................... 71
Emptying the dust bin ............................................................................ 71
Removing and cleaning the brushes ...................................................... 75
11 Troubleshooting ......................................................................... 76
Ordering spare parts and accessories ................................................... 79
Warranty ................................................................................................ 79
12 Disposal ...................................................................................... 80
Removing the rechargeable battery ....................................................... 80
Disposing of the appliance and rechargeable battery ............................ 81
45
Page 46

Chill.book Seite 46 Dienstag, 8. Dezember 2015 3:13 15
1 Safety guidelines
1.1 Safety of particular groups of people
1 Safety guidelines
– This appliance may be used by children over 8 years of age and by
persons with reduced physical, sensory or mental capacities or a
lack of experience and/or knowledge if they are supervised or if they
have been instructed on safe use of the appliance and have understood the risks resulting from use of the appliance.
– Children must not be allowed to play with the appliance or stand or
sit on it. Cleaning and user maintenance must not be performed by
children without supervision.
– Keep children younger than 8 away from the appliance and power
cable.
– Keep packaging materials out of the reach of children and dispose of
them. Otherwise, there is a risk of suffocation.
1.2 Connect the appliance safely
The appliance is operated with electrical current. Therefore there is a
risk of electric shock. Therefore, heed the following:
– Only connect the mains adapter to outlets which match the specifi-
cations on the mains adapter type plate.
– Check the appliance and mains adapter for possible damage before
use. Never operate a defective appliance or an appliance with a defective mains adapter.
– Never try to repair the appliance or its mains adapter yourself. To
prevent hazards, repairs to the appliance and the mains adapter may
only be made by our customer service. Give a defective appliance to
a dealer or SEVERIN customer service for repair.
46
Page 47

Chill.book Seite 47 Dienstag, 8. Dezember 2015 3:13 15
1 Safety guidelines
– Do not immerse appliance or mains adapter in water or other liquids.
Keep appliance and mains adapter away from rain and wet conditions. Do not operate the appliance outdoors or in rooms with high
humidity.
– Do not handle the mains adapter with wet hands. When unplugging
the mains adapter from the outlet, always pull directly on the plug.
– Make sure that the mains adapter is not kinked, crushed or run over
and that it does not come into contact with sources of heat, humidity
and sharp edges. Make sure that the mains adapter does not become a stumbling hazard.
– Before cleaning or maintaining the appliance, as well as before
changing accessories, switch off the appliance and unplug the mains
adapter from the outlet.
1.3 Safety when handling rechargeable batteries
With improper handling of rechargeable batteries, there is a danger of
injury and explosion.
– Should it be necessary to replace the rechargeable battery, contact
a dealer or SEVERIN customer service. Never replace the rechargeable battery yourself. Never replace with other rechargeable batteries or other batteries.
– Before activating, using or removing the rechargeable battery, make
sure that the mains adapter is unplugged from the outlet.
– Never take rechargeable batteries apart, expose them to high tem-
peratures or throw them in the fire.
– Never expose rechargeable batteries to direct sunlight.
- With a storage duration of up to 3 months, adhere to the following
temperatures: -20 ― +45 °C.
- With a storage duration of more than 1 year, adhere to the following temperatures: -20 ― +20 °C.
47
Page 48

Chill.book Seite 48 Dienstag, 8. Dezember 2015 3:13 15
1 Safety guidelines
– Never short-circuit rechargeable batteries, that is, never touch both
poles at the same time, especially not with objects that conduct electricity. Store rechargeable batteries so that they cannot be short-circuited by other rechargeable batteries or metal objects during storage.
– Only use the included mains adapter to charge the rechargeable bat-
tery. Never charge the rechargeable battery with another mains
adapter. Only use the included mains adapter to charge the rechargeable battery for this appliance.
– At the end of its life span, remove the rechargeable battery as de-
scribed. Then take the rechargeable battery to an appropriate collection point nearby, thus ensuring safe and environmentally-appropriate disposal. Never throw rechargeable batteries away in household
garbage!
– In case of improper handling, liquid can escape from the rechargea-
ble battery. Do not use the rechargeable battery if it is damaged or if
it leaking liquid.
- If liquid has escaped, avoid contact with the liquid.
- In case of contact with the liquid, rinse it off immediately with copious amounts of water. In case of after-effects (irrespective of
type), consult a doctor.
1.4 Intended use
The appliance must only be used domestically. The appliance must only
be used for cleaning on flat hard floors or short-pile carpets with a normal level of soiling.
Any other use is deemed improper and is forbidden.
48
Page 49

Chill.book Seite 49 Dienstag, 8. Dezember 2015 3:13 15
1 Safety guidelines
In order to prevent injuries, fires and damage, the appliance must
not be used to clean:
– people, animals and plants. Always keep vacuum openings away
from all body parts, hair and clothing.
– glowing or burning particles (such as ash, coals, charcoal, ciga-
rettes, matches).
– explosive or flammable materials or toner.
– water and other liquids, e.g. wet carpet cleaning agents.
– sharp objects, such as glass splinters, needles or construction
waste.
The following is also forbidden:
– Modify or repair the appliance or its charger and mains adapter.
– Use if the dust bin, filter and cover have not been correctly inserted.
– Use in rooms where there are breakable object or objects that can
tip over easily. Prepare rooms so that the use of the appliance will
not cause damage.
– Use, storage or charging outdoors.
– The storage of objects on the appliance.
49
Page 50

Chill.book Seite 50 Dienstag, 8. Dezember 2015 3:13 15
2 Technical data
2Technical data
Robot vacuum cleaner Model RB7028
Rechargeable battery type Lithium-Ion
Rechargeable battery capacity
Rechargeable battery life approx. 90 min
Timer function 30 min. ►45 min. ►60 min. ►max.
Rechargeable battery
charge time
Suction power 180 mmAq
Range approx. 100 m²
Mains adapter Type GQ30300100AG
Input 100-240 V~; 50/60 Hz 1.0 A max.
Output 30 V DC 1A
3 Familiarising yourself with the appliance
14.8 V; 2,800 mAh
max. 4 hours
50
Page 51

1
2
3
4
5
6
7
8
9
10
11
1
Chill.book Seite 51 Dienstag, 8. Dezember 2015 3:13 15
3 Familiarising yourself with the appliance
3.1 Scope of delivery
1 Robot
2 Round brushes (4 x)
3 Charging station
4 Spare filter
5 Mains adapter
6 USB cable (for charging the remote control)
7 Room Containment unit
8 Remote control
9 Rechargeable battery pack
10 Batteries (for Room Containment unit)
11 Cleaning brushes
51
Page 52

1
2
3
4
5
6
7
2
Chill.book Seite 52 Dienstag, 8. Dezember 2015 3:13 15
3 Familiarising yourself with the appliance
3.2 Internal components
1 Cover
2 Dust bin cover
3 Dust filter
4 Dust inlet cover
52
5 Dust bin
6 Control panel
7 Bumper
Page 53

4
4
5
6
7
3
4
2
1
8
3
Chill.book Seite 53 Dienstag, 8. Dezember 2015 3:13 15
3 Familiarising yourself with the appliance
3.3 Underside of the robot
1 Round brushes
2 Brush mount
3 Suction inlet
4 Drop sensors
5 On/Off switch / charging socket
6 Charging contacts
7 Rechargeable battery pack
8 Rechargeable battery compartment cover
53
Page 54

1
2
3
4
5
4
Chill.book Seite 54 Dienstag, 8. Dezember 2015 3:13 15
3 Familiarising yourself with the appliance
3.4 Detailed view of charging station
1 Charging contacts
2 Panel (details fig. 23, page. 69)
3 Mounting plate for wall mounting (front)
4 Mounting plate for wall mounting (rear)
5 Adhesive surface
54
Page 55

5
6
Chill.book Seite 55 Dienstag, 8. Dezember 2015 3:13 15
4 Preparing the robot
4.1 Fitting the brushes
4 Preparing the robot
1. Make sure that the appliance is switched off and the
mains adapter is not connected.
2. Carefully place the appliance on its head so that the underside is accessible.
3. Connect the brushes to the brush mount (fig. 5).
4.2 Setting the drop sensors
The drop sensors enable the robot to detect steps and drops
automatically and prevents it from going down them. The
drop sensors scan the surface. The relative lightness of the
floor therefore has to be taken into account when setting the
sensors.
1. Make sure that the appliance is switched off and the
mains adapter is not connected.
2. Carefully place the appliance on its head so that the underside is accessible.
3. Put all 3 sensors in the same position (fig. 6):
– For light floors and low steps, position 0 to 1.
– For dark floors and high steps, positions 2 to 3.
TIP: If the robot always moves backwards on dark floors, select position "3".
55
Page 56

789
Chill.book Seite 56 Dienstag, 8. Dezember 2015 3:13 15
4 Preparing the robot
4.3 Inserting the rechargeable battery pack
1. Make sure that the appliance is switched off and the
mains adapter is not connected.
2. Carefully place the appliance on its head so that the underside is accessible.
3. Press the catch to unfasten it and remove the rechargeable battery compartment cover (fig. 7).
4. Push the rechargeable battery pack against the springs
(fig. 8).
Make sure that the "+" marking on the rechargeable battery is positioned opposite the "+" marking in the rechargeable battery compartment.
56
5. Push the rechargeable battery pack down into the rechargeable battery compartment.
6. Firmly push the rechargeable battery cover on so that
you hear and feel it click into place (fig. 9).
The rechargeable battery is now installed and has to be
charged, chapter „Charging the robot“, page 57.
Page 57

101112
Chill.book Seite 57 Dienstag, 8. Dezember 2015 3:13 15
4 Preparing the robot
4.4 Charging the robot
TIP: If you want to use the robot as soon as possible, charge
the robot with the mains adapter. That way, you save time
which you would otherwise need to set up the charging station.
It is best to charge the robot's rechargeable battery pack before each use, especially after the appliance has not been
used for a while.
This increases the service life of the rechargeable battery
and ensures the longest possible cleaning cycles.
With the mains adapter:
1. Switch on the robot (fig. 10).
2. Connect the mains adapter to the appliance (fig. 11).
3. Connect the mains adapter to an outlet socket.
With the charging station:
1. Set up and connect the charging station. chapter „Set-
ting up and connecting the charging station“, page 60
2. Place the robot on the charging station.
In the process, make sure that the charging contacts on
the robot touch those in the charging station.
– "00" appears on the display screen.
– Every 2.4 minutes the charge status increases by 01.
– The Power LED " " flashes green.
57
Page 58

13
Chill.book Seite 58 Dienstag, 8. Dezember 2015 3:13 15
4 Preparing the robot
– After approximately 4 hours, the Power LED " " lights
– "FU" appears on the display screen.
– The appliance is fully charged. If the robot has been
TIP: In order for the rechargeable battery to be ready for use
with a maximum charge at all times, it is charged for 15 minutes each hour as long as it is connected to the mains power.
The display switches from "FU" to "93" and then increases
every 2.4 minutes again until fully charged ("FU").
TIP: When the rechargeable battery charge has almost run
out, the robot emits two sound signals and "Lo" is displayed
on the display screen. The Power LED " " now lights up
red. The robot stops or returns to the charging station, depending on which setting you have selected.
up constantly in green.
charged using the mains adapter: Disconnect the mains
adapter from the outlet and appliance.
58
Page 59

14
Chill.book Seite 59 Dienstag, 8. Dezember 2015 3:13 15
5 Charging the remote control
5 Charging the remote control
1. Connect the supplied USB cable to the remote control.
2. Connect the USB cable to a USB port.
– The LED indicator lights up and indicates that the remote
control is being charged.
– After approximately 30 minutes, the remote control is ful-
ly charged and the LED indicator switches back off
3. Disconnect the USB cable from the remote control and
the USB port.
59
Page 60

15
16
Chill.book Seite 60 Dienstag, 8. Dezember 2015 3:13 15
6 Setting up and connecting the charging station
6 Setting up and connecting the charging station
1. Set up the charging station on a wall within range of an
outlet socket with the appropriate free space as shown in
the illustration (fig. 15).
TIP: To secure the charging station, the mounting plate on
the back of the charging station can be screwed or stuck to
the wall.
60
2. Connect the mains adapter to the charging station
(fig. 16).
3. Connect the mains adapter to an outlet socket.
TIP: We recommend that you check whether the robot finds
the charging station. To do so, place the robot in the room
and press " " on the remote control (chapter „Setting
the cleaning duration“, page 67). If the robot does not find the
charging station, place the charging station in a more accessible position.
Page 61

17
18
Chill.book Seite 61 Dienstag, 8. Dezember 2015 3:13 15
7 Setting up the Room Containment unit
7.1 Inserting the battery
7 Setting up the Room Containment unit
1. Push the battery compartment cover at the rear up-
wards.
2. Insert the supplied batteries (4x AA) into the battery
compartment (fig. 17) in accordance with the symbols.
3. Re-attach the battery compartment cover
7.2 Setting up the Room Containment unit
The Room Containment unit can be used to block the robot's
access to passageways.
1. Switch on the Room Containment unit with the slide
switch on the top.
2. Place the Room Containment unit in the passageway
(fig. 18).
61
Page 62

19
Chill.book Seite 62 Dienstag, 8. Dezember 2015 3:13 15
8Cleaning a room
8.1 Preparing the room
8 Cleaning a room
– Remove any loose objects which may otherwise be
– Remove cables, draperies, and everything that could get
– Remove breakable objects or objects that can tip over
8.2 Switching on the robot
1. Switch on the robot at the On/Off switch (position "I")
2. Wait until the Power LED " " lights up green.
8.3 Starting the robot
Starting from any point in the room
Requirement: The robot must be switched on. chapter
„Switching on the robot“, page 62
On the robot:
1. Press the Power LED " " to activate the robot.
TIP: The default settings after switching on are: Automatic
mode (" ", " ", " " and " " light up), maximum
cleaning duration ("99 ") and normal suction power
(" ").
2. Set the cleaning pattern.
3. Set the duration of cleaning and the return to the charg-
4. Set the suction power.
5. Wait 3 seconds until the robot begins cleaning.
pushed around by the robot.
entangled in the brushes.
easily.
(fig. 19).
chapter „Setting the cleaning pattern“, page 64
ing station after cleaning.
chapter „Setting the cleaning duration“, page 65
chapter „Adjusting the suction power“, page 65
62
Page 63

Chill.book Seite 63 Dienstag, 8. Dezember 2015 3:13 15
8 Cleaning a room
With the remote control:
Press " ", " ", " " or " " to start the robot with the
desired option or use the intensifying function to start.
chapter „Intensive cleaning“, page 67
Starting the robot from the charging station
Requirement: The robot must be switched on. chapter
„Switching on the robot“, page 62
On the robot:
Press and hold the Power LED " " for 3 seconds.
With the remote control:
Use the intensifying function.
chapter „Intensive cleaning“, page 67
Automatic start-up
Generate a weekly schedule on the charging station.
chapter „Setting the weekly schedule“, page 70
63
Page 64

20
Chill.book Seite 64 Dienstag, 8. Dezember 2015 3:13 15
8Cleaning a room
8.4 Controlling the robot with the control panel
TIP: The robot confirms each input with a sound signal. If the
setting is not plausible, 2 sounds signals can be heard.
1. Press the Power LED " " to activate the robot.
If no button is pressed on the robot or on the remote control
within 3 seconds, the robot starts cleaning with the current
settings.
64
Setting the cleaning pattern
1. Press the " " button repeatedly until the LED for the
desired setting lights up:
– " ": Travel in a spiral pattern
– " ": Follow the wall
– " ": Travel in straight lines
– " ": Random mode
– " ", " ", " ", " ": Automatic mode
TIP: The robot switches between the different cleaning
modes automatically in accordance with the situation.
Page 65

Chill.book Seite 65 Dienstag, 8. Dezember 2015 3:13 15
8 Cleaning a room
2. Set the duration of cleaning and the return to the charg-
ing station after cleaning.
chapter „Setting the cleaning duration“, page 65
3. Set the suction power.
chapter „Adjusting the suction power“, page 65
4. Wait 3 seconds until the robot begins cleaning.
Setting the cleaning duration
1. Press the Power LED " " repeatedly until the desired
cleaning duration is set and the automatic return to the
charging station is switched on/off:
– "00 ": Robot returns to charging station
– "30": Robots vacuums for 30 minutes.
– "45": Robots vacuums for 45 minutes.
– "60": Robots vacuums for 60 minutes.
– "30 ": Robot vacuums for 30 minutes and then return
to the charging station.
– "45 ": Robot vacuums for 45 minutes and then return
to the charging station.
– "60 ": Robot vacuums for 60 minutes and then return
to the charging station.
– "99 ": The robot vacuums until the rechargeable bat-
tery starts to run out (90-120 minutes) and then returns
to the charging station.
2. Set the cleaning pattern.
chapter „Setting the cleaning pattern“, page 64
3. Set the suction power.
chapter „Adjusting the suction power“, page 65
4. Wait 3 seconds until the robot begins cleaning.
Adjusting the suction power
1. Press the " " button repeatedly until the desired suc-
tion power is set:
– " ": low suction power
– " ": high suction power
– no symbol: OFF
2. Set the cleaning pattern.
chapter „Setting the cleaning pattern“, page 64
65
Page 66

Chill.book Seite 66 Dienstag, 8. Dezember 2015 3:13 15
8Cleaning a room
3. Set the duration of cleaning and the return to the charg-
4. Wait 3 seconds until the robot begins cleaning.
TIP: After cleaning the robot emits a sound signal and stops,
or returns to the charging station, depending on the setting.
Stopping the robot
– Press and hold the Power LED " " for half a second
– Pick up the robot. Cleaning is stopped after 1 second.
– Switch off the robot at the On/Off switch.
TIP: Three minutes after the robot stops or has been
stopped, it switches to sleep mode. (Power LED " " is off).
Press any key on the robot or remote control to activate the
robot again.
ing station after cleaning.
chapter „Setting the cleaning duration“, page 65
to stop the robot.
66
Page 67

21
22
Chill.book Seite 67 Dienstag, 8. Dezember 2015 3:13 15
8 Cleaning a room
8.5 Controlling the robot using the remote control
TIP: The robot confirms each input with a sound signal. If the
setting is not plausible, 2 sounds signals can be heard.
Setting the cleaning pattern
1. Point the remote control at the robot.
2. Press " ", " " or " " to set the desired cleaning
pattern.
– " ": Automatic
– " ": Random
– " ": Follow the wall
Setting the cleaning duration
1. Point the remote control at the robot.
2. Press " " to set the cleaning duration to 30 minutes
with a subsequent return to the charging station.
TIP: A setting for a longer cleaning duration has to be made
on the robot.
Setting the suction power
1. Press " " to set a high suction power
2. Press " " to set a low suction power
3. Press " " o shut off the fan.
Intensive cleaning
1. Press and hold " ".
2. Point the red dot of light at the spot in front of the robot
which is to be cleaned (fig. 22).
TIP: The spot for intensive cleaning must not be more than
15 cm away from the robot when pointing at it.
67
Page 68

Chill.book Seite 68 Dienstag, 8. Dezember 2015 3:13 15
8Cleaning a room
You can also use the intensifying function to start up the robot from the charging station:
1. Press and hold " ".
2. Point the red dot of light at a spot in front of the robot until
3. Press " ", " " or " " to set the desired cleaning
8.6 Return to the charging station
– Press " " so that the robot returns to the charging sta-
TIP: Alternatively, to have the robot return to the charging
station by using the control panel, press the Power LED
" " repeatedly until "00 " is displayed.
it leaves the charging station. After intensive cleaning,
the robot resumes cleaning in automatic mode.
mode.
tion.
8.7 Stopping the robot
8.8 Finding the robot
68
– Press " ".
TIP: 3 minutes after the robot stops or has been stopped, it
switches to sleep mode. (Power LED " " is off). Press any
key on the robot or remote control to activate the robot again.
Clap loudly 3 times. The robot responds with 3 sound signals
and the control panel flashes.
Page 69

23
Chill.book Seite 69 Dienstag, 8. Dezember 2015 3:13 15
9 Setting the time and weekly schedule
9.1 Setting the time
9 Setting the time and weekly schedule
TIP: The time has to be set correctly so that the weekly
schedule is performed at the correct time.
1. Press the "Set" key repeatedly until SET and CLK flash
on the display screen. (fig. 23)
2. Press the "Select" key.
3. Use the "+" and "-" keys to set the hours.
4. Press the "Select" key.
5. Use the "+" and "-" keys to set the minutes.
6. Press the "Select" key.
7. Use the "+" and "-" keys to set the day of the week.
8. Press the "Select" key.
69
Page 70

Chill.book Seite 70 Dienstag, 8. Dezember 2015 3:13 15
9 Setting the time and weekly schedule
9.2 Setting the weekly schedule
This setting enables you to have the robot clean automatically on set days of the week, at a certain time.
1. Press the "Set" key repeatedly until SET and " " flash
on the display screen.
2. Press the "Select" key.
3. Use the "+" and "-" keys to set the hours.
4. Press the "Select" key.
5. Use the "+" and "-" keys to set the minutes.
6. Press the "Select" key.
7. Select the day(s) of the week on which you wish the robot to clean:
– Complete week (all the days of the week flash)
– Monday to Friday (Mo, Tu, We, Th and Fr flash)
– Monday to Saturday (Mo, Tu, We, Th, Fr and Sa flash)
– Saturday and Sunday (Sa and Su flash)
– Individual day of the week (one day of the week flashes)
8. Press the "Select" key.
– " " is displayed.
– The weekly schedule has been set.
9.3 Configuring the cleaning module for the weekly schedule
1. Connect the robot to the mains adapter or place it on the
charging station.
2. Press the Power LED " ".
3. Set the cleaning pattern.
chapter „Setting the cleaning pattern“, page 64
4. Set the duration of cleaning and the return to the charging station after cleaning.
chapter „Setting the cleaning duration“, page 65
5. Set the suction power.
chapter „Adjusting the suction power“, page 65
TIP: You can also make the settings using the remote control.
)
70
Page 71

242526
Chill.book Seite 71 Dienstag, 8. Dezember 2015 3:13 15
10 Cleaning and care
10.1 Emptying the dust bin
10 Cleaning and care
Empty the dust bin when the suction power drops or the
" " LED lights up.
1. Make sure that the appliance is switched off and the
2. Remove the cover (fig. 24).
3. Use the handle to lift the dust container out of the appli-
mains adapter is not connected.
ance (fig. 25).
4. Pull the tabs on the dust bin cover outwards (fig. 26).
5. Remove the dust bin cover.
71
Page 72

27
28
29
30
Chill.book Seite 72 Dienstag, 8. Dezember 2015 3:13 15
10 Cleaning and care
6. Remove the filter upwards from the dust container
7. Remove the suction inlet cover (fig. 28).
(fig. 27).
TIP: It is recommended that you use a vacuum cleaner
for this.
The vacuum cleaner will take up any escaping dust directly and also clean the filter efficiently.
72
8. Empty the dust bin (fig. 29).
9. Clean the dust filter with a brush (fig. 30).
Page 73

31
32
24 h
33
Chill.book Seite 73 Dienstag, 8. Dezember 2015 3:13 15
10 Cleaning and care
10. Clean the suction inlet with a small brush (fig. 31).
11. If necessary, wet-clean the dust container and filter.
12. Leave the dust bin and filter to dry for 24 hours.
73
Page 74

34
35
36
37
Chill.book Seite 74 Dienstag, 8. Dezember 2015 3:13 15
10 Cleaning and care
Inserting the dust bin
1. Insert the suction inlet cover in the dust bin (fig. 34).
2. Insert the dust filter (fig. 35).
74
3. Fit the dust bin cover (fig. 36).
4. Place the dust bin in the robot (fig. 37).
Page 75

383940
Chill.book Seite 75 Dienstag, 8. Dezember 2015 3:13 15
10 Cleaning and care
On the suction inlet (on the underside of the appliance) there
are 2 sensors which respond when the suction inlet is heavily
soiled (fig. 38).
If this is the case, clean the suction inlet thoroughly, for example, with a vacuum cleaner.
When inserting the dust bin and the cover, make sure that the
sensors trigger (fig. 38).
5. Fit the cover (fig. 39).
10.2 Removing and cleaning the brushes
1. Make sure that the appliance is switched off and the
mains adapter is not connected.
2. Carefully place the appliance on its head so that the un-
derside is accessible.
3. Detach the brushes as indicated (fig. 40).
4. Remove hair and dirt from the brushes. If necessary,
carefully use a scissors or tweezers to do so.
5. Rinse the brushes off under water.
6. Remove hair and dirt from the brush mount.
7. Re-attach the brushes.chapter „Fitting the brushes“,
page 55
TIP: If the bristles are bent, the brushes can be soaked in hot
water so that they return to their original shape.
75
Page 76

Chill.book Seite 76 Dienstag, 8. Dezember 2015 3:13 15
11 Troubleshooting
Using the table below, check whether you can remedy the problem:
When a fault is shown on the display screen, the robot emits 3 sound signals, one after the other.
Fault code Possible cause / solution
E 1 Wheels or robot stuck
Switch off the robot. Free the robot from obstructions. Switch the robot back on.
E 2 Cover or dust bin not installed correctly.
Insert the cover and dust bin correctly.page 74, „Inserting the dust bin“
E 3 The bumper is stuck.
Free the robot from obstructions
E 4 The robot has been lifted for longer than 1 second.
Place robot on the floor.
E 5 Floor too dark.
Set the drop sensors correctly. page 55, „Setting the drop sensors“
E 6 Charging error. The robot has been switched off or the rechargeable battery
pack has not been installed correctly.
Insert the rechargeable battery correctly. page 56, „Inserting the rechargea-
ble battery pack“
Switch on the robot.
Problem Possible cause / solution
The robot cannot be
switched on.
The remote
control does
not function
The rechargeable battery has not been inserted correctly.
Insert the rechargeable battery correctly. page 55, „Preparing the robot“.
Rechargeable battery is completely discharged.
Switch on the appliance (position "I") and charge the rechargeable battery.
page 57, „Charging the robot“.
The remote control rechargeable battery is completely discharged.
Charge the remote control. page 59, „Charging the remote control“
The robot and/or remote control are in strong light.
Close the curtains and switch off any string light sources.
Robot too near to the charging station.
Position the robot at least 2 metres from the charging station.
11 Troubleshooting
76
Page 77

Chill.book Seite 77 Dienstag, 8. Dezember 2015 3:13 15
11 Troubleshooting
Problem Possible cause / solution
The robot vacuums but does
not pick up any
dirt
Dust bin is too full or filter is soiled.
Switch off the appliance (position "0") and page 71, „Cleaning and care“.
The " " LED
lights up
The robot goes
round and
round in circles
The robot is
running but is
constantly travelling in reverse.
The robot
stops on its
own.
The robot has
become stuck.
The robot does
not move in
straight lines
directly after it
is switched on.
One of the
round brushes
no longer
turns.
The dust bin is full. Empty the dust bin. chapter „Emptying the dust bin“, page
71
A cable of one of the wheels has become detached.
Open the wheel cover and re-insert the cable or contact the customer service
department page 319, „Service Centres“
The slider for setting the sensitivity of the sensors is on a setting for light floors
while the appliance is being used on a dark floor.
Adjust setting of the slider for the setting of the sensitivity of the sensors,
page 55, „Setting the drop sensors“.
The rechargeable battery needs to be charged.
Switch off the appliance (position "0") and charge rechargeable battery, page
57, „Charging the robot“.
Help the robot manually by giving it a push.
It is possible that soiling is preventing one of the wheels from moving freely.
Free wheel of dirt. If necessary, carefully use a scissors or tweezers for this.
It is possible that dirt is preventing this round brush from moving freely.
Remove the round brush (page 60, „Setting up and connecting the charging
station“) and free it of dirt. If necessary, carefully use a scissors or tweezers for
this.
Individual bristles of the
round brushes
are bent
Signs of wear.
Soak the brushes in hot water.
77
Page 78

Chill.book Seite 78 Dienstag, 8. Dezember 2015 3:13 15
11 Troubleshooting
Problem Possible cause / solution
The robot cannot be
charged.
The mains adapter is not plugged in correctly.
Check whether the mains adapter plug and the mains adapter are connected
firmly to their sockets. page 57, „Charging the robot“.
The robot is not switched on.
Switch the robot on for charging (position "I").
The operating
duration is becoming progressively
shorter.
It is possible that dirt is preventing the wheels from moving freely.
Free wheel of dirt. If necessary, carefully use a scissors or tweezers for this.
If you can not solve the problem using the table above, call
our Service hotline (see contact information in the appendix
of this instruction manual).
Together with our trained service employees, we are sure to
find a solution.
78
Page 79

Chill.book Seite 79 Dienstag, 8. Dezember 2015 3:13 15
11 Troubleshooting
11.1 Ordering spare parts and accessories
Item number Description
2549048 4-part set of round brushes
0811048 Cleaning set (filter + cleaning brush)
11.2 Warranty
The legal warranty rights with respect to the seller and any seller warranties are unaffected by the
following warranty conditions.
If repairs are required, contact our customer service department by telephone or e-mail. The
contact information can be found in the appendix to this instruction manual. In case of war-
ranty claim, contact the dealer directly. In addition, SEVERIN provides a manufacturer's warranty of
two years from the date of purchase. During this period, we will eliminate any defects which are proven to be due to material or manufacturing errors and which compromise the function, free of charge.
Other claims are excluded.
Excepted from the warranty are: Damage that is due to non-observance of the instruction manual,
improper handling or normal wear; also easily-breakable parts such as glass, plastic or LEDs. Batteries and rechargeable batteries which are faulty or whose service life has been shortened as a
result of normal wear or improper handling, are not covered by the warranty either.
If the appliance is tampered with by persons not authorised by SEVERIN, this will render the warranty null and void.
You can order spare parts and accessories from the comfort
of your own home via the internet at
https://shop.severin.com/shop/search.
79
Page 80

41
42
43
Chill.book Seite 80 Dienstag, 8. Dezember 2015 3:13 15
12 Disposal
12.1 Removing the rechargeable battery
12 Disposal
1. Make sure that the appliance is switched off and the
mains adapter is not connected.
2. Carefully place the appliance on its head so that the underside is accessible.
3. Press the catch to unfasten it and remove the rechargeable battery compartment cover (fig. 41).
4. Push the rechargeable battery pack against the springs
5. Remove the rechargeable battery pack from the rechargeable battery compartment (fig. 42).
80
6. Firmly push the rechargeable battery cover on so that
you hear and feel it click into place (fig. 43).
The rechargeable battery and appliance must now be disposed of separately from one another chapter „Disposing
of the appliance and rechargeable battery“, page 81.
Page 81

Chill.book Seite 81 Dienstag, 8. Dezember 2015 3:13 15
12 Disposal
12.2 Disposing of the appliance and rechargeable battery
Appliances and rechargeable batteries which are marked
with this symbol must be disposed of separately from domestic waste. Appliances and rechargeable batteries contain valuable raw materials that can be recycled. Proper disposal
protects the environment and the health of your fellow men.
Dispose of the appliance and the removed rechargeable battery separately in the appropriate collection locations.
81
Page 82

Chill.book Seite 82 Dienstag, 8. Dezember 2015 3:13 15
12 Disposal
82
Page 83

Chill.book Seite 83 Dienstag, 8. Dezember 2015 3:13 15
Remerciements
Chère cliente, cher client,
nous espérons que ce produit de qualité fabriqué par les soins de la maison SEVERIN vous donnera
pleine et entière satisfaction, et nous vous remercions de votre confiance.
Au sujet de cette notice
Cette notice contient des informations importantes pour votre sécurité et pour l'utilisation optimale
de l'appareil. En cas de non-respect des instructions, des personnes peuvent être blessées ou l'appareil endommagé. Conservez soigneusement cette notice. Faites-la suivre en cas de cession de
l'appareil à un tiers.
Veuillez lire l'intégralité de la notice avant la première utilisation.
Il est possible de télécharger cette notice d'utilisation à www.severin-floorcare.de.
Remerciements
FR
83
Page 84

Chill.book Seite 84 Dienstag, 8. Dezember 2015 3:13 15
Sommaire
Remerciements ........................................................................... 83
Sommaire
Au sujet de cette notice ............................................................. 83
1 Consignes de sécurité ............................................................... 86
2 Caractéristiques techniques ..................................................... 90
3 Faire la connaissance de l'appareil .......................................... 90
Etendue de la livraison ............................................................................ 91
Composants intérieurs ............................................................................ 92
Dessous du robot .................................................................................... 93
Chargeur en détail .................................................................................. 94
4 Préparation du robot .................................................................. 95
Mise en place de la brosse ..................................................................... 95
Réglage des capteurs antichute ............................................................. 95
Mettre en place la batterie ...................................................................... 96
Mise en place de la brosse ..................................................................... 95
5 Chargement de la télécommande ............................................. 99
6 Mise en place et raccordement du chargeur ......................... 100
7 Mise en place du Room Containment .................................... 101
Mettre les piles en place ....................................................................... 101
Mise en place du Room Containment ................................................... 101
84
Page 85

Chill.book Seite 85 Dienstag, 8. Dezember 2015 3:13 15
8 Nettoyage de la pièce .............................................................. 102
Préparer la pièce ................................................................................ 102
Mettre le robot en marche ................................................................. 102
Démarrer le robot ................................................................................. 102
Commander le robot avec le Control-Panel ......................................... 104
Commander le robot avec la télécommande ....................................... 107
Retour au chargeur .............................................................................. 108
Arrêter le robot ..................................................................................... 108
Trouver le robot .................................................................................... 108
9 Réglage de l'heure et du planning hebdomadaire ................ 109
Réglage de l'heure ............................................................................... 109
Réglage du planning hebdomadaire .................................................... 110
Configurer le mode de nettoyage pour le planning hebdomadaire ...... 110
10 Nettoyage et entretien ............................................................. 111
Vider le bac à poussière ...................................................................... 111
Enlever et nettoyer les brosses ............................................................ 115
11 Résolution des pannes ............................................................ 116
Commande de pièces détachées ou d'accessoires ............................. 119
Garantie ............................................................................................... 119
12 Mise au rebut ............................................................................ 120
Démontage de la batterie ..................................................................... 120
Mise au rebut séparée de l'appareil et de la batterie ........................... 121
85
Page 86

Chill.book Seite 86 Dienstag, 8. Dezember 2015 3:13 15
1 Consignes de sécurité
1.1 Sécurité des personnes
1 Consignes de sécurité
– Cet appareil peut être utilisé par des enfants à partir de 8 ans, ainsi
que par des personnes aux facultés physiques, sensorielles ou mentales restreintes, ou ne possédant pas l'expérience et/ou les
connaissances suffisantes, si elles sont surveillées ou bien ont été
instruites sur l'utilisation en toute sécurité de l'appareil et qu'elles ont
compris les dangers associés.
– Il doit être interdit aux enfants de jouer avec l’appareil, ainsi que de
monter ou de s’asseoir dessus. Les enfants ne doivent pas être autorisés à nettoyer ou à effectuer l'entretien de l'appareil sans surveillance.
– Il convient d'empêcher les enfants de moins de 8 ans de toucher à
l'appareil et au câble du bloc d'alimentation.
– Stocker les emballages hors de la portée des enfants ou les mettre
à la poubelle, pour éviter tout risque d’étouffement.
1.2 Branchement de l’appareil en toute sécurité
Cet appareil fonctionnant grâce à une alimentation électrique, un risque
d'électrocution existe. Il convient donc de respecter les consignes
suivantes :
– Brancher le bloc d'alimentation uniquement sur des prises de cou-
rant dont les caractéristiques correspondent aux indications de la
plaque signalétique du bloc d'alimentation.
– Vérifier avant usage que l’appareil et le cordon électrique sont
exempts de défauts. Ne jamais mettre en marche un appareil défectueux ou dont le bloc d’alimentation est défectueux.
86
Page 87

Chill.book Seite 87 Dienstag, 8. Dezember 2015 3:13 15
1 Consignes de sécurité
– Ne jamais essayer de pratiquer soi-même des réparations sur l’ap-
pareil ou le bloc d’alimentation. Pour éviter tout risque, les réparations doivent être effectuées exclusivement par notre service aprèsvente. Le cas échéant, il convient de remettre l’appareil défectueux
à votre revendeur ou au service après-vente SEVERIN.
– Ne jamais immerger l’appareil dans l’eau ou dans d’autres liquides.
Garder l'appareil et le bloc d'alimentation à l'abri de la pluie et de l'humidité. Ne pas utiliser l'appareil en plein air, ni dans des pièces très
humides.
– Ne pas toucher le bloc d'alimentation avec les mains humides. Pour
débrancher le bloc d'alimentation de la prise, toujours le saisir par la
fiche.
– Veiller à ce que le câble du bloc d'alimentation ne soit ni vrillé, ni
coincé, ni écrasé. Empêcher tout contact avec des sources de chaleur, d'humidité ou avec des objets tranchants. Veiller à ne pas laisser le câble du bloc d'alimentation dans le passage pour éviter tout
risque de trébucher.
– Avant le nettoyage ou l'entretien de l'appareil, ainsi qu'avant de rem-
placer un accessoire, éteindre l'appareil et s'assurer que le bloc d'alimentation n'est pas branché.
1.3 Sécurité lors de l'utilisation de la batterie
Un maniement incorrect de la batterie constitue un risque de blessure
ou d'exposition.
– Si le remplacement de la batterie est nécessaire, contacter un reven-
deur ou le service après-vente de SEVERIN. Ne jamais remplacer la
batterie soi-même. Ne jamais remplacer la batterie par un accumulateur ou une autre batterie.
– Avant l'activation, l'insertion ou le retrait de la batterie, vérifier que le
bloc d'alimentation est débranché au niveau de la prise.
87
Page 88

Chill.book Seite 88 Dienstag, 8. Dezember 2015 3:13 15
1 Consignes de sécurité
– Ne jamais retirer la batterie ni l'exposer à des températures élevées,
ni encore la jeter au feu.
– Ne jamais exposer la batterie aux rayons directs du soleil.
- En cas de durée d'entreposage jusqu'à 3 mois, respecter la plage
de température suivante : -20 à +45 °C.
- En cas de durée d'entreposage supérieure à 1 an, respecter la
plage de température suivante : -20 à +20 °C.
– Ne jamais court-circuiter la batterie, c'est-à-dire ne pas toucher les
deux pôles en même temps, en particulier avec des objets conducteurs. Stocker la batterie de façon à ce qu'elle ne puisse pas être
court-circuitée accidentellement par d'autres batteries ou objets métalliques.
– Utiliser uniquement le bloc d'alimentation fourni pour la recharge de
la batterie. Ne jamais charger la batterie avec un bloc d'alimentation
différent. De même, ne pas utiliser le bloc d'alimentation fourni pour
recharger autre chose que la batterie de cet appareil.
– A l'issue de sa durée de vie, démonter la batterie comme décrit. En-
suite, apporter immédiatement la batterie à un point de collecte près
de chez vous pour garantir son élimination conforme et respectueuse de l'environnement. Ne jamais jeter les batteries dans les déchets ordinaires !
– En cas de maniement incorrect, du liquide peut fuir de la batterie. Ne
pas utiliser la batterie si elle est endommagée ou si du liquide s'en
échappe.
- Eviter tout contact avec les liquides fuyant d'une batterie.
- Si cela se produit malgré tout, rincer abondamment à l'eau courante la partie concernée. En cas de manifestation quelconque,
consulter un médecin.
88
Page 89

Chill.book Seite 89 Dienstag, 8. Dezember 2015 3:13 15
1 Consignes de sécurité
1.4 Utilisation conforme
L'utilisation de cet appareil n'est autorisée que pour un usage domestique. L'appareil doit être passé exclusivement sur des sols durs, plats,
normalement sales, et des tapis ou moquettes à poils ras.
Toute utilisation autre que celles décrites sera considérée comme non
conforme.
Pour éviter tout risque de blessure, d'incendie, de dégâts matériels, l'aspiration des objets suivants est proscrite :
– Personnes, animaux, plantes. Tenir en permanence les buses et les
orifices d'aspiration éloignés de toute partie du corps, ainsi que des
cheveux et des vêtements.
– Particules incandescentes, (p. ex. : cendres, braises, charbon de
bois, cigarettes, allumettes).
– Matières explosives ou facilement inflammables, toner.
– Eau et autres liquides, p. ex. les mousses nettoyantes pour tapis à
base d'eau.
– Objets pointus tels que du verre cassé, des clous ou des gravats.
Sont également interdits :
– Transformation ou réparation de l'appareil ou de son bloc d'alimen-
tation par l'utilisateur.
– Utilisation sans que le bac à poussière, le filtre et le couvercle soit
correctement installés.
– Utilisation dans des pièces contenant des objets fragiles ou suscep-
tibles de se renverser facilement. Préparer les pièces de manière à
ce que le passage de l'aspirateur robot ne puisse provoquer aucun
dommage.
– Utilisation, stockage ou recharge en extérieur.
– Placement d'objets sur l'appareil.
89
Page 90

Chill.book Seite 90 Dienstag, 8. Dezember 2015 3:13 15
2 Caractéristiques techniques
2 Caractéristiques techniques
Aspirateur robot Modèle RB7028
Type de batterie Lithium ions
Capacité de la batterie 14,8 V; 2 800 mAh
Autonomie Env. 90 min
Fonction minuterie 30 min. ►45 min. ►60 min. ►maxi.
Durée de recharge Maxi. 4 heures
Puissance d'aspiration 180 mmAq
Rayon d'action Env. 100 m²
Bloc d'alimentation Type GQ30300100AG
Entrée 100-240 V~ ; 50/60 Hz 1.0 A maxi.
Sortie 30 V DC 1A
3 Faire la connaissance de l'appareil
90
Page 91

1
2
3
4
5
6
7
8
9
10
11
1
Chill.book Seite 91 Dienstag, 8. Dezember 2015 3:13 15
3 Faire la connaissance de l'appareil
3.1 Etendue de la livraison
1 Robot
2 Brosses rondes (4)
3 Chargeur
4 Filtre de rechange
5 Bloc d'alimentation
6 Câble USB (pour charger la télécommande)
7 Room Containment
8 Télécommande
9 Batterie
10 Piles (pour Room Containment)
11 Brosse de nettoyage
91
Page 92

1
2
3
4
5
6
7
2
Chill.book Seite 92 Dienstag, 8. Dezember 2015 3:13 15
3 Faire la connaissance de l'appareil
3.2 Composants intérieurs
1 Couvercle
2 Couvercle du bac à poussière
3 Filtre à poussière
4 Couvercle de l'ouverture d'aspiration
92
5 Bac à poussière
6 Control-Panel
7 Pare-chocs
Page 93

4
4
5
6
7
3
4
2
1
8
3
Chill.book Seite 93 Dienstag, 8. Dezember 2015 3:13 15
3 Faire la connaissance de l'appareil
3.3 Dessous du robot
1 Brosses rondes
2 Fixation de la brosse
3 Ouverture d'aspiration
4 Capteurs antichute
5 Interrupteur Marche/Prise de recharge
6 Contacts de charge
7 Batterie
8 Couvercle du compartiment de la batterie
93
Page 94

1
2
3
4
5
4
Chill.book Seite 94 Dienstag, 8. Dezember 2015 3:13 15
3 Faire la connaissance de l'appareil
3.4 Chargeur en détail
1 Contacts de charge
2 Afficheur (détails fig. 23, page. 109)
3 Plaque de fixation murale (devant)
4 Plaque de fixation murale (arrière)
5 Surface de collage
94
Page 95

5
6
Chill.book Seite 95 Dienstag, 8. Dezember 2015 3:13 15
4 Préparation du robot
4.1 Mise en place de la brosse
4 Préparation du robot
1. Assurez-vous que l'appareil est éteint et que le bloc d'alimentation n'est pas branché.
2. Retournez prudemment l'appareil pour pouvoir accéder
au dessous.
3. Enfoncer la brosse sur la fixation (fig. 5).
4.2 Réglage des capteurs antichute
Grâce aux capteurs antichute, le robot peut détecter tout seul
les marches et les escaliers, et ne tombe pas. Comme les
capteurs antichute contrôlent la surface, il faut aussi tenir
compte de la luminosité du sol pour régler les capteurs.
1. Assurez-vous que l'appareil est éteint et que le bloc d'alimentation n'est pas branché.
2. Retournez prudemment l'appareil pour pouvoir accéder
au dessous.
3. Mettre les 3 capteurs antichute simultanément sur la
même position (fig. 6) :
– Pour les sols clairs et les niveaux faibles, position 0 à 1.
– Pour les sols foncés et les niveaux élevés, position 2 à 3.
CONSEIL : Si le robot fonctionne en permanence en marche
arrière sur un sol foncé, choisissez le niveau « 3 ».
95
Page 96

789
Chill.book Seite 96 Dienstag, 8. Dezember 2015 3:13 15
4 Préparation du robot
4.3 Mettre en place la batterie
1. Assurez-vous que l'appareil est éteint et que le bloc d'ali-
2. Retournez prudemment l'appareil pour pouvoir accéder
3. Appuyer sur le verrouillage pour l'ouvrir, et retirer le cou-
4. Pousser la batterie contre les ressorts (fig. 8).
5. Enfoncer la batterie dans le compartiment.
mentation n'est pas branché.
au dessous.
vercle du compartiment de la batterie (fig. 7).
Faire attention à ce que la marque "+" de la batterie soit
en face de la marque "+" du compartiment de la batterie.
96
6. Repoussez le couvercle du compartiment de la batterie
à sa place, jusqu'à le sentir et l'entendre s'enclencher
(fig. 9).
La batterie est à présent en place et doit être rechargée.
chapitre „Chargement du robot“, page 97.
Page 97

101112
Chill.book Seite 97 Dienstag, 8. Dezember 2015 3:13 15
4 Préparation du robot
4.4 Chargement du robot
CONSEIL : Si vous voulez utiliser très rapidement le robot,
chargez-le avec le bloc d'alimentation. Ainsi, vous gagnez le
temps, qu'il vous faudrait pour mettre en place le chargeur.
Le mieux c'est de rechargez la batterie avant chaque utilisation, notamment après une période d'arrêt prolongée.
Cela permet d'augmenter la durée de vie de la batterie et de
garantir des cycles de nettoyage aussi longs que possible.
Avec le bloc d'alimentation :
1. Mettre le robot en marche (fig. 10).
2. Brancher le bloc d'alimentation sur l'appareil (fig. 11).
3. Brancher le bloc d'alimentation à une prise de courant.
Avec le chargeur :
1. Mise en place et raccordement du chargeur. chapitre
„Mise en place et raccordement du chargeur“, page 100
2. Mettre le robot sur le chargeur.
Faire attention à ce que les contacts de charge du robot
touchent ceux du chargeur.
– "00" apparaît à l'écran.
– Toutes les 2,4 minutes, l'état de charge augmente de 01.
– La LED Power « » verte clignote.
97
Page 98

13
Chill.book Seite 98 Dienstag, 8. Dezember 2015 3:13 15
4 Préparation du robot
– 4 heures après environ, la LED Power " " verte est al-
– "FU" apparaît à l'écran.
– L'appareil est complètement chargé. Si le robot a été
CONSEIL : Pour que la batterie soit toujours disponible avec
la charge maximale, elle est chargée toutes les heures pendant 15 minutes, tant qu'elle est branchée au secteur. L'affichage passe ensuite de "FU" à "93", et augmente toutes les
2,4 minutes jusqu'à "FU".
CONSEIL : Dès que l'état de charge de la batterie touche à
sa fin, le robot donne trois signaux sonores et "Lo" apparaît
à l'écran. La LED Power " " rouge s'allume. Le robot s'arrête et retourne au chargeur suivant le réglage sélectionné.
lumée en permanence.
chargé avec le bloc d'alimentation : Débranchez le bloc
d'alimentation du secteur et de l'appareil.
98
Page 99

14
Chill.book Seite 99 Dienstag, 8. Dezember 2015 3:13 15
5 Chargement de la télécommande
5 Chargement de la télécommande
1. Brancher le câble USB fourni à la télécommande.
2. Brancher le câble USB à une prise USB.
– Le voyant LED s'allume et indique que la télécommande
est entrain d'être chargée.
– 30 minutes après environ, la télécommande est entière-
ment chargée, et le voyant LED s'éteint
3. Débrancher le câble USB de la télécommande et de la
prise USB.
99
Page 100

15
16
Chill.book Seite 100 Dienstag, 8. Dezember 2015 3:13 15
6 Mise en place et raccordement du chargeur
6 Mise en place et raccordement du chargeur
1. Mettre le chargeur en place près d'un mur et d'une prise
de courant, avec l'espace libre indiqué sur la figure
(fig. 15).
CONSEIL : Pour fixer le chargeur, il est possible de visser ou
de coller la plaque de fixation au dos du chargeur sur le mur.
100
2. Brancher le bloc d'alimentation au chargeur (fig. 16).
3. Brancher le bloc d'alimentation à une prise de courant.
CONSEIL : Il est recommandé de contrôler si le robot trouve
le chargeur. Pour cela, mettre le robot dans la pièce et appuyer sur " " sur la télécommande (chapitre „Régler la
durée du nettoyage“, page 107). Lorsque le robot ne trouve
pas le chargeur, mettre le chargeur à un endroit plus facilement accessible.
 Loading...