

Page 1
ART.-NO. MW 7758
DE Gebrauchsanweisung
GB Instructions for use
FR Mode d’emploi
NL Gebruiksaanwijzing
ES Instrucciones de uso
IT Manuale d’uso
DK Brugsanvisning
SE Bruksanvisning
FI Käyttöohje
PT Manual de instruções
PL Instrukcja obsługi
GR Oδηγίες χρήσεως
Mikrowelle 3
Microwave oven 18
Four à micro-ondes 33
Magnetronoven 49
Microondas 64
Forno a microonde 79
Mikrobølgeovn 95
Mikrovågsugn 110
Mikroaaltouuni 125
Micro-ondas 139
Kuchenka mikrofalowa 154
Φούρνος μικροκυμάτων 170
Page 2

Liebe Kundin, lieber Kunde,
wir wünschen Ihnen mit dem Qualitätsprodukt aus dem Hause SEVERIN viel Freude und
bedanken uns für Ihr Vertrauen.
Die Marke SEVERIN steht seit über 120 Jahren für Beständigkeit, deutsche Qualität und
Entwicklungskraft. Jedes Gerät wurde mit Sorgfalt hergestellt und geprüft.
Mit der sprichwörtlichen Sauerländer Gründlichkeit, Genauigkeit und Ehrlichkeit überzeugt
das Familienunternehmen aus Sundern seit der Gründung 1892 mit innovativen Produkten
Kunden in aller Welt.
In den sieben Produktgruppen Kaffee, Frühstück, Küche, Grillen, Haushalt, Personal
Care und Kühlen & Gefrieren bietet SEVERIN mit über 250 Produkten ein umfassendes
Elektrokleingeräte-Sortiment. Für jeden Anlass das richtige Produkt!
Lernen Sie die SEVERIN-Produktvielfalt kennen und besuchen Sie uns unter www.severin.
de oder www.severin.com.
Ihre
Geschäftsleitung und Mitarbeiter
der SEVERIN Elektrogeräte GmbH
2
Page 3
DE
Mikrowelle
Liebe Kundin, lieber Kunde,
die Gebrauchsanweisung sorgfältig vor der Benutzung des Mikrowellengerätes durchlesen und für den weiteren Gebrauch
aufbewahren. Das Gerät darf nur von Personen benutzt werden, die mit den Sicherheitsanweisungen vertraut sind.
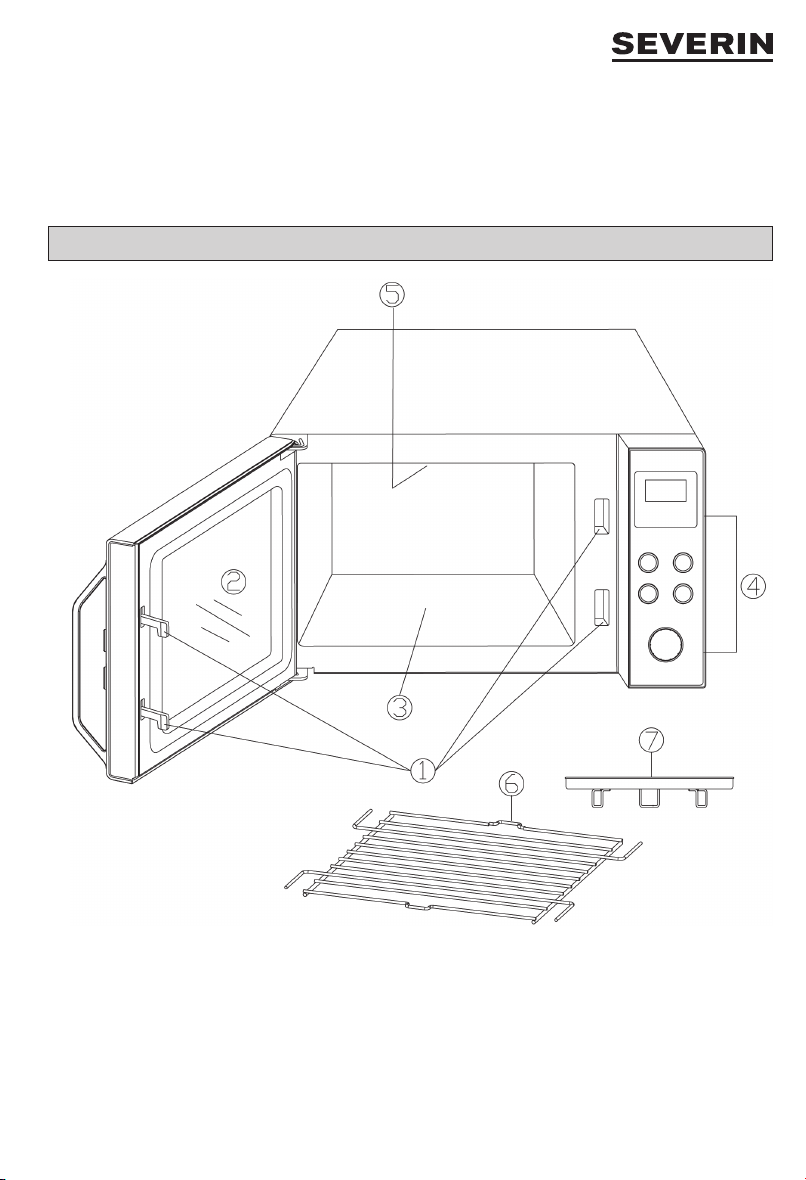
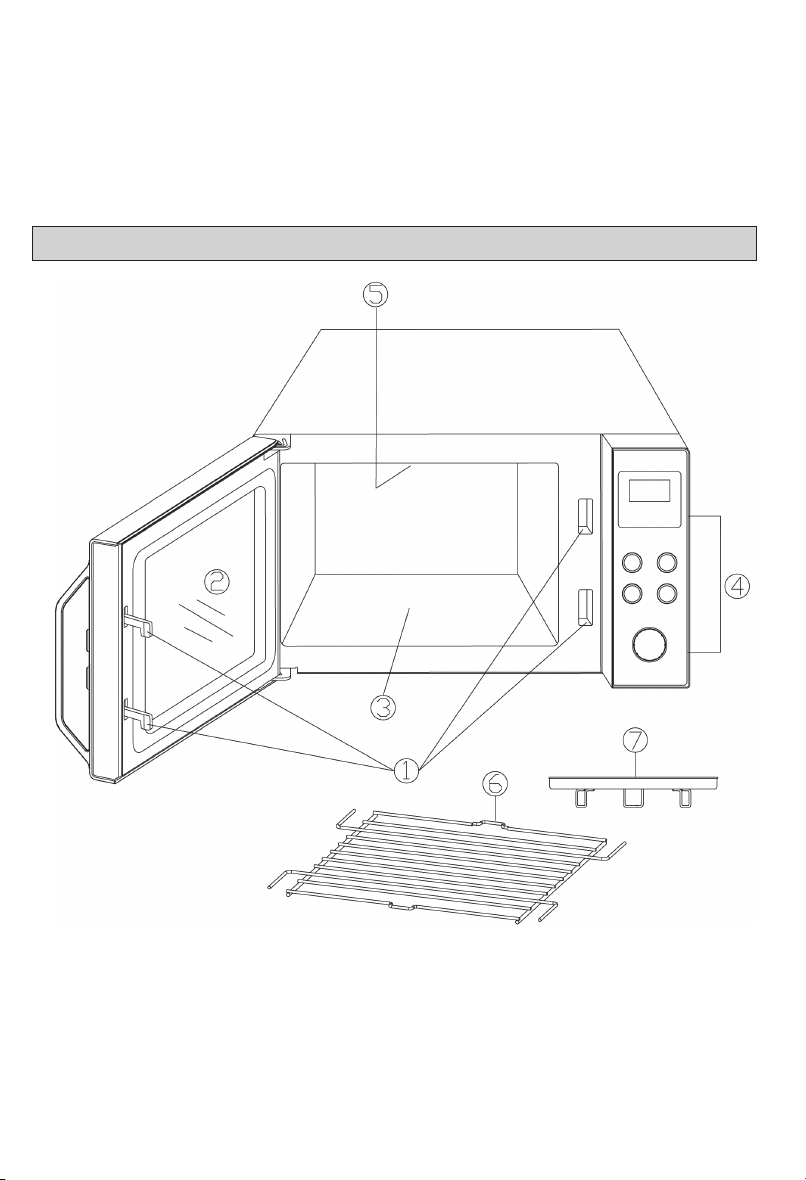
Aufbau Gerät
1. Türverriegelung
2. Sichtfenster
3. Keramikboden
4. Bedienfeld
5. Heizelement
6. Grillrost
7. Backblech
3
Page 4
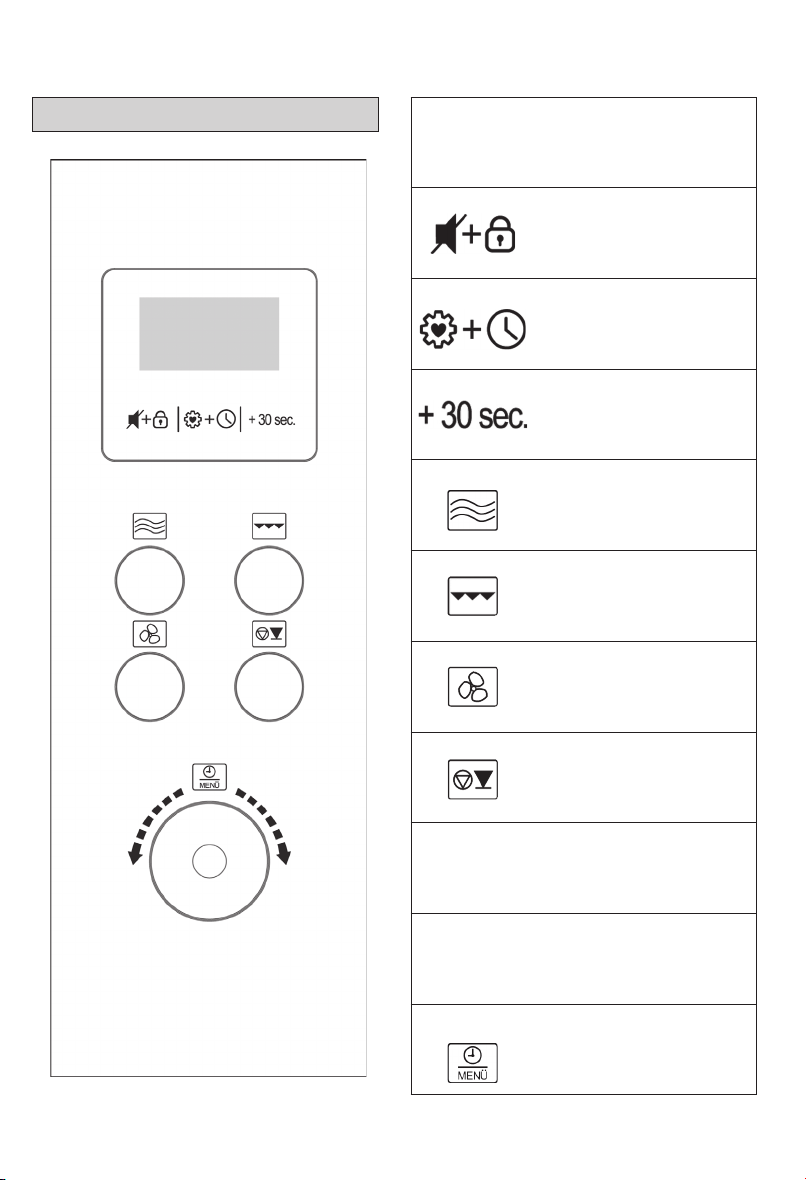
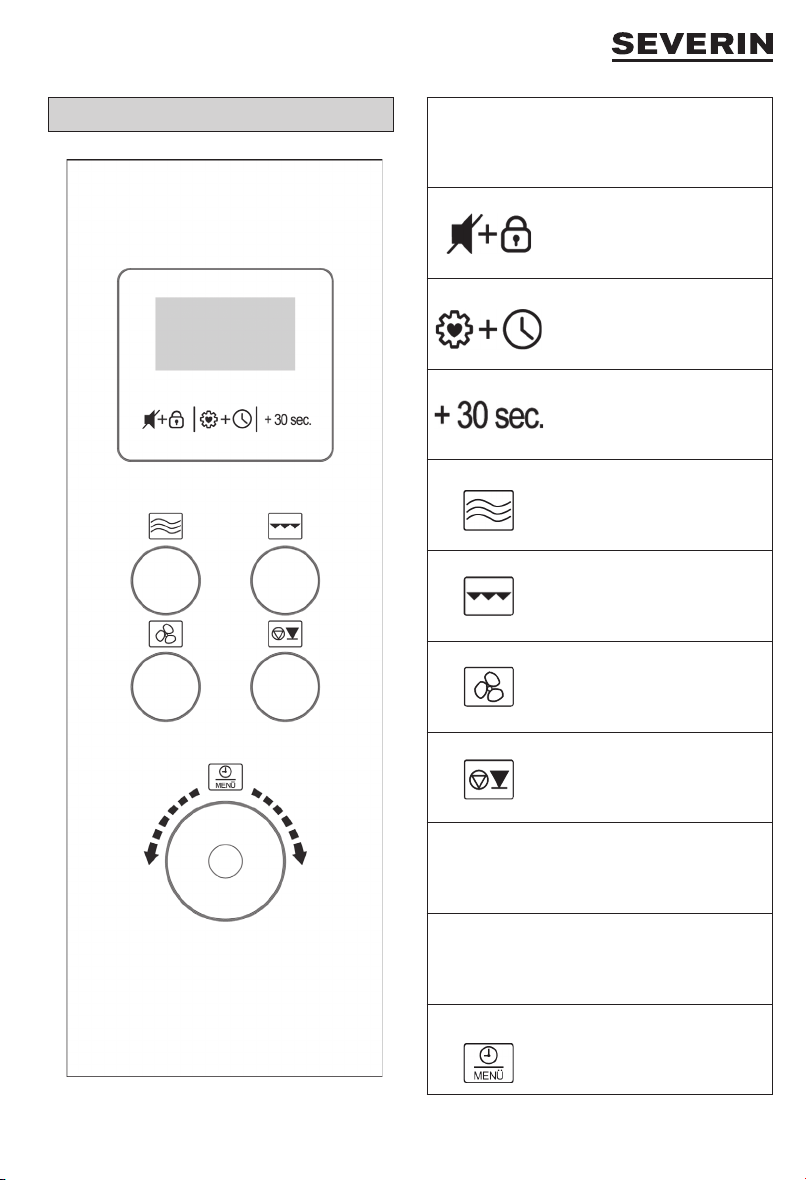
Aufbau Bedienfeld
Taste Funktion
Tastentöne & Kindersicherung
Lieblingsessen & Uhr
Quickstart / Zubereitungszeit um
30 Sekunden erhöhen
Auswahl Mikrowelle
Auswahl Grill
Auswahl Ultra-Heißluft
Unterbrechen / Stopp
Dreh- Knebel Funktion
Drücken Start
Drehen
4
Einstellung Zeit & Automatik-
Kochprogramme
Page 5
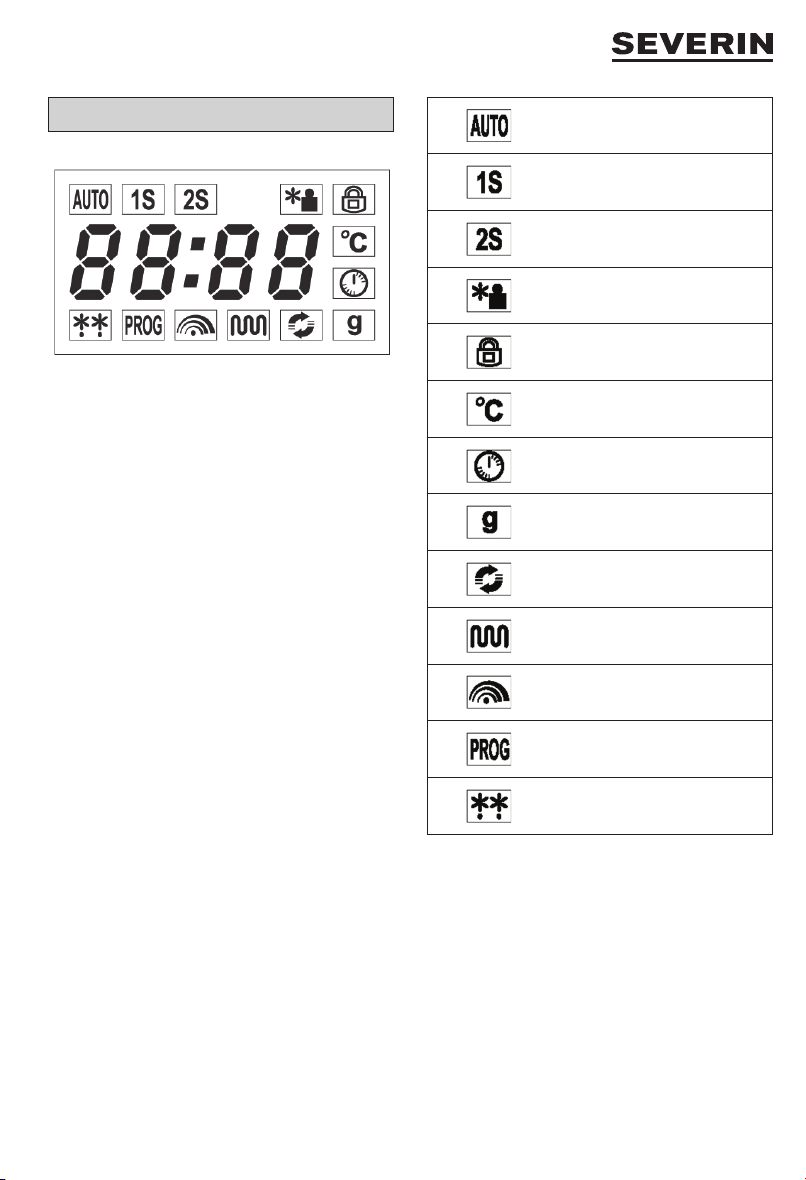
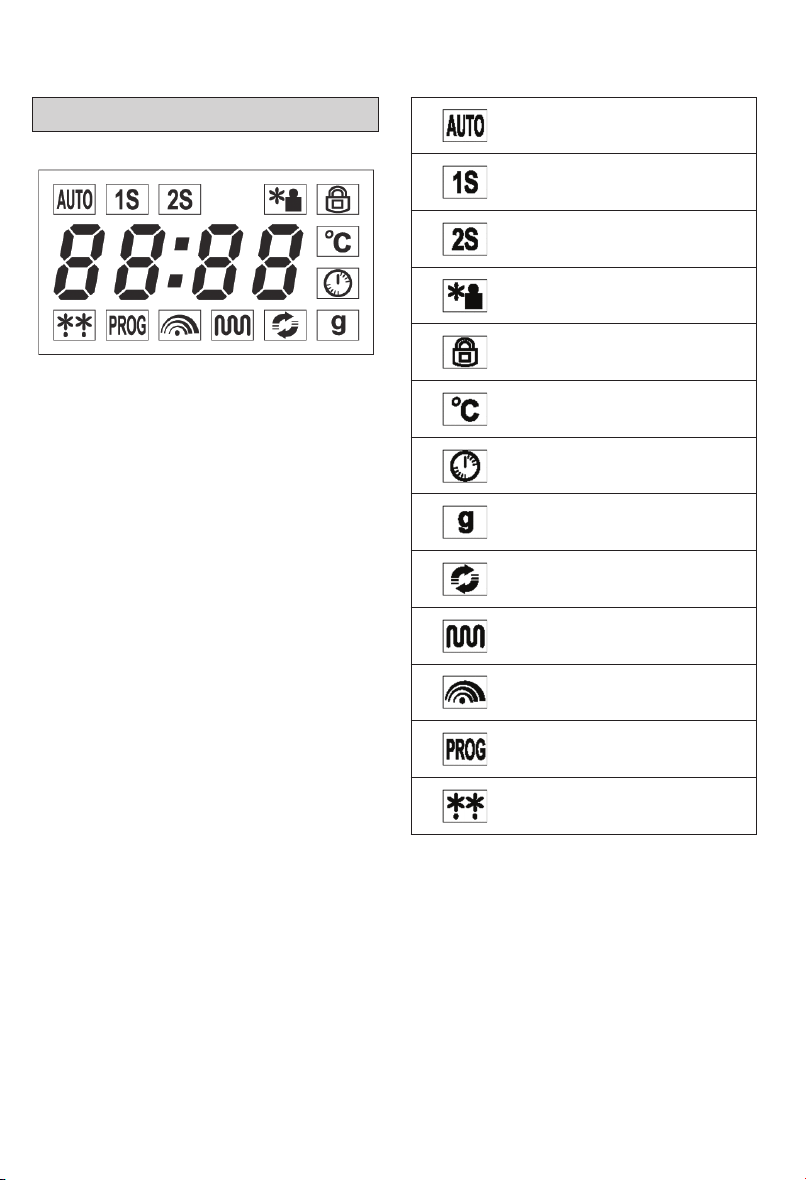
Aufbau Display
Automatik Programme
Erste Programmauswahl
Zweite Programmauswahl
Auftauen nach Gewicht
Kindersicherung
Im Display werden die Uhrzeit bzw. die eingestellte Laufzeit
und die ausgewählten Funktionen angezeigt.
Temperatur
Einstellen Uhr
Gewicht
Ultra-Heißluft
Grill
Mikrowelle
Automatik-Programme
Auftauen nach Zeit
5
Page 6

Sicherheitshinweise
Wichtige Sicherheitshinweise
Sorgfältig lesen und für den weiteren Gebrauch aufbewahren
Anschluss
Das Gerät nur an eine vorschriftsmäßig installierte, geerdete Schutzkontaktsteckdose
anschließen. Die Netzspannung muss der auf dem Typenschild des Gerätes
angegebenen Spannung entsprechen. Das Gerät entspricht den Richtlinien, die für
die CE-Kennzeichnung verbindlich sind.
Aufstellen des Gerätes
∙
Das Mikrowellengerät nur auf eine ausreichend stabile, ebene und hitzebeständige
Fläche stellen und vor hohen Temperaturen oder Feuchtigkeit schützen.
∙
Das Gerät nicht im Freien aufstellen.
∙
Die Aufstellfüße des Gerätes dürfen nicht entfernt werden.
∙
Es muss eine ausreichende Luftzirkulation gewährleistet sein. Daher dürfen keine
Gegenstände auf das Gerät gelegt werden und zu den Wänden müssen folgende
Abstände eingehalten werden:
Seiten: 7,5 cm
Hinten: 7,5 cm
Oben: 30,0 cm
∙
Das Gerät darf nicht in einen Schrank eingebaut werden. Die Montage des Gerätes
direkt unter einer Platte oder einem Schrank ist nicht erlaubt.
Wichtige Hinweise
∙
Achtung: Speisen können sich entzünden. Das Gerät während des
Mikrowellen-, Grill-, Heißluft- und Kombinationsbetriebs niemals
unbeaufsichtigt lassen.
∙
Das Mikrowellengerät ist ausschließlich zum Auftauen, Erwärmen und Garen von
Lebensmitteln vorgesehen. Das Trocknen von Speisen oder Kleidung und die
Erwärmung von Heizkissen, Hausschuhen, Schwämmen, feuchten Putzlappen und
Ähnlichem kann zu Verletzungen, Entzündungen und Feuer führen.
∙
Wird das Gerät falsch bedient oder zweckentfremdet verwendet, kann keine
Haftung für evtl. auftretende Schäden übernommen werden.
∙
Es darf nur mikrowellengeeignetes Geschirr verwendet werden. Metallische
Behälter zum Erwärmen von Speisen und Getränken im Mikrowellenbetrieb sind
nicht zulässig. Nähere Informationen können dem Abschnitt ‚Geeignetes Geschirr
verwenden‘entnommen werden.
6
Page 7
∙
Das Gerät ist nicht dazu bestimmt, mit einer externen Zeitschaltuhr oder einem
separatem Fernwirksystem betrieben zu werden.
∙
Das Gerät kann von Kindern ab 8 Jahren sowie von Personen mit reduzierten
physischen, sensorischen oder mentalen Fähigkeiten oder Mangel an Erfahrung
und/oder Wissen benutzt werden, wenn sie beaufsichtigt oder bezüglich
des sicheren Gebrauchs des Gerätes unterwiesen wurden und die daraus
resultierenden Gefahren verstanden haben.
∙
Kinder dürfen nicht mit dem Gerät spielen.
∙
Reinigung und Benutzer-Wartung dürfen nicht durch Kinder durchgeführt werden
es sei denn, sie sind älter als 8 Jahre und werden beaufsichtigt.
∙
Kinder jünger als 8 Jahre sind vom Gerät und der Anschlussleitung fernzuhalten.
∙
Das Gerät darf aus Gründen der elektrischen Sicherheit nicht mit Flüssigkeiten
behandelt oder gar darin eingetaucht werden.
∙
Warnung! Wenn das Gerät mit der Grill- und/oder Heißluftfunktion betrieben
wird, dürfen Kinder wegen der vorkommenden Temperaturen das Gerät nur unter
Aufsicht von Erwachsenen benutzen.
∙
Bei Nutzung der Grill- und/oder Heißluftfunktion, sowie bei kombinierter Betriebsart
ist besondere Vorsicht geboten, um das Berühren der Heizelemente im Inneren der
Mikrowelle zu vermeiden.
∙
Das Gerät darf nicht mit einem Dampfreiniger gereinigt werden.
∙
Das Gerät ausschalten und den Netzstecker ziehen:
- vor jeder Reinigung,
- bei Störungen während der Benutzung,
- nach jedem Gebrauch.
∙
Den Netzstecker nicht an der Anschlussleitung aus der Steckdose ziehen, sondern
den Netzstecker anfassen.
∙
Warnung! Das Gerät wird an berührbaren Oberächen heiß und an den
Entlüftungsöffnungen kann heißer Dampf austreten. Verbrennungsgefahr!
∙ Das Gerät erst ausreichend abkühlen lassen, bevor es transportiert wird.
∙ Weder das Gehäuse noch die Anschlussleitung dürfen einer heißen Kochplatte
oder offenen Flammen zu nahe kommen. Die Anschlussleitung nicht
herunterhängen lassen und von heißen Geräteteilen fernhalten.
∙ Wird das Gerät nicht sauber gehalten und Nahrungsmittelreste nicht entfernt,
kann dies zu einer Güteminderung der Oberäche führen, was wiederum eine
Beeinträchtigung der Lebensdauer des Geräts mit sich bringen und eventuell eine
Gefahr für den Benutzer darstellen kann. Die Türdichtungen, den Garraum mit
dem Keramikboden und die angrenzenden Teile nach jedem Gebrauch mit einem
feuchten Tuch reinigen. Den Grillrost und das Backblech im Spülwasser reinigen.
7
Page 8

Weitere Angaben zur Reinigung und Benutzer-Wartung können dem Abschnitt
‘Reinigung’ entnommen werden.
∙
Das Gerät ist dazu bestimmt, im Haushalt und ähnlichen Anwendungen verwendet
zu werden, wie z.B.
- in Küchen für Mitarbeiter in Läden, Büros und anderen gewerblichen Bereichen,
- in landwirtschaftlichen Betrieben,
- von Kunden in Hotels, Motels und anderen Unterkünften,
- in Frühstückspensionen.
∙
Achtung: Es ist für alle anderen, außer für den Fachmann, gefährlich,
irgendwelche Wartungs- oder Reparaturarbeiten auszuführen, die die Entfernung
einer Abdeckung erfordern, die den Schutz gegen Strahlenbelastung durch
Mikrowellenenergie sicherstellt. Dies gilt auch für den Austausch der speziellen
Anschlussleitung oder der Beleuchtung. Daher im Reparaturfall unseren
Kundendienst telefonisch oder per Mail kontaktieren (siehe Anhang).
∙
Eine Erwärmung von Getränken mit der Mikrowelle kann zu einem verzögert
ausbrechenden Kochen führen. Die üblicherweise auftretenden Dampfblasen
treten nicht auf, obwohl der Siedepunkt schon erreicht ist. Daher ist beim Hantieren
mit dem Behälter, z.B. bei der Entnahme aus dem Gerät, besondere Vorsicht
geboten.
Dieser Siedeverzug kann vermindert werden, wenn ein temperaturbeständiger
Glasstab während des Erwärmens in die Flüssigkeit gestellt wird.
∙
Eier mit Schale oder ganze hart gekochte Eier dürfen nicht in Mikrowellengeräten
erwärmt werden, da sie explodieren können, selbst nachdem die Erwärmung durch
Mikrowellen beendet ist.
∙
Achtung: Flüssigkeiten oder andere Speisen dürfen nicht in verschlossenen
Behältern erwärmt werden, da sie leicht explodieren können.
∙
Der Inhalt von Babyäschchen und Gläsern mit Kindernahrung muss umgerührt
oder geschüttelt werden, damit eine gleichmäßige Temperaturverteilung entsteht.
Anschließend muss die Temperatur vor dem Verbrauch überprüft werden, um
Verbrennungen zu vermeiden!
∙
Beim Erwärmen oder Kochen von Speisen in brennbaren Materialien, wie
Kunststoff- oder Papierbehältern, besteht die Gefahr, dass dieses Material sich
entzündet. Ebenso können Speisen austrocknen und sich entzünden, wenn
eine zu lange Einschaltzeit gewählt wurde. Fette oder Öle können sich ebenfalls
entzünden. Daher muss das eingeschaltete Gerät laufend überwacht werden.
Brennbare Flüssigkeiten, z.B. konzentrierter Alkohol, dürfen nicht erwärmt werden.
8
Page 9

∙
Wenn Rauch abgegeben wird, ist die Tür geschlossen zu halten, um eventuell
auftretende Flammen zu ersticken. Das Gerät sofort ausschalten und den
Netzstecker ziehen.
∙ Bei der Entnahme der Speisen aus dem Garraum geeignete Topappen
benutzen. Nicht nur im Grill- oder Heißluftbetrieb wird das Geschirr heiß,
sondern auch im Mikrowellenbetrieb, da die heiße Speise auch das
Geschirr erwärmt.
∙
Speisenthermometer sind nicht für den Mikrowellenbetrieb geeignet.
Vor der Inbetriebnahme
∙ Das Gerät und die Anschlussleitung nach dem Auspacken und vor jeder
Inbetriebnahme auf Beschädigungen überprüfen.
∙
Achtung! Die Tür, inkl. Sichtfenster, Türdichtung und Türverriegelungen, darf nicht
verbogen oder beschädigt sein, damit keine Mikrowellenstrahlung austreten kann.
Dies gilt auch für das gesamte Gehäuse und die Garraumwände.
Im Falle einer Beschädigung darf das Gerät nicht in Betrieb genommen werden,
bevor es von einem Fachmann repariert worden ist.
∙ Sämtliches Verpackungsmaterial, eventuelle Werbeaufkleber und alle Einlagen aus dem Gerät entfernen. Das
Verpackungsmaterial ist recycelbar.
∙ Die Gummistopfen am Grillrost nicht entfernen!
∙ Die aufgeklebte Schutzfolie der Türinnenseite nicht entfernen.
∙ Kinder von Verpackungsmaterial fernhalten. Es besteht u.a. Erstickungsgefahr!
∙ Das Gerät vor der ersten Inbetriebnahme und nach längerem Nichtgebrauch wie unter ‘Reinigung’ beschrieben ist
reinigen.
∙ Das Gerät bei der ersten Inbetriebnahme in der Grillstufe (ohne Mikrowelle!) für 10 Minuten aufheizen. Hierbei kann ein
leichter Geruch entstehen, daher für eine ausreichende Belüftung sorgen.
∙ Hinweis: Das Gerät niemals ohne Inhalt in Betrieb nehmen. Das Gerät könnte sonst beschädigt werden.
ISM-Gerät
Dieses Produkt ist ein ISM-Gerät der Gruppe 2 Klasse B. Gruppe 2 umfasst alle ISM-Geräte (industrielle, wissenschaftliche,
medizinische) in denen Radiofrequenzenergie entsteht und/oder in Form von elektromagnetischer Ausstrahlung zur
Bearbeitung von Material benutzt wird, sowie Funkenerosionsgeräte. Klasse B sind Geräte für den Hausgebrauch oder
Geräte an Stromversorgungsnetzen, die Wohnungsgebäude speisen.
Funktion der Mikrowelle (Gruppe II nach EN 55011)
Im Gerät werden elektromagnetische Wellen erzeugt, die die in den Speisen enthaltenen Moleküle, hauptsächlich
Wassermoleküle, zu starken Schwingungen anregen. Aufgrund dieser Schwingungen entsteht Wärme. Lebensmittel mit
einem hohen Flüssigkeitsgehalt erwärmen sich daher schneller als relativ trockene Lebensmittel. Die Erwärmung entsteht
besonders schonend direkt im Lebensmittel. Das Geschirr wird nur indirekt von der Speise mit erwärmt.
9
Page 10
Geeignetes Geschirr verwenden
∙ Die Lebensmittel zum Garen nicht direkt auf den Keramikboden legen, sondern geeignetes Geschirr verwenden.
∙ Mikrowellen werden von metallischen Flächen reektiert und können das Gargut nicht erreichen. Es kann außerdem zur
Funkenbildung kommen, wenn sich Metall im Garraum bendet und das Gerät könnte hierdurch Schaden nehmen.
∙ Bestecke oder Metallbehälter dürfen daher nicht im Mikrowellengerät verwendet werden. Einige Verpackungen enthalten,
z.B. unter einer Papierschicht, Alu-Folie oder Drähte und sind daher ebenfalls ungeeignet.
Sollte der Einsatz von Aluminiumfolie in einem Rezept empfohlen werden, muss diese eng an der Speise anliegen. Es
muss sichergestellt sein, dass zwischen den Garraumwänden und der Aluminiumfolie mindestens ein Abstand von 2,5
cm eingehalten wird.
∙ Geschirr darf kein Metalldekor enthalten, z.B. Goldrand oder metallhaltige Farben. Ungeeignet ist auch Bleikristall. Im
Geschirr, z.B. in den Griffen, dürfen sich keine geschlossenen Hohlräume benden. Poröses Geschirr kann eventuell
beim Spülen Wasser aufnehmen und ist daher nicht geeignet. Geschirr aus dem Kunststoff Melamin nimmt Energie auf
und ist ungeeignet.
Mikrowellenbetrieb
∙ Geschirr aus hitzebeständigem Glas oder Porzellan eignet sich gut für den Mikrowellenbetrieb.
∙ Kunststoff kann verwendet werden, wenn er hitzebeständig ist.
∙ Im Handel ist spezielles Mikrowellengeschirr aus Kunststoff erhältlich.
∙ Bratschläuche oder -beutel sollten mit Löchern versehen werden, damit ein Druckanstieg vermieden wird.
Grill- oder Heißluftbetrieb
∙ Für den Grill- oder Heißluftbetrieb können alle hitzebeständigen Geschirrarten und Behälter verwendet werden, die auch
für einen herkömmlichen Backofen geeignet sind. Kunststoffgeschirr darf im Grill- oder Heißluftbetrieb nicht verwendet
werden!
∙ Das Gargut kann direkt auf den Grillrost bzw. das Backblech gelegt werden. Den Grillrost einschieben und das
Backblech auf den Keramikboden stellen.
Kombinationen Mikrowelle-Grill und Mikrowelle-Heißluft
∙ Im Kombinationsbetrieb werden die Mikrowelle und der Grill oder die Heißluft wechselweise zugeschaltet. Daher muss
das Geschirr mikrowellengeeignet und hitzebeständig sein. Kunststoffgeschirr kann aufgrund der hohen Temperaturen
nicht benutzt werden. Das Geschirr darf kein Metall enthalten.
Bedienung
Erstes Einstellen der Uhrzeit
∙ Nachdem das Gerät an die Stromversorgung angeschlossen wurde, zeigt das Display ‚1:00‘ an, die Stundenanzeige
blinkt und ein Signalton ertönt.
∙ Den Drehknebel drehen, um die korrekte Stunde einzustellen.
∙ Die Taste kurz antippen. Die Minutenanzeige blinkt.
∙ Den Drehknebel drehen, um die korrekten Minuten einzustellen.
∙ Die Taste kurz antippen, um die Uhrzeiteinstellung abzuschließen. ‚:‘ blinkt und die Uhrzeit wird angezeigt.
∙ Die Einstellung der Uhr kann durch Drücken der Taste abgebrochen oder übersprungen werden.
∙ Bei Unterbrechung der Stromversorgung muss die Uhrzeit neu eingestellt werden.
Ändern der Uhrzeit
∙ Zum Ändern der Uhrzeit die Taste 3 Sekunden lang drücken. Im Display steht Hr 24 oder Hr 12.
∙ Die Taste kurz antippen, um zwischen dem 24- oder 12-Stundensystem zu wechseln.
∙ Die Stundenanzeige blinkt, den Drehknebel drehen, um die korrekte Stunde einzustellen.
∙ Die Taste kurz antippen. Die Minutenanzeige blinkt.
∙ Den Drehknebel drehen, um die korrekten Minuten einzustellen.
∙ Die Taste kurz antippen, um die Uhrzeiteinstellung abzuschließen. ‚:‘ blinkt und die Uhrzeit wird angezeigt.
10
Page 11
Signalton & Kindersicherung
Signalton
∙ Beim Betätigen einer Taste oder des Drehknebels ertönt ein Quittierton, der die Eingabe bestätigt.
∙ Zum Ausschalten des Quittiertons die Taste kurz drücken.
Es wird nur der Quittierton zur Bestätigung der Tasten und des Drehknebels ausgeschaltet. Nicht der Signalton in bzw.
nach den Programmabläufen!
∙ Zum Wiedereinschalten des Quittiertons die Taste erneut kurz drücken.
Kindersicherung
∙ Die Kindersicherung verhindert, dass Kinder das Gerät unerwünscht in Betrieb nehmen können.
∙ Zum Einschalten der Kindersicherung die Taste ca. 3 Sekunden lang drücken. In der Anzeige erscheint .
∙ Um die Kindersicherung wieder auszuschalten, die Taste erneut ca. 3 Sekunden lang drücken. Im Display erlischt
.
∙ Hinweis: Lässt sich das Gerät nicht in Betrieb nehmen, überprüfen, ob die Kindersicherung eingeschaltet ist.
Allgemeine Bedienfolge
∙ Die zu erhitzende Speise in ein geeignetes Geschirr geben und auf den Keramikboden stellen.
∙ Speisen im Mikrowellenbetrieb abdecken, damit ein Austrocknen verhindert wird. Mikrowellengeeignete Abdeckhauben
aus Glas oder Kunststoff sind im Handel erhältlich.
∙ Im Kombinations-, Grill- oder Heißluftbetrieb keine Abdeckung verwenden.
∙ Die Tür schließen und gewünschtes Programm einstellen.
∙ Hinweis:
Die Zählschritte beim Einstellen der Garzeit sind wie folgt:
0 – 5 Minuten: 10 Sekunden-Schritte
5 – 10 Minuten: 30 Sekunden-Schritte
10 – 30 Minuten: 1 Minute-Schritte
30 – 95 Minuten: 5 Minuten-Schritte
∙ Zum Start einer Programmierung den Drehknebel drücken.
∙ Nach dem Starten des Programms wird die Beleuchtung zugeschaltet.
∙ Wenn während des Garvorgangs die Tür geöffnet oder gedrückt wird, um z.B. die Speise zur gleichmäßigen
Wärmeverteilung umzurühren, wird das Gerät abgeschaltet und die eingestellte Garzeit solange angehalten. Nachdem
die Tür wieder geschlossen und den Drehknebel gedrückt wurde, läuft die Zeit weiter und der Garvorgang wird
fortgesetzt.
∙ Zum Abbrechen des Programms zweimal drücken.
∙ Nach Ablauf der eingestellten Zeit ertönen Signaltöne, die Beleuchtung im Gerät erlischt und im Display erscheint ‚End‘.
∙ Die Tür öffnen und das Geschirr mit der Speise entnehmen.
∙ Die Speise noch einige Minuten ruhen lassen, damit sich die Wärme gleichmäßig verteilen kann.
∙ Wenn die Tür nicht direkt nach Ablauf der eingestellten Zeit geöffnet wird, ertönen alle zwei Minuten Signaltöne.
Abkühlfunktion
Das Gerät hat eine automatische Abkühlfunktion.
Wenn das Gerät länger als zwei bis drei Minuten betrieben wurde, schaltet sich nach Beendigung des Kochvorganges der
Ventilator für einige Minuten ein.
Grillrost & Backblech
∙ Der Grillrost und der Pizzateller eignen sich zum Grillen und für den Heißluftbetrieb. Sie dürfen in den Mikrowellen- und
Kombinationsprogrammen nicht benutzt werden.
∙ Achtung! Nicht die Gummistopfen am Grillrost entfernen!
∙ Den Grillrost in der gewünschten Höhe einschieben und das Backblech auf den Grillrost oder den Keramikboden stellen.
∙ Das Gargut kann direkt auf den Grillrost bzw. das Backblech gelegt werden.
11
Page 12
Garen/Erwärmen mit Mikrowellen
Beim Garen/Erwärmen mit Mikrowellen werden die Lebensmittel direkt im Inneren erwärmt.
Tipp! Bei der Zubereitung von zwei Portionen auf Grillrost und Keramikboden, das Gargut versetzt einlegen, sodass die
beiden Portionen nicht direkt übereinander stehen. Nach der Hälfte der Zeit die Position des Gargutes tauschen.
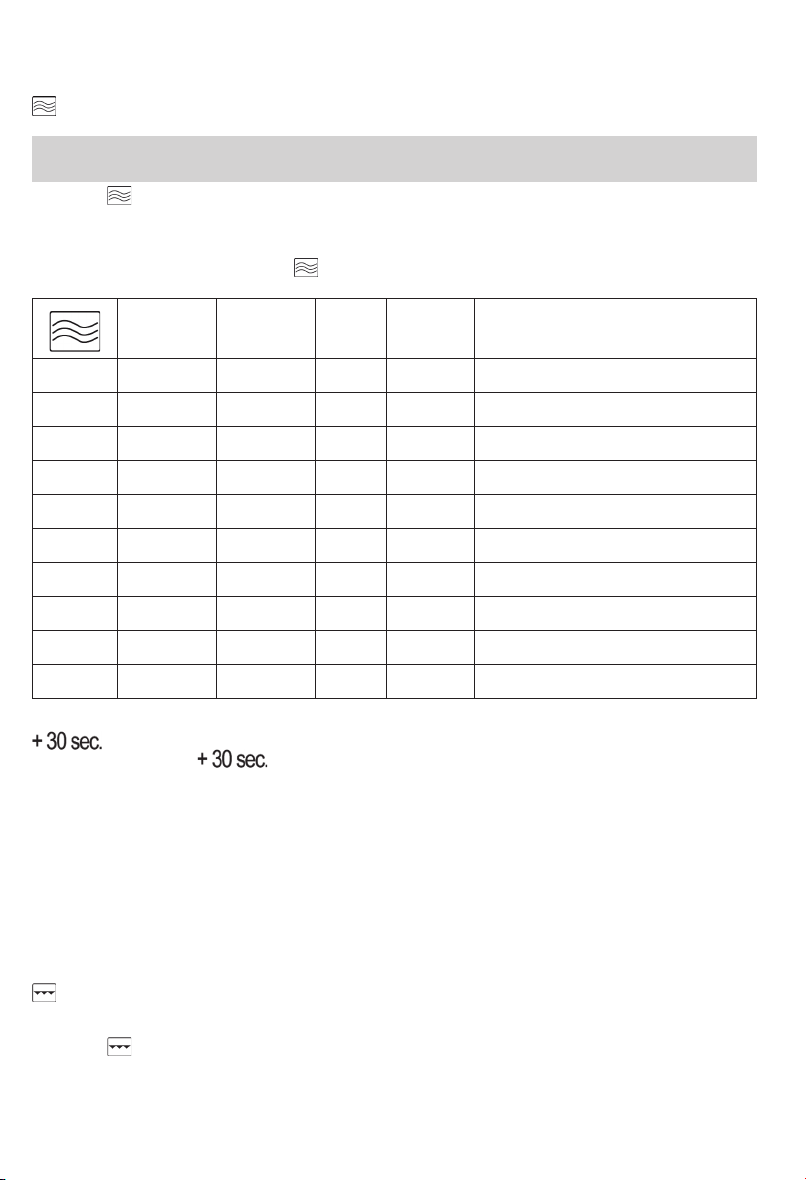
∙ Die Taste so oft drücken, bis die gewünschte Leistung angezeigt wird (siehe nachstehende Tabelle).
∙ Dann mithilfe des Drehreglers die gewünschte Garzeit einstellen. Die maximal einstellbare Garzeit beträgt 95 Minuten.
∙ Den Garvorgang durch Drücken des Drehknebels starten.
∙ Die zu garende/erwärmende Speise ggf. ab und zu umrühren, damit sie sich gleichmäßig erwärmen kann.
∙ Wird während des Garvorgangs die Taste gedrückt, wird im Display die eingestellte Leistung angezeigt.
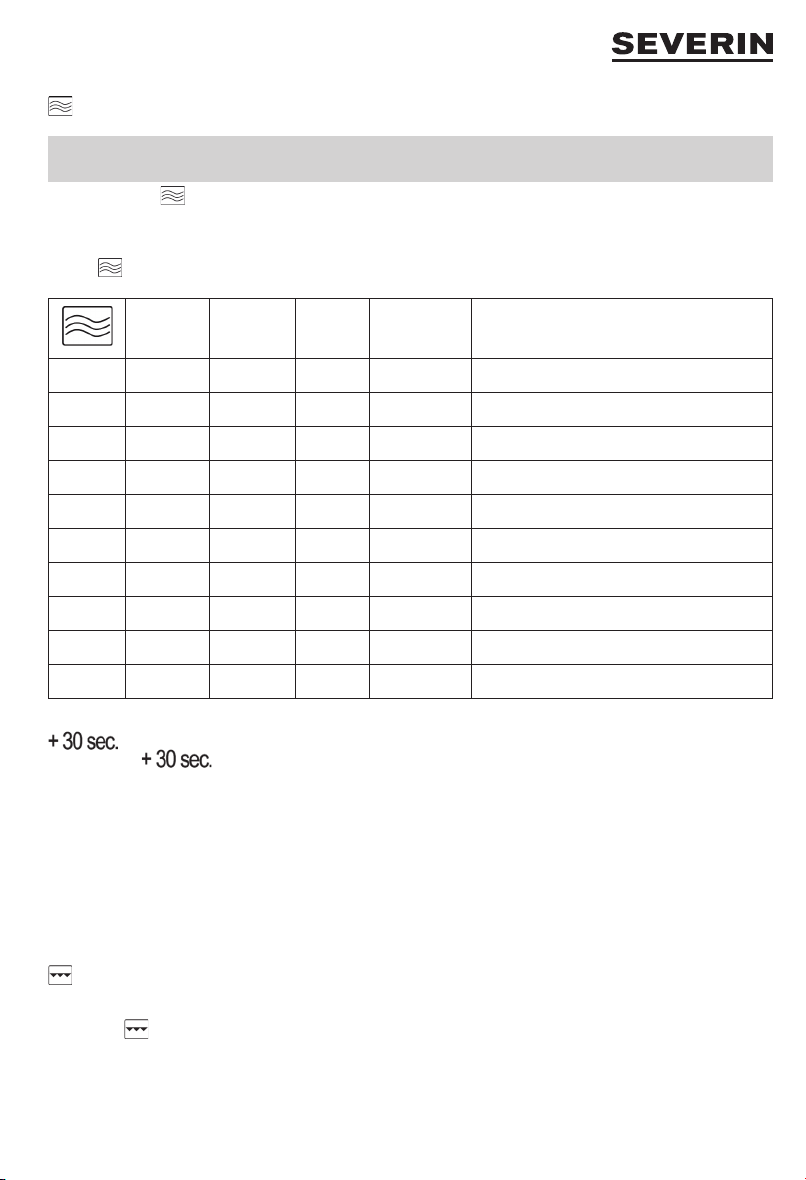
Leistung (W) Leistung (%) Anzeige Typ Verwendung
1 x drücken 900 W 100 P100 Hoch Flüssigkeiten erhitzen, Garen
2 x 810 W 90 P-90
3 x 720 W 80 P-80
4 x 630 W 70 P-70 Mittelhoch Eingefrorene Gerichte auftauen und erhitzen
5 x 540 W 60 P-60
6 x 450 W 50 P-50 Mittel Garen von empndlichen Lebensmitteln
7 x 360 W 40 P-40
8 x 270 W 30 P-30 Gering Auftauen von Lebensmitteln
9 x 180 W 20 P-20
10 x 90 W 10 P-10 Sehr gering Auftauen von empndlichen Lebensmitteln
∙ Durch Drücken der Taste wird der Garvorgang direkt gestartet. Durch jeden Tastendruck erhöht sich die
Quick-Programm / Garen mit Mikrowellen:
Garzeit um 30 Sekunden.
∙ Die Mikrowellenleistung beträgt immer 100 %.
∙ Die längste einstellbare Zeit beträgt 95 Minuten.
∙ Wird die Taste während eines bereits laufenden Mikrowellen-Programms gedrückt, erhöht sich die Garzeit pro
Tastendruck um 30 Sekunden.
Drehknebel Quick-Programm / Garen mit Mikrowellen
∙ Durch Drehen des Drehknebels im Uhrzeigersinn kann eine gewünschte Garzeit ausgewählt werden.
∙ Durch Drücken des Drehknebels wird der Garvorgang direkt gestartet.
∙ Die Mikrowellenleistung beträgt 100 %.
∙ Die längste einstellbare Zeit beträgt 95 Minuten.
Grillen
Beim Grillen wird mit Strahlungswärme gegart. Das Grill-Programm kann zum Überbacken oder Grillen von dünnen
Fleischstücken verwendet werden.
∙ Die Taste drücken.
∙ Dann mithilfe des Drehreglers die gewünschte Garzeit einstellen. Die maximal einstellbare Garzeit beträgt 95 Minuten.
∙ Den Garvorgang durch Drücken des Drehknebels starten.
∙ Das Lebensmittel beim Grillen beobachten, um nach Erreichen einer ausreichenden Bräunung dieses zu wenden bzw. bei
einer ausreichenden Garung zu entnehmen.
12
Page 13
Kombinationsprogramme Grill und Mikrowelle
Die Kombinationsprogramme eignen sich zum Garen von Geügel, Fisch und Gratin.
∙ Die Taste mehrfach drücken:
Zweimal drücken: Co-1 → 30 % Mikrowellenleistung, 70 % Grillleistung
Dreimal drücken: Co-2 → 55 % Mikrowellenleistung, 45 % Grillleistung
∙ Dann mithilfe des Drehreglers die gewünschte Garzeit einstellen. Die maximal einstellbare Garzeit beträgt 95 Minuten.
∙ Den Garvorgang durch Drücken des Drehknebels starten.
∙ Das Lebensmittel beim Grillen beobachten, um nach Erreichen einer ausreichenden Bräunung dieses zu wenden bzw. bei
einer ausreichenden Garung zu entnehmen.
Ultra-Heißluft
Beim Garen mit Heißluft zirkuliert heiße Luft im Garraum, um eine gleichmäßige Garung und Bräunung zu erzielen. Heißluft
eignet sich besonders gut zur Zubereitung von Pizza oder ähnlichen Gerichten.
Tipp! Bei der Zubereitung von zwei Portionen auf Grillrost und Keramikboden, das untere Gargut auf das Backblech und
nicht direkt auf den Keramikboden legen. Nach der Hälfte der Zeit die Position des Gargutes tauschen.
∙ Die Taste mehrfach drücken, um eine Gartemperatur zwischen 230° und 110 °C auszuwählen.
∙ Dann mithilfe des Drehreglers die gewünschte Garzeit einstellen. Die maximal einstellbare Garzeit beträgt 95 Minuten.
∙ Den Garvorgang durch Drücken des Drehknebels starten.
∙ Das Lebensmittel während der Zubereitung beobachten, um nach Erreichen einer ausreichenden Bräunung dieses zu
wenden bzw. bei einer ausreichenden Garung zu entnehmen.
∙ Nach der Hälfte der Garzeit das Gargut um ca. 180° drehen.
∙ Wird während des Garvorgangs die Taste gedrückt, wird im Display die eingestellte Temperatur angezeigt.
Vorheizen:
Das Gerät kann auch vorgeheizt werden:
∙ Die Taste mehrfach drücken, um eine Gartemperatur zwischen 230° und 110 °C auszuwählen.
∙ Den Heizvorgang sofort durch Drücken des Drehknebels starten. Im Display wird 30.00 angezeigt und das Vorheizen
beginnt.
∙ Nach Erreichen der ausgewählten Temperatur ertönen Signaltöne. Die Tür öffnen und den Garraum bestücken.
∙ Die Taste drücken und das Gerät starten wie unter ‚Heißluft‘ beschrieben.
Kombinationsprogramm Mikrowelle und Ultra-Heißluft
∙ Das Kombinationsprogramm eignet sich zum Garen von Auäufen und anderen Speisen.
∙ Die Taste ca. 3 Sekunden lang drücken.
∙ Die Taste mehrfach drücken, um eine Temperatur von 230, 200, 170 oder 140 °C auszuwählen. Andere
Temperaturen sind nicht wählbar.
∙ Dann mithilfe des Drehreglers die gewünschte Garzeit einstellen. Die maximal einstellbare Garzeit beträgt 95 Minuten.
∙ Den Garvorgang durch Drücken des Drehknebels starten.
∙ Das Lebensmittel während der Zubereitung beobachten, um nach Erreichen einer ausreichenden Bräunung dieses zu
wenden bzw. bei einer ausreichenden Garung zu entnehmen.
∙ Nach der Hälfte der Garzeit das Gargut um ca. 180° drehen.
∙ Wird während des Garvorgangs die Taste gedrückt, wird im Display die eingestellte Temperatur angezeigt.
Mehrere Programme programmieren
Das Gerät kann zwei verschiedene Programme direkt nacheinander ausführen, ohne dass es neu gestartet werden
muss; zum Beispiel ein Gericht zunächst mit Mikrowelle garen und dann mit Grill überbacken. Als Programme können die
Mikrowellen-, Heißluft, Grill- und Kombinationsprogramme gewählt werden. Die Automatik-Koch- und das Quickprogramm
können hierbei nicht gewählt werden.
∙ Die Taste für das jeweilige Programm so oft drücken, bis die gewünschte Leistung/Temperatur angezeigt wird.
∙ Mithilfe des Drehreglers die gewünschte Garzeit einstellen.
∙ Dann die Taste für das nächste Programm so oft drücken, bis die gewünschte Leistung/Temperatur angezeigt wird.
∙ Mithilfe des Drehreglers die gewünschte Garzeit einstellen.
∙ Den Garvorgang durch Drücken des Drehknebels starten.
∙ Das Gerät startet den ersten Garvorgang. Im Display wird S1 angezeigt. Sobald das nächste Programm ausgeführt wird,
wird im Display S2 angezeigt.
13
Page 14
Tipp!
Diese Funktion kann optimal beim Garen durch Einstellen von unterschiedlichen Mikrowellenleistungen genutzt werden.
Zu Beginn des Garprozesses eine hohe Leistung einstellen, anschließend eine niedrige Leistung, damit dem Gargut noch
Wärme zugeführt wird. Die Wärme kann sich dann optimal verteilen, obwohl sich das Gargut schon in der sogenannten
Ruhephase bendet.
Lieblingsessen speichern
Die bisher genannten Programme und Programmkombinationen können als ‚Lieblingsessen‘ für spätere, schnelle
Verwendung gespeichert werden. Drei verschiedene Lieblingsessen können gespeichert werden. Ist ein Speicherplatz noch
nicht belegt, blinkt die jeweilige Zahl. Die Automatik-Kochprogramme und das Quickprogramm können hierbei nicht gewählt
werden.
∙ Die Taste ein- bis dreimal kurz drücken. Im Display blinkt 1, 2 oder 3.
∙ Die Taste für das jeweilige Programm so oft drücken, bis die gewünschte Leistung/Temperatur angezeigt wird.
∙ Mithilfe des Drehreglers die gewünschte Garzeit einstellen.
∙ Dann die Taste für das nächste Programm so oft drücken, bis die gewünschte Leistung/Temperatur angezeigt wird.
∙ Mithilfe des Drehreglers die gewünschte Garzeit einstellen.
∙ Die Taste erneut kurz drücken, um das Lieblingsessen zu speichern.
∙ Das gespeicherte Programm wird durch kurzen Druck auf die Taste und auf den Drehknebel gestartet.
∙ Wird das Gerät vom Netz getrennt, müssen die Programme neu gespeichert werden.
∙ Ist ein Platz bereits belegt, blinkt die Zahl nicht. Das Programm kann jedoch einfach überschrieben werden, wie oben
beschrieben.
Automatik-Koch- und Auftauprogramme
Durch die Automatik-Koch- und Auftauprogramme können Lebensmittel gegart und aufgetaut werden ohne die Leistung oder
die Garzeit einzustellen.
∙ Den Drehknebel gegen den Uhrzeigersinn drehen, bis im Display das gewünschte Programm aus der nachfolgenden
Tabelle angezeigt wird. Den Drehknebel drücken.
∙ Durch Drehen des Drehknebels das passende Gewicht (siehe Tabelle) auswählen.
∙ Den Drehknebel drücken, um das Programm zu starten.
∙ Im Display wird nun die Laufzeit des Programms angezeigt.
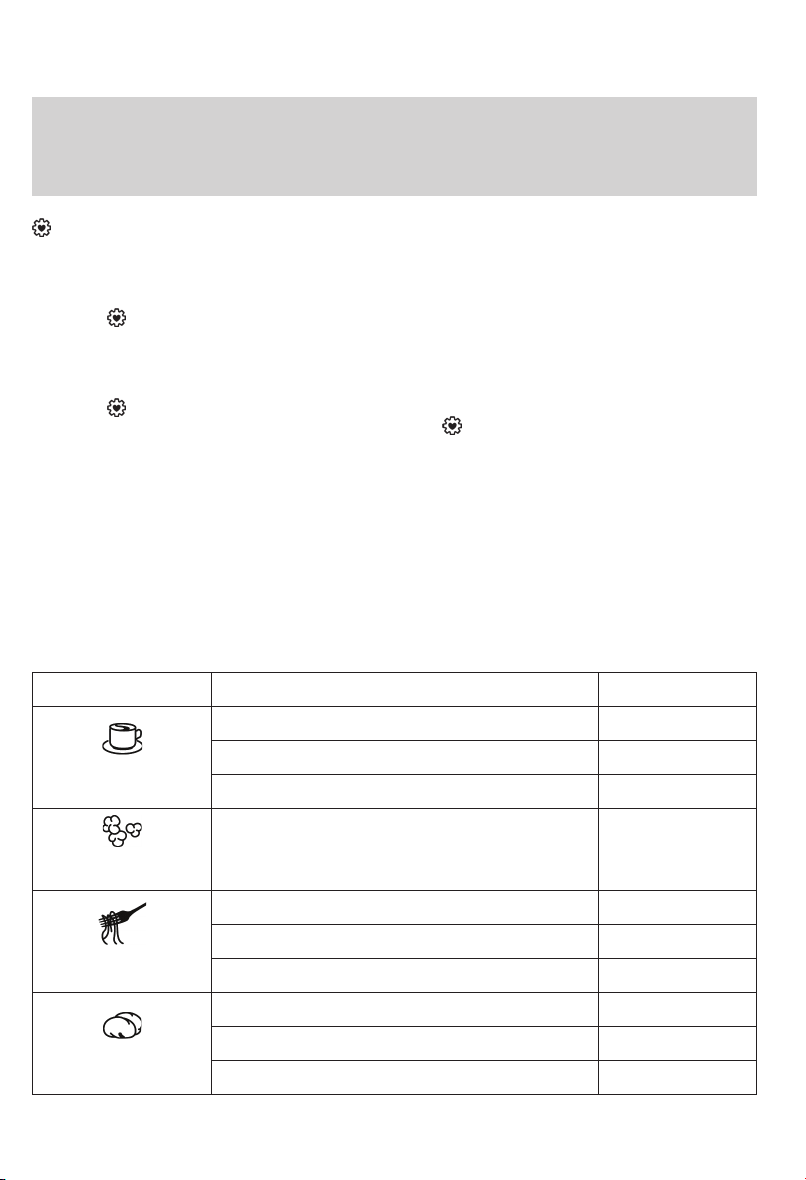
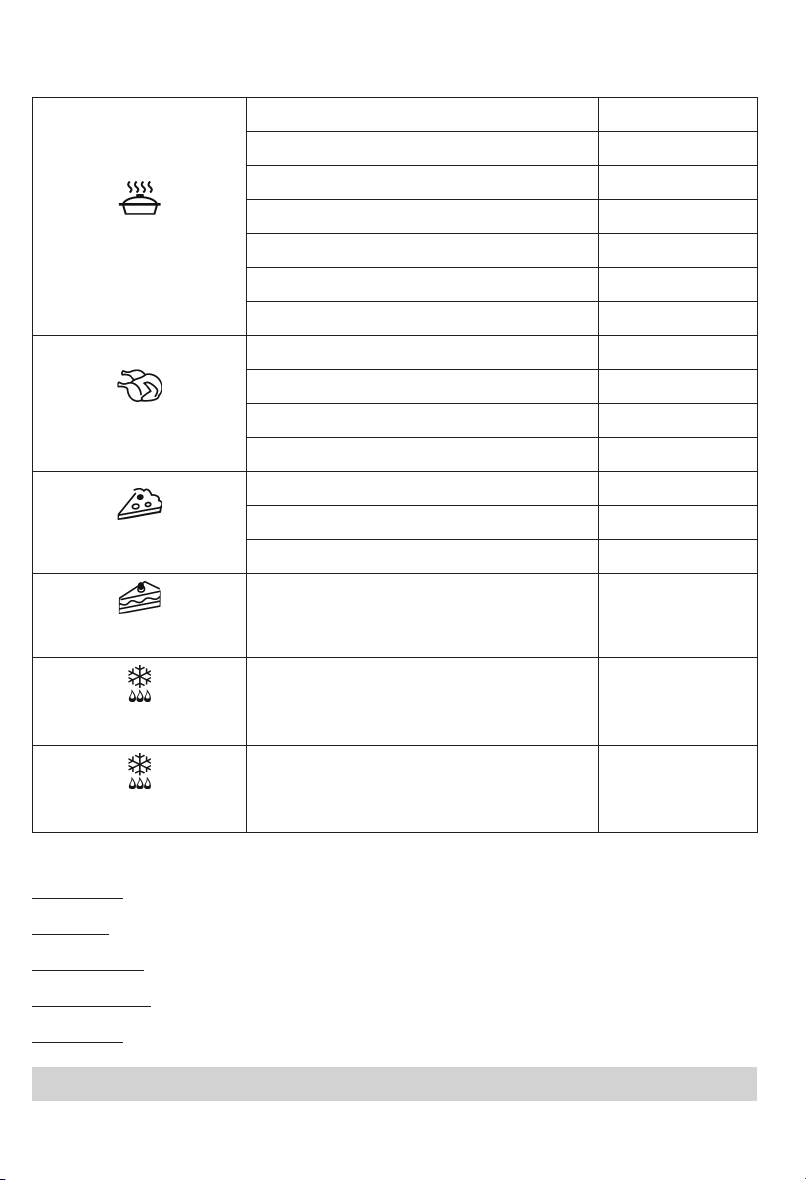
Menü Gewicht Display
A-1
Getränke
A-2
Popcorn
A-3
Nudeln
A-4
Gebackene Kartoffeln
14
200 ml 1
400 ml 2
600 ml 3
99 g 99
100 g (in 400 ml kaltem Wasser) 100
200 g (in 800 ml kaltem Wasser) 200
300 g (in 1200 ml kaltem Wasser) 300
230 g 1
460 g 2
690 g 3
Page 15
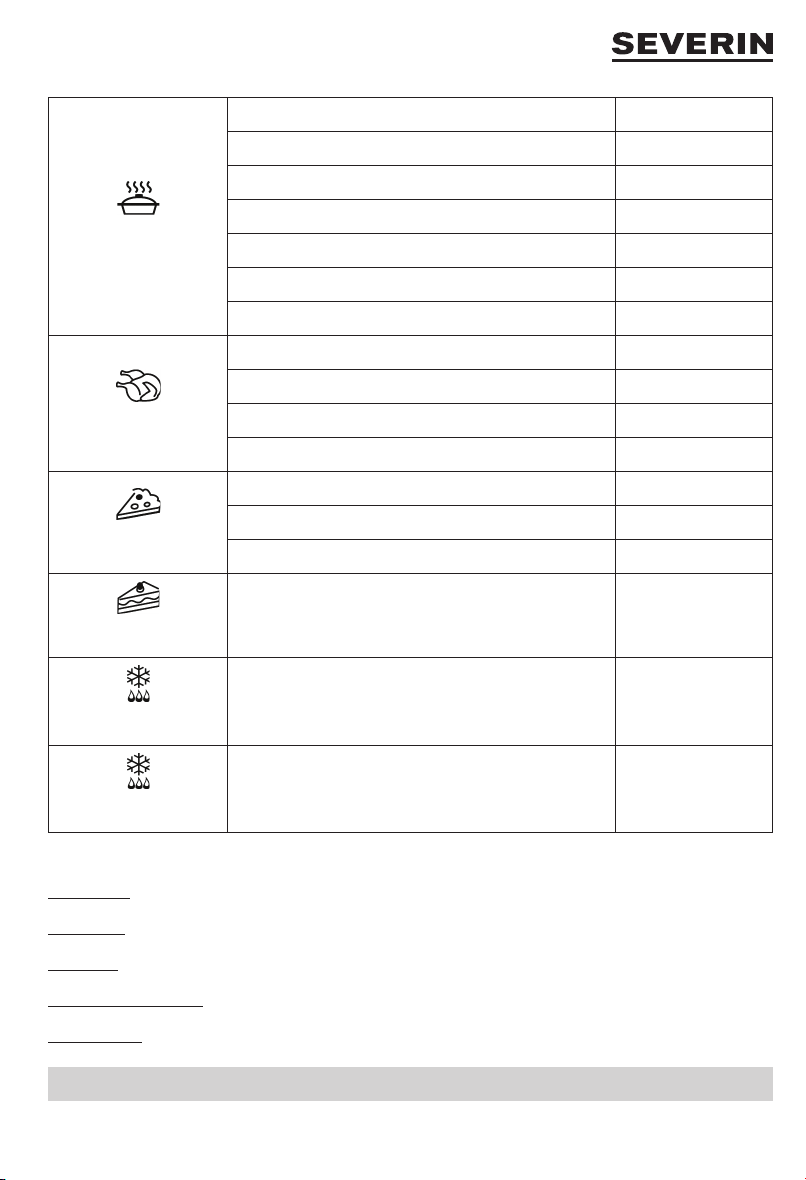
200 g 200
300 g 300
400 g 400
A-5
Aufwärmen
A-6
Brathähnchen
A-7
Pizza
A-8
Kuchen
d-1
Auftauen nach Zeit
d-2
Auftauen nach Gewicht
500 g 500
600 g 600
700 g 700
800 g 800
800 g 800
1000 g 1000
1200 g 1200
1400 g 1400
150 g 150
300 g 300
450 g 450
ca. 475 g 475
Zeit wählbar 0:00
Gewicht wählbar
100
:
:
1800
Zubereitungshinweise
A-1 Getränke:
Zum Aufwärmen von Getränken, zum Erhitzen von Wasser für Tee oder Instantkaffee
A-2 Popcorn:
Für Mikrowellen-Popcorn in Tüten. Die Anweisung des Herstellers beachten.
A-3 Nudeln:
Nudeln in einen Behälter geben, mit kaltem Wasser übergießen und in die Mitte des Garraumes stellen.
A-4 Gebackene Kartoffeln:
Rohe Kartoffeln mit Schale auf einen mikrowellengeeigneten Teller in die Mitte des Garraumes stellen.
A-5 Aufwärmen:
Zum Aufwärmen von Speisen in mikrowellengeeigneten Behältnissen.
Tipp! Die Speisen ringförmig anordnen, um eine optimale Wärmeverteilung zu erreichen.
15
Page 16

A-6 Brathähnchen:
Ganzes Hähnchen auf einen mikrowellengeeigneten Teller in die Mitte des Garraumes platzieren.
Nach Ablauf von der Hälfte der Laufzeit ertönen Signaltöne und der Garvorgang stoppt. Das Gargut wenden und den
Drehknebel drücken um den Garvorgang fortzusetzen.
A-7 Pizza:
Zum Backen von Pizza auf dem Grillrost oder dem Backblech. Bei Tiefkühlpizza die Angaben auf der Verpackung bezüglich
der Vorheizzeit beachten. Das Gerät nach Angaben des Herstellers vorheizen, danach Automatikprogramm wählen.
Nach der Hälfte der Laufzeit ertönen Signaltöne. Die Tür öffnen, die Pizza um 180° drehen und den Drehknebel drücken um
den Garvorgang fortzusetzen.
A-8 Kuchen:
Dieses Programm ist zum Backen von einfachen Rührkuchen mit einem Gewicht von ca. 475 g geeignet. Die Angaben
im Rezept bezüglich der Vorheizzeit beachten und das Gerät ggf. vorher aufheizen. (siehe ‘Heißluft/Vorheizen’). Den
Kuchenteig in eine hitzebeständige Backform geben und die Form auf den Grillrost oder Keramikboden stellen.
Nach der Hälfte der Laufzeit ertönen Signaltöne. Die Tür öffnen, die Backform um 180° drehen und den Drehknebel drücken
um den Garvorgang fortzusetzen.
d-1 Auftauen nach Zeit:
Siehe nachstehenden Abschnitt ‚Auftauen nach Zeit‘.
d-2 Auftauen nach Gewicht:
Siehe nachstehenden Abschnitt ‚Auftauen nach Gewicht‘.
d-1 Auftauen nach Zeit und d-2 Auftauen nach Gewicht
Bei diesen Auftau-Programmen kann durch Angabe der Zeit oder des Gewichts aufgetaut werden.
Den Drehknebel gegen den Uhrzeigersinn drehen, bis im Display d-1 oder d-2 angezeigt wird.
∙ Den Drehknebel drücken um das Programm zu bestätigen.
∙ Den Drehknebel drehen, bis im Display die gewünschte Auftauzeit (bei d-1) oder das gewünschte Gewicht (bei d-2)
erscheint.
∙ Den Drehknebel drücken, um den Auftauvorgang zu starten.
Hinweise:
∙ Nach Ablauf von 2/3 der eingestellten Zeit ertönen Signaltöne. Die bereits aufgetauten Lebensmittel entnehmen, bzw. das
aufzutauende Gargut wenden.
∙ Den Drehknebel drücken, um den Auftauvorgang fortzusetzen.
∙ Wenn nach Ablauf der Zeit das Lebensmittel noch nicht aufgetaut ist, das Gerät in 1-Minuten-Schritten programmieren bis
es endgültig aufgetaut ist.
∙ Wenn sich das Lebensmittel in einem nicht mikrowellengeeigneten Plastikbehälter bendet, erst nur so lange auftauen,
bis das Lebensmittel aus dem Plastikbehälter entfernt werden kann, um dann mikrowellensicheres Geschirr zu
verwenden.
Beleuchtung
Bei geöffneter Tür und bei Betrieb des Gerätes ist die Innenbeleuchtung eingeschaltet. Ist ein Programm beendet, erlischt
die Lampe.
Reinigung
∙ Die Mikrowelle sollte regelmäßig gereinigt und eventuelle Lebensmittelreste nach jedem Gebrauch entfernt werden.
∙ Vor jeder Reinigung das Gerät ausschalten, den Netzstecker ziehen und ausreichend abkühlen lassen.
∙ Das Gerät darf nicht mit Wasser behandelt werden. Es darf kein Wasser in die Lüftungsöffnungen innen oder außen am
Gerät eindringen. Ein Dampfreiniger darf nicht zur Reinigung verwendet werden.
∙ Zur Reinigung des gesamten Gerätes eignen sich ein nur leicht angefeuchtetes weiches Tuch und etwas Spülmittel.
Anschließend mit einem weichen Tuch trockenreiben.
∙ Keine Scheuermittel oder andere aggressive Reinigungsmittel benutzen. Backofenreinigungsspray darf nicht verwendet
werden.
∙ Den Garraum nach jedem Gebrauch reinigen. Die Türinnenseite, der Türrahmen und der Keramikboden müssen stets
sauber gehalten werden.
∙ Den Grillrost und das Backblech im heißen Spülwasser reinigen. Die Einzelteile nicht in der Spülmaschine reinigen.
16
Page 17

Sonstige Hinweise
Technische Daten
Abmessungen außen : 490 mm (L) x 491 mm (T) x 287 mm (H)
Abmessungen innen :
∙ Innenraum : 340 mm (L) x 338 mm (T) x 197 mm (H)
∙ Höhe über dem Keramikboden : 190 mm
∙ Backblech : Ø 265 mm
Gerätegewicht : ca. 17,4 kg
Betriebsspannung : 230 V~ 50 Hz
Leistungsaufnahme gesamt : 2050 W
- Grill : 1200 W
- Mikrowelle : 1400 W
- Heißluft : 2050 W
Abgabeleistung
- Mikrowelle : 90 W - 900 W
Ersatzteile und Zubehör
Ersatzteile oder Zubehör können bequem im Internet auf unserer Homepage www.severin.de unter dem Unterpunkt „Service
/ Ersatzteile“ bestellt werden.
Entsorgung
Geräte, die mit diesem Symbol gekennzeichnet sind, müssen getrennt vom Hausmüll entsorgt werden. Diese
Geräte enthalten wertvolle Rohstoffe, die wiederverwertet werden können. Eine ordnungsgemäße Entsorgung
schützt die Umwelt und die Gesundheit Ihrer Mitmenschen. Ihre Gemeindeverwaltung bzw. Ihr Fachhändler gibt
Auskunft über die ordnungsgemäße Entsorgung.
Garantie
Von den nachfolgenden Garantiebedingungen bleiben die gesetzlichen Gewährleistungsrechte gegenüber dem Verkäufer
und eventuelle Verkäufergarantien unberührt. Wenden Sie sich im Garantiefall daher direkt an den Fachhändler. Zusätzlich
gewährt SEVERIN eine Herstellergarantie von zwei Jahren ab Kaufdatum. In diesem Zeitraum beseitigen wir kostenlos
alle Mängel, die nachweislich auf Material- oder Fertigungsfehlern beruhen und die Funktion wesentlich beeinträchtigen.
Weitere Ansprüche sind ausgeschlossen. Von der Garantie ausgenommen sind: Schäden, die auf Nichtbeachtung
der Gebrauchsanweisung, unsachgemäße Behandlung oder normalen Verschleiß zurückzuführen sind, ebenso leicht
zerbrechliche Teile wie z. B. Glas, Kunststoff oder Glühlampen. Die Garantie erlischt bei Eingriff nicht von SEVERIN
autorisierter Stellen. Sollte eine Reparatur erforderlich werden, setzen Sie sich bitte telefonisch oder per Mail mit unserem
Kundendienst in Verbindung. Die Kontaktdaten nden Sie im Anhang der Anleitung.
17
Page 18
GB
Microwave oven
Dear Customer,
Before using the microwave oven, please read the following instructions carefully and keep this manual for future reference.
The appliance must only be used by persons familiar with these instructions.
Parts of the appliance
1. Door lock
2. Inspection window
3. Ceramic base
4. Control panel
5. Heating element
6. Grill rack
7. Baking tray
18
Page 19
Control panel detail
Button Function
Button sounds and Childproof
safety device
Favourite dish & Clock
Quick start / Increase cooking time
by 30 seconds
Microwave selection
Grill selection
Ultra-hot-air selection
Interrupt / Stop
Rotary control Function
Press Start
Turn
Time / Automatic cooking
programmes
19
Page 20
Display
Automatic programmes
First programme selection
Second programme selection
Defrosting according to weight
Childproof safety device
The display shows the current time of the day or, during
operation, the running time programmed and functions
selected.
Temperature
Setting the clock
Weight
Ultra-hot-air function
Grill function
Microwave function
Automatic programmes
Defrosting according to time
20
Page 21

Safety instructions
Important safety instructions
Please read the following instructions carefully and keep this instruction
manual for future reference
Connection to the mains supply
The appliance should only be connected to an earthed socket installed in accordance
with the regulations. Make sure that the supply voltage corresponds with the voltage
marked on the rating label. This product complies with all binding CE labelling
directives.
Positioning the unit
∙ Always place the microwave oven on a stable, level and heat-resistant surface,
ensuring that it is protected from any heat source or excessive humidity.
∙ Do not operate the appliance outdoors.
∙ The feet on the base of the unit must not be removed.
∙ Sufcient ventilation must be ensured at all times. Do not place any objects on the
unit, and make sure that the following minimum distances from any wall or other
object are maintained:
Sides: 7.5 cm
Rear: 7.5 cm
Top: 30.0 cm
∙ The unit must not be installed inside a cupboard; when positioning the unit, also
ensure that it is not placed directly underneath a cupboard or any other similar
object.
Important notes
∙ Caution:Certaintypesoffoodmaytendtocatchre.Donot,underany
circumstances, leave the appliance unattended when using the microwave,
grill, hot-air or combination functions.
∙ This microwave oven is intended for the defrosting, heating and cooking of food
only. Caution: Any attempt to dry food or clothing, to heat up warming pads, house
slippers, sponges, wet cleaning cloths etc. may cause injuries, combustion or re.
∙ No responsibility will be accepted if damage results from improper use, or if these
instructions are not complied with.
∙ Only use utensils that are suitable for use in microwave ovens. Do not use any
metal containers when heating up food or beverages using the microwave function.
For detailed information, please refer to section ‘Always use suitable kitchen
21
Page 22

utensils’.
∙ The appliance is not intended to be operated by means of an external timer or
separate remote-control system.
∙ This appliance may be used by children (at least 8 years of age) and by persons
with reduced physical, sensory or mental capabilities, or lacking experience and
knowledge, provided they have been given supervision or instruction concerning
the use of the appliance and fully understand all dangers and safety precautions
involved.
∙ Children must not be permitted to play with the appliance.
∙ Children must not be permitted to carry out any cleaning or maintenance work on
the appliance unless they are supervised and at least 8 years of age.
∙ The appliance and its power cord must be kept well away from children under 8 at
all times.
∙ To avoid the risk of electric shock, do not clean the appliance with water and do not
immerse it in water.
∙ Warning: Because of the high temperatures that occur during operation in the
grill and/or hot-air functions, children must not use the appliance unless they are
properly supervised by an adult.
∙ When using the combination, grill and/or hot-air functions, take extreme care not to
touch the interior heating elements.
∙ Do not use any steam cleaning appliances for cleaning.
∙ Always switch the appliance off and remove the plug from the wall socket:
- before cleaning,
- in case of any malfunction,
- after each use.
∙ When removing the plug from the wall socket, never pull on the power cord;
always grip the plug itself.
∙
Caution: The exterior surfaces of the appliance may become hot during
operation. There is also a danger of steam being emitted through the
ventilation slots, with a consequent risk of scalding.
∙ Let the appliance cool down sufciently before it is transported.
∙ Do not allow the appliance or its power cord to touch hot surfaces or come into
contact with any heat sources. Do not let the power cord hang free, and keep it
away from any hot parts.
∙ If the unit is not kept properly clean, deterioration in the quality of its surfaces may
be caused, with possible subsequent shortening of its life-cycle, as well as potential
risk to the user’s safety. Any food residue should therefore be removed right away.
Wipe the door seals, the cooking chamber with its ceramic base and all adjacent
22
Page 23

parts with a damp cloth after each use. The grill rack and baking tray are cleaned
with warm soapy water. For detailed information on cleaning the appliance, please
refer to the section Cleaning.
∙ This appliance is intended for domestic or similar applications, such as the
- staff kitchens in shops, ofces and other similar working environments,
- agricultural working environments,
- by customers in hotels, motels etc. and similar accommodation,
- in bed-and breakfast type environments.
∙ Caution: Any maintenance or repair work requiring the removal of any microwave
radiation protection cover represents a serious hazard to unqualied persons. This
includes the replacement of the special power cord or an interior light bulb. The unit
must not be opened, except by qualied personnel. If repairs are needed, please
contact our customer service department by telephone or email (see appendix).
∙ When heating liquids in your microwave oven, the liquid may heat up beyond
boiling-point without visible evidence of bubbling. It is therefore important to
exercise extreme caution when handling any containers, e.g. when removing them
from the oven.
The risk of such over-boiling may be reduced by placing a heat-resistant glass rod
in the container during the heating process.
∙ Eggs in their shells or whole hard-boiled eggs must not be heated up in a
microwave oven, since they may explode even after the microwave heating
process has nished.
∙ Caution: It is also highly dangerous to heat up liquids or any kind of solid food
items in closed containers in the unit, since there is a real danger of explosion.
∙ The contents of baby bottles or glass containers with baby food must be thoroughly
stirred or shaken to ensure that the temperature is evenly distributed. Caution:
To avoid painful and dangerous scalding, always check the temperature before
feeding a child.
∙ When heating or cooking food contained or wrapped in combustible materials such
as plastic or paper, there is a danger of those materials igniting. It is also possible
that food will dry out or even ignite if the selected cooking time is excessive. Fat
or oil are also inammable substances. It is therefore important to supervise
the appliance during operation. Highly volatile or inammable liquids such as
concentrated alcohol must of course not be heated up.
∙ Should any smoke be noticed during operation, keep the door closed to inhibit or
smother any ames. Switch the unit off immediately and remove the plug from the
wall socket.
23
Page 24

∙ To prevent danger of burns, a suitable oven-cloth must always be used when
removing food items from the oven, since the utensils and cooking containers heat
up not only during use of the grill or hot-air functions, but also during microwave
operation.
∙ Special food thermometers (as used in conventional baking ovens) are not suitable
for use with microwave ovens.
Beforeusingforthersttime
∙ After unpacking and every time before connecting the unit to the power supply,
check the unit and its power cord carefully for any signs of damage.
∙ Caution: Ensure that the door, including the inspection window, door seals and
locks, are not damaged or bent and that it closes rmly against the support. This
is important to ensure that no microwave energy is allowed to escape during
operation. For the same reason, the entire casing as well as the inside of the oven
must be carefully checked.
Should the unit show any signs of damage, it must not be used under any
circumstances until it has been repaired by a qualied technician.
∙ Remove any exterior and interior packaging materials, and any promotional or other stickers found. All these materials are
suitable for recycling.
∙ Caution: Do not remove the rubber plugs from the grill rack.
∙ Do not remove the protective lm covering the inside of the door.
∙ Caution: Keep any packaging materials well away from children – such materials are a potential source of danger, e.g. of
suffocation.
∙ Before the appliance is used for the rst time, or after extended periods of non-use, it should be thoroughly cleaned as
described in the section Cleaning.
∙ Before the microwave appliance is used for the rst time, let it heat up on the grill setting (without the microwave function
activated) for approximately 10 minutes. This will remove the smell typically encountered when rst switching on a grill. A
little smoke may be emitted; this is quite normal, but ensure there is sufcient ventilation.
∙ Note: Do not switch the unit on unless the food to be heated or cooked has been placed inside the oven.
Operating the appliance empty could result in damage to the unit.
IMS device
This appliance is a group 2 class B ISM device. Group 2 contains all ISM devices (industrial, scientic, medical) generating
radio frequency energy and/or using radio frequency energy in the form of electro-magnetic radiation to process materials;
it also comprises spark erosion devices. Class B species devices designed for domestic use, or any similar devices
integrated in the general power grid supplying domestic units.
The microwave function (Group II in compliance with EN 55011)
Electromagnetic energy is generated inside the unit, causing the molecules in the food (mainly water molecules) to oscillate
and subsequently causing the food to become hot. Food with high water content will therefore heat up faster than relatively
dry food. The heat is generated gradually inside the food. Any utensils, container or plates used are heated up only indirectly
as a result of the food temperature.
24
Page 25
Always use suitable kitchen utensils
∙ Do not place the food directly onto the ceramic base; always use a suitable plate or cooking container.
∙ Metal objects are to be avoided since microwaves are reected from metal surfaces and might not reach the food to be
cooked. Any metal in the oven could also cause sparks, resulting in possible damage to the unit.
∙ As a general rule, cutlery or metal containers must not be used in the microwave oven. Some food wrappings contain
aluminium foil or wires underneath a layer of paper and are therefore also unsuitable for use with microwave appliances.
Should the use of aluminium foil be recommended in a recipe, ensure that the food is tightly wrapped in the aluminium foil
(avoiding any air blisters). Ensure a minimum distance of 2.5 cm between the aluminium foil and the interior walls of the
oven.
∙ Always make sure that the cooking container or plate used does not contain any metal decoration such as a gold rim or
colour containing metal particles. Lead crystal objects are also not suitable. Always make sure that no parts of the cooking
containers used are hollow (e.g. the handles). Porous materials may have absorbed water during cleaning and are again
not suitable. Cooking containers or utensils made of ‘Melamine’ plastic material absorb energy and are also unsuitable.
Using the microwave function
∙ Containers made from heat-resistant glass or porcelain are particularly suitable for use in microwave appliances.
∙ Plastic is suitable only if it is heat-resistant.
∙ Plastic cooking containers especially designed for use with microwave ovens are available at most kitchenware dealers.
∙ Cooking bags etc. should be punctured to be able to release any high pressure during cooking.
Using the grill or hot-air function
∙ With these functions, any heat-resistant containers or plates suitable for conventional ovens may be used, though not any
plastic items.
∙ The food to be cooked can be put directly on the grill rack or baking tray. Slide the grill rack into position and place the
baking tray on the ceramic base.
Using the microwave/grill or microwave/hot-air combination
∙ When using the combination functions, the microwave and grill or hot-air functions are activated alternately. The
containers or plates must therefore be suitable for use in a microwave appliance as well as being heat-resistant. Because
of the relatively high temperatures, plastic items must not be used. Make sure that the container or plate used does not
contain any metal parts.
Operation
Initial setting of the clock
∙ Once the unit has been connected to the power supply, the display shows ‘1:00’, the hour display ashes and an acoustic
signal is heard.
∙ Turn the rotary control to set the correct hour.
∙ Press the button briey. The minute digits start ashing.
∙ Turn the rotary control to set the correct minutes.
∙ Press the button briey to nish setting the time. ‘:’ ashes in the display and the current time is shown.
∙ The time setting process can be cancelled or skipped by pressing the key.
∙ After a power failure, the clock must be re-set.
Changing the time
∙ To change the time, press the button for 3 seconds. The display shows Hr 24 or Hr 12.
∙ Press the button briey to change between the 24- or 12 –hour formats.
∙ The hour display ashes; turn the rotary control to set the correct hour.
∙ Press the button briey. The minute digits start ashing.
∙ Turn the rotary control to set the correct minutes.
∙ Press the button briey to nish setting the time. ‘:’ ashes in the display and the current time is shown.
25
Page 26
Acoustic signal & Childproof safety device
Acoustic signal
∙ When any control button is pressed or the rotary control turned, a correct input is acknowledged by a beep signal.
∙ To cancel the signal, press the button briey.
Cancelling the beep signal in this way only affects the use of control buttons or rotary control; the signals indicating
programme sequences will still be active.
∙ To re-activate the signal, press the button again briey.
Childproof safety device
∙ This safety device prevents children from operating the appliance without supervision.
∙ To activate the safety device, press for 3 seconds. The indicator appears on the display.
∙ To switch off the safety device, press again for 3 seconds. The indicator goes out.
∙ Note: Should you experience a problem when switching the appliance on, rst verify that the safety device is not
activated.
General operating sequence
∙ Place the food to be heated in a suitable container. Place the container on the ceramic base in the oven.
∙ When food is placed in the microwave, it should be covered to prevent it from drying out. Glass or plastic covers
especially designed for use with microwave appliances are available at most kitchenware dealers.
∙ When using the grill, hot-air or any of the combination functions, do not cover the food to be cooked.
∙ Close the door and set the desired programme.
∙ Note:
The following steps are used for setting the cooking time:
0 – 5 minutes : 10-second steps
5 – 10 minutes : 30-second steps
10 – 30 minutes : 1-minute steps
30 – 95 minutes : 5-minute steps
∙ Press the rotary control to start a programme.
∙ As the programme is started, the interior light comes on.
∙ If, during operation, the door is opened or the key is pressed (e.g. to stir or to turn the food in order to ensure that the
temperature is evenly distributed), the timer and programme functions are automatically suspended. The programme will
automatically resume only after the door is closed again and the rotary control is pressed.
∙ Press twice to interrupt the programme.
∙ Beep signals indicates that the pre-programmed cooking time has elapsed; at the same time, the interior lighting switches
off and the display shows ‘End’.
∙ Open the door and remove the container with the food.
∙ In order to achieve an even heat distribution through the food, the container should be set aside for several minutes.
∙ If the door is not opened immediately after the pre-programmed operating time has elapsed, a number of beep signals are
heard every 2 minutes.
Cooling-off function
This microwave oven has an automatic cooling feature.
After any operating time exceeding two to three minutes, the cooling fan will automatically run for several minutes after the
programme stops.
Grill rack & baking tray
∙ The grill rack and baking tray are suitable for microwave, grill and hot-air operation.
∙ Caution: Do not remove the rubber plugs from the grill rack.
∙ Insert the grill rack at the desired height level and position the baking tray on the grill rack or on the ceramic base.
∙ The food to be cooked can be put directly on the grill rack or baking tray.
26
Page 27
Cooking/heating with microwaves
When cooking/heating with microwaves, the heating directly affects the inside of the food.
Hint: When preparing two portions, on the grill rack and ceramic base, they should not be placed directly on top of each
other, but in an off-set position. Change the positions of the portions once half the processing time has elapsed.
∙ Push the button repeatedly until the required power setting is shown (see the table below).
∙ Then use the rotary control to set the desired cooking time. The cooking time can be pre-set to a maximum of 95 minutes.
∙ Press the rotary control to start the cooking process.
∙ To ensure that the heat is evenly distributed, the food being cooked or heated should be occasionally stirred.
∙ If the button is pressed during the cooking process, the display will show the selected power setting.
Power (W) Power (%) Display Type Use
Press 1 x 900 W 100 P100 High Heating up liquids, cooking
2 x 810 W 90 P-90
3 x 720 W 80 P-80
4 x 630 W 70 P-70 Medium high Defrosting and heating up deep-frozen dishes
5 x 540 W 60 P-60
6 x 450 W 50 P-50 Medium Cooking delicate food
7 x 360 W 40 P-40
8 x 270 W 30 P-30 Low Defrosting food
9 x 180 W 20 P-20
10 x 90 W 10 P-10 Very low Defrosting sensitive food
∙ Pressing the button activates the cooking process directly. Each press on the button adds 30 seconds to the
Quick-programme / Cooking with microwaves:
cooking time.
∙ The microwave power setting is always 100 %.
∙ The maximum programmable cooking time is 95 minutes.
∙ If the button is pressed while a microwave programme is running, each press adds 30 seconds to the cooking time.
Rotary control - Quick-programme / Cooking with microwaves
∙ The required cooking time is selected by turning the rotary control clockwise.
∙ Pressing the rotary control will start the cooking process directly.
∙ The microwave power setting is always 100 %.
∙ The maximum programmable cooking time is 95 minutes.
Grill function
The grilling process uses radiation heat to cook the food. The programme is suitable for cooking ‘au gratin’ or for grilling thin
pieces of meat.
∙ Press the button.
∙ Then use the rotary control to select the desired cooking time. The maximum programmable cooking time is 95 minutes.
∙ Start the cooking process by pressing the rotary control.
∙ As the meat needs to be turned after one side is sufciently browned, and taken out once it is done on both sides, this
process should be closely monitored.
27
Page 28
Combination programme grill and microwave
These programmes are suitable for cooking poultry, sh or cooking ‘au gratin’.
∙ Press the button repeatedly:
Press twice: Co-1 → 30 % microwave power, 70 % grill power
Press three times: Co-2 → 55 % microwave power, 45 % grill power
∙ Then use the rotary control to select the desired cooking time. The maximum programmable cooking time is 95 minutes.
∙ Start the cooking process by pressing the rotary control.
∙ As the food needs to be turned after one side is sufciently browned, and taken out once it is done on both sides, this
process should be closely monitored.
Ultra-hot-air function
With this function, hot air circulates inside the oven, achieving an even cooking and browning process. Hot-air cooking is
especially suitable for cooking pizza or similar dishes.
Hint: When preparing two portions, on the grill rack and ceramic base, the lower portion should be placed on the baking
tray and not directly on the ceramic base. Change the positions of the portions once half the processing time has elapsed.
∙ Press the button repeatedly to select a cooking temperature between 230° and 110 °C.
∙ Then use the rotary control to select the desired cooking time. The maximum programmable cooking time is 95 minutes.
∙ Start the cooking process by pressing the rotary control.
∙ As the food needs to be turned after one side is sufciently browned, and taken out once it is done on both sides, this
process should be closely monitored.
∙ Rotate the food 180° after half the cooking time.
∙ If, during the cooking process, the button is pressed, the display will show the selected temperature.
Pre-heating:
If required, the appliance may also be pre-heated.
∙ Press the button repeatedly to select a cooking temperature between 230° and 110 °C.
∙ Start the heating process immediately by pressing the rotary control. The display shows 30.00 and the pre-heating
process begins.
∙ Beep signals indicate that the pre-selected temperature has been reached. Open the door and put in the food.
∙ Press to start the process as described under ‘Hot-air function’.
Combination programme microwave and Ultra-hot air
∙ The combination programme is suitable for casseroles and similar dishes.
∙ Press the button for around 3 seconds.
∙ Press the button repeatedly to select a temperature of 230, 200, 170 or 140 °C. Other temperatures cannot be
selected.
∙ Then use the rotary control to select the desired cooking time. The maximum programmable cooking time is 95 minutes.
∙ Start the cooking process by pressing the rotary control.
∙ As the food needs to be turned after one side is sufciently browned, and taken out once it is done on both sides, this
process should be closely monitored.
∙ Rotate the food 180° after half the cooking time.
∙ If, during the cooking process, the button is pressed, the display will show the selected temperature.
Setting multiple programmes
The microwave can be set for 2 separate programmes to run consecutively without having to restart the unit in-between;
eg regular cooking with the microwave function rst, followed by cooking ‘au gratin’ using the grill. This multiple-programme
feature can be used with any of the microwave, hot-air, grill and combination functions. The automatic cooking programmes
and the quick-programme are not suitable for multiple programming.
∙ Press the button for the particular programme repeatedly until the desired power setting/temperature is shown.
∙ Use the rotary control to select the desired cooking time.
∙ Now press the button for the next programme repeatedly until the desired power setting/temperature is shown.
∙ Use the rotary control to select the desired cooking time.
∙ Use the rotary control to start the cooking process.
∙ The appliance starts the rst programme. The display shows S1. As soon as the next programme is started, the display
changes to S2.
28
Page 29

Hint:
This function is especially helpful when using the microwave to cook food at different power settings. While a higher power
setting is selected initially, the power can be reduced at a later stage in order to keep the food hot, and to ensure that the
heat is evenly distributed when the food is already done.
Saving your favourite dish
The above described programmes and programme combinations can be saved as ‘Favourite dishes’ for future quick use.
Three different dishes may be pre-stored. If a memory space is not occupied, its corresponding number ashes. But note
that in this mode, the automatic cooking programmes and the quick-programme cannot be selected.
∙ Press the button briey once, twice or three times. The number 1, 2 or 3 start ashing in the display.
∙ Press the button for the particular programme repeatedly until the power setting/temperature is shown.
∙ Use the rotary control to select the desired cooking time.
∙ Now press the button for the next programme repeatedly until the desired power setting/temperature is shown.
∙ Use the rotary control to select the desired cooking time.
∙ Press the button again briey to save the favourite dish.
∙ The saved programme can be started by briey pressing the button rst and then the rotary control.
∙ If the appliance has been disconnected from the mains, the programmes must be saved again.
∙ If a memory space is already occupied, the corresponding number will not ash. However, the memory space can be
simply over-written as described above.
Automatic cooking and defrosting programmes
These programmes are helpful when cooking or heating up food without having to select any particular settings, e.g. for
power or cooking time.
∙ Turn the rotary control anti-clockwise until the display shows the required programme listed in the table below. Press the
rotary control.
∙ Use the rotary control to select the appropriate weight (see table).
∙ Press the rotary control to start the programme.
∙ The display shows the selected programme running time.
Menu Weight Display
200 ml 1
A-1
Beverages
A-2
Popcorn
A-3
Noodles/Pasta
A-4
Baked potatoes
400 ml 2
600 ml 3
99 g 99
100 g (in cold water, 400 ml) 100
200 g (in cold water, 800 ml) 200
300 g (in cold water, 1200 ml) 300
230 g 1
460 g 2
690 g 3
29
Page 30
200 g 200
300 g 300
400 g 400
A-5
Heating up
A-6
Roast chicken
A-7
Pizza
A-8
Cake
d-1
Defrosting according to time
d-2
Defrosting according to weight
500 g 500
600 g 600
700 g 700
800 g 800
800 g 800
1000 g 1000
1200 g 1200
1400 g 1400
150 g 150
300 g 300
450 g 450
approx. 475 g 475
Time selectable 0:00
Weight selectable
100
:
:
1800
General instructions
A-1 Beverages:
To heat up beverages and hot water for tea or instant coffee.
A-2 Popcorn:
For microwave popcorn (available in bags). Always refer to the manufacturer’s instructions on the package.
A-3 Noodles/pasta:
Put the pasta in a suitable container, and cover with cold water; place the container in the centre of the cooking chamber.
A-4 Baked potatoes:
Put the raw, unpeeled potatoes on a suitable plate, and place it in the centre of the oven.
A-5 Heating up:
For heating up solid food in containers suitable for use with microwaves.
Hint: Arrange the food in a circular pattern to ensure optimal heat distribution.
30
Page 31

A-6 Roast chicken:
Put a whole chicken on a plate suitable for use with microwaves in the centre of the oven.
Several beep signals indicate that 1/2 of the pre-programmed cooking time has elapsed, when cooking is interrupted. Turn
the chicken over and press the rotary control to restart the cooking process.
A-7 Pizza:
For cooking pizza on the grill rack or baking tray. For frozen pizzas, always let the appliance pre-heat according to the
manufacturer’s instructions (to be found on the package), and then choose the appropriate automatic programme.
Several beep signals indicate that 1/2 of the pre-programmed cooking time has elapsed. Open the door, turn the pizza 180°
and press the rotary control to continue the cooking process.
A-8 Cake:
This programme is suitable for baking simple, basic pound cakes with a weight of around 475 g. Please refer to the relevant
recipe information for the necessary pre-heating times. If required, pre-heat the appliance (see ‘Hot-air function/Pre-
heating’). Put the dough into a heat-proof baking tin and place the tin on the grill rack or ceramic base.
Several beep signals indicate that 1/2 of the pre-programmed cooking time has elapsed. Open the door, turn the baking tin
180° and press the rotary control to continue the cooking process.
d-1 Defrosting according to time:
See section ‘ Defrosting according to time’ below.
d-2 Defrosting according to weight:
See section ‘Defrosting according to weight’ below.
d-1 Defrosting according to time and d-2 Defrosting according to weight
The defrosting programmes allow for time- or weight-based defrosting.
Turn the rotary control anti-clockwise, until the display shows d-1 or d-2.
∙ Press the rotary control to conrm the programme selection.
∙ Turn the rotary control, until the display shows the desired defrosting time (for d-1) or the relevant weight (for d-2).
∙ Press the rotary control to start defrosting
Helpful notes:
∙ Several beep signals indicate that 2/3 of the programmed defrosting time has elapsed. Turn the food over, taking out any
that is already defrosted.
∙ Press the rotary control to continue defrosting.
∙ Should the food not be completely defrosted after the pre-set defrosting time has elapsed, it is advisable to limit any
further defrosting times to 1-minute periods until the food is fully defrosted.
∙ Food stored in plastic containers not suitable for use in microwave ovens should be left for a while after being taken from
the freezer. Wait until the food can be easily detached from the plastic, before it is put into the oven inside a container
suitable for use with microwave ovens.
Interior lighting
The interior light comes on when the door is opened; it also remains on during operation. It goes out once a programme has
nished.
Cleaning
∙ The microwave should be cleaned regularly, removing any food residue right away after use.
∙ Before cleaning the appliance, ensure it is disconnected from the power supply and has cooled down completely.
∙ Do not clean the unit with water: ensure that no water is allowed to enter the ventilation slots on the inside or outside of
the unit. Do not use any steam cleaning appliances for cleaning.
∙ The entire unit may be wiped with a slightly damp lint-free cloth and a mild household detergent. Wipe thoroughly dry
afterwards.
∙ Do not use abrasives or harsh cleaning solutions. Commercially available cleaning sprays for conventional baking ovens
are not to be used.
∙ The interior surfaces must be cleaned thoroughly after each operation cycle. The inside of the door, the door frame and
ceramic base must be kept clean at all times.
∙ The grill rack and baking tray may be cleaned with warm soapy water. Caution: Do not put any parts in a dishwasher.
31
Page 32

Additional information
Technicalspecications
Outside dimensions : 490 mm (W) x 491 mm (D) x 287 mm (H)
Inside dimensions : 340 mm (W) x 338 mm (D) x 197 mm (H)
∙ clearance above the ceramic base : 190 mm
∙ baking tray : Ø 265 mm
Unit weight : 17.4 kg
Operating voltage : 230 V~ 50 Hz
Total power consumption : 2050 W
∙ grill : 1200 W
∙ microwave : 1400 W
∙ hot-air function : 2050 W
Microwave output : 90 W - 900 W
Disposal
Devices marked with this symbol must be disposed of separately from your household waste, as they contain
valuable materials which can be recycled. Proper disposal protects the environment and human health. Your local
authority or retailer can provide information on the matter.
Guarantee
This product is guaranteed against defects in materials and workmanship for a period of two years from the date of
purchase. Under this guarantee the manufacturer undertakes to repair or replace any parts found to be defective, providing
the product is returned to one of our authorised service centres. This guarantee is only valid if the appliance has been
used in accordance with the instructions, and provided that it has not been modied, repaired or interfered with by any
unauthorised person, or damaged through misuse.
This guarantee naturally does not cover wear and tear, nor breakables such as glass and ceramic items, bulbs etc. This
guarantee does not affect your statutory rights, nor any legal rights you may have as a consumer under applicable national
legislation governing the purchase of goods. If the product fails to operate and needs to be returned, pack it carefully,
enclosing your name and address and the reason for return. If within the guarantee period, please also provide the
guarantee card and proof of purchase.
32
Page 33

FR
Four à micro-ondes
Chère cliente, Cher client,
Avant d’utiliser ce four à micro-ondes, lisez attentivement les instructions suivantes et conservez le présent manuel
d’instructions pour toute référence ultérieure. L’appareil doit être utilisé exclusivement par des personnes familiarisées avec
les présentes instructions.
Description de l’appareil
1. Verrous de la porte
2. Hublot d’observation
3. Fond céramique
4. Tableau de commande
5. Résistance
6. Grille
7. Plaque de cuisson
33
Page 34

Tableau de commande
Bouton Fonction
Touche paramétrage Signal sonore
et Dispositif de sécurité pour la
protection des enfants
Plat favori & minuterie
Départ rapide / augmentation du
temps de cuisson par incrément de
30 secondes
Micro-ondes
Gril
Air très chaud
Pause / Stop
Bouton rotatif Fonction
Appuyez Départ
Tournez
Temps de cuisson / Programmes
automatiques de cuisson
34
Page 35

Écrand’afchage
Programmes automatiques
Première sélection programme
Deuxième sélection programme
Cet écran d’afchage indique l’heure de la journée ou,
pendant le fonctionnement de l’appareil, le temps de
cuisson programmé et les fonctions sélectionnées.
Décongélation en fonction du
poids
Dispositif de sécurité pour la
protection des enfants
Température
Réglage de l’horloge
Poids
Fonction air très chaud
Fonction gril
Fonction micro-ondes
Programmes automatiques
Décongélation selon la durée
35
Page 36

Consignes de sécurité
Consignes de sécurité importantes
Lisez attentivement les instructions ci-après et conservez ce manuel
d’instructions pour toute référence ultérieure
Branchement au secteur
L’appareil doit être branché exclusivement sur une prise de courant avec terre,
installée selon les normes en vigueur. Assurez-vous que la tension d’alimentation
correspond à la tension indiquée sur la plaque signalétique de l’appareil. Ce produit
est conforme aux directives obligatoires inhérentes au marquage CE.
Positionnement de l’appareil
∙ Installez toujours le four à micro-ondes sur une surface stable et plane, résistant à
la chaleur et à l’abri de toute source de chaleur ou d’humidité excessive.
∙ Ne pas utiliser l’appareil en plein air.
∙ Les pieds de l’appareil ne doivent pas être enlevés.
∙ Assurez une ventilation sufsante et constante. Ne placez aucun objet sur
l’appareil et veillez à ce que les distances minimales suivantes soient respectées
entre l’appareil et le mur ou tout autre objet :
Côtés : 7,5 cm
À l’arrière : 7,5 cm
Au-dessus : 30 cm
∙ L’appareil ne doit pas être encastré dans un placard de cuisine. Évitez également
de positionner l’appareil directement sous un élément ou autre objet analogue.
Remarques importantes
∙ Attention:Certainstypesd’alimentspeuvents’enammer.Nelaissezpas
l’appareil sans surveillance lorsque vous utilisez les fonctions micro-ondes,
gril, chaleur traditionnelle ou des fonctions combinées.
∙ Ce four à micro-ondes a été conçu exclusivement pour la décongélation, le
réchauffage et la cuisson d’aliments. Attention : Le séchage d’aliments ou de
vêtements et le réchauffage de coussins de noyaux de cerises, de chaussons,
d’éponges, de serpillières mouillées, etc. peut entraîner des risques de blessures,
combustion ou feu.
∙ Nous déclinons toute responsabilité en cas de dommages résultant d’une utilisation
erronée ou de la non-conformité aux présentes instructions.
∙ Utilisez uniquement des ustensiles adaptés à la cuisson au four micro-ondes. Ne
pas utiliser de récipients en métal lors du réchauffage d’aliments ou de boissons
36
Page 37

pour la fonction cuisson aux micro-ondes. Pour des informations plus détaillées,
veuillez vous référer au paragraphe ‘Utilisez toujours des ustensiles de cuisine
appropriés’.
∙ L’appareil n’est pas destiné à être utilisé avec un programmateur externe ou une
télécommande indépendante.
∙ Cet appareil peut être utilisé par des enfants (à partir de 8 ans) et par des
personnes souffrant de déciences physiques, sensorielles ou mentales, ou
manquant d’expérience ou de connaissances, s’ils ont été formés à l’utilisation
de l’appareil et ont été supervisés, et s’ils en comprennent les dangers et les
précautions de sécurité à prendre.
∙ Les enfants ne sont pas autorisés à jouer avec l’appareil.
∙ Les enfants ne doivent pas être autorisés à nettoyer ou entretenir l’appareil à
moins d’être supervisés et d’avoir plus de 8 ans.
∙ L’appareil et son cordon d’alimentation doivent être, à tout moment, tenus hors de
portée des enfants de moins de 8 ans.
∙ Pour éviter le risque de chocs électriques, ne pas nettoyer l’appareil à l’eau et ne
pas le plonger dans l’eau.
∙ Avertissement : En raison des très hautes températures utilisées par les
fonctions gril et/ou à chaleur traditionnelle, cet appareil ne doit pas être utilisé par
les enfants sans la surveillance d’un adulte.
∙ Lors de l’utilisation des fonctions combinées ou des fonctions gril et/ou à chaleur
traditionnelle, prenez soin de ne pas toucher la résistance interne.
∙ L’emploi d’appareils de nettoyage à la vapeur pour nettoyer ce four est interdit.
∙ Éteignez toujours l’appareil et débranchez la che de la prise de courant :
- avant tout nettoyage,
- en cas de fonctionnement défectueux.
- Après chaque utilisation.
∙ Ne débranchez pas l’appareil en tirant sur le cordon ; tirez toujours sur la che.
∙
Attention : Les parois extérieures de l’appareil et l’intérieur du four
deviennent chaudes pendant le fonctionnement. Il existe également un
risque d’émission de vapeur par les grilles de ventilation et, par conséquent, un
risque de brûlure.
∙ Laissez l’appareil refroidir sufsamment avant de le transporter.
∙ Ne pas laisser l’appareil, ou son cordon d’alimentation, entrer en contact avec
une source de chaleur. Ne pas laisser pendre le cordon d’alimentation et le tenir à
l’écart des parties chaudes de l’appareil.
∙ Gardez toujours l’appareil dans un état propre. Sinon, les surfaces de l’appareil
peuvent se dégrader, ce qui peut écourter la durée de vie de l’appareil et provoquer
37
Page 38

un risque pour la sécurité de l’utilisateur. Tout reste d’aliment doit donc être retiré
immédiatement. Après chaque utilisation, essuyez les joints de porte, la cavité et
son fond céramique ainsi que toutes les parties attenantes avec un chiffon humide.
La grille et la plaque de cuisson se nettoient à l’eau chaude savonneuse. Pour des
informations détaillées concernant le nettoyage de l’appareil, veuillez vous référer
au paragraphe Nettoyage.
∙ Cet appareil est destiné à être utilisé dans des applications domestiques et
analogues telles que :
- des coins cuisines réservés au personnel dans des magasins, bureaux et autres
environnements professionnels ;
- des fermes ;
- l’utilisation par les clients des hôtels, motels et autres environnements à caractère
résidentiel ;
- des environnements de type chambres d’hôtes.
∙ Attention : Toute intervention nécessitant l’enlèvement d’un dispositif de protection
contre les rayons micro-ondes constitue un risque grave pour toute personne non
compétente. Ceci comprend le remplacement du cordon d’alimentation spécial ou
d’une ampoule intérieure. L’appareil ne doit pas être ouvert, sauf par un technicien
compétent. En cas de besoin de réparations, veuillez contacter notre Service
Clientèle par téléphone ou courriel (voir annexe).
∙ Les liquides chauffés dans le four à micro-ondes peuvent chauffer au-delà de leur
point d’ébullition sans l’apparition de bulles. Il est donc important de manipuler tous
les récipients avec extrême prudence, notamment lorsqu’ils sont retirés du four.
Ce risque de surchauffe peut être minimisé en introduisant une tige en verre
résistant à la chaleur dans le récipient pendant le réchauffage.
∙ Les œufs frais en coquille et les œufs durs entiers ne doivent pas être chauffés
dans un four à micro-ondes car ils risquent d’éclater même après la n du
réchauffage par micro-ondes.
∙ Attention : Il est également très dangereux de réchauffer dans l’appareil tout
liquide ou aliment solide dans des récipients fermés car il existe un réel risque
d’explosion.
∙ Le contenu des biberons ou des récipients en verre contenant des aliments pour
bébés doit être soigneusement remué ou agité pour assurer une température
uniforme. Attention : Pour éviter toute brûlure, vériez toujours la température des
aliments avant de les donner à l’enfant.
∙ Le réchauffage ou la cuisson d’aliments contenus ou emballés dans un emballage
combustible, tel que le plastique ou le papier, présente un risque d’incendie.
Les aliments peuvent également se dessécher, voire s’enammer, si le temps
38
Page 39

de cuisson est excessif. Les graisses et huiles sont aussi des substances
inammables. Il est donc important de surveiller l’appareil pendant son
fonctionnement. Bien entendu, les liquides très volatils et inammables tels que
l’alcool concentré ne doivent jamais être réchauffés.
∙ En cas d’émission de fumée pendant le fonctionnement, tenez la porte fermée pour
retarder ou étouffer les ammes éventuelles. Éteignez immédiatement l’appareil,
puis débranchez la che de la prise de courant.
∙ Pour éviter tout risque de brûlure, une manique doit toujours être utilisée pour
retirer les aliments du four. Les ustensiles et récipients se réchauffent non
seulement pendant la fonction gril et la cuisson à chaleur traditionnelle, mais
également pendant la cuisson aux micro-ondes.
∙ Les thermomètres à four (tels qu’utilisés dans les fours traditionnels) ne
conviennent pas aux fours à micro-ondes.
Avant la première utilisation
∙ Après le déballage et avant toute utilisation, vériez soigneusement que l’appareil
et son cordon d’alimentation ne présentent aucun signe de détérioration.
∙ Attention : Vériez également que la porte, l’hublot d’observation, les joints de
la porte et les verrous ne sont pas endommagés ou déformés et que la porte se
ferme parfaitement contre le montant. Ceci est important an de prévenir toute
émission d’énergie micro-ondes pendant le fonctionnement. Pour cette même
raison, vériez soigneusement l’intégralité du boîtier et l’intérieur du four.
Si une détérioration quelconque est constatée, en aucun cas l’appareil ne doit être
utilisé avant d’être réparé par un technicien qualié.
∙ Retirez tout emballage à l’extérieur et à l’intérieur, ainsi que les étiquettes. Les matériaux d’emballage peuvent être
recyclés.
∙ Attention : Ne retirez pas les capuchons en caoutchouc de la grille.
∙ Ne retirez pas le lm de protection recouvrant l’intérieur de la porte.
∙ Attention : Tenez les enfants à l’écart des emballages, qui représentent un risque potentiel, par exemple, de suffocation.
∙ Avant la première utilisation, ou après toute période prolongée de non utilisation, l’appareil doit être soigneusement
nettoyé en suivant la méthode décrite au paragraphe Nettoyage.
∙ Avant la première utilisation du four à micro-ondes, laissez-le chauffer 10 minutes environ sur la fonction gril uniquement
(sans que la fonction micro-ondes soit activée) an d’éliminer l’odeur caractéristique qui se dégage lors de la mise en
route initiale de tout gril. Une légère fumée peut être dégagée; ceci est normal, mais prévoyez une aération sufsante.
∙ Remarque : N’allumez pas l’appareil sans avoir placé au préalable les aliments à chauffer ou à cuire à l’intérieur du four.
Tout fonctionnement de l’appareil à vide risque de l’endommager.
Appareil ISM
Cet appareil est un appareil ISM du Groupe 2, Classe B. Cet appareil appartient à la classe d’appareils ISM de Groupe 2,
Classe B. Le Groupe 2 comprend tous les appareils ISM (industriels, scientiques, médicaux) produisant de l’énergie en
radiofréquences et/ou utilisant l’énergie en radiofréquences sous forme de radiation électromagnétique pour le traitement
des matériaux; il comprend également les appareils d’électroérosion. La Classe B désigne les appareils conçus pour un
usage domestique, ou tout autre appareil similaire intégré au réseau d’alimentation en électricité domestique.
39
Page 40

La fonction micro-ondes (Groupe II conforme à la norme EN 55011)
Une énergie électromagnétique est générée à l’intérieur de l’appareil, provoquant l’oscillation des molécules alimentaires
(des molécules d’eau notamment), déclenchant la chauffe des aliments. Les aliments à forte teneur en eau se réchauffent
donc plus rapidement que les aliments secs. La chaleur est graduellement générée à l’intérieur des aliments. Les ustensiles,
récipients ou plats utilisés sont chauffés indirectement en raison de la hausse de la température des aliments.
Utilisez toujours des ustensiles de cuisine appropriés
∙ Ne placez pas les aliments à même le fond céramique ; utilisez toujours un plat ou un récipient de cuisson approprié.
∙ L’emploi d’objets en métal doit être évité car les surfaces métalliques rééchissent les micro-ondes, qui risquent de ne
pas atteindre les aliments destinés à la cuisson. Toute présence de métal dans le four risque également de provoquer des
étincelles, qui risquent à leur tour d’endommager l’appareil.
∙ D’une manière générale, les couverts de table ou de cuisine ou récipients en métal ne doivent pas être utilisés dans le
four à micro-ondes. Certains emballages alimentaires comportent de la feuille d’aluminium ou des ls métalliques sous
une couche de papier et ne se prêtent donc également pas à l’utilisation avec les appareils à micro-ondes.
Si une recette conseille d’utiliser de la feuille d’aluminium, veillez à emballer soigneusement les aliments dans la feuille
d’aluminium (en évitant les bulles d’air). Respectez un espace minimal de 2,5 cm entre la feuille d’aluminium et les
parois intérieures du four.
∙ Assurez-vous toujours que le récipient ou le plat de cuisson utilisé ne comporte aucune décoration métallique telle
qu’un bord doré ou de couleur, contenant des particules métalliques. Les objets en cristal de plomb sont également
déconseillés. Assurez-vous toujours que les récipients de cuisson utilisés ne présentent aucun élément creux (par
exemple les poignées). Les substances poreuses risquent d’absorber de l’eau pendant le nettoyage et sont donc
également déconseillées. Les récipients ou ustensiles de cuisson en ‘mélamine’ absorbent l’énergie et sont également
déconseillés.
Utilisation de la fonction micro-ondes
∙ Les récipients en verre ou en porcelaine résistants à la chaleur, se prêtent parfaitement à l’utilisation dans les appareils à
micro-ondes.
∙ Les récipients en plastique conviennent également s’ils sont conçus pour résister à la chaleur.
∙ Des récipients de cuisson spécialement conçus pour l’utilisation avec les fours à micro-ondes sont disponibles dans la
plupart des magasins d’articles de cuisine.
∙ Les sacs de cuisson etc. seront percés de manière à libérer toute pression élevée pendant la cuisson.
Cuisson au gril ou à chaleur traditionnelle
∙ Tous récipients ou assiettes résistants à la chaleur étudiés pour une utilisation avec des fours traditionnels peuvent être
utilisés avec ces fonctions. Des récipients en plastiques ne doivent pas être utilisés!
∙ Les aliments à réchauffer peuvent être placés directement sur la grille ou la plaque de cuisson. Faites glisser la grille en
position et placez la plaque de cuisson sur le fond céramique.
Cuisson aux micro-ondes/gril ou micro-ondes/chaleur traditionnelle
∙ Lors de cuissons combinées, les fonctions micro-ondes et gril ou chaleur traditionnelle sont activées en alternance. Les
récipients ou plats doivent donc à la fois se prêter à l’utilisation dans un appareil à micro-ondes et être résistants à la
chaleur. A cause des températures relativement élevées, les articles en plastique ne doivent pas être utilisés. Assurez-
vous que le récipient ou le plat utilisé ne contient aucun élément en métal.
40
Page 41

Fonctionnement
Réglage initial de l’horloge
∙ Au branchement au secteur, l’écran afche ‘1:00’, le chiffre des heures clignote et l’appareil émet un signal sonore.
∙ Tournez le bouton rotatif pour régler l’heure correcte.
∙ Appuyez brièvement sur la touche . Les chiffres des minutes clignotent.
∙ Tournez le bouton rotatif pour régler les minutes correctes.
∙ Appuyez brièvement sur la touche pour terminer le réglage de l’horloge. Le symbole ‘:’ s’afche en clignotant et
l’heure actuelle est afchée.
∙ Le réglage de l’heure peut être annulé ou ignoré en appuyant sur la touche .
∙ À la suite d’une coupure de courant, l’horloge doit à nouveau être réglée.
Modicationduformatheure
∙ Pour modier le format, appuyez sur la touche pendant 3 secondes. L’écran afche soit Hr 24 soit Hr 12.
∙ Appuyez brièvement sur la touche pour passer du format 24 heures au format 12 heures et vice versa.
∙ Le chiffre des heures clignote ; tournez le bouton rotatif pour régler l’heure correcte.
∙ Appuyez brièvement sur la touche . Les chiffres des minutes clignotent.
∙ Tournez le bouton rotatif pour régler les minutes correctes.
∙ Appuyez brièvement sur la touche pour terminer le réglage de l’horloge. Le symbole ‘:’ s’afche en clignotant et
l’heure actuelle est afchée.
Signal sonore & Dispositif de sécurité pour la protection des enfants
Signal sonore
∙ Lorsque vous appuyez sur une touche de commande ou si vous tournez le bouton rotatif, l’entrée correcte des
informations est indiquée par un signal sonore.
∙ Pour annuler ce signal sonore, appuyez brièvement sur la touche .
La désactivation du signal sonore de cette façon concerne uniquement l’utilisation de la touche de commande ou du
bouton rotatif ; les signaux sonores indiquant les séquences de programmation sont, eux, toujours activés.
∙ Pour réactiver le signal, appuyez à nouveau brièvement sur la touche .
Dispositif de sécurité pour la protection des enfants
∙ Ce dispositif de sécurité empêche les enfants de faire fonctionner l’appareil sans surveillance.
∙ Pour activer le dispositif de sécurité, appuyez pendant 3 secondes sur la touche . Le symbole s’afche à
l’écran.
∙ Pour désactiver le dispositif de sécurité, appuyez de nouveau sur la touche pendant 3 secondes. Le symbole
disparaît.
∙ Note : En cas de problème lors de la mise en route de l’appareil, vériez d’abord que le dispositif de sécurité n’est pas
activé.
41
Page 42

Fonctionnement général
∙ Placez les aliments destinés à être chauffés dans un récipient approprié. Placez le récipient sur le fond céramique du
four.
∙ Les aliments placés au four à micro-ondes doivent être couverts pour éviter leur dessèchement. Des couvercles en verre
ou en plastique spécialement conçus pour une utilisation dans les appareils à micro-ondes sont disponibles dans le
commerce.
∙ Ne pas couvrir les aliments à cuire lors des cuissons au gril, à la chaleur traditionnelle ou toutes cuissons combinées.
∙ Fermez la porte, puis sélectionnez le programme désiré.
∙ Remarque :
Pour la programmation, le temps de cuisson est fractionné comme suit :
0 – 5 minutes : par intervalle de 10 secondes
5 – 10 minutes : par intervalle de 30 secondes
10 – 30 minutes : par intervalle de 1 minute
30 – 95 minutes : par intervalle de 5 minutes
∙ Appuyez sur le bouton rotatif pour démarrer un programme.
∙ Lorsque le programme démarre, l’éclairage intérieur s’allume.
∙ Si, pendant le fonctionnement, la touche est pressée ou la porte est ouverte (par exemple, pour remuer les
aliments an d’assurer une bonne répartition de la température), l’appareil s’arrête et les fonctions de minuterie et de
programmation sont suspendues. Le programme redémarrera automatiquement uniquement lorsque la porte sera
refermée et que le bouton rotatif sera enfoncé.
∙ Appuyez deux fois sur la touche pour interrompre le programme.
∙ Des bips sonores indiquent la n du temps préprogrammé ; l’éclairage intérieur s’éteint et l’écran afche ‘End’ (Fin)
∙ Ouvrez la porte et retirez le récipient contenant les aliments.
∙ Laissez le récipient de côté pendant plusieurs minutes an d’assurer une distribution uniforme de la chaleur dans les
aliments.
∙ Si la porte n’est pas ouverte immédiatement après l’écoulement du temps de cuisson préprogrammé, plusieurs bips
sonores sont émis toutes les 2 minutes.
Fonction refroidissement
Ce four à micro-ondes dispose d’une fonction automatique de refroidissement.
Si le temps de fonctionnement dépasse deux à trois minutes, le ventilateur se met automatiquement en marche et fonctionne
pendant plusieurs minutes après l’arrêt du programme.
Grille & plaque de cuisson
∙ La grille et la plaque de cuisson conviennent pour la cuisson aux micro-ondes, au gril et à chaleur traditionnelle.
∙ Attention : Ne retirez pas les capuchons en caoutchouc de la grille.
∙ Insérez la grille à la hauteur souhaitée et posez la plaque de cuisson sur la grille ou sur le fond céramique.
∙ Les aliments à réchauffer peuvent être placés directement sur la grille ou la plaque de cuisson.
Cuisson/réchauffage micro-ondes
Lors de la cuisson/du réchauffage micro-ondes, les effets du réchauffage affectent directement l’intérieur des aliments.
Conseil : Lorsque vous préparez deux portions, sur la grille et sur le fond céramique, ne les placez pas directement
l’une au-dessus de l’autre, mais en position décalée. Changez la position des portions une fois la moitié du temps de
préparation écoulée.
∙ Appuyez de façon répétée sur la touche jusqu’à l’afchage de la puissance (voir tableau ci-dessous).
∙ Puis, à l’aide du bouton rotatif, réglez le temps de cuisson désiré. Le temps de cuisson est programmable jusqu’à 95
minutes maximum.
∙ Appuyez sur le bouton rotatif pour démarrer la cuisson.
∙ Pour assurer la répartition uniforme de la chaleur, les aliments à cuire ou à réchauffer doivent être mélangés
occasionnellement.
∙ En appuyant sur la touche pendant la cuisson, l’écran afche la puissance programmée.
42
Page 43

Puissance
(W)
Puissance
(%)
Afchage Niveau Use
Retournez 1 x 900 W 100 P100 Maximum Réchauffage de liquides, cuisson
2 x 810 W 90 P-90
3 x 720 W 80 P-80
4 x 630 W 70 P-70 Élevé
Décongélation et réchauffage de
plats surgelés
5 x 540 W 60 P-60
6 x 450 W 50 P-50 Moyen Cuisson d’aliments délicats
7 x 360 W 40 P-40
8 x 270 W 30 P-30 Faible Décongélation des aliments
9 x 180 W 20 P-20
10 x 90 W 10 P-10 Très faible
Décongélation des aliments
délicats
∙ En appuyant sur la touche vous démarrez directement la cuisson. À chaque fois que vous appuyez sur la
Programme rapide / Cuisson micro-ondes
touche, vous rajoutez 30 secondes au temps de cuisson.
∙ Le niveau de puissance du four à micro-ondes est toujours à 100 %.
∙ Le temps de cuisson maximum programmable est de 95 minutes.
∙ Si la touche est pressée pendant la cuisson micro-ondes, chaque impulsion rajoute 30 secondes au temps de cuisson.
Bouton rotatif - Programme rapide / Cuisson micro-ondes
∙ Le temps de cuisson requis est sélectionné en tournant le bouton rotatif dans le sens des aiguilles d’une montre.
∙ En appuyant sur le bouton rotatif, vous démarrez directement la cuisson.
∙ Le niveau de puissance du four à micro-ondes est toujours à 100 %.
∙ Le temps de cuisson maximum programmable est de 95 minutes.
Fonction gril
La fonction gril cuit les aliments en utilisant la chaleur rayonnante. Le programme gril convient à la cuisson de gratins ou
pour les pièces de viande minces.
∙ Appuyez sur la touche .
∙ Puis, servez-vous du bouton rotatif pour sélectionner le temps de cuisson désiré. Le temps de cuisson maximum
programmable est de 95 minutes.
∙ Démarrez la cuisson en appuyant sur le bouton rotatif.
∙ Ce processus doit être surveillé de près car la viande doit être retournée lorsque la première face est saisie, puis retirée
dès que grillée.
Programmes de cuisson combinée gril/micro-ondes
Ces programmes sont utiles pour la cuisson des volailles, du poisson ou la cuisson des plats ‘au gratin’.
∙ Appuyez plusieurs fois sur la touche :
Appuyez deux fois : Co-1 → 30 % puissance micro-ondes, 70 % puissance gril
Appuyez trois fois : Co-2 → 55 % puissance micro-ondes, 45 % puissance gril
∙ Puis, servez-vous du bouton rotatif pour sélectionner le temps de cuisson désiré. Le temps de cuisson maximum
programmable est de 95 minutes.
∙ Démarrez la cuisson en appuyant sur le bouton rotatif.
43
Page 44

∙ Ce processus doit être surveillé de près car les aliments doit être retournés lorsque la première face est saisie, puis
retirés dès que grillés.
Fonction air très chaud
Cette fonction met en circulation l’air chaud à l’intérieur du four, assurant une cuisson régulière et des aliments parfaitement
dorés. La cuisson à chaleur traditionnelle convient surtout pour la cuisson des pizzas ou autres plats similaires.
Conseil : Lorsque vous préparez deux portions, sur la grille et sur le fond céramique, la portion inférieure doit être placée
sur la plaque de cuisson et non directement sur le fond céramique. Changez la position des portions une fois la moitié du
temps de préparation écoulée.
∙ Appuyez de façon répétée sur la touche pour sélectionner une température de cuisson entre 230° et 110 °C.
∙ Puis, servez-vous du bouton rotatif pour sélectionner le temps de cuisson désiré. Le temps de cuisson maximum
programmable est de 95 minutes.
∙ Démarrez la cuisson en appuyant sur le bouton rotatif.
∙ Ce processus doit être surveillé de près car les aliments ont besoin d’être retournés lorsque la première face est saisie
puis retirés du four une fois la cuisson terminée des deux côtés.
∙ Tournez les aliments à 180° à la moitié du temps de cuisson.
∙ Si, au cours de la cuisson, la touche est pressée, l’écran afche la température sélectionnée.
Préchauffage
L’appareil peut-être préchauffé si nécessaire.
∙ Appuyez de façon répétée sur la touche pour sélectionner une température de cuisson entre 230° et 110 °C.
∙ Démarrez immédiatement le préchauffage en appuyant sur le bouton rotatif. L’écran afche 30.00 et le préchauffage
démarre.
∙ Des bips sonores indiquent lorsque la température sélectionnée est atteinte. Ouvrez la porte et placez les aliments à
l’intérieur.
∙ Appuyez sur la touche pour démarrer la cuisson tel indiqué au paragraphe ‘Cuisson à chaleur traditionnelle’.
Programmes de cuisson combinée micro-ondes/fonction air très chaud
∙ Le programme de cuisson combinée convient pour les ragoûts et autres plats similaires.
∙ Appuyez sur la touche pendant environ 3 secondes.
∙ Appuyez de façon répétée sur la touche pour sélectionner une température de 230, 200, 170 ou 140 °C. Il n’est pas
possible de sélectionner d’autres températures.
∙ Puis, servez-vous du bouton rotatif pour sélectionner le temps de cuisson désiré. Le temps de cuisson maximum
programmable est de 95 minutes.
∙ Démarrez la cuisson en appuyant sur le bouton rotatif.
∙ Ce processus doit être surveillé de près car les aliments ont besoin d’être retournés lorsque la première face est saisie
puis retirés du four une fois la cuisson terminée des deux côtés.
∙ Tournez les aliments à 180° à la moitié du temps de cuisson.
∙ Si, au cours de la cuisson, la touche est pressée, l’écran afche la température sélectionnée.
Sélection de programmes multiples
Le four à micro-ondes peut être programmé pour 2 programmes individuels menés de manière consécutive sans avoir
à redémarrer l’appareil entre deux ; par ex. tout d’abord une cuisson normale aux micro-ondes, suivie d’une cuisson ‘au
gratin’ au gril. Cette fonction programmes multiples peut être utilisée avec n’importe quelles fonctions micro-ondes, chaleur
traditionnelle, gril et combinées. Les programmes automatiques de cuisson et le programme rapide ne conviennent pas pour
la programmation multiple.
∙ Appuyez de façon répétée sur la touche pour sélectionner le programme requis et jusqu’à ce que la puissance/
température requises soient afchées.
∙ Servez-vous du bouton rotatif pour sélectionner le temps de cuisson désiré.
∙ Puis, appuyez de façon répétée sur la touche pour sélectionner le programme suivant jusqu’à ce que la puissance/
température requises soient afchées.
∙ Servez-vous du bouton rotatif pour sélectionner le temps de cuisson désiré.
∙ Servez-vous du bouton rotatif pour démarrer la cuisson.
∙ L’appareil démarre le premier programme. L’écran afche S1. Dès que le programme suivant démarre, l’écran afche S2.
44
Page 45

Conseil :
Cette fonction est particulièrement utile lors de l’utilisation du mode cuisson micro-ondes pour cuire des aliments à
différents niveaux de puissance. Un niveau élevé de puissance est d’abord sélectionné, puis la puissance peut être
diminuée plus tard an de conserver les aliments au chaud et pour assurer que la chaleur est distribuée uniformément
lorsque les aliments sont déjà cuits.
Sauvegarder votre plat favori
Les programmes décrits ci-dessus et les programmes combinés peuvent être sauvegardés comme ‘Plats favoris’ pour une
utilisation ultérieure rapide. Trois plats différents peuvent être sauvegardés. Lorsqu’un espace mémoire n’est pas occupé,
son numéro correspondant clignote. Cependant, veuillez noter que pour ce mode, les programmes automatiques de cuisson
et le programme rapide ne peuvent pas être sélectionnés.
∙ Appuyez brièvement une fois, deux fois, trois fois, sur la touche . Le numéro 1, 2 ou 3 clignote sur l’écran.
∙ Appuyez de façon répétée sur la touche pour sélectionner le programme requis et jusqu’à ce que la puissance/
température requises soient afchées.
∙ Servez-vous du bouton rotatif pour sélectionner le temps de cuisson désiré.
∙ Puis, appuyez de façon répétée sur la touche pour sélectionner le programme suivant jusqu’à ce que la puissance/
température requises soient afchées.
∙ Servez-vous du bouton rotatif pour sélectionner le temps de cuisson désiré.
∙ Appuyez à nouveau brièvement sur la touche pour sauvegarder votre plat favori.
∙ Le programme sauvegardé peut être démarré en appuyant d’abord brièvement sur la touche puis sur le bouton rotatif.
∙ Si l’appareil a été débranché du secteur, les programmes doivent être à nouveau sauvegardés.
∙ Si un espace mémoire est déjà occupé, le numéro correspondant ne clignote pas. Cependant, l’espace mémoire peut
simplement être effacé puis à nouveau occupé tel décrit ci-dessus.
Programmes automatiques de cuisson et décongélation
Ces programmes sont pratiques pour cuire ou réchauffer les aliments sans devoir spécialement programmer, par exemple,
le temps de cuisson ou la puissance.
∙ Tournez le bouton rotatif dans le sens inverse des aiguilles d’une montre jusqu’à ce que le programme requis listé dans le
tableau ci-dessous s’afche à l’écran. Appuyez sur le bouton rotatif.
∙ Servez-vous du bouton rotatif pour sélectionner le poids approprié (voir tableau).
∙ Appuyez sur le bouton rotatif pour démarrer le programme.
∙ L’écran afche le temps de fonctionnement du programme sélectionné.
Carte Poids Afchage
200 ml 1
A-1
Boissons
A-2
400 ml 2
600 ml 3
99 g 99
Popcorn
100 g (dans de l’eau froide, 400 ml) 100
A-3
Nouilles
200 g (dans de l’eau froide, 800 ml) 200
300 g (dans de l’eau froide, 1200 ml) 300
230 g 1
Pommes de terre au four
A-4
460 g 2
690 g 3
45
Page 46

200 g 200
300 g 300
400 g 400
A-5
Préchauffage
A-6
Poulet rôti
A-7
Pizza
A-8
Gâteau
d-1
Décongélation selon la durée
d-2
Décongélation en fonction du poids
500 g 500
600 g 600
700 g 700
800 g 800
800 g 800
1000 g 1000
1200 g 1200
1400 g 1400
150 g 150
300 g 300
450 g 450
environ 475 g
Poids sélectionnable
Poids sélectionnable
475
0:00
100
:
:
1800
Instructions générales
A-1 Boissons :
Pour réchauffer des boissons et l’eau pour le thé ou le café instantané.
A-2 Pop-corn :
Pour du popcorn aux micro-ondes (disponible en sachet). Référez-vous toujours aux instructions du fabricant gurant sur
l’emballage.
A-3 Nouilles/pâtes :
Placez les pâtes dans un récipient adapté et recouvrez-les d’eau ; posez le récipient au centre du four.
A-4 Pommes de terre au four :
Posez les pommes de terre crues, avec la peau, dans un plat adéquat et placez-le au centre du four.
A-5 Réchauffage :
Pour réchauffer des aliments solides dans des récipients allant au four à micro-ondes.
Conseil : Placez les aliments au centre du four pour assurer une distribution optimale de la chaleur.
46
Page 47

A-6 Poulet rôti :
Placez le poulet entier sur une assiette allant au four à micro-ondes, au centre du four.
Plusieurs bips sonores indiquent que les 1/2 du temps de cuisson préprogrammé se sont écoulés, et la cuisson est
interrompue. Retournez le poulet et appuyez sur le bouton rotatif pour redémarrer la cuisson.
A-7 Pizza :
Pour la cuisson de pizza sur la grille ou sur la plaque de cuisson. Pour les pizzas surgelées, laissez toujours préchauffer
l’appareil selon les instructions du fabricant, que vous trouverez sur l’emballage, et sélectionnez le programme automatique
de cuisson approprié.
Plusieurs bips sonores indiquent que les 1/2 du temps de cuisson préprogrammé se sont écoulés. Ouvrez la porte, tournez
la pizza à 180° et appuyez sur le bouton rotatif pour redémarrer la cuisson.
A-8 Gâteau :
Ce programme convient pour cuire des gâteaux simples, comme des quatre-quarts (pesant environ 475 g). Veuillez vous
référer à la recette an de connaître le temps de préchauffage requis. Si nécessaire, préchauffez l’appareil (voir ‘Cuisson à
chaleur traditionnelle/Préchauffage). Placez la pâte dans un moule à pâtisserie résistant à la chaleur et posez le moule
sur la grille ou sur le fond céramique.
Plusieurs bips sonores indiquent que les 1/2 du temps de cuisson préprogrammé se sont écoulés. Ouvrez la porte, tournez
le moule à pâtisserie à 180° et appuyez sur le bouton rotatif pour redémarrer la cuisson.
d-1 Décongélation selon la durée :
Voir le paragraphe ‘Décongélation selon la durée ‘ ci-après.
d-2 Décongélation en fonction du poids :
Voir le paragraphe ‘Décongélation en fonction du poids’ ci-après.
d-1 Décongélation selon la durée et d-2 Décongélation en fonction du poids
Les programmes de décongélation permettent une décongélation en fonction du temps ou du poids.
Tournez le bouton rotatif dans le sens inverse des aiguilles d’une montre jusqu’à ce que l’écran afche d-1 ou d-2.
∙ Appuyez sur le bouton rotatif pour conrmer la sélection du programme.
∙ Tournez le bouton rotatif jusqu’à ce que le programme de décongélation désiré en fonction du temps (d-1) ou du poids
correspondant (d-2) s’afche à l’écran.
∙ Appuyez sur le bouton rotatif pour démarrer la décongélation.
Observations utiles :
∙ Plusieurs bips sonores indiquent que les 2/3 du temps de décongélation programmé se sont écoulés. Tournez les
aliments et retirez les aliments déjà décongelés.
∙ Appuyez sur le bouton rotatif pour continuer le programme.
∙ Si, à l’issue du temps de décongélation préprogrammé, les aliments s’avèrent encore congelés, il est recommandé de
continuer la décongélation en la limitant à des périodes d’1 minute, jusqu’à la décongélation complète.
∙ Les aliments conservés dans des récipients en plastique ne pouvant pas passer dans un four à micro-ondes, doivent être
laissés quelques temps à température ambiante. Attendez que les aliments soient facilement détachables du lm ou des
parois du conteneur avant de les mettre au four dans un récipient pouvant passer au four à micro-ondes.
Éclairage intérieur :
L’éclairage intérieur s’allume lorsque la porte est ouverte ; il reste également allumé pendant le fonctionnement de l’appareil.
Si un programme est terminé, l’éclairage intérieur s’éteint.
Nettoyage
∙ Le four à micro-ondes doit être régulièrement nettoyé, en retirant tout résidu alimentaire, immédiatement après
l’utilisation.
∙ Assurez-vous, avant tout nettoyage, que l’appareil est débranché de la source d’alimentation et qu’il s’est complètement
refroidi.
∙ Abstenez-vous de nettoyer l’appareil avec de l’eau. Interdisez toute pénétration d’eau (aussi minime soit-elle) dans les
fentes d’aération prévues sur les parois intérieures ou extérieures de l’appareil. L’emploi d’appareils de nettoyage à la
vapeur pour nettoyer ce four est interdit.
∙ L’appareil intégral pourra être essuyé à l’aide d’un chiffon non pelucheux légèrement humide et d’un léger détergent de
ménage. Essuyez-le ensuite soigneusement pour le sécher.
47
Page 48

∙ N’utilisez aucun produit d’entretien abrasif ou concentré. L’emploi des aérosols spécialement étudiés pour le nettoyage
des fours traditionnels disponibles dans le commerce est interdit.
∙ Les parois intérieures doivent être soigneusement nettoyées après chaque cycle de fonctionnement. La paroi interne de
la porte, l’encadrement de la porte et le fond céramique doivent être maintenus propres en permanence.
∙ La grille et la plaque de cuisson peuvent être nettoyés à l’eau chaude savonneuse. Attention : Aucune pièce n’est
lavable au lave-vaisselle.
Informations supplémentaires
Fiche technique
Dimensions extérieures : 490 mm (L) x 491 mm (P) x 287 mm (H)
Dimensions intérieures : 340 mm (L) x 338 mm (P) x 197 mm (H)
∙ hauteur au-dessus du fond céramique : 190 mm
∙ plaque de cuisson : Ø 265 mm
Poids de l’appareil : 17.4 kilos
Tension de service : 230 V~ 50 Hz
Consommation totale d’énergie : 2050 W
∙ gril : 1200 W
∙ micro-ondes : 1400 W
∙ cuisson chaleur traditionnelle : 2050 W
Réglages de la puissance micro-ondes : 90 W - 900 W
Mise au rebut
Les appareils qui portent ce symbole doivent être collectés et traités séparément de vos déchets ménagers, car ils
contiennent des matériaux précieux qui peuvent être recyclés. En vous débarrassant correctement de ces
appareils, vous contribuez à la prévention de potentiels effets négatifs sur la santé humaine et l’environnement.
Votre mairie ou le magasin auprès duquel vous avez acquis l’appareil peuvent vous donner des informations à ce
sujet.
Garantie
Cet appareil est garanti par le fabricant pendant une durée de deux ans à partir de la date d‘achat, contre tous défauts de
matière et vices de fabrication. Au cours de cette période, toute pièce défectueuse sera remplacée gratuitement. Cette
garantie ne couvre pas l‘usure normale de l‘appareil, les pièces cassables telles que du verre, des ampoules, etc., ni les
détériorations provoquées par une mauvaise utilisation et le non-respect du mode d‘emploi. Aucune garantie ne sera due
si l‘appareil a fait l‘objet d‘une intervention à titre de réparation ou d‘entretien par des personnes non-agréées par nousmêmes. Cette garantie n‘affecte pas les droits légaux des consommateurs sous les lois nationales applicables en vigueur,
ni les droits du consommateur face au revendeur résultant du contrat de vente/d‘achat. Si votre appareil ne fonctionne plus
normalement, veuillez l‘adresser, sous emballage solide, à une de nos stations de service après-vente agréées, muni de
votre nom et adresse. Si vous retournez votre appareil pendant la période de garantie, n‘oubliez pas de joindre à votre envoi
la preuve de garantie (ticket de caisse, facture etc.) certiée par le vendeur.
48
Page 49

NL
Magnetronoven
Beste Klant,
Voordat men de magnetron oven gebruikt moet men de gebruiksaanwijzing goed doorlezen en deze goed bewaren voor
later gebruik. Dit apparaat moet alleen gebruikt worden door personen bekend met de gebruiksaanwijzing.
Onderdelen van het apparaat
1. Deursluitingen
2. Kijkraam
3. Keramische bodem
4. Controlepaneel
5. Verwarmingselement
6. Grillrek
7. Bakplaat
49
Page 50

Details controlepaneel
Knop Functie
Knopgeluid en kinderslot
Favoriet gerecht en klok
Snelstart / Verleng de kooktijd met
30 seconden
Magnetron
Grill
Ultra hetelucht
Onderbreken / Stop
Draaiknop Functie selectie
Drukken Start
Draaien
50
Tijd & Automatische
kookprogramma’s
Page 51

Display
Automatische programma’s
Selectie eerste programma
Selectie tweede programma
Ontdooien volgens gewicht
Kinderslot
De display geeft de huidige tijd van de dag aan, of tijdens
gebruik, de looptijd geprogrammeerd en geselecteerde
functies.
Temperatuur
De klok instellen
Gewicht
Ultraheteluchtfunctie
Grillfunctie
Magnetronfunctie
Automatische programma’s
Ontdooien volgens tijd
51
Page 52

Veiligheidsaanwijzingen
Belangrijke veiligheidsaanwijzingen
De volgende aanwijzingen alstublieft goed doorlezen en deze handleiding
bewaren voor toekomstige raadpleging
Aansluiting
Deze combimagnetron mag alleen worden aangesloten op een volgens de
voorschriften geïnstalleerd geaard stopcontact. Zorg ervoor dat de netspanning
overeenkomt met de spanning aangegeven op het typeplaatje. Dit product komt
overeen met de richtlijnen aangegeven op het CE label.
Plaatsen van het apparaat
∙ Plaats de combimagnetron altijd op een stabiele en vlakke, hittebestendige
ondergrond en zorg ervoor dat deze beschermd is tegen hitte en vochtigheid.
∙ Gebruik het apparaat niet buiten.
∙ De poten aan de onderkant van het apparaat mogen niet verwijderd worden.
∙ Zorg voor voldoende ventilatie. Plaats nooit voorwerpen op het apparaat en zorg
ervoor dat er voldoende ruimte aanwezig is tussen het apparaat, de muur en
andere voorwerpen:
Zijkanten: 7.5 cm
Achterkant: 7.5 cm
Bovenkant: 30.0 cm
Het apparaat mag nooit in een kast geplaatst worden. Wanneer men het apparaat
neerzet, moet men ervoor zorgen dat het niet direct onder een keukenkastje of een
ander voorwerp geplaatst wordt.
Belangrijke aanwijzingen
∙ Attentie: Bepaalde voedselsoorten kunnen tot ontbranding overgaan. Laat
het apparaat nooit onbeheerd achter wanneer men de magnetron-, grill-,
hetelucht- of de combinatiefuncties gebruikt.
∙ De magnetronfunctie is alleen geschikt voor ontdooien, opwarmen en koken
van voedsel. Waarschuwing: Iedere poging om voedsel of kleding te
drogen, het opwarmen van verwarmingskussen, huisslippers, sponzen, natte
schoonmaakkleding enz. kunnen letsel, verbranding of brand veroorzaken.
∙ Geen verantwoordelijkheid wordt geaccepteerd wanneer er schade ontstaat tijdens
onjuist gebruik van het apparaat of wanneer men de gebruiksaanwijzing niet volgt.
∙ Gebruik alleen keukengerei geschikt voor gebruik in de microwave oven. Gebruik
geen metalen houders in de magnetron voor het opwarmen van etenswaren of
52
Page 53

drankjes. Voor gedetailleerde informatie, alstublieft de paragraaf ‘Gebruik altijd
geschikt keukengerei’ raadplegen.
∙ Dit apparaat is niet geschikt voor gebruik met een externe tijdklok of een aparte
afstandsbediening.
∙ Dit apparaat mag gebruikt worden door kinderen (tenminste 8 jaar oud) en door
personen met verminderde fysische, zintuiglijke of mentale bekwaamheden, of
gebrek van ervaring en kennis, wanneer deze onder begeleiding zijn of instructies
ontvangen hebben over het gebruik van dit apparaat en volledig de gevaren en
veiligheidsvoorschriften begrijpen.
∙ Kinderen mogen niet met het apparaat spelen.
∙ Kinderen mogen in geen geval dit apparaat schoonmaken of
onderhoudswerkzaamheden uitvoeren behalve wanneer onder toezicht van een
volwassene en ze tenminste 8 jaar oud zijn.
∙ Het apparaat en het snoer moeten altijd goed uit de buurt gehouden worden van
kinderen jonger dan 8 jaar.
∙ Om elektrische schokken te voorkomen dit apparaat nooit met water schoonmaken
of onderdompelen.
∙ Waarschuwing: Vanwege de hoge temperaturen die ontstaan tijdens het gebruik
in de grill en/of heteluchtfuncties, mogen kinderen dit apparaat niet gebruiken
zonder begeleiding van een volwassene.
∙ Bij gebruik van de combinatie functies of de grill en/of heteluchtfuncties, wees dan
uiterst voorzichtig niet de verwarmingselementen aan de binnenkant aan te raken.
∙ Gebruik geen stoomapparaten voor het schoonmaken.
∙ Schakel het apparaat altijd uit na gebruik en verwijder de stekker uit het
stopcontact:
- voor het schoonmaken,
- in geval van problemen.
- na elk gebruik.
∙ Trek de stekker niet aan het snoer uit het stopcontact, maar aan de stekker zelf.
∙
Let op: De buitenkant van dit apparaat kan zeer heet worden tijdens
gebruik. Er kan stoom uitgestoten worden via de ventilatiegaten: gevaar
voor verbranding.
∙ Laat het apparaat voldoende afkoelen alvorens het te verplaatsen.
∙ Plaats het apparaat nooit op een hete ondergrond of in de buurt van open vuur
of brandbare gassen. Zorg dat het snoer niet in aanraking komt met een hete
ondergrond. Laat het snoer nooit los hangen.
∙ Wanneer de unit niet goed schoongemaakt wordt, zal de kwaliteit van de
oppervlakken verminderen, met mogelijk als gevolg een verkorting van de
53
Page 54

levensduur evenals mogelijk gevaar voor de gebruiker. Alle etensresten moeten
daarom direct verwijderd worden. Veeg na elk gebruik de deurdichtingen, het
kookcompartiment met de keramische bodem en alle aangrenzende onderdelen
schoon met een vochtige doek. Het grillrek en de bakplaat moeten worden
gereinigd met een warm sopje. Voor uitvoerige informatie over het schoonmaken
van het apparaat, de paragraaf Schoonmaken raadplegen.
∙ Dit apparaat is bestemd voor huishoudelijk of gelijkwaardig gebruik, zoals
- in bedrijfskeukens, in winkels, kantoren of andere bedrijfsruimtes,
- in agrarische instellingen,
- door klanten in hotels, motels enz. en gelijkwaardige accommodaties,
- in bed and breakfast gasthuizen.
∙ Pas op: Ieder onderhoud- of reparatiewerk dat aan de combimagnetron gedaan
wordt waarbij men de beschermende platen moet verwijderen, is zeer gevaarlijk
voor ongetrainde personen. Dit is inclusief de vernieuwing van het speciale snoer
of het verwisselen van de lamp binnenin. De magnetron mag nooit opengeschroefd
worden behalve door getraind personeel. Voor reparaties graag via telefoon of
email contact opnemen met onze afdeling klantenservice (zie bijlage).
∙ Wanneer men vloeistoffen opwarmt in de combimagnetron kan de vloeistof het
kookpunt bereiken zonder dat dit zichtbaar wordt. Het is daarom erg belangrijk
dat men zeer voorzichtig is met het aanpakken van bakjes tijdens het verwijderen
ervan uit het apparaat.
Om overkoken te voorkomen, kan men een hittebestendige glazen staaf in een
bakje plaatsen tijdens het verhittingsproces.
∙ Eieren in hun schaal of heel hard gekookte eieren mag men nooit in de
combimagnetron opwarmen. Er is een grote kans dat deze exploderen zelfs als het
opwarmingsproces al klaar is.
∙ Pas op: Het is ook zeer gevaarlijk om vloeistoffen of vast voedsel op te warmen in
afgesloten bakjes omdat ook hier het gevaar voor explosie zeer groot is.
∙ De inhoud van babyessen of van glazen potjes met babyvoedsel moet goed
geroerd of geschud worden om ervoor te zorgen dat de warmte gelijkmatig
verdeeld wordt. Waarschuwing: Om pijn en gevaarlijke verbranding te
voorkomen, moet men altijd eerst de temperatuur controleren voordat men het kind
het eten geeft.
∙ Wanneer men voedsel opwarmt of kookt dat verpakt is in brandbare materialen
zoals plastic of papier, dan bestaat er gevaar dat deze materialen ontbranden. Het
is tevens mogelijk dat voedsel uitdroogt of ontbrandt wanneer de gekozen kooktijd
te lang is. Vet en olie zijn ook zeer brandbare stoffen. Het is daarom zeer belangrijk
om bij het apparaat te blijven wanneer het in gebruik is. Zeer brandbare stoffen
54
Page 55

zoals geconcentreerde alcohol mogen natuurlijk nooit verhit worden.
∙ Wanneer er rook zichtbaar is tijdens gebruik, moet men de deur gesloten houden
om eventuele vlammen te doven. Schakel het apparaat onmiddellijk uit en haal de
stekker uit het stopcontact.
∙ Om gevaar van verbranding te voorkomen moet men altijd een pannenlap
gebruiken wanneer men voedsel uit de magnetron verwijderd. Keukengerei zal niet
alleen heet worden tijdens gebruik van de grill- en hete lucht functies maar ook
tijdens gebruik van de magnetron.
∙ Speciale voedselthermometers (zoals gebruikt in gewone bakovens) zijn niet
geschikt voor gebruik in magnetrons.
Voor het eerste gebruik
∙ Controleer na het uitpakken en elke keer wanneer men het apparaat aansluit op
het stopcontact, het apparaat en het snoer op eventuele beschadigingen.
∙ Let op: Zorg ervoor dat de deur (inclusief het kijkvenster, de deurafdichting en
de deursluitingen) niet beschadigd of verbogen zijn en sluit de deur stevig in het
deurframe. Dit is belangrijk om te voorkomen dat er geen microgolven vrijkomen
tijdens het gebruik. Tevens moet men om dezelfde redenen de behuizing van
buiten en van binnen controleren.
In geval van schade dit apparaat niet gebruiken totdat het gerepareerd is door een
gekwaliceerde monteur.
∙ Verwijder alle externe, interne verpakkingsmaterialen en stickers. Al deze materialen zijn geschikt voor recycling.
∙ Voorzichtig: de rubberen pluggen van het grillrek niet verwijderen.
∙ Verwijder nooit de zelfklevende, beschermende folie aan de binnenkant van de deur.
∙ Waarschuwing: Houd kinderen weg van inpakmateriaal, omdat deze een bron van gevaar zijn, bv. verstikkingsgevaar.
∙ Voordat men het apparaat voor het eerst gebruikt of wanneer men het apparaat voor lange periode niet gebruikt heeft,
moet men deze eerst goed schoonmaken zoals staat beschreven in de paragraaf Schoonmaken.
∙ Laat voordat men de combimagnetron gebruikt, het apparaat ongeveer 10 minuten opwarmen op de grillstand (zonder dat
de magnetronfunctie geactiveerd is). Dit doet de geur verwijderen die normaal aanwezig is, wanneer men de grill voor de
eerste keer gebruikt. Een kleine hoeveelheid rook zal zichtbaar zijn. Dit is normaal, maar zorg voor voldoende ventilatie.
∙ Let op: Schakel het apparaat nooit aan tenzij het voedsel dat men wil koken of opwarmen in de combimagnetron
geplaatst is. Gebruik van dit apparaat wanneer het leeg is, kan schade veroorzaken aan het apparaat.
ISM-apparaat
Dit apparaat is een ISM-apparaat uit groep 2 klasse B. Groep 2 bevat alle ISM-apparaten (industrieel, wetenschappelijk,
medisch) die radiofrequentie-energie gebruiken en/of radiofrequentie-energie afgeven in de vorm van elektromagnetische
straling om materialen te bewerken; het bevat ook vonkerosieapparatuur. Klasse B speciceert apparaten die zijn
ontworpen voor huishoudelijk gebruik, of soortgelijke apparaten die zijn geïntegreerd in het algemene elektriciteitsnet dat de
huishoudelijke apparaten van stroom voorziet.
De magnetronfunctie (Groep II in overeenstemming met EN 55011)
In dit apparaat wordt elektromagnetische energie opgewekt, waardoor de moleculen in het voedsel (voornamelijk
watermoleculen) versnellen en ervoor zorgen dat het voedsel warm wordt. Voedsel met een hoog watergehalte zal daarom
sneller heet worden dan droog voedsel. De hitte wordt geleidelijk opgebouwd in het voedsel. Keukengerei, bakjes en borden
die gebruikt worden, worden alleen heet vanwege het hete voedsel.
55
Page 56

Gebruik altijd geschikt keukengerei
∙ Plaats voedsel nooit direct op de keramische bodem; gebruik altijd een geschikt bord of een bakje.
∙ Metalen voorwerpen moeten nooit gebruikt worden in de magnetron oven daar deze de straling reecteert en men het
voedsel hierdoor niet kan koken of opwarmen. Metalen voorwerpen veroorzaken ook vonken die schade aan het apparaat
kunnen veroorzaken.
∙ Als vaste regel moet men geen metalen voorwerpen of aluminium folie gebruiken in de microwave oven. Sommige
verpakkingen hebben aluminium folie of metalen draden onder een laag papier en zijn daarom niet geschikt voor de
microwave oven.
Wanneer men in een recept aluminiumfolie moet gebruiken zorg dan dat het voedsel zeer goed is ingepakt zonder dat
er luchtzaken aanwezig zijn en dat er voldoende ruimte, minimale afstand van 2.5 cm, tussen de aluminiumfolie en de
binnenwand van de magnetron oven aanwezig is.
∙ Zorg er altijd voor dat bakjes of borden geen metalen decoratie hebben zoals gouden randen of gekleurde metalen
deeltjes. Lood kristallen voorwerpen zijn ook niet geschikt. Zorg er altijd voor dat bakjes geen holle onderdelen hebben
(zoals in de handvaten). Poreus materiaal kan water hebben geabsorbeerd tijdens het schoonmaken en is daarom ook
niet geschikt. Bakjes en keukengerei gemaakt van “melanine” plastic materiaal absorberen energie en zijn ook niet
geschikt.
Gebruik van de microwave functie
∙ Bakjes gemaakt van hittebestendig glas of porselein zijn zeer geschikt voor gebruik in de microwave oven.
∙ Plastic is alleen geschikt wanneer het hittebestendig is.
∙ Kookcontainers die speciaal ontworpen zijn voor gebruik in de microwave oven zijn beschikbaar van meeste keukengerei
winkels.
∙ Kook zakken enz. moeten doorgeprikt worden om te zorgen dat de hoge druk weg kan tijdens het koken.
Gebruik de grill of de hete lucht functie
∙ Met deze functies, mag men hittebestendige containers of borden gebruiken die geschikt zijn voor gewone ovens, maar
gebruik geen plastic voorwerpen.
∙ Het voedsel dat men wil koken kan direct op het grillrek of de bakplaat geplaatst worden. Installeer het grillrek en zet de
bakplaat op de keramische bodem.
Gebruik de microwave/grill of microwave/hete lucht combinatie functie
∙ Wanneer men de combinatie functies gebruikt, zullen de microwave en grill of hete lucht functies afwisselend werken. De
containers of borden moeten daarom geschikt zijn voor de microwave en tevens hittebestendig zijn. Vanwege de hoge
temperatuur is het beter om geen plastic te gebruiken. Zorg ervoor dat de containers die men gebruikt geen metalen
onderdelen bevatten.
Gebruik
Initiële instelling van de klok
∙ Wanneer de klok op het lichtnet is aangesloten, geeft deze ‘1:00’ aan; het uur display knippert en men zal een akoestisch
signaal horen.
∙ Draai aan de draaiknop om het juiste uur in te stellen.
∙ Druk kortstondig op de knop. De minuut nummers beginnen te knipperen.
∙ Draai aan de draaiknop om de juiste minuten in te stellen.
∙ Druk kortstondig op de knop om de tijdinstelling te beëindigen. ‘:’ knippert in het display en de actuele tijd wordt
weergegeven.
∙ Het tijdsinstelling proces kan geannuleerd of overgeslagen worden door op de toets te drukken.
∙ Na een stroomstoring moet de klok opnieuw ingesteld worden.
De tijd wijzigen
∙ Om de tijd te wijzigen, gedurende 3 seconden op de knop drukken. Het display geeft dan Hr 24 of Hr 12 aan.
∙ Druk kortstondig op de om te wisselen tussen de 24- of 12 –uur formats.
∙ Het uur display zal knipperen; draai aan de draaiknop om het juiste uur in te stellen.
∙ Druk kortstondig op de knop. De minuut nummers beginnen te knipperen.
56
Page 57

∙ Draai aan de draaiknop om de juiste minuten in te stellen.
∙ Druk kortstondig op de knop om de tijdinstelling te beëindigen. ‘:’ knippert in het display en de actuele tijd wordt
weergegeven.
Akoestisch signaal & Veiligheidsinrichting voor kinderen
Akoestisch signaal
∙ Wanneer een controleknop is ingedrukt of wanneer de draaibare controle word gedraaid, zal correct invoeren erkend
worden met een piep signaal.
∙ Om het signaal te beëindigen, kortstondig op de knop . drukken.
Stoppen van het piepsignaal op deze manier zal alleen het gebruik van de controleknop of draaibare controle
beïnvloeden; de signalen welke de programma volgorde aangeven zullen actief blijven.
∙ Om het signaal weer te activeren, nog een keer kortstondig op de knop drukken.
Veiligheidsinrichting voor kinderen
∙ Deze veiligheidsinrichting dient om te voorkomen dat kinderen het apparaat zonder toezicht in werking stellen.
∙ Om de veiligheidsinrichting te activeren, druk op gedurende 3 seconden. Het symbool wordt zichtbaar in de
display.
∙ Om de veiligheidsinrichting uit te schakelen, druk opnieuw op gedurende 3 seconden. Het symbool zal
verdwijnen.
∙ Noot: Ingeval u met het apparaat een schakelprobleem heeft, eerst controleren of de veiligheidsinrichting niet
geactiveerd is.
Algemene volgorde van bediening
∙ Plaats het voedsel dat opgewarmd moet worden in een geschikt bakje. Plaats het bakje op de keramische bodem in de
oven.
∙ Wanneer voedsel wordt gekookt met gebruik van microgolven moet het afgedekt worden om uitdrogen te voorkomen.
Glazen of kunststof deksels geschikt voor gebruik in magnetrons zijn te verkrijgen bij huishoudspeciaalzaken.
∙ Wanneer men de grill, hete lucht of welke andere combinatie functie gebruikt, mag men het te koken voedsel niet
afdekken.
∙ Sluit de deur en kies het gewenste programma.
∙ Let op:
De volgende stappen worden gebruikt voor het instellen van de kooktijd:
0 – 5 minuten : 10-seconden stappen
5 – 10 minuten : 30-seconden stappen
10 – 30 minuten : 1-minuut stappen
30 – 95 minuten : 5-minuut stappen
∙ Druk op de draaiknop om een programma te starten.
∙ Wanneer men het programma activeert, zal de binnenverlichting aangaan.
∙ Als de deur wordt geopend wanneer het apparaat in werking is of op wordt gedrukt, (b.v. om het voedsel te roeren
of om te draaien teneinde er zeker van te zijn dat de temperatuur gelijkmatig wordt verdeeld), zullen de timer- en
programmafuncties worden onderbroken. Wanneer nodig, mag de kooktijd veranderd worden. Het programma zal alleen
automatisch verder gaan nadat de deur gesloten is en de draaibare controle knop wordt ingedrukt.
∙ Druk tweemaal op om het programma te onderbreken .
∙ Piepsignalen geven aan dat de voorgeprogrammeerde tijd is verstreken; op hetzelfde moment zal de binnenverlichting
worden uitgeschakeld en de display geeft ‘End’ aan.
∙ Open de deur en verwijder het bakje met voedsel.
∙ Om te zorgen dat de warmte gelijkmatig over het voedsel verdeeld wordt kan men het voedsel enkele minuten laten
staan.
∙ Wanneer de deur niet onmiddellijk geopend wordt nadat de voorgeprogrammeerde gebruikstijd verlopen is, zullen
meerdere piepsignalen iedere 2 minuten hoorbaar zijn.
Afkoelfunctie
Deze microwave oven heeft een automatische koelingsfunctie.
Na iedere gebruikstijd langer dan twee tot drie minuten, zal de koelingsventilator automatisch voor enkele minuten draaien
nadat het programma stopt.
57
Page 58

Grillrek & bakplaat
∙ Het grillrek en de bakplaat zijn geschikt voor het gebruik van de magnetron, grill en hete lucht functies.
∙ Voorzichtig: de rubberen pluggen van het grillrek niet verwijderen.
∙ Installeer het grillrek op de gewenste hoogte en plaats de bakplaat op het grillrek of op de keramische bodem.
∙ Het voedsel dat men wil koken kan direct op het grillrek of de bakplaat geplaatst worden.
Koken/Opwarmen met de magnetron
Bij het koken/opwarmen met de magnetron, beïnvloed het opwarmen direct de binnenkant van het voedsel.
Tip: wanneer u twee porties bereidt, op het grillrek en op de keramische bodem, moeten deze niet recht boven elkaar
worden geplaatst, maar schuin. Verwissel de porties van plaats wanneer de helft van de bereidingstijd is verstreken.
∙ Druk herhaaldelijk op de knop totdat de benodigde vermogen instelling getoond wordt (zie onderstaande tabel).
∙ Gebruik dan de draaiknop om de gewenste kooktijd in te stellen. De kooktijd kan ingesteld worden tot een maximum van
95 minuten.
∙ Druk op de draaiknop om het kookproces te starten.
∙ Om ervoor te zorgen dat de warmte gelijkmatig verspreid wordt, moet het voedsel wat gekookt of opgewarmd wordt, af en
toe omgeroerd worden.
∙ Als tijdens het kookproces op wordt gedrukt, zal de geselecteerde vermogensinstelling visueel worden weergegeven.
Vermogen (W) Vermogen (%) Display Bereik Voor
1 x omkeren 900 W 100 P100 Hoog Opwarmen vloeistoffen, koken
2 x 810 W 90 P-90
3 x 720 W 80 P-80
4 x 630 W 70 P-70 Middelhoog
Ontdooien en opwarmen
diepvriesmaaltijden
5 x 540 W 60 P-60
6 x 450 W 50 P-50 Midden Koken jn voedsel
7 x 360 W 40 P-40
8 x 270 W 30 P-30 Laag Koken jn voedsel
9 x 180 W 20 P-20
10 x 90 W 10 P-10 Zeer laag Ontdooien voedsel
Snelprogramma / Koken met de magnetron
∙ Op de knop drukken activeert direct het kookproces. Iedere keer dat men op de knop drukt zal er 30
seconden bij de kooktijd komen.
∙ De magnetron vermogen instelling is altijd 100 %.
∙ De maximaal instelbare kooktijd is 95 minuten.
∙ Wanneer er op de knop gedrukt wordt terwijl er een magnetron programma loopt, dan voegt dit elke keer 30 seconden
toe aan de kooktijd.
Draaiknop - Snelprogramma / Koken met de magnetron
∙ De benodigde kooktijd wordt geselecteerd door de draaiknop rechtsom te draaien.
∙ Door op de draaiknop te drukken zal het kookproces direct starten.
∙ De magnetron vermogen instelling is altijd 100 %.
∙ De maximaal instelbare kooktijd is 95 minuten.
58
Page 59

Grill functie
Het grillproces maakt gebruik van stralingshitte om het voedsel te bewerken. Dit programma is geschikt voor het koken van
gegratineerde gerechten of voor het grillen van dunne stukken vlees.
∙ Druk op de knop.
∙ Gebruik dan de draaiknop om de gewenste kooktijd te selecteren. De maximaal instelbare kooktijd is 95 minuten.
∙ Het kookproces kan gestart worden door op de draaiknop te drukken.
∙ Omdat het vlees omgedraaid moet worden als één zijde voldoende gebruind is en het uit de magnetron genomen moet
worden als beide kanten gaar zijn, moet dit hele proces goed in de gaten gehouden worden.
Grill/magnetron combinatie programma’s
Deze programma’s zijn geschikt voor het koken van gevogelte, vis of koken van ‘au gratin’.
∙ Druk herhaaldelijk op de knop:
Tweemaal drukken: Co-1 → 30 % magnetron vermogen, 70 % grillvermogen
Driemaal drukken: Co-2 → 55 % magnetron vermogen, 45 % grillvermogen
∙ Dan met de draaiknop de gewenste kooktijd selecteren. De maximaal instelbare kooktijd is 95 minuten.
∙ Start het kookproces door op de draaiknop te drukken.
∙ Omdat het voedsel omgedraaid moet worden als één zijde voldoende gebruind is en het uit de magnetron genomen moet
worden als beide kanten gaar zijn, moet dit hele proces goed in de gaten gehouden worden.
Ultraheteluchtfunctie
Met deze functie zal hete lucht door het apparaat circuleren. Hierbij wordt een gelijkmatig kook- en bruiningsproces bereikt.
Koken met hetelucht is vooral geschikt voor het bereiden van een pizza of soortgelijke gerechten.
Tip: wanneer u twee porties bereidt, op het grillrek en op de keramische bodem, moeten deze niet recht boven elkaar
worden geplaatst, maar schuin. Verwissel de porties van plaats wanneer de helft van de bereidingstijd is verstreken.
∙ Druk herhaaldelijk op de knop om een kooktemperatuur tussen 230° en 110 °C te selecteren.
∙ Gebruik dan de draaiknop om de gewenste kooktijd te selecteren. De maximaal instelbare kooktijd is 95 minuten.
∙ Start het kookproces door op de draaiknop te drukken.
∙ Omdat het voedsel omgedraaid moet worden als één zijde voldoende gebruind is en het uit de magnetron genomen moet
worden als beide kanten gaar zijn, moet dit hele proces goed in de gaten gehouden worden.
∙ Draai het voedsel 180° nadat de helft van de kooktijd is verstreken.
∙ Indien u tijdens het koken de -knop indrukt, toont de display de gekozen temperatuur.
Voorverwarmen
Indien gewenst wordt de oven voorverwarmd.
∙ Druk herhaaldelijk op de knop om een kooktemperatuur tussen 230° en 110 °C te selecteren.
∙ Start het proces van verwarmen onmiddellijk door op de draaiknop te drukken. Het display geeft 30.00 aan en het proces
van voorverwarmen begint.
∙ De piepsignalen geven aan dat de geselecteerde temperatuur bereikt is. Open de deur en plaats het voedsel erin.
∙ Druk op om het te starten zoals beschreven in ‘Hete lucht functie’.
Magnetron/ultraheteluchtfunctie combinatie programma’s
∙ Het combiprogramma is geschikt voor stoofpotjes en vergelijkbare gerechten.
∙ Druk ongeveer 3 seconden op de -knop.
∙ Druk meermaals op de -knop om een temperatuur van 230, 200, 170 or 140 °C te selecteren. Andere
temperatuurkeuzes zijn niet mogelijk.
∙ Gebruik dan de draaiknop om de gewenste kooktijd te selecteren. De maximaal instelbare kooktijd is 95 minuten.
∙ Start het kookproces door op de draaiknop te drukken.
∙ Omdat het voedsel omgedraaid moet worden als één zijde voldoende gebruind is en het uit de magnetron genomen moet
worden als beide kanten gaar zijn, moet dit hele proces goed in de gaten gehouden worden.
∙ Draai het voedsel 180° nadat de helft van de kooktijd is verstreken.
∙ Indien u tijdens het koken de -knop indrukt, toont de display de gekozen temperatuur.
59
Page 60

Zetten van meerdere programma’s
De magnetron kan ingesteld worden om 2 aparte programma’s na elkaar te laten lopen zonder dat het apparaat tussentijds
opnieuw gestart hoeft te worden; bijv. Eerst gewoon koken met de magnetron functie, gevolgd door het ‘Au gratin’ koken
met de grill. Deze functie met meerder programma’s kan gebruikt worden met alle magnetron, hetelucht, grill en combinatie
functies. De automatische kookprogramma’s en de snel-programma’s zijn niet geschikt voor meerdere programmeringen.
∙ Druk herhaaldelijk op de knop voor het benodigde programma totdat de gewenste vermogen instelling /temperatuur
getoond wordt.
∙ Gebruik de draaiknop om de gewenste kooktijd te selecteren.
∙ Nu de knop in blijven drukken voor het volgende programma totdat de gewenste vermogen instelling/temperatuur getoond
wordt.
∙ Gebruik de draaiknop om de gewenste kooktijd te selecteren.
∙ Gebruik de draaiknop om het kookproces te starten.
∙ Het toestel begint met het eerste programma. Het display toont S1. Zodra het volgende programma gestart is, toont het
display S2.
Tip:
Deze functie is speciaal behulpzaam wanneer men de magnetron gebruikt om voedsel op verschillende vermogen
standen te koken. Terwijl een hogere vermogen stand later zal worden gekozen, kan het vermogen later verlaagt worden
zodat men het voedsel warm kan houden, en om ervoor te zorgen dat de hitte gelijkmatig over het voedsel verdeeld wordt
wanneer het voedsel klaar is.
Je favoriete gerecht opslaan
De hierboven beschreven programma’s en programma combinaties kunnen opgeslagen worden als ‘Favourite dishes’
voor het snel gebruiken in de toekomst. Drie verschillende gerechten kunnen vooraf opgeslagen worden. Wanner een
geheugenplaats niet bezet is, zal zijn overeenkomstig nummer knipperen. Maar let erop dat in deze modus, de automatische
kookprogramma’s en het snel-programma niet geselecteerd kan worden.
∙ Druk kortstondig één, twee of drie keer op de knop. Het nummer 1, 2 of 3 begint te knipperen in het display.
∙ Druk herhaaldelijk op de knop voor het benodigde programma totdat de gewenste vermogen instelling /temperatuur
getoond wordt.
∙ Gebruik de draaiknop om de gewenste kooktijd te selecteren.
∙ Nu de knop in blijven drukken voor het volgende programma totdat de gewenste vermogen instelling/temperatuur getoond
wordt.
∙ Gebruik de draaiknop om de gewenste kooktijd te selecteren.
∙ Druk nogmaals kortstondig op de knop om het favoriete gerecht op te slaan.
∙ Het opgeslagen programma kan worden gestart door eerst kortstondig op de knop te drukken en daarna op de
draaiknop.
∙ Als het apparaat van het lichtnet ontkoppeld is, moeten de programma’s opnieuw opgeslagen worden.
∙ Wanneer geheugenruimte al in gebruik is, zal het corresponderend nummer niet knipperen. De geheugenruimte kan
echter eenvoudig overschreven worden zoals hierboven vermeld.
Automatische kook en ontdooiprogramma’s
Deze automatische programma’s zijn nuttig als voedsel gekookt of verwarmd wordt zonder dat specieke instellingen
geprogrammeerd hoeven te worden zoals vermogen of kooktijd.
∙ Draai de draaiknop linksom totdat het display het benodigd programma in de onderstaande tabel toont. Druk nu op de
draaiknop.
∙ Gebruik de draaiknop om het juiste gewicht te selecteren (zie tabel).
∙ Draai de draaibare controle om het programma te starten.
∙ De display geeft de looptijd van het geselecteerde programma aan.
Menu Gewicht Display
200 ml 1
A-1
Dranken
60
400 ml 2
600 ml 3
Page 61

A-2
Popcorn
99 g 99
100 g (in koud water, 400 ml) 100
A-3
Noedels, pasta
A-4
Gebakken aardappel
A-5
Opwarmen
A-6
Geroosterde kip
A-7
Pizza
200 g (in koud water, 800 ml) 200
300 g (in koud water, 1200 ml) 300
230 g 1
460 g 2
690 g 3
200 g 200
300 g 300
400 g 400
500 g 500
600 g 600
700 g 700
800 g 800
800 g 800
1000 g 1000
1200 g 1200
1400 g 1400
150 g 150
300 g 300
450 g 450
A-8
Gebak
d-1
Ontdooien volgens tijd
d-2
Ontdooien volgens gewicht
ongeveer 475 g
Tijd selecteerbaar
Gewicht selecteerbaar
475
0:00
100
:
:
1800
61
Page 62

Algemene instructies
A-1 Dranken:
Om dranken en heet water op te warmen voor thee of voor instant kofe.
A-2 Popcorn:
Voor microwave popcorn (beschikbaar in zakken). Altijd de instructies van de van de fabrikant op de verpakking volgen.
A-3 Noodles/pasta:
Plaats de pasta in een geschikte container, en zorg dat het onder koud water valt; plaats de container in het midden van de
oven.
A-4 Gebakken aardappel:
Plaats een rauwe, ongeschilde aardappel op een geschikte plaat, en plaats de plaat in het midden van de oven.
A-5 Opwarmen:
Voor het opwarmen van vast voedsel in houders die geschikt zijn voor de magnetron.
Tip: Breng het voedsel in een cirkelvormig patroon om een optimale warmteverdeling te garanderen.
A-6 Geroosterde kip:
Plaats een hele kip op een plaat, die voor een magnetron geschikt is, in het midden van de oven.
Piepsignalen zullen aangeven dat 1/2 van de ingestelde kooktijd verlopen is. Draai de kip nu om en druk op de draaiknop om
het kookproces te hervatten.
A-7 Pizza:
Voor het bakken van pizza op het grillrek of de bakplaat. Voor diepgevroren pizza, laat het apparaat altijd opwarmen volgens
de instructies van de fabrikant, welke men op de verpakking kan vinden, en kies dan het juiste automatische programma.
Piepsignalen zullen aangeven dat 1/2 van de ingestelde kooktijd verlopen is. Open de deur, draai de pizza 180° en druk op
de draaiknop om het kookproces te hervatten.
A-8 Gebak:
Dit programma is geschikt voor het bakken van simpele gewone pound cakes (ongeveer 475 g). Gebruik de toepasselijke
recept informatie voor de benodigde opwarm tijden. Indien nodig, het toestel voorverwarmen (zie ‘Heteluchtfunctie/
‘Voorverwarmen’). Plaats het deeg in een hittebestendige bakvorm en plaats de vorm op het grillrek of de keramische
bodem.
Piepsignalen zullen aangeven dat 1/2 van de ingestelde kooktijd verlopen is. Open de deur, draai de bakvorm 180° en druk
op de draaiknop om het kookproces te hervatten.
d-1 Ontdooien volgens tijd:
Zie de ‘Ontdooien volgens tijd’ sectie hieronder.
d-2 Ontdooien volgens gewicht:
Zie de ‘Ontdooien volgens gewicht’ sectie hieronder.
d-1 Ontdooien volgens tijd en d-2 Ontdooien volgens gewicht
De ontdooiprogramma’s maken ontdooien op basis tijd of gewicht mogelijk.
Draai de draaiknop linksom, totdat hey display d-1 of d-2 weergeeft.
∙ Druk op de draaiknop om de programma selectie te bevestigen.
∙ Draai aan de draaiknop, totdat het display de gewenste ontdooitijd weergeeft (voor d-1) of het relevant gewicht (voor
d-2).
∙ Druk op de draaiknop om het ontdooien te starten.
Nuttige tips:
∙ Pieptonen zullen aangeven dat 2/3 van het ontdooiprogramma verlopen is. Draai het voedsel om, en verwijder het
voedsel wat al ontdooid is.
∙ Druk op de draaibare controle om het programma voort te zetten.
∙ Voor het geval het voedsel niet helemaal is ontdooid als de voorgeprogrammeerde ontdooitijd verstreken is, dan verdient
het aanbeveling eventuele verdere ontdooitijden steeds met perioden van niet meer dan 1-minuut te verlengen tot het
voedsel helemaal is ontdooid.
∙ Men moet voedsel dat in plastic containers verpakt is, en welke niet geschikt zijn voor magnetron ovens, eerst een poosje
laten staan. Wacht tot het voedsel gemakkelijk van het plastic kan worden losgemaakt voordat het in een bakje wordt
gedaan, dat geschikt is voor magnetrons. Let op: Geen enkel deel in de vaatwasser wassen.
Binnenverlichting
De binnenverlichting zal aangaan wanneer de deur geopend word; het zal aanblijven tijdens gebruik. Wanneer een
programma voltooid is, zal het licht uitgaan.
62
Page 63

Schoonmaken
∙ De magnetron moet regelmatig schoongemaakt worden en daarbij moeten etensresten na het gebruik direct verwijderd
worden.
∙ Voordat men het apparaat schoonmaakt moet men zorgen dat de stekker is verwijderd uit het stopcontact en het apparaat
volledig is afgekoeld.
∙ Maak het apparaat niet schoon met water. Zorg ervoor dat geen water - hoe klein de hoeveelheid ook is – in de ventilatie
gaten komt aan de binnenkant of buitenkant van het apparaat. Gebruik geen stoomapparaten voor het schoonmaken.
∙ Het hele apparaat mag schoongemaakt worden met een vochtige pluisvrije doek en een zachte huishoudzeep. Veeg
goed droog hierna.
∙ Gebruik geen schurende of bijtende schoonmaakmiddelen. Spuitbussen beschikbaar voor commercieel gebruik die
speciaal ontworpen zijn voor het schoonmaken van gewone ovens mogen niet gebruikt worden.
∙ De binnenkant moet schoongemaakt worden na ieder gebruik. De binnenkant van de deur, het deurframe en de
keramische bodem, moeten altijd schoongehouden worden.
∙ De grillrek en bakplaat mogen schoongemaakt worden met warm water en zeep. Pas op: Geen enkel deel in de
vaatwasser wassen.
Aanvullende informatie
Technischespecicaties
Buitenmaten : 490 mm (B) x 491 mm (D) x 287 mm (H)
Binnenmaten : 340 mm (B) x 338 mm (D) x 197 mm (H)
∙ ruimte boven de keramische bodem : 190 mm
∙ bakplaat : Ø 265 mm
Unit gewicht : 17.4 kg
Gebruiks voltage : 230 V~ 50 Hz
Totaal stroomgebruik : 2050 W
∙ grill : 1200 W
∙ magnetron : 1400 W
∙ hete lucht : 2050 W
Magnetron output : 90 W - 900 W
Afval weggooien
Instrumenten gemerkt met dit symbool moeten apart weggegooid worden van het huishoudelijke afval, daar
deze waardevolle materialen bevatten welke men kan recyclen. Juist wegdoen zal het milieu en de menselijke
gezondheid beschermen. De plaatselijke autoriteit of handelaar kan daar informatie over geven.
Garantieverklaring
Voor dit apparaat geldt een garantie van twee jaar na de aankoopdatum voor materiaal- en fabrieksfouten. Uitgesloten van
garantie is schade die ontstaan is door het niet in acht nemen van de gebruiksaanwijzing, normale slijtage en zeer breekbare
onderdelen zoals glazen kannen etc. Deze garantieverklaring heeft geen invloed op uw wettelijke rechten, en ook niet op
uw legale rechten welke men heeft als een consument onder de toepasselijke nationale wetgeving welke de aankoop van
goederen beheerst. De garantie vervalt bij reparatie door niet door ons bevoegde instellingen.
63
Page 64

ES
Microondas
Estimado Cliente,
Antes de utilizar el horno microondas, le recomendamos que lea detenidamente las siguientes instrucciones y que conserve
este manual de instrucciones como referencia en el futuro. El aparato sólo debe ser usado por personas que se han
familiarizado con estas instrucciones.
Componentes del aparato
1. Cierres de la puerta
2. Ventanilla de observación
3. Base cerámica
4. Tablero de mando
5. Resistencia térmica
6. Rejilla para el grill
7. Bandeja de hornear
64
Page 65

Información del panel de control
Botón Función
Señal sonora de los botones y
Dispositivo de seguridad infantil
Plato favorito y Reloj
Inicio rápido / Incrementar el
tiempo de cocción en 30 segundos
Microondas
Grill
Aire ultra caliente
Interrumpir / Detener
Mando giratorio Función
Pulsar Iniciar
Girar
Tiempo & Programas automáticos
65
Page 66

Visualizador
Programas automáticos
Selección del primer programa
Selección del segundo programa
Descongelación por peso
Dispositivo de seguridad infantil
El visualizador indica la hora actual del día o, mientras está
funcionando, el tiempo de funcionamiento programado y
las funciones seleccionadas.
Temperatura
Ajuste del reloj
Peso
Función de aire ultra caliente
Función grill
Función microondas
Programas automáticos
Descongelación por tiempo
66
Page 67

Instrucciones de seguridad
Instrucciones importantes de seguridad
Lea atentamente las instrucciones siguientes y conserve este manual de
instrucciones para cualquier consulta posterior
Conexión a la red eléctrica
El aparato sólo debe ser enchufado a una toma conectada a tierra instalada según
las normas vigentes. Asegúrese de que la tensión de la red coincide con la tensión
indicada en la placa de características. Este producto cumple con las directivas
obligatorias que acompañan el etiquetado de la CEE.
Emplazar la unidad
∙ Coloque siempre el horno microondas sobre una supercie estable y nivelada
resistente al calor y asegúrese de que queda protegido de cualquier fuente de
calor o de una humedad excesiva.
∙ No utilice el aparato en exteriores.
∙ No debe quitarle los pies que se encuentran en la base de la unidad.
∙ Debe asegurar una ventilación suciente en todo momento. No coloque objetos
encima de la unidad, y asegúrese de que se respeten las siguientes distancias
mínimas de una pared u otro objeto:
Lateral: 7.5 cm
Posterior: 7.5 cm
Superior: 30.0 cm
No debe instalarse este aparato dentro de un armario; al colocar el aparato,
asegúrese también de no situarlo inmediatamente debajo de un armario o de
cualquier otro objeto similar.
Notas importantes
∙ Cuidado: Cierto tipo de alimentos puede tener una tendencia a prender
fuego. Nunca, en ninguna circunstancia, deje el aparato sin supervisión
durante la utilización de las funciones microondas, grill, aire caliente o una
combinación de estas.
∙ Este microondas sólo está diseñado para descongelar, recalentar y cocer comida.
Precaución: Si intenta secar alimentos o comida, calentar una bolsa térmica,
unas zapatillas, una esponja, un paño de cocina mojado, etc. podría sufrir lesiones
por combustión o incendio.
∙ No se acepta responsabilidad alguna si hay averías a consecuencia del
uso incorrecto del aparato o si estas instrucciones no han sido observadas
67
Page 68

debidamente.
∙ Utilice solo utensilios de menaje adecuados para el uso en el horno de
microondas. No utilice ningún recipiente metálico para calentar alimentos o
bebidas utilizando la función microondas. Puede consultar información más
detallada en la sección ‚Emplee siempre utensilios de cocina apropiados‘.
∙ El aparato no debe ser utilizado con un temporizador externo ni un sistema de
mando a distancia.
∙ Este aparato podrá ser utilizado por niños (mayores de 8 años) y personas
con reducidas facultades físicas, sensoriales o mentales, o sin experiencia
ni conocimiento del producto, siempre que hayan recibido la supervisión o
instrucciones referentes al uso del aparato y entiendan por completo el peligro y
las precauciones de seguridad.
∙ Los niños no deben jugar con el aparato.
∙ No se debe permitir que los niños realicen ningún trabajo de limpieza o
mantenimiento del aparato a menos que esté bajo vigilancia y tengan más de 8
años.
∙ El aparato y su cable eléctrico siempre se deben mantener fuera del alcance de
niños menores de 8 años.
∙ Para evitar riesgo de electrocución, no limpie la unidad con agua ni la sumerja.
∙ Advertencia: Debido a las elevadas temperaturas que se alcanzan en las
funciones de grill y/o aire caliente, los niños no deben utilizar el aparato a menos
que estén bajo la supervisión adecuada de un adulto.
∙ Durante el uso de una combinación de funciones o las funciones de grill y/o aire
caliente, evite tocar las resistencias térmicas interiores
∙ No emplee aparatos de limpieza con vapor para limpiar el aparato.
∙ Apague y desenchufe siempre el aparato:
- antes de la limpieza,
- en caso de avería.
- después de cada utilización.
∙ Cuando se desenchufa la clavija de la pared, nunca tirar del cable de alimentación.
∙
Atención: Las supercies exteriores del electrodoméstico pueden
calentarse durante su funcionamiento. También existe peligro de emisión
de vapor por las ranuras de ventilación: peligro de quemaduras.
∙ Espere hasta que el aparato se haya enfriado sucientemente para poder
transportarlo.
∙ No deje que el aparato o su cable de alimentación entren en contacto con
supercies calientes o fuentes de calor. No permita que el cable de alimentación
cuelgue en el vacío y manténgalo lejos de cosas calientes.
68
Page 69

∙ Si el aparato no se mantiene limpio, se producirá el deterioro de su supercie, y
en consecuencia una disminución en la vida útil del aparato, además de constituir
un peligro para la seguridad del usuario. Por este motivo, se debe eliminar
inmediatamente cualquier residuo de alimentos. Después de cada uso, limpie los
cierres de la puerta, el compartimento interior con su base cerámica y todas las
partes adyacentes utilizando un paño húmedo. La rejilla para el grill y la bandeja
de hornear se pueden limpiar con agua templada y jabón. Para tener información
detallada sobre la limpieza del aparato, consulte la sección Limpieza.
∙ Este aparato ha sido diseñado para el uso doméstico u otra aplicación similar, por
ejemplo
- en cocinas de personal, en ocinas y otros puntos comerciales,
- en empresas agrícolas,
- por los clientes de hoteles, pensiones, etc. y alojamientos similares,
- en casas rurales.
∙ Atención: Cualquier trabajo de mantenimiento o reparación que precise la
extracción de alguna cubierta protectora contra la radiación del microondas
representa un serio peligro para personas no cualicadas. Esto incluye la
sustitución del cable especial eléctrico o la bombilla del alumbrado interior. El
aparato no debe ser abierto, excepto por personal cualicado. Para cualquier
reparación, póngase en contacto con nuestro departamento de atención al cliente
por teléfono o email (consulte el apéndice).
∙ Al calentar líquidos en su microondas, el líquido puede calentarse más allá del
punto de ebullición sin burbujear visiblemente. Por lo tanto, es importante tener
muchísimo cuidado al tocar los recipientes, p. ej. al sacarlos del horno.
El riesgo de sobrecalentamiento se puede reducir al poner una varilla de vidrio
termorresistente en el recipiente durante el calentamiento.
∙ Los huevos con su cáscara o huevos enteros cocidos no deberán calentarse en un
horno microondas, ya que podrían explotar incluso después de que el proceso de
calentamiento en el microondas hubiera concluido.
∙ Atención: Es también sumamente peligroso calentar en el aparato líquidos o
cualquier tipo de comida sólida dentro de recipientes cerrados, puesto que existe
un riesgo real de explosión.
∙ El contenido de biberones o recipientes de vidrio con comida para niños deben
ser revueltos o sacudidos para asegurar que el calor está distribuido de modo
uniforme. Atención: Para evitar quemaduras dolorosas y peligrosas, controle
siempre la temperatura antes de darle de comer al niño.
∙ Al calentar o cocer comida que está envuelta en materiales combustibles como
plástico o papel, hay un riesgo de que estos ardan. También es posible que la
69
Page 70

comida se seque y hasta puede arder si el tiempo de cocción seleccionado es
demasiado largo. La grasa y el aceite también son sustancias inamables. Por lo
tanto, es importante controlar el aparato durante su funcionamiento. Por supuesto
que los líquidos altamente inamables como el alcohol concentrado no deben ser
calentados.
∙ Si observa que está saliendo humo durante el funcionamiento, mantenga la puerta
cerrada para inhibir o apagar las llamas si hay. Apague la unidad inmediatamente y
saque el enchufe de la toma de pared.
∙ Para evitar el peligro de quemaduras, hay que utilizar siempre un paño apropiado
para el horno al extraer los alimentos del horno, dado que los utensilios y los
recipientes de cocina se calientan no sólo durante la utilización de las funciones de
grill y aire caliente, sino también durante el funcionamiento del microondas.
∙ Los termómetros especiales de cocina (como los que se emplean con un horno
normal) no son indicados para el uso con los microondas.
Antes de usarlo por primera vez
∙ Después de desembalarlo y cada vez que conecta la unidad a la red eléctrica,
examine la unidad y el cable de alimentación por si hubiera indicios de
desperfectos.
∙ Nota: Asegúrese también de que la puerta (incluyendo la ventanilla de
observación, el sellado de la puerta y los cierres) no está dañada o torcida y
ciérrela rmemente contra su marco. Esto es importante porque asegura que no
haya escapes de energía de microondas durante el funcionamiento. Por la misma
razón debe examinar cuidadosamente la caja entera junto con el interior del horno.
En caso de avería, este aparato no debe ser usado hasta que haya sido reparado
por un técnico cualicado.
∙ Retire todos los materiales de embalaje del interior y del exterior, y cualquier adhesivo si lo hubiera. Todos estos
materiales están indicados para el reciclaje.
∙ Precaución: No retirar los tacos de goma de la rejilla.
∙ No extraiga la capa protectora que cubre el interior de la puerta.
∙ Precaución: Mantenga a los niños alejados del material de embalaje, porque podría ser peligroso, existe el peligro de
asxia.
∙ Antes de utilizar el aparato por vez primera, o tras largos períodos de no utilización, se debe limpiar meticulosamente
como viene indicado en la sección Limpieza.
∙ Antes de utilizar el horno microondas, ponga el aparato a calentar en el ajuste grill (sin activar la función microondas) por
unos 10 minutos. Esto eliminará el olor típico que sale de un grill la primera vez que se enciende. Puede que salga un
poco de humo; esto es normal, pero asegure una ventilación adecuada.
∙ Nota: No encienda el aparato a no ser que la comida a calentar o cocinar haya sido introducida en el horno. La
utilización del electrodoméstico vacío podría dañar el aparato.
Dispositivo ISM
Este electrodoméstico es un aparato del grupo 2 de la clase B ISM. El grupo 2 incluye todos los aparatos ISM (industriales,
cientícos, médicos) que generan energía por radio frecuencia en forma de radiación electromagnética para el
procesamiento de material; también incluye los aparatos de electroerosión. La clase B indica aparatos diseñados para el
uso doméstico, o cualquier aparato similar integrado en las unidades domésticas de suministro eléctrico.
70
Page 71

La función microondas (Grupo II cumple con la norma EN 55011)
Dentro de la unidad se genera energía electromagnética, haciendo que las moléculas en la comida (principalmente
moléculas de agua) oscilen y por consiguiente que la comida se caliente. Por esta razón, la comida con un alto contenido
de agua se calentará más rápidamente que la comida relativamente seca. El calor se propaga gradualmente dentro de la
comida. Los utensilios, platos o recipientes que emplea solo se calientan indirectamente, como resultado de la temperatura
de la comida.
Emplee siempre utensilios de cocina apropiados
∙ No coloque los alimentos directamente sobre la base cerámica; utilice siempre un plato o un recipiente apropiado de
cocina.
∙ Debe evitarse el uso de objetos metálicos dado que las ondas se reejan en las supercies metálicas, pudiendo no llegar
hasta la comida que se desea cocinar. Cualquier metal dentro del horno podría generar chispas, y con ello un eventual
daño al aparato.
∙ Como regla general, los cubiertos o contenedores metálicos no deben ser usados en el microondas. Algunas envolturas
de comida contienen aluminio doméstico o alambre bajo una capa de papel y por lo tanto tampoco son indicadas para el
uso con los aparatos de microondas.
En el caso de que una receta recomiende el uso de papel de aluminio, asegúrese de que la comida está rmemente
envuelta en el papel de aluminio (evitando que haya burbujas de aire). Asegúrese de mantener una distancia mínima de
2.5 cm entre el papel de aluminio y las paredes interiores del horno.
∙ Compruebe siempre que el recipiente o el plato utilizado no lleva ningún detalle en metal como por ejemplo un borde
de oro o colores que contengan partículas de plomo. Los objetos hechos de cristal de plomo tampoco se deben
utilizar. Asegúrese siempre de que los recipientes de cocina empleados no tienen sitios huecos (p.ej. en las asas). Los
materiales porosos pueden haber absorbido agua durante la limpieza y tampoco son adecuados. Los recipientes de
cocina o utensilios hechos de materiales de plástico del tipo “Melamina” absorben energía y tampoco son adecuados.
Utilización de la función microondas
∙ Sin embargo, los contenedores hechos de vidrio termorresistente o porcelana son muy adecuados para el uso en
aparatos de microondas.
∙ El plástico es adecuado solo si es termorresistente.
∙ Los recipientes de cocina diseñados especialmente para el uso con microondas se pueden adquirir en la mayoría de
tiendas que venden productos de cocina.
∙ Las bolsas de cocinar etc. deben ser perforadas para soltar la alta presión que se acumula durante la cocción.
Utilización de la función grill o la función de aire caliente
∙ Con estas funciones, se deben utilizar recipientes o platos resistentes al calor y adecuados para hornos convencionales,
y nunca utensilios de plástico.
∙ Los alimentos a cocinar se pueden colocar directamente encima de la rejilla para el grill o la bandeja de hornear.
Introduzca la rejilla en su posición y coloque la bandeja sobre la base cerámica.
Utilización de la combinación microondas/grill o microondas/aire caliente
∙ Al utilizar las funciones de combinación, las funciones de microondas y grill o aire caliente se activan alternativamente.
Los recipientes o platos deben, por lo tanto, ser apropiados para el uso en un microondas además de ser
termorresistentes. Debido a las temperaturas elevadas que alcanza el aparato, no debe emplear artículos de plástico.
Asegúrese de que el recipiente o plato usado no contiene partes de metal.
Funcionamiento
Ajuste inicial del reloj
∙ Después de enchufar el aparato al suministro eléctrico, el visualizador mostrará ‘1:00’, los dígitos de las horas destellarán
y se escuchará una señal acústica.
∙ Gire el control giratorio para ajustar la hora correcta.
∙ Pulse brevemente el botón . Los dígitos de los minutos comenzarán a destellar.
∙ Gire el control giratorio para ajustar correctamente los minutos.
∙ Pulse brevemente el botón para nalizar el ajuste del reloj. ‚:‘ parpadea en la pantalla y se visualiza la hora
71
Page 72

actual.
∙ El proceso de ajuste del reloj se puede cancelar o saltar pulsando la tecla .
∙ Después de una interrupción en el suministro eléctrico, deberá volver a ajustar el reloj.
Cambio de la hora
∙ Para cambiar la hora, pulse el botón durante 3 segundos. La pantalla indicará Hr 24 o Hr 12.
∙ Pulse brevemente el botón para cambiar entre los formatos del reloj de 24- o 12 –horas.
∙ Los dígitos de las horas destellarán; gire el control giratorio para ajustar la hora correcta.
∙ Pulse brevemente el botón . Los dígitos de los minutos comenzarán a destellar en la pantalla.
∙ Gire el control giratorio para ajustar correctamente los minutos.
∙ Pulse brevemente el botón para nalizar el ajuste del reloj. ‚:‘ parpadea en la pantalla y se visualiza la hora
actual.
Señal sonora & Dispositivo de seguridad para niños
Señal sonora
∙ Al pulsar cualquier botón de control o mover el mando giratorio, se escuchará una señal sonora conrmando que se ha
realizado correctamente.
∙ Para cancelar la señal, pulse brevemente el botón .
La cancelación de la señal sonora de este modo solo afectará al uso del botón de control o el mando giratorio; las
señales que indican la secuencia de un programa seguirán activadas.
∙ Para reactivar la señal, vuelva a pulsar brevemente el botón .
Dispositivo de seguridad para niños
∙ Este dispositivo de seguridad evita que los niños puedan utilizar el aparato sin supervisión.
∙ Para activar el dispositivo de seguridad, pulse durante 3 segundos. El símbolo aparecerá en el visualizador.
∙ Para desactivar el dispositivo de seguridad, Pulse de nuevo durante 3 segundos. El símbolo desaparecerá.
∙ Nota: Si Vd. no pudiera encender el aparato, compruebe primero que el dispositivo de seguridad no está activado.
Secuencia de funcionamiento general
∙ Introduzca la comida a calentar en un recipiente apropiado. Coloque el recipiente en la base cerámica del horno.
∙ Al colocar alimentos en el microondas, deben cubrirse para evitar que se sequen. Las tapas de vidrio o plástico
diseñadas especialmente para usar con microondas se pueden encontrar en la mayoría de las tiendas.
∙ Cuando utilice la función grill, aire caliente o cualquier combinación de funciones, no cubra los alimentos a cocinar.
∙ Cierre la puerta y seleccione el programa deseado.
∙ Nota:
Para ajustar el tiempo de cocción debe seguir estos intervalos de avance:
0 – 5 minutos : avances de 10-segundos
5 – 10 minutos : avances de 30-segundos
10 – 30 minutos : avances de 1-minuto
30 – 95 minutos : avances de 5-minutos
∙ Pulse el control giratorio para iniciar un programa.
∙ Cuando se inicie el programa, la luz interior se encenderá.
∙ Si, durante el funcionamiento, se abre la puerta o se pulsa la tecla (para revolver o dar la vuelta a la comida y
asegurar una distribución uniforme del calor), el funcionamiento del temporizador y el programa quedará suspendido. En
este momento se puede cambiar el tiempo de cocción, si es necesario. El programa se reanudará automáticamente al
cerrar la puerta de nuevo y pulsar la tecla del mando giratorio.
∙ Pulse dos veces para interrumpir el programa.
∙ Pitidos indicarán que el tiempo previamente programado ha transcurrido; a la vez, la luz interior se apagará y el
visualizador indicará ‚End‘ (‚Fin‘).
∙ Abra la puerta y saque el recipiente con la comida.
∙ Para obtener una distribución de calor uniforme en la comida, debe dejar el recipiente durante algunos minutos.
∙ Si la puerta no se abre inmediatamente después de que el tiempo de funcionamiento programado haya transcurrido, se
escucharán señales sonoras cada 2 minutos.
Función de refrigeración
Este horno microondas incluye una prestación automática de refrigeración.
72
Page 73

Después de cualquier tiempo de funcionamiento superior a dos o tres minutos, el ventilador de refrigeración funcionará
automáticamente durante unos minutos cuando el programa haya nalizado.
Rejilla del grill & bandeja de hornear
∙ La rejilla para el grill y la bandeja de hornear son adecuados para la cocción con microondas, grill y aire caliente.
∙ Precaución: No retire los tacos de goma de la rejilla.
∙ Introduzca la rejilla a la altura deseada y coloque la bandeja de hornear sobre la rejilla o la base cerámica.
∙ Los alimentos a cocinar se pueden colocar directamente encima de la rejilla para el grill o la bandeja de hornear.
Cocinar/calentar con microondas
Al cocinar/calentar con microondas, el calor afecta directamente al interior de los alimentos.
Consejo: Al preparar dos raciones, en la rejilla y la base cerámica, no se deben colocar una encima de otra, sino
complementándose. Cambie la posición de las raciones cuando haya transcurrido la mitad del tiempo del proceso de
preparación.
∙ Pulse varias veces el botón hasta visualizar el ajuste de potencia deseado (consulte la tabla siguiente).
∙ Después utilice el control giratorio para ajustar el tiempo de cocción deseado. El tiempo de cocción se puede programar
hasta un valor máximo de 95 minutos.
∙ Pulse el control giratorio para iniciar el proceso de cocción.
∙ Para asegurar la distribución homogénea del calor, los alimentos que están siendo cocinados o calentados deberán ser
revueltos ocasionalmente.
∙ Si durante el proceso de cocción se pulsa la tecla , el visualizador mostrará el ajuste de potencia seleccionado.
Dar la vuelta
1 x
Potencia
(W)
900 W 100 P100 Alto Calentar líquidos, cocinar
Potencia
(%)
Visualizador Tipo Uso
2 x 810 W 90 P-90
3 x 720 W 80 P-80
4 x 630 W 70 P-70 Medio alto Descongelar y calentar platos ultracongelados
5 x 540 W 60 P-60
6 x 450 W 50 P-50 Medio Cocinar comida delicada
7 x 360 W 40 P-40
8 x 270 W 30 P-30 Bajo Descongelar comida
9 x 180 W 20 P-20
10 x 90 W 10 P-10 Muy bajo Descongelar comida delicada
Programa rápido / Cocción con microondas
∙ Pulsando el botón se activa directamente el proceso de cocción. Cada pulsación del botón añadirá 30
segundos al tiempo de cocción.
∙ El ajuste de la potencia de microondas siempre es el 100 %.
∙ El tiempo de cocción se puede congurar hasta un máximo de 95 minutos.
∙ Si se pulsa el botón durante el funcionamiento de un programa del microondas, con cada pulsación se añadirán 30
segundos al tiempo de cocción.
Control giratorio - Programa rápido / Cocción con microondas
∙ El tiempo de cocción deseado se selecciona girando el control giratorio en el sentido de las agujas del reloj.
73
Page 74

∙ Pulsando el control giratorio directamente se iniciará el proceso de cocción.
∙ El ajuste de la potencia de microondas siempre es el 100 %.
∙ El tiempo de cocción se puede congurar hasta un máximo de 95 minutos.
Función grill
El proceso del grill utiliza calor por radiación para cocinar la comida. Este programa es adecuado para gratinar o para asar
piezas delgadas de carne.
∙ Pulse el botón .
∙ Después utilice el control giratorio para seleccionar el tiempo de cocción deseado. El tiempo de cocción se puede
congurar hasta un máximo de 95 minutos.
∙ Inicie el proceso de cocción pulsando el control giratorio.
∙ Se deberá girar la carne cuando un lado esté sucientemente dorado, y se deberá sacar cuando esté hecho por ambos
lados, por ello es importante comprobar atentamente este proceso.
Programas de combinación grill/microondas
Estos programas son adecuados para cocinar aves, pescado o para gratinar.
∙ Pulse el botón reiteradamente:
Pulse dos veces: Co-1 → 30 % potencia de microondas, 70 % potencia del grill
Pulse tres veces: Co-2 → 55 % potencia de microondas, 45 % potencia del grill
∙ Después utilice el control giratorio para seleccionar el tiempo de cocción deseado. El tiempo de cocción se puede
congurar hasta un máximo de 95 minutos.
∙ Inicie el proceso de cocción pulsando el control giratorio.
∙ Se deberá girar la comida cuando un lado esté sucientemente dorado, y se deberá sacar cuando esté hecho por ambos
lados, por ello es importante comprobar atentamente este proceso.
Función de aire ultra caliente
Con esta función, el aire caliente circula dentro del horno, consiguiendo una cocción y un dorado uniformes. La cocción con
aire caliente es especialmente adecuada para cocinar pizza o platos similares.
Consejo: Al preparar dos raciones, en la rejilla y la base cerámica, la ración inferior se debe colocar en la bandeja de
hornear y no directamente sobre la base cerámica. Cambie la posición de las raciones cuando haya transcurrido la mitad
del tiempo del proceso de preparación.
∙ Pulse varias veces el botón para seleccionar una temperatura de cocción entre 230° y 110 °C.
∙ Después utilice el control giratorio para seleccionar el tiempo de cocción deseado. El tiempo de cocción se puede
congurar hasta un máximo de 95 minutos.
∙ Inicie el proceso de cocción pulsando el control giratorio.
∙ Se deberá girar la comida cuando un lado esté sucientemente dorado, y se deberá sacar cuando esté hecho por ambos
lados, por ello es importante comprobar atentamente este proceso.
∙ Gire los alimentos 180° a la mitad del tiempo de cocción.
∙ Si, durante el proceso de cocción, se pulsa el botón, , el visualizador indicará la temperatura seleccionada.
Precalentamiento
Si es necesario, se puede precalentar el aparato.
∙ Pulse varias veces el botón para seleccionar una temperatura de cocción entre 230° y 110 °C.
∙ Inicie el proceso de cocción inmediatamente pulsando el control giratorio. La pantalla indicará 30.00 y se iniciará el
proceso de precalentamiento.
∙ Los pitidos indican que se ha alcanzado la temperatura seleccionada. Abra la puerta e introduzca los alimentos.
∙ Pulse para iniciar el proceso tal y como se indica en ‚Función de aire caliente‘.
Programas de combinación microondas/ función de aire ultra caliente
∙ El programa de combinación es adecuado para guisos y platos similares.
∙ Pulse el botón durante unos 3 segundos.
∙ Pulse varias veces el botón para seleccionar una temperatura de 230, 200, 170 o 140 °C. No se puede seleccionar
otra temperatura.
∙ Después utilice el control giratorio para seleccionar el tiempo de cocción deseado. El tiempo de cocción se puede
congurar hasta un máximo de 95 minutos.
∙ Inicie el proceso de cocción pulsando el control giratorio.
∙ Se deberá girar la comida cuando un lado esté sucientemente dorado, y se deberá sacar cuando esté hecho por ambos
74
Page 75

lados, por ello es importante comprobar atentamente este proceso.
∙ Gire los alimentos 180° a la mitad del tiempo de cocción.
∙ Si, durante el proceso de cocción, se pulsa el botón , el visualizador indicará la temperatura seleccionada.
Ajuste de programas múltiples
El microondas se puede congurar para que 2 programas separados funcionen consecutivamente sin tener que reiniciar
el aparato entre estos programas; por ejemplo, primero la función normal de cocción del microondas, y a continuación la
cocción de ‚gratinado‘ utilizando el grill. Esta prestación de varios programas se puede utilizar con cualquier combinación
de funciones de microondas, aire caliente, grill y combinación de funciones. Los programas automáticos de cocción y el
programa rápido no son adecuados para la programación múltiple.
∙ Pulse varias veces el botón del programa deseado hasta que aparezca visualizado el ajuste de potencia/temperatura
deseado.
∙ Use el control giratorio para seleccionar el tiempo de cocción deseado.
∙ Ahora pulse varias veces el botón del programa siguiente hasta visualizar el ajuste de potencia/temperatura deseado.
∙ Use el control giratorio para seleccionar el tiempo de cocción deseado.
∙ Use el control giratorio para iniciar el proceso de cocción.
∙ El aparato inicia el primer programa. La pantalla indica S1. Cuando se inicia el siguiente programa, la pantalla cambia a
S2.
Consejo:
Esta función es especialmente útil cuando se utiliza el microondas para cocinar alimentos a distintos niveles de potencia.
Inicialmente se puede seleccionar una potencia elevada, y posteriormente se puede reducir la potencia para mantener
los alimentos calientes, y asegurar una distribución homogénea del calor cuando los alimentos ya están hechos.
Memorización de su plato favorito
Los programas y las combinaciones de programas descritos anteriormente se pueden memorizar como ‚Platos favoritos‘
para poder utilizarlos rápidamente en el futuro. Se pueden pre-memorizar tres platos diferentes. Si un espacio de memoria
está libre, su número correspondiente parpadeará. Pero recuerde que, en este modo, no se podrán seleccionar los
programas automáticos de cocción y el programa rápido.
∙ Pulse brevemente el botón una, dos o tres veces. En la pantalla parpadeará el número 1, 2 o 3.
∙ Pulse varias veces el botón del programa deseado hasta que aparezca visualizado el ajuste de potencia/temperatura
deseado.
∙ Use el control giratorio para seleccionar el tiempo de cocción deseado.
∙ Ahora pulse varias veces el botón del programa siguiente hasta visualizar el ajuste de potencia/temperatura deseado.
∙ Use el control giratorio para seleccionar el tiempo de cocción deseado.
∙ Pulse de nuevo brevemente el botón para memorizar el plato favorito.
∙ El programa memorizado se podrá iniciar pulsando brevemente, primero el botón y a continuación el control giratorio.
∙ Si el aparato ha sido desconectado de la red eléctrica, se deberán volver a memorizar los programas.
∙ Si un espacio de memoria ya está ocupado, el número correspondiente no parpadeará. No obstante, se puede
memorizar sobre un espacio de memoria ya ocupado siguiendo los pasos anteriores.
Programas automáticos de cocción y descongelación
Estos programas automáticos son útiles cuando se cuecen o calientan alimentos sin haber seleccionado ningún ajuste
particular, para potencia o tiempo de cocción.
∙ Gire el control giratorio en sentido contrario a las agujas del reloj hasta que la pantalla indique el programa deseado de la
tabla siguiente. Pulse el control giratorio.
∙ Use el control giratorio para seleccionar el peso adecuado (consultar la tabla).
∙ Pulse el mando giratorio para iniciar el programa.
∙ El visualizador indica el tiempo de funcionamiento del programa seleccionado.
Menú Peso Visualizador
200 ml 1
A-1
Bebidas
400 ml 2
600 ml 3
75
Page 76

A-2
Palomitas de maíz
99 g 99
100 g (en agua fría, 400 ml) 100
A-3
Fideos/pasta
A-4
Patatas cocidas
A-5
Calentar
A-6
Pollo asado
A-7
Pizza
200 g (en agua fría, 800 ml) 200
300 g (en agua fría, 1200 ml) 300
230 g 1
460 g 2
690 g 3
200 g 200
300 g 300
400 g 400
500 g 500
600 g 600
700 g 700
800 g 800
800 g 800
1000 g 1000
1200 g 1200
1400 g 1400
150 g 150
300 g 300
450 g 450
A-8
Pastel
d-1
Descongelación por tiempo
d-2
Descongelación por peso
76
aprox. 475 g
Tiempo seleccionable
Peso seleccionable
475
0:00
100
:
:
1800
Page 77

Instrucciones generales
A-1 Bebidas:
Calentar bebidas y agua para preparar té o café instantáneo.
A-2 Palomitas de maíz:
Palomitas de maíz para microondas (disponibles en bolsas especiales). Consulte siempre las instrucciones del fabricante
que aparecen en el envase.
A-3 Fideos/pasta:
Introduzca la pasta en un recipiente adecuado, y añada agua fría hasta cubrirla; coloque el recipiente en la parte central del
interior del horno.
A-4 Patatas cocidas:
Coloque las patatas crudas y sin pelar en un plato adecuado, e introdúzcalas en la parte central del interior del horno.
A-5 Calentar:
Calentar alimentos sólidos en recipientes adecuados para microondas.
Consejo: Distribuya los alimentos en modo circular para asegurar la distribución óptima del calor.
A-6 Pollo asado:
Coloque en el centro del horno un pollo entero en un plato adecuado para microondas.
Las señales sonoras indican que han transcurrido 1/2 del tiempo de cocción seleccionado, momento en que se interrumpirá
el proceso de cocción. Dé la vuelta al pollo y pulse el mando giratorio para reiniciar el proceso de cocción.
A-7 Pizza:
Cocer pizza en la rejilla o la bandeja. Cuando use pizza ultracongelada, precaliente primero el horno según las instrucciones
del fabricante, que aparecen en el envase de la pizza, y a continuación seleccione el programa automático adecuado.
Las señales sonoras indican que han transcurrido 1/2 del tiempo de cocción seleccionado. Abra la puerta, gire la pizza 180°
y pulse el mando giratorio para reiniciar el proceso de cocción.
A-8 Pastel:
Este programa es adecuado para preparar pasteles y bizcochos sencillos (alrededor 475 g). Consulte la receta
correspondiente donde se indica el tiempo de precalentamiento necesario. Si fuera necesario, precaliente el aparato (ver
‘Función de aire caliente/Precalentamiento’). Coloque la masa en una bandeja termorresistente adecuada y colóquela en
la rejilla o la base cerámica.
Las señales sonoras indican que han transcurrido 1/2 del tiempo de cocción seleccionado. Abra la puerta, gire la bandeja
180° y pulse el mando giratorio para continuar el reiniciar de cocción.
d-1 Descongelación por tiempo:
Consulte la sección ‘Descongelación por tiempo’ incluida a continuación.
d-2 Descongelación por peso:
Consulte la sección ‘Descongelación por peso’ incluida a continuación.
d-1 Descongelación por tiempo y d-2 Descongelación por peso
Los programas de descongelación permiten descongelar en función del tiempo o del peso.
Gire el control giratorio en sentido contrario a las agujas del reloj, hasta que la pantalla indique d-1 o d-2.
∙ Pulse el control giratorio para conrmar el programa seleccionado.
∙ Gire el control giratorio, hasta que la pantalla indique el tiempo de descongelación deseado (para d-1) o el peso
relevante (para d-2).
∙ Pulse el control giratorio para iniciar la descongelación.
Notas útiles:
∙ Las señales sonoras indican que ha transcurrido 2/3 del tiempo de descongelación programado. Gire los alimentos, y
extraiga lo que ya esté descongelado.
∙ Pulse el mando giratorio para que el programa continúe.
∙ Si los alimentos no están completamente descongelados después de haber transcurrido el tiempo de descongelación
seleccionado, se aconseja que la descongelación posterior se limite a periodos de 1 minuto hasta conseguir descongelar
los alimentos por completo.
∙ Los alimentos conservados en recipientes de plástico que no son adecuados para su uso en el horno microondas
deberán dejarse reposar durante un rato después de sacarlos del congelador. Espere hasta que los alimentos se puedan
separar fácilmente del plástico, antes de introducirlos en el horno dentro de un recipiente apropiado para su uso en
hornos microondas.
77
Page 78

Iluminación interior
La luz interior se encenderá al abrir la puerta; permanecerá encendida durante el funcionamiento del horno. Cuando naliza
un programa, la luz se apagará.
Limpieza
∙ El microondas se debe limpiar con regularidad, eliminando cualquier resto de comida inmediatamente después de su
uso.
∙ Antes de limpiar el aparato, asegúrese de que esté desconectado de la red eléctrica y que se haya enfriado por
completo.
∙ No limpie la unidad con agua. Asegúrese de que el agua - ni la más mínima cantidad – no entre en las ranuras de
ventilación del interior o el exterior de la unidad. No emplee aparatos de limpieza con vapor para limpiar el aparato.
∙ El aparato entero se puede limpiar con un paño limpio ligeramente humedecido y un detergente ligero. Después séquelo
meticulosamente.
∙ No emplee productos de limpieza abrasivos o muy fuertes. Los pulverizadores especiales para limpiar hornos normales
que se pueden conseguir en las tiendas no se deben de usar.
∙ Las supercies internas se deben de limpiar a fondo después de cada ciclo de funcionamiento. El interior de la puerta, el
marco de la puerta y la base cerámica se deben mantener siempre limpias.
∙ La rejilla del grill y la bandeja de hornear se pueden limpiar en agua templada con detergente. Cuidado: No lave ninguna
pieza en el lavavajillas.
Información adicional
Especicacionestécnicas
Tamaño exterior : 490 mm (A) x 491 mm (P) x 287 mm (A)
Tamaño interior : 340 mm (A) x 338 mm (P) x 197 mm (A)
∙ espacio encima de la base cerámica : 190 mm
∙ bandeja de hornear : Ø 265 mm
Peso de unidad : 17.4 kg
Voltaje de funcionamiento : 230 V~ 50 Hz
Consumo total de energía : 2050 W
∙ grill : 1200 W
∙ microondas : 1400 W
∙ función de aire caliente : 2050 W
Potencia de salida de microondas : 90 W - 900 W
Eliminación
Los dispositivos en los que gura este símbolo deben ser eliminados por separado de la basura doméstica,
porque contienen componentes valiosos que pueden ser reciclados. La eliminación correcta ayuda a proteger el
medio ambiente y la salud de las personas. Consulte a las autoridades municipales o el establecimiento de venta
donde podrán facilitarle la información relevante. Los aparatos eléctricos que ya no son utilizables se pueden
entregar gratuitamente en el establecimiento de venta.
Garantía
Este producto está garantizado por un período de dos años, contado a partir de la fecha de compra, contra cualquier defecto
en materiales o mano de obra. Esta garantía sólo es válida si el aparato ha sido utilizado siguiendo las instrucciones de uso,
siempre que no haya sido modicado, reparado o manipulado por cualquier persona no autorizada o haya sido estropeado
como consecuencia de un uso inadecuado del mismo. Naturalmente esta garantía no cubre las averías debidas a uso o
desgaste normales, así como aquellas piezas de fácil rotura tales como cristales, piezas cerámicas, etc. Esta garantía no
afecta a los derechos legales del consumidor ante la falta de conformidad del producto con el contrato de compraventa.
78
Page 79

IT
Forno a microonde
Gentile Cliente,
Prima d’utilizzare il forno a microonde, leggete attentamente le seguenti istruzioni e conservate il presente libretto per poterlo
consultare anche in futuro. L’apparecchio deve essere utilizzato solo da persone che hanno preso familiarità con le seguenti
istruzioni.
Descrizione dell’apparecchio
1. Chiusura sportello
2. Oblò d’osservazione
3. Piano in vetroceramica
4. Quadro di comando
5. Resistenza
6. Griglia
7. Teglia
79
Page 80

Descrizione del pannello di controllo
Tasto Funzione
Tasto delle segnalazioni acustiche
e Dispositivo di sicurezza per i
bambini
Pietanza preferita e Orologio
Avvio rapido / Aumento dei tempi di
cottura di 30 secondi
Microonde
Grill
Aria ultra calda
Interruzione / Stop
Manopola di
controllo
Funzione
Premi Avvio
Ruota
80
Tempo / Programmi di cottura
automatica
Page 81

Display
Programmi automatici
Selezione del primo programma
Selezione del secondo programma
Scongelamento in base al peso
Dispositivo di sicurezza per i bambini
Sul display è indicata l’ora corrente del giorno o, durante il
funzionamento, il tempo programmato in corso e le funzioni
selezionate.
Temperatura
Regolazione dell’orologio
Peso
Funzione ad aria ultra calda
Funzione grill
Funzione microonde
Programmi automatici
Scongelamento in base al tempo
81
Page 82

Norme di sicurezza
Importanti norme di sicurezza
Vi preghiamo di leggere le seguenti istruzioni con attenzione e di conservare il
manuale per farvi riferimento anche in futuro
Collegamento alla rete
L’apparecchio deve essere collegato esclusivamente a una presa di corrente
con messa a terra, installata a norma di legge. Assicuratevi che la tensione di
alimentazione corrisponda alla tensione indicata sulla targhetta portadati. Questo
prodotto è conforme alle direttive vincolanti per l’etichettatura CE.
Sistemazione dell’apparecchio
∙ Installate sempre il forno a microonde sopra a una supercie stabile e piana,
termoresistente e al riparo da qualsiasi fonte di eccessivo calore o umidità.
∙ Non utilizzate l’apparecchio all’aperto.
∙ Non togliete i piedini posti sulla base dell’apparecchio.
∙ Assicurate sempre una sufciente aerazione. Non poggiate sull’apparecchio
nessun oggetto e rispettate le distanze minime qui di seguito indicate fra
l’apparecchio e il muro o altri oggetti:
Lati: 7,5 cm
Dietro: 7,5 cm
Alto: 30,0 cm
∙ L’apparecchio non deve essere incassato all’interno di mobiletti chiusi. Quando
sistemate l’apparecchio, evitate di installarlo direttamente sotto uno stipo pensile o
qualsiasi altro oggetto simile.
Note importanti
∙ Avvertenza: Alcuni alimenti possono prendere fuoco. Non lasciate mai,
in nessuna circostanza, l’apparecchio incustodito durante l’uso delle
microonde, del grill, della cottura ad aria calda o delle funzioni combinate.
∙ Questo forno a microonde è stato progettato esclusivamente per lo scongelamento,
il riscaldamento e la cottura degli alimenti. Avvertenza: ogni tentativo di riscaldare
cibi secchi o capi di abbigliamento, cuscinetti scaldini, pantofole, spugne,
stronacci bagnati ecc. può essere causa di ferite, fuoco o incendio.
∙ Nessuna responsabilità verrà assunta in caso di danni risultanti da un uso erroneo
o dalla non conformità alle istruzioni.
∙ Utilizzate solo utensili da cucina adatti per l’uso con un forno a microonde. Non
usate nessun contenitore metallico per riscaldare alimenti o bevande quando
82
Page 83

utilizzate la funzione a microonde. Per maggiori informazioni, consultate la sezione
“Utilizzate sempre utensili da cucina idonei”.
∙ L’apparecchio non è previsto per l’utilizzo con un timer esterno o con un sistema
separato di comando a distanza.
∙ Il presente apparecchio può essere usato da bambini (di almeno 8 anni di età) e
da persone con ridotte capacità siche, sensoriali o mentali, o da persone senza
particolari esperienze o conoscenze, purché siano sotto sorveglianza o siano state
date loro istruzioni sull’uso dell’apparecchio e comprendano pienamente i rischi e
le precauzioni di sicurezza che l’apparecchio comporta.
∙ Ai bambini non deve essere consentito di giocare con l’apparecchio.
∙ Ai bambini non deve essere consentito di effettuare operazioni di pulizia o di
manutenzione sull’apparecchio a meno che non siano supervisionati da un adulto e
siano comunque più grandi di 8 anni di età.
∙ L’apparecchio e il cavo di alimentazione devono essere tenuti sempre fuori della
portata di bambini di età inferiore agli 8 anni.
∙ Per evitare ogni rischio di scossa elettrica, non pulite l’apparecchio con acqua e
non immergetelo in acqua.
∙ Avvertenza: A causa delle alte temperature raggiunte durante l’utilizzo delle
funzioni grill e/o le funzioni ad aria calda, i bambini non dovrebbero utilizzare
l’apparecchio senza l’adeguata sorveglianza di un adulto.
∙ Nell’utilizzare le funzioni combinate o il grill e/o le funzioni ad aria calda, prestate
estrema attenzione a non toccare la resistenza interna.
∙ È decisamente sconsigliato l’uso di apparecchi di pulizia a vapore per pulire questo
forno.
∙ Spegnete sempre l’apparecchio e disinserite la spina dalla presa di corrente:
∙ prima di ogni operazione di pulizia,
∙ in caso di cattivo funzionamento.
∙ dopo ogni uso.
∙ Per disinserire la spina dalla presa di corrente, non tirate mai il cavo di
alimentazione ma afferrate direttamente la spina.
∙
Attenzione: Le superci esterne dell’apparecchio potrebbero riscaldarsi
durante l’uso. Esiste anche il rischio di emissione di vapore attraverso le
fenditure di aerazione: Pericolo di scottature.
∙ Aspettate che l’apparecchio si sia raffreddato sufcientemente prima di
trasportarlo.
∙ Evitate che l’apparecchio o il cavo d’alimentazione si trovino a contatto con fonti
di calore. Non lasciate pendere liberamente il cavo di alimentazione e tenetelo
lontano dagli elementi soggetti a riscaldarsi.
83
Page 84

∙ La mancanza di una corretta pulizia dell’apparecchio potrebbe danneggiare la
qualità delle superci e comportare l’eventuale diminuzione del ciclo di vita oltre
che potenziali rischi per la sicurezza di chi lo utilizza. È bene quindi eliminare
immediatamente ogni residuo di cibo. Pulite le guarnizioni dello sportello, il vano di
cottura, il piano di vetroceramica e tutte le parti adiacenti con un panno umido dopo
ogni uso. La griglia e la teglia possono essere lavate con acqua calda e detersivo
per i piatti. Per informazioni più dettagliate su come pulire l’apparecchio, consultate
la sezione Pulizia.
∙ Questo apparecchio è studiato per il solo uso domestico o per impieghi simili,
come per esempio
- cucine per il personale, negozi, ufci e altri ambienti simili di lavoro,
- aziende agricole,
- clienti di alberghi, motel e stabilimenti simili,
- clienti di pensioni “bed-and-breakfast” (letto & colazione).
∙ Attenzione: Ogni manutenzione o assistenza che esiga la rimozione del
coperchietto di protezione contro i raggi a microonde costituisce un rischio
grave per le persone non qualicate. Ciò comprende la sostituzione del cavo di
alimentazione speciale o di qualsiasi lampadina interna. L’apparecchio non deve
essere aperto, tranne che da un tecnico qualicato. Se si rendono necessarie
operazioni di riparazione, vi raccomandiamo di mettervi in contatto con il nostro
servizio di assistenza clienti per telefono o per email (v. appendice).
∙ Quando mettete a riscaldare nel forno a microonde delle sostanze liquide, potrebbe
succedere che il liquido si riscaldi oltre il punto di ebollizione, senza che sia visibile
nessun ribollimento. È importante perciò prestare molta attenzione quando toccate
i contenitori, ad esempio per toglierli dal forno.
Per ridurre i rischi di trabocco, durante il processo di riscaldamento sarebbe
opportuno introdurre nel contenitore un’asta in vetro termoresistente.
∙ Non mettete a riscaldare con il forno a microonde uova nei gusci o uova sode
intere: rischierebbero di scoppiare, e il rischio persiste anche dopo che il processo
di riscaldamento a microonde si è concluso.
∙ Attenzione: È altrettanto pericoloso riscaldare con il forno a microonde liquidi o
altri cibi solidi sistemati in contenitori chiusi perché potrebbero esplodere.
∙ Dopo aver riscaldato biberon o pappe per bambini in barattoli di vetro, agitate e
mescolatene bene il contenuto per assicurare una distribuzione uniforme della
temperatura. Attenzione: Prima di presentare il cibo al bambino, controllatene
sempre la temperatura in modo da evitare dolorose e pericolose scottature.
84
Page 85

∙ Quando riscaldate o cuocete cibo contenuto o avvolto in materiali combustibili quali
la plastica o la carta, l’involucro rischia di inammarsi. Potrebbe succedere anche
che il cibo si secchi o addirittura si inammi se il tempo di cottura è eccessivo.
Anche il grasso o l’olio sono sostanze inammabili. È quindi importante sorvegliare
l’apparecchio durante il funzionamento. I liquidi molto inammabili come l’alcool ad
alta concentrazione, ovviamente non devono mai essere riscaldati.
∙ In caso di emissione di fumo durante il funzionamento, tenete lo sportello
chiuso per impedire o soffocare eventuali amme. Spegnete immediatamente
l’apparecchio e disinserite la spina dalla presa di corrente.
∙ Per evitare rischi di scottature, utilizzate sempre una presina adatta quando togliete
il cibo dal forno: gli utensili e i contenitori da cottura si riscaldano sia durante le
funzioni grill e di aria calda, sia durante il funzionamento a microonde.
∙ I termometri da forno speciali (come quelli utilizzati nei forni tradizionali) non sono
adatti per i forni a microonde.
Prima di adoperare l’apparecchio per la prima volta
∙ Dopo la sballatura e prima di collegare alla rete di alimentazione, controllate
accuratamente che l’apparecchio e il cavo di alimentazione non presentino
nessuna traccia di deterioramento.
∙ Avvertenza: Assicuratevi inoltre che lo sportello (oblò d’osservazione, guarnizioni
dello sportello e chiusure dello sportello compresi) non sia danneggiato o piegato
e che si chiuda saldamente contro il suo supporto. Ciò è importante per impedire
l’emissione di energia microonde durante il funzionamento. Per lo stesso motivo
occorrerà esaminare accuratamente la parte esterna dell’apparecchio e l’interno
del forno.
In caso di danneggiamento, l’apparecchio non deve essere utilizzato nché non
sarà stato controllato da un tecnico specializzato.
∙ Eliminate tutto il materiale di imballaggio interno ed esterno e tutti gli adesivi presenti. I materiali utilizzati per l’imballaggio
sono tutti riciclabili.
∙ Avvertenza: Non rimuovete i gommini della griglia.
∙ Non rimuovete la pellicola di schermatura posta sulla parte interna dello sportello.
∙ Avvertenza: Tutto il materiale di imballaggio deve essere tenuto fuori della portata dei bambini a causa del rischio
potenziale esistente, per esempio di soffocamento.
∙ Dovendo usare l’apparecchio per la prima volta, o dopo un lungo periodo di inattività, pulitelo accuratamente nel modo
indicato nella sezione Pulizia.
∙ Dovendo usare il forno a microonde per la prima volta, lasciate riscaldare l’apparecchio regolato solo sulla funzione
grill (senza attivare la funzione microonde) per circa 10 minuti. In questo modo si potrà eliminare il caratteristico odore
emesso da un qualsiasi grill al primo utilizzo. Potrebbe fuoriuscire un leggero fumo; questo fenomeno è normale ma
occorrerà assicurare una sufciente aerazione.
∙ Avvertenza: Non accendete l’apparecchio senza aver inserito nel forno il cibo da riscaldare o da cuocere. L’uso a
vuoto dell’apparecchio rischia di danneggiarlo.
85
Page 86

Dispositivo ISM
Questo apparecchio è un dispositivo del gruppo 2 classe B ISM. Al gruppo 2 appartengono tutti i dispositivi ISM (industriali,
scientici, medici) che generano energia a radio-frequenza e/o utilizzano energia a radio-frequenza sotto forma di radiazioni
elettromagnetiche per la lavorazione dei materiali; vi appartengono inoltre anche i dispositivi a elettroerosione. La classe B
designa i dispositivi a uso domestico, o qualsiasi altro dispositivo simile integrato nella rete di potenza generale di fornitura
degli apparecchi domestici.
La funzione microonde (Gruppo II in accordo alla norma EN 55011)
Un’energia elettromagnetica verrà prodotta all’interno dell’apparecchio, generando l’oscillazione delle molecole alimentari
(molecole d’acqua in particolare), oscillazione che, a sua volta, determinerà il riscaldamento del cibo. I cibi ad alto tenore
d’acqua si riscalderanno perciò più velocemente dei cibi secchi. Il calore verrà gradualmente prodotto all’interno del cibo. Gli
utensili, contenitori o piatti utilizzati saranno indirettamente riscaldati e solamente in funzione della temperatura del cibo.
Utilizzate sempre utensili da cucina idonei
∙ Non poggiate gli alimenti direttamente sul piano in vetroceramica; utilizzate sempre un piatto o un contenitore da cottura
adatto.
∙ L’uso di oggetti di metallo deve essere evitato perché le superci metalliche riettono le microonde, impedendo che esse
giungano sino al cibo da cuocere. La presenza di metallo dentro il forno potrebbe causare alcune scintille suscettibili di
danneggiare l’apparecchio.
∙ In linea generale, non si devono usare nel forno a microonde posate o contenitori in metallo. Alcuni involucri alimentari
comprendono fogli d’alluminio o li metallici sotto lo strato di carta e non sono consigliabili per l’uso con gli apparecchi a
microonde.
Nel caso in cui una ricetta preveda l’utilizzo del foglio di alluminio, badate ad avvolgere accuratamente il cibo nel foglio di
alluminio (evitando la formazione di bollicine d’aria). Calcolate uno spazio di minimo 2,5 cm fra il foglio di alluminio e le
pareti interne del forno.
∙ Assicuratevi sempre che il contenitore o il piatto di cottura utilizzato non abbia nessuna decorazione metallica tipo
un bordo dorato o colorato contenente delle particelle di metallo. Gli oggetti in cristallo di piombo sono sconsigliati.
Assicuratevi sempre che i contenitori utilizzati per la cottura non presentino nessun elemento vuoto (impugnature, ad
esempio). Le sostanze porose rischiano di assorbire acqua durante la pulizia e sono quindi sconsigliate. I contenitori o
utensili da cottura in “melamina” assorbono energia e sono anch’essi sconsigliati.
Uso della funzione microonde
∙ I contenitori in vetro o in porcellana termoresistente si prestano perfettamente all’uso dentro gli apparecchi a microonde.
∙ La plastica è adatta solo se del tipo resistente al calore.
∙ Presso i principali negozi di articoli da cucina sono disponibili contenitori da cottura specialmente designati per l’uso con i
forni a microonde.
∙ I sacchetti di cottura ecc. devono essere perforati in modo da liberare l’alta pressione durante la cottura.
Uso della funzione grill o della funzione a aria calda
∙ Con queste funzioni, è possibile utilizzare contenitori o piatti termoresistenti adatti per i forni convenzionali, ma che non
abbiano nessun elemento in plastica.
∙ Gli alimenti da cucinare possono essere poggiati direttamente sulla griglia o nella teglia. Fate scivolare la griglia in sede e
poggiate la teglia sul piano in vetroceramica.
Uso della combinazione di funzioni microonde/grill o microonde/aria calda
∙ Quando utilizzate le combinazioni di funzioni, si attivano alternativamente le funzioni microonde e grill o aria calda. Per
questo motivo i contenitori o i piatti utilizzati devono prestarsi all’uso dentro un apparecchio a microonde ma devono
essere anche termoresistenti. A causa delle temperature relativamente alte non si devono usare prodotti di plastica.
Assicuratevi che il contenitore o il piatto utilizzato non contenga nessun elemento metallico.
86
Page 87

Funzionamento
Regolazione iniziale dell’orologio
∙ Dopo che l’apparecchio è stato collegato alla rete di alimentazione elettrica, sul display compaiono le cifre “1:00”, le cifre
corrispondenti alle ore lampeggiano e viene emesso un segnale acustico.
∙ Ruotate la manopola per regolare l’ora esatta.
∙ Premete brevemente il tasto . Le cifre dei minuti cominciano a lampeggiare.
∙ Ruotate la manopola per regolare i minuti esatti.
∙ Premete brevemente il tasto per completare la regolazione dell’orario. Il simbolo “:” lampeggia sul display e
compare l’ora corrente.
∙ È possibile cancellare o saltare la procedura di regolazione dell’orario premendo il tasto .
∙ Dopo un’interruzione di corrente bisognerà regolare di nuovo l’orologio.
Modicadeltipodiorario
∙ Per modicare il tipo di visualizzazione dell’orario, premete il tasto per 3 secondi. Sul display compaiono le cifre
Hr 24 o Hr 12.
∙ Premete brevemente il tasto per cambiare la visualizzazione dell’orario scegliendo tra il tipo a 24 ore o quello a
12 ore.
∙ Le cifre corrispondenti alle ore lampeggiano; ruotate la manopola per regolare l’ora esatta.
∙ Premete brevemente il tasto . Le cifre dei minuti cominciano a lampeggiare.
∙ Ruotate la manopola per regolare i minuti esatti.
∙ Premete brevemente il tasto per completare la regolazione dell’orario. Il simbolo “:” lampeggia sul display e
compare l’ora corrente.
Tasto delle segnalazioni acustiche & Dispositivo di sicurezza per i bambini
Segnalazioni acustiche
∙ Quando premete un tasto di comando o ruotate la manopola di controllo, la corretta immissione del comando è
confermata da un segnale acustico.
∙ Per non avere segnali acustici di conferma, premete brevemente il tasto .
L’eliminazione della segnalazione acustica in questo modo è possibile solo per il tasto di comando o la manopola di
controllo; i segnali acustici che indicano le successioni dei programmi rimangono attivi.
∙ Per riattivare la segnalazione acustica, premete brevemente di nuovo il tasto .
Dispositivo di sicurezza per i bambini
∙ Questo dispositivo di sicurezza impedisce che i bambini possano mettere in funzione l’elettrodomestico senza
sorveglianza.
∙ Per attivare il dispositivo di sicurezza, premete per 3 secondi. Sul display comparirà il simbolo .
∙ Per disattivare il dispositivo di sicurezza, premete per altri 3 secondi. Il simbolo scomparirà.
∙ N.B.: In caso di eventuali problemi nell’accensione dell’elettrodomestico, vericate prima che il dispositivo di sicurezza
non sia attivato.
87
Page 88

Messa in funzione: istruzioni generali
∙ Ponete il cibo da riscaldare in un contenitore idoneo. Sistemate il contenitore all’interno del forno sul piano in
vetroceramica.
∙ Per non far asciugare troppo i cibi da preparare con la funzione microonde, utilizzate dei coperchi. Coperchi in vetro o in
plastica, specici per l’uso con gli apparecchi a microonde, sono disponibili presso quasi tutti i negozi di articoli da cucina.
∙ Quanto utilizzate le funzioni del grill, dell’aria calda o una qualunque combinazione di funzioni, non coprite gli alimenti da
cucinare.
∙ Chiudete lo sportello e impostate il programma di cottura desiderato.
∙ Nota:
I passi che seguono servono per impostare il tempo di cottura:
0 – 5 minuti : passi da 10 secondi
5 – 10 minuti : passi da 30 secondi
10 – 30 minuti : passi da 1 minuto
30 – 95 minuti : passi da 5 minuti
∙ Premete sulla manopola di controllo per avviare un programma.
∙ All’avvio del programma, l’illuminazione interna si accende.
∙ Se, durante il funzionamento, aprite lo sportello o premete il tasto (per esempio per mescolare o girare gli alimenti
per assicurare un’uniforme distribuzione del calore), le funzioni di programmazione e il timer verranno interrotti. Se
necessario, a questo punto potete modicare il tempo di cottura. Il programma ricomincerà automaticamente solo dopo
che avrete chiuso lo sportello e premuto la manopola di controllo.
∙ Premete il tasto due volte per interrompere il programma.
∙ Diversi segnali sonori indicano che il tempo pre-programmato è terminato: immediatamente si spegne la luce interna e sul
display compare la scritta “End” (Completato).
∙ Aprite lo sportello e togliete il contenitore con il cibo.
∙ Per ottenere una distribuzione del calore uniforme all’interno del cibo, occorrerà lasciare riposare il contenitore per
parecchi minuti.
∙ Se non aprite lo sportello subito dopo il completamento del tempo di funzionamento programmato, sentirete diversi
segnali acustici ripetuti ogni 2 minuti.
Funzione di raffreddamento
Questo forno a microonde presenta anche la funzione di raffreddamento automatico.
Dopo ogni periodo di funzionamento maggiore di 2-3 minuti, si attiva la ventola automatica per il raffreddamento che
continuerà per alcuni minuti successivi all’interruzione del programma.
Griglia & teglia
∙ La griglia e la teglia sono adatte per l’uso con la funzione microonde, grill o cottura ad aria calda.
∙ Avvertenza: Non rimuovete i gommini della griglia.
∙ Inserite la griglia all’altezza desiderata e poggiate la teglia sulla griglia o sul piano in vetroceramica.
∙ Gli alimenti da cucinare possono essere poggiati direttamente sulla griglia o sulla teglia.
Cottura/riscaldamento con le microonde
Nella cottura/riscaldamento con le microonde, il calore colpisce direttamente l’interno degli alimenti.
Suggerimento: Se preparate due pietanze, sulla griglia e sul piano in vetroceramica, queste non devono essere
sovrapposte esattamente una sull’altra, ma messe in posizioni alternate. Invertite la posizione delle pietanze a metà del
tempo di preparazione previsto.
∙ Premete ripetutamente il tasto sino a evidenziare l’impostazione di potenza richiesta (ved. la tabella più sotto).
∙ Poi, ruotando la manopola di controllo impostate il tempo di cottura desiderato. Il tempo di cottura può essere pre-
impostato sino ad un massimo di 95 minuti.
∙ Premete sulla manopola di controllo per avviare il processo di cottura.
∙ Per garantire che il calore sia distribuito in maniera omogenea, gli alimenti da cucinare o da riscaldare devono essere
mescolati di tanto in tanto.
∙ Se durante il processo di cottura, premete il pulsante sul display verranno visualizzate le impostazioni di potenza
selezionate.
88
Page 89

Potenza
(W)
Potenza
(%)
Display Tipo Utilizzo
Girate1 x 900 W 100 P100 Alto Riscaldamento di liquidi, cottura
2 x 810 W 90 P-90
3 x 720 W 80 P-80
4 x 630 W 70 P-70 Medio-alto Scongelamento e riscaldamento dei cibi congelati
5 x 540 W 60 P-60
6 x 450 W 50 P-50 Medio Cottura di alimenti delicati
7 x 360 W 40 P-40
8 x 270 W 30 P-30 Basso Cottura di alimenti delicati
9 x 180 W 20 P-20
10 x 90 W 10 P-10 Molto basso Scongelamento di alimenti
∙ Premendo il tasto si attiva direttamente il processo di cottura. Ogni pressione sul tasto aggiunge 30 secondi
Programmazione rapida / Cottura a microonde
al tempo di cottura.
∙ La potenza impostata del microonde è sempre del 100 %.
∙ Il tempo massimo preprogrammabile è di 95 minuti.
∙ Se si preme il tasto nel corso del programma microonde, a ogni pressione si aggiungono 30 secondi di tempo ai tempi di
cottura complessivi.
Manopola di controllo - Programmazione rapida / Cottura a microonde
∙ I tempi di cottura necessari si impostano ruotando la manopola di controllo in senso orario.
∙ Premendo sulla manopola di controllo si avvia direttamente il processo di cottura.
∙ La potenza impostata del microonde è sempre del 100 %.
∙ Il tempo massimo preprogrammabile è di 95 minuti.
Funzione grill
Il processo di grigliatura utilizza il sistema di irradiamento del calore per la preparazione degli alimenti. Questo programma è
adatto per la doratura ‘au gratin’ o per grigliare sottili fette di carne.
∙ Premete il tasto .
∙ Poi agite sulla manopola di controllo per impostare il tempo di cottura desiderato. Il tempo massimo preprogrammabile è
di 95 minuti.
∙ Avviate il processo di cottura premendo sulla manopola di controllo.
∙ Questo processo di cottura necessita della vostra continua sorveglianza, dato che la carne ha bisogno di essere girata a
metà cottura e tirata fuori dal forno a cottura ultimata.
89
Page 90

Programmi combinati grill/ microonde
Questi programmi servono per la cottura di pollami, di pesci o per gratinare.
∙ Premete ripetutamente il tasto :
Premete due volte: Co-1 → 30 % potenza microonde, 70 % potenza grill
Premete tre volte: Co-2 → 55 % potenza microonde, 45 % potenza grill
∙ Poi, agendo sulla manopola di controllo, selezionate il tempo di cottura desiderato. Il tempo massimo preprogrammabile è
di 95 minuti.
∙ Avviate il processo di cottura premendo sulla manopola di controllo.
∙ Questo processo di cottura necessita della vostra continua sorveglianza, dato che gli alimenti hanno bisogno di essere
girati a metà cottura e tirati fuori dal forno a cottura ultimata.
Funzione ad aria ultra calda
Con questa funzione, all’interno del forno circola aria calda, ottenendo sia la cottura sia la doratura degli alimenti. La cottura
ad aria calda è ideale per la preparazione della pizza e altre pietanze simili.
Suggerimento: Quando preparate due pietanze, sulla griglia e sul piano in vetroceramica, la pietanza del livello inferiore
deve essere sistemata nella teglia e non direttamente sul piano in vetroceramica. Invertite la posizione delle pietanze a
metà del tempo di preparazione previsto.
∙ Premete ripetutamente il tasto per selezionare una temperatura di cottura compresa tra i 230° e i 110 °C.
∙ Poi, agendo sulla manopola di controllo selezionate il tempo di cottura desiderato. Il tempo massimo preprogrammabile è
di 95 minuti.
∙ Avviate il processo di cottura premendo sulla manopola di controllo.
∙ Questo processo di cottura necessita della vostra continua sorveglianza, dato che gli alimenti hanno bisogno di essere
girati a metà cottura e tirati fuori dal forno a cottura ultimata.
∙ Ruotate di 180° gli alimenti a metà del tempo di cottura.
∙ Se, durante il processo di cottura, è premuto il tasto sul display si evidenzia la temperatura selezionata.
Pre-riscaldamento
Se necessario, l’apparecchio può essere pre-riscaldato.
∙ Premete ripetutamente il tasto per selezionare una temperatura di cottura compresa tra i 230° e i 110 °C.
∙ Avviate immediatamente il processo di riscaldamento premendo sulla manopola di controllo. Sul display è indicata la cifra
30.00 e il processo di pre-riscaldamento comincia.
∙ Dei segnali acustici indicano che è stata raggiunta la temperatura selezionata. Aprite lo sportello e inserite gli alimenti.
∙ Premete il tasto per avviare il processo secondo quanto descritto nella sezione “Funzione ad aria calda”.
Programmi combinati microonde / funzione ad aria ultra calda
∙ La combinazione di programmi è adatta per cucinare in casseruola o per altre ricette simili.
∙ Premete il tasto per circa 3 secondi.
∙ Premete ripetutamente il tasto per selezionare la temperatura di 230, 200, 170 o 140 °C. Non è possibile selezionare
temperature diverse.
∙ Poi, agendo sulla manopola di controllo selezionate il tempo di cottura desiderato. Il tempo massimo preprogrammabile è
di 95 minuti.
∙ Avviate il processo di cottura premendo sulla manopola di controllo.
∙ Questo processo di cottura necessita della vostra continua sorveglianza, dato che gli alimenti hanno bisogno di essere
girati a metà cottura e tirati fuori dal forno a cottura ultimata.
∙ Ruotate di 180° gli alimenti a metà del tempo di cottura.
∙ Se, durante il processo di cottura, è premuto il tasto sul display si evidenzia la temperatura selezionata.
Impostazione di programmi multipli
Il forno a microonde può essere impostato in modo che esegua 2 programmi separati consecutivamente senza necessità
di riavviare l’apparecchio tra il primo e il secondo; per esempio: prima la cottura regolare con la funzione a microonde,
seguita dalla cottura “au gratin” con la funzione grill. Questa possibilità di programmazione multipla può essere utilizzata
con qualsiasi funzione di microonde, di aria calda, di grigliatura e di funzioni combinate. I programmi di cottura automatici e i
programmi rapidi non sono adatti per la programmazione multipla.
90
Page 91

∙ Premete ripetutamente il tasto del programma necessario sino a evidenziare le impostazioni di potenza/temperatura
desiderate.
∙ Con la manopola di controllo, impostate il tempo di cottura desiderato.
∙ Ora premete ripetutamente il tasto per il programma successivo sino a evidenziare le impostazioni di potenza/temperatura
desiderate.
∙ Con la manopola di controllo, impostate il tempo di cottura desiderato.
∙ Sempre agendo sulla manopola di controllo, avviate il processo di cottura.
∙ L’apparecchio comincia con il primo programma. Sul display si legge S1. Appena comincia il programma successivo, sul
display si legge S2.
Consiglio utile:
Questa funzione è particolarmente utile quando utilizzate il forno a microonde per cucinare alimenti a diverse impostazioni
di potenza. Anche se inizialmente avete selezionato un’impostazione alta, la potenza può essere ridotta in un secondo
momento per tenere gli alimenti in caldo e per garantire che il calore sia distribuito in modo omogeneo quando l’alimento
è ormai cotto.
Memorizzare la pietanza preferita
I programmi descritti più sopra così come la combinazione di programmi possono essere memorizzati come “Pietanza
preferita” per utilizzarla rapidamente anche altre volte. Possono essere pre-memorizzate sino a tre diverse pietanze. Se uno
spazio di memoria non è ancora occupato, lampeggia il numero che gli corrisponde. Ma con questa funzione non possono
essere selezionati i programmi automatici di cottura o i programmi rapidi.
∙ Premete brevemente il tasto una, due o tre volte. Il numero 1, 2 o 3 comincia a lampeggiare sul display.
∙ Premete ripetutamente il tasto del programma necessario sino a evidenziare le impostazioni di potenza/temperatura
desiderate.
∙ Con la manopola di controllo, impostate il tempo di cottura desiderato.
∙ Ora premete ripetutamente il tasto per il programma successivo sino a evidenziare le impostazioni di potenza/temperatura
desiderate.
∙ Con la manopola di controllo, impostate il tempo di cottura desiderato.
∙ Premete di nuovo brevemente il tasto per memorizzare la pietanza preferita.
∙ Il programma memorizzato può essere avviato premendo brevemente prima il tasto e poi premendo sulla manopola di
controllo.
∙ Se l’apparecchio è stato scollegato dall’alimentazione elettrica, bisognerà memorizzare di nuovo i programmi.
∙ Se uno spazio di memoria è già stato utilizzato, il numero corrispondente non lampeggerà. Comunque, lo spazio può
anche essere sovrascritto seguendo le stesse istruzioni descritte più sopra.
Cottura automatica e programmi per scongelare
Questi programmi automatici risultano utili per preparare o riscaldare alimenti senza dover immettere impostazioni
particolari, come per esempio la potenza o il tempo di cottura.
∙ Ruotate la manopola di controllo in senso anti-orario sino a mostrare sul display il programma desiderato riportato nella
lista della tabella qui sotto. Premete sulla manopola di controllo.
∙ Agendo sulla manopola di controllo selezionate il peso giusto (ved. tabella).
∙ Premete la manopola di controllo per avviare il programma.
∙ Sul display sarà indicato il tempo in corso del programma selezionato.
Menu Peso Display
200 ml 1
A-1
Bevande
A-2
400 ml 2
600 ml 3
99 g 99
Popcorn
91
Page 92

100 g (in acqua fredda, 400 ml) 100
A-3
Fettuccine, pasta
A-4
Patate al forno
A-5
Riscaldamento
A-6
Pollo arrostito
A-7
Pizza
200 g (in acqua fredda, 800 ml) 200
300 g (in acqua fredda, 1200 ml) 300
230 g 1
460 g 2
690 g 3
200 g 200
300 g 300
400 g 400
500 g 500
600 g 600
700 g 700
800 g 800
800 g 800
1000 g 1000
1200 g 1200
1400 g 1400
150 g 150
300 g 300
450 g 450
A-8
Ciambella
d-1
Scongelamento in base al tempo
d-2
Scongelamento in base al peso
92
circa 475 g
Tempo selezionabile
Peso selezionabile
475
0:00
100
:
:
1800
Page 93

Istruzioni generali
A-1 Bevande:
Per riscaldare bevande o acqua calda per preparare tè o caffè solubile.
A-2 Popcorn:
Per preparare popcorn con la funzione a microonde (disponibili in sacchetti predisposti). Leggete sempre le istruzioni del
produttore riportate sul sacchetto.
A-3 Fettuccine, pasta:
Mettete la pasta in un contenitore adatto e ricopritela di acqua fredda; sistemate il contenitore al centro del forno.
A-4 Patate al forno:
Mettete le patate crude, non sbucciate, su un piatto adatto e inseritelo al centro del forno.
A-5 Riscaldamento:
Per riscaldare alimenti solidi in contenitori adatti per microonde.
Consiglio utile: Sistemate gli alimenti in forma circolare per garantire un’ottima distribuzione del calore.
A-6 Pollo arostito:
Mettete al centro del forno un pollo intero poggiato su un piatto adatto all’uso con il microonde.
Dei segnali acustici indicano che è trascorso 1/2 del tempo di cottura pre-programmato, a questo punto il processo di cottura
è interrotto. Girate il pollo e premete la manopola di controllo per continuare il processo di cottura.
A-7 Pizza:
Per la preparazione della pizza sulla griglia o nella teglia. Per pizza congelata: fate sempre pre-riscaldare l’apparecchio
seguendo le istruzioni del produttore riportate sulla confezione della pizza e poi scegliete il programma automatico più
adatto.
Dei segnali acustici indicano che è trascorso 1/2 del tempo di cottura pre-programmato. Aprite lo sportello, ruotate la pizza di
180° e premete la manopola di controllo per continuare il processo di cottura.
A-8 Ciambella:
Questo programma è indicato per preparare delle ciambelle semplici con ricette base (circa 475 g). Vi raccomandiamo di
fare riferimento alle istruzioni base della ricetta per i corretti tempi di pre-riscaldamento. Se necessario, fate pre-riscaldare
l’apparecchio (ved. “Funzione ad aria calda/Pre-riscaldamento”). Mettete l’impasto in una tortiera termoresistente e
sistemate la tortiera sulla griglia o sul piano in vetroceramica.
Dei segnali acustici indicano che è trascorso 1/2 del tempo di cottura pre-programmato. Aprite lo sportello, ruotate la teglia
da forno di 180° e premete la manopola di controllo per continuare il processo di cottura.
d-1 Scongelamento in base al tempo:
Vedete la sezione “Scongelamento in base al tempo” più sotto.
d-2 Scongelamento in base al peso:
Vedete la sezione “Scongelamento in base al peso” più sotto.
d-1 Scongelamento in base al tempo e d-2 Scongelamento in base al peso
I programmi di scongelamento consentono di scongelare alimenti in base al tempo o al peso.
Ruotate la manopola di controllo in senso anti-orario, sino a mostrare sul display le diciture d-1 o d-2.
∙ Premete sulla manopola di controllo per confermare la selezione del programma.
∙ Ruotate la manopola di controllo sino a mostrare sul display il tempo di scongelamento desiderato (per d-1) o il peso
rilevante (per d-2).
∙ Premete sulla manopola di controllo per avviare il processo di scongelamento.
Consigli utili:
∙ Dei segnali acustici indicano che sono trascorsi i 2/3 del programma di scongelamento. Girate gli alimenti e togliete le
parti che sono già scongelate.
∙ Premete la manopola di controllo per far continuare il programma.
∙ Se al termine del tempo pre-impostato il cibo non è ancora completamente scongelato, vi consigliamo di continuare con
intervalli di tempo non superiori a 1 minuto ciascuno sino allo scongelamento completo dell’alimento.
∙ Gli alimenti conservati in sacchetti di plastica per congelare non adatti all’impiego nei forni a microonde devono essere
lasciati per un po’ fuori dal congelatore. Solo quando si staccheranno facilmente dall’involucro in plastica, potrete metterli
in un contenitore specico per microonde e inserirli nel forno.
Illuminazione interna
L’illuminazione interna si accende quando viene aperto lo sportello; rimane accesa anche durante il funzionamento. Al
termine del processo, la luce si spegne.
93
Page 94

Pulizia
∙ Il forno a microonde deve essere pulito con regolarità, bisogna rimuovere ogni residuo di cibo subito dopo ogni uso.
∙ Prima di procedere alla pulizia dell’apparecchio, assicuratevi che l’apparecchio sia disinserito dalla presa di corrente e si
sia completamente raffreddato.
∙ Non pulite l’apparecchio con acqua. Impedite che dell’acqua (sia pur in minima quantità) penetri nelle fenditure di
aerazione collocate sulle pareti interne o esterne dell’apparecchio. È decisamente sconsigliato l’uso di apparecchi di
pulizia a vapore per pulire questo forno.
∙ L’intero apparecchio va pulito con un panno non lanuginoso leggermente umido e con un detersivo casalingo delicato. In
seguito asciugatelo accuratamente.
∙ Non usate soluzioni abrasive o detergenti concentrati. Non utilizzate prodotti spray per la pulizia dei forni convenzionali
disponibili sul mercato.
∙ Le pareti interne devono essere accuratamente pulite dopo ogni ciclo di funzionamento. L’interno dello sportello, il telaio
dello sportello e il piano in vetroceramica devono essere tenuti sempre puliti.
∙ La griglia e la teglia possono essere lavati con acqua calda e detersivo. Avvertenza: Non lavate nessun elemento in
lavastoviglie.
Informazioni aggiuntive
Scheda tecnica
Dimensioni esterne : 490 mm (L) x 491 mm (A) x 287 mm (P)
Dimensioni interne : 340 mm (L) x 338 mm (A) x 197 mm (P)
∙ spazio libero sul piano in vetroceramica : 190 mm
∙ Teglia : Ø 265 mm
Peso dell’apparecchio : 17,4 chili
Tensione d’esercizio : 230 V~ 50 Hz
Consumo totale d’energia : 2050 W
∙ graticola : 1200 W
∙ microonde : 1400 W
∙ funzione ad aria calda : 2050 W
Uscita microonde : 90 W - 900 W
Smaltimento
Gli apparecchi contrassegnati con questo simbolo devono essere smaltiti separatamente dai normali riuti
domestici perché contengono materiali di valore che possono essere riciclati. Lo smaltimento adeguato protegge
l’ambiente e la salute umana. Le autorità locali o il negoziante di riferimento possono fornire ulteriori informazioni
in materia.
Dichiarazione di garanzia
La garanzia sui nostri prodotti ha validità di 2 anni dalla data di vendita (certicata da scontrino scale) e comprende gli
eventuali difetti del materiale o di particolari di costruzione. I danni derivanti da un uso improprio, rotture da caduta o similari
non vengono riconosciuti. La presente garanzia non pregiudica i vostri diritti legali, né i diritti acquisiti in quanto consumatore
e riconosciuti dalla legislazione nazionale vigente che disciplina l‘acquisto di beni. La garanzia decade nel momento in cui gli
apparecchi vengono aperti o manomessi da Centri non da noi autorizzati.
94
Page 95

DK
Mikrobølgeovn
Kære kunde,
Læs venligst denne brugsanvisning omhyggeligt inden mikrobølgeovnen tages i brug og gem denne brugsanvisning til
senere reference. Ovnen bør kun benyttes af personer der er bekendt med denne vejledning.
Apparatets dele
1. Dørlukker
2. Ovnvindue
3. Keramisk bund
4. Kontrolpanel
5. Varmeelement
6. Grillrist
7. Bageplade
95
Page 96

Kontrolpanelets funktioner
Knap Funktion
Tastelyd og Børnesikring
Favorit retter & ur
Kvik-start / Øg tilberedningstiden
med 30 sekunder
Mikrobølger
Grill
Ultra varmluft
Afbryd / Stop
Drejeknap Funktion
Tryk Start
Drej
96
Tidsindstilling &Automatisk
tilberedningsprogram
Page 97

Display
Automatiske programmer
Første program valg
Anden program valg
Optøning i henhold til vægt
Børnesikring
Displayområdet viser det aktuelle klokkeslæt eller, når
apparatet er i brug, programmets tilberedningstid og dine
valgte funktioner.
Temperatur
Indstilling af uret
Vægt
Ultra varmluft
Grill
Mikrobølger
Automatiske programmer
Optøning i henhold til tid
97
Page 98

Sikkerhedsforskrifter
Vigtige sikkerhedsforskrifter
Læs venligst brugsanvisningen omhyggeligt igennem og gem den til
senere reference
Tilslutning til lysnettet
Mikrobølgeovnen bør kun tilsluttes til et stik med jordforbindelse, der er installeret
i overensstemmelse med el-regulativet. Spændingen på typeskiltet skal svare til
spændingen i el-installationen. Dette produkt overholder direktiverne, som gælder for
CE-mærkning.
Placering af mikrobølgeovnen
∙ Placer altid mikrobølgeovnen på en stabil, plan og varmefast overade og sørg for
at den ikke udsættes for andre varmekilder eller meget høj fugtighed.
∙ Benyt ikke apparatet udendørs.
∙ Fødderne under ovnen må ikke fjernes.
∙ Der skal altid være tilstrækkelig ventilation. Placer ikke andre ting ovenpå
mikrobølgeovnen, og sørg for at overholde følgende minimumsafstande mellem
ovn og vægge eller andre genstande:
Siderne: 7,5 cm
Bagpå: 7,5 cm
Top: 30,0 cm
Apparatet må ikke installeres inde i et skab; når mikrobølgeovnen skal placeres bør
man også sikre sig at den ikke står tæt op under et skab eller noget tilsvarende.
Vigtige noter
∙ Advarsel: Nogle typer af fødevarer er letantændelige. Lad aldrig under nogen
omstændigheder ovnen være uden opsyn, når mikrobølge - , grill - , varmluft
– eller kombinationsfunktionerne er i brug.
∙ Denne mikrobølgeovn er kun beregnet til optøning, opvarmning eller tilberedning
af mad. Advarsel: Forsøg aldrig på at tørre mad eller tøj, eller på at opvarme
varmepuder, hjemmesko, svampe, våde rengøringsklude el. lign., da dette kan
forårsage tilskadekomst, brandsår eller brand.
∙ Ansvar accepteres ikke, hvis ødelæggelse skyldes ukorrekt brug, eller hvis denne
brugsanvisning ikke er fulgt.
∙ Benyt kun køkkenudstyr som er egnet til brug i mikrobølgeovne. Brug aldrig
metalbeholdere ved opvarmning af mad eller drikkevarer ved hjælp af
mikrobølgefunktionen. For detaljeret information, se venligst afsnittet ’Benyt altid
98
Page 99

velegnede køkkenredskaber’.
∙ Apparatet er ikke beregnet til brug ved hjælp af en ekstern timer eller et separat
fjernstyringssystem.
∙ Dette apparat kan benyttes af børn (som er mindst 8 år) og af personer med
reducerede fysiske, sensoriske eller mentale evner, eller mangel på erfaring eller
viden, såfremt de har fået vejledning og instruktion i brugen af dette apparat og
fuldt ud forstår alle farer og forholdsregler vedrørende sikkerheden som brug af
apparatet medfører.
∙ Børn må aldrig få lov til at lege med apparatet.
∙ Børn må aldrig få lov til at udføre rengørings- eller vedligeholdelsesarbejde på
dette apparat, medmindre de er under opsyn og mindst 8 år gamle.
∙ Apparatet og dets ledning må altid holdes væk fra børn som er yngre en 8 år.
∙ For at undgå elektrisk stød bør apparatet ikke rengøres med vand og heller ikke
nedsænkes i vand.
∙ Advarsel: Som følge af de høje temperaturer der opstår ved brug af grill- og/eller
varmluftsfunktionerne, må børn ikke benytte apparatet medmindre de er under nøje
opsyn af en voksen.
∙ Når kombinationsfunktionerne eller grill- og/eller varmluftsfunktionerne
benyttes, skal man være ekstra påpasselig med ikke at berøre de indvendige
varmeelementer.
∙ Brug heller aldrig dampapparater til rengøringen.
∙ Sluk altid apparatet og tag stikket ud af stikkontakten:
- inden rengøring,
- tilfælde af fejlfunktion.
- efter brug.
∙ Træk aldrig i selve ledningen, når ledningen tages ud af stikkontakten; tag altid fat i
selve stikket.
∙
Advarsel: Apparatets ydre ader kan blive varme under brug. Der er også
fare for at damp kan udledes gennem ventilationsrillerne: Fare for
skoldning.
∙ Lad apparatet køle tilstrækkeligt ned, før det yttes.
∙ Lad ikke apparatet eller dets ledning komme i berøring med varme overader eller
komme i kontakt med andre varmekilder. Lad ikke ledningen hænge løst og hold
den væk fra alle varme dele.
∙ Hvis apparatet ikke holdes ordentligt rent, kan det forårsage forringelse af
overadernes kvalitet, hvilket kan medføre mulig forkortelse af apparatets levetid,
såvel som mulig risiko for brugerens sikkerhed. Eventuelle madrester bør derfor
straks fjernes. Aftør ovndørslisterne, ovnrummet med dets keramiske bund og alle
99
Page 100

dele rundt omkring med en fugtig klud efter hver brug. Grillristen og bagepladen
rengøres med varmt sæbevand. Detaljeret information om rengøring af apparatet
ndes i afsnittet om Rengøring.
∙ Dette apparat er beregnet til privat brug eller i tilsvarende omgivelser, såsom
- i tekøkkener, kontorer eller andre mindre virksomheder,
- landbrugsvirksomheder,
- af kunder på hoteller, moteller m.m. og tilsvarende foretagender,
- B&B pensionater.
∙ Advarsel: Al vedligehold eller reparation som nødvendiggør aftagning af
strålebeskyttelsesdækslet udgør en alvorlig fare for uautoriserede personer. Dette
gælder også udskiftning af den specielle ledning eller det indvendige lys. Apparatet
bør aldrig åbnes af andre end kvalicerede reparatører. Hvis der er behov for
reparationer, skal du kontakte vores kundeservice via telefon eller e-mail (se bilag).
∙ Ved opvarmning af væske i mikrobølgeovnen, kan væsken opvarmes til
kogepunktet uden synlige tegn på bobler. Det er derfor vigtigt at der udvises
ekstrem forsigtighed når beholderen håndteres, dvs. når den tages ud af ovnen.
Denne risiko for at væsken koger over, kan mindskes ved at anbringe en varmefast
glasstang i beholderen under opvarmningen.
∙ Hele æg med skal eller hårdkogte æg må aldrig varmes i en mikrobølgeovn da de
kan eksplodere selv efter at opvarmningsprocessen er afsluttet.
∙ Advarsel: Det er også farligt at varme væsker eller fødevarer i nogen form for
faste hermetisk lukkede beholdere, da disse kan eksplodere.
∙ Indholdet i sutteasker eller glasbeholdere må rystes eller omrøres grundigt for
at sikre at varmen er jævnt fordelt. Advarsel: For at undgå pinefuld og farlig
skoldning, skal man altid afprøve temperaturen, inden man mader et barn.
∙ Når man varmer eller tilbereder mad, der er indeholdt eller indpakket i et brændbart
materiale såsom plastik eller papir, er der altid en fare for at disse materialer
antændes. Det er også muligt at maden vil tørre ud eller endda antænde, hvis der
vælges for lang kogetid. Fedt eller olie er også brændbare stoffer. Det er derfor
vigtigt at overvåge mikrobølgeovnen under betjeningen. Stærkt brændbare væsker
såsom koncentreret alkohol må selvfølgelig ikke opvarmes i mikrobølgeovnen.
∙ Hvis det begynder at ryge under betjeningen, holdes døren lukket for at hæmme
eller kvæle udvikling af ammer. Sluk øjeblikkeligt for mikrobølgeovnen og tag
stikket ud af stikkontakten.
∙ For at undgå forbrændinger må man altid bruge grydelapper når maden tages ud
af ovnen, eftersom fade og beholdere opvarmes til høje temperaturer ikke kun ved
grill- og varmluftfunktionerne, men også når der benyttes mikrobølger.
100
 Loading...