

Page 1
2
3
4
5
6
7
8
9
10
11
1
12
I II III
IV V VI
Page 2

Dear customer,
Congratulations on your purchase of this
excellent SEVERIN coffee maker. Decades
of experience as well as our most modern
production facilities guarantee the high
quality standard of our products.
With this machine, SEVERIN presents a
new generation of coffee makers:
Vapotronic brewing system
... the coffee tastes as if hand-brewed
functional design
... the coffee maker is easy to operate
The Vapotronic brewing system allows to
make excellent rich-flavoured coffee as the
maximum amount of flavour is extracted
from the coffee grounds – real coffee for the
connoisseur.
And this is how the Vapotronic-brewing
system works:
A 1400 watt element heats the water up to
the perfect brewing temperature.
Once the perfect brewing temperature has
been reached the valve opens and the
brewing cycle begins.
The remaining water is brought to the boil
and the arising steam leads the water
reservoir element to switch off
automatically.
The hot water flows in one jet onto the
coffee powder, which ensures that the
maximum amount of flavour is extracted
from the grounds.
The self-regulating element of the hotplate
guarantees that the coffee is kept warm
with almost no loss of flavour.
Thus your coffee maker does not only
convince through its modern design but also
through its technical features.
Please read the instruction booklet
carefully before using your coffee maker for
the first time.
Contribution to environmental
preservation:
The instruction booklet is made of 100%
recycled paper.
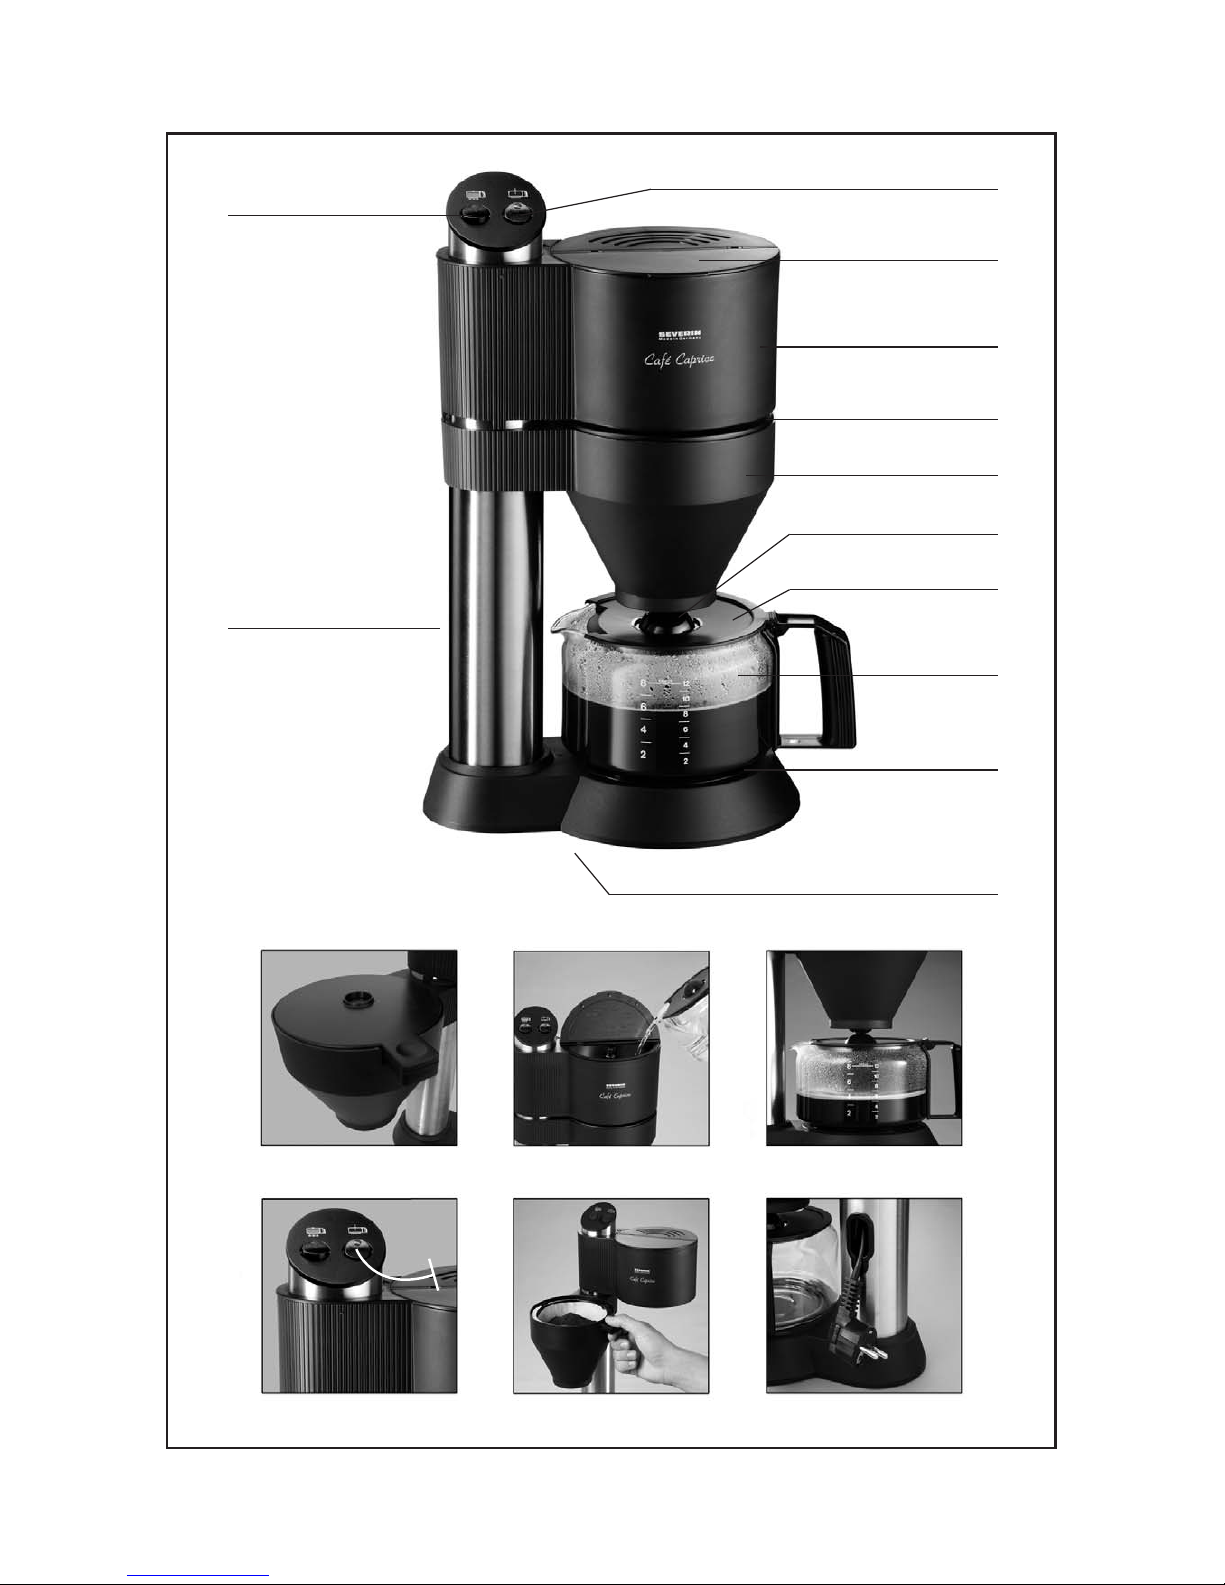
Familiarisation
1. On-off switch with pilot light for
hotplate
2 ON-switch with indicator light for water
reservoir
2. Water reservoir lid (turnable)
4. Water reservoir
5. Filter holder lid
6. Pivoted filter holder with plastic filter
7. Non-drip valve
8. Glass jug lid
9. Glass jug with water level marks
10. Hotplate
11. Rating label (at the bottom of the
machine)
12. Cable storage space (at the rear)
Connection to mains supply
Connect only to perfectly installed and
earthed sockets. Make sure that the supply
voltage is the same as the voltage marked
on the rating label of the machine.
This product complies with the directives
which are binding for the CE-labelling.
Safety
● The hotplate (10) and the water
reservoir (4) get very hot while the
machine is in use.
● Ensure that the mains lead does not
touch the hotplate (10).
● Never leave the machine unattended.
● This appliance is not intended for use by
any person (including children) with
reduced physical, sensory or mental
capabilities, or lacking experience and
knowledge, unless they have been given
supervision or instruction concerning
the use of the appliance by a person
responsible for their safety.
● Children should be supervised to ensure
that they do not play with the appliance.
● Never place the coffee maker nor its
mains lead on or adjacent to hot
surfaces such as the hot plates of an
electric stove or near a hot gas flame.
5
Coffee Maker
Page 3

● Unplug the machine from the mains
supply socket:
- in the event that it malfunctions
during use,
- when it is not in use,
- before cleaning.
● Do not operate the coffee maker with a
damaged mains lead or after it has been
damaged in any manner.
● If the supply cord is damaged, it must be
replaced by the manufacturer or its
service agent or similarly qualified
person in order to avoid a hazard.
● Repairs of electrical appliances should
only be performed by skilled personnel
as safety precautions have to be
observed. Improper repairs can result in
considerable hazards for the user.
Should your coffee maker require
repair, please contact the nearest
authorized Severin service centre.
Addresses are detailed in this booklet.
● This coffee maker has been designed for
domestic use only and not for
commercial applications.
● In case the coffee maker is misused or
operated in any manner other than
described in these instructions for use,
no liability will be undertaken for
possible damage.
First use
● First clean your coffee maker by
operating it twice or three times with
approx. 6 cups of fresh cold water but
without using ground coffee.
● The Vapotronic-system will
automatically switch off the water
reservoir element. It cannot be switched
off manually.
How to make filter coffee
-
When making smaller quantities of
coffee, it is better to place the glass jug
on the hotplate and then switch it on. In
that way, the freshly brewed coffee will
be delivered into the pre-heated jug.
-
Open the pivoted filter holder (6) and
take off the filter holder lid (5)
(illustration I).
-
Place a paper filter (size 1 x 4) into the
plastic filter and add fine ground coffee:
We recommend using
- approx. 6g=2 tsp. for a medium sized
coffee cup and
- approx. 4g=1
1
/2. for a smaller sized
coffee cup.
The amount of coffee used may be
altered to taste.
-
Replace the filter lid (5) back onto the
filter holder (6) and swing back the filter
holder.
-
Open the water reservoir lid (3) and fill
the reservoir (4) with the required
amount of cold water. The minimum
quantity of water used should be for two
medium-sized coffee cups (illustration
II).
-
The water level marks inside the water
reservoir help you to measure the
amount of water needed for the number
of cups of coffee you wish to prepare:
- water level marks on the left-hand
side:
medium-sized coffee cups (approx.
125 ml)
- water level marks on the right-hand
side:
smaller sized coffee cups.
● Be careful not to exceed the maximum
water level of 8 medium-sized cups as
otherwise boiling water may be ejected
and cause burns.
-
Close the water reservoir lid (3). This is
important as the “Vapotronic“-system
can only operate while the lid is closed.
-
Place the glass jug (9) with its lid (8) on
top of it onto the hotplate (10). The jug
lid opens the non-drip valve of the filter
holder (illustration III).
-
Switch the hotplate (10) on by turning
the on/off switch (1) to ON-position.
Alternatively you can leave the hotplate
switched off during the filtering process
and switch it on only after the filtering
process is complete. This affects the
coffee temperature.
-
Switch on the water reservoir element
6
Page 4

by depressing switch (2) (illustration
IV). The pilot light on the right-hand
side will illuminate. The water in the
reservoir is now brought to the boil.
With the water reservoir filled to its
maximum capacity, it will take about 5
minutes to heat the water.
-
Once the perfect brewing temperature
has been reached the valve inside the
water reservoir opens and the brewing
cycle begins.
-
The water reservoir element will switch
off automatically and the pilot light on
the right-hand side will go out.
-
The water starts to flow through the
filter holder into the glass jug (9). The
filtering process is complete when the
total amount of water has passed
through and no water is left in the filter
holder.
-
When removing the glass jug (9) from
the machine once the filtering process is
complete, the non-drip valve of the filter
holder will close and prevent coffee
from dripping onto the hotplate of the
machine.
-
We recommend you to stir the coffee
before serving.
-
To keep remaining coffee hot, replace
the glass jug (9) back onto the hotplate
(10).
-
The hotplate (10) will keep the coffee
hot as long as you leave it switched on.
-
The plastic filter can be removed for
cleaning (illustration V).
● This coffee maker has been designed for
domestic use only. Should you wish to
start several brewing cycles one after
the other, allow the machine to cool
down for at least 5 minutes with the
reservoir lid open before re-using it. Use
cold water only to refill the water
reservoir.
Warning! Remember that the water
reservoir and the reservoir lid are still hot
after the brewing cycle has been completed
and hot steam may escape from the
reservoir when opening the lid (danger of
scalding)!
Cable storage
The cable storage space serves for storing
the cable and for the limitation of its length
(illustration VI).
Cleaning and care
● Before cleaning your coffee maker,
always make sure that the plug has been
removed from the mains supply socket.
For safety reasons the coffee maker
should not be treated with water or
liquids and should never be immersed.
-
Wipe the body of the machine with a
clean damp cloth and dry afterwards. To
prevent the valve of the water reservoir
from getting clogged, use a non-fluffy
cloth to clean the water reservoir and
the glass jug.
-
The glass jug (9), its lid (8), the filter lid
(5) and the plastic filter (6) are
dishwasher safe.
-
Do not use harsh abrasive cleaners.
Descaling
In order to maintain the excellent quality of
your coffee maker, we recommend you to
descale the machine at regular intervals.
Descaling is needed when
-
the brewing cycle takes longer than
normal,
-
there is build-up of deposits inside the
water reservoir or on the valve unity,
-
the valve of the water reservoir has
become leaky.
For descaling we recommend using a
mixture of min. 0.25 litre of water and 2
tablespoonful of vinegar.
-
Place a paper filter into the plastic filter
(without using ground coffee).
-
Fill the cold descaling mixture into the
water reservoir (4).
-
Switch on the machine and allow it to
complete the brewing cycle. To clean
the machine after descaling operate it
twice or three times with fresh cold
water only (without using ground
7
Page 5

coffee).
-
Never pour the descaler into an
enamelled sink and do not use it a
second time.
Disposal
Do not dispose of old or defective
appliances in domestic garbage; this
should only be done through public
collection points.
Guarantee
This product is guaranteed for a period of
two years from the date of purchase against
defects in materials and workmanship.
Under this guarantee the manufacturer
undertakes to repair or replace any parts
found to be defective, providing the product
is returned to one of our authorized service
centres.
This guarantee is only valid if the appliance
has been used in accordance with the
instructions and provided that it has not
been modified, repaired or interfered with
by any unauthorized person, or damaged
through misuse.
This guarantee naturally does not cover
wear and tear, nor breakables such as glass
and ceramic items, bulbs, etc.
If the product fails to operate and needs to
be returned, pack it carefully, enclosing
your name and address and the reason for
return. If within the guarantee period,
please provide the guarantee card and proof
of purchase.
If a fault occurs...
... if the brewing cycle takes longer than
normal, or
... if the valve of the water reservoir has
become leaky or,
... if the machine has accidentally been
switched on without water in the water
reservoir
descale the water reservoir (see section
Descaling).
In case descaling does not help to eliminate
the malfunction, check whether the valve of
the reservoir is clogged (e. g. through coffee
grounds, fluff). Only in this case the valve
unit should be removed for cleaning. To
clean it proceeds as follows:
Turn the complete valve unit anti-
clockwise and lift it out of the reservoir.
Do not point the valve unit at any
person as it is under tension. Clean the
valve unit and the water outlet opening
thoroughly. After cleaning, re-insert the
valve unit and fasten it, turning
clockwise.
... if hot water is ejected through the
reservoir lid, or
... if the valve does not open although the
boiling process is complete,
the water reservoir (4) has been overfilled.
● When filling the water reservoir be
careful not to exceed the maximum
water level of 8 cups and not to remain
below the 2 cup mark for medium-sized
coffee cups.
8
 Loading...