

Seura SHD2-55, SHD2-43, SHD2-65, SHD2-75 Installation Guide

SHADE SERIES™ SOUNDBAR
INSTALLATION GUIDE
SHD2-43
SHD2-55
SHD2-65
SH D2-75

1
Parts Included
Soundbar
Mounting
Bracket
SOUNDBAR
TV VESA
LABEL 93-056001
THIS SIDE
AWAY
FROM TV
Soundbar
Mounting
Bracket
SOUNDBAR
TV VESA
LABEL 93-056001
THIS SIDE
AWAY
FROM TV
Soundbar
Mounting
Bracket
SOUNDBAR
TV VESA
LABEL 93-056001
THIS SIDE
AWAY
FROM TV
Soundbar
Mounting
Bracket
SOUNDBAR
TV VESA
LABEL 93-056001
THIS SIDE
AWAY
FROM TV
Soundbar
Mounting
Bracket
SOUNDBAR
TV VESA
LABEL 93-056001
THIS SIDE
AWAY
FROM TV
Soundbar
Mounting
Bracket
SOUNDBAR
TV VESA
LABEL 93-056001
THIS SIDE
AWAY
FROM TV
Wood stud wall
Mur de montant en bois
Pared de vigas de madera
Concrete wall
Mur en béton
Muro de concreto
x4 x4
A: M6 x 35 mm
x4
B: 14 mm
x4
F: M6 / M8 G: 5 mm
C : M8
x4
E: M8 x 65 mm
Cable Sleeve /
Couverture de
cable / Cubierta
para cable
PDX650W
32
"
7
8
"
3
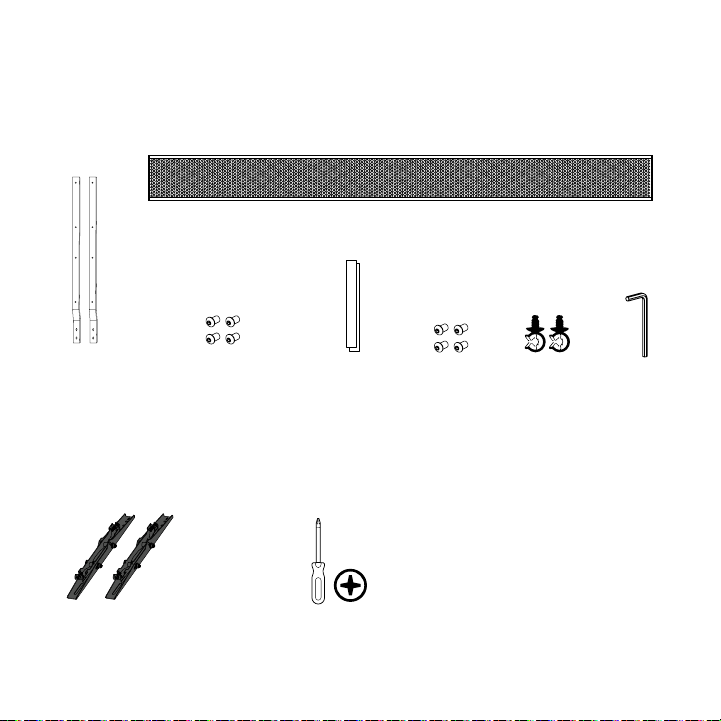
Before installing the soundbar, unpack the box and check for completeness of the following contents.
NOTE: Illustrations are not to scale.
(A) Soundbar
(B) Two soundbar
mounting brackets
(comes packaged
attached to the
soundbar)
Parts not Included Tool Required
TV mounting brackets
(sold separately)
(C) Four Soundbar
Screws (comes
packaged holding
the soundbar
mounting brackets
to the soundbar)
(D) Two 4-inch
strips of VHB
tape (optional)
Phillips #2
Screwdriver
(E) Four
VESA Screws
(F) Two wire
saddles
3/16 Allen
wrench
2
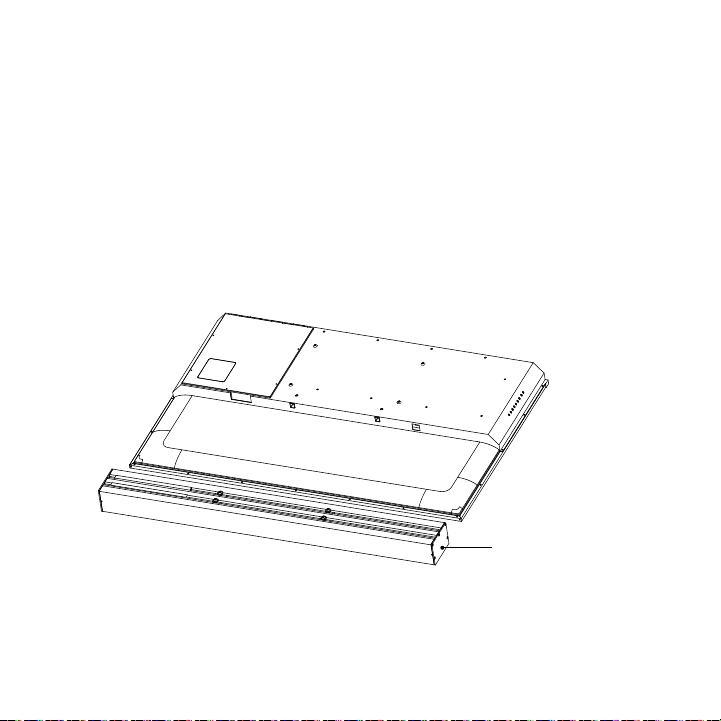
Step 1: Prep for Installation
a. Lay the TV face down on a soft clean surface. Position the soundbar below
the TV, aligning the mounting holes. Take caution not to lay the TV on a
surface that will scratch or damage the screen. Position the soundbar on
the bottom or top of the TV as desired for installation.
b. Using a 3/16 Allen wrench, remove the four screws (part C) from the two
mounting brackets (part B) attached to the soundbar (part A) for shipping.
There are two screws per bracket that need to be removed. Set the
brackets and screws aside and save for later.
Part A
3
 Loading...