

Seuic AutoID 9,AutoID 9HC User Manual

I
Contents
Chapter Usage Note ....................................................................................................... 1
1.1 Caution for Laser scan engines ......................................................................... 1
1.2 Safety notes ....................................................................................................... 1
Chapter 2 Device layout................................................................................................. 3
Chapter 3 Keyboard ....................................................................................................... 5
Chapter 4 Quick Start Guide .......................................................................................... 8
4.1 First Use ............................................................................................................ 8
4.2 Start ................................................................................................................... 8
4.3 Power off ........................................................................................................... 8
4.4 Restart ............................................................................................................... 8
4.5 Installing the SIM Card .................................................................................... 9
4.6 Installing the SD Card .............................................................................................. 9
4.7 Installing the battery ....................................................................................... 10
4.8 Uninstalling the battery ................................................................................... 12
Chapter 5 Charging the Battery ................................................................................... 14
5.1 Charging time .................................................................................................. 14
5.2 Charging temperature ...................................................................................... 14
5.3 Battery power supply ...................................................................................... 14
5.4 Notes for battery use ....................................................................................... 15
5.5 LED Indicators ................................................................................................ 16
Chapter 6 Home Screen ............................................................................................... 17
6.1 Status Bar ........................................................................................................ 17
Chapter 7 Settings ........................................................................................................ 19
7.1 WLAN ............................................................................................................. 19
7.2 Bluetooth ......................................................................................................... 28
7.3 Data Usage ...................................................................................................... 31
7.4 More ................................................................................................................ 32
7.4.1 Airplane mode ....................................................................................... 32
7.4.2 NFC ....................................................................................................... 32
7.4.3 Portable hotspot .................................................................................... 33
7.4.4 VPN ....................................................................................................... 35
7.4.5 Mobile data ........................................................................................... 35
7.5 Keypad ............................................................................................................ 41
7.6 Home Screen ................................................................................................... 41
7.7 Status bar ......................................................................................................... 42
7.8 Display ............................................................................................................ 43
7.9 Sound and notification .................................................................................... 46

II
7.10 Storage .......................................................................................................... 47
7.11 Battery ........................................................................................................... 48
7.12 Applications .................................................................................................. 49
7.13 Scene mode ................................................................................................... 49
7.14 Location ........................................................................................................ 52
7.15 Security ......................................................................................................... 52
7.16 Accounts ........................................................................................................ 53
7.17 Language and input ....................................................................................... 54
7.18 Backup and reset ........................................................................................... 55
7.19 Date and time ................................................................................................ 56
7.20 Scheduled power on and off ......................................................................... 56
7.21 Accessibility .................................................................................................. 57
7.22 Developer options ......................................................................................... 58
7.23 About phone .................................................................................................. 59
Chapter 8 Typical applications introduction ................................................................ 62
8.1 Scan tool.......................................................................................................... 62
8.2 System update ................................................................................................. 69
8.3 Mobile butler ................................................................................................... 72
8.4 ShortCut Key settings ..................................................................................... 80
8.5 Once configure ................................................................................................ 83
8.5.1 Import .................................................................................................... 83
8.5.2 Export .................................................................................................... 87
8.5.3 User configuration ................................................................................ 89
8.6 Features setup.................................................................................................. 92
8.6.1 Fn Stick Once Mode ............................................................................. 93
8.6.2 Glove mode ........................................................................................... 93
8.6.3 Prohibit drop-down status bar ............................................................... 94
8.6.4 Disable Virtual key1.............................................................................. 94
8.6.5 Disable Virtual key2.............................................................................. 94
8.6.6 Disable Virtual key3.............................................................................. 95
8.6.7 Disable LockScreen key* ..................................................................... 95
8.6.8 Automatically close unknown source after reboot* .............................. 95
8.6.9 Show scan suspension button ............................................................... 96
8.6.10 Hide shortcut on the left side of the lockscreen* ................................ 96
8.6.11 Hide shortcut on the right side of the lockscreen* .............................. 96
8.7 Certificate Whitelist ........................................................................................ 97
Chapter 9 Troubleshooting ......................................................................................... 101
Accessories ................................................................................................................ 103

1
Chapter Usage Note
1.1 Caution for Laser scan engines
Laser radiation; users do not stare into beam.
1.2 Safety notes
➢ Your device can only use the battery and charger specified by the
company. Any other products may cause the battery leakage,
overheating, burst and fire.
➢ Do not short circuit a charger, otherwise it will cause an electric shock,
smoke and charger damage.
➢ Please do not use the charger when the power cord is damaged,
otherwise it will cause fire and an electric shock.
➢ Please do not disassemble or modify the charger, otherwise it will
lead to personal injuries, an electric shock, fire and charger damage.
➢ Seize the charger when pulling the plug, and pulling the power cord
will damage the cord, causing an electric shock and fire.
➢ Clean the device, battery and charger with a piece of soft and dry
cloth.
➢ Please do not use alcohol, thinner, benzene or other solutions to wipe
the device.

2
1.3 Maintenance notes
➢ This product is waterproof and dustproof, but it still should be kept
away from being operated in the environment of extremely high or
low temperature. Please refer to temperature and humidity standards
in the product specifications .
➢ Hard press on the screen may cause damage to the screen. Please do
not use a resistive screen touching pen to avoid the scratch or damage
to the screen. To clean the screen, please spray a small amount of the
commercial LCD cleaner onto a soft cloth instead of spraying cleaner
directly onto the screen.
➢ Do not use any chemical cleaning agent to clean the LCD screen.
➢ Keep the scanning exit window clean and stay away from sharp
objects.
➢ If this product has not been used for a long time, please make sure to
download the data to the computer store, and remove the battery.
Please separately store the device and battery pack.
➢ It will take a long time to fully charge the battery when it is the first
time to work or recovery from storage.
➢ In the event of device failure, please take down the situation and
information and contact with maintenance staff.

3
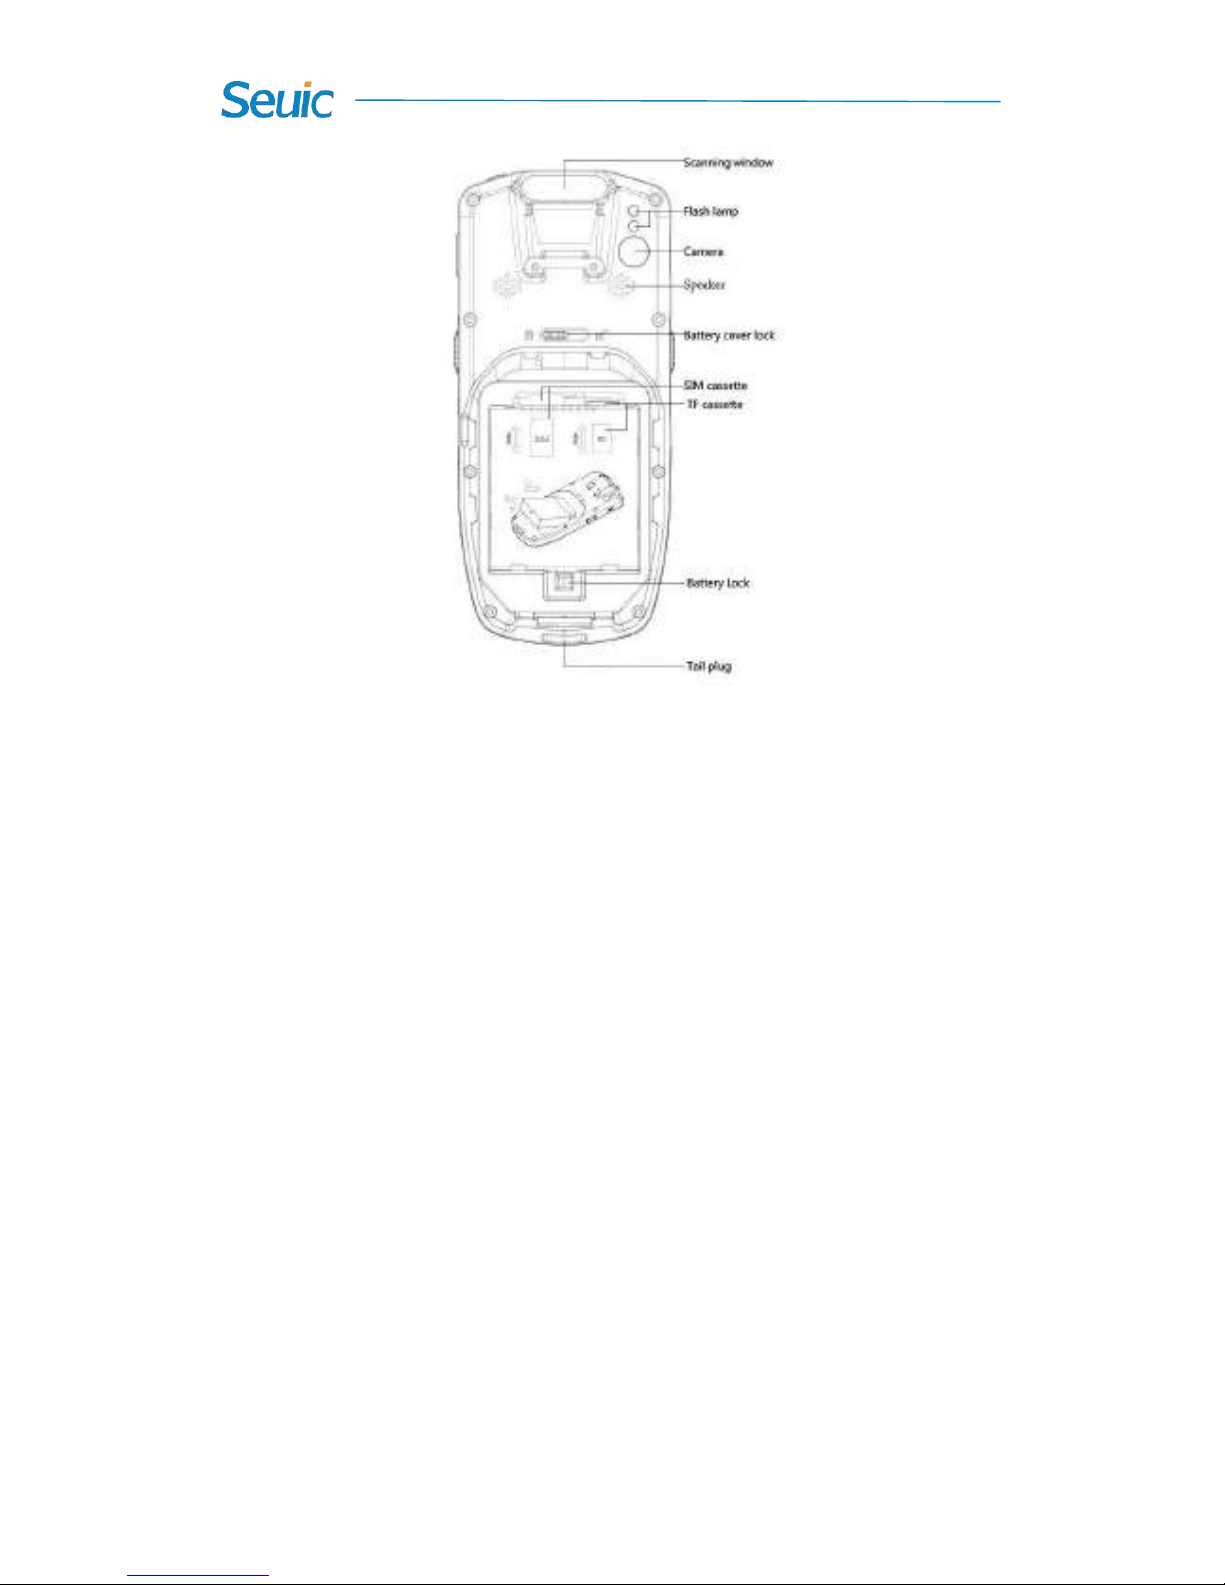
Chapter 2 Device layout
Figure 2-1 Front view of 17 keys
Figure 2-2 Front view of 22 keys
4
Figure 2-3 Back view
5
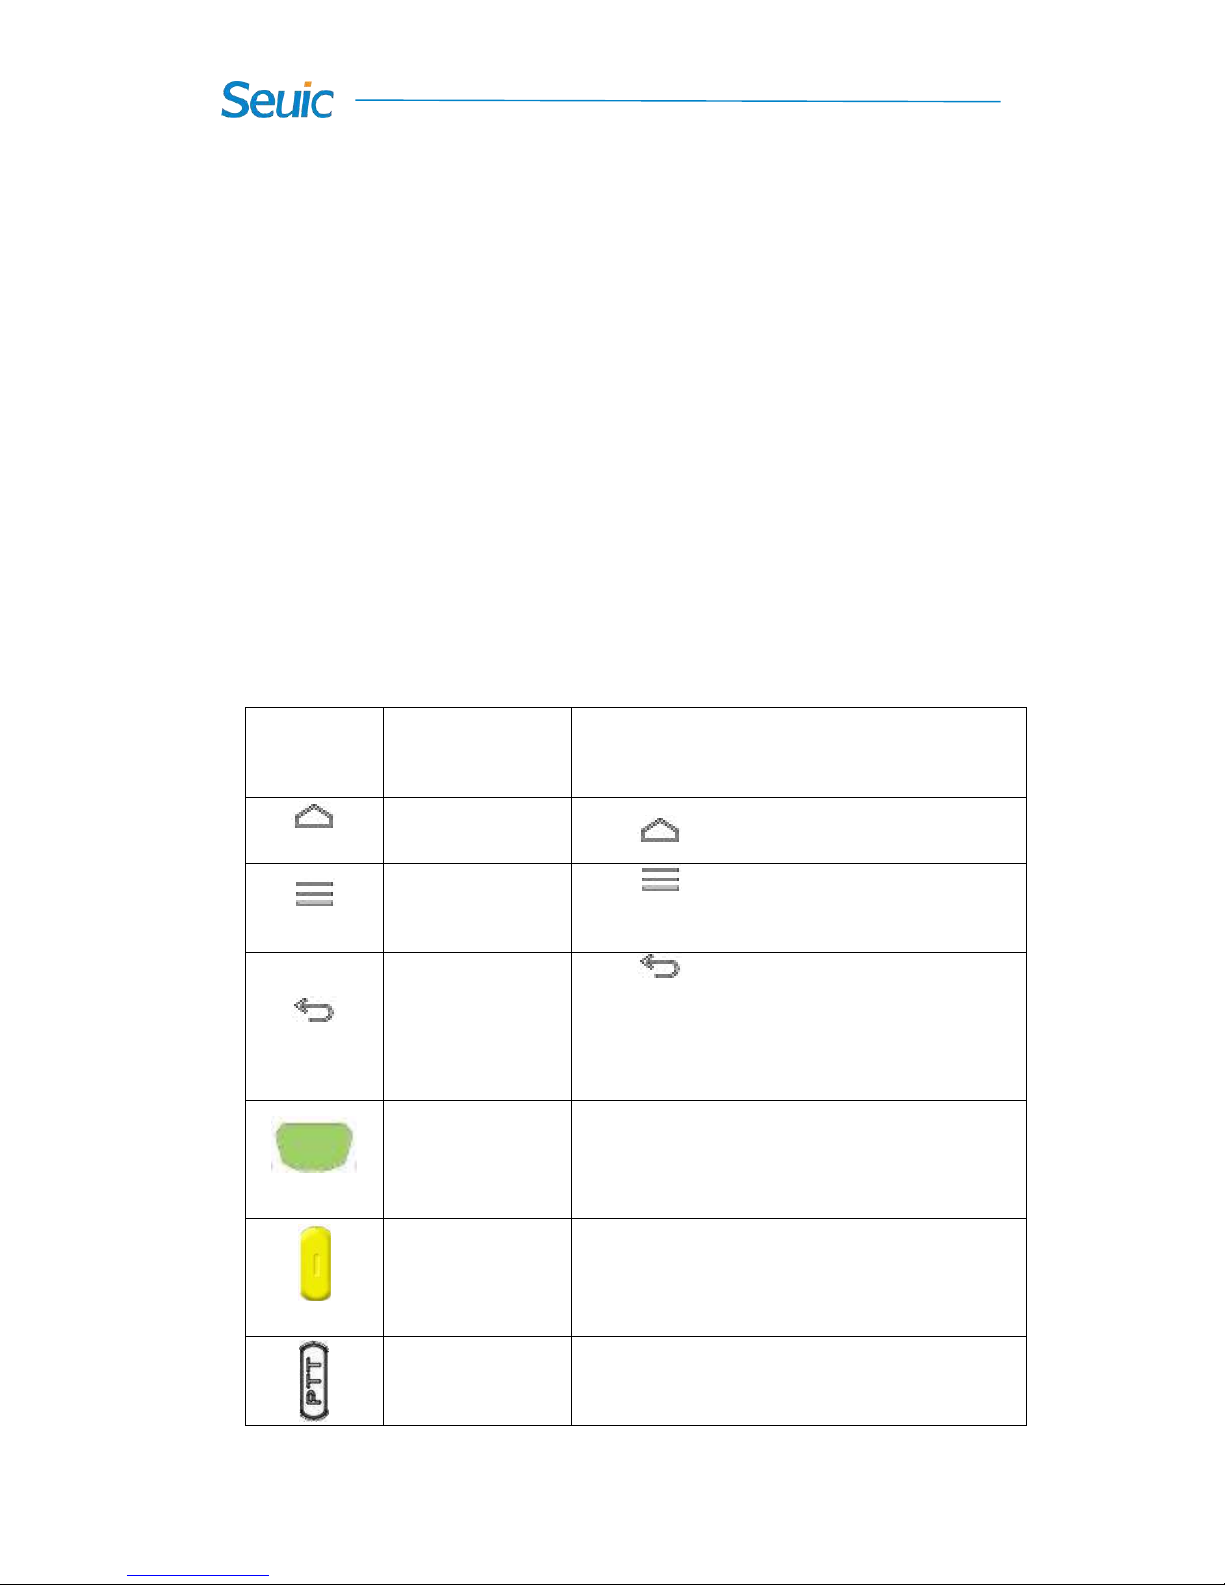
Chapter 3 Keyboard
There are 22 keys, 2 side buttons, 1 PTT key on the keyboard of
brand-new AUTOID 9/9HC device (The brand-new AUTOID 9 series
have removed 4 arrow keys and 1 Lock screen key on the keyboard of
9HC series); there are 3 buttons on the on-screen keyboard (Menu, Home,
Back).
Key Description:
Table 3-1 Key description
Key
Function Function description
Home key
Touch to go back to main screen.
Menu key
Touch to open the menu on the current
interface.
Back key
Touch to return to the previous screen or
exit the application. On the text input interface,
touch to close the on-screen keyboard.
Scan key
In general, scan bar code as the scan key.
On the camera interface, ( the built-in camera),
as the camera button.
Side scan key
In general, scan bar code as the scan key.
On the camera interface, (the built-in camera),
as the camera button.
PTT key
Initiates press-to-talk communications
6
Num Lock key
Lock the keyboard input for number input
Fn Lock key
Lock keyboard input for Fn function key input
Lock key
After being locked, the touch screen is not
operational, but the display is normal.
Enter key
Confirm
Direction key: up
Direction key
:
down
Direction key:
Left
Direction key:
Right
Delete
0
0 key
Fn mode: F10 key
7
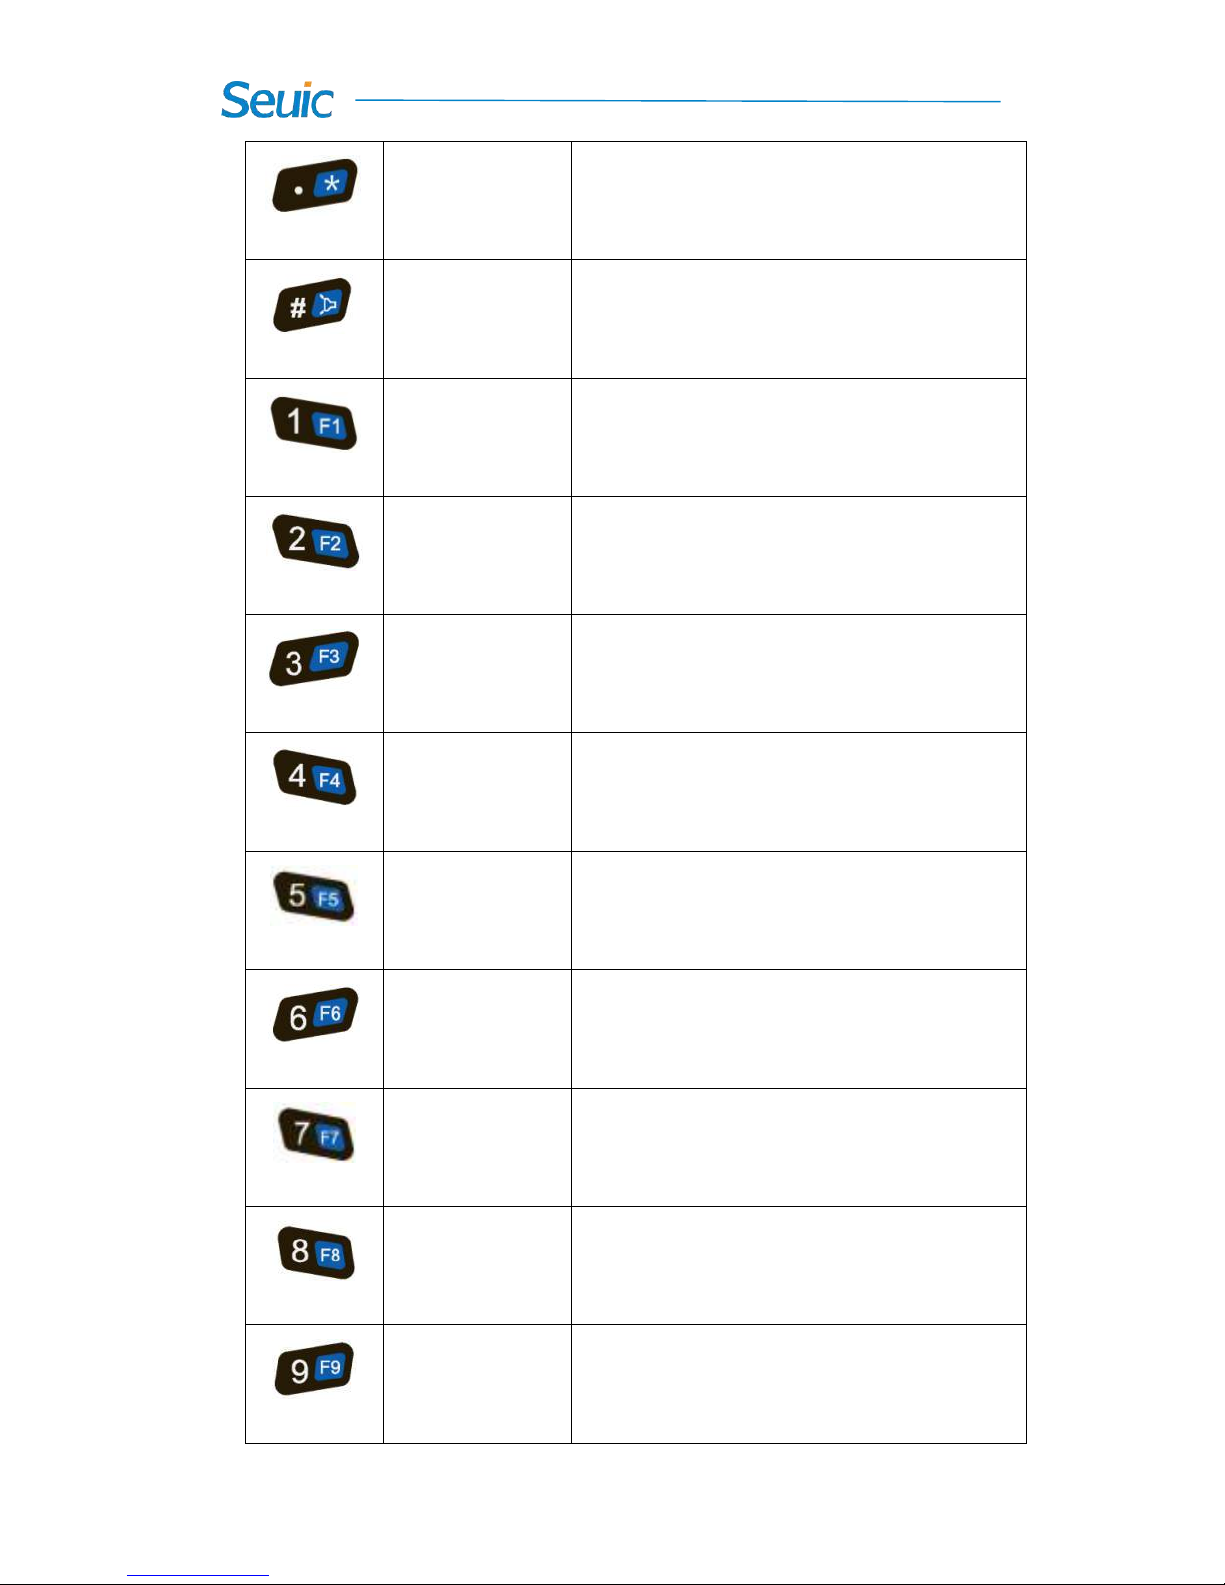
.
·
key
Fn mode: * key
#
# key
1
Number 1 key
Fn mode:F1key
Screen Capture: Power key+F1
2
Number 2 key, A. B. C in English keyboard
Stroke input method: horizontal stroke
Fn mode: F2 key
3
Number 3 key, D. E. F in English keyboard
Fn mode: F3 key
4
Number 4 key, G.H.I in English keyboard
Stroke input method: left-falling stroke
Fn mode: F4 key
5
Number 5 key, J.K.L in English keyboard
Stroke input method: vertical stroke
Fn mode:F5 key
6
Number 6 key, M. N. O in English keyboard
Stroke input method: vertical stroke
Fn mode:F6 key
7
Number 7 key, P.Q.R.S in English keyboard
Fn mode: F7 key
8
Number 8 key, T.U.V in English keyboard
Stroke input method: horizontal hook
Fn mode:F8 key
9
Number 9 key, W.X.Y.Z in English keyboard
Fn mode: F9 key

8
Chapter 4 Quick Start Guide
4.1 First Use
➢ Install the battery and close the battery cover. Long press the Power
button to start up the device. In the working state, briefly press Power
button to switch to the Sleep mode. To wake up the device and turn
on the display, briefly press the Power button.
4.2 Start
➢ Long press Power button to start the device until the it vibrates and its
screen is lit up. To wake up it from the deep sleep mode, press the
Power button. If the device’s power is supplied by battery, the battery
cover must be been properly closed.
4.3 Power off
➢ After switching on the device, press the Power button for 2s in the
non-sleep mode until the menu displays. Touch Power off and then
the OK, and a normal shutdown is completed.
4.4 Restart
➢ After switching on the device, press and hold the Power button for 2s
until the menu displays. Touch Restart and then the OK, and a normal
restart is completed.

9
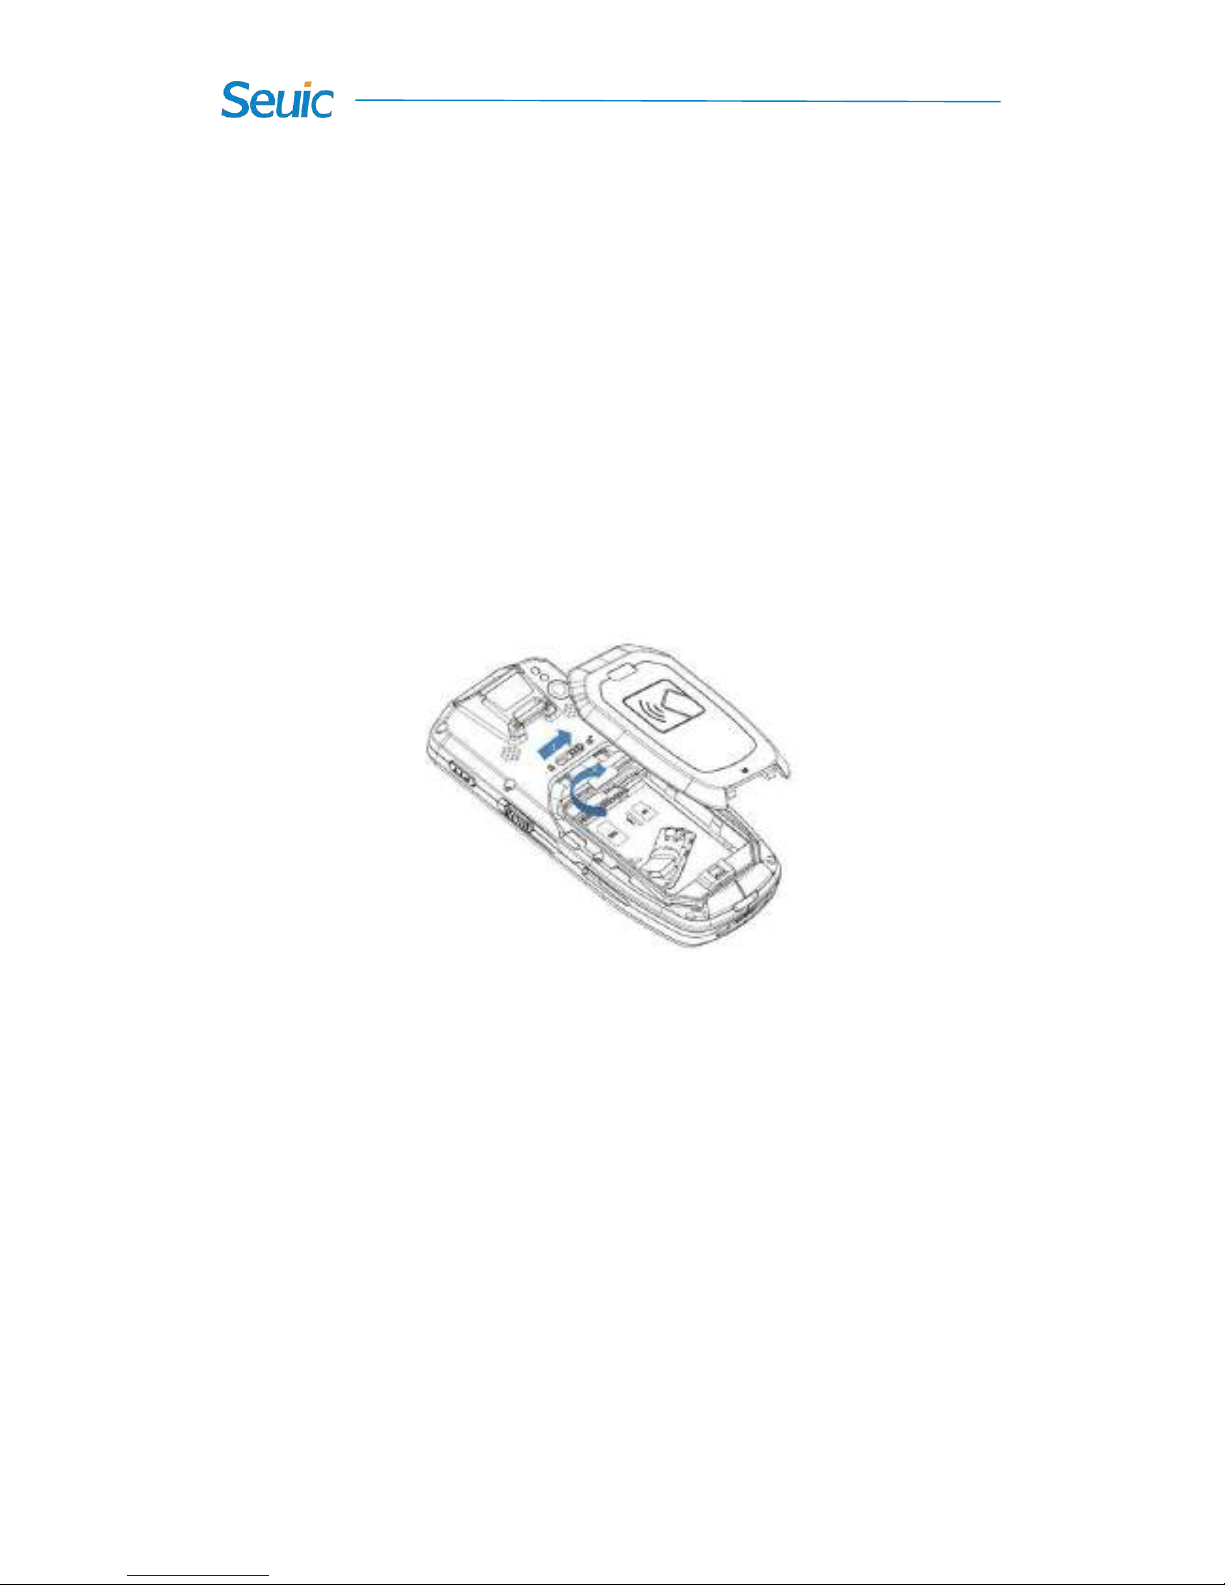
4.5 Installing the SIM Card
➢ Please install the SIM card as instructed below:
➢ Insert the SIM card in the direction shown in the figure.
Fig. 4-1 Installing the SIM Card
4.6 Installing the SD Card
➢ Please install the SIM card as instructed below:
➢ Insert the SD card in the direction shown in the figure below
(microSD or microSDHC).
Figure 4-2 Installing the SIM Card
10
Note: 1. PSAM card is not supported.
2. The device does not support the card hot plug, and you must
reset the card after plugging and unplugging it.
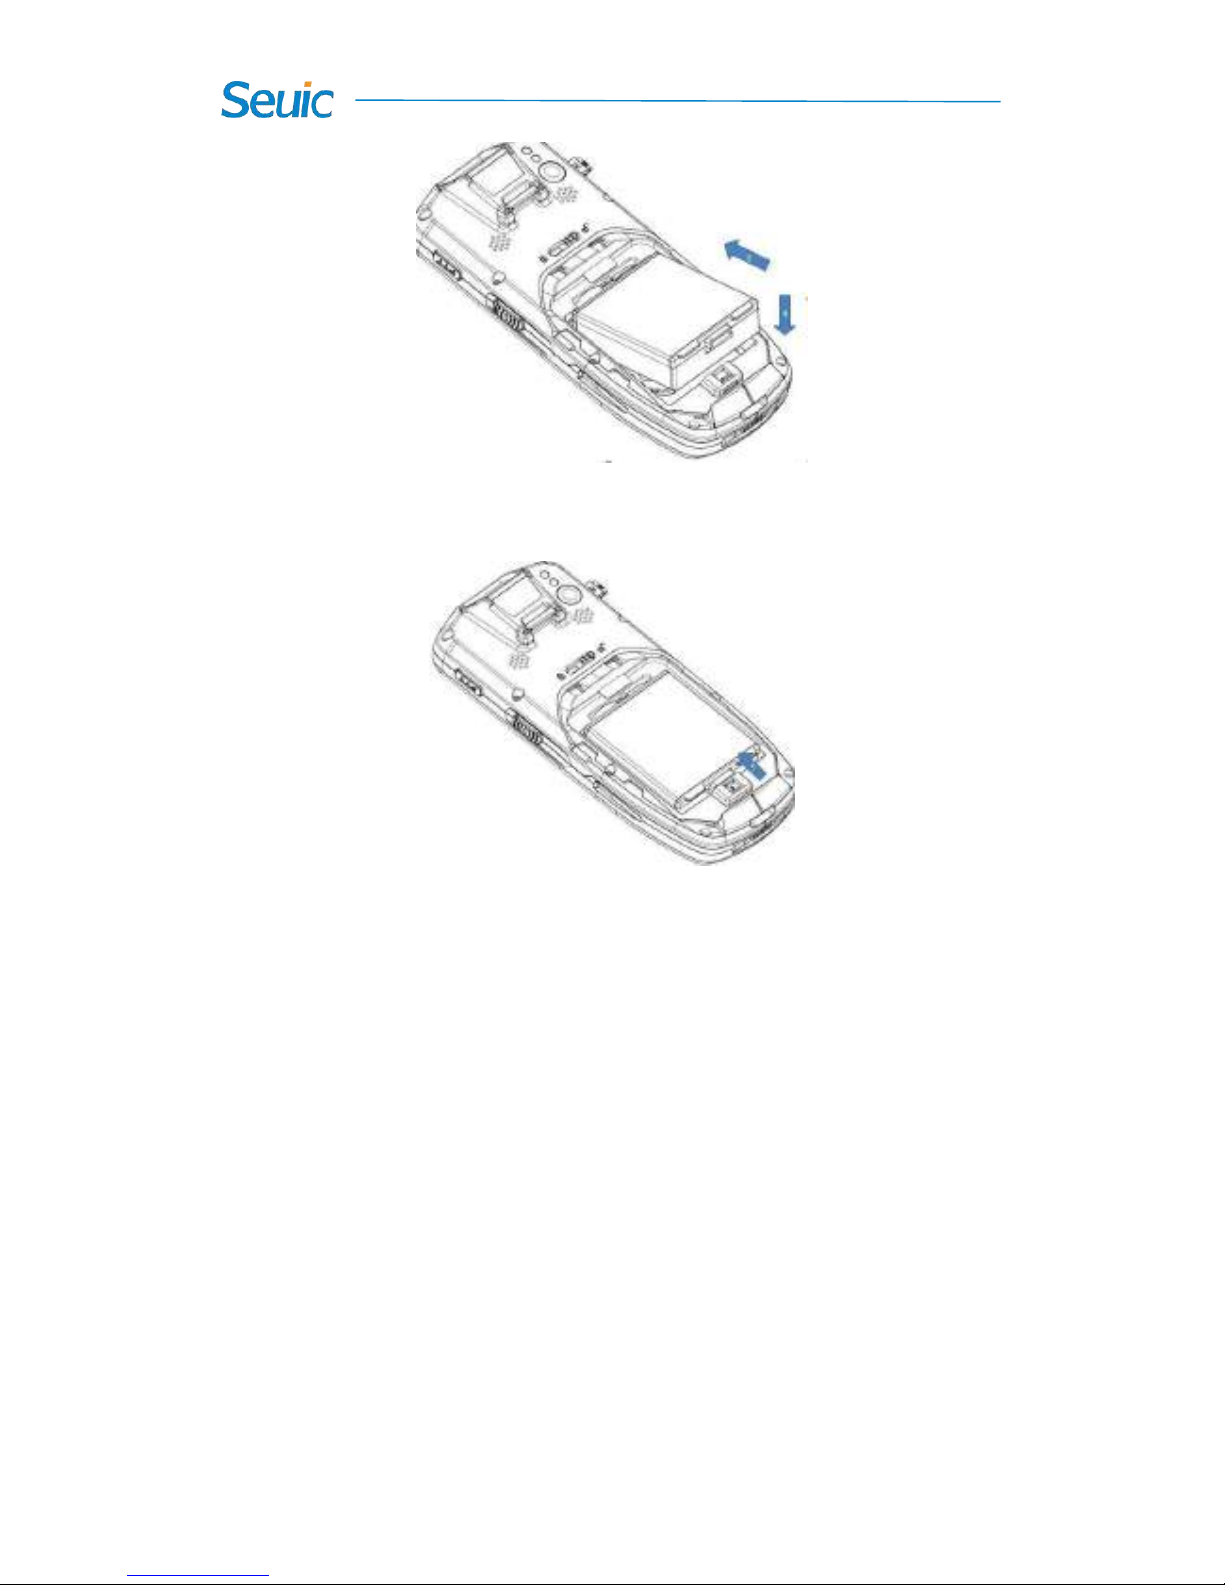
4.7 Installing the battery
➢ Please install the SIM card as instructed below:
➢ Slide the battery cover switch to the unlock side (right side);
➢ Place thumbnail at the battery notch and lift the battery cover;
Figure 4-3 Remove the battery cover
➢ Put the battery into the battery compartment at an appropriate
angle;
➢ Make sure the battery contacts are aligned with the battery
compartment and press the battery downward;
11
Figure 4-4 Install the battery
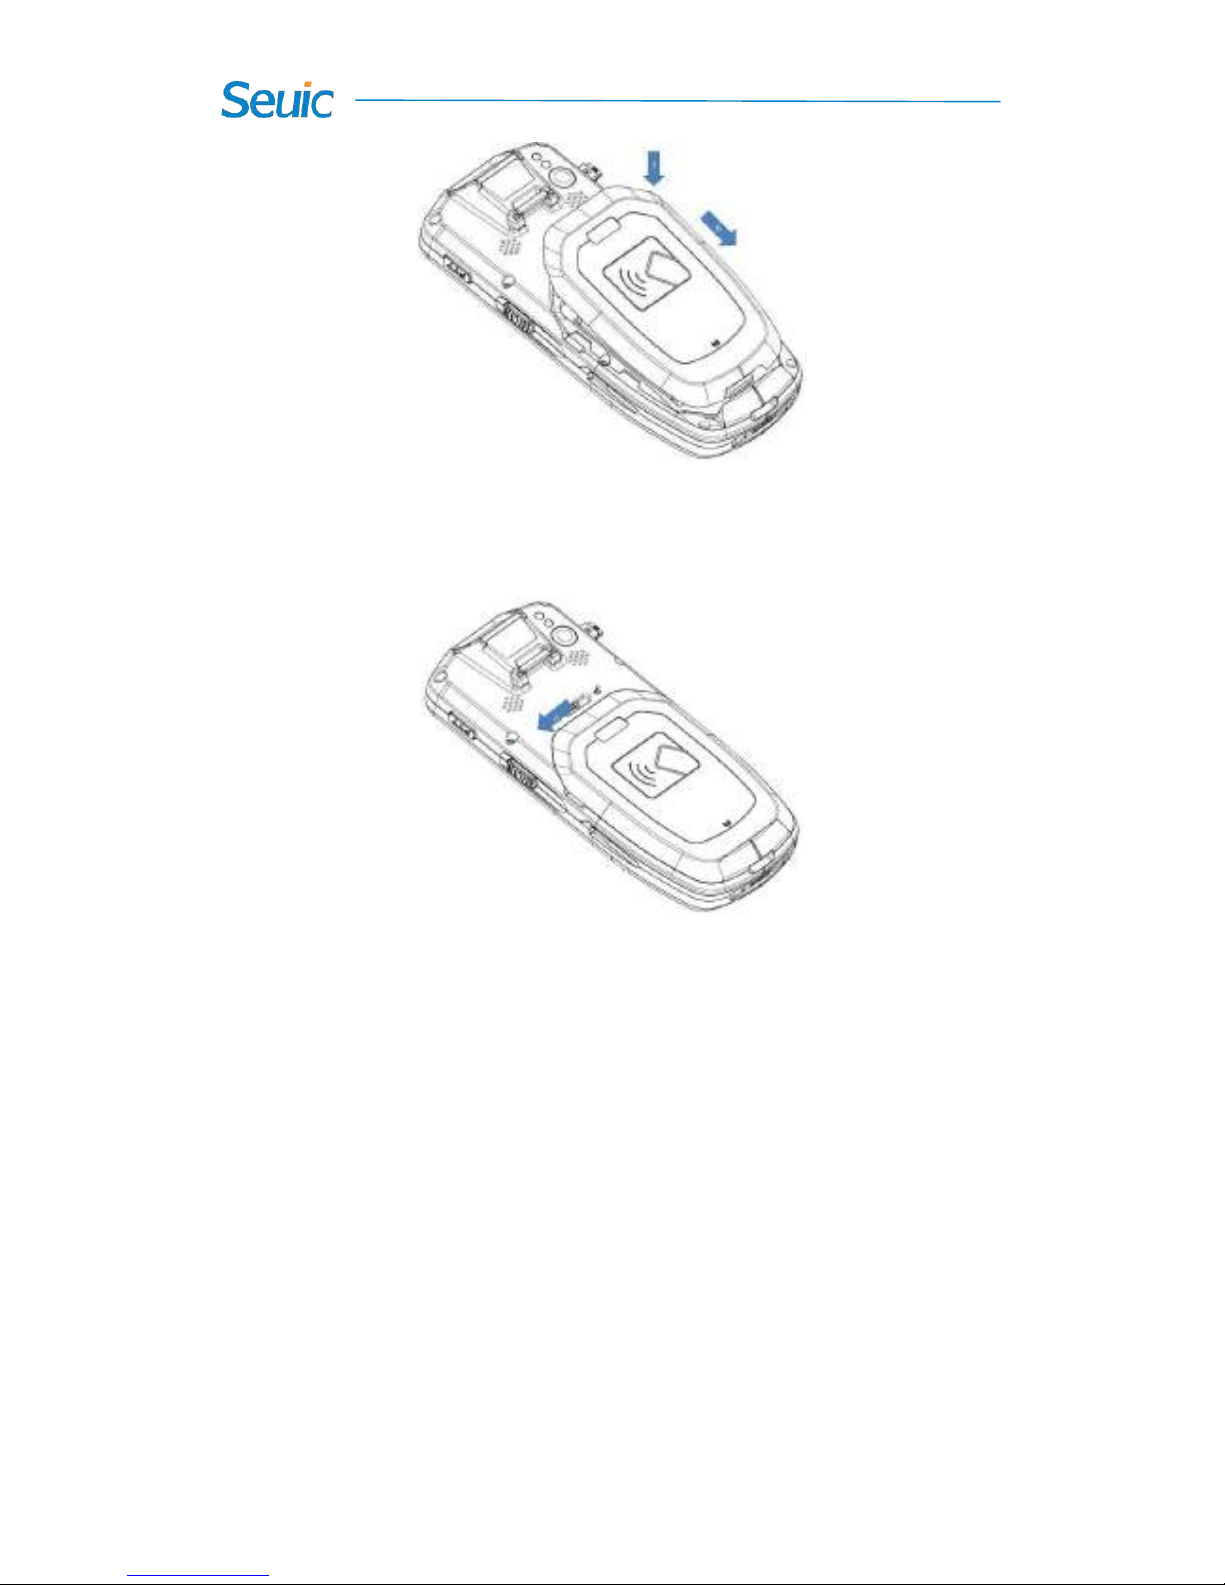
➢ Slide the battery lock up and make sure the battery is locked;
Figure 4-5 Lock the battery
➢ Align the battery cover with the back of the device and press the
battery cover down until it snaps into place;
➢ Ensure that the battery cover is seated properly and no gaps are
presented;
12
Figure 4-6 Close the battery cover
➢ Slide the battery cover switch to the lock side (left side);
Figure 4-7 Lock the battery cover
➢ If you need to transport or do not use the device for a long time,
please remove the battery and then separately store the battery and
device.
Note: Any improper use may affect battery life, and the batteries of
brand-new AUTOID 9 series and AUTOID 9
1/2
series are not compatible.
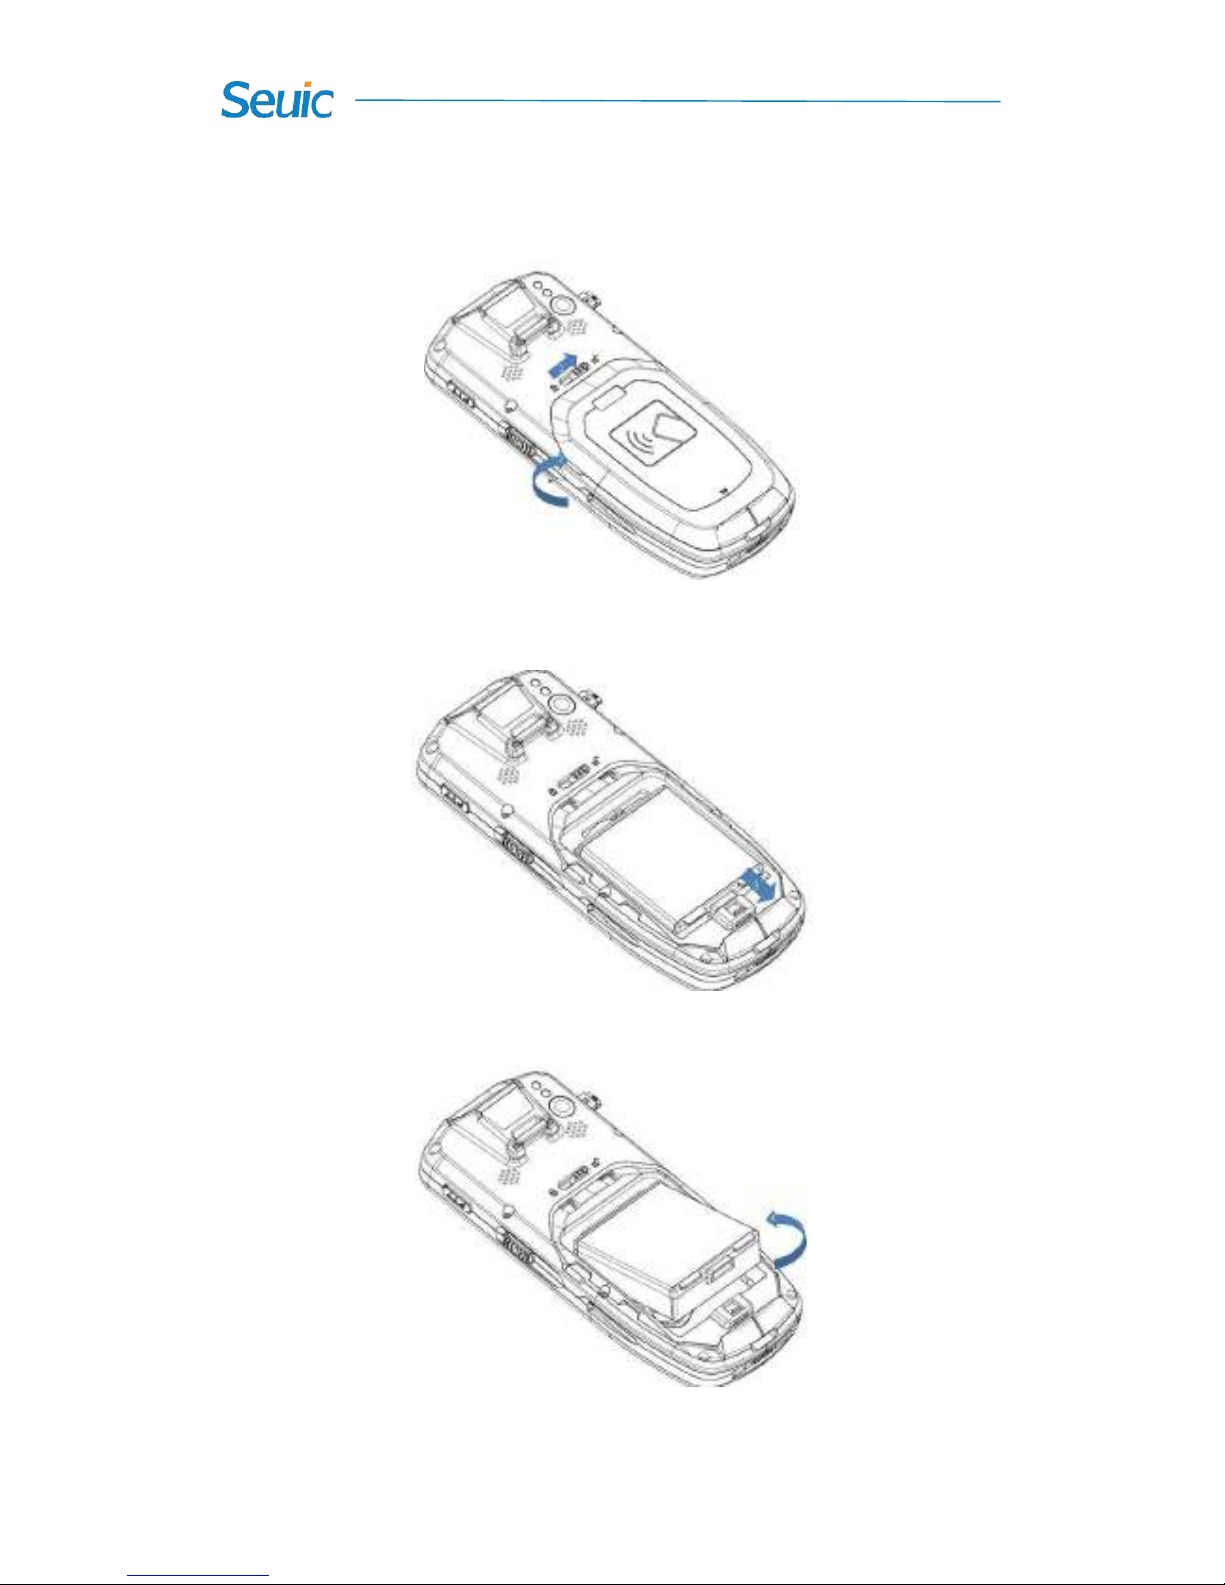
4.8 Uninstalling the battery
➢ Please uninstall the battery as instructed below:
13
➢ Slide the battery cover switch to the unlock side (right side);
➢ Remove the battery cover;
Figure 4-8 Remove the battery cover
➢ Slide the battery lock down to release the battery;
Figure 4-9 Unlock the battery
➢ Uninstall the battery
Figure 4-10 Uninstall the battery

14
Chapter 5 Charging the Battery
➢ Due to the battery in the factory only with a small amount of
electricity used for tests, you have to use the charger to charge the
battery before using it for the first time. After inserting the battery,
you can connect the device to the adapter for charging directly. At the
same time, the brand-new AUTOID 9/9HC series also have optional
cradles for charging
5.1 Charging time
➢ Battery: the battery’s first charge time is about 3.5 hours through the
adapter, and the LED indicator is solid red when charging. When
charging is completed, the LED indicator is long and solid green.
5.2 Charging temperature
➢ The best operating temperature is room temperature 18~250C.
➢ The battery will not be charged if the temperature lower than-100C or
higher than 550C.
5.3 Battery power supply
➢ If you turn on the wireless network service or data capture program,

15
the battery will drain quickly. You should close some services and
features that use battery to save power.
➢ In order to avoid the work inconvenience caused by low battery
power, it is recommended that you prepare a fully charged battery or
connect an external power supply at work.
Note: If you do not use the product for a long time, please charge the
device at least once every two months.
5.4 Notes for battery use
➢ If the battery is completely discharged, the device can’t be turned on
immediately. This is a normal phenomenon. Allow the depleted
device to be charged for a few minutes before turning on the device.
➢ The battery can be charged repeatedly, but the battery is a consumable
product. Please replace a new battery if you find the device's standby
time is greatly reduced.
➢ Battery charging time changes with temperature and battery usage.
Please charge it at a reasonable temperature range.
➢ When the battery is in low power, the device will give the low-power
warning. When the battery power is too low, the device will
automatically shut down.

16
5.5 LED Indicators
➢ the LED indicator, in the middle of the top right of the device,
indicates the battery and charging status by flashing different colors:
➢ Without the insertion of USB and charging adapter, red flash shows
that the battery power is low. Please charge the device as soon as
possible.
➢ With insertion of USB cable and charge adapter, long bright red
indicates that the battery is charging.
➢ With insertion of USB cable and charge adapter, long bright green
indicates the battery is fully charged.
➢ If the LED indicator on the right side of the device flashes blue just
like the breathing light, it indicates that there’s a message for
reading. Please check it in time.
➢ When a bar code is scanned, the LED indicator flashes red once.
When the bar code is not scanned, there will be no LED flash.
Note: When the system is in charge, the blue indicator light will not be
on.
17
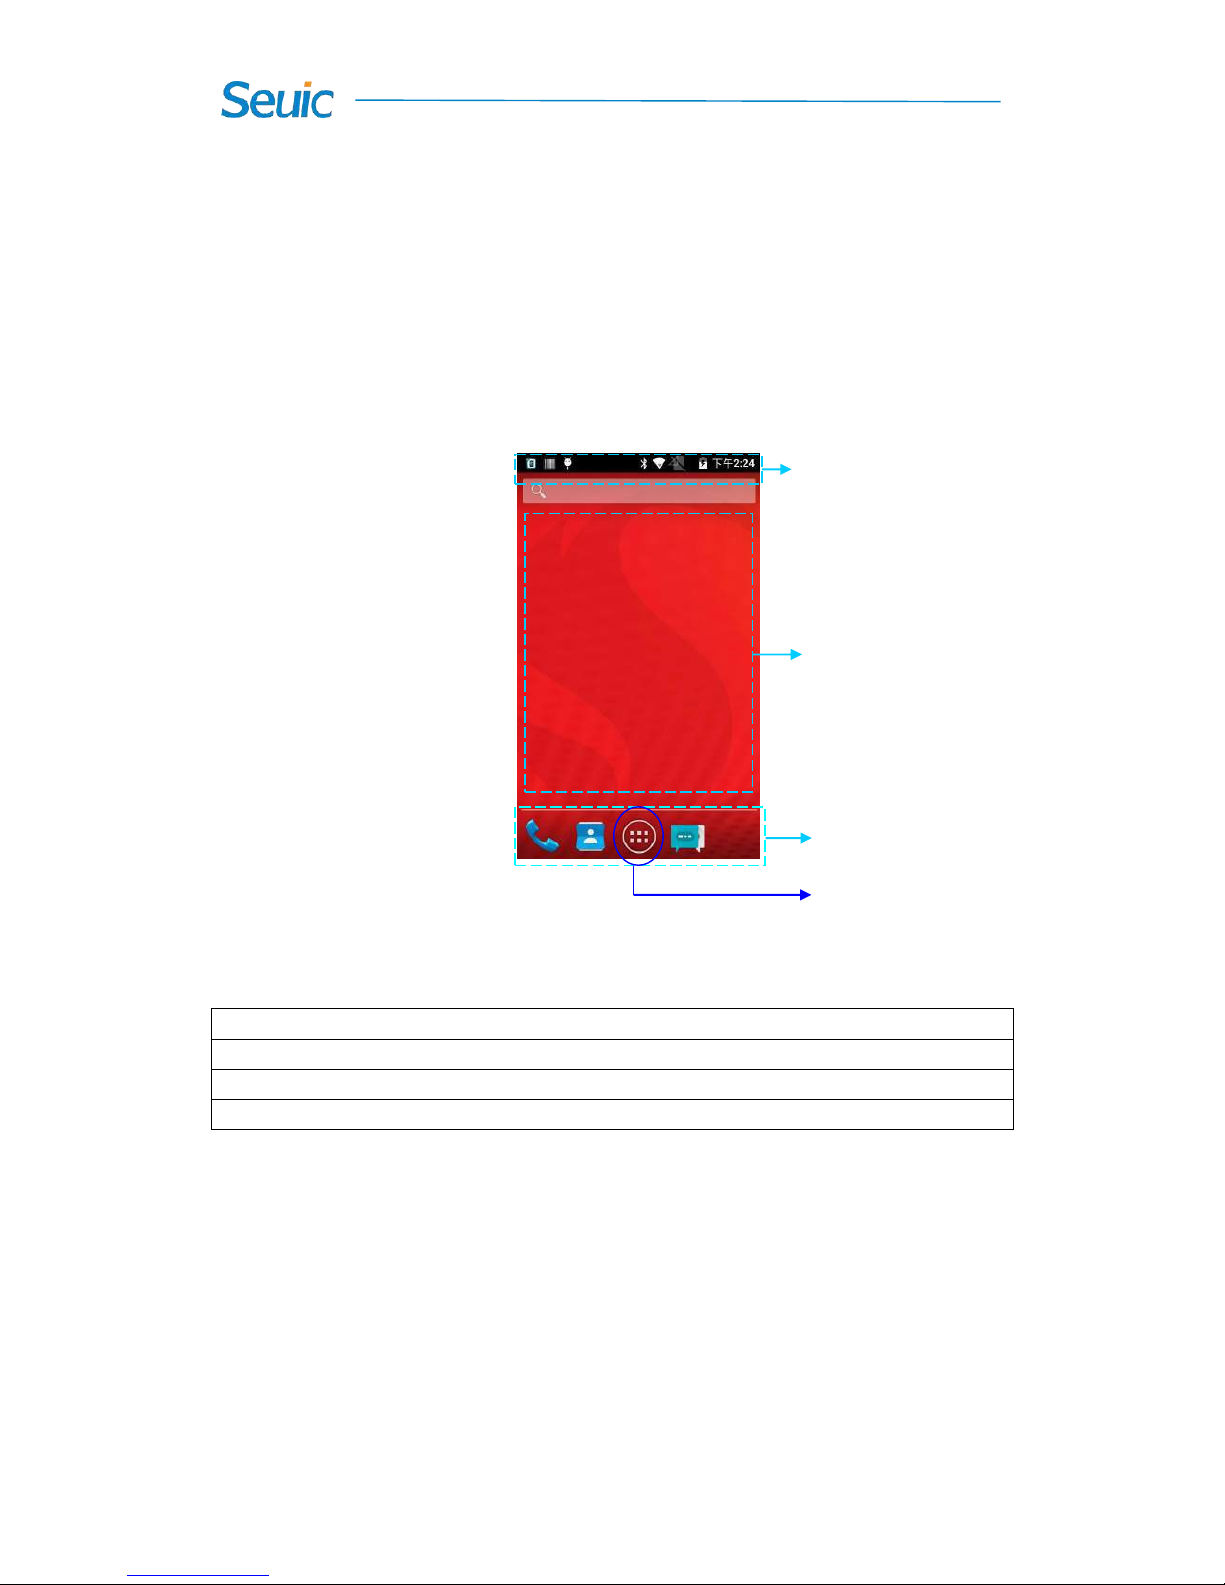
Chapter 6 Home Screen
The Home screen of Brand-new AUTOID 9 / 9HC series devices
have five panels in total, To view other panels, slide left or right. Tap any
APP icon on the Home screen to access its functions.
Figure 6-1 Home Screen
Table 6-1 Home screen features
① Status bar:display notification and status icons.
② Display area:used to place APP icons, folders and widgets.
③ Shortcuts:tap to launch APPs.
④ Tray application: tap to view all the APPs.
6.1 Status Bar
Status icons and notification icons are located at the top of the screen to
notify the device status information and notifications, as shown in the
table below:
① ② ③
④
18
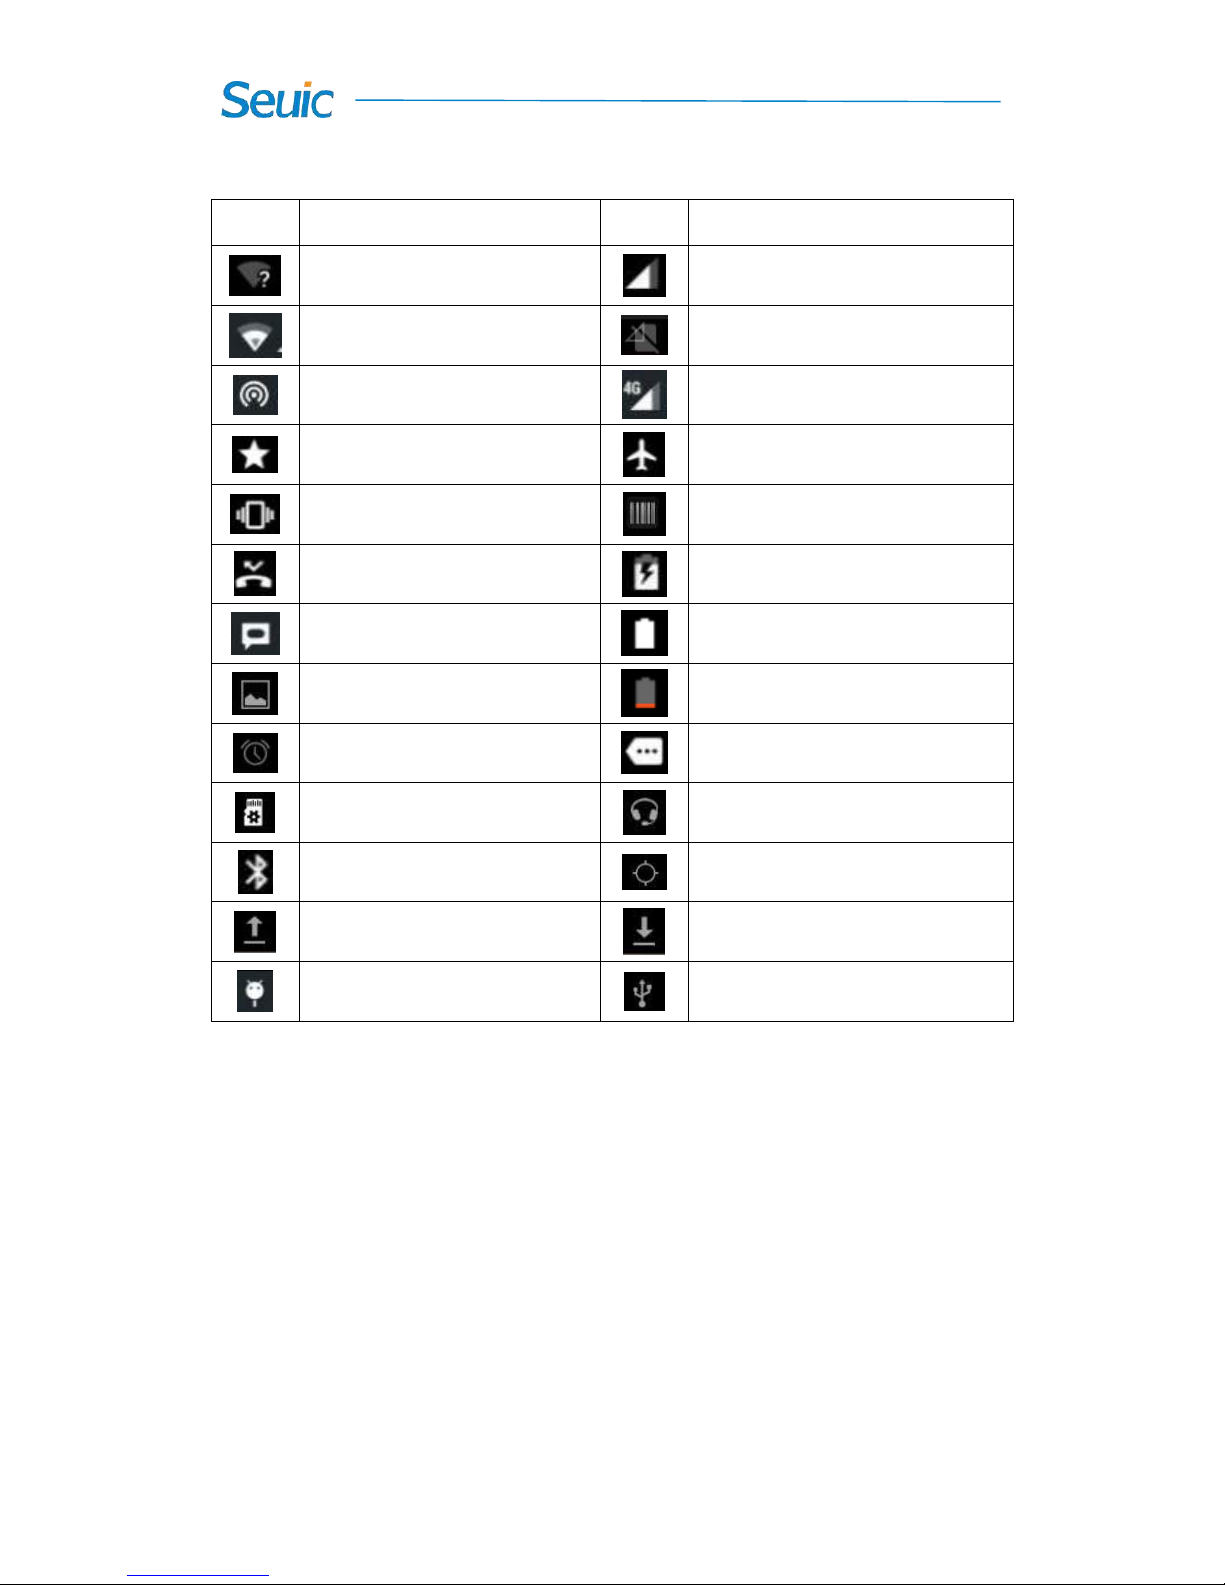
Table 6-2 Status Icons and Notification bar Icons
Icon
Description
Icon
Description
An Available Open Wi-Fi
Network
Signal Strength
Connected to a Wi-Fi Network
SIM card missing
The portable WLAN is on
Connected to a Mobile Network
Silent Mode
Airplane Mode
Vibrate Mode
Scanning is on
Missed Call
Battery being charged
New Messages
Battery is fully charged
Screenshots saved
Battery level critically low
Alarm activated
Multiple notification icons are
beyond the display limit
Preparing microSD Card
Headset is connected to the
device
Bluetooth
Location Service (GPS) enabled
Uploading Data
Downloading Data
USB Debugging
USB connection with PC
established

19
Chapter 7 Settings
7.1 WLAN
Find this icon:
->Settings
->Wi-Fi and network
->WLAN
2.4G and 5G Wi-Fi provides the farthest 450 feet (150m) and 300 feet
(100m) wireless network access range respectively (note: industry class
AP, open area). To use the Wi-Fi on your device, you must connect to a
wireless access point or hotspot.
Note: the availability and range of the Wi-Fi signal are determined by the
number, the infrastructure, and the object to which other signals are
penetrated.
Tap Wi-Fi and then turn on the Wi-Fi switch. Connect to the Wi-Fi
network.
1. Tap WLAN and switch on the Wi-Fi. The device will detect available
wireless networks automatically.
2. Then the Wi-Fi network list available will show the network name and
security type of the Wi-Fi network (open network or encrypted network)
3. Tap one of the networks to make a connection. If you select an open
Wi-Fi network, your device will connect automatically. If the network is

20
protected, enter the password when prompted and then tap Connect.
Figure 7-1 Wi-Fi menu
4. WALN frequency band setting (Advanced -> WLAN frequency
band). If you select only 5GHz/2.4GHz frequency band, only
5GHz/2.4GHz frequency band AP can be searched.
Figure 7-2 WLAN frequency band
Tap to connect to the network
Tap to turn on and detect the network
21
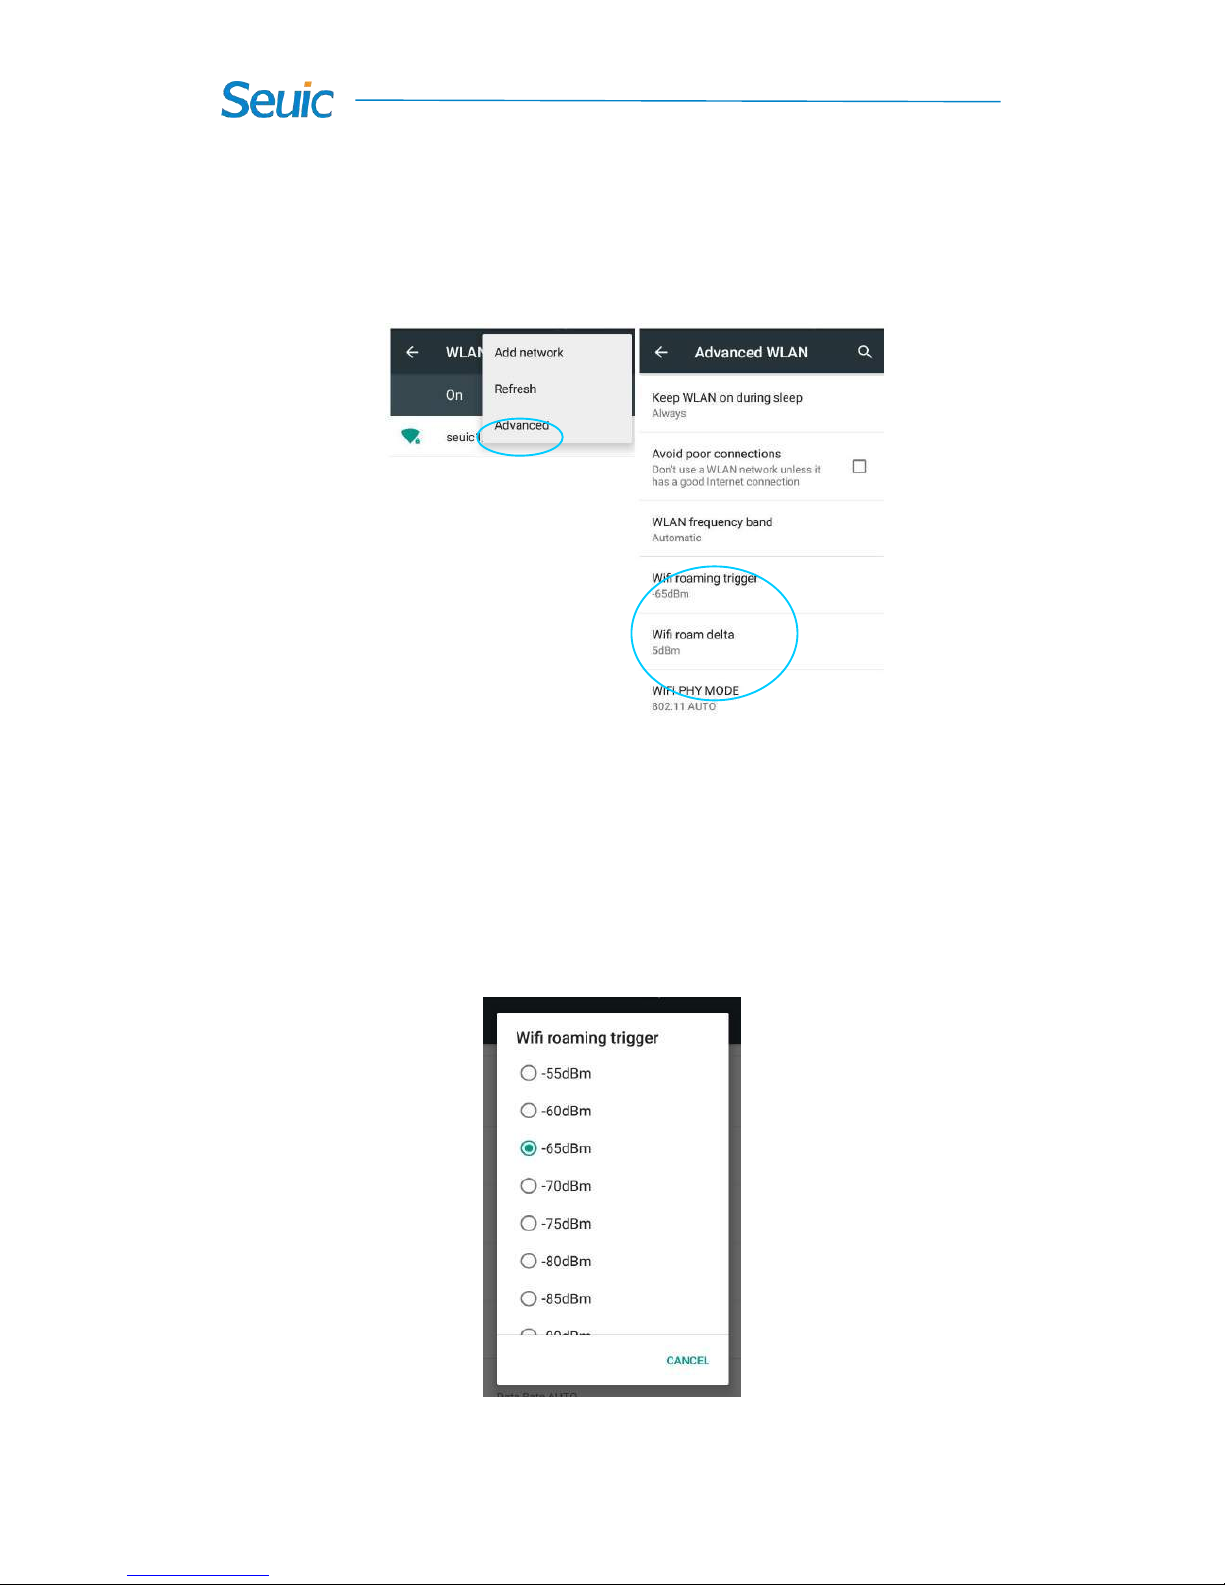
5. Wi-Fi roaming threshold and roaming increment can be set by the
advanced settings according to customer needs (on the Wi-Fi switch
interface, brief press Menu button or Settings -> Advanced).
Figure 7-3 WLAN roaming setting
(1)Roaming threshold: when the connected AP signal value (Note:
a roaming environment is required) is lower than the set threshold, the
roaming will be triggered. When the roaming threshold is set to -65dBm,
roaming will be triggered by lower value than -65dBm.
Figure 7-4 Roaming threshold
22
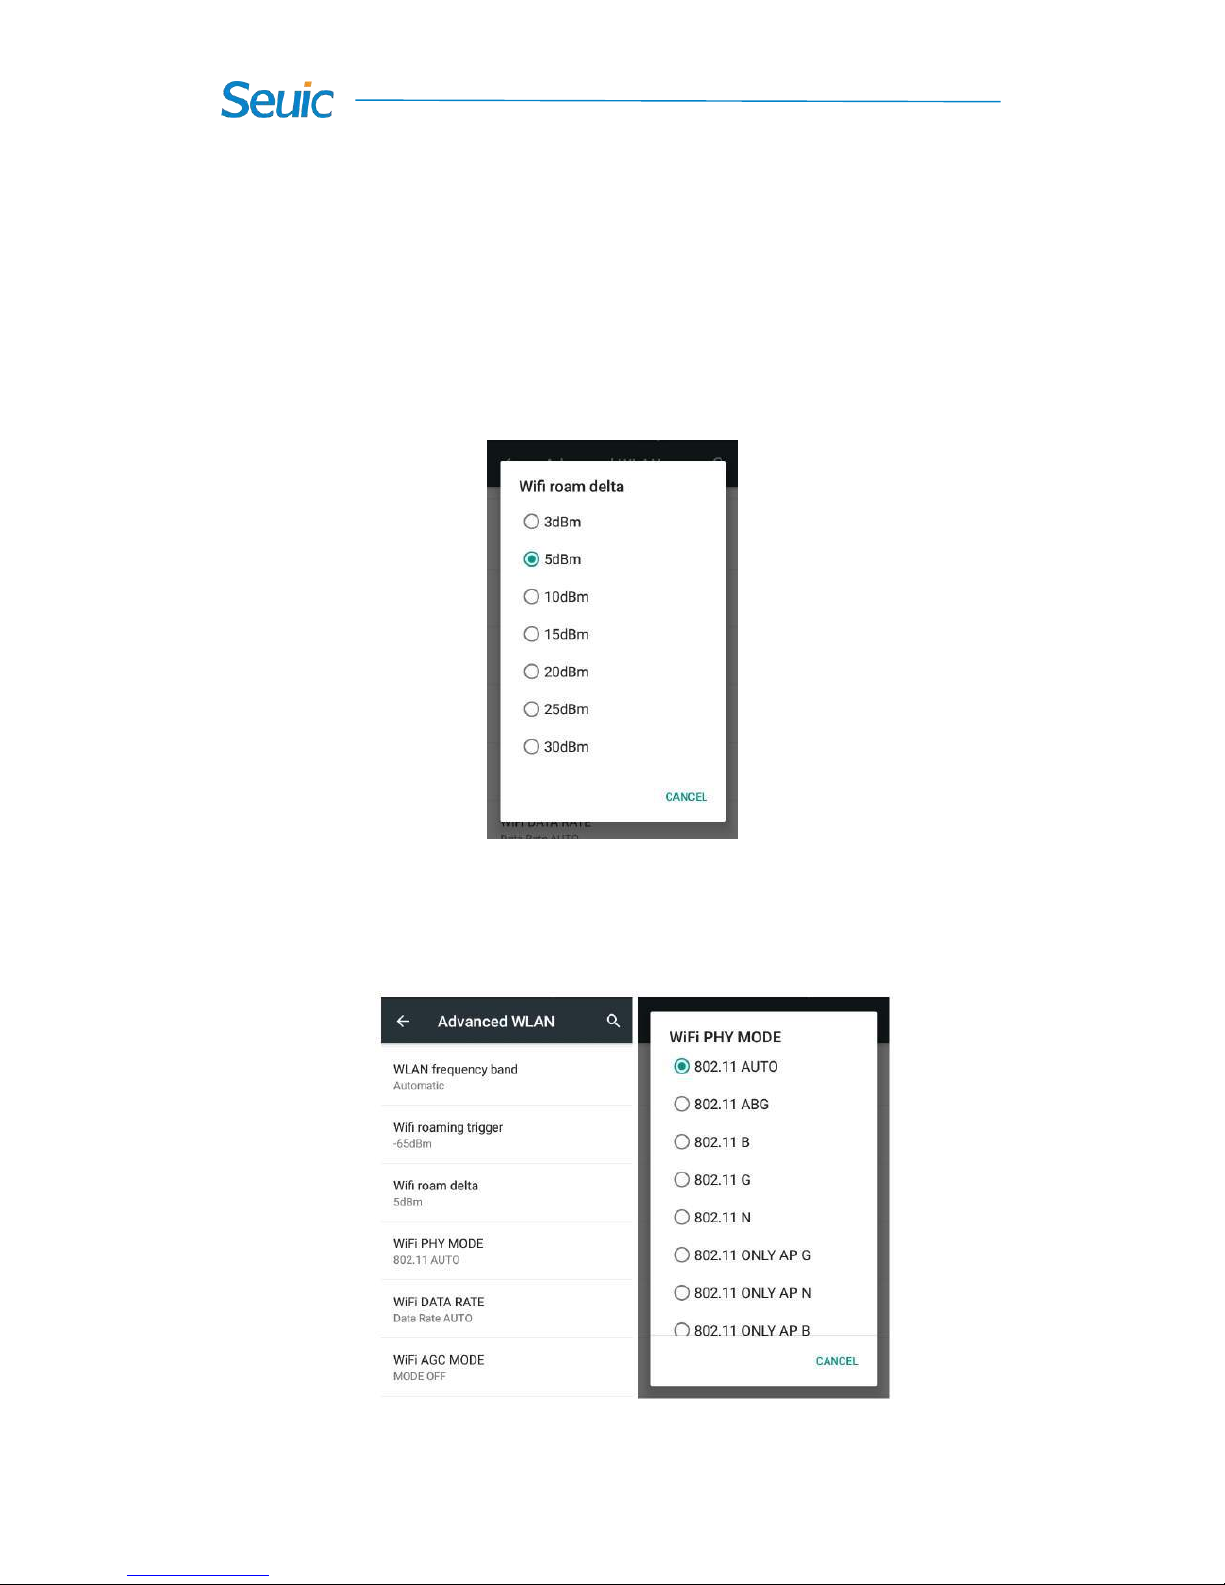
(2) Roaming increment: when the signal difference value between
the two APs reaches the set value, roaming will be triggered to connect to
the AP with better signal value. If the difference value between the two
APs is higher than 5dBm, as shown in the figure (Roaming threshold is
also required to be reached), roaming can normally start.
Figure 7-5 Roaming increment
5. WIFI work mode configuration: support module configuration of
fixed work mode (a/b/g/n), and the default is 802.11 AUTO.
Figure 7-6 WIFI work mode configuration
23
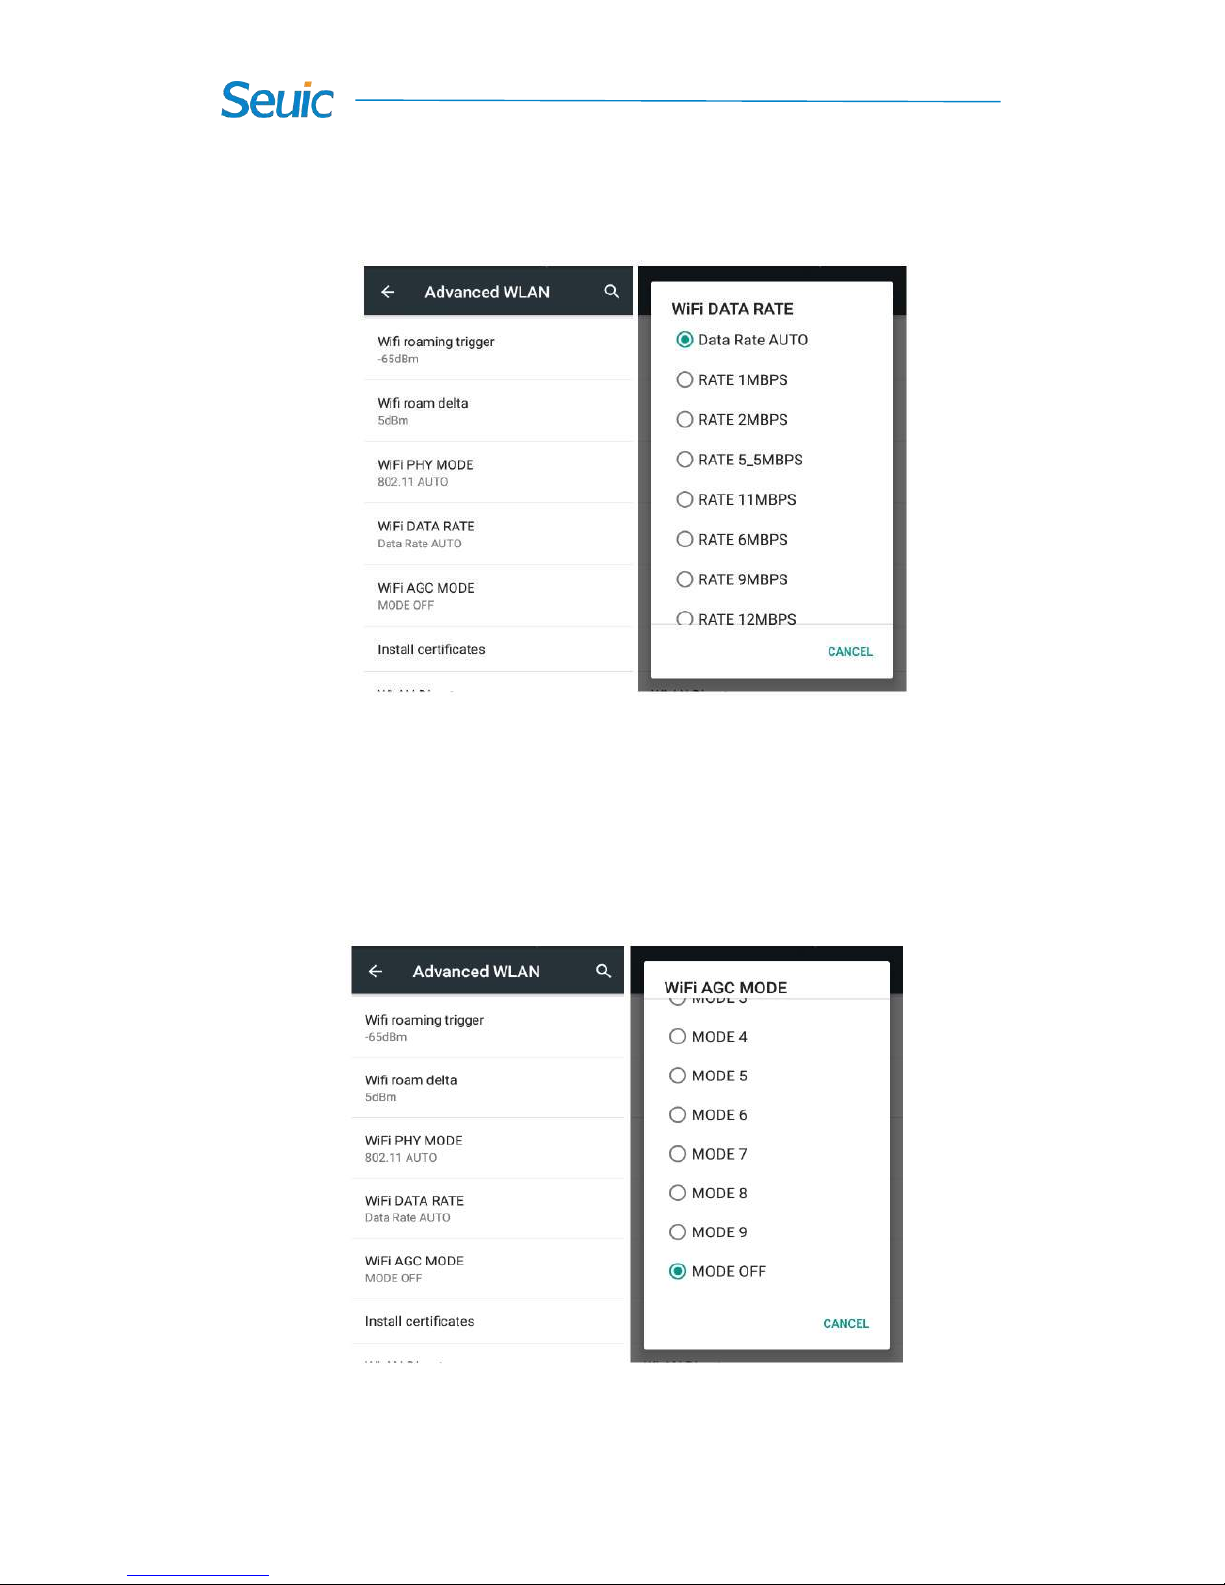
7. WIFI data rate supports rate control and the default value is Data Rate
AUTO.
Figure 7-7 WIFI data rate
8. AGC monitor threshold configuration; AGC RX control function is
used to adapt to the noisy environment and low receiving efficiency to
reduce the interference, and the default is MODE OFF.
Figure 7-8 AGC monitor threshold configuration
24
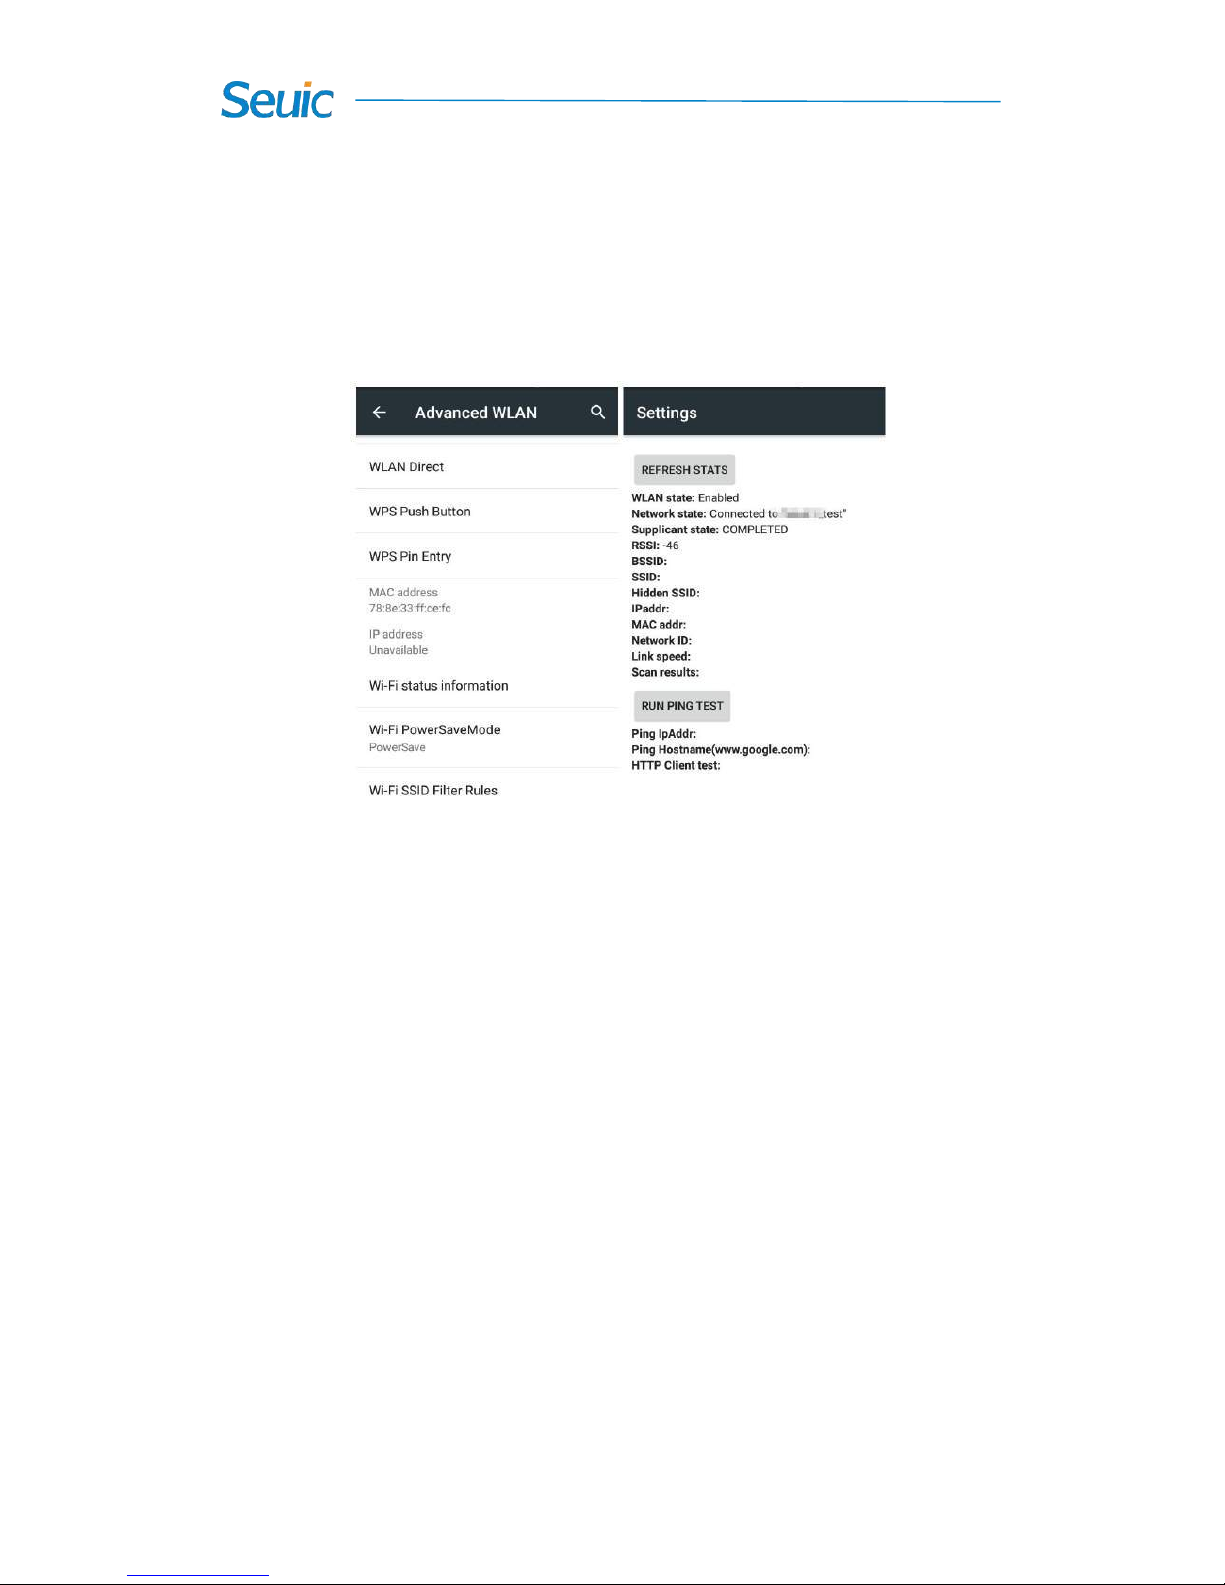
9. Wi-Fi status information: you can view relevant information on the
Wi-Fi status information interface, and tap REFRESH STATS, such as
Wi-Fi status, the connected AP, signal value, MAC address, etc., as
shown in the figure below;
Figure 7-9 Wi-Fi status information
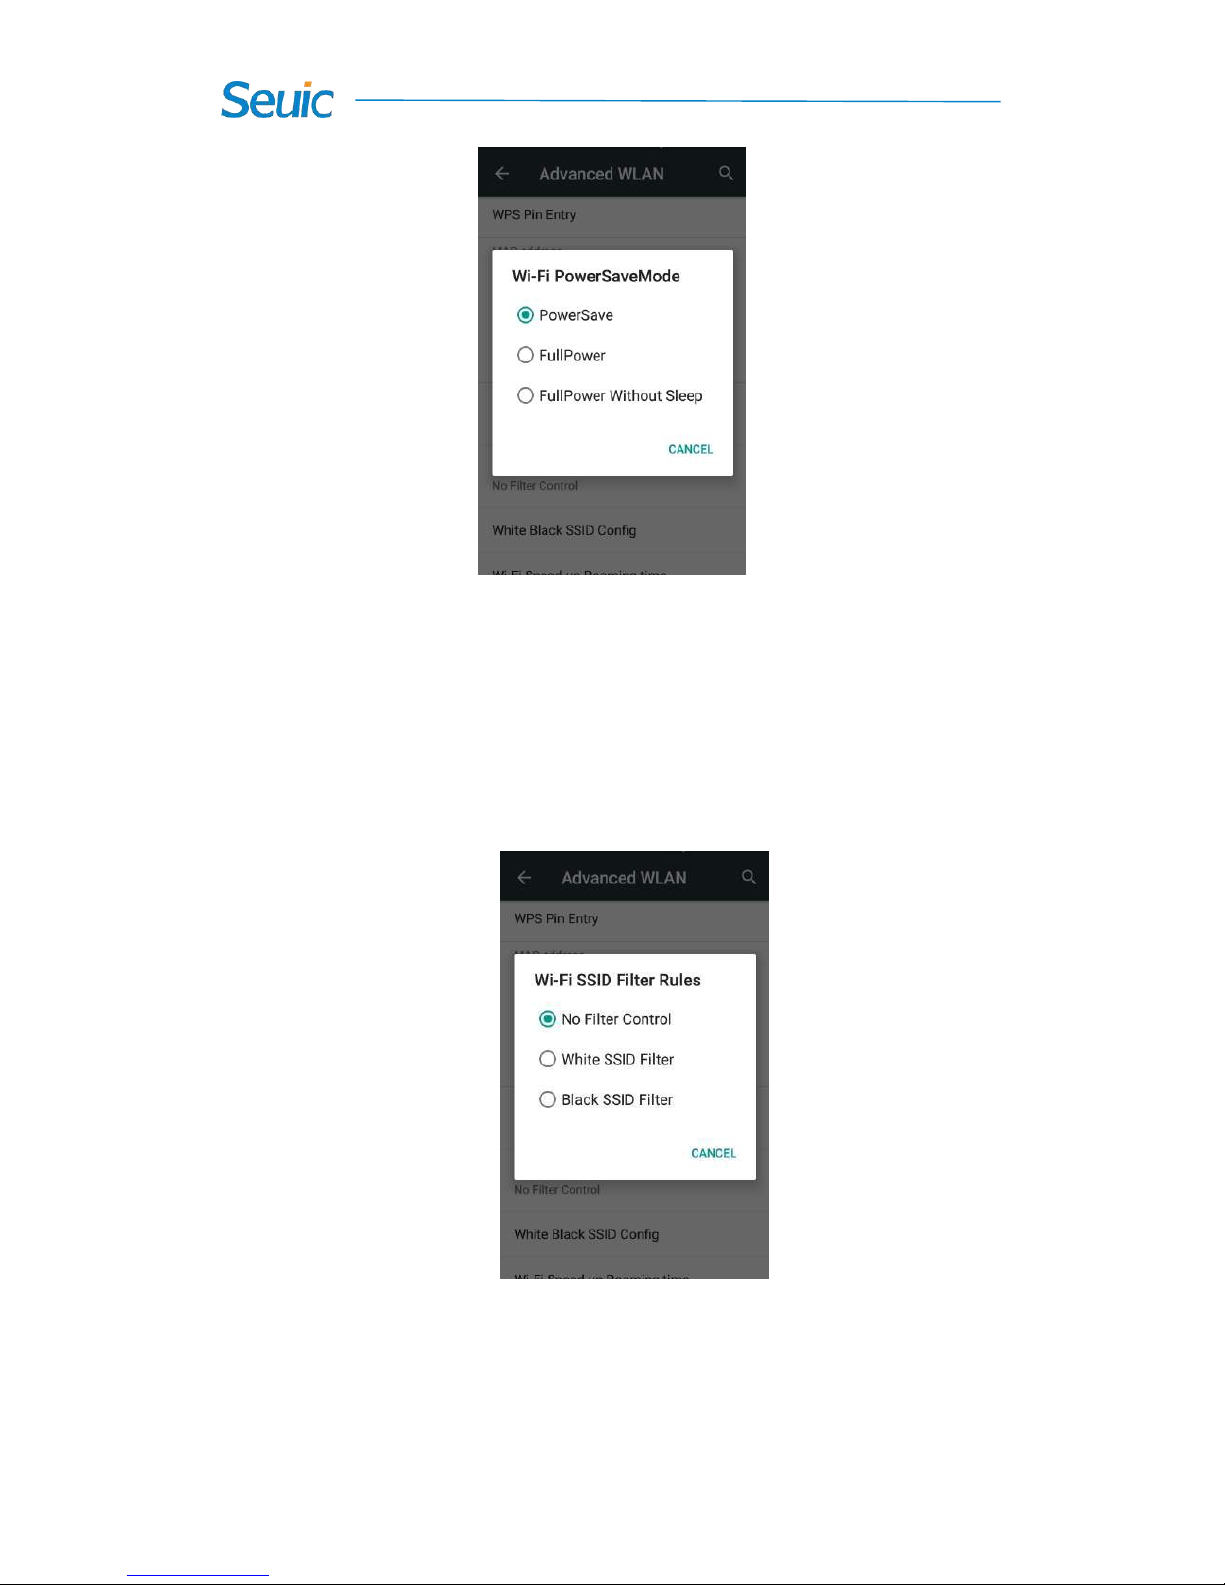
10. Power saving mode settings: there are three modes: power saving, full
power, full power but to save power in sleep mode, and the default is
power saving mode. Power saving indicates always taking the
power-saving mode; full power indicates always taking the activity mode,
huge power consumption; full power but to save power in sleep mode
indicates that only saving power in the sleep mode.
25
Figure 7-10 Power saving mode
11. Wi-Fi SSID Filter Rules and configure blacklist and whitelist
(1) Wi-Fi SSID Filter Rules (set filter rules): there are three rules:
Do not use any filter rules, Only display whitelist AP, Do not display
blacklist AP, as shown in the figure below:
Figure 7-11 Set filter rules
(2) The blacklist configuration contains adding the whitelist, deleting the
whitelist for the specified serial number, adding the blacklist, deleting the
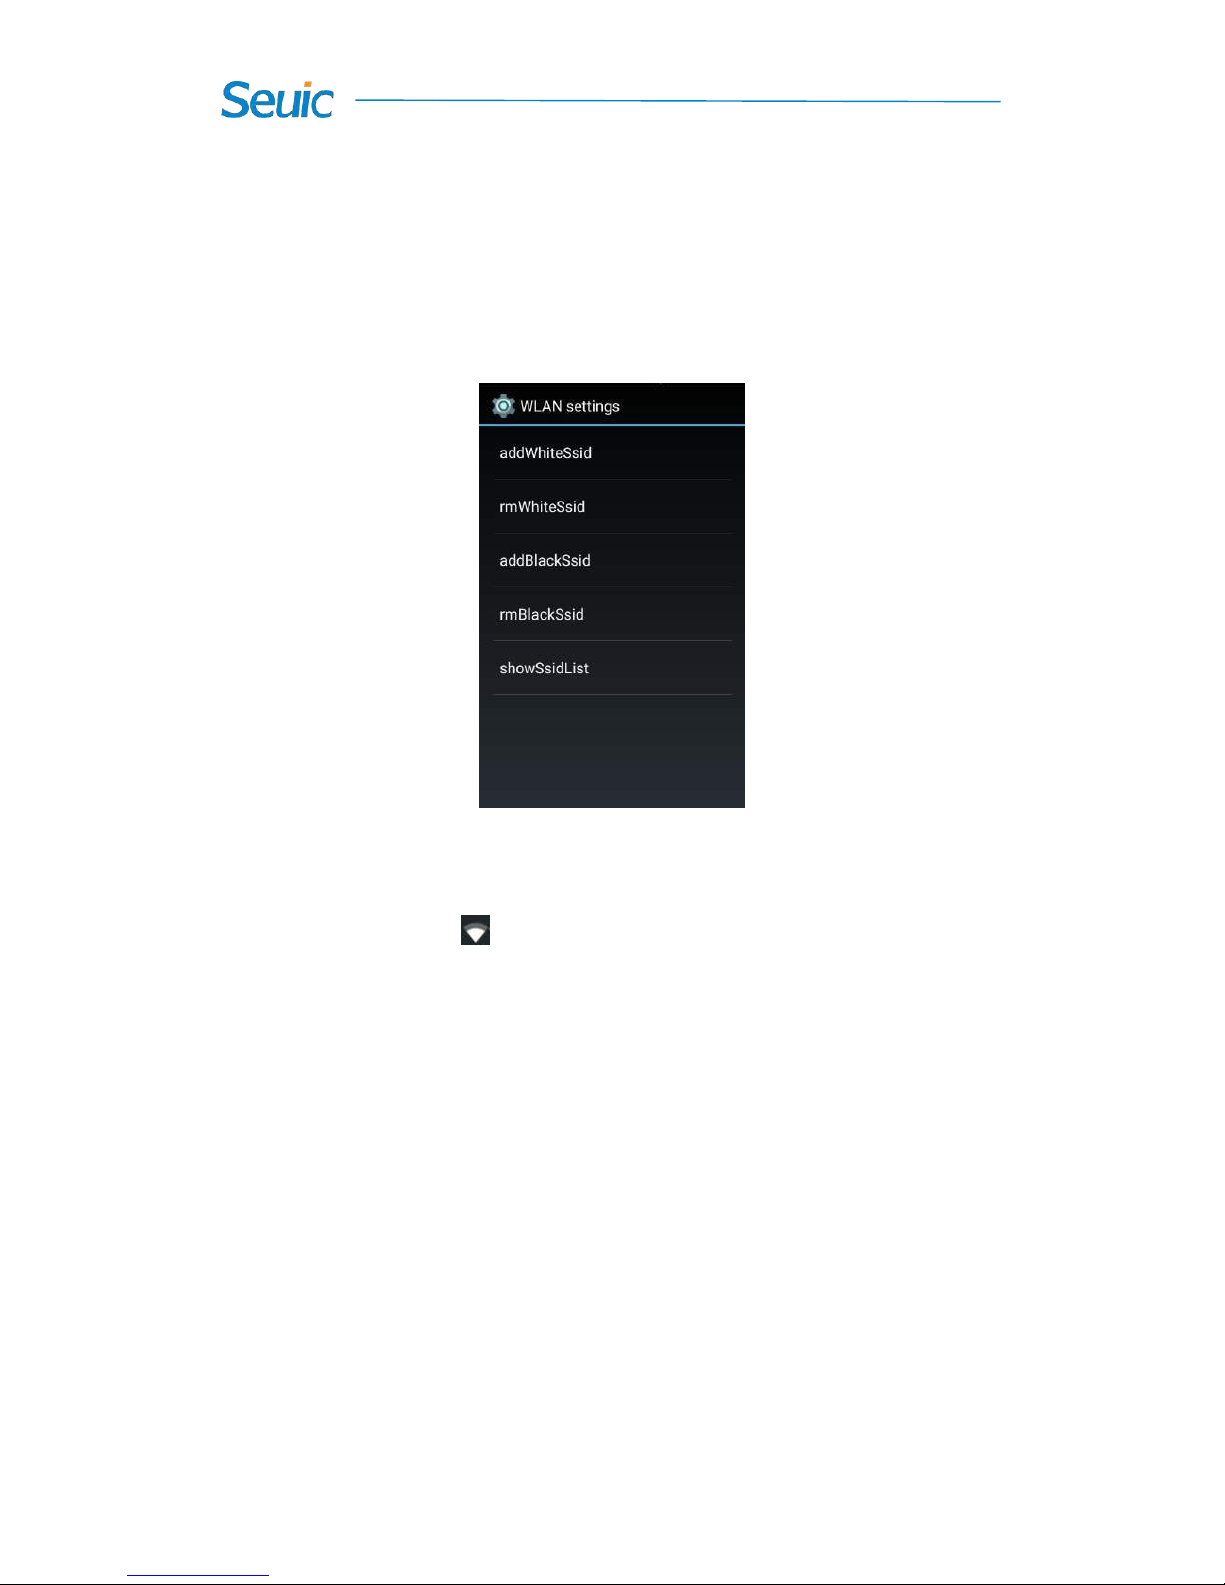
26
specified blacklist, and displaying the current list status. Enter the correct
SSID number to add the black/white list; enter the serial number of AP to
delete the specified white/black list; enter 0 to delete all (The AP serial
number can viewed by displaying the current list status).
Figure 7-12 Configure blacklist and whitelist
Note: when the device is connected to a Wi-Fi network, the
connected Wi-Fi icon will display in the status bar and shows you the
signal strength ( indicated by the number of bands that light up). If you
touch the Wi-Fi network that is currently connected to the device, its
name, status, speed, signal strength, security information, and IP address
will be displayed.
If you want to remove the wireless network settings on your device,
touch and hold the connected AP, and then select to forget network and
delete this AP, as shown in the figure:
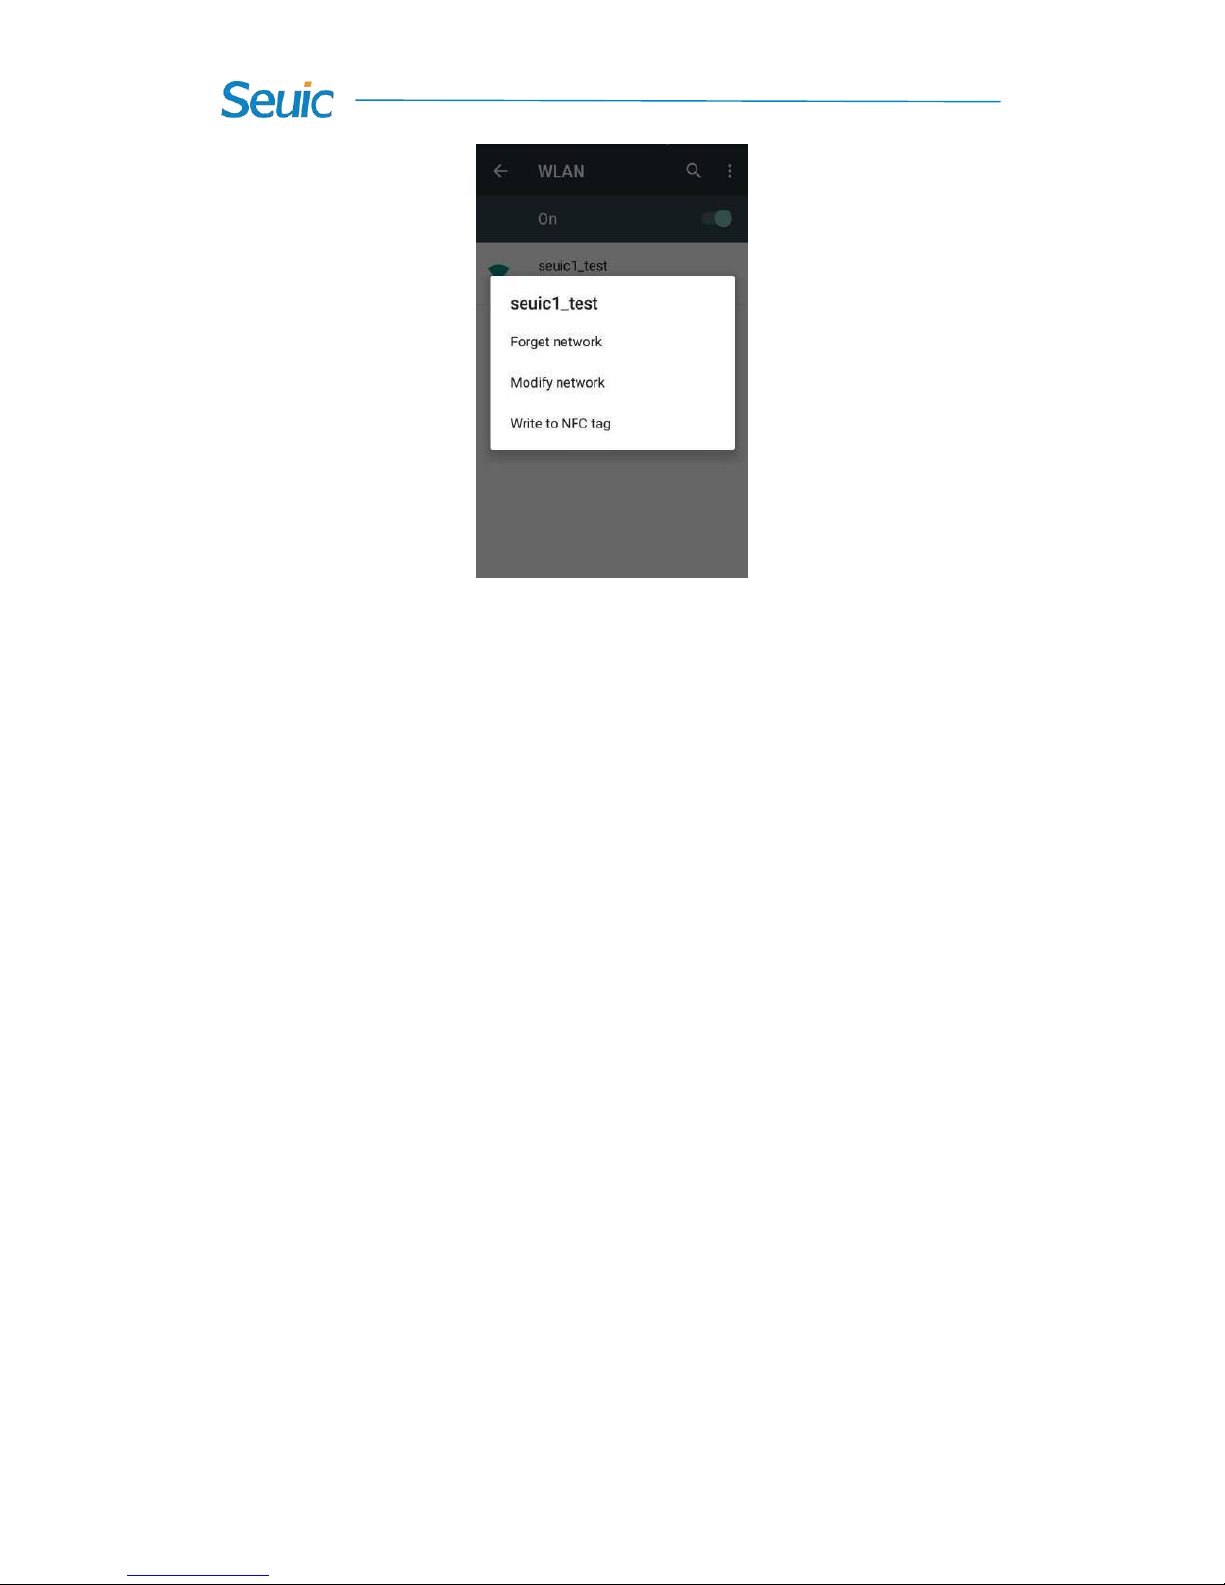
27
Figure 7-13 Delete or modify network
Note: the device will remember an encrypted Wi-Fi network you
have used before and reconnect to it automatically. You don’t need to
enter password again. When Wi-Fi is enabled, the device will
automatically connects to the best network.
Connect to other Wi-Fi networks
➢ On the Wi-Fi On/Off switch interface, touch the scan, and you will
then see a list of available Wi-Fi networks.
➢ Tap the Wi-Fi network you want to connect.
28
7.2 Bluetooth
Find this icon:
->Settings
->Wi-Fi and networks
->Bluetooth
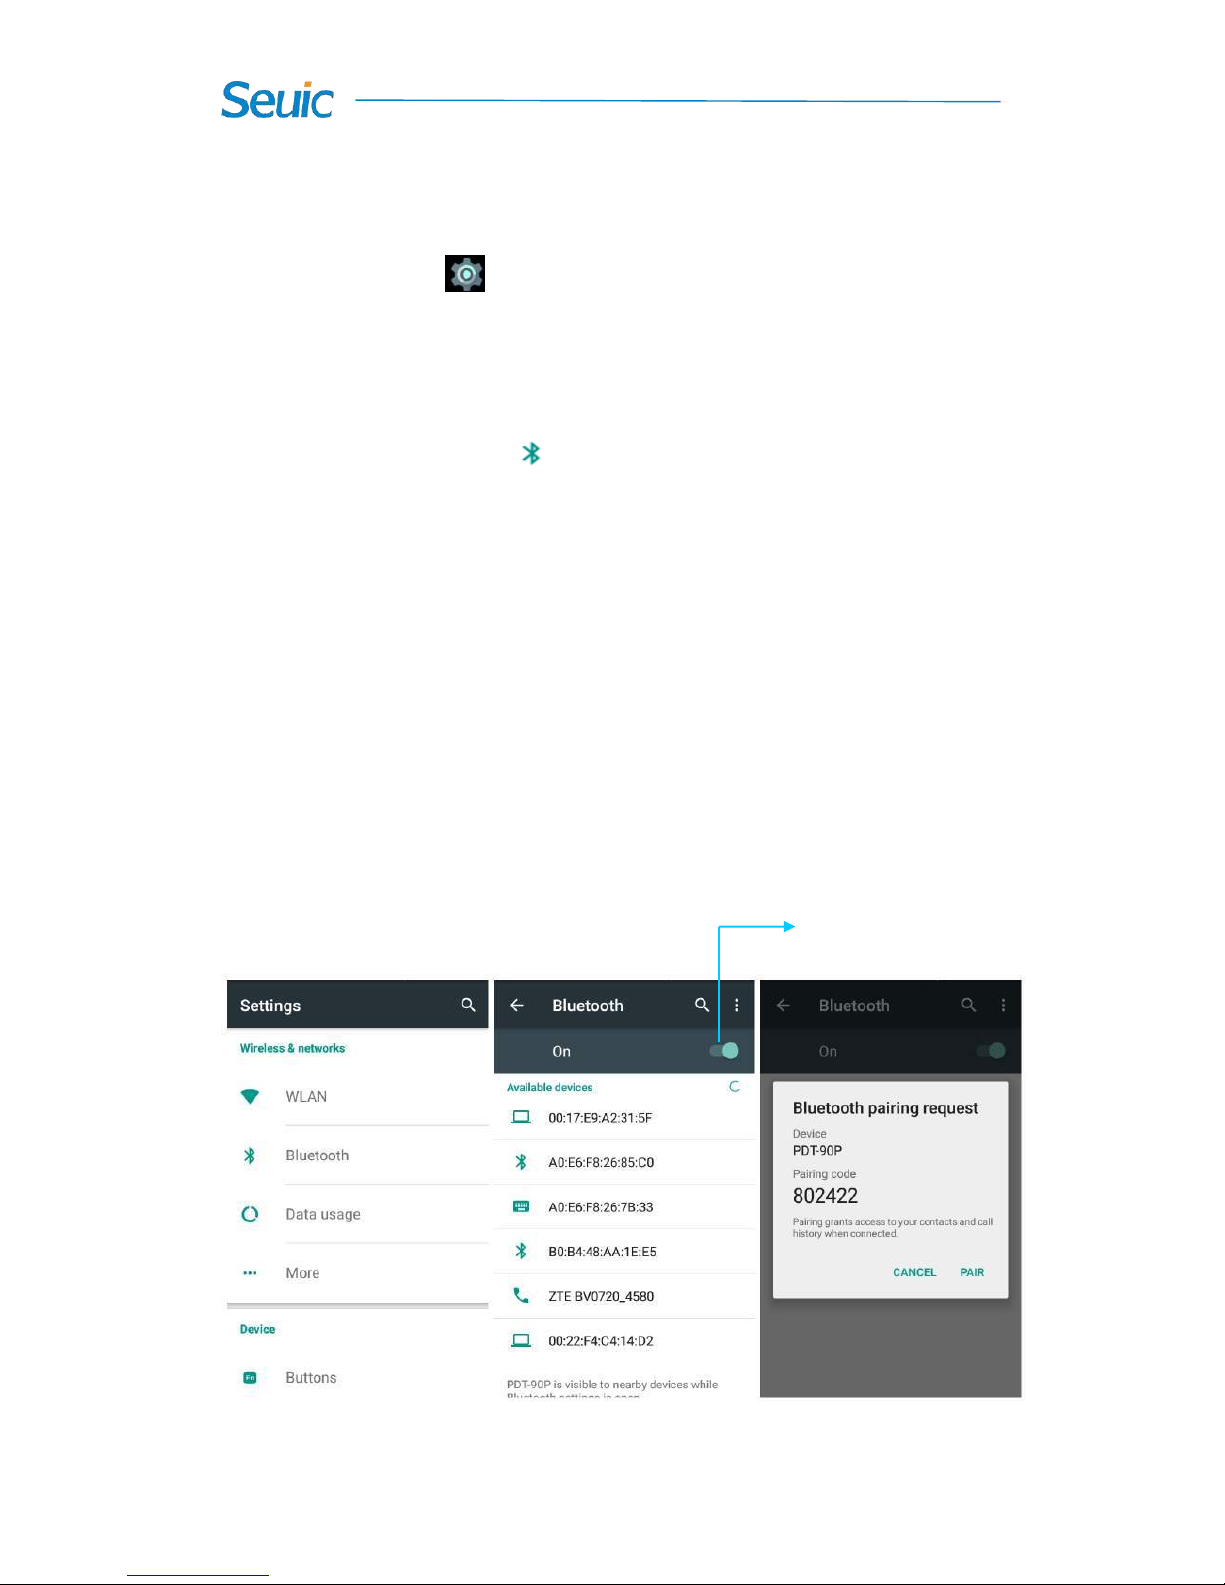
1.On the Settings screen, tap Bluetooth, and then tap the switch to
activate it and detect other Bluetooth devices;
2.Select a Bluetooth device you want to pair with from the detected
Bluetooth devices list;
3. Input the PIN code into the pop-up dialogue box of the Bluetooth
connection request on your device to confirm;
Figure 7-14 Bluetooth menu
Tap the switch to activate it
 Loading...