

Setra Systems Super II Supervisor And Technical Manual

TM
Super II
Supervisor and Technical
Manual
Setra Systems, Inc
Weighing Systems Division
159 Swanson Road
Boxborough, MA 01719
TDSS2068-01 Rev D 12/01

Table of Contents
Introduction ...............................................................................................................................................4
Supervisor Setup.......................................................................................................................................... 9
Soft Key: PRINT SETUP............................................................................................10
Soft Key: SAMPLE SETUP ....................................................................................... 18
Soft Key: ACCURCY SETUP ....................................................................................20
Soft Key: PORTS SETUP...........................................................................................22
Soft Key: TIME/DATE................................................................................................ 24
Soft Key: UNITS ENABLED ..................................................................................... 27
Soft Key:DATBASE SETUP......................................................................................30
Soft Key:TRANSAC SETUP .....................................................................................34
Soft Key:ID NAME SETUP....................................................................................... 38
Soft Key: MACRO SETUP........................................................................................ 41
Soft Key: SETUP SECURTY ..................................................................................... 47
Soft Key: BEEPER CONTROL.................................................................................. 49
Bases Setup...................................................................................................................................................51
Soft Key: CALIB..........................................................................................................52
Soft Key: SPEED......................................................................................................... 56
Soft Key: ZERO........................................................................................................... 58
Soft Key: RESOLUT ................................................................................................... 60
Soft Key: INFO............................................................................................................ 62
Soft Key: NAME ......................................................................................................... 64
Soft Key: ADDRESS...................................................................................................66
Soft Key: BASERST....................................................................................................69
Technical Setup ...........................................................................................................................................70
Soft Key:GREETNG ...................................................................................................72
Soft Key: BACKLIT.....................................................................................................74
Soft Key: SETUP TRANSFR ..................................................................................... 77
Soft Key: RESET..........................................................................................................80

Soft Key: AUTO SWITCH ......................................................................................... 84
Soft Key: ALARMS..................................................................................................... 86
Soft Key: DIG INP ...................................................................................................... 90
Soft Key: SETUP SECURTY ..................................................................................... 92
Soft Key: HYSTERS.................................................................................................... 94
Soft Key: APW QTY................................................................................................... 96
Appendix A: RS232 Serial Port Communications ............................................................................99
Appendix B: ScriptcoderTM Custom Label Printing..........................................................................106
Appendix C: Battery Option ....................................................................................................................114
Appendix D: Strain Gauge Remote Scale Option ............................................................................116
Appendix E: Specifications ......................................................................................................................122
Appendix F: Glossary .................................................................................................................................125
Appendix G: Warranty ...............................................................................................................................127
Appendix H: Warnings...............................................................................................................................128
FCC W arning .................................................................................................................................................129
EC Declaration of Conformity.................................................................................................................130
Index................................................................................................................................................................131

Introduction
Introduction • Super II 4

Introduction
For many counting or weighing applications, the Super II default settings are adequate and the scale can
be used just as it comes from the factory. However, often the scale performance can be enhanced or
operation simplified if the factory settings are changed, or if some of the more specialized features are
enabled. This manual is designed to instruct the programmer in the procedures used to change factory
default settings for numerous scale features and, also, to describe how to use certain other features that
are not enabled at the factory. Access to these settings can be password protected to assure that the
settings, once programmed, are only changed by authorized personnel.
The manual is divided into four sections: Supervisor Setup, Technical Setup, Bases Setup and the appendices. Supervisor Setup, in general, allows application specific customization of the scale, such as programming the minimum sample size that will be allowed for counting certain parts, setting the baud rate for
communicating with a particular printer, changing the name of field identifiers that will appear on printed
labels and customizing prompts that will walk the user through a recurring counting or weighing transaction. Technical Setup allows customization of the scale that tends to be more related to scale performance,
as well as several other scale specific parameters. The Bases Setup section describes how to configure the
network of bases, including performance parameters. The fourth section consists of appendices that
explain, at length, how to use two standard features, RS232 data communications and the ScriptCoder
label making routine. It also describes the use of the optional battery and strain gauge remote scale option
which can be purchased separately.
This setups manual will enable customization and/or implementation of the following scale f eatures:
Printing
Text and bar coded labels can be printed directly from the Super II controller using the optional Dymo®
SETRA 300 printer or the more advanced Eltron thermal printer (not available from Setra). ScriptCoder
allows easy interfacing to a wide variety of other printers and use of its powerful scripting language can
produce fairly complex labels, if needed.
Multiple Scale Systems
As described in the Bases Setup section of this manual, a single Super II scale can be converted into a
system consisting of one Super II controller connected to and operating up to eight separate bases. These
bases can be either Setra variable capacitance load cell bases or more conventional strain gauge load cell
bases, or a combination of both. This feature provides the advantage of integrating, at one workstation,
high resolution, low capacity bases for the optimal development of average piece weights, with low
resolution, high capacity bases for counting and weighing very large, bulky loads.
Internal Database
A flexible internal database can be used to store part numbers and associated data for up to 750 inventory
items. The ability to instantly recall an item‘s average piece weight from the database can eliminate repetitive sampling when that part is frequently counted. The ability to recall descriptive information from the
database reduces the need to input data when transaction receipts or other labels are generated.
Transaction Log
Resident in the scale’s database, this feature chronologically stores the results of each weighing or counting operation. The part number, the operator’s name, the time and date of the transaction and the quantity
counted can be automatically stored when the appropriate key is pressed. Transaction reports can be
periodically printed to help track material flow and reconcile inventory miscounts.
Introduction • Super II 5

Prompting Macros
The scale’s display can prompt a user through a series of steps for repetitive tasks. The macros are easily
written using this manual and the Super II controller. They can consist of up to 100 individual steps and
can be written in some foreign languages or industry jargon, if desired. The macros help to simplify scale
operation for novice or untrained operators by providing one-button operation.
Programmable Accuracy and Sample Size
This feature permits the programmer to make a trade-off between the sample size that is hand counted
onto the scale and the accuracy that the scale can potentially deliver. The higher the accuracy setting
selected, the larger the sample weight required. If the parts are small, a high accuracy setting can mean
that the scale will prompt an operator to hand count very large samples onto the scale. Hand counting
large samples can, in itself, introduce operator errors as well as slow down the scale counting process.
Hand counting very small samples (fewer than 5 pieces) may produce errors, since the average piece
weight may not be representative of the entire population of parts. The programmer uses these settings
to minimize errors introduced by nonuniform parts, hand counting or insufficient sample weight.
Programmable Units of Measure
A preprogrammed list of weighing units is available in the User Menu. This feature allows the programmer
to make several units available to the user, or only one unit if one is less likely to create confusion. Customized weighing units for special applications can be programmed and can be easily accessed by the user
when needed
.
Setra Dialog Language (SDL) (New in Software Ver 3.01)
Setups, database records and transaction logs can be saved and restored using the Setra dialogue language.
A brief synopsis of the programming functions as they appear in the menu selections are listed below:
Supervisor Menu:
PRINT Program the interval print time period as well as the print formats for the 10 print
SETUP registers.
SAMPLE Program the minimum sample size, the sample size selections and to include a
SETUP sample size selection menu as part of your default operation.
ACCURCY Program the minimum scale performance accuracy based on the sample weight.
SETUP
PORTS Program the baud rate and parity characteristics of the three serial ports.
SETUP
TIME Program the time and date and their reporting formats on power-up and when
DATE printing.
UNITS Select the availability of the various weighing units of measure as well as
ENABLED program the user definable unit of measure.
DATBASE Select the Database fields for display, print the databases, and set the database
SETUP record protection.
Introduction • Super II 6

TRANSAC Activate and choose the fields to record in the transaction log, print the
SETUP transaction log or transfer to a computer, and clear the transaction log.
ID NAME Change the names of the ID fields.
SETUP
MACRO Program up to ten macros (a series of scale operation steps) along with
SETUP customizable prompts.
SETUP Program password protection for the Supervisor menus
SECURTY
BEEPER Allows the beeper to be disabled.
CONTROL
Bases Menu:
CALIB Perform a Span calibration and access the factory linearity calibration and test
UPDATE Select the filtering and update rate.
SPEED
menu.
ZERO Set the level of Zero Tracking.
TRACK
RESOLUT Set the displayed weight resolution of the scale.
INFO Display information about the bases such as display resolution, zero
NAME Change the name of a base.
ADDRESS Display and change the network address of the bases.
BASERST Force the controller to evaluate the base network.
Technical Menu:
GREETNG Change the greeting message on power-up.
BACKLIT Set up the battery saving modes for the backlight option (if available).
SETUP Send setup and database information through the ports.
TRANSFR (Note: Available in Software Version 3.01.)
tracking, sample resolution, and software revision.
RESET Return to the factory defaults and clear out separately the Database, Print
Registers, and Macros.
AUTO Program automatic switching options among multiple bases.
SWITCH
Introduction • Super II 7

ALARMS Configure and enable/disable the digital output alarms.
DIG INP Set up the controller for control by outside equipment.
SETUP Program password protection for the Technical and Bases Menu.
SECURTY
HYSTERS Set up display hysteresis for more stable display.
APW QTY Program the number of pieces by which the scale counts
Introduction • Super II 8

Supervisor Setup
Supervisor Setup • Super II 9
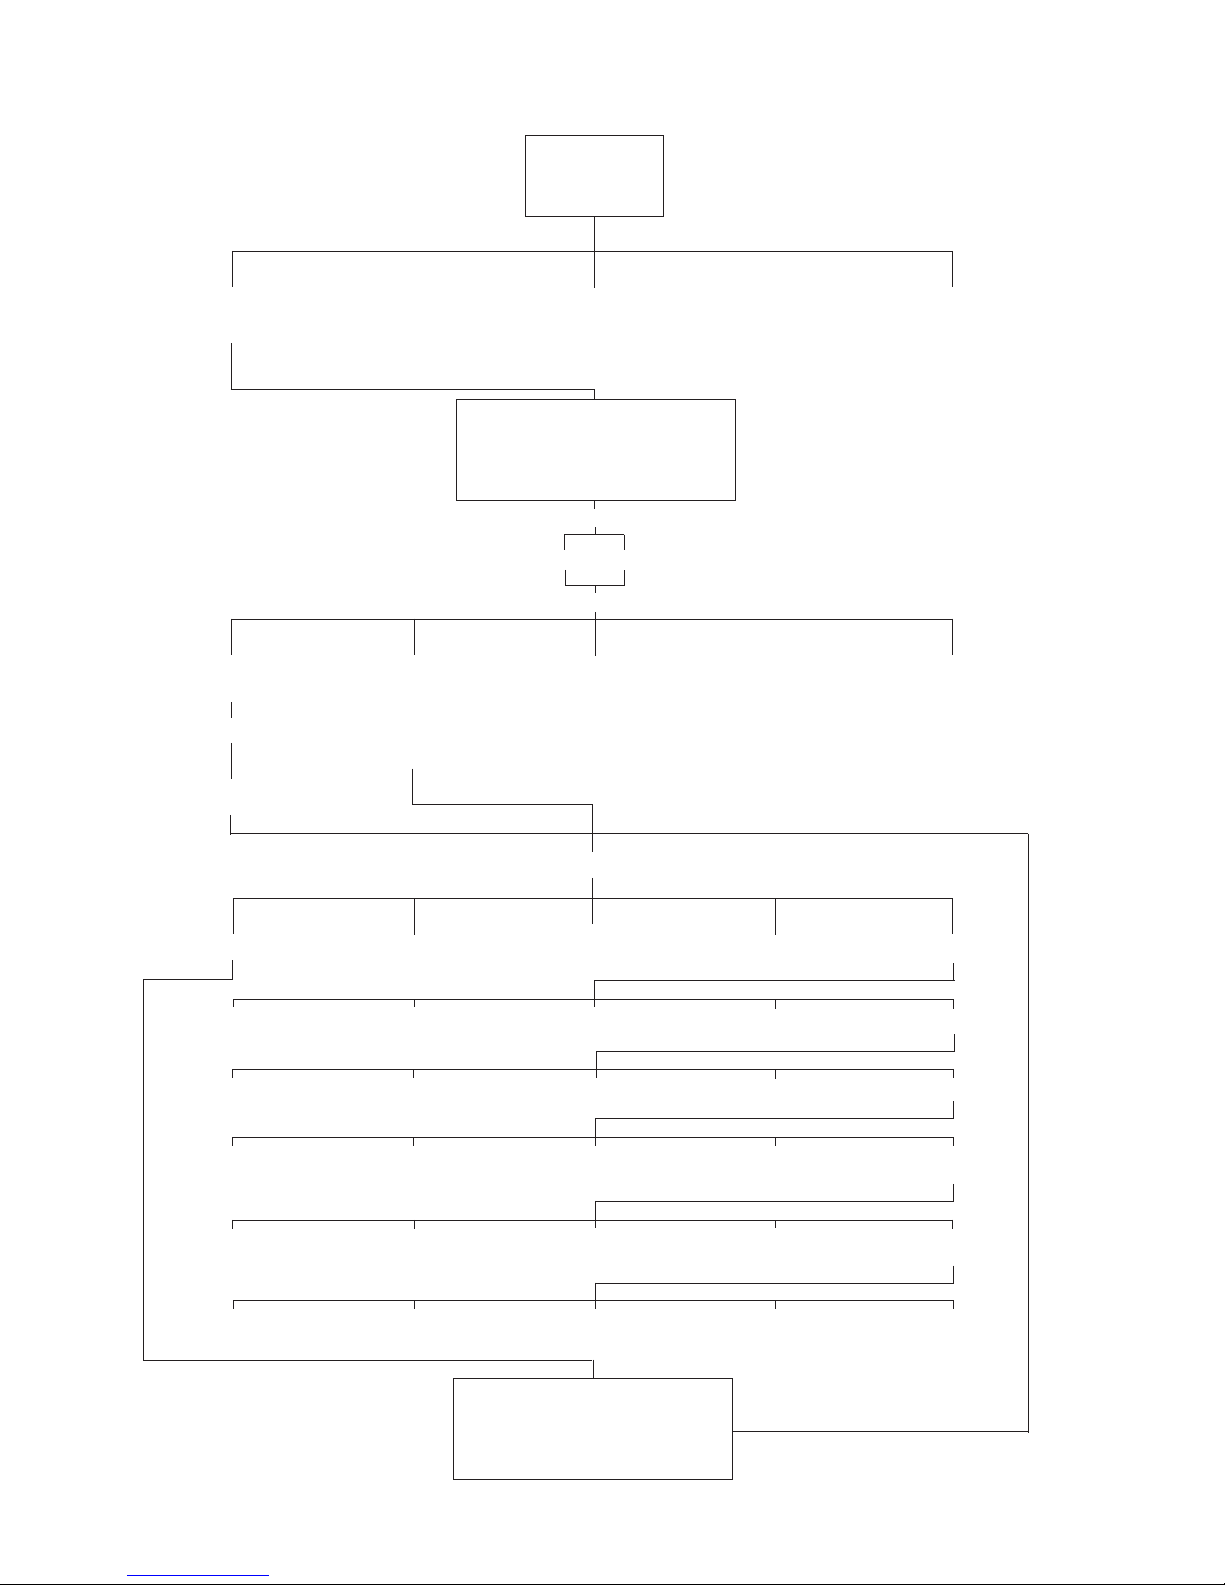
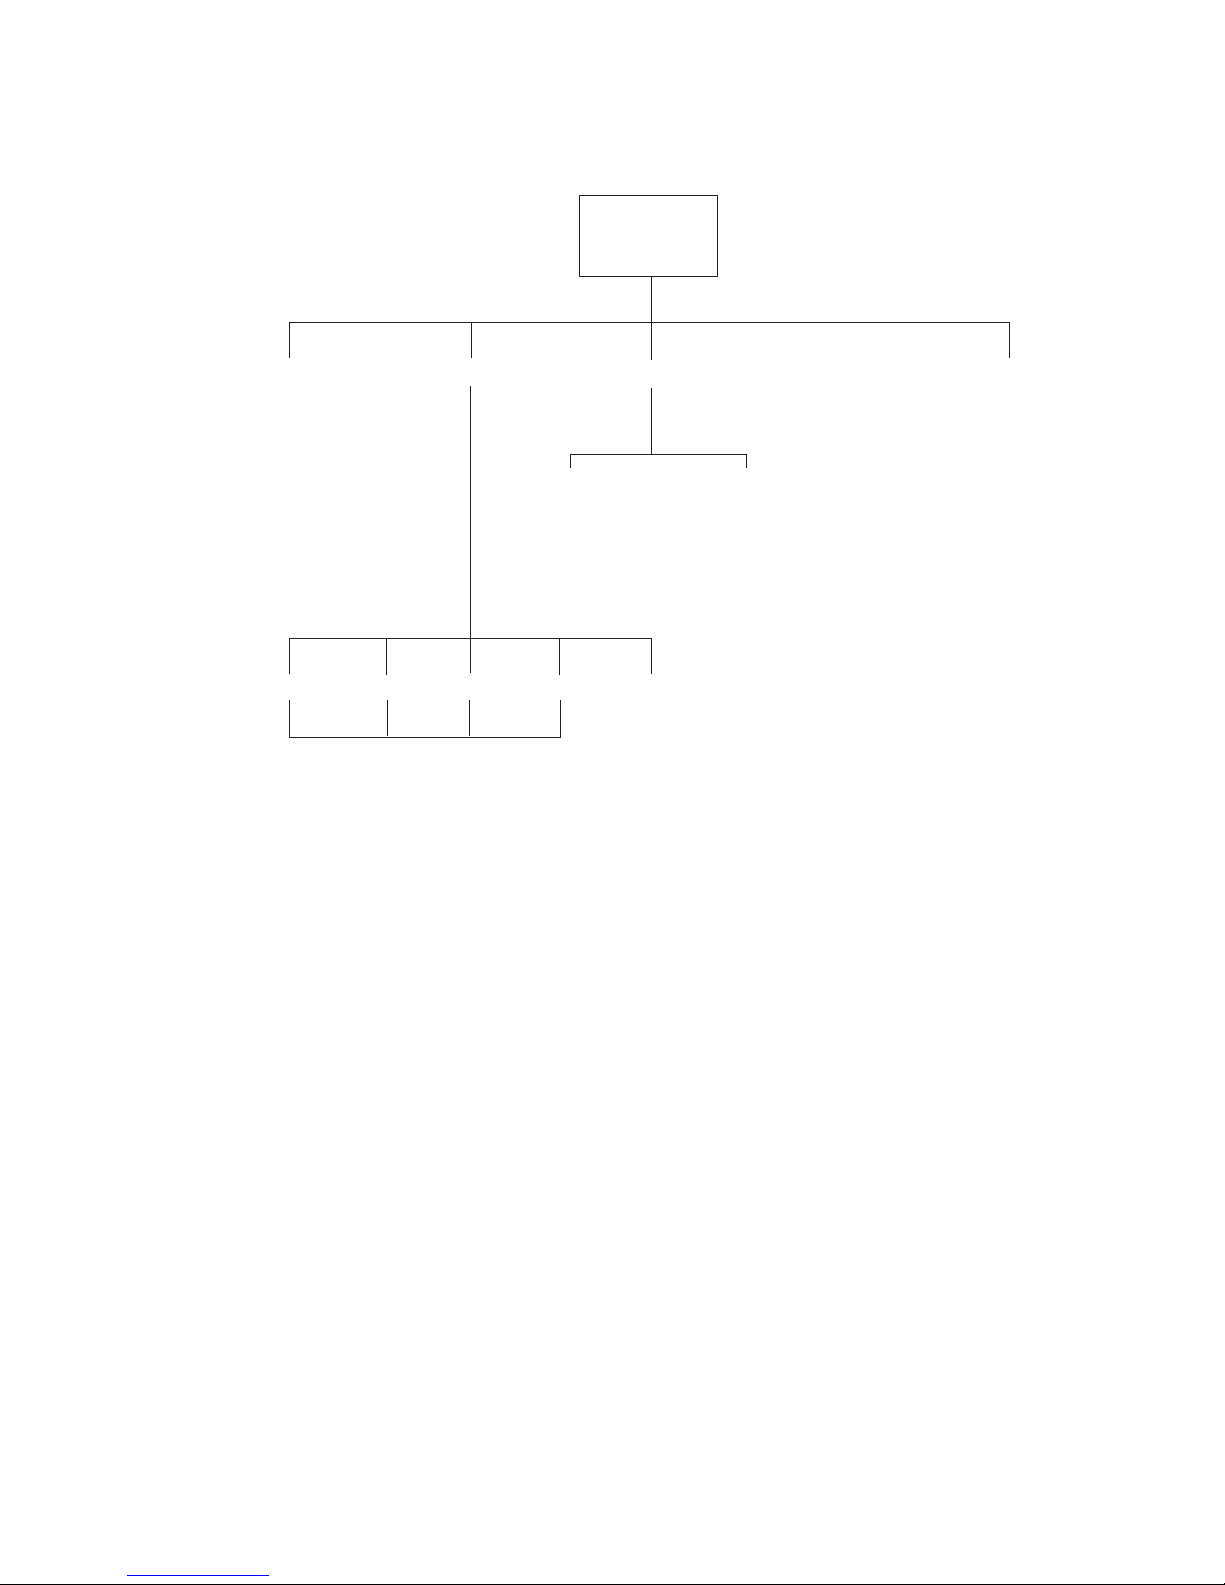
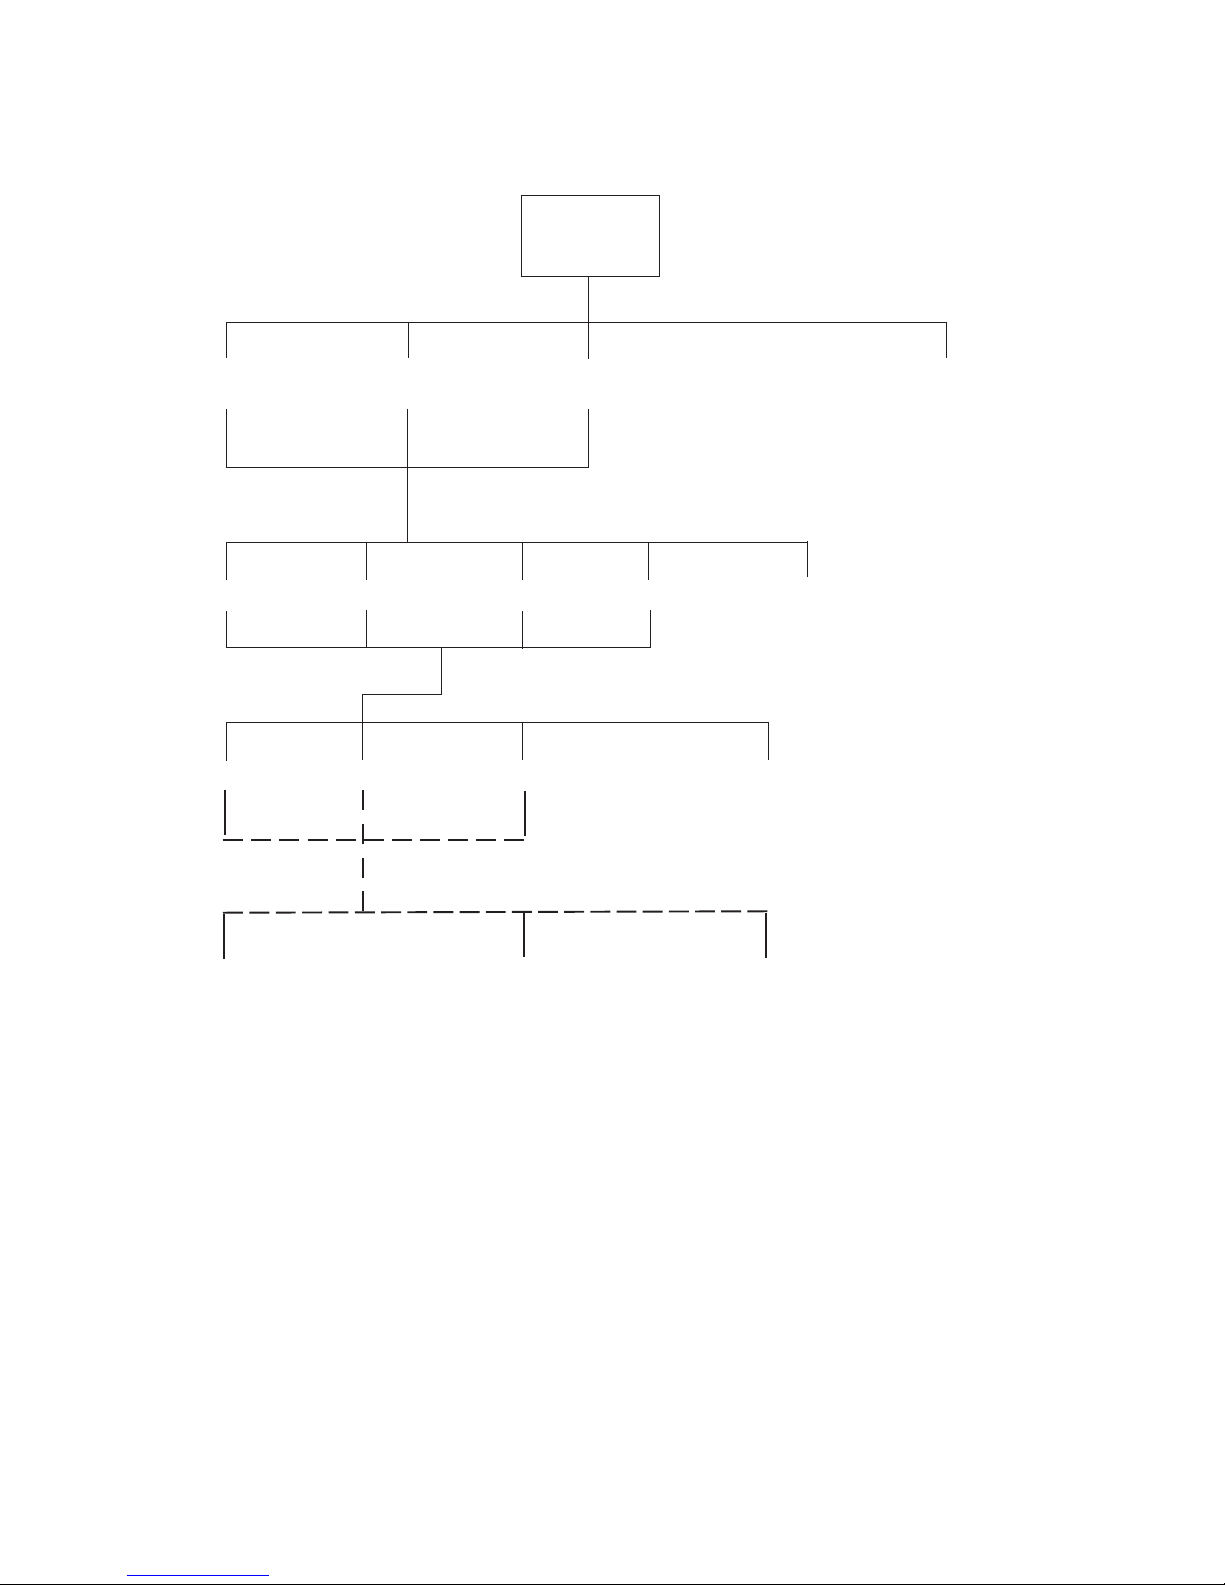
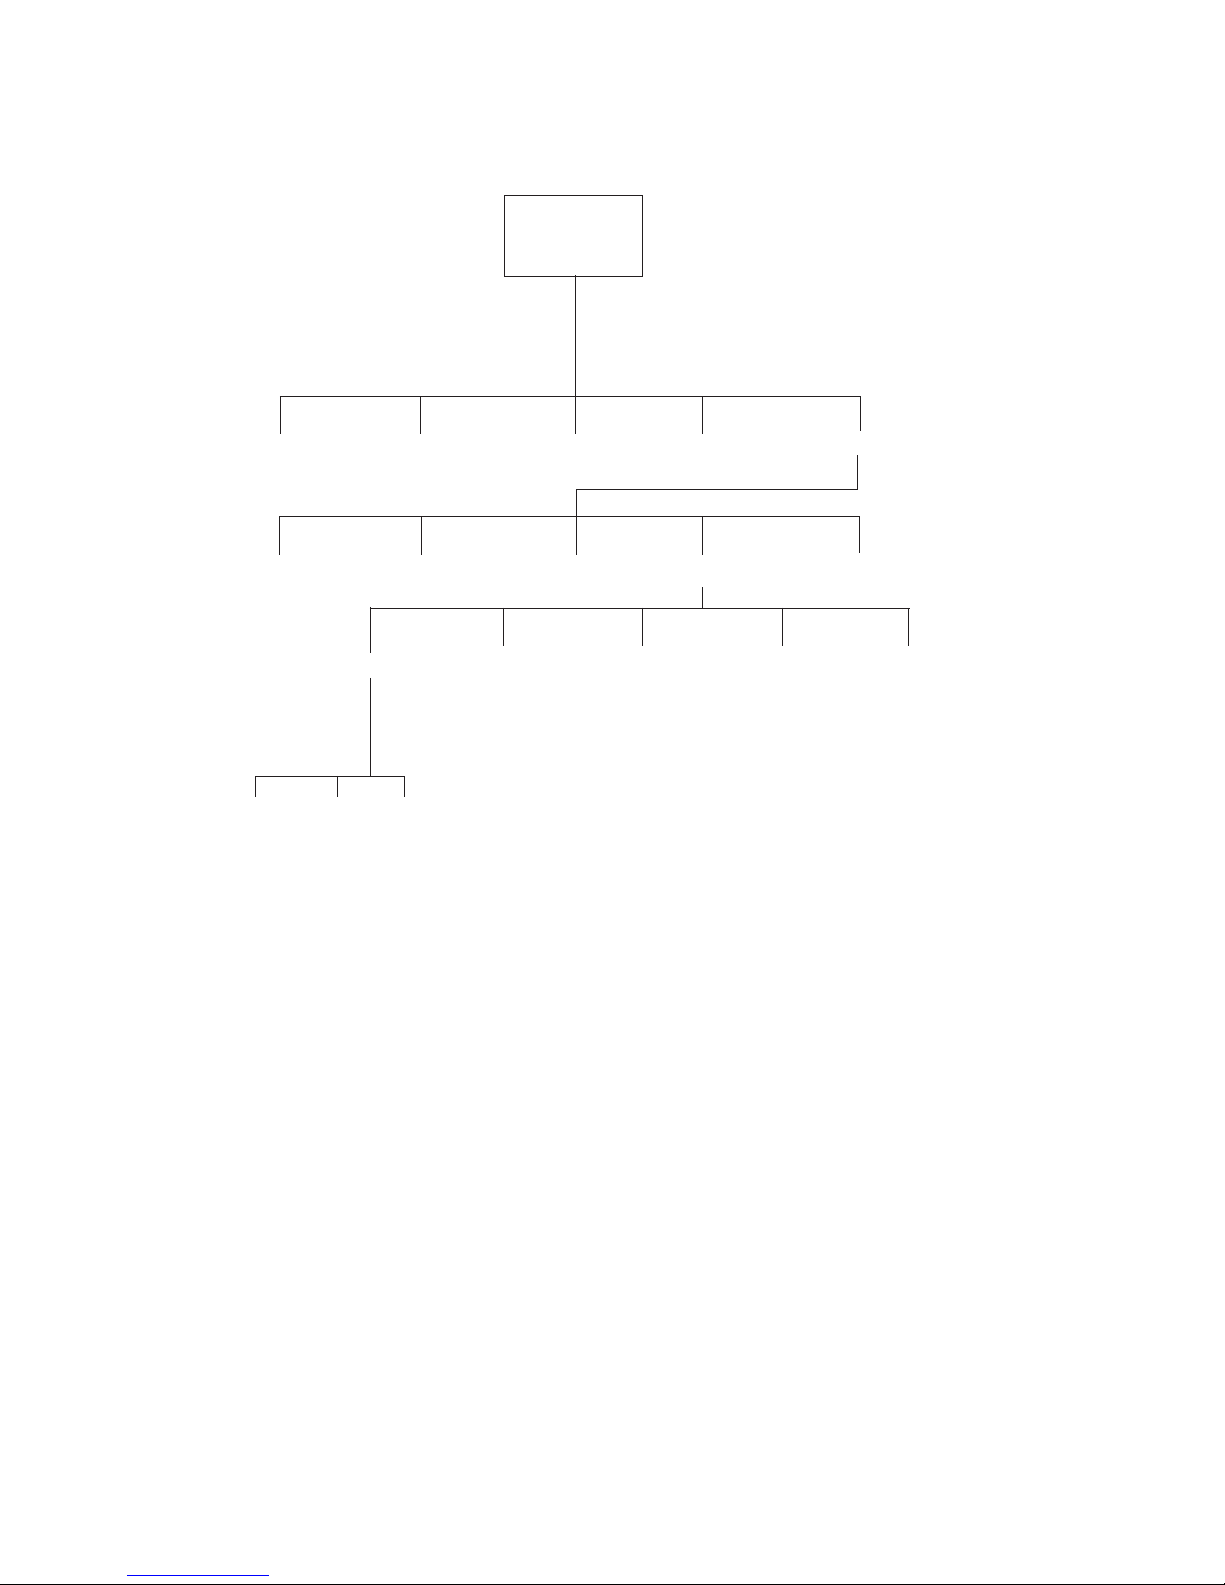
Supervisor Setup Menu: Soft Key PRINT
PRINT PRINT GO BACK
FORMATS INTERVAL
0. PRINT 0 4. PRINT 4 8. PRINT 8
1. PRINT 1 5. PRINT 5 9. PRINT 9
2. PRINT 2 6. PRINT 6 -. Prt Int
3. PRINT 3 7. PRINT 7
PRINT
SETUP
Select Print Register:
Select Output Port:
BI OUT
Select Output Format:
®
DYMO
/ ELTRON
®
COSTAR
Enter label name D ownload “Script” or enter codes
®
SCRIPT GO BACK
LABEL/PAPER as stored in printer through the front keypad QWERTY
keyboard, or barcode scanner
PORTRAIT/LANDSCAPE
Select the fields to print:
ID TARE APW GO BACK MORE
COUNT GROSS NET GO BACK MORE
ACCUMCT ACCUMWT ENTRIES GO BACK MORE
TIME DATE X (X of Y) GO BACK MORE
Y (X of Y) LOW TARGET GO BACK MORE
HIGH SPL SIZE LINEFEED GO BACK DONE
Supervisor Setup • Super II 10
ID 0. PART ID ID 4. DESC. ID8.
ID1. OPRTR ID5. VENDOR ID9.
ID2. ORDER # ID6. REV #
ID3. LOT # ID7.
Soft Key:
PRINT SETUP
Setting Print Formats or Print Interval
This setup allows for the design of up to ten different label formats, as well as, setting up the interval
printing function. There are three types of label formats available - the Dymo® SETRA 300 printer format,
the Eltron printer format, and Scriptcoder. Each of these formats is detailed below .
The Dymo® SETRA 300 has either “English only” or bar code and English information available for printing.
Straight ASCII text output is available by selecting “regular” size (vs. large print) which is compatible with
any serial dot matrix printer.
The Eltron printer selection is only designed to work in conjunction with a label format created using the
Eltron Create-A-Label software. The label format is stored in the printer’s memory. When an Eltron label is
printed, scale information is sent to the printer and combined with the label format in the printer.
For any other serial printer, a label design can be created using the ScriptCoder feature (see Appendix B for
details).
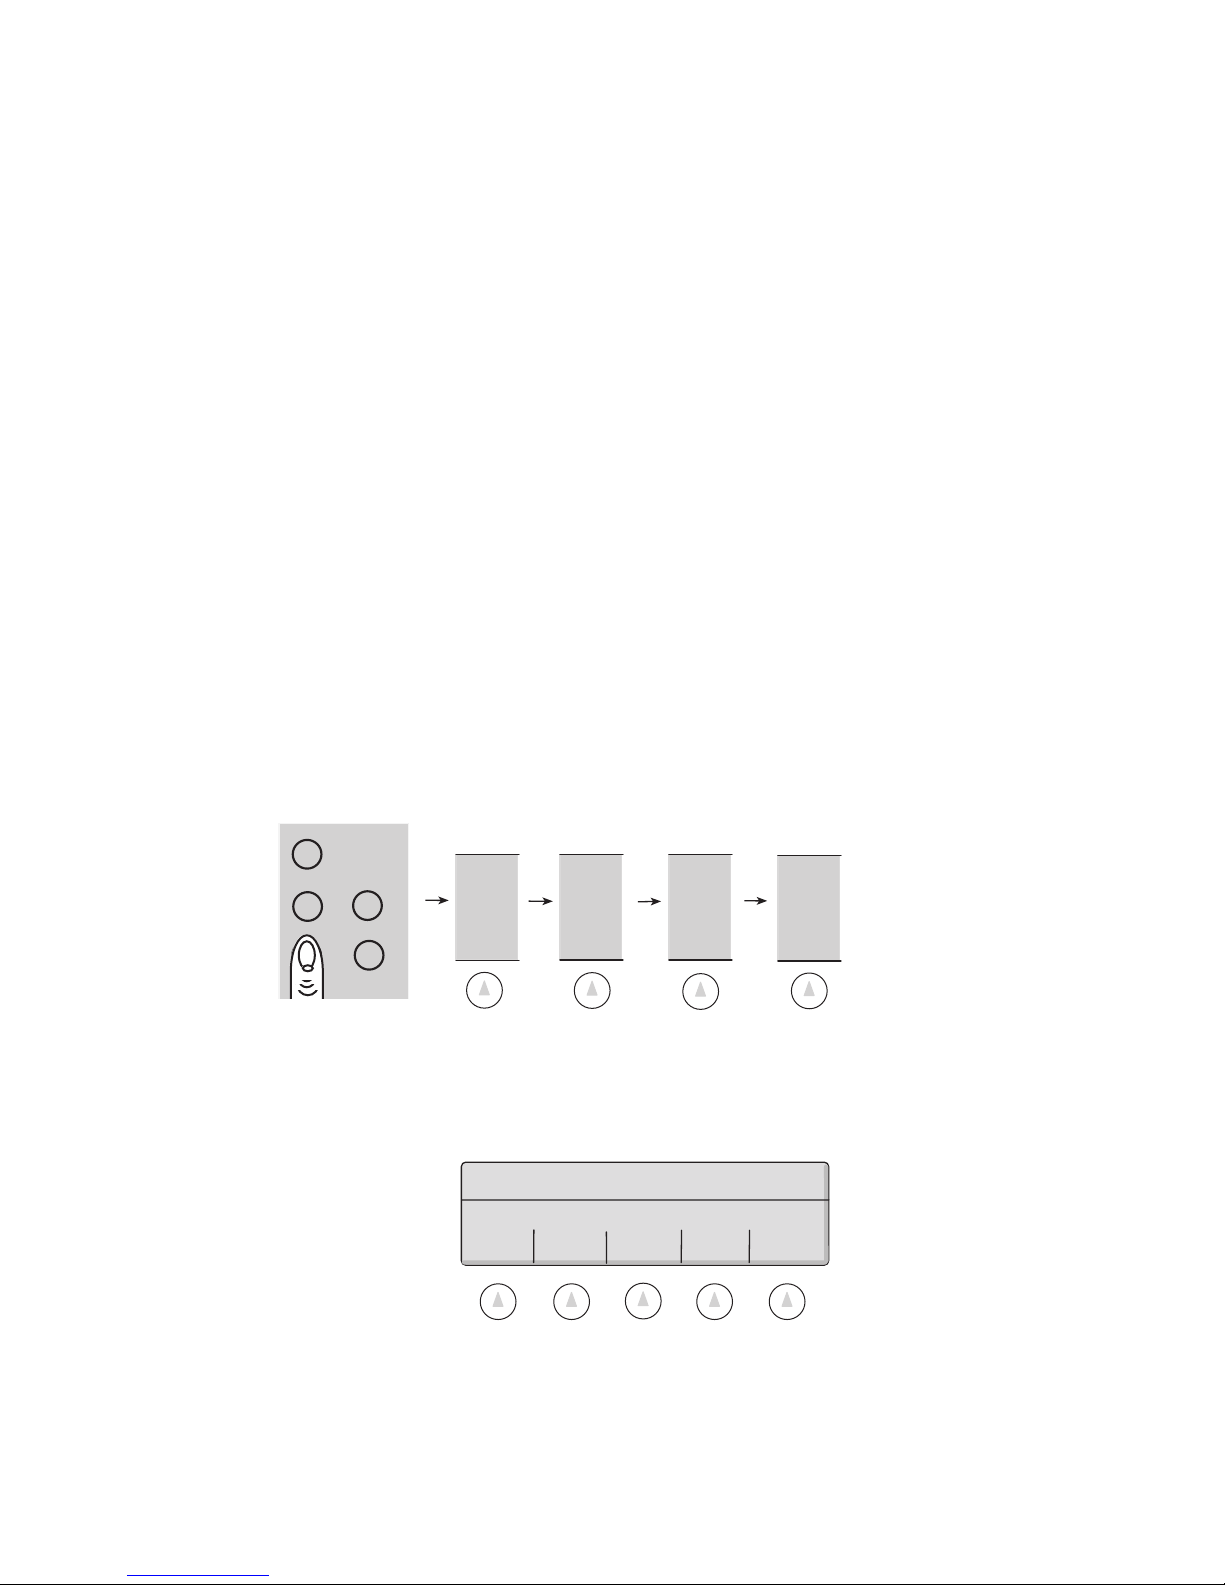
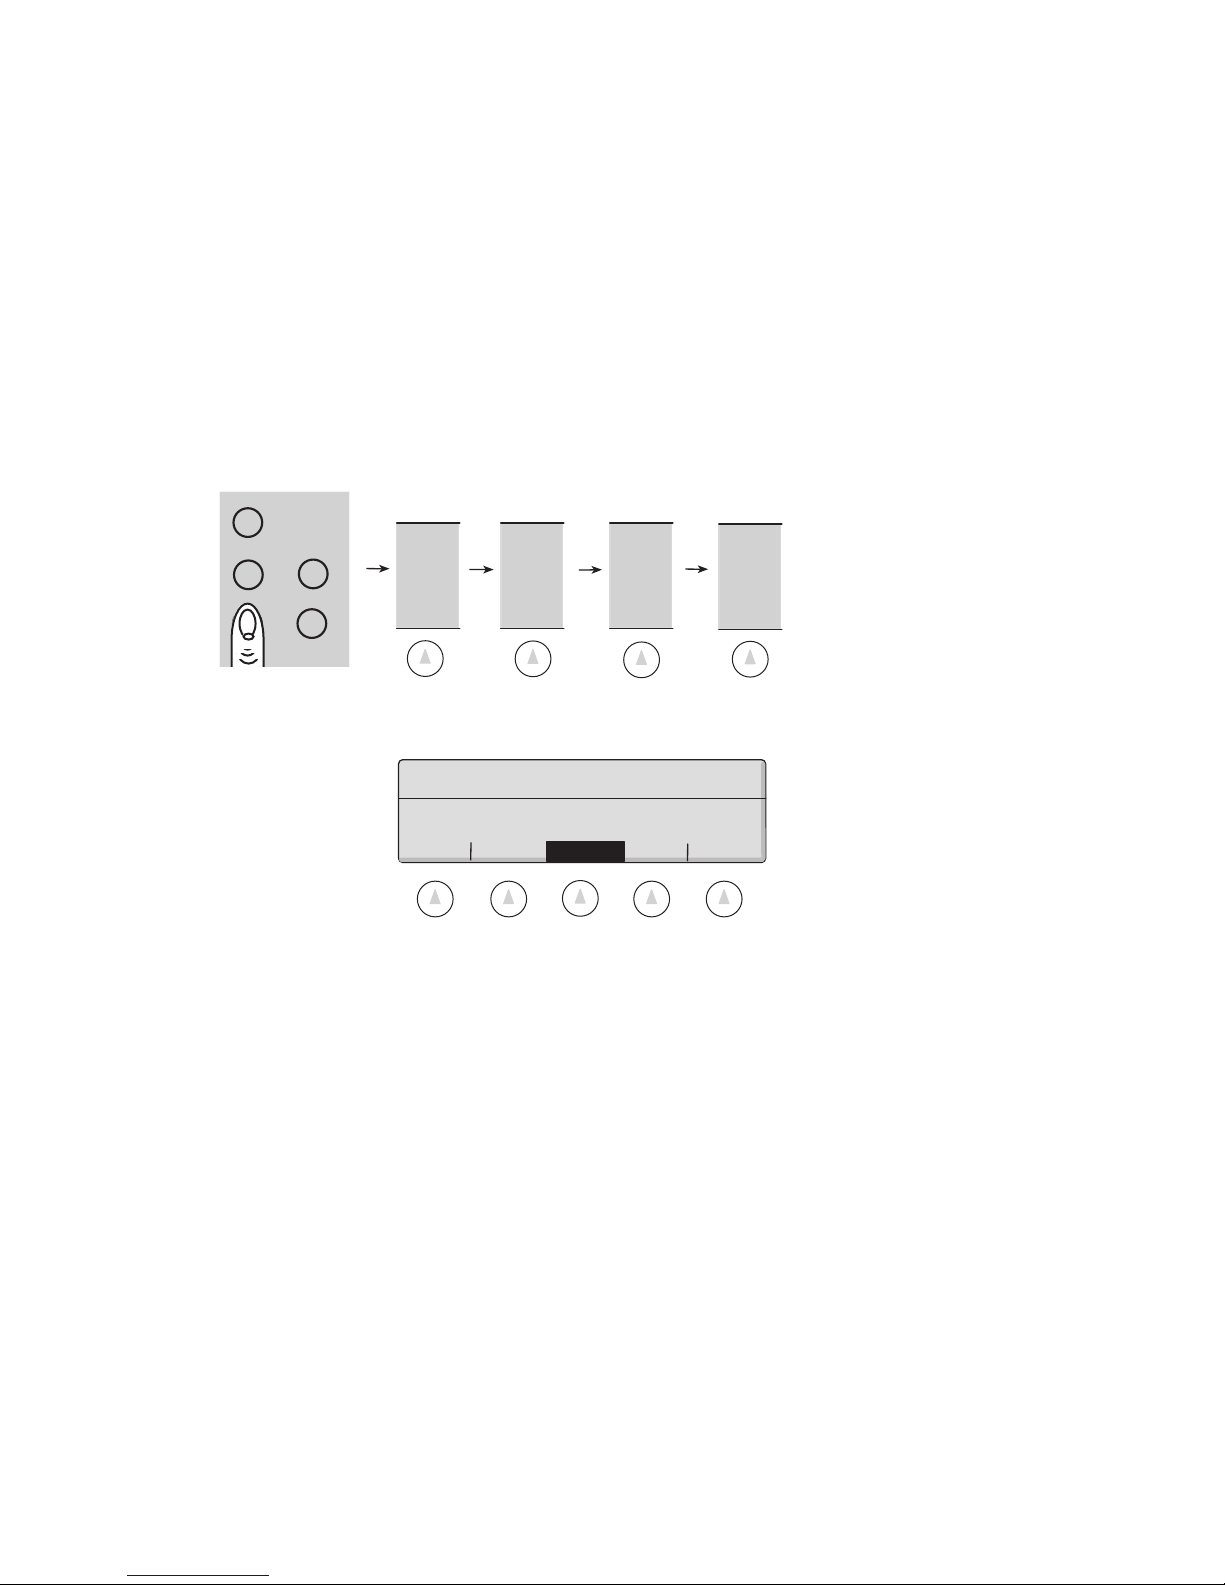
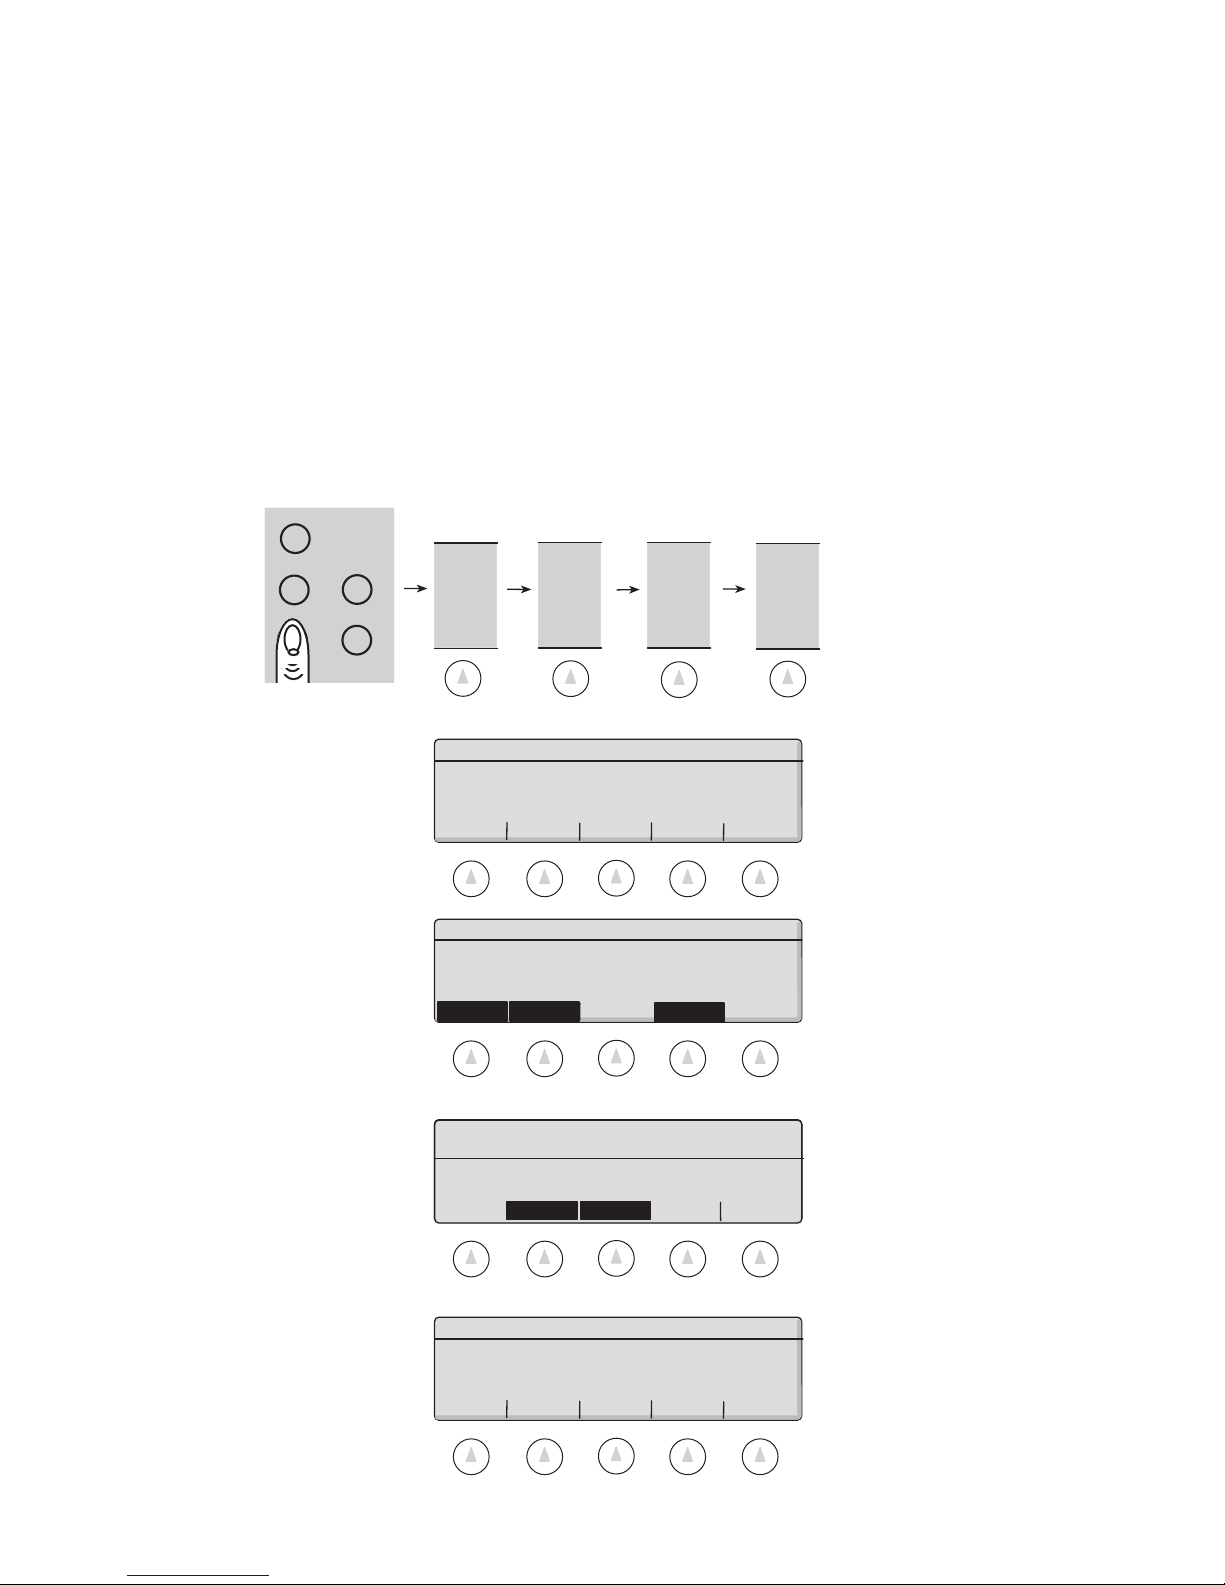
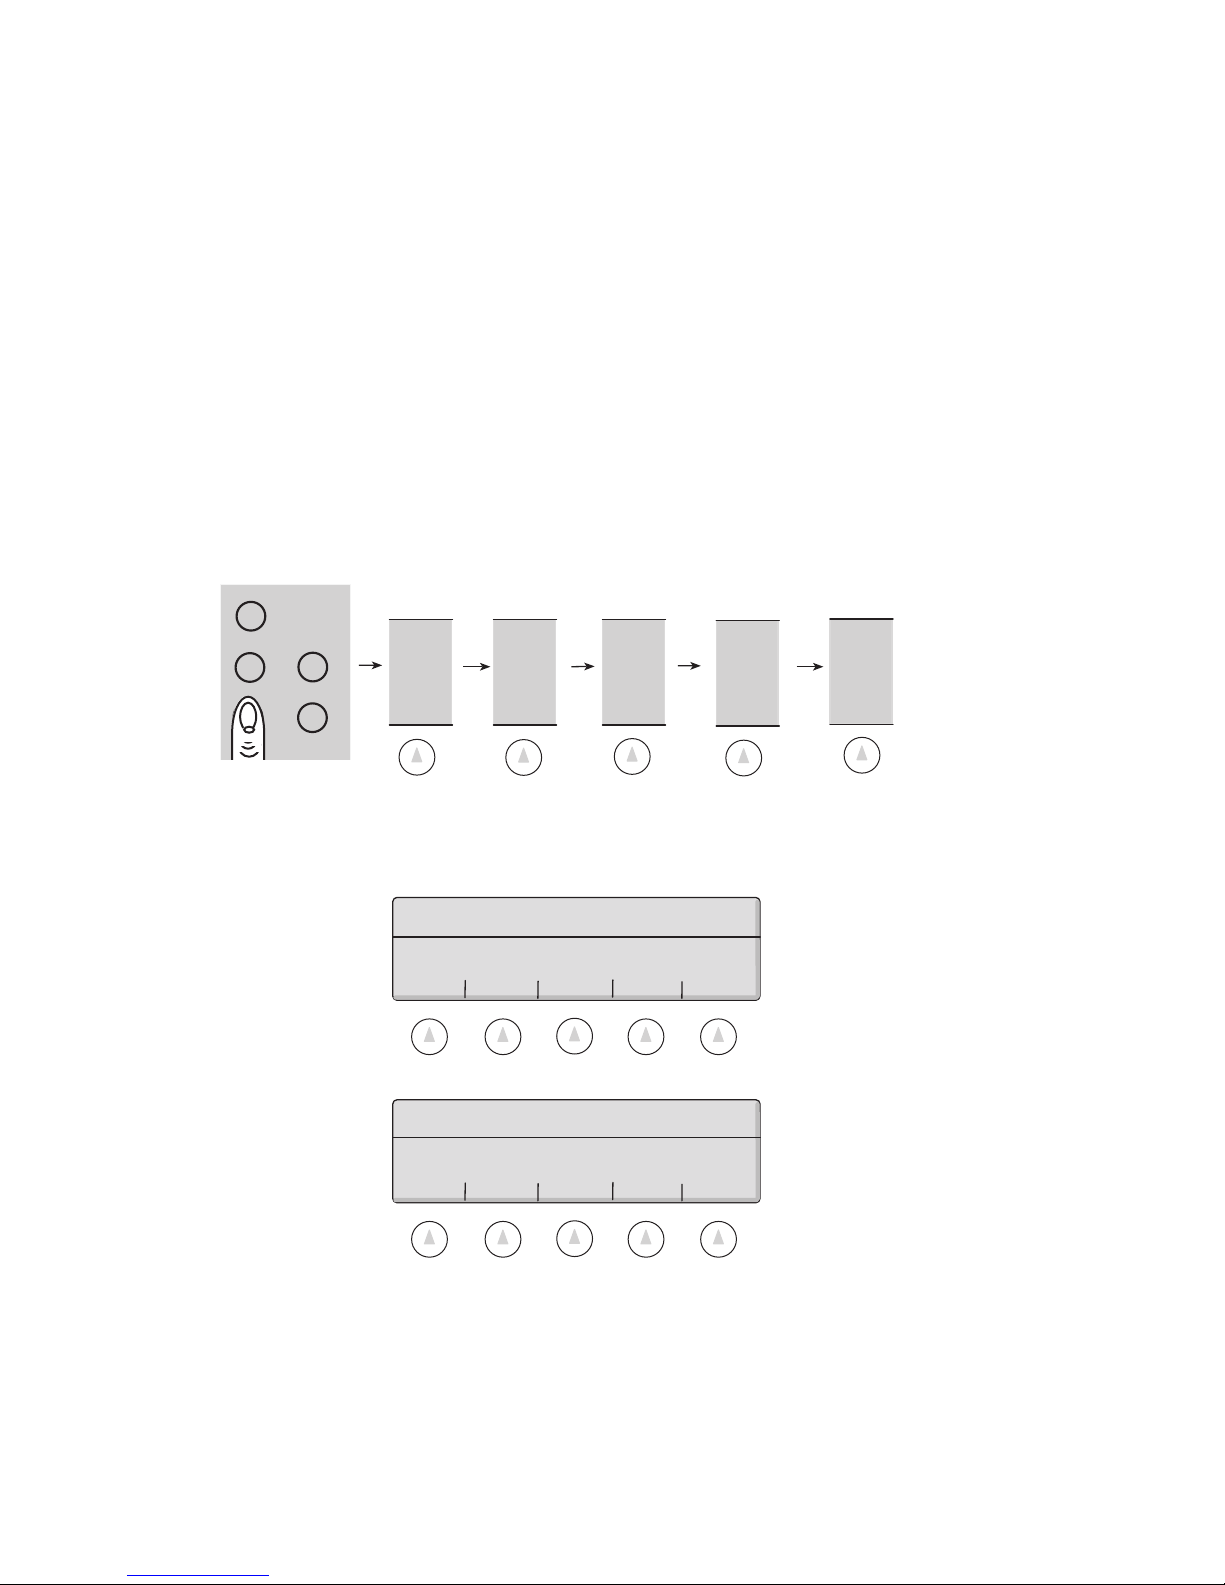
To access the PRINT SETUP menu, either follow the menu tree or press the soft keys in the order listed
below:
tare
menu remote
MORE
abc reset
The soft keys will change to the following:
Select your print format # or special
instructions from the menu below:
PRINT PRINT GO BACK
FORMATS INTERVL
SETUPS
SUPER
SETUP
PRINT
SETUP
Supervisor Setup • Super II 11
Select the function to program:
PRINT FORMATS allows the print registers to be configured.
.
PRINT INTRVL allows programming a time interval which, when elapsed, causes the scale to print
a selected format.
Programming a PRINT Format
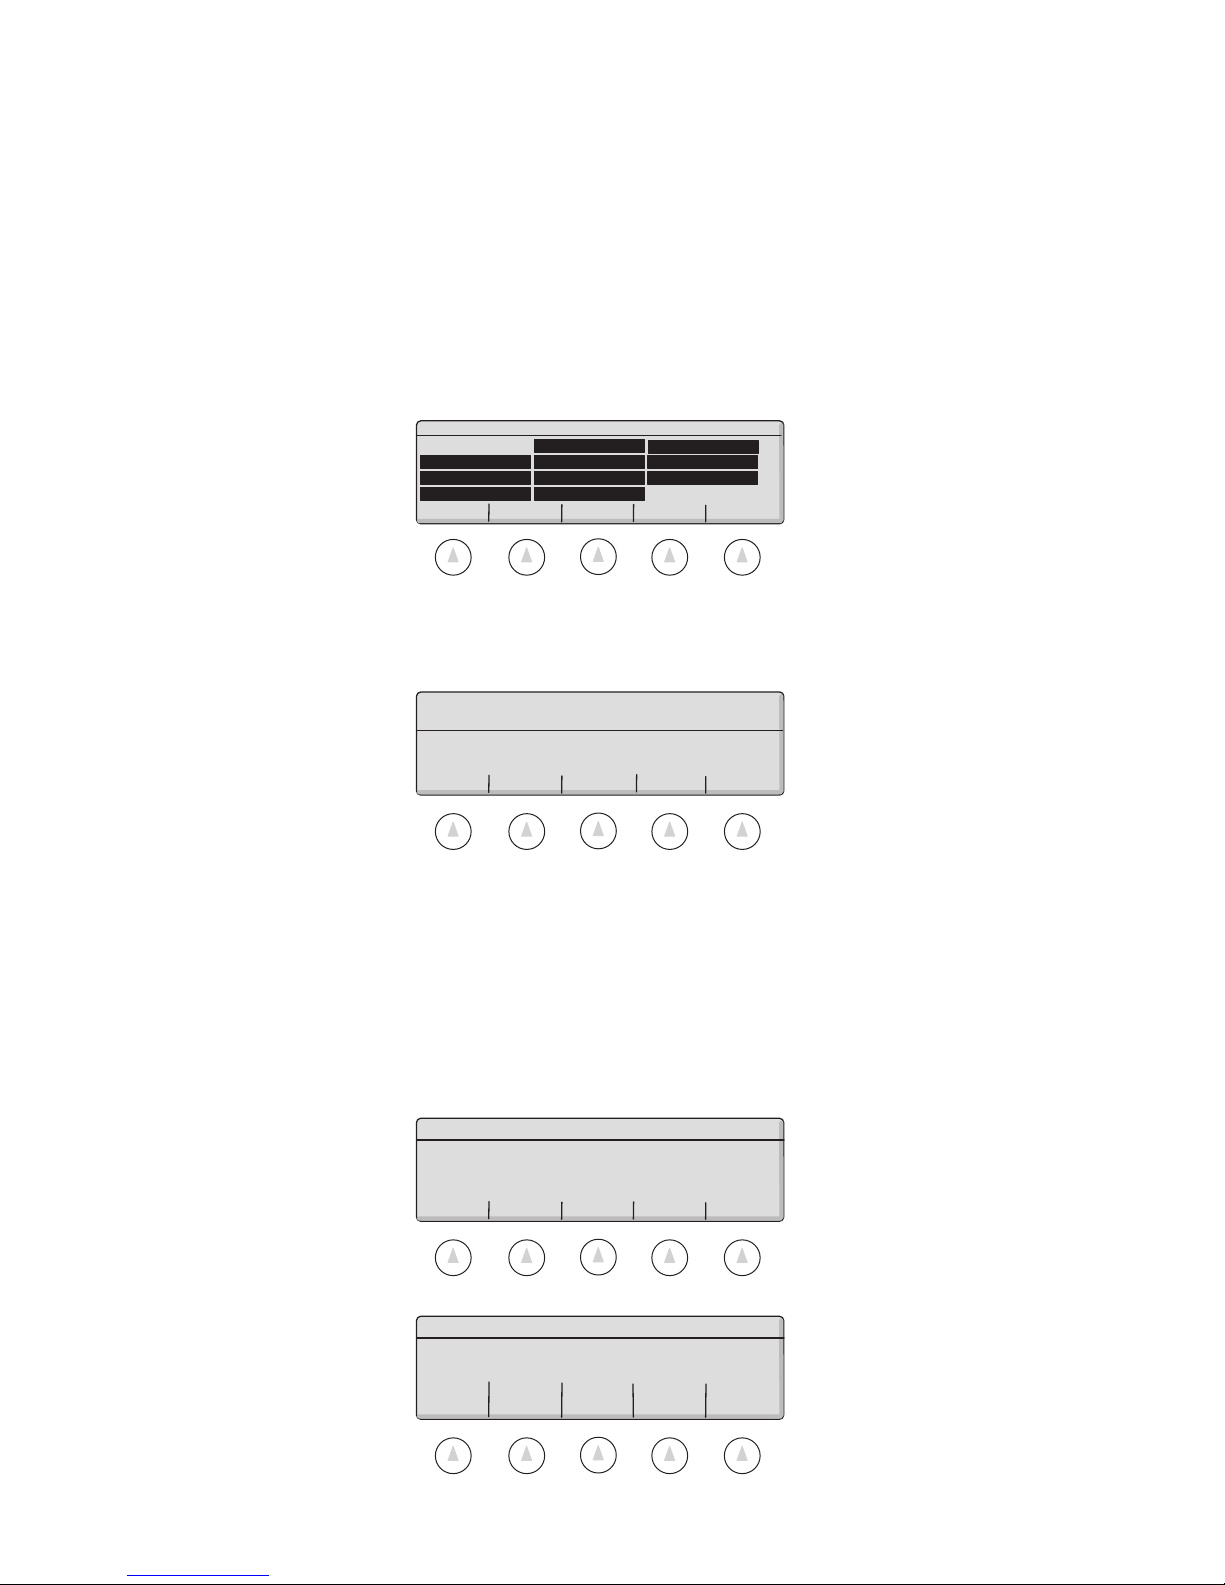
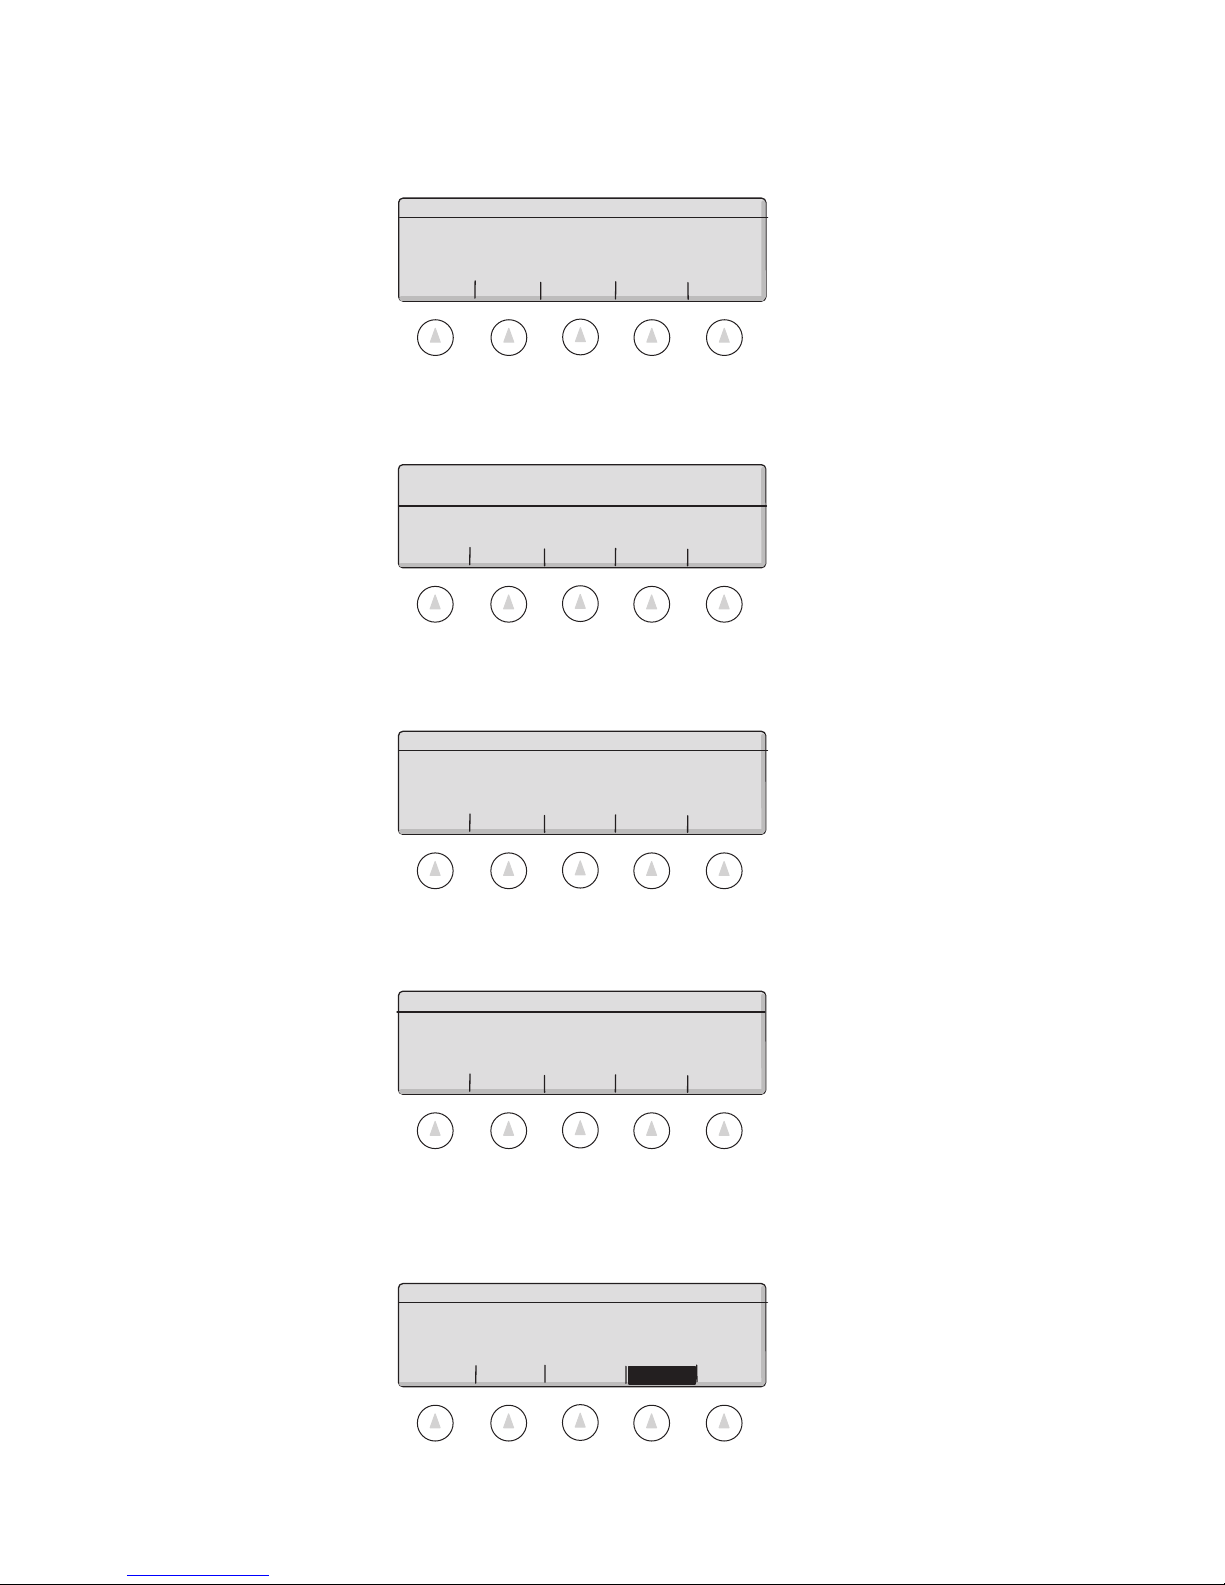
Print Format Options: There are ten available formats that can be individually configured. Pressing the
PRINT FORMATS soft key described previously will access the Print register selection menu.
Select Print Register:
0. Print 0 4. Print 4 8. Print 8
1. Print 1 5. Print 5 9. Print 9
2. Print 2 6. Print 6 –. Prt Int
3. Print 3 7. Print 7
NAME ON/OFF DELETE # COPYS GO BACK
Select the NAME soft key to change the print format name (the title that appears in the above screen).
Select ON/OFF to enable and disable the print format. Disabled print formats cannot be printed but retain
their format information. Select # COPYS to program multiple label prints. Pressing # Copys will display the
following screen:
Enter number of copies to be printed or
VARIABL to select number at print time:
COPIES:
ENTER VARIABL GO BACK
Either enter the number of copies to be printed using the numeric keypad and press the ENTER soft key or
press the VARIABL soft key to allow the user to choose the number of copies when printing.
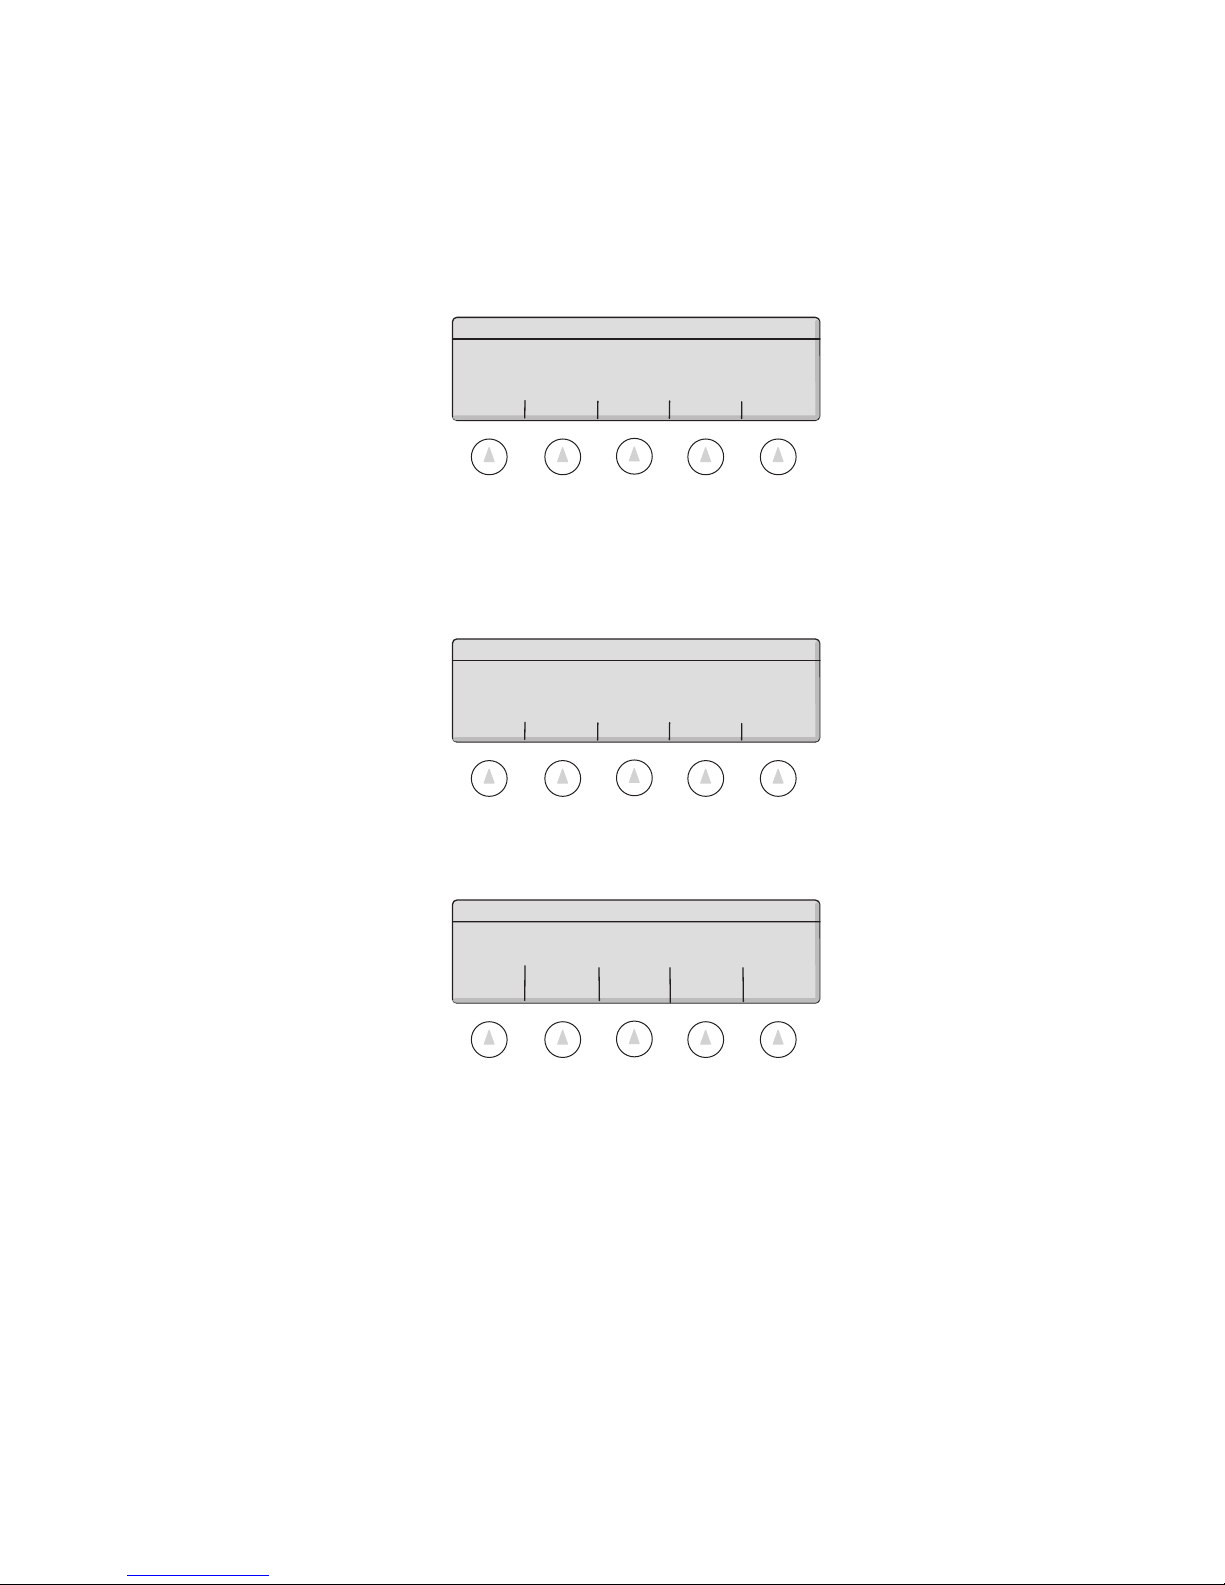
To program a print format, follow the steps below:
1. Using the numeric keypad, select the desired print register to program
2. Select the output port for the print format.
Select the port for the printer output.
BI OUT GO BACK
3. Select the print format type:
Select your printer type:
Supervisor Setup • Super II 12
DYMO ELTRON SCRIPT GO BACK
COSTAR
Based on the print format type selected, one of three series of screens appears:
DYMO®* Setra 300/COSTAR
A. Select LABEL (ends with form feed) or PAPER printing (sends a line of
dashes between printings).
Select your media type:
LABEL PAPER GO BACK
B. Choose label orientation as either PORTRAIT which limits the bar coded ID information
to 9 characters when using the Setra control codes or LANDSCAPE which limits the bar
coded ID information to 20 characters when using the Setra control codes. (See RS232
Communications in Appendix A for more information on Setra control codes).
Select print orientation:
PRTRAIT LNDSCPE GO BACK
C. Select a print field to appear on the label (see “Selecting Fields to Print”, p. 15). After
selecting a field to print, choose the output characteristics for that field.
Select the output for the field:
SMALL LARGE BARCODE BARCODE BARCODE
ENGLISH ENGLISH SC ENG SC LENG ENGLISH
SMALL ENGLISH is for the regular sized English text printing (straight ASCII text).
LARGE ENGLISH is for large English text printing (contains Dymo® control codes).
Large text has twice the height of the small text, but the same width.
BARCODE SC ENG is for a bar coded field with the Setra control characters (see
RS232 Appendix A) and regular size English
BARCODE SC LENG is for a bar coded field with the Setra control characters (see
RS232 Appendix A) and large English text.
BARCODE ENGLISH is for a bar coded field without the Setra control characters and
regular size English
* Trademark of Dymo® Corporation
Supervisor Setup • Super II 13

D. After selecting and formatting all of the desired fields, select the DONE soft key at the
end of the field selection menu (see “Selecting Fields to Print”, p. 15).
ELTRON*
A. For the Eltron printer, type in the name of the label as stored in the printer with the
Create-A-Label software by using the alphanumeric keypad (abc key) followed by
the ENTER soft key.
B. Next select the Create-A-Label “when printed” fields (see “Selecting Fields to Print” ,
p. 15 in the order they appear on the Eltron label as created with the Create-A-Label
software.
C. After choosing the last “when printed” field, select the DONE soft key at the end of
the field selection menu (see next section). When printing an Eltron label, the
Super II software recalls the label name as stored in the printer and then sends the
appropriate “when printed” field information followed by the print command (see
ScriptCoder Manual for more information on Eltron Create-A-Label formats).
SCRIPTCODER
ScriptCoder is a powerful scripting language that allows the user to program the print register a single
character at a time. There are four methods of data entry for a script. Please refer to Appendix B or the
ScriptCoder Manual for a detailed explanation of each method of data entry and scripting language.
Enter each character or code now. PC
to download script. BARCODE to scan.
ENTER CODE PC BARCODE GO BACK
*Eltron® is a registered trademark of Zebra Corporation
Supervisor Setup • Super II 14

Selecting Fields to Print
The following is a list of all scale fields available for printing. The fields can be printed in any order selected. Move up and down through the menus by using the GO BACK and MORE keys.
Select the desired fields to print from the menu below:
ID TARE APW GO BACK MORE
(will bring up all ID
fields listed below)
COUNT GROSS NET GO BACK MORE
ACCUMCT ACCUMWT ENTRIES GO BACK MORE
(for an
accumulated
count)
(for an
accumulated
weight)
(for the number
of accumulated
entries)
TIME DATE X(X of Y) GO BACK MORE
Y (Xof Y) LOW TARGET GO BACK MORE
HIGH SPLSIZE LINEFED GO BACK DONE
Supervisor Setup • Super II 15
(for the sample size
used to determine
the APW)
(for spacing
between fields)
(to end
print format)

ID Fields
ID field selection will bring up the following menu.
Select ID Field:
IDØ: PART ID ID4: DESC ID8:
ID1: OPRTR ID5: VENDOR ID9:
ID2: ORDER # ID6: REV #
ID3: LOT # ID7:
GO BACK
Select the desired ID field to print by entering the numeric ID# associated with that field using the numeric
keypad.
The “identifier” associated with each field will print before the variable ID information as it appears in the
choices above for the Dymo® format. The identifier can be changed to any 7 characters desired.
To change the field identifier name, see the ID NAME soft key section starting on page 41.
NOTE: The database uses the IDØ field for storage indexing. It is recommended that the PART ID be
used for the IDØ field. LOT# (ID3) and DESC (ID4) correspond to the same scale ID locations as in
Setra’s AutoCount 200 for backward compatibility purposes.
Supervisor Setup • Super II 16

Interval Print Programming
Any of the ten print fomats can be selected for interval printing. Selecting “No Format” will send the
displayed weight or count value to the BI port. The interval print function is set up by selecting the PRINT
INTERVL soft key in the Print setup. The following display will appear:
Select Format or Time for Interval
Printing:
Interval Print Format: No Format
Interval Print Time: 0.0 SEC
PRINT TIME GO BACK
The currently selected format as well as the Time Interval between printings is displayed. Note that the
time interval of 0.0 means that the internal print function is disabled. The interval printer will wait for the
last printing job to finish before starting the next. If a small interval is selected, the port will continuously
stream data. Select the PRINT soft key to set up the print format and the TIME soft key to select the time
between printings.
If the PRINT soft key is selected, the following screen appears:
Select Format for Interval Printing:
0. Print 0 4. Print 4 8. Print 8
1. Print 1 5. Print 5 9. Print 9
2. Print 2 6. Print 6 –. Prt Int
3. Print 3 7. Print 7
NO FRMT GO BACK
Select one of the preprogrammed print registers using the numeric keypad, or the NO FRMT soft key to
have the scale print the weight or count in the immediate Print Mode format. (Appendix A)
If the TIME soft key is selected:
Select from either the two pre-programmed choices or, using the numeric keypad, enter a time interval
followed by the ENTER key. Once the time interval is programmed, interval printing is stopped or started
by selecting the Prt Int register through the - (minus) key in the print menu.
Select print interval or enter
interval time (in sec.):
ENTER OFF 0.2 0.5 GO BACK
NOTE: The maximum output rate is ev ery 0.2 seconds.
Supervisor Setup • Super II 17
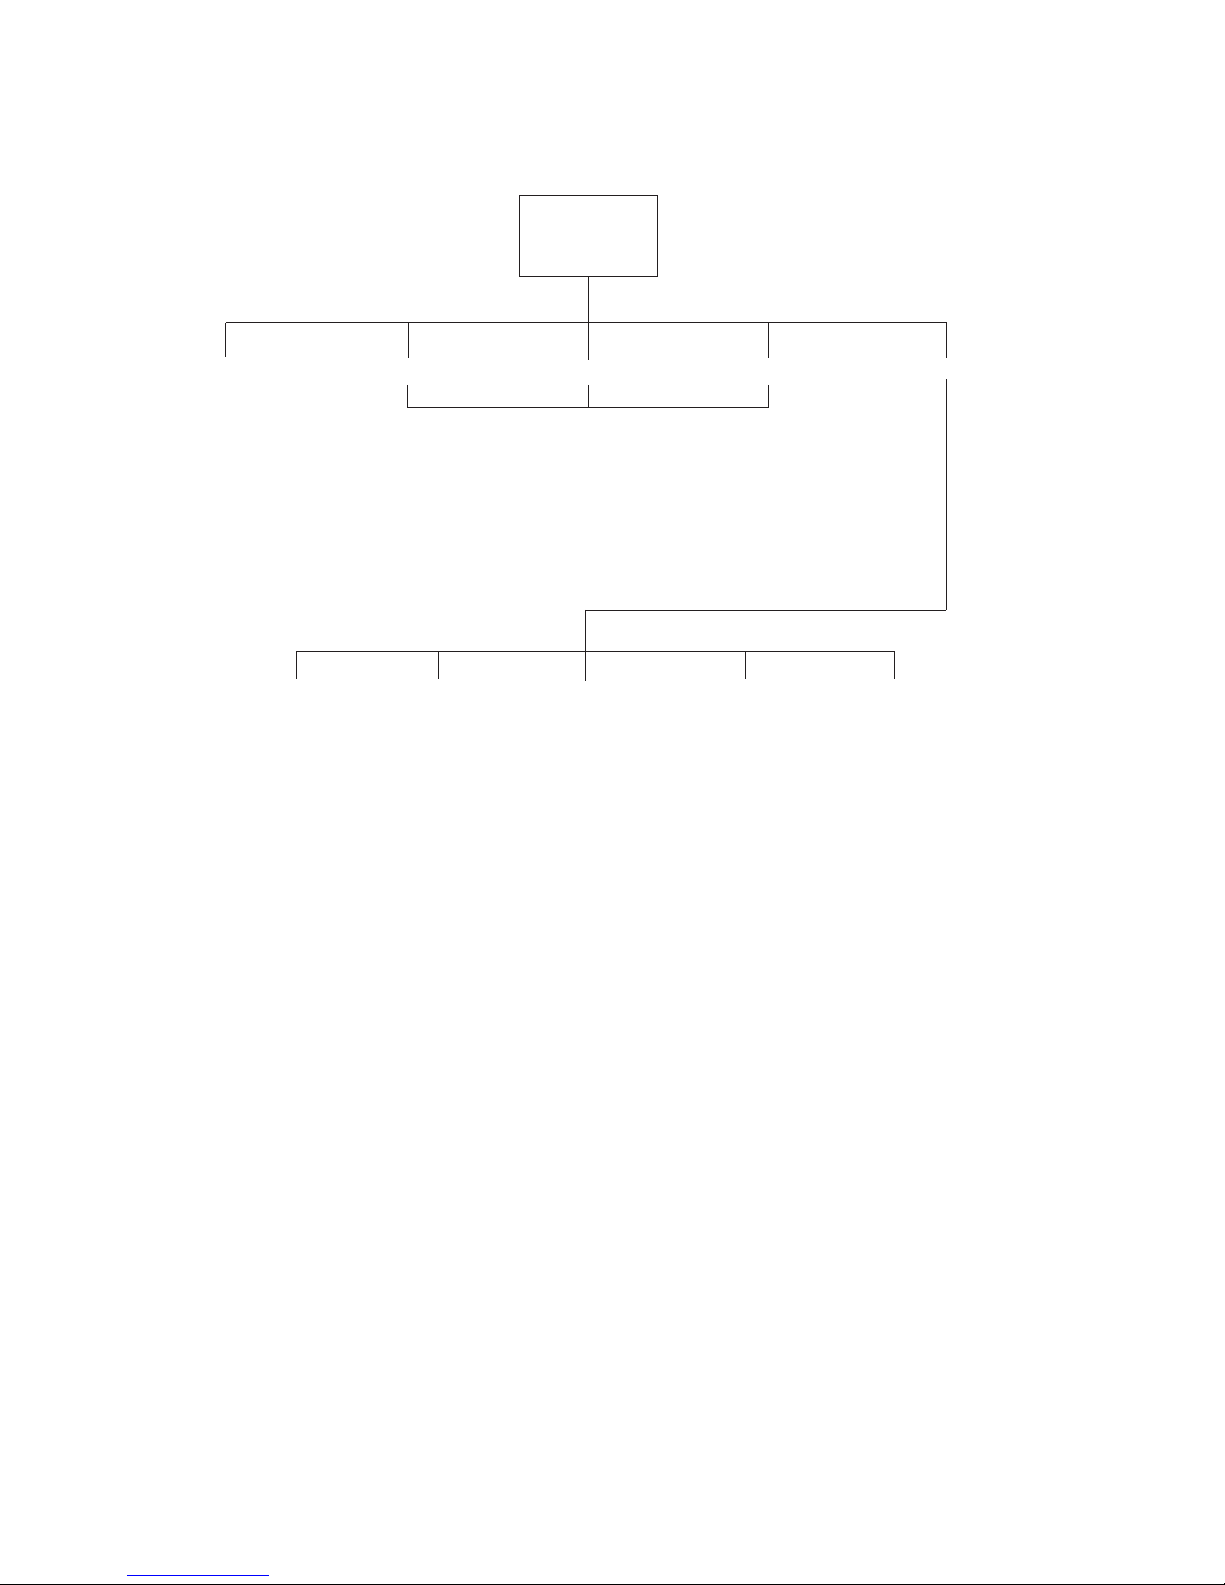
Supervisor Setup Menu: Soft Key SAMPLE SETUP
ENTER SAMPLE # IN MENU GO BACK
Using the numeric keypad,
type in the desired minimum
sample size followed by
ENTER key
YES NO
SAMPLE
SETUP
To have Sample S ize menu
appear after SAMPLE key
is pressed.
10 25 50 100
Using the numeric
keypad, type in the
desired sample size
followed by the
soft key location
GO BACK
Supervisor Setup • Super II 18
Soft Key:
SAMPLE SETUP
Setting a Minimum Sample Size/Sample Size Selection Menu
This setup allows a selection of a minimum number of pieces that can be used to generate an APW. Also
available is the capability to have the scale create a prompt for multiple sample size selections that can be
customized to whatever the operator needs.
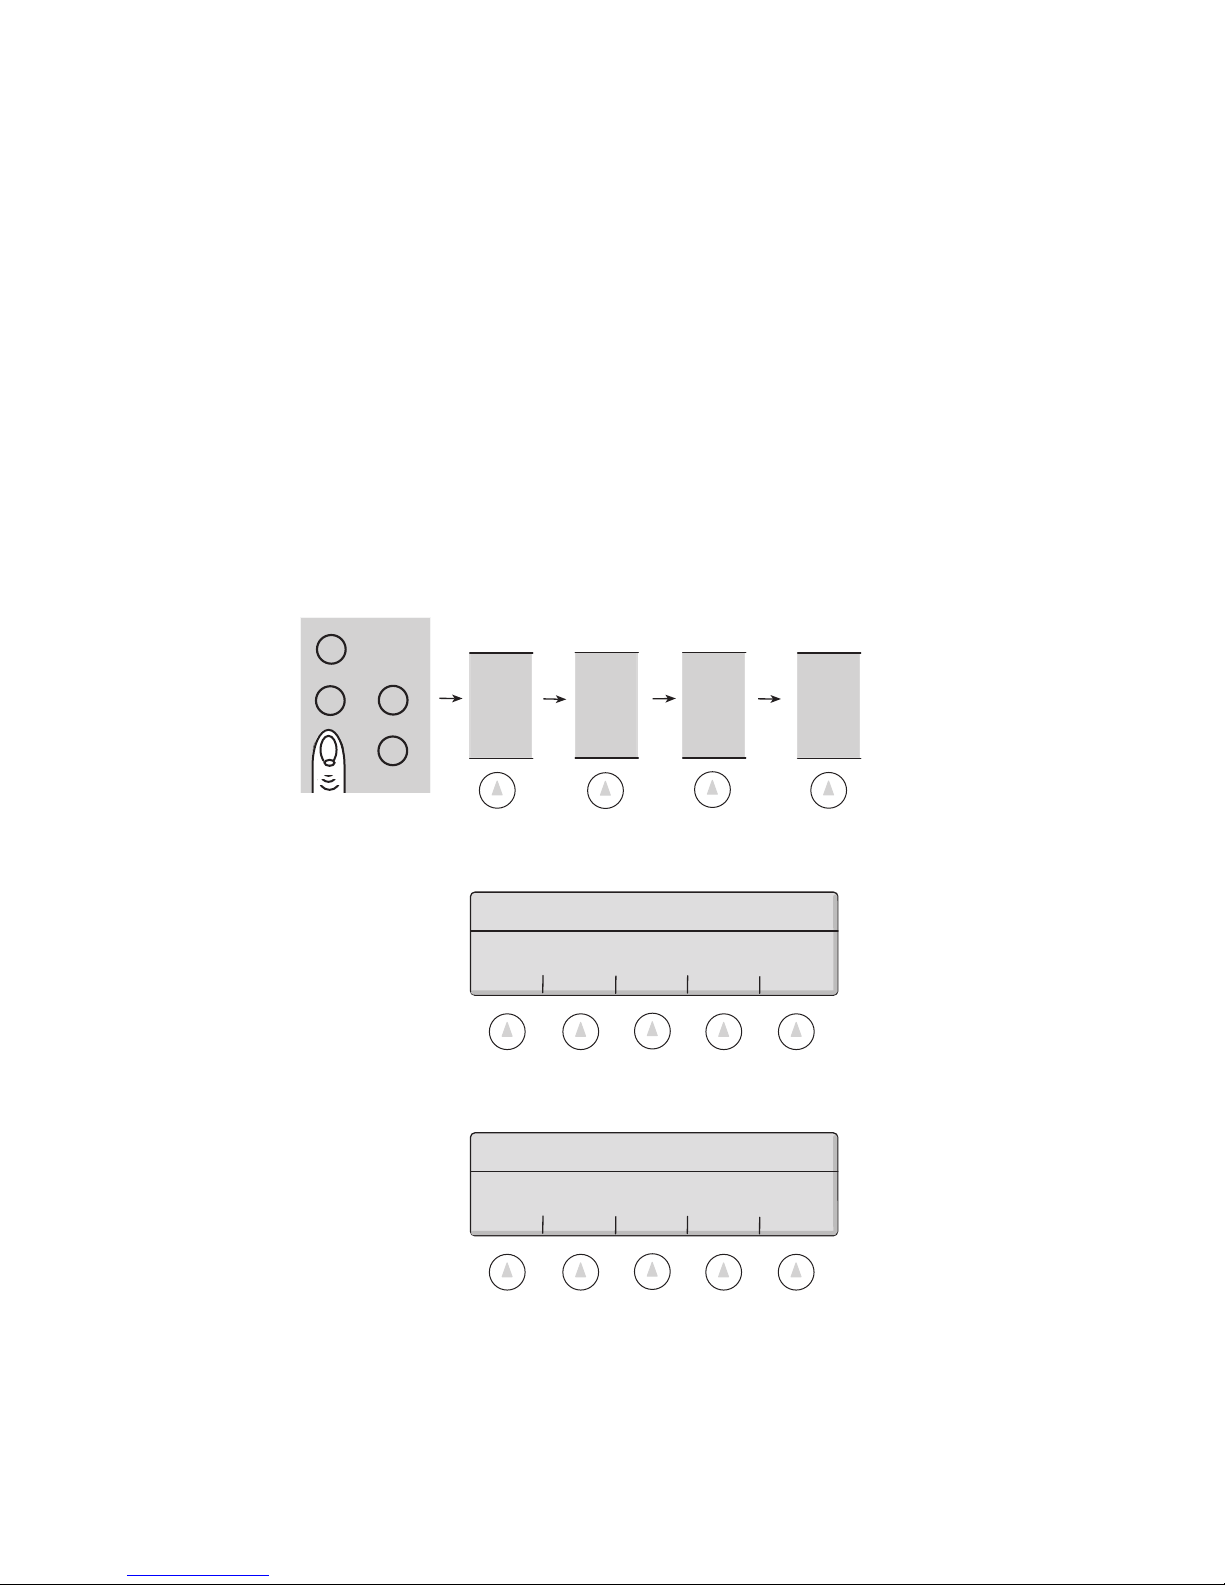
To access the SAMPLE menu, either follow the menu tree or press the soft keys in the order listed below:
tare
menu remote
MORE
abc reset
The soft keys will change to the following:
Type in the minimum sample size or choose
from the options below.
SETUPS
SUPER
SETUP
SAMPLE
SETUP
MIN. SAMPLE: 1
ENTER SAMPLE # IN MENU GO BACK
1. To set the minimum sample size, use the numeric keypad and type in the desired number followed
by the ENTER key.
2. To change the sample size in the series of prompts when the LRG SPL key is pressed in the
default user menu, choose SAMPLE #. Change each prompt to any desired value by using the
numeric keypad followed by the soft key for the number to be changed.
3. To have sample size choices appear in the main menu when the SAMPLE > key is pressed,
choose the IN MENU key followed by the YES key. The “sample size menu” choice can be turned
off by pressing the IN MENU key followed by the NO key.
Supervisor Setup • Super II 19
Supervisor Setup Menu: Soft Key ACCURCY SETUP
ACCURACY
SETUP
ENTER 95% 98% 99% MORE
Using numeric keypad, type in
the desired minimum scale
performance accuracy based
on sample weight followed by
the ENTER key
ENTER 99.5% 99.8% 99.9% GO BACK
Selected
accuracy
Supervisor Setup • Super II 20
Soft Key:
ACCURCY SETUP
Setting a Minimum Scale Performance Accuracy
This setup allows selection of the minimum accuracy level to which the scale will perform based on the
sample weight. The higher the scale performance, the larger the sample weight required. This may cause
the scale to prompt for additional pieces when the COUNT key is pressed to meet the minimum weight
requirement to perform to the programmed accuracy level.
IMPORTANT: This setup does not take individual piece weight variance into account and only has to do
with sample weight. The scale must also be programmed with a large enough minimum sample size to
guarantee performance based on piece weight variance.
To access the ACCURACY menu, either follow the menu tree or press the soft keys in the order listed below:
tare
menu remote
abc reset
MORE
SETUPS
SUPER
SETUP
ACCURCY
SETUP
Using the numeric keypad, type in the desired Minimum Scale Performance Accuracy followed by the
ENTER key or choose from the soft key selections available and listed below.
Enter the minimum scale performance
accuracy or select from the menu below:
ACCURACY 95.00
ENTER 95% 98% 99% MORE
Additional selections are available by pressing the MORE soft key.
Enter the minimum scale performance
accuracy or select from the menu below:
ENTER 99.5% 99.8% 99.9% GO BACK
Either type in the desired Minimum Scale Performance Accuracy followed by the ENTER soft key or choose
from the selections available.
Supervisor Setup • Super II 21
Supervisor Setup Menu: Soft Key PORTS SETUP
BI* OUT IN GO BACK
B9600 B4800 B2400 B1200 GO BACK
PORTS
SETUP
8 NONE 7 ODD 7 EVEN GO BACK
ON OFF GO BACK
* Hardware handshaking available on the BI port only
Supervisor Setup • Super II 22
Soft Key:
PORTS SETUP
Programming the RS232 Settings
This setup allows selection of the settings for the three RS232 communication ports.
The factory default setting for the BI port is 9600 baud, 8 databits, no parity with hardware handshaking
on. For the IN and OUT ports, the factory default is 2400 baud, 8 databits, and no parity.
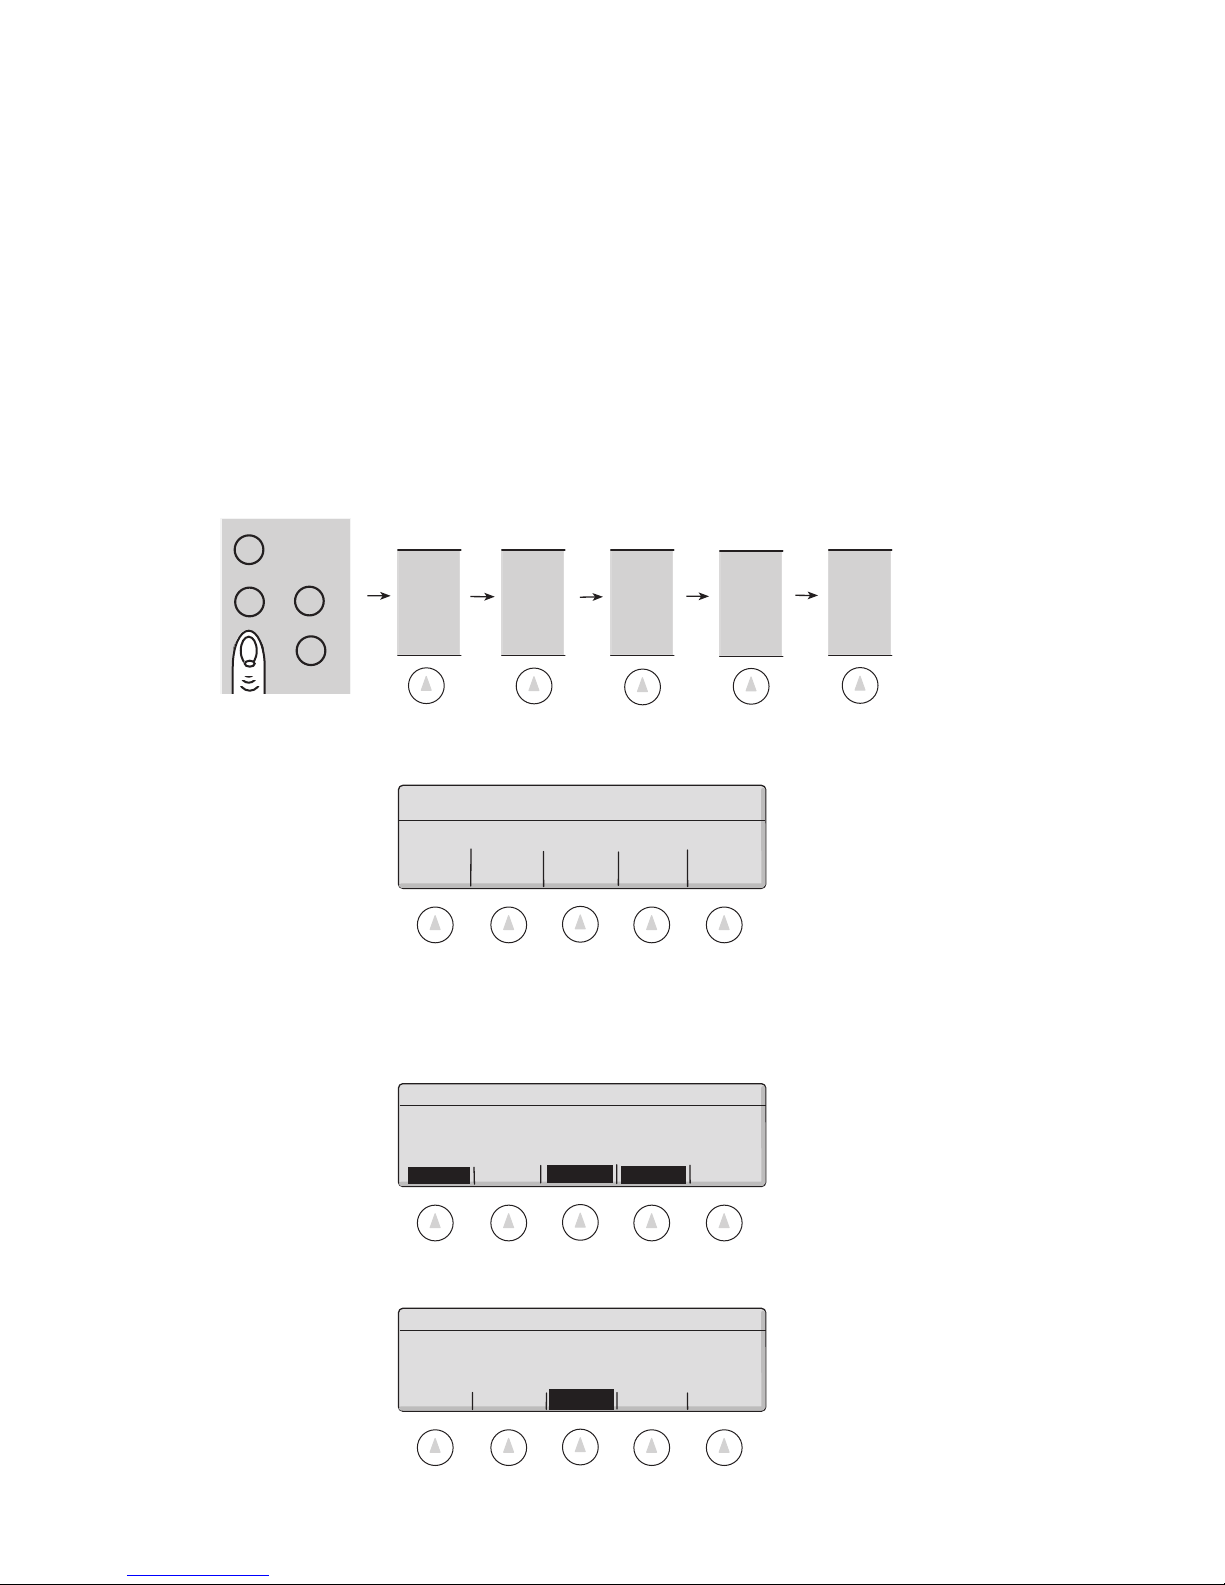
To access the RS232 menu, either follow the menu tree or press the soft keys in the order listed below:
tare
menu remote
MORE
abc reset
1. Choose the RS232 port to configure.
Select the port to configure:
BI OUT IN GO BACK
2. Choose the baud rate.
Select the baud rate:
B9600
3. Choose the databit/parity setting.
Select the character format/byte size:
Note: IN & OUT ports share a common byte
SETUPS
B4800
B2400
SUPER
SETUP
B1200
GO BACK
PORTS
SETUP
4. For the BI port only, choose to have hardware handshaking ON or OFF.
Supervisor Setup • Super II 23
8NONE 7ODD 7EVEN GO BACK
Select enabling of hardware handshaking:
ON OFF GO BACK
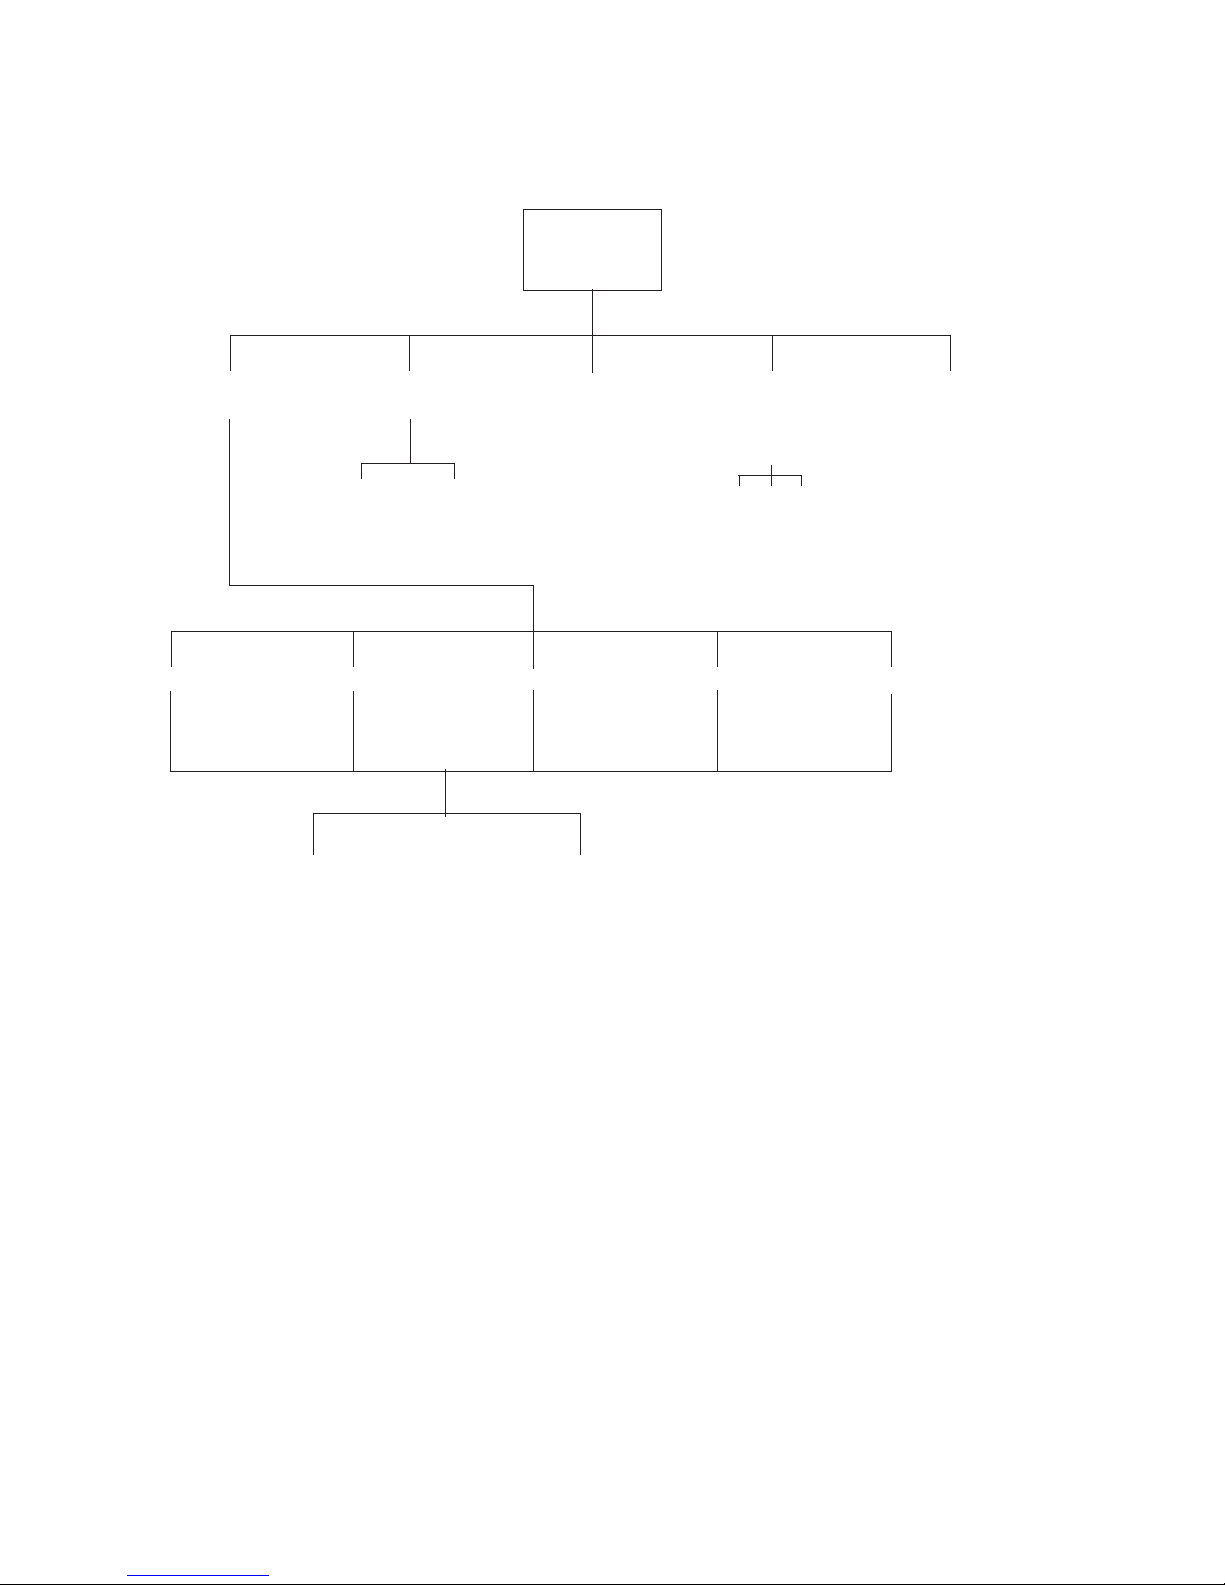
Supervisor Setup Menu: Soft Key TIME DATE
DATE TIME SET SET GO BACK
FORMAT FORMAT DATE TIME
TIME
DATE
Enter date Enter time
MM.DD.YY HH.MM
12 HR 24 HR
ENGLISH US NUM EUR NUM MILITARY SET DIG
2 DIGIT 4 DIGIT
YEAR YEAR
AM PM 24 HR
Supervisor Setup • Super II 24
Soft Key:
TIME DATE
Programming the Time Date Reporting
This setup allows setting of the time and date for the scale as well as choosing the format for reporting the
time and date. For example, time can be reported in either 12 or 24 hour format and the year can be
reported as either 4 digits (e.g., “2001”) or 2 digits (e.g. , “01”)
Note: The factory default reports the date in US MM/DD/YYYY and the hour in 12 hour time format.
To access the TIME DATE menu, either follow the menu tree or press the keys in the order listed below.
tare
menu remote
abc reset
MORE
SETUPS
SUPER
SETUP
MORE
TIME
DATE
Choose from the options below:
Select from the options below to set up
the time and date:
DATE TIME SET SET GO BACK
FORMAT FORMAT DATE TIME
DATE FORMAT
The date can be printed in four different formats. ENGLISH spells out the month in English. The numeric
date reporting can be in U.S. format (US NUM) or European format (EUR NUM). MILITRY reports the date
in the military format. Choose from the available options:
Choose the print format for the month:
ENGLISH US NUM EUR NUM MILITRY SET DIG
Select (SET DIG) to print the year in either 2 digit or 4 digit format.
Choose the print format for the year:
2 DIGIT 4 DIGIT GO BACK
Supervisor Setup • Super II 25

TIME FORMAT
The time can be printed in either 12 hour or 24 hour format. Choose from the options below:
Select the display format for the time.
12 HR 24 HR GO BACK
SET DATE
Using the numeric keypad, type in the date in the format, MM.DD.YY, followed by the ENTER key:
Set the date using the format MM.DD.YY
ENTER GO BACK
SET TIME
Using the numeric keypad, type in the time in the format, HH.MM, followed by a selection for AM, PM, or
24 HR key.
Set the time using the format HH.MM
AM PM 24 HR GO BACK
Supervisor Setup • Super II 26
Supervisor Setup Menu: Soft Key UNITS ENABLED
UNITS
ENABLED
GRAMS OZ LBS DWT MORE
TROY OZ CARATS KG GRAINS GO BACK
CONVERSION NAME RESOLUTION ON/OFF GO BACK
Enter name for Enter resolution
user definable unit for last digit for
user definable unit
FACTOR DIVISOR GO BACK
Supervisor Setup • Super II 27
Soft Key:
UNITS ENABLED
Selecting Weighing Units
This setup allows selection of units of measure available in the UNITS soft key menu in the User Functions
(See User’s Manual). In addition, the last unit of measure (GRAINS) is a user definable unit of measure,
sometimes referred to as ‘x’units. For the user definable unit, the conversion factor, the resolution and the
name of the unit can be customized.
Note: The factory default is to have all units available and the user definable unit set to GRAINS.
To access the UNITS ENABLED menu, either follow the menu tree or press the keys in the order listed
below:
GRAMS
tare
menu remote
abc reset
MORE
SETUPS
SUPER
SETUP
MORE
UNITS
ENABLED
1. To toggle the availability of a unit of measure, selec t that unit of measure. Units that are not available to the
user are shown in reverse video.
Enable/Disable units or Program
x units. Select from the menu below:
GRAMS OZ LBS DWT MORE
Enable/Disable units or Program
x units. Select from the menu below:
TROY OZ CARATS KG GRAINS GO BACK
Supervisor Setup • Super II 28
Programming the User Definable Unit of Measure
To program the user definable unit, choose the last unit (GRAINS) then select from the following menu:
Enter the details of the selected unit:
CONVRSN NAME RESOLUT ON/OFF GO BACK
a. CONVERSION: Press CONVRSN and then, using the scale keypad, enter the conver-
sion number for grams; then choose either FACTOR (multiplier) or DIVISOR.
Enter the conversion factor (x) or
divisor (/) from grams:
FACTOR DIVISOR
GO BACK
b. NAME: Using the alphanumeric keypad (abc key), enter the unit name (limited to
six characters) followed by the ENTER key.
Enter the unit name:
ENTER
GO BACK
c. RESOLUTION: Using the scale keypad, enter the resolution of the last displayed digit
followed by the ENTER key.
Enter the resolution of the last digit:
ENTER
GO BACK
d. ON/OFF: This key turns off the availability of the User Definable Unit of
Measure. When the ON/OFF soft key appears in reverse video, the user definable unit
of measure is unavailable.
Enter the details of the selected unit:
CONVRSN NAME RESOLUT ON/OFF GO
Supervisor Setup • Super II 29
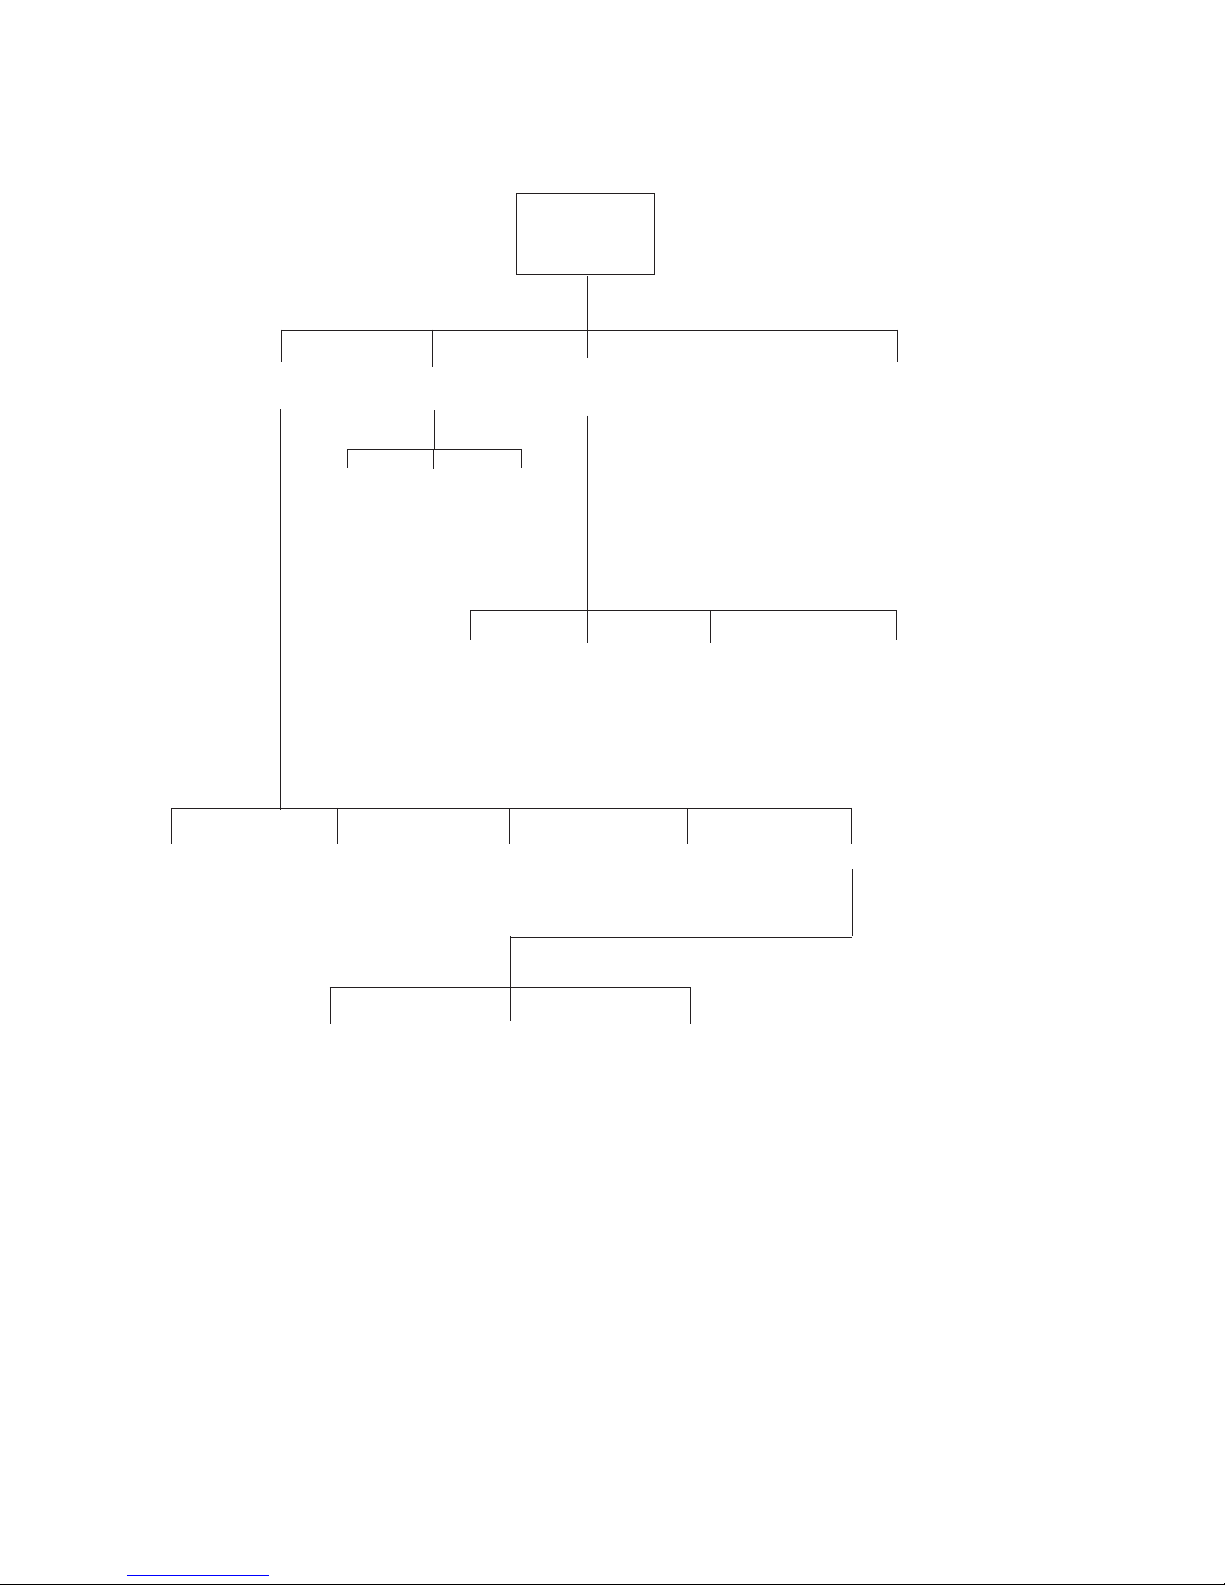
Supervisor Setup Menu: Soft Key DATBASE SETUP
DATABASE
SETUP
DATBASE PRINT DATBASE GO BACK
FORMAT TRANSFR SECURTY
BI OUT GO BACK
LOCKOLD NO LOCK LOCKALL GO BACK
1 2 3 4 MORE
PART ID, APW, TARE PART ID, LOT #, APW PART ID, APW, ACC CT PART ID, LOW, TARGET, HIGH
5 6 GO BACK
FULL DATABASE DATABASE OFF
Supervisor Setup • Super II 30
 Loading...