

Setra Systems EL-200S, EL-410S, BL-410S, EL-2000S, EL-4100S User Manual
...
Table of Contents
Introduction ...................................................................................................................... 3
Section One ....................................................................................................................... 4
Installing Your Balance .............................................................................................4
SETUP ..........................................................................................................................4
Section Two ....................................................................................................................... 5
Understanding Your Balance ................................................................................. 5
KEYBOARD FUNCTIONS........................................................................................ 5
LED INDICATORS .....................................................................................................5
DISPLAY MESSAGES ............................................................................................... 6
Section Three ....................................................................................................................7
Using Your Balance ....................................................................................................7
BASIC WEIGHING ..................................................................................................... 7
WEIGHING WITH A CONTAINER ........................................................................ 7
CONVERTING WEIGHING UNITS ........................................................................ 7
PERCENT DEVIATION ............................................................................................. 8
FILLING TO 100% ....................................................................................................8
CHANGING THE DISPLAY RESPONSE RATE ...................................................9
FILLING TO A TARGET WEIGHT .......................................................................... 9
WEIGHING IN THE PRESENCE OF VIBRATION ............................................... 9
FLOW RATE ............................................................................................................. 10
HOLDING A DISPLAYED WEIGHT ................................................................... 10
INTERFACING WITH A COMPUTER ................................................................ 10
PRINTING OUT INFORMATION ........................................................................ 10
REPETITIVE PRINTING ......................................................................................... 11
Appendix I ....................................................................................................................... 12
User Setups................................................................................................................. 12
CALIBRATION......................................................................................................... 13
SETTING FUNCTION OF MODE KEY FOR DISPLAY RESPONSE RATE OR
HOLD ........................................................................................................................ 14
SETTING THE PRINT FUNCTION ...................................................................... 15
SETTING THE BAUD RATE ................................................................................. 17
ENABLING UNITS OF MEASURE ...................................................................... 18
SETTING THE USER DEFINED UNIT OF MEASURE..................................... 19
SELECTING FLOW RATE (PER SECOND) ....................................................... 22
FIRMWARE VERSION ........................................................................................... 24
RESTORING THE FACTORY DEFAULT SETUPS ........................................... 25
ENVIRONMENTAL CUSTOMIZATION ............................................................ 26
TEMPERATURE COMPENSATION CALIBRATION....................................... 28

2
Appendix II ...................................................................................................................... 31
RS-232 Serial Data Communications ................................................................ 31
Receiving Data Using the Immediate Print Symbol ............................... 31
The RS-232 Interface Hardware...................................................................... 32
Appendix III..................................................................................................................... 33
Accessories and Options ....................................................................................... 33
Appendix IV .................................................................................................................... 34
In Case of Difficulty.................................................................................................. 34
Appendix V ..................................................................................................................... 35
Specifications ............................................................................................................ 35
Appendix VI .................................................................................................................... 36
Limited 3 Year Warranty ........................................................................................ 36

3
Introduction
Thank you for purchasing a Setra precision balance. The fine workmanship
and durable construction should provide years of reliable service. While
your balance is easy to operate, it is advisable to read this guide carefully
before use. It is designed to help you perform weighing and related operations quickly and accurately.
This manual is divided into four major sections. Section One, “Installing Your
Balance,” explains where to put your balance, how to level it and install the
pan, and how to get started. Section Two, “Understanding Your Balance,”
explains the various keys, displays, and messages you will encounter while
using your balance. Section Three, “Using Your Balance,” provides the detailed instructions necessary to perform various operations. Following Section Three are appendices which include initial balance setups, RS-232 information, accessory information, troubleshooting, specifications and a warranty statement.
Typographical conventions used in this manual include the following:
1. BOLD UPPER CASE CHARACTERS indicate specific keys on the balance
keyboard.
2. “Quotation marks” enclose messages seen on the balance display.

4
Section One
Installing Your Balance
SETUP
1.Locating your balance...
You should treat your balance as you would any piece of precision
equipment, locating it on a clean, dry surface; away from extremes of
draft and vibration.
2.Leveling your balance...
The bubble level is located underneath the loading pan. Adjust the
two front feet until the bubble is centered in the circle.
3.Installing the weighing pan...
Next, place the pan support over the shaft in the center of the unit.
Then, place the pan over the pan support.
4.Connecting your balance to an AC outlet...
To power up your balance, insert the appropriate end of the AC adaptor into an electrical outlet. Now insert the connector end into the
back of the balance. The balance draws very little current from an
outlet, and should always remain plugged in. The display may be
turned off by holding down the TARE key for five seconds. This keeps
your balance always ready to use with no “warm up” time.
5.Display test...
Each time your balance is powered on, it automatically runs through a
display test lasting about thirty seconds, showing all possible segments which might be displayed, and then setting itself to zero. The
balance is then ready to be used. For best accuracy allow the balance
to warm up for 5 minutes prior to using or calibrating.

5
Section Two
Understanding Your Balance
KEYBOARD FUNCTIONS
CAL Instructs the balance to accept calibration data.
MODE Factory programmed to select display response rate. Can
be user programmed to hold a displayed weight.
PRINT Sends to a printer or other peripheral device the informa-
tion on the display.
UNITS Converts weighing units (for example, changes from grams
to ounces).
TARE/POWER Assigns the pan and whatever is currently being weighed a
value of zero. To turn the display off, hold this key down for
five seconds. To turn the display on press this key again.
% Instructs the balance to display percent weight.
LED INDICATORS
ok Reading shown is stable.
g Reading shown is given in grams.
oz Reading shown is given in ounces (avoirdupois).
ct Reading shown is given in carats.
% Reading shown is given as a percent weight.
x Reading shown is given in user-definable units.
Note: "x" units are preset at the factory to grams/second.
FAST The display response rate is set to fast.

6
SLOW The display response rate is set to slow.
DISPLAY MESSAGES
–␣ –␣ –␣ –␣ –␣ – The balance is developing a stable reading.
UnAbLE The balance is unable to perform your requested operation.
Press the TARE key and select another operation.
HHHHHH The weight on the pan exceeds the capacity of the balance.
LLLLLL The pan is not properly seated or has been removed.

7
Section Three
Using Your Balance
BASIC WEIGHING
To weigh a sample on your balance, use the following procedure:
1. Press the TARE key to zero the display.
2. Place the object(s) to be weighed on the pan.
3. Wait for the “ok” indicator, then read the weight from the display.
WEIGHING WITH A CONTAINER
To weigh objects or liquids without including the weight of the container,
use the following procedure:
1. Place the empty container on the pan. Press the TARE key, the scale will
display “–␣ –␣ –␣ –␣ –␣ –” and return to zero.
2. Wait for the “ok” indicator. Place or pour objects or liquids into the
container.
3. Wait for the “ok” indicator, the net weight will be displayed.
CONVERTING WEIGHING UNITS
Your balance is capable of weighing in any of the units listed in the "LED
INDICATORS" portion of this manual. To convert from one unit to another,
simply press the UNITS key. Each time you press the key, the display converts
to the unit next in line on the balance. Continue pressing the key until the
unit you wish to use is displayed. The order of units is as follows: GRAMS —
OUNCES — CARATS — "x" UNITS.
Note: If a weighing unit has been disabled, it will not be displayed. Refer to
Appendix I: ENABLING UNITS OF MEASURE.

8
PERCENT DEVIATION
To calculate the amount by which a weight varies from a reference, follow
this procedure:
1. Press TARE.
2. Place the reference weight on the pan.
3. Press the "%" key. After acquiring a stable reading, the display will read
"100.000", "100.00" or "100.0" depending on the amount of weight
applied and the % LED will be lit.
4. Press the TARE key. After acquiring a stable reading, the display will
read "0.000 ", "0.00" or "0.0" depending on the amount of weight
applied. The display now shows percent deviation.
5. Remove the reference weight.
6. Place the weight to be measured on the pan.
7. Wait for the ok LED to light. Read the display. The display indicates
percent deviation from the reference.
8. Remove the weight.
9. Repeat Steps 6-8 as many times as desired.
10. Press UNITS to return to weighing.
NOTE: To display a % of a reference weight, skip step 4.
FILLING TO 100%
You may specify a weight as a given percentage of a total. To fill to 100%,
proceed as follows:
1. Press TARE.
2. Place the reference filled container on the pan.
3. Press the % key. After acquiring a stable reading, the display will read
"100.000", "100.00" or "100.0" depending on the amount of weight
applied.

9
4. Remove the container.
5. Place the empty container on the pan.
6. Fill the container until “100%” is displayed and the ok LED is lit.
7. Empty the container.
8. Repeat Steps 5 - 7 as many times as desired.
9. Press UNITS to return to weighing.
CHANGING THE DISPLAY RESPONSE RATE
The MODE key is factory preset to allow you to modify the display response
rate. The default is Automatic and provides a fast display response (short
integration time) when the balance senses large changes in weight and a
slow display response (long integration time) when sensing small changes
in weight. The MODE key can be used to provide a constant FAST display
response rate for filling operations or a SLOW display response rate for
weighing in the presence of vibration. To change display response rates,
simply press the MODE key repeatedly until you have selected the desired
response rate.
FILLING TO A TARGET WEIGHT
The MODE key is used to enter a FAST response rate for filling operations.
1. Press the MODE key. The FAST LED should be lit.
2. Place a container on the pan and press the TARE key.
3. Pour to the targeted weight.
4. Return to the automatic weighing mode by pressing the MODE key
twice.
WEIGHING IN THE PRESENCE OF VIBRATION
The MODE key is used to enter a SLOW display response rate for weighing in
the presence of vibration.
1. Press the MODE key twice. The SLOW LED indicator should be lit.

10
2. Perform any weighing procedure.
3. To return to the automatic weighing mode, press the MODE key.
FLOW RATE
The balance can monitor flow rates by calculating the weight change in
weight per second. The factory default "x" user definable unit is set to
grams/second. To select the "x" unit, press the UNITS key until the X LED
indicator is lit. Refer to SETTING THE USER DEFINABLE UNIT OF MEASURE;
SELECTING FLOW RATE in Appendix I: User Setups, to change the flow rate
to other weight units per second.
HOLDING A DISPLAYED WEIGHT
The balance is capable of locking onto a displayed reading. The MODE key's
function can be changed to act as a HOLD button. Refer to SETTING FUNCTION OF THE MODE KEY in Appendix I: User Setups, to change the function
of the MODE key. The factory default setup for the MODE key is to select the
display response rate.
INTERFACING WITH A COMPUTER
Your balance has a male DB9 RS-232 serial port and is designed to interface
with computer equipment. If your balance is connected to a computer,
follow the instructions in Appendix II.
PRINTING OUT INFORMATION
Your balance is designed to print out the displayed weight when connected
to an optional serial printer. To print using the CoStar SETRA 250 thermal
receipt/label printer, follow the instructions below:
1. Connect the printer’s AC adaptor to the proper electrical outlet.
2. Make sure the printer is turned on (as indicated by the printer’s green
light). If the printer is not on, press the blue power button on the front
of the printer.
3. Load the appropriate paper or label stock into the printer. (See printer
instructions for details).
4. Connect the printer to the balance’s RS-232 connector using the cable
provided.

11
5. Perform the necessary weighing procedures on the balance.
6. Press the PRINT key on the balance.
NOTE: If using label stock, the form feed command must be programmed
in User Setups (see Appendix I). When using a printer other than the
CoStar SETRA 250, set the baud rate and parity of your balance to
match the printer (see Appendix I, User Setups to select the print
mode, baud rate and parity).
REPETITIVE PRINTING
It is sometimes desirable to measure weight at fixed intervals of time. One
use of this procedure is evaporation studies. To print out weight at fixed
intervals, refer to SETTING THE PRINT FUNCTION in Appendix I: User Setups.
Once the time interval has been selected proceed as follows:
1. Press PRINT to begin the repetitive printing procedure.
2. Press PRINT again to stop the procedure.
12
Appendix I
User Setups
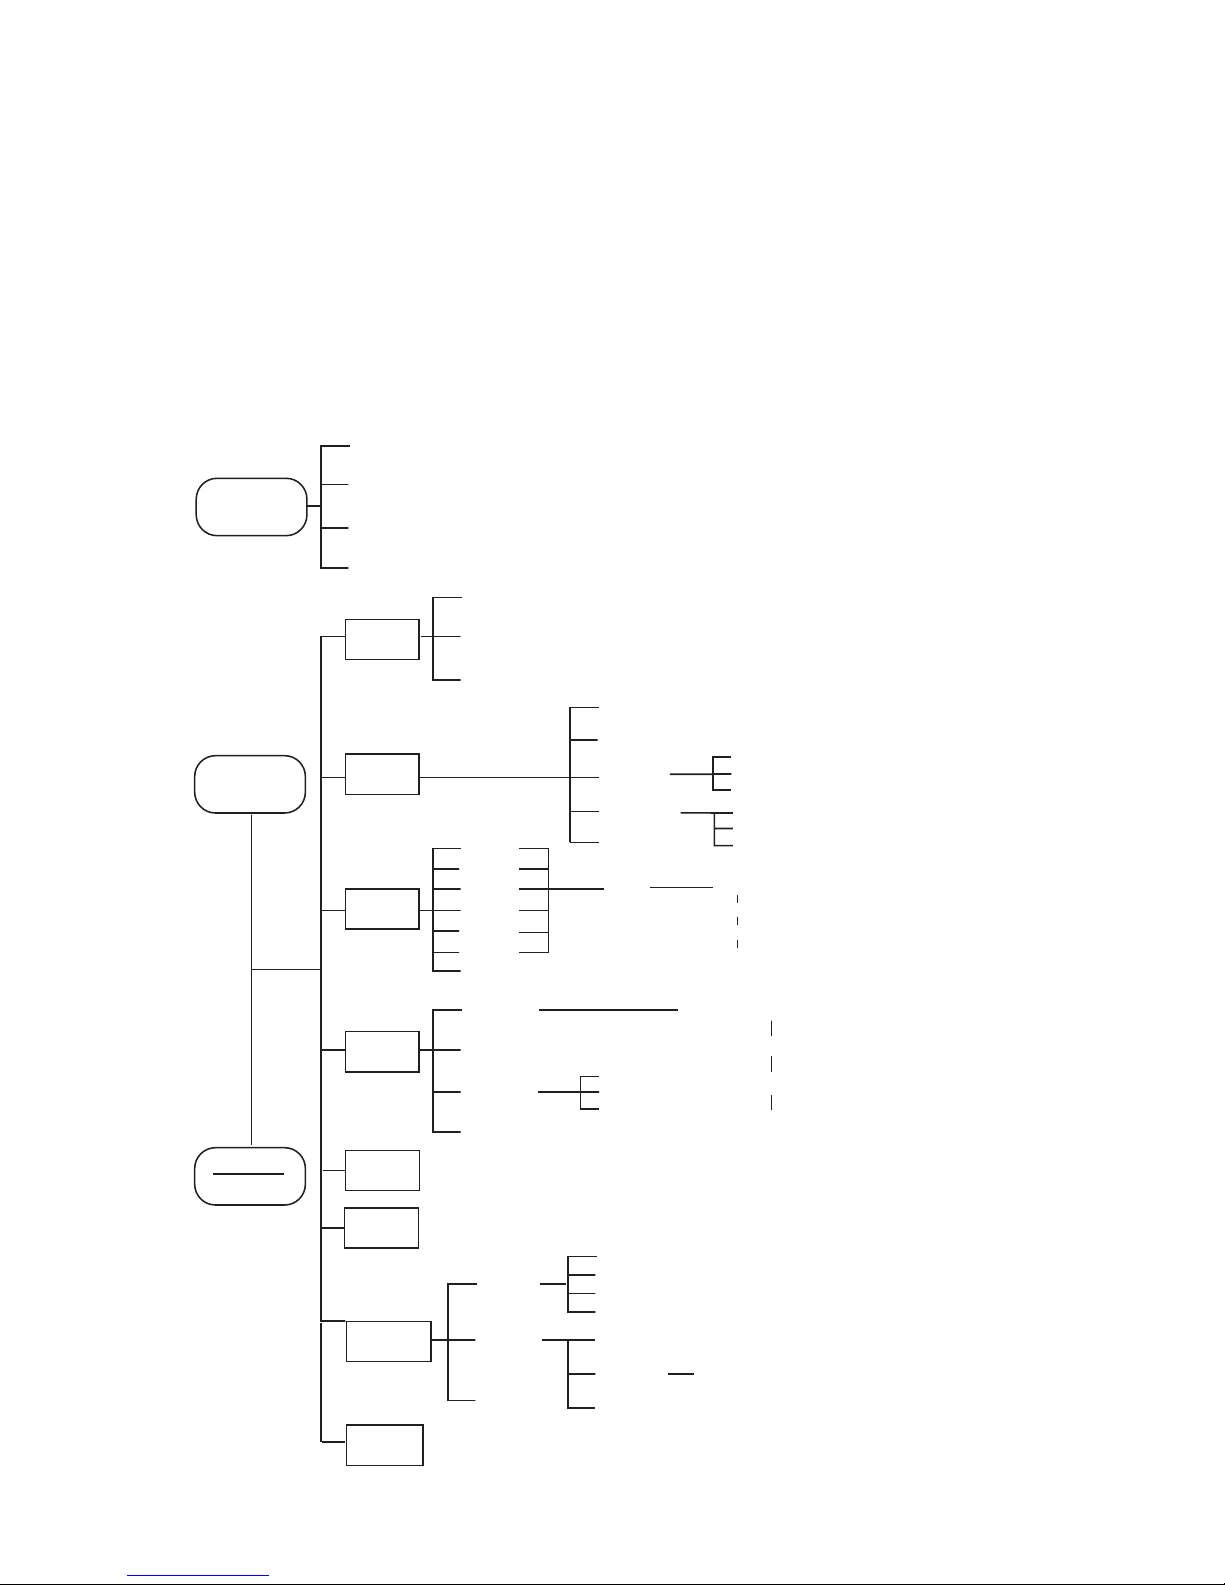
The outline below represents the balance's menu structure. To enter the
menu press and hold the TARE key and then press the MODE␣ key. To view the
current menu options, press the TARE key repeatedly. To select the displayed
option, press the MODE key.
MODE
TARE
POWER
REF
Displays current software version
UNITS
Enable
User U
Per Sec
Escape
FUNC
sets function
of mode key
Speed
Hold
Escape
BAUD
set for RS-
232 interface
PRINT
Rate On
Rate Off
Escape
grams yes/no, Escape
ounces yes/no, Escape
carats yes/no, Escape
User U yes/no, Escape
Returns to weighing mode
Speed
CAL T
Escape
Fast
Slow
Auto
Escape
Hot Cal
Environmental
Customization
300
600
1200
2400
4800
9600
Escape
Parity
None
Even
Odd
Escape
Stable
Instant
Interval
Line Feed
Escape
1...
...18
Escape
0...
...600
Escape
CUSTOM
CAL
Full Scale
Lower Weights
Unspan
Escape
Restores all factory defaults
FACDEF
ESCAPE
Fac TP
User TP
Escape
 Loading...