

Setra Systems L Series, 12000L, 5000L, 2000L, 500L User Manual

1
Table of Contents
Introduction 3
Section One 5
Installing Your Balance 5
Section Two 7
Understanding Your Balance 7
Section Three 9
Using Your Balance 9
Section Four 15
Advanced Functions 15
Appendix I 17
Set-Up Functions 17
Appendix II 20
Calibration 20
Appendix III 21
Glossary of Terms 21
Appendix IV 22
RS-232 Serial Data Communications 22
Appendix V 27
Accessories and Options 27
Appendix VI 28
In Case of Difficulty 28
Appendix VII 29
Specifications 29
Appendix VIII 30
Limited Two Year Warranty 30
Index 31

2

3
Introduction
Thank you for purchasing a Setra precision balance. Its ease of operation and durable
construction should provide years of reliable service. While your balance is easy to
operate, it is advisable to read this guide carefully before use. It is designed to help you
perform weighing, formulation by percentage and related operations quickly and
accurately.
This guide is divided into four major sections. Section One, “Installing Your Balance,”
explains the proper installation of your balance in its surroundings. Section Two,
“Understanding Your Balance,” explains the various keys, functions, displays and
messages you will encounter while using your balance. Section Three, “Using Your
Balance,” provides the actual instructions necessary to execute your balance’s various
functions. Section Four, “Advanced Functions,” describes some of the more salient
features of the balance. Following Section Four, this guide contains Appendices. The
Appendices include calibration information, a Glossary of Terms, and instructions for
interfacing the balance with computers and other equipment. Also provided are
specifications, a list of accessories, and a warranty statement.
Typographical conventions used in this guide include the following:
1. bold, lower case characters indicate specific keys on the balance keyboard.
(e.g., Press — tare, asks you to press the — key and then the tare key on the
balance keyboard.)
2. "Quotation marks" enclose messages you receive from the balance display.
3. nnn indicates that a number will appear in the display message.
4
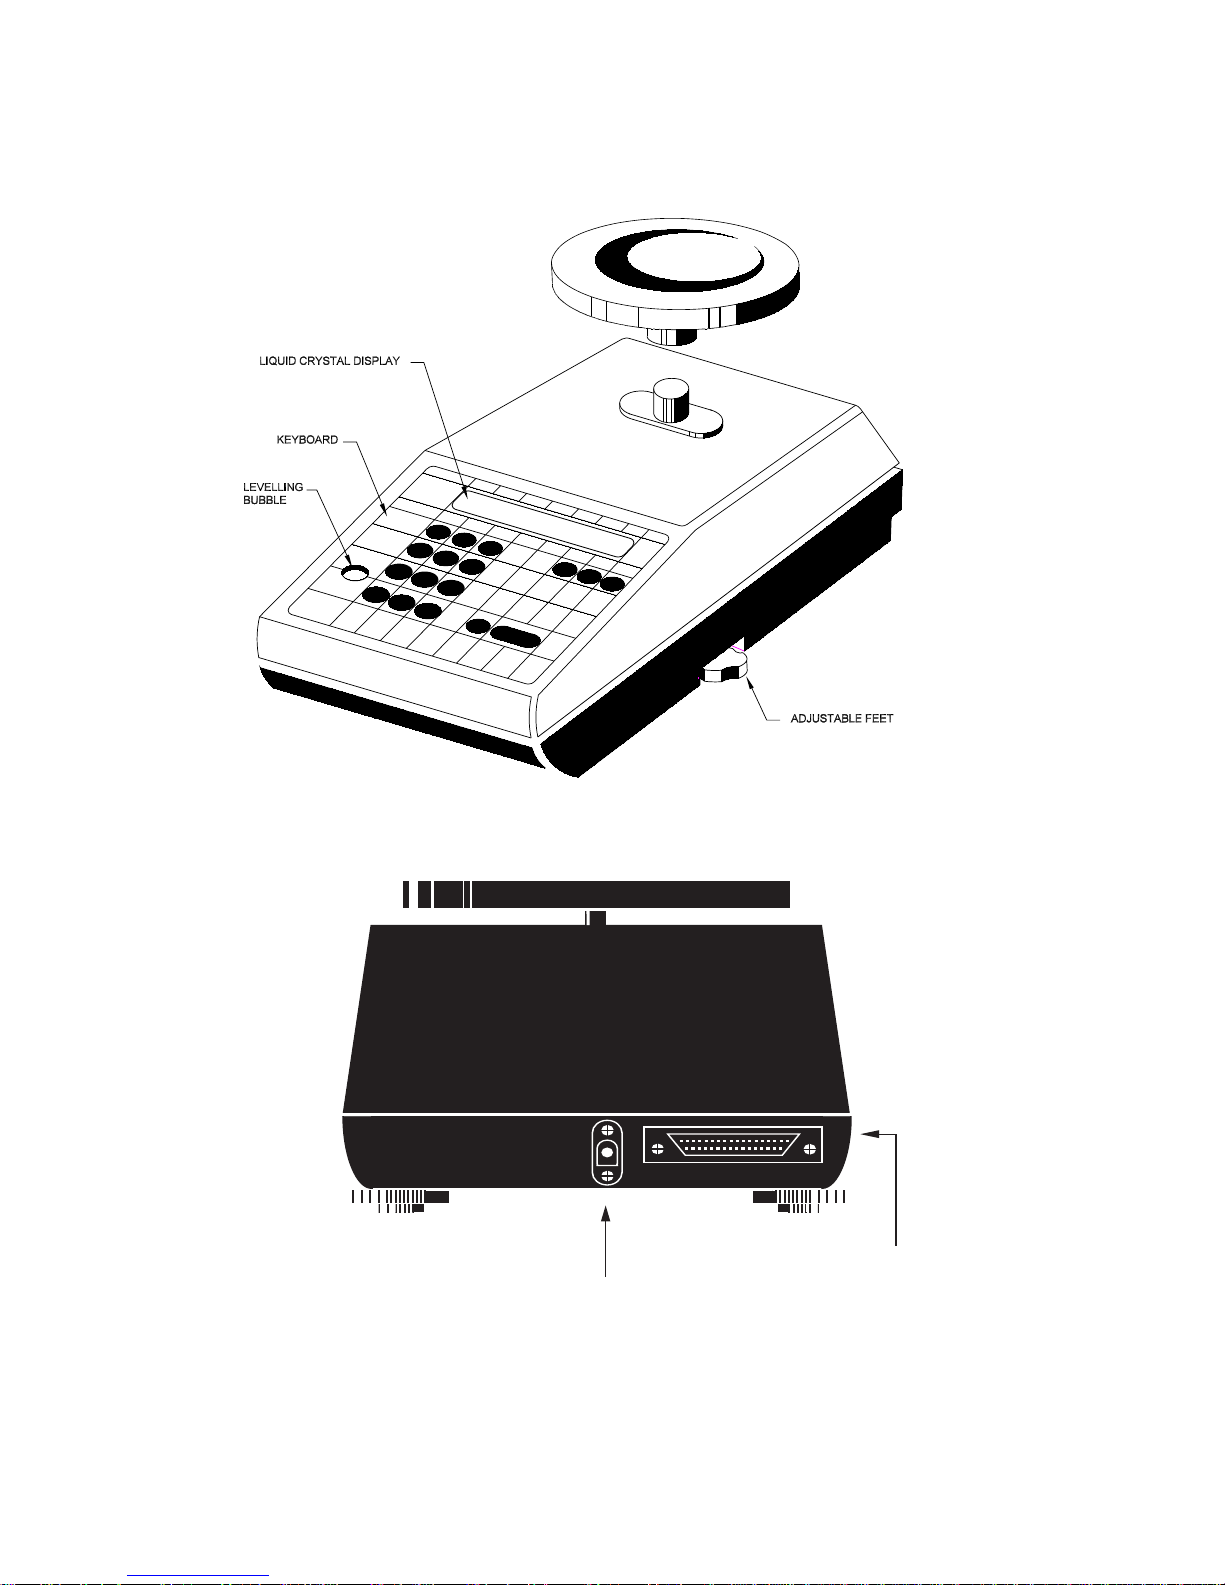
FIGURE 1. Components and Features of the SETRA balance.
D.C.Connector
RS-232
Serial Connector

5
Section One
Installing Your Balance
SETUP
1. Locating your balance
The rugged design of your Setra balance ensures that it will withstand most
environmental conditions it might encounter. Nonetheless, you should treat
your balance as you would any piece of precision equipment, locating it away
from extremes of draft and vibration.
2. Levelling your balance
To level your balance, adjust the two front feet on the bottom of the balance, until
the bubble on the left front corner of the keyboard is centered inside the circle
(see FIGURE 1).
3. Installing the weighing pan
Next, you should place the pan to your balance over the shaft (or rubber guides
on the Model 12000L - see special assembly instructions included), on the top
of the unit.
4. Connecting your balance to an AC outlet
To connect your balance to an AC outlet, insert the appropriate end of the A.C.
adaptor into an electrical outlet. Now connect the other end into the back of the
balance (see FIGURE 1). Once you have plugged your scale into a live outlet,
it is automatically on. The balance itself, when not in use, draws very little current
from an outlet, and may be left connected. For best accuracy, allow the balance
to warm up for 45 minutes prior to use.
5. Calibration
It is recommended that you calibrate your balance prior to initial use to allow for
gravitational differences between your location and the factory. Follow the
procedure outlined in Appendix II, “Calibration.”

6
EXPERIMENTATION
1. Display test
When your balance is first powered on (connected to an AC outlet or battery),
it automatically runs through a “display test,” showing all possible segments
which might be displayed. This test lasts approximately six seconds. The
balance next says “HELLO” and performs self-diagnostics to ensure proper
operation. The balance then counts down to zero, and is ready for use.
2. Trying your balance
It is important that you read this User’s Guide thoroughly to ensure proper use
of your balance. Nonetheless, experimenting with your balance and its keyboard prior to reading this guide in its entirety will not harm your balance, and
may actually give you a better understanding of the instructions in this guide.
If you instruct the balance to do something it is not capable of doing, the balance
will simply respond by displaying “UnAbLE”. To continue experimenting, press
the clear key.

7
Section T wo
Understanding Y our Balance
KEYBOARD FUNCTIONS
tare Clears display. Assigns the pan and whatever is currently
being weighed a value of zero.
% Instructs the balance to display percent weight.
conv Converts weighing units (for example, changes from grams to
ounces).
print Sends to a printer or other peripheral device information
displayed, along with the sample number, if entered.
clear Clears the display and the last number entered or function
requested, and displays weight.
Note: — clear sets the sample number and aggregate percent
weight registers to zero.
sample no. Instructs balance to accept identification number of up to
twenty-five digits for use as desired; e.g., an experiment
number to be printed out with batch weight.
cal Instructs the balance to accept calibration data.
int When filling a container with liquids, use of the key provides a
rapid display update to help prevent overshooting the target
weight. With special programming this key can also improve
stability in the presence of vibration. Pressing the key again
returns to the normal weighing mode. See Set Up Functions,
Appendix I.
X10 Instructs the balance to toggle the display between full reso-
lution and one less digit (decade) of resolution.
— Instructs the balance to change the sign of a number. Also acts
as a second function key for certain commands and may be
used to insert dashes into a sample number.
0-9 Instructs the balance to enter numerical values, such as
percentage or tare weight.

8
DISPLAY SYMBOLS
OK Reading on balance is stable. Further operations may be
performed.
INT Balance is operating in the fast integration mode, for use when
filling containers to a target weight, or in the slow integration
mode for use when vibration is present.
APW Reading given in “aggregate percent weight.” This is the
weight equivalent to 100% when using the percent function.
PC Reading shown is given in percent.
g Reading shown is given in grams.
oz Reading shown is given in ounces (avoir-dupois).
lb Reading shown is given in pounds.
t oz Reading shown is given in troy ounces.
dwt Reading shown is given in pennyweights.
c Reading shown is given in carats.
t Reading shown is given in user-definable, tamperproof units.
Note: t units are preset by the factory in grains (15.4326 = 1
gram).
X Reading shown is given in user-definable units.
Note: X units are preset at the factory to grams.
DISPLAY MESSAGES
bUSY The balance is developing a stable reading.
UnAbLE The balance is unable to complete your requested function.
Clear the display, and select another function.
OFLO The number in the display exceeds six digits. Remove some of
the weight or formulate and weigh in smaller batches. Press
clear to continue.
FLASHING The weight on the pan exceeds the capacity of the instrument.
DISPLAY Remove some of the weight to continue.

9
Section Three
Using Your Balance
ENTERING A NUMBER OR FUNCTION
To enter a number or function on your balance, simply press the key or keys which
correspond to the numbers or functions you wish to enter.
CLEARING A NUMBER OR FUNCTION
To clear the last function or number you entered on the balance’s keyboard, simply
press the clear key. This automatically returns your balance to the weighing mode.
CONVERTING A NUMBER OR FUNCTION
Your balance is capable of weighing in any of the units listed in the “Display Symbols”
portion of this guide. To convert from one unit to another, simply press the conv key.
Each time you press the key, the display converts to the unit next in line in your program.
Continue pressing the key until the unit you wish to use is displayed. The order of units
is as follows: GRAMS - OUNCES - POUNDS - TROY OUNCES - PENNYWEIGHTS CARATS - t UNITS - X UNITS - GRAMS. To return directly to grams, press — then conv.
BASIC WEIGHING
To weigh a sample on your balance, use the following procedure:
1. Press the tare key.
2. Place the object(s) to be weighed on the pan.
3. Wait for the “OK” symbol, then read the weight from the display.
BASIC MASS DETERMINATION
To determine mass on your balance, use the following procedure:
1. Calibrate your balance using a mass standard of known value. (See Appendix
II, “Calibration.”)
2. Press the tare key.
3. Place the mass to be determined on the pan.
4. Wait for the “OK” symbol, then read the display.

10
Since mass and weight are different measurements, your instrument must be compensated for local gravitational effects in order to determine mass. This calibration should
be performed prior to initial use and on a regular basis thereafter. Refer to Appendix II,
“Calibration.” Further references to weight in this manual may be assumed to be
interchangeable with mass if calibration has been performed.
WEIGHING WITH THE TARE FUNCTION
You can use your balance to weigh objects (or liquids) by placing or pouring them into
a container. To weigh objects or liquids in this manner, WITHOUT including the weight
of the container, use the TARE function. This function subtracts out and stores the tare
or container weight before you begin weighing. To do this, use the following procedure:
1. Place the empty container on the pan.
2. Press the tare key.
3. Place or pour objects or liquids into the container.
4. Wait for the “OK” symbol, then read the net weight from the display.
ENTERING A TARE WEIGHT
To find the weight of the contents of a container when the container weight is known,
follow this procedure:
1. Press tare.
2. Place the object or liquid and the container to be weighed on the pan.
3. Enter the container weight.
4. Press tare.
5. Wait for the “OK” symbol. The display reads net (contents) weight.
FILLING TO A TARGET WEIGHT
The int key is factory pre-set to provide a rapid display update for filling operations. (If
your balance does not provide a rapid update when in the INT mode, refer to Appendix
I, Set-Up Functions, to alter the INT key functionality.)
1. Press the int key. The INT symbol will be displayed.
2. Place a container on the pan and press tare.
3. Pour to the targeted weight.
4. Return to the normal weighing mode by repressing int.
 Loading...