

Setra Systems 35CP, 70CP, 140CP User Manual

Table of Contents
Introduction ................................................................................................................. 3
Section One ................................................................................................................ 5
Installing Your Scale ................................................................................................ 5
SETUP .................................................................................................................. 5
EXPERIMENTATION............................................................................................. 8
Section Two ................................................................................................................ 9
Understanding Your Scale ...................................................................................... 9
KEYBOARD FUNCTIONS..................................................................................... 9
DISPLAY SYMBOLS ........................................................................................... 10
DISPLAY MESSAGES......................................................................................... 11
Section Three............................................................................................................ 12
Using Your Scale ................................................................................................... 12
ENTERING A NUMBER OR FUNCTION ............................................................ 12
CLEARING A NUMBER OR FUNCTION ............................................................ 12
RECALLING A NUMBER OR FUNCTION .......................................................... 12
CONVERTING WEIGHING UNITS ..................................................................... 12
STORING A NUMBER IN A REGISTER.............................................................. 12
CLEARING A NUMBER FROM A REGISTER..................................................... 12
BASIC WEIGHING.............................................................................................. 13
WEIGHING WITH THE TARE FUNCTION .......................................................... 13
WEIGHING WITH THE GROSS FUNCTION ....................................................... 13
NET TOTALIZING BY WEIGHT .......................................................................... 14
BASIC COUNTING ............................................................................................. 15
COUNTING WITH THE TARE FUNCTION ......................................................... 15
COUNTING WITH THE GROSS FUNCTION ...................................................... 16
COUNTING WITH THE AVERAGE-PIECE-WEIGHT FUNCTION ....................... 16
COUNTING WITH ACCURACY ENHANCEMENT.............................................. 17
REVERSE COUNTING OR KITTING .................................................................. 17
NET TOTALIZED COUNTING ............................................................................ 18
USING THE MINIMUM SAMPLE SIZE FEATURE .............................................. 19
USING THE MINIMUM ACCURACY FEATURE ................................................. 19
ACCUMULATING RESULTS .............................................................................. 20
ASSIGNING AN I.D. NUMBER TO A BATCH .................................................... 21
FAST OR SLOW UPDATE (“INT” MODE) ........................................................... 21
PRINTING OUT INFORMATION......................................................................... 22
BAR CODING INFORMATION ........................................................................... 22
INTERFACING WITH A COMPUTER.................................................................. 22
COUNTING WITH APW VALUES IN EXPONENTIAL NOTATION...................... 22
Section Four .............................................................................................................. 23
Dual Scale Operation ............................................................................................ 23
INSTALLING A DUAL SCALE SYSTEM ............................................................. 23
USING A DUAL SCALE SYSTEM ....................................................................... 24
Appendix I ................................................................................................................ 25
User-Definable Units ............................................................................................. 25
X UNITS .............................................................................................................. 25

2
T UNITS .............................................................................................................. 26
Appendix II ............................................................................................................... 27
Setup Functions..................................................................................................... 27
PRINT FORMAT.................................................................................................. 27
FORMATTING MINIMUM SAMPLE SIZE ........................................................... 28
FORMATTING MINIMUM ACCURACY .............................................................. 28
SECONDARY PRINT FORMAT FOR BAR CODE LABELS ................................ 28
FORMATTING BAUD RATE ............................................................................... 29
DUAL SCALE OPERATION ................................................................................ 30
FIRMWARE VERSION ........................................................................................ 30
RESTORING THE FACTORY DEFAULT SETUPS .............................................. 31
DISABLING TONE .............................................................................................. 31
ALTERING DISPLAY UPDATE RATE ................................................................. 32
Appendix III .............................................................................................................. 33
Calibration ............................................................................................................. 33
FULL SCALE SPAN CALIBRATION ................................................................... 33
SPAN CALIBRATION WITH A SPECIFIC WEIGHT ............................................ 33
Appendix IV .............................................................................................................. 34
Typical Uses of Your Scale: Examples ................................................................. 34
Appendix V ............................................................................................................... 36
Glossary of Terms ................................................................................................. 36
Appendix VI .............................................................................................................. 37
RS-232 Serial Data Communications .................................................................... 37
Interfacing a Setra Scale to a Computer ........................................................... 37
Sending Commands to the Scale ...................................................................... 37
Sending Alphanumeric ID#s to the Scale .......................................................... 39
Receiving Data From the Scale ......................................................................... 40
Immediate and Continuous Print Modes ........................................................... 41
The Jump Function............................................................................................. 42
The Verify Function............................................................................................. 43
Status After Power is Applied ............................................................................ 43
The RS-232 Interface Hardware ........................................................................ 43
Appendix VII ............................................................................................................. 45
Accessories and Options ...................................................................................... 45
Appendix VIII ............................................................................................................ 46
In Case of Difficulty ............................................................................................... 46
Appendix IX .............................................................................................................. 48
User Replaceable Components ............................................................................ 48
BATTERY REPLACEMENT ................................................................................. 48
CABLE REPLACEMENT ..................................................................................... 50
Appendix X ............................................................................................................... 52
Specifications ........................................................................................................ 52
Appendix XI .............................................................................................................. 53
Limited Two-Year Scale Warranty ......................................................................... 53
Index ......................................................................................................................... 55

3
Introduction
Thank you for purchasing a Setra precision counting scale. Its ease of operation and
durable construction should provide years of reliable service. While your scale is
easy to operate, it is advisable to read this guide carefully before use. It is designed
to help you perform weighing, counting, and related operations quickly and accurately.
This guide is divided into four major sections. Section One, “Installing Your Scale,”
explains the proper installation of your scale in its surroundings. Section Two,
“Understanding Your Scale,” explains the various keys, functions, displays, and
messages you will encounter while using your scale. Section Three, “Using Your
Scale,” provides the actual instructions necessary to perform your scale’s various
functions. Section Four, "Dual Scale Operation," describes a special case whereby
two Setra scales are cabled together for quick and easy transfer of the average
piece weight. Following Section Four, this guide contains Appendices. The Appendices include examples, a Glossary of Terms, and setup information for advanced
functions.
Typographical conventions used in this manual include the following:
1. Bold , lower case characters indicate specific keys on the scale keyboard. (e.g.,
Press — tare , asks you to press the — key and then the tare key on the scale
keyboard.)
2. “Quotation marks” enclose messages you receive from the scale display.
3. nnn indicates that a number will appear in the display message.
4
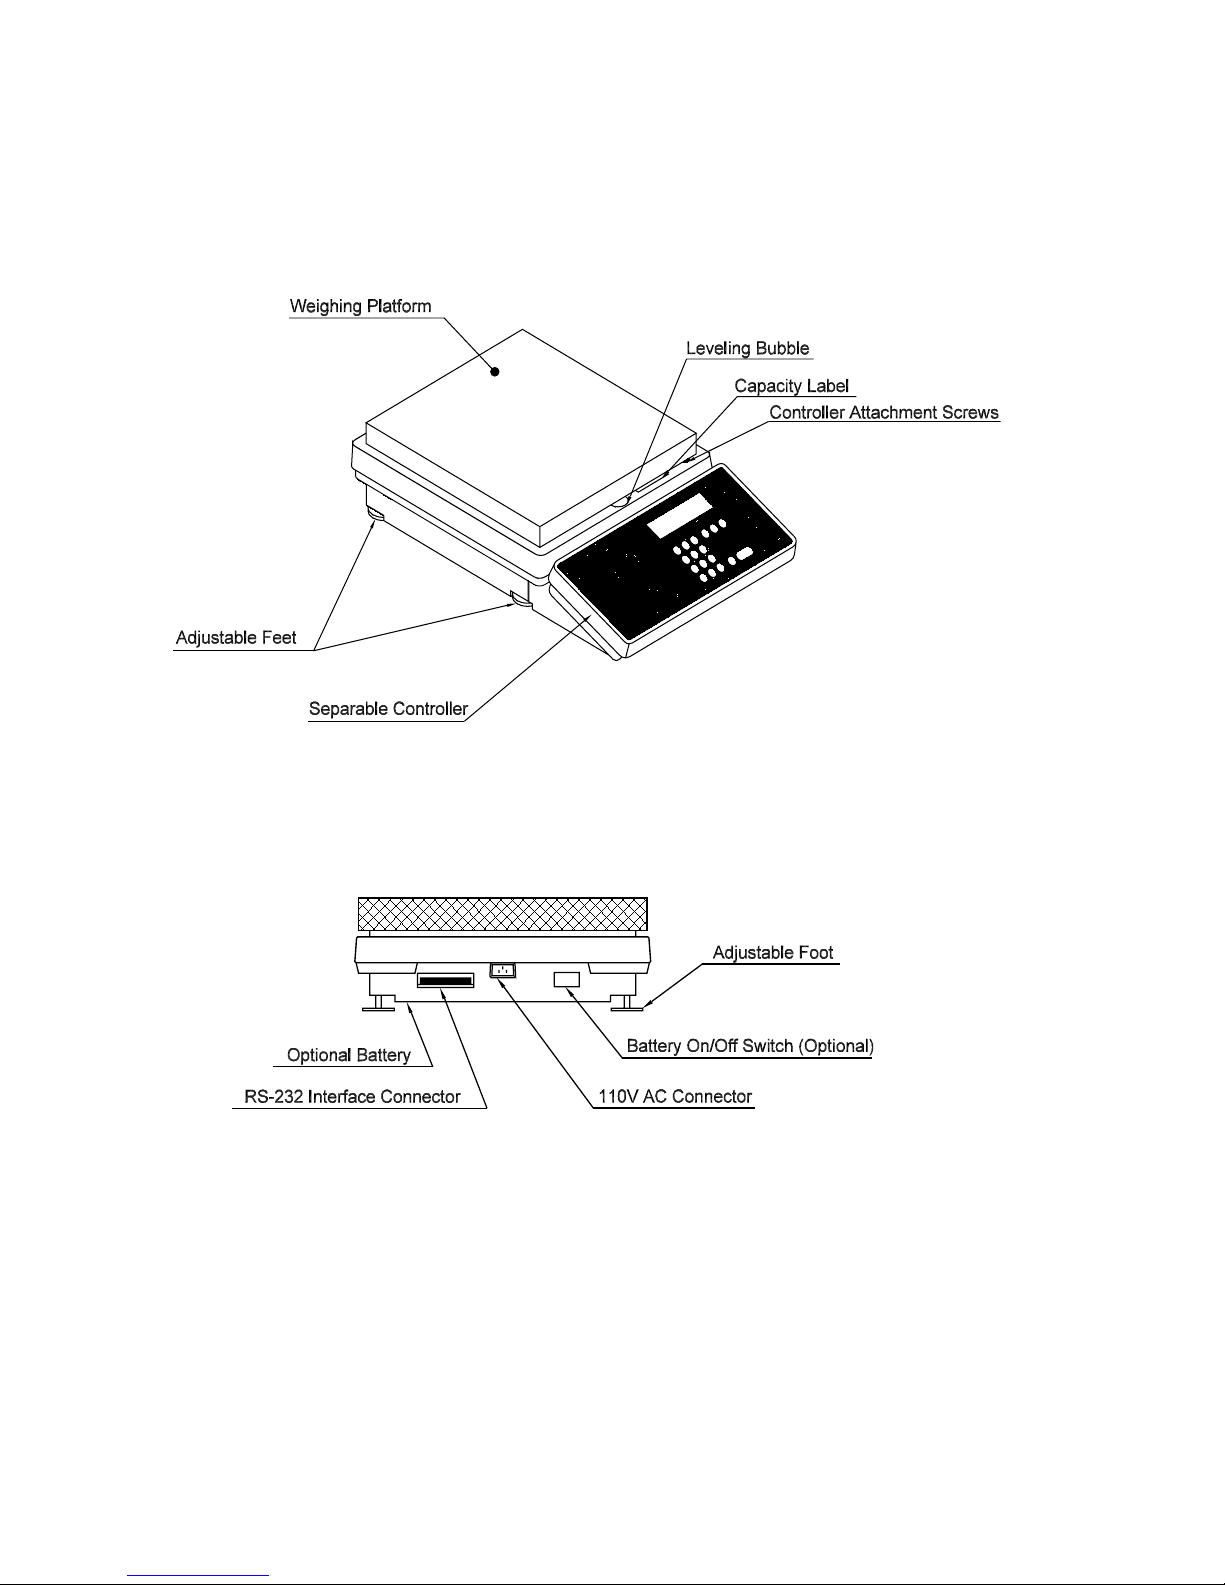
Figure 1. Components and features of the Setra platform scale.

5
Section One
Installing Y our Scale
SETUP
1 . Locating your scale
The rugged design of your Setra scale ensures that it will withstand most of the
environmental conditions it might encounter. Nonetheless, you should treat your
scale as you would any piece of precision equipment, locating it on a clean, dry
surface; protected where possible from extremes of draft and vibration. The
controller (keyboard and display unit) may be separated from the weighing
platform. This allows the platform to be located on the floor with the keyboard
and display on a table or wall.
2. Leveling your scale
1. Retract the left rear foot completely into the scale.
2. Adjust the two front feet until the leveling bubble is centered in the circle.
3. Extend the left rear foot until it contacts the mounting surface. Make certain that
all four feet are contacting the mounting surface.
Replace the weighing pan by visually centering the pan on the scale and
pressing in place until well seated. The pan will be seated correctly if it is level on
all sides.
3. Connecting your scale to an AC outlet
To connect your scale to an AC outlet, insert the appropriate end of the power
cord into an electrical outlet. Now connect the other end into the back of the
scale (see Figure 1). Once you have plugged your scale into a live outlet, it is
automatically on. The scale draws very little current from an outlet, and should
be left connected. This keeps your scale ready to use with no “warm-up” time.
4. Using the optional internal battery
The internal battery option on Setra CP Model Scales includes one nickel cadmium battery pack, an internal battery charger, and a battery on/off switch.
The switch is located on the rear of the platform. (Refer to Figure 1.)
The battery does not come fully charged from the factory. Before using
your scale for the first time, it is necessary to charge the battery. To charge
the battery, simply plug the scale into an electrical outlet. Fourteen hours is
necessary for a full charge. The battery will charge faster if the battery on/off
switch is in the off position.
6
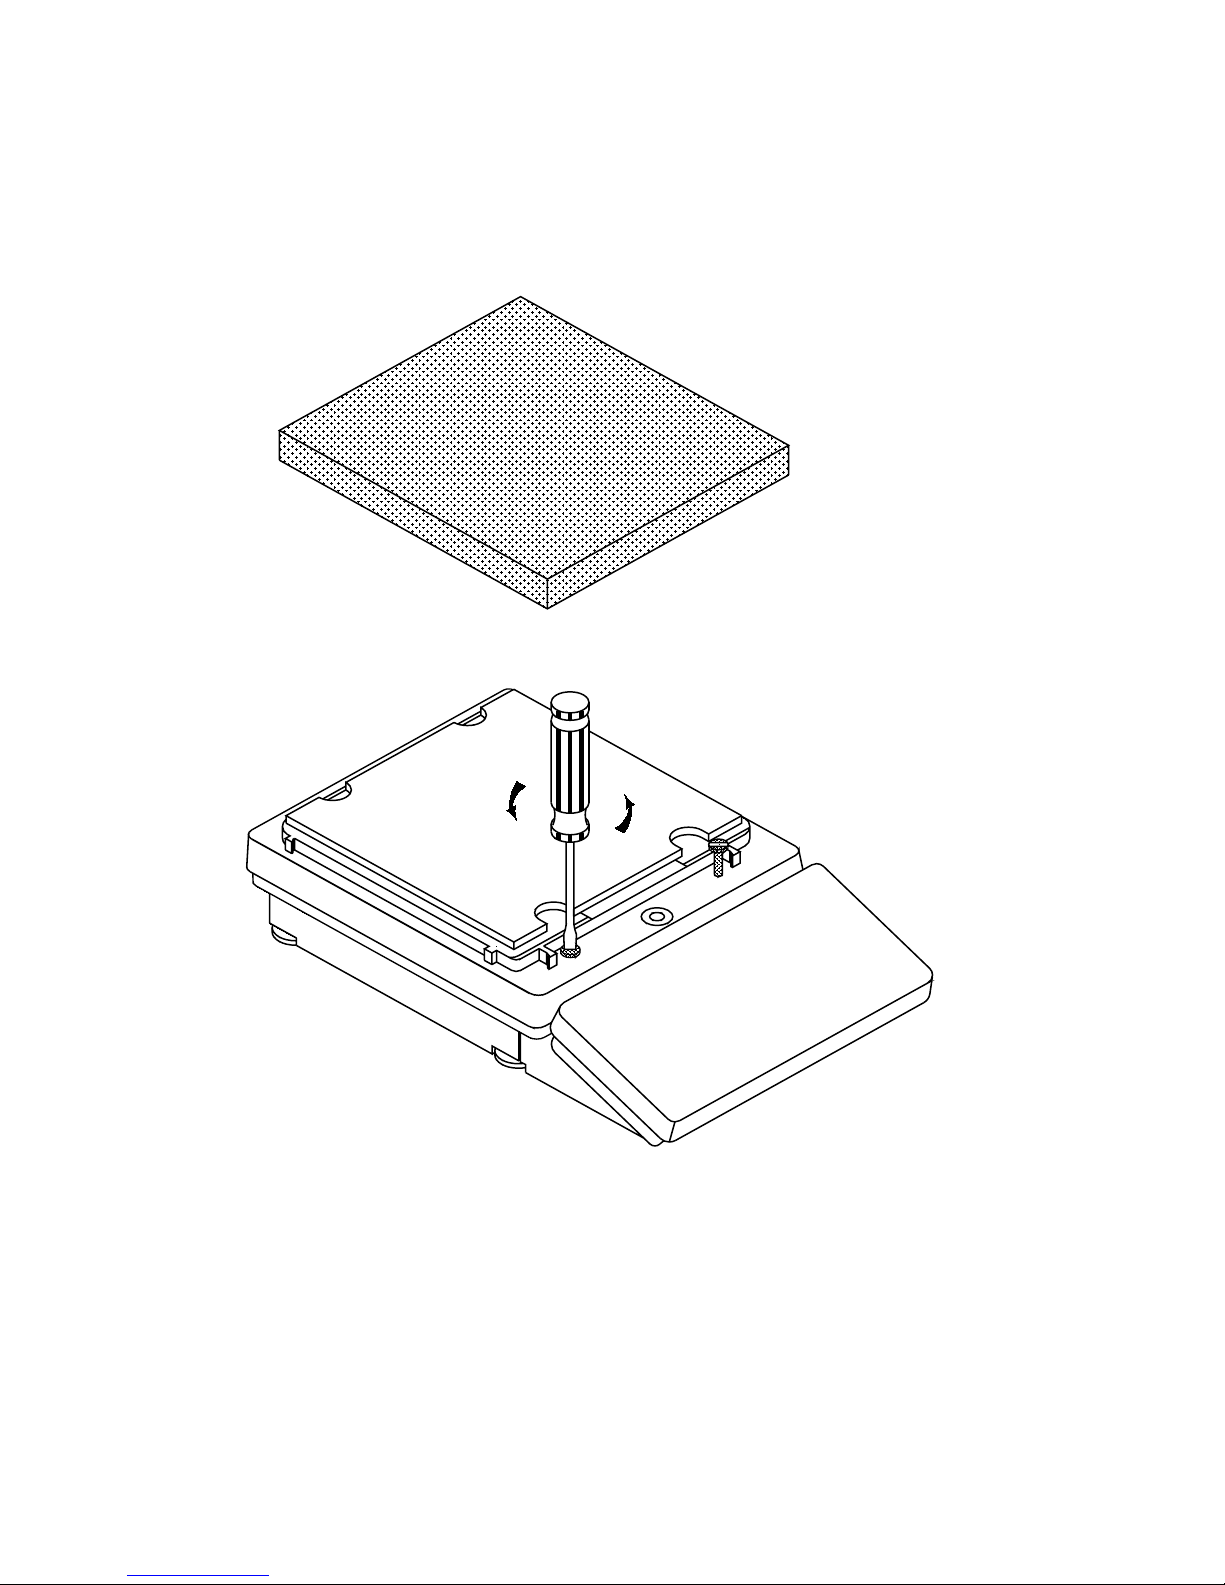
Figure 2. Detaching the contr oller.

7
Discharge the battery pack completely each time before recharging to maximize the life of the battery. A fully charged battery should provide about six
hours of operation.
The battery on/off switch is used only during battery operation to conserve the
charge. Be certain to turn the scale off when not in use during battery operation.
When operating on AC, it is recommended that the scale always be left on. This
reduces warm-up time and keeps a full charge in the battery at all times.
5. Detaching the controller and weighing platform
Since Setra platform scales have a high weighing capacity, it may be easier to
place the weighing platform on the floor. This will reduce the height to which
heavy weights must be lifted. To allow this type of operation, the CP models
come standard with a detachable controller (keyboard and display). This controller may be placed on a table or wall, while the platform is used on the floor.
To detach the controller, follow the procedure below: (refer to Figure 2)
1. Remove the pan by grasping it with two hands on the sides and lifting.
2. Loosen the controller attaching screws. The controller will drop down
until it rests on its own feet.
3. Lift up the front of the weighing platform and slide the controller out
from underneath.
Replace the pan by visually centering it on the scale and pressing it in place
until well seated. The pan will be seated correctly if it is level on all sides.
To replace the controller, follow this procedure:
1. Remove the pan by grasping it with two hands on the sides and lifting.
2. Pull the cable out of the weighing platform in order to obtain some
tension.
3. Pack as much cable as possible into the retainer on the rear of the
controller. The cable must be double folded in order to store it
completely.
4. Lift up on the front of the weighing platform and slide the controller
under the front lip.
5. Align the controller with the attaching screws and engage them by
hand for several turns.
CAUTION: TO PREVENT CROSS-THREADING, DO NOT USE A SCREWDRIVER TO
ENGAGE THE ATTACHING SCREWS.

8
6. Tighten attaching screws until the controller is firmly seated. Tightness
may be checked by rocking the controller.
Replace the pan by visually centering it on the scale and pressing it
in place until well seated. The pan will be seated correctly if it is level
on all sides.
Note: When the controller and platform are attached, the scale may be carried by
grasping the right or left side of the platform, using the flange as a handle.
EXPERIMENTATION
1 . Display test
When your scale is first powered on (connected to an AC outlet), it automatically
runs through a “display test,” showing all possible segments which might be
displayed. This test lasts approximately six seconds. The scale next says “HELLO”
and performs self-diagnostics to ensure proper operation. The scale then sets
itself to zero, and is ready for use. For best accuracy allow the scale to warm up
for at least 45 minutes.
2. Trying your scale
Experimenting with your scale and its keyboard prior to reading this guide in its
entirety will not harm your scale, and may actually give you a better understanding of the instructions in this guide. If you instruct the scale to do something it is
not capable of doing, the scale will simply respond by displaying the message
“UnAbLE”. To continue experimenting, press the clear key.

9
Section T wo
Understanding Y our Scale
KEYBOARD FUNCTIONS
zero Clears the display and tare memory. Assigns the pan and whatever is
currently being weighed a value of zero.
count Instructs the scale to begin or continue counting.
setup/cal Instructs the scale to accept or to enter the advanced function
programming mode.
apw Instructs the scale to accept an average-piece-weight entry or display
average piece weight.
clear Clears the display and the last number entered or function requested,
and displays weight.
Note: — clear acts as a reset function, setting all counting and weighing
registers to zero.
tare Assigns weight on the pan as the “tare” or container weight, subtracts
the weight from the display and saves it in the tare register, leaving the
display to read “net” or contents weight.
gross Adds weight saved in tare register to net weight to display gross
weight.
print Sends to a printer (or other peripheral device) information displayed,
along with all stored and programmed fields of information.
conv Converts weighing units (for example, changes from grams to ounces).
accum Stores and sums results of weighing or counting functions.
i.d. Instructs scale to accept an identification number of up to 25 digits for
use as desired; (e.g., a part number or account number.)
./ rcl Instructs scale to recall the value stored in any of the various registers
(tare, accumulate, etc.). Also instructs scale to enter a decimal point
during numeric entry.
— Instructs scale to change the sign of a number. Also acts as a second
function key for commands.

10
0-9 Instructs the scale to enter numerical values given, such as the
number of pieces or average piece weight.
remote Switches display from the Setra CP scale to the remote base. When
repressed, display returns to the Setra CP scale. Used with Setra
Remote Scale Option (p/n 402520).
DISPLAY SYMBOLS
ok Reading shown is stable. Further operations may be performed.
gross Reading shown is gross weight, and includes both net weight and tare
weight.
apw Reading shown is the average piece weight.
accum Reading shown is the amount, in pieces or in weight, stored in the
accumulator register.
tare Reading shown is the weight stored in the tare register.
pc Reading shown is given in number of pieces.
lb Reading shown is given in pounds.
oz Reading shown is given in ounces.
g Reading shown is given in grams.
“x” Reading shown is given in user-definable units.
Note: “x” units are preset at the factory in kilograms.
t Reading shown is given in user-definable, tamperproof units.
Note: T units are preset at the factory in grains (15.4326 grains = 1
gram).
c Reading shown is given in carats.
dwt Reading shown is given in pennyweights.
t oz Reading shown is given in troy ounces.

11
DISPLAY MESSAGES
bUSY The scale is developing a stable reading.
UnAbLE The scale is unable to complete your requested function. Press the
clear key and select another function.
OFLO The counting display has overloaded beyond 999,999 pieces. Re-
move some of the pieces and count in smaller lots.
FLASHING The weight on the pan exceeds the capacity of the scale. Remove
DISPLAY some of the weight from the pan. If you are counting, count in smaller
lots.
UPdAtE The scale is recomputing the average piece weight to enhance
accuracy.
dnOS The scale has been placed in the self-diagnostic mode. Press setup/cal ,
the scale will reset itself to the factory defaults.
TArE CLEAr If a value is stored in the tare register when the zero key is pressed, this
message will appear warning that the tare value has been cleared.
Add nnn Pc The scale is requesting an additional number of pieces (nnn) to satisfy
minimum accuracy and/or minimum sample size setup requirements.
Sub nnn Pc When kitting, the scale is requesting an additional number of pieces
(nnn) be removed to satisfy minimum accuracy and/or minimum
sample size setup requirements.

12
Section Three
Using Y our Scale
ENTERING A NUMBER OR FUNCTION
To enter a number or function on your scale, simply press the key or keys which
correspond to the numbers or functions you wish to enter. The weighing function is
automatically displayed when the scale is on and something is placed on the pan.
CLEARING A NUMBER OR FUNCTION
To clear the last number or function you entered on the scale’s keyboard, simply
press the clear key. This automatically returns your scale to the weighing mode.
RECALLING A NUMBER OR FUNCTION
Your scale is equipped with several memory registers which facilitate the storage of
weights and numbers, as well as the calculation of related functions (such as
average piece weight). Once a value has been stored in a specific memory, such as
the tare register, it can be returned to the display by pressing the ./rcl key, and then
by pressing the register key you wish to recall, e.g., press ./rcl , tare .
CONVERTING WEIGHING UNITS
Your scale is capable of weighing in: pounds —ounces — grams —X units — T units
— carats — pennyweights — or troy ounces. To convert from one unit to another,
simply press the conv key. Each time you press the key, you are converting to the
units next in line in your scale’s program. Continue pressing the key until the units
you wish to use are displayed.
STORING A NUMBER IN A REGISTER
To store a displayed number in a particular memory, simply press the register key
(the tare key for example). The number is now stored in the register, and the scale is
ready to continue weighing. (See above to recall the stored value.)
CLEARING A NUMBER FROM A REGISTER
To clear a number stored in a register, simply enter a value of 0 in place of the number
previously stored.
Note: The accumulator register acts differently from other registers, as it adds the
displayed value to an existing value. See the section on "Accumulating
Results" for detailed information on storing and clearing a number in the
accumulator register.

13
BASIC WEIGHING
To weigh a sample on your scale, use the following procedure:
1. Press the zero key.
2. Place the object(s) to be weighed on the pan.
3. Wait for the “OK” symbol, then read the weight from the display.
WEIGHING WITH THE TARE FUNCTION
To weigh objects (or liquids) in a container without including the weight of the
container, use the tare function. The container weight is subtracted from the display
and stored in the tare register before you begin weighing. To tare out the weight of a
container, and then weigh the contents placed or poured into it, use the following
procedure:
1. Press the zero key.
2. Place the empty container on the pan.
3. Press the tare key.
4. Place or pour objects or liquids into the container.
5. Wait for the “OK” symbol, then read the net weight from the display.
Note: When you press the tare key, the display ONLY is set to zero. This is not the
same as using the zero key. When using the tare key, the container weight is
not set to zero, but is subtracted from the display and stored in the tare register.
WEIGHING WITH THE GROSS FUNCTION
You can use your scale to weigh contents placed or poured into a container, and
then add the weight of the container to find the gross (combined) weight of the
contents and the container. This is different from basic weighing, as it lets you find
the weight of contents (resistors, for example) placed or poured in a container, and
then find the total weight. To find the gross weight of a container and its contents, use
the following procedure:
1. Press the zero key.
2. Place the empty container on the pan.
3. Press the tare key.
4. Place or pour objects or liquids into the container.
5. Read the net weight from the display.

14
6. Press the gross key.
7. Wait for the “OK” symbol, then read the gross weight from the display.
Note: Pressing the gross key adds the tare (container) weight to the net (contents)
weight to provide the gross (combined) weight. Pressing the gross key again
( or pressing clear ) will return the display to net weight.
The gross key switches the scale into an active gross weighing mode. Pressing
the zero , tare , or accum keys while displaying gross weight will cause the gross
weight to be entered into that register. This is useful for certain applications,
such as net totalizing.
NET TOTALIZING BY WEIGHT
In some applications, when accumulating the net weight, it is necessary to check the
gross weight periodically to ensure the capacity of the scale is not exceeded. The
procedure used to store both the gross and net weight is called “net totalizing.” To
net totalize weight, use the following procedure:
1. Press the — key.
2. Press the clear key.
3. Press the zero key.
4. Place a container on the pan.
5. Press the tare key.
6. Add material to the container.
7. Press the accum key. The display shows the net weight stored in the accumulator.
8. Press the gross key. The display shows the gross weight.
9. Press the tare key. The gross weight is entered into the tare register. In this
manner, the tare register is used to accumulate gross weight.
10. Repeat Steps 6-9 until the desired weight is reached.
11. Press the ./rcl key.
12. Press the accum key. The display shows the net totalized weight.
Note: Setra scales have an active-gross weighing mode. While in this mode, if the tare
key is pressed, the gross weight is entered into the tare register. Likewise, if
the zero key is pressed while in the gross weighing mode, the gross weight will
be set to zero. This is useful in certain applications as shown above.

15
BASIC COUNTING
To count the number of like objects placed on your scale, use the following procedure:
1. Press the zero key.
2. Place a known number of pieces on the pan.
3. Enter the number of pieces you have placed on the pan.
4. Press the count key.
5. Add pieces.
6. Wait for the “OK” symbol, then read the total number of pieces on the display.
COUNTING WITH THE TARE FUNCTION
You can use your scale to count pieces while at the same time placing them in a
container. Your scale can do this by “taring out” (subtracting) the weight of the
container before it begins counting. To tare out the weight of the container before
counting pieces being placed in it, use the following procedure:
1. Press the zero key.
2. Place the container on the pan.
3. Press the tare key.
4. Place a known number of pieces in the container.
5. Enter the number of pieces you have placed in the container.
6. Press the count key.
7. Add pieces.
8. Wait for the “OK” symbol, then read the display. The scale will read the total
number of pieces in the container.
Note: You may use the tare function to key-in a known container weight. See the
example, “Finding the Number of Washers in a Full Box”, in Appendix IV.

16
COUNTING WITH THE GROSS FUNCTION
You can use your scale to count the number of pieces being placed in a container,
find the net weight of the pieces, and find the gross (combined) weight of the pieces
and the container. To do so, use the following procedure:
1. Press the zero key.
2. Place the container on the pan.
3. Press the tare key.
4. Place a known number of pieces in the container.
5. Enter the number of pieces placed in the container.
6. Press the count key.
7. Add pieces to continue counting.
8. Wait for the “OK” symbol, then read the display. The scale reads the total
number of pieces placed in the container.
9. Press the gross key. The scale now displays the gross weight of the contents
and the container.
Note: Pressing the gross key again (or pressing clear ) will return the display to net
weight.
COUNTING WITH THE AVERAGE-PIECE-WEIGHT FUNCTION
You can use your scale to count the number of pieces in a batch (a handful of
capacitors, for example) by weighing the pieces and dividing the weight of the batch
by the known average weight of one piece. To calculate the number of pieces in a
batch using the average piece weight, use the following procedure:
1. Press the zero key then place the pieces on the pan.
2. Make sure the scale is in the units you wish to use, then enter the average piece
weight.
3. Press the apw key.
4. Wait for the “OK” symbol, then read the display. The scale now reads the
number of pieces on the pan.
Note: If you don’t know the average weight of one piece, your scale can automatically
calculate it for you. Simply use the procedure for counting, and press the apw
key when you have a known number of pieces placed on the pan and showing
on the display.

17
COUNTING WITH ACCURACY ENHANCEMENT
When counting parts that are not uniform in weight, you can periodically update the
average piece weight (APW) and thereby increase the accuracy. Each time the count
key is pressed, the scale will update the APW as long as the additional weight is less
than or equal to the previous sample weight. If the added weight is more than 100%
of the previous sample, the APW will not be updated. For example, if you start with a
sample size of 10 pieces then add 10 more and press the count key, the APW will be
recalculated based on a 20 piece sample. The next time you wanted to update the
APW you could add up to 20 pieces. If you added 11 or more to the original 10 piece
sample, the APW would not be updated and would continue to represent the original
10 pieces. To count using this accuracy enhancement feature, follow the procedure
below.
1. Place an empty container on the scale and press the zero or tare key.
2. Place a known number of pieces on the scale.
3. Enter the number of pieces you have placed on the scale.
4. Press the count key. Wait for the “OK” symbol, then slowly add pieces until the
displayed count is increased by 100% or less.
5. Press the count key. The scale displays “UPdAtE” and automatically calculates
a new average piece weight based on the larger number of pieces, and is
ready to continue counting.
If “UPdAtE” is not displayed, the additional pieces have exceeded 100% of the
previous sample weight and the APW will not be updated.
CAUTION: This accuracy enhancement feature is disabled if the average piece weight
has been scanned in from a bar code or entered via a computer.
REVERSE COUNTING OR KITTING
Using this feature, you can place a container full of parts (such as capacitors) on
your scale and count the number of parts removed. This is especially helpful when
kitting (counting out a certain number of parts to be packed together). To perform
reverse counting or kitting, use the following procedure:
1. Place a container full of parts you wish to count on the pan.
2. Press the zero key.
3. Remove a known number of pieces from the pan.
4. Enter the number of pieces removed.
5. Press the count key.
 Loading...