

Page 1

Installation and Setup
User’s Guide
Page 2

WebReboot™
Installation and Setup User’s Guide
Copyright 2005. Servprise International, Inc. All rights reserved.
Table of Contents
PRODUCT DESCRIPTION......................................................................... 1
SPECIFICATIONS ........................................................................................1
WEBREBOOT PACKAGE .............................................................................2
CUSTOMER SERVICE .................................................................................3
BASIC SETUP ............................................................................................4
NETWORK SETUP ......................................................................................4
JavaTM Verification...............................................................................4
Factory Default Settings......................................................................4
Connection ..........................................................................................5
WEBREBOOT SETUP..................................................................................6
Login Procedure..................................................................................6
Managing and Rebooting Servers.......................................................7
Change IP Address .............................................................................8
Ports ....................................................................................................9
Change Administrator Username & Password ...................................9
MULTI-USER SETUP ...............................................................................10
Add User ...........................................................................................10
Modify User Logins............................................................................11
Modify User Permissions ..................................................................11
Remove User ....................................................................................11
INSTALLING THE WEBREBOOT............................................................12
INSTALLATION - PCI SLOT CONNECTOR ....................................................13
INSTALLATION – DIRECT MOTHERBOARD ..................................................14
FACTORY RESET....................................................................................15
Page 3
1 Product Description
Product Description
The WebReboot is a web-based remote reboot switch capable of
managing up to 8 computers. Through a simple web interface it
allows up to 8 users plus an administrator to reboot any
computer remotely and securely over the Internet, even behind a
firewall.
The WebReboot operates by connecting to the reset pins on a
server's motherboard, avoiding the need to re-route the power
cables through the server racks. This method is much safer than
traditional power-cycling equipment because it avoids a power
surge to fragile server components.
Specifications
Ports
• One AC Power Port
• One Ethernet Port
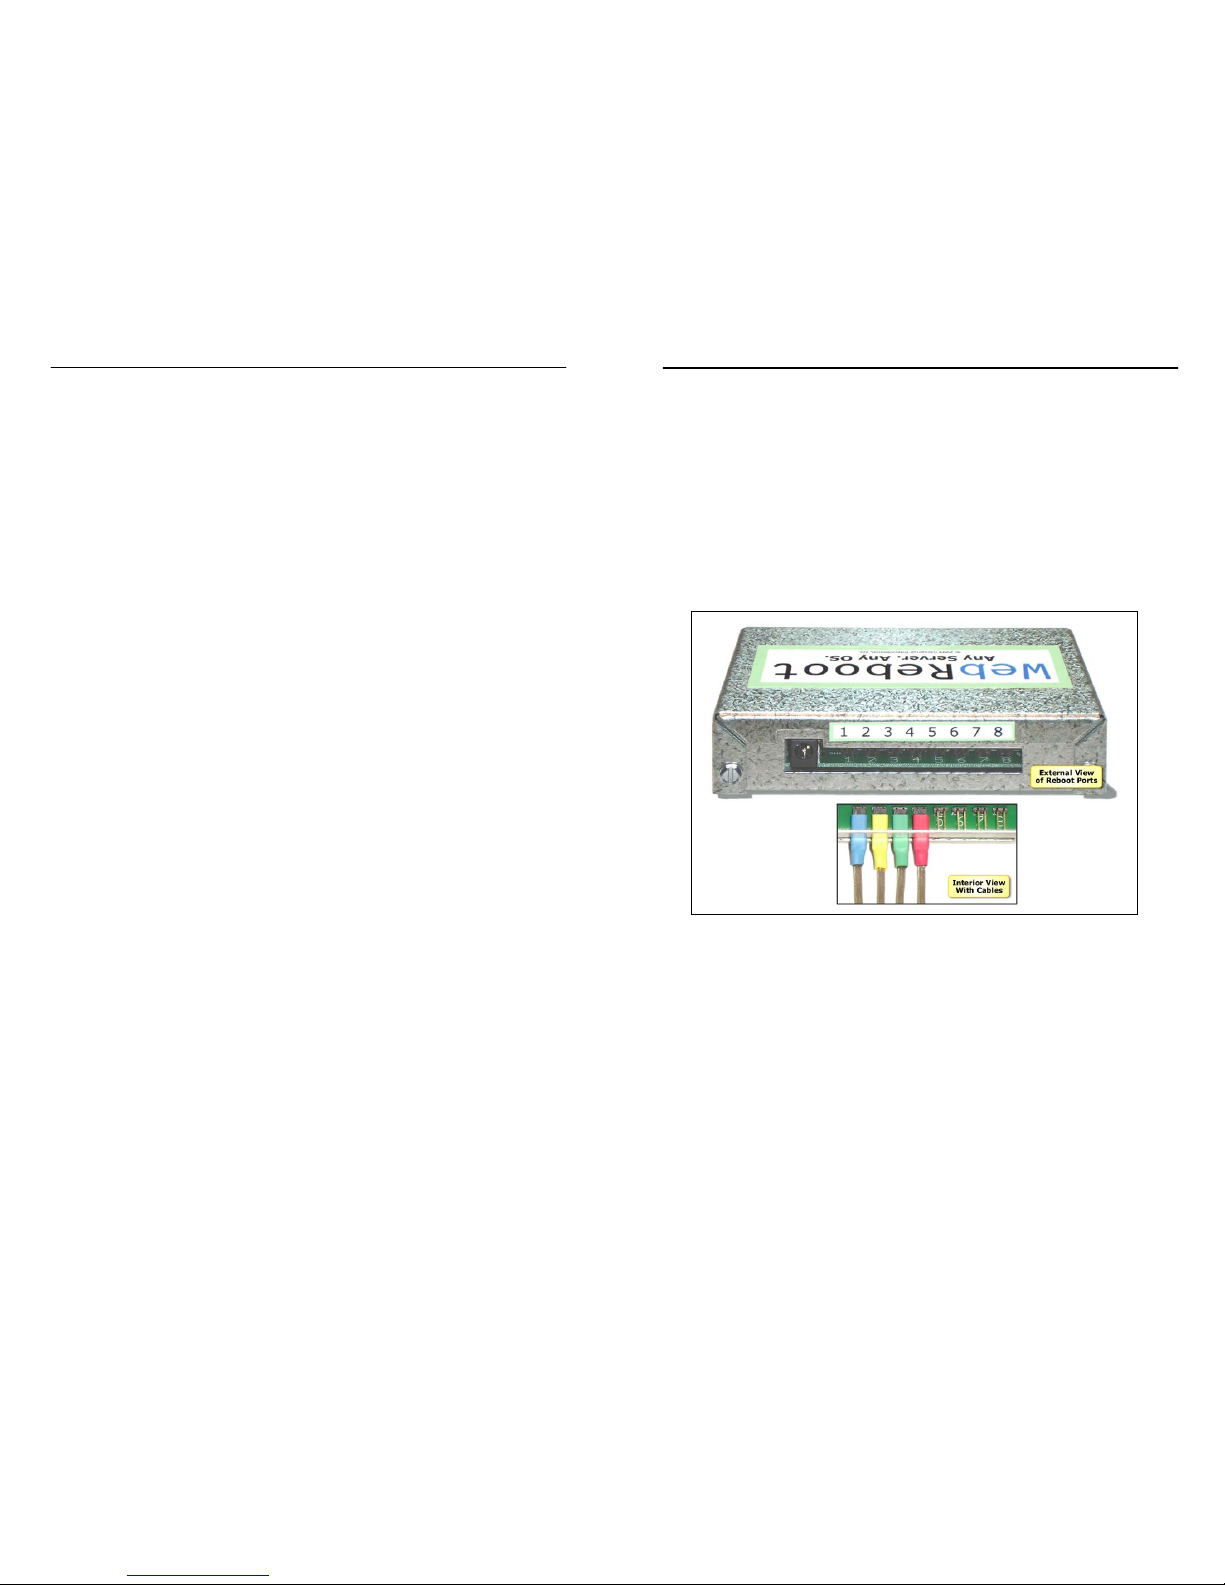
• Eight Reboot Ports
Indicators
• AC Power Indicator
• Status Indicator
• Link Indicator
Electrical
• Power Input: 9 – 12 Volts DC
• Maximum Current Draw: 500 mA
• Connector Size: P5 2.1 mm –
Positive Center
Language
• English
• Spanish
• Danish
• Norwegian
Requirements
• JavaTM 1.4.2 or later
Product Description 2
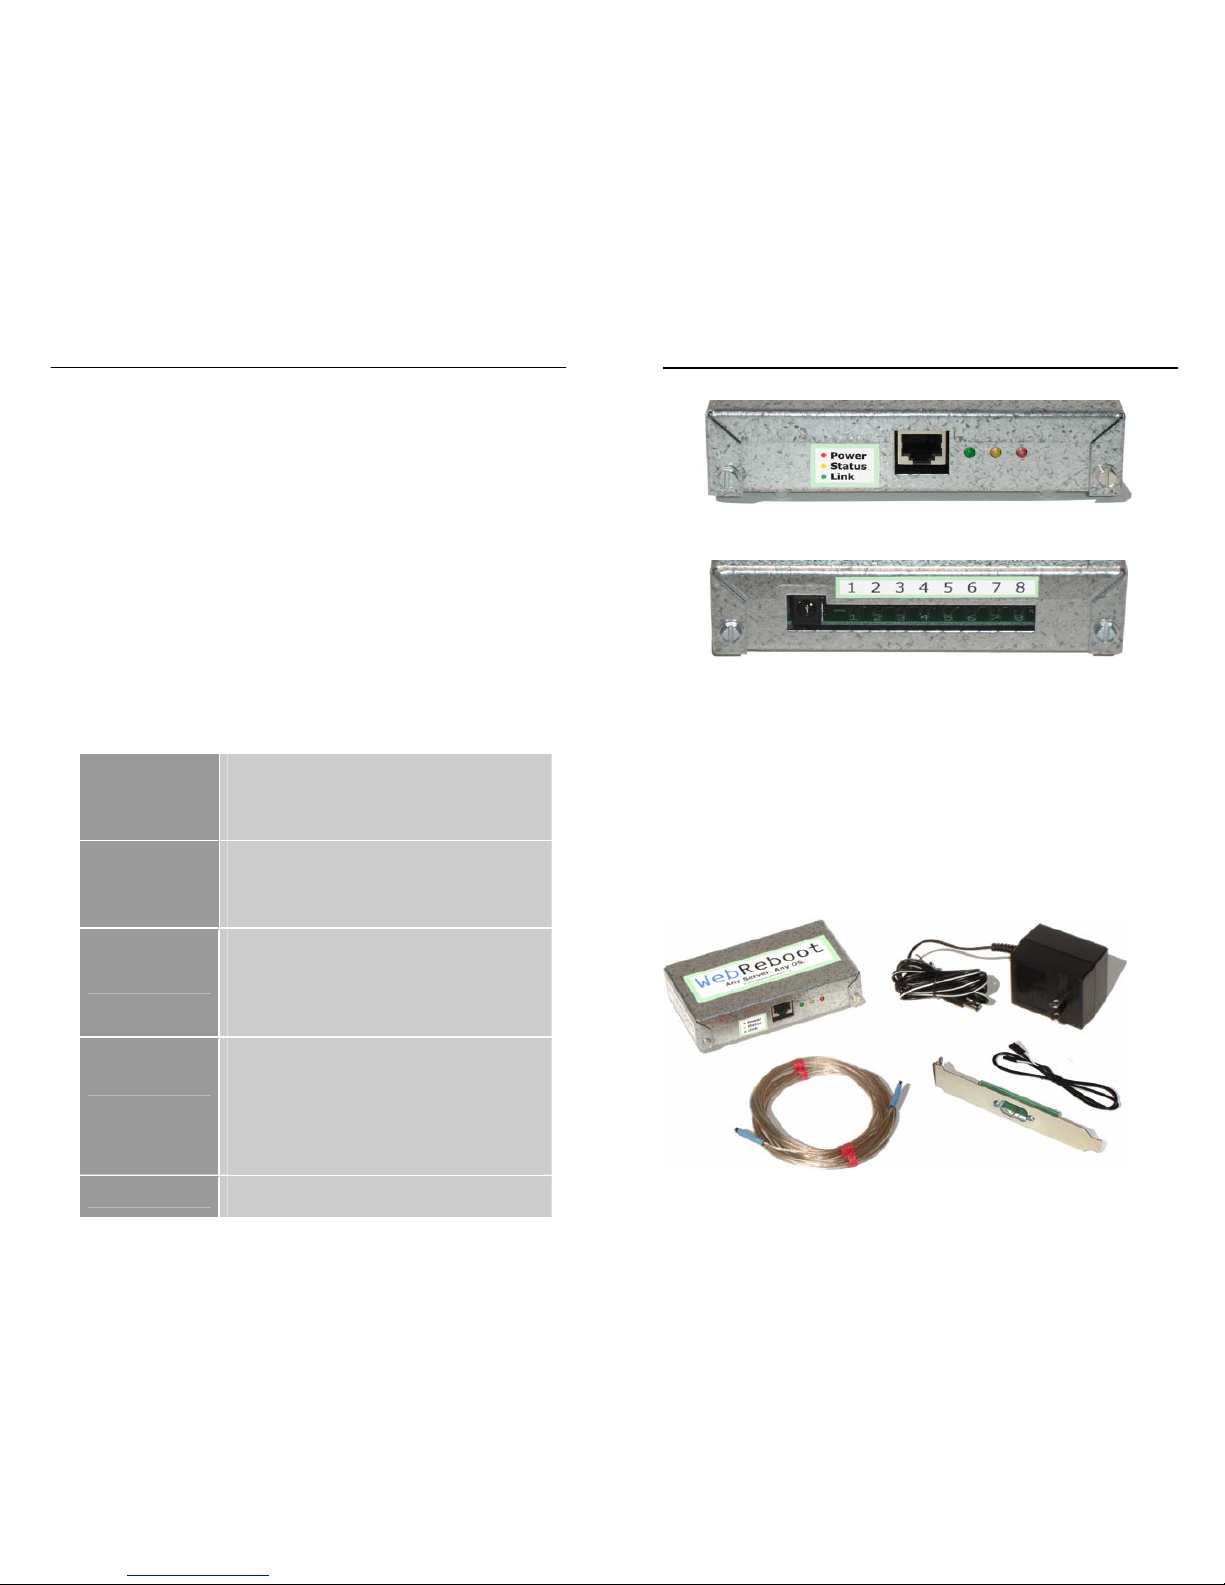
Ethernet Port and LEDs (front)
Power and 8 Reboot Ports (rear)
WebReboot Package
The WebReboot package contains:
• 1 WebReboot Network Appliance
• 1 AC Adapter
• 1 PCI Slot Connector
• 1 WebReboot Cable (6 ft.)
• 1 Motherboard Cable (1.5 ft.)
Page 4

3 Product Description
Customer Service
Online:
Additional information that may not be included in this guide
can be found at http://www.servprise.com. Questions may be
emailed to [email protected].
Telephone:
1-800-832-3823 – United States
1-774-239-7079 – International
Mail:
Servprise International, Inc.
447 Rawson Street
Leicester, MA 01524
USA
Basic Setup 4
Basic Setup
Network Setup
The following procedure details the setup that must be
performed prior to attaching the WebReboot to the servers.
JavaTM Verification
If you do not have JavaTM installed on your computer, visit
http://www.java.com/ to download the latest version of the
JavaTM Runtime Environment (JRE) from Sun Microsystems,
Inc. The WebReboot requires JavaTM 1.4.2 or later.
Factory Default Settings
The WebReboot arrives factory programmed with the following
settings:
• IP Address: 192.168.1.225
• Username: admin
• Password: password
Page 5
5 Basic Setup
Connection
If the local network is in the 192.168.1.XXX address space
and the IP address 192.168.1.225 is not in use:
• Connect an Ethernet cable to the WebReboot.
• Connect the WebReboot directly to your hub or switch.
If the local network is in any other address space:
• Connect the WebReboot to your computer using a
crossover cable.
• Provide your computer an IP address in the
192.168.1.XXX range.
• Connect to the WebReboot at 192.168.1.225.
• Log in with the default username and password as
described in Login Procedure on Page 6.
• Follow the Change IP Address instructions on Page 8.
• Disconnect the crossover cable, and attach the
WebReboot directly to your hub or switch with a
straight-through Ethernet cable.
Basic Setup 6
WebReboot Setup
Login Procedure
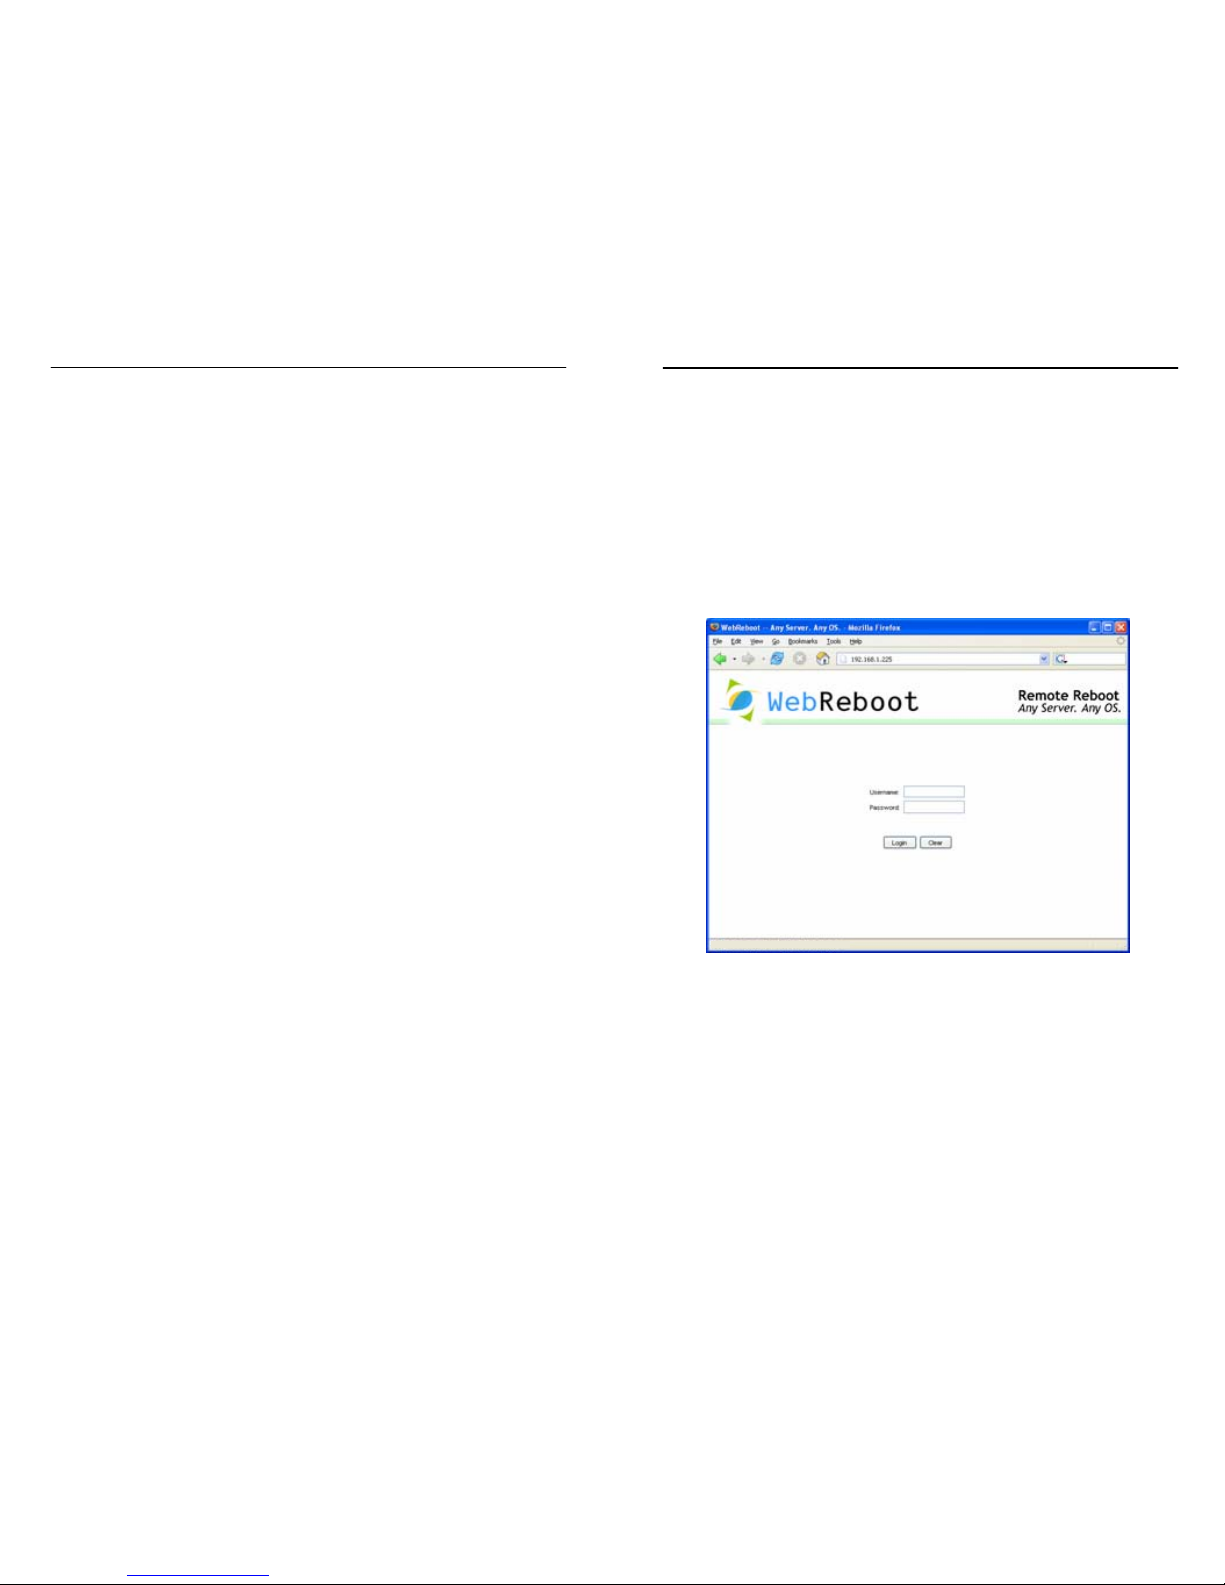
Log into the WebReboot using the factory set username, admin,
and password, password.
While logged in, the yellow status LED on the front of the
WebReboot will blink once per second. Users are automatically
logged out after 120 seconds of inactivity.
Page 6
7 Basic Setup
Managing and Rebooting Servers
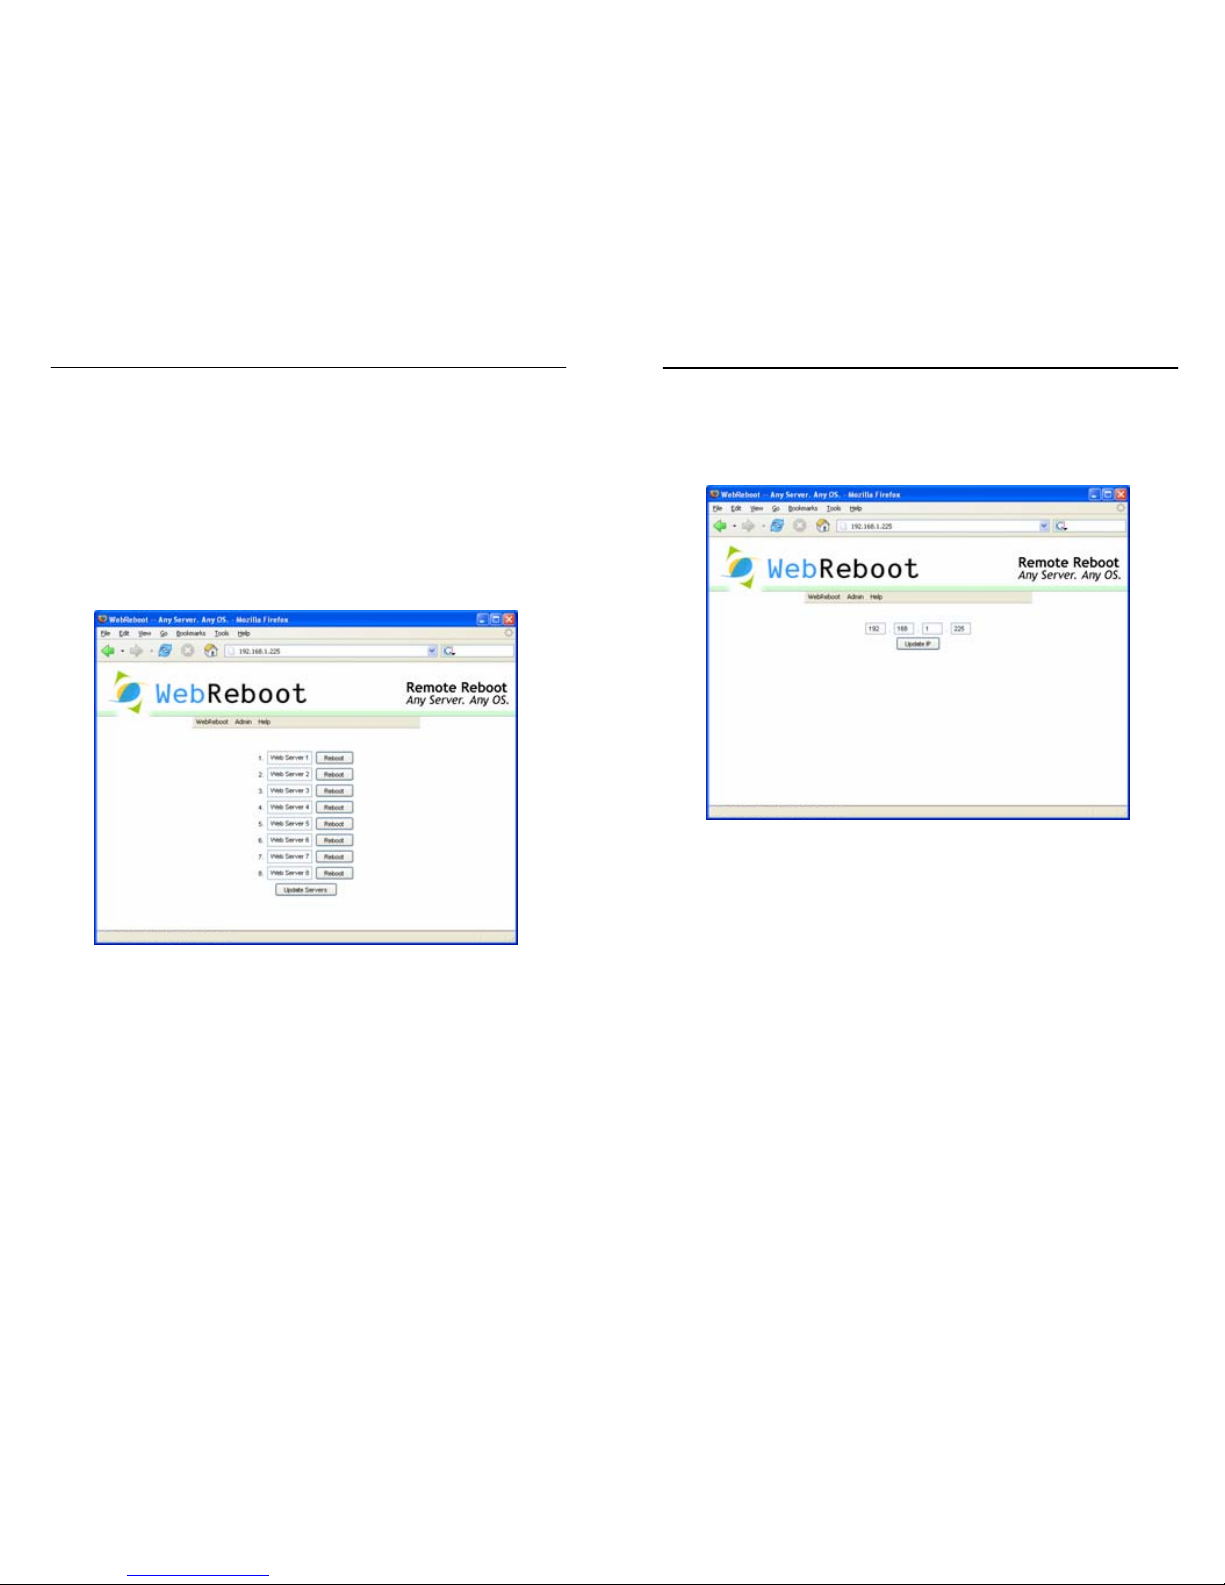
To customize the server names, type the new name for each
server and click Update Servers. Server names are limited to 16
characters in length.
The Manage Servers screen is also utilized for rebooting a
server. Simply click on the Reboot button next to the desired
server to initiate a reboot. You can return to this screen at any
time by clicking Manage Servers from the WebReboot menu.
Basic Setup 8
Change IP Address
Under the Admin menu, click Change IP, and enter your new IP
address on the following screen.
You may either:
• Provide a routable IP address for connection directly to
the Internet.
• Provide a non-routable local IP address for use solely on
the local network, or use the factory set IP address on the
local network.
• Provide a non-routable local IP address or use the factory
set IP address for use with a port forwarding router to
publish the WebReboot onto the Internet.
Page 7
9 Basic Setup
Ports
The WebReboot will respond to HTTP requests on any
incoming port, although the most commonly used port for
access is the standard HTTP port, 80. For example, the two
addresses shown below will access a WebReboot with all of the
factory default settings in place without any customization.
http://192.168.1.225 – Access default port 80
http://192.168.1.225:5282 – Access port 5282
Using this feature, you can easily setup a firewall to limit
external access to the WebReboot on a specific port.
Change Administrator Username & Password
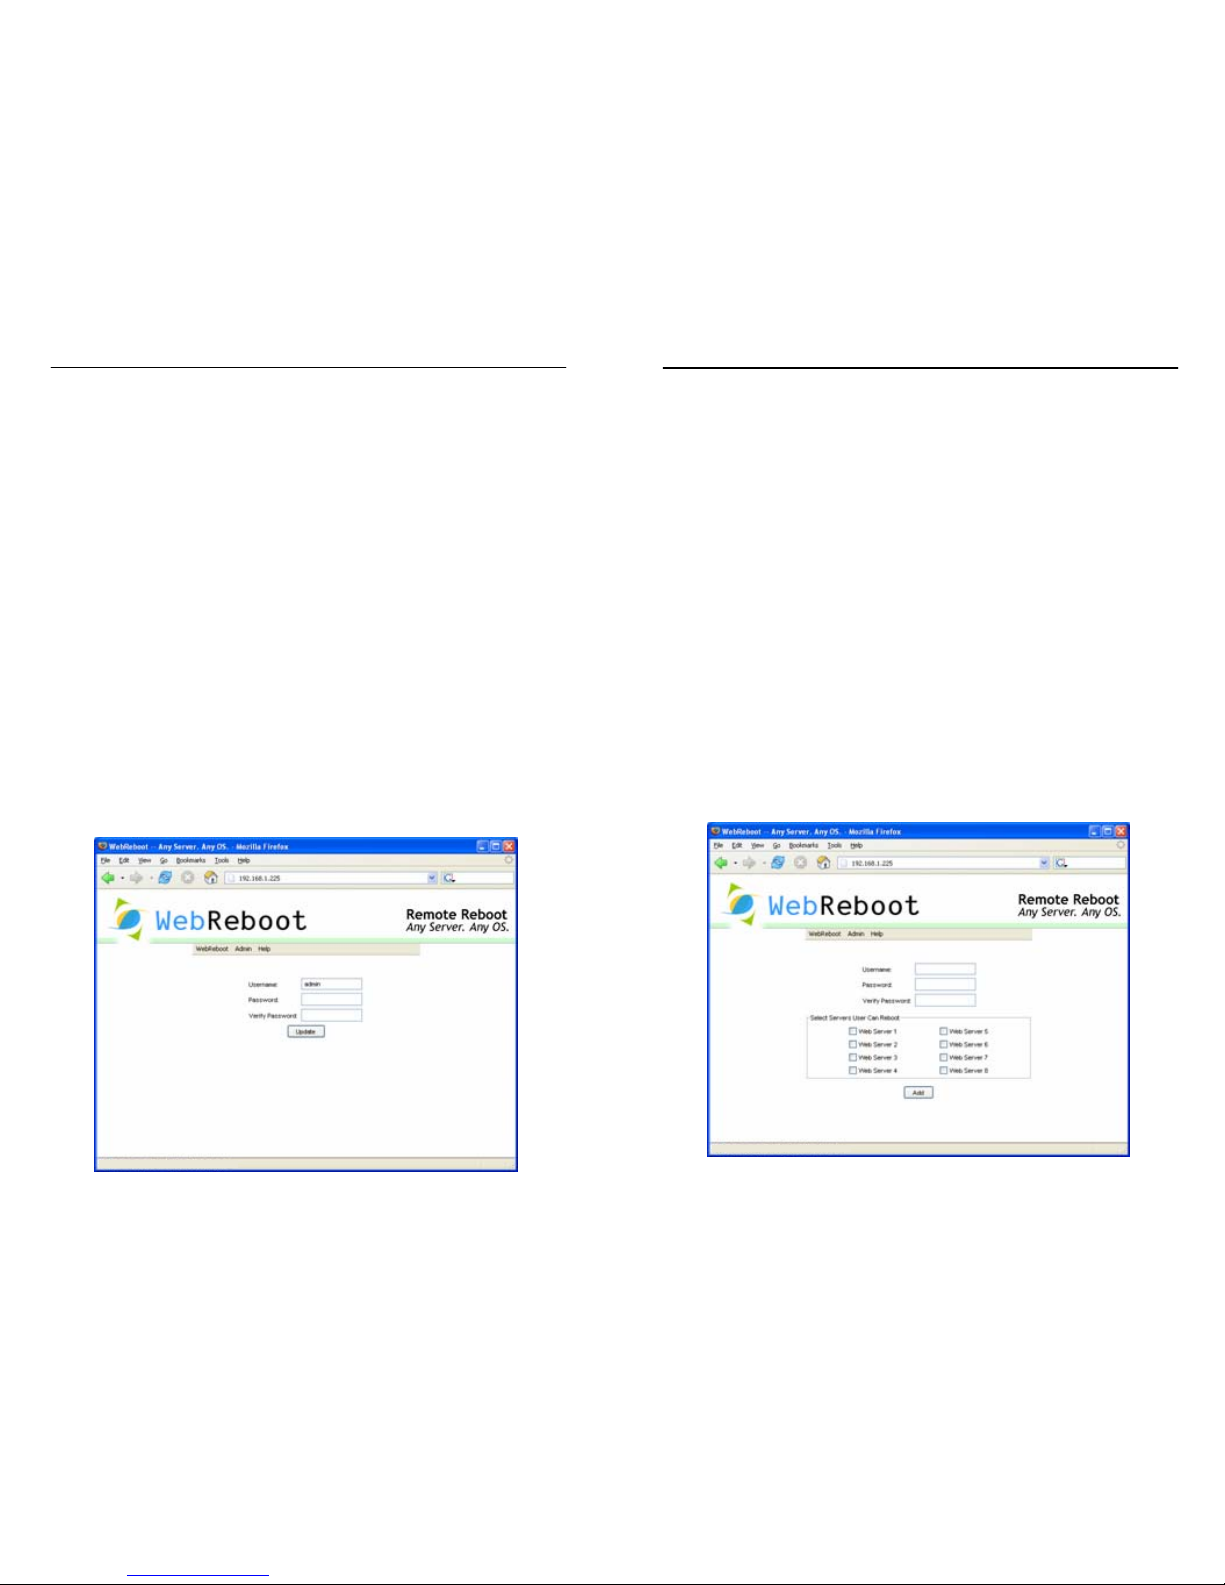
Under the WebReboot menu, click Change Login to permanently
change the administrator username and password used to login
to your WebReboot. Both the username and the password have a
maximum length of 16 characters and are case-sensitive.
Multi-User Setup 10
Multi-User Setup
Administrators can configure additional user accounts with
custom reboot permissions. Each user can be assigned
permission for multiple ports, and each port can be controlled
by more than one user. Up to 8 user accounts can be created in
addition to the Administrator account. The Administrator
retains control over all configuration options. Individual users
are allowed to change their passwords, but not their usernames
or reboot port permissions.
Add User
Under the Admin menu, click on Add User. On the following
screen, enter the username and password for the new user and
select the servers that the user will be able to access. Both the
username and the password have a maximum length of 16
characters and are case-sensitive.
Page 8
11 Multi-User Setup
Modify User Logins
To change a username or password, click on Modify User
Logins under the Admin menu and select the user to change.
Change the username and/or the password and click Update.
Modify User Permissions
To change the servers that a user has access to, select Modify
User Permissions under the Admin menu and select the user.
Check or uncheck the servers the user should have reboot
privileges on and click Update.
Remove User
To remove a user, select Remove User under the Admin menu
and select the user to remove.
Installing the WebReboot 12
Installing the WebReboot
Each server can be connected to the WebReboot either with the
PCI Slot Connector, allowing you to easily access the
WebReboot cable from the exterior of the server and maintain
usage of the case reset switch, or with a WebReboot Cable
directly connected to the motherboard. A separate WebReboot
Cable is required to connect to each server.
Page 9
13 Installing the WebReboot
Installation - PCI Slot Connector
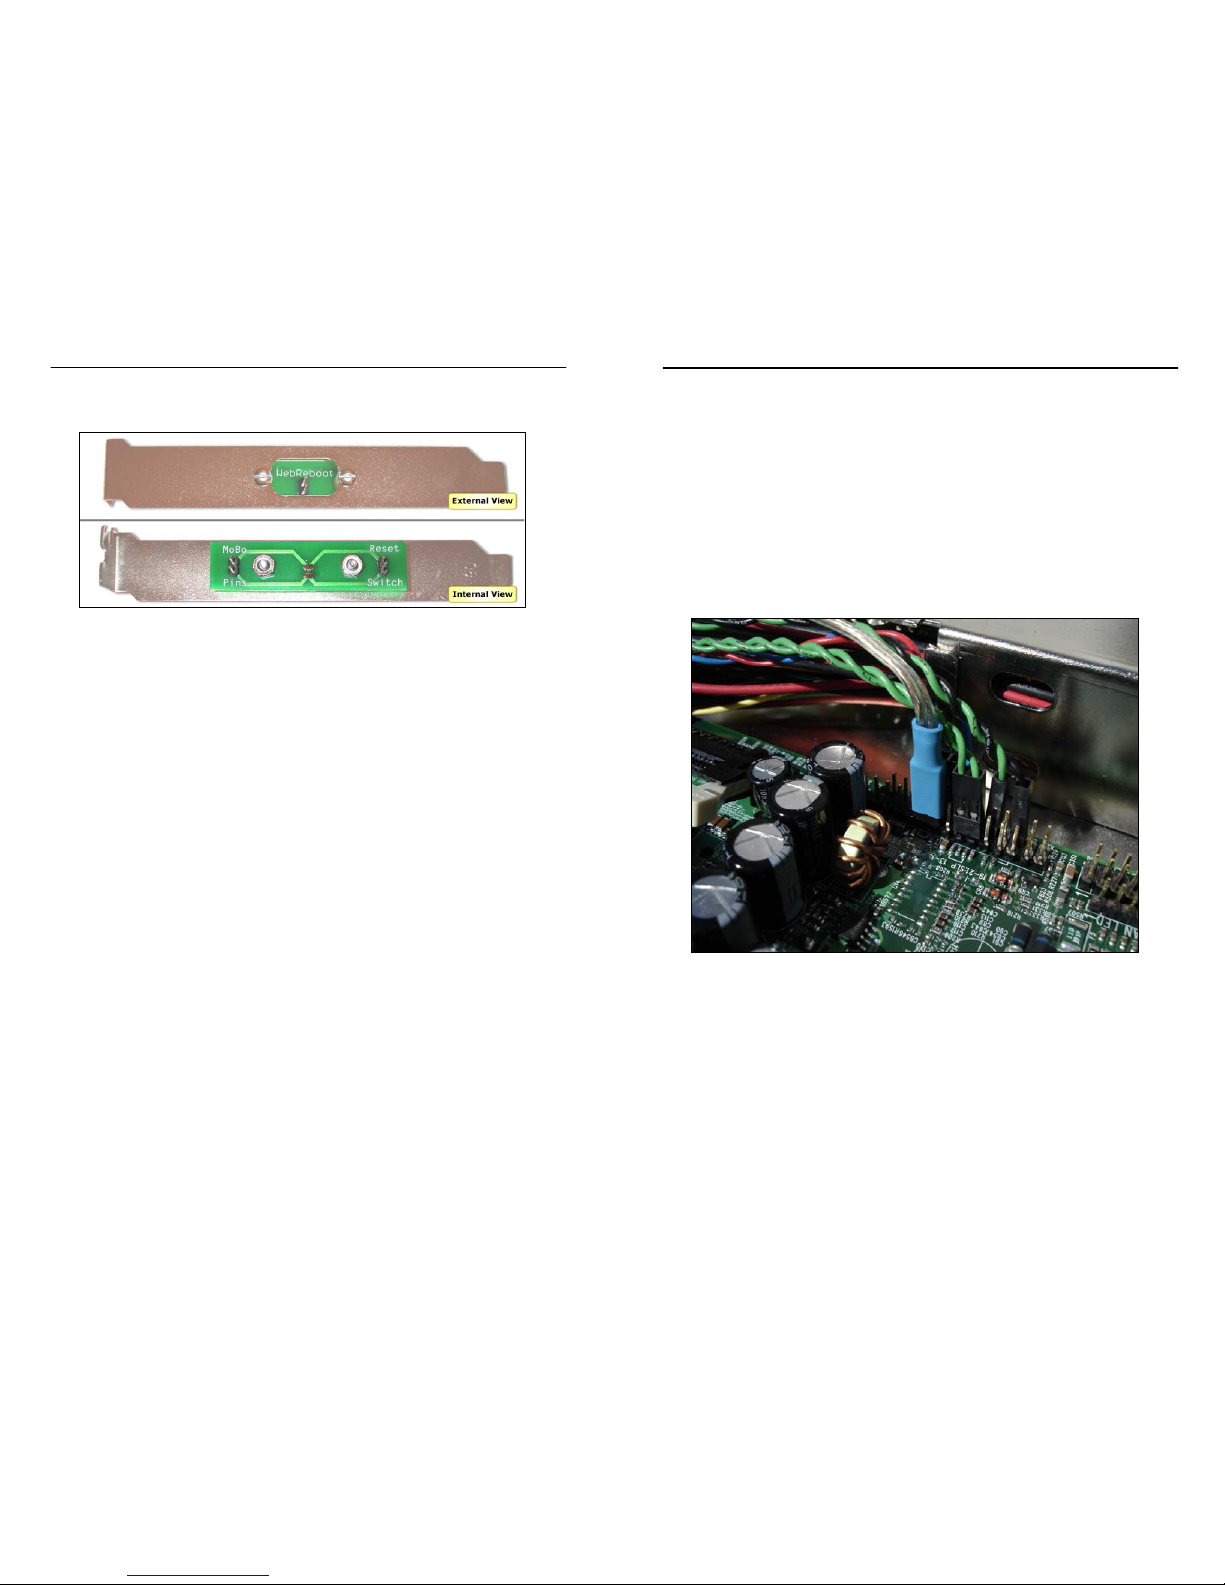
1. Install the PCI Slot Connector into an open PCI slot in
the back of your server.
2. Identify the reset pins located on the motherboard. If
necessary, refer to the documentation of your
motherboard to locate the reset pins.
3. (Optional) If the reset pins are currently connected to a
reset switch on the exterior of your server’s case,
disconnect the reset switch cable from the motherboard
and connect it to the Reset Switch pins on the PCI Slot
Connector. This will enable you to reboot your computer
both through the WebReboot and the case reset switch.
4. Using the Motherboard Cable included with your PCI
Slot Connector, connect the reset pins located on the
motherboard to the MoBo Pins on the PCI Slot
Connector.
5. Use the WebReboot Cable included in the WebReboot
package to connect to an open reboot port on the rear of
the WebReboot. Attach the other end of the cable to the
WebReboot pins on the exterior side of the PCI Slot
Connector.
Installing the WebReboot 14
Installation – Direct Motherboard
1. Connect the WebReboot cable included in the
WebReboot package to an open reboot port on the rear
of the WebReboot.
2. Route the other end of the cable through the case of the
computer that you want to enable for rebooting.
3. Connect the WebReboot Cable to the motherboard’s
reset pins, as shown below.
If the WebReboot is connected directly, you will no longer be able
to use the existing chassis reset switch. However, the server can be
physically rebooted by toggling the power switch.
Page 10

15 Factory Reset
Factory Reset
The factory reset is used to restore the factory default IP
address, username, and password of the WebReboot.
1. Remove the power and Ethernet cables from the
WebReboot.
2. Locate the factory reset button on the bottom of the
WebReboot.
3. While pressing and holding the reset button, plug the
power cable into the WebReboot.
4. The yellow status LED on the front of the case will stay
on for four seconds. Do not release the reset button until
the status LED turns completely off.
5. Reconnect the Ethernet cable and connect to your
WebReboot at the factory programmed IP address using
the default username and password.
 Loading...