

Page 1
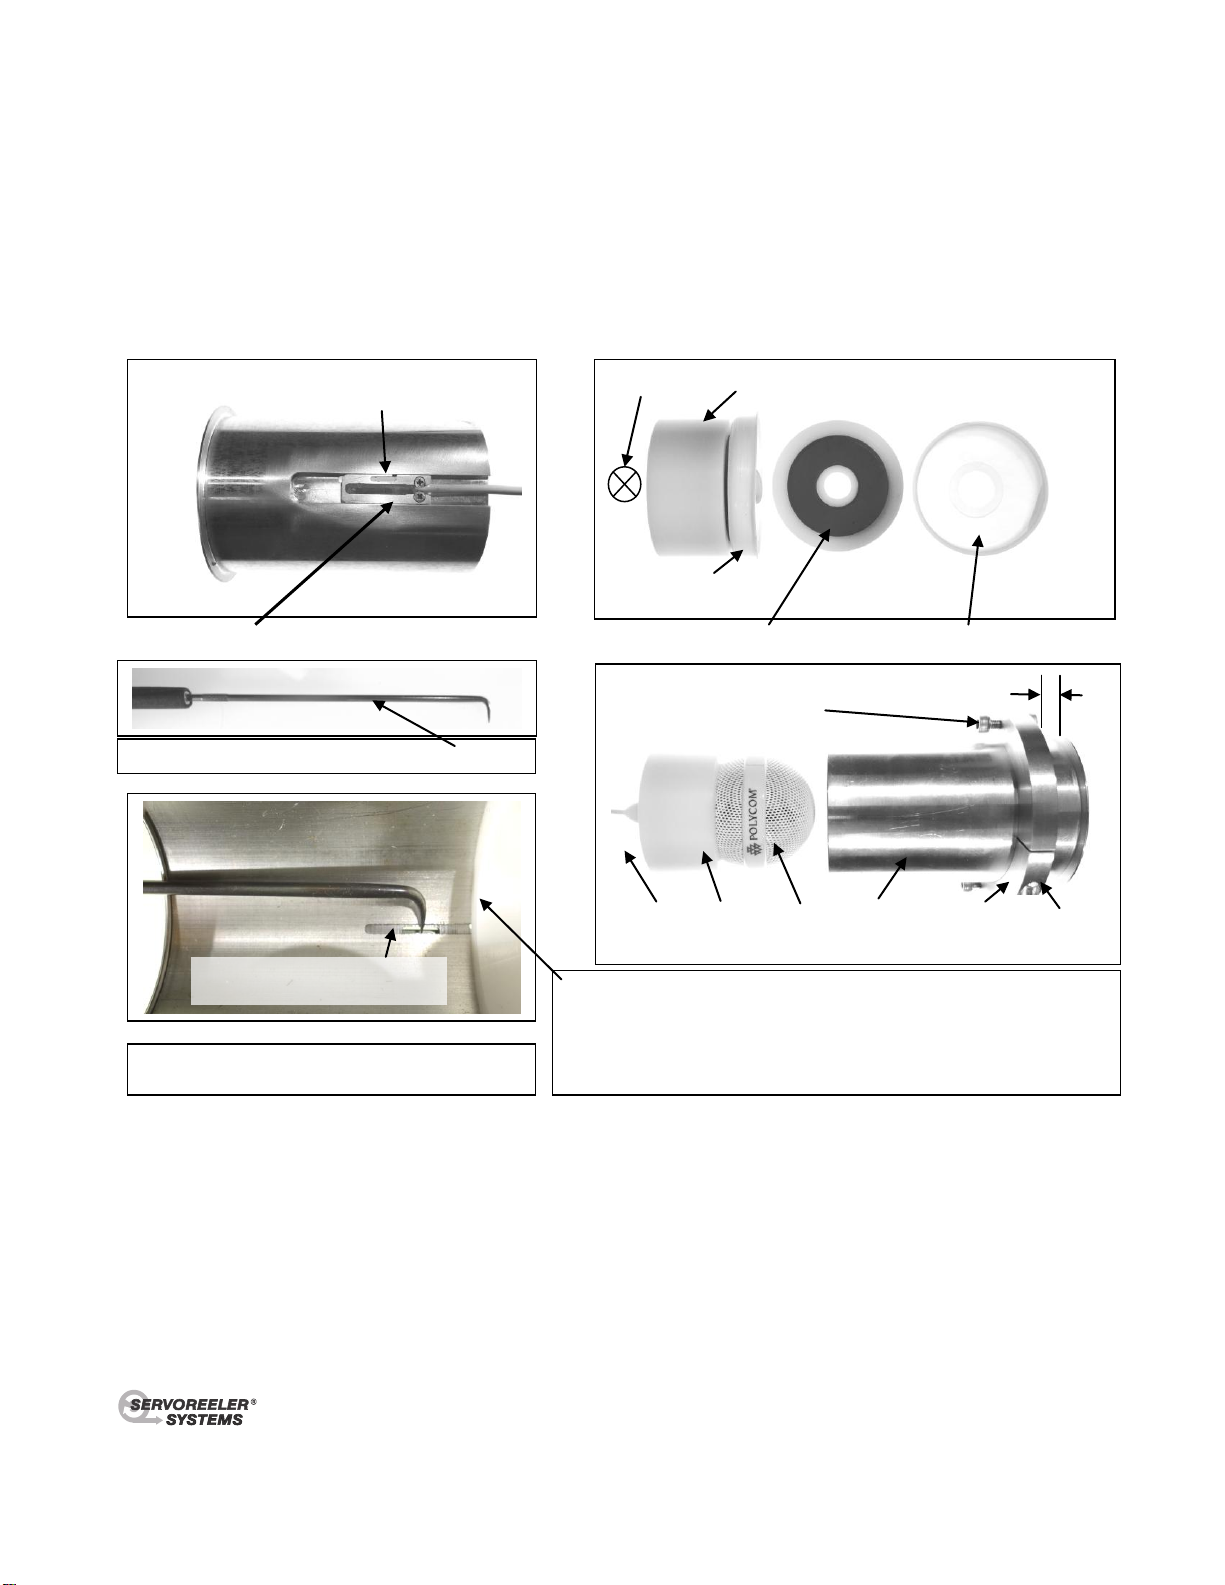
BZ-3
JACK SCREWS
4mm
5/32"
Allen
Microphone Guide/Magnet carrier
Dust Cap - Guide - Microphone - BZ-3 Clamp
Ceiling Material
ADJUSTABLE RETRACT - LIMIT SWITCH CARRIER
RETRACT LIMIT SWITCH ADJUSTMENT TOOL
RETRACTION ADJUSTMENT FROM INSIDE THE
ROOM AFTER INSTALLATION AS SHOWN ABOVE
PROCEDURE: DEPLOY THE MICROPHONE FOR ACCESS TO THE
BEZEL INTERIOR. AT THE CEILING, PUSH THE WHITE DELRIN GUIDE
UP UNTIL THE SMALL SIDEWALL ADJUSTMENT SLOT IS VISIBLE. TO
MOVE THE MIC. MORE OR LESS INTO THE BEZEL, ENGAGE THE SW.
CARRIER WITH THE HOOK TOOL - MOVE THE SWITCH CARRIER UP
OR DOWN LITTLE AT A TIME UNTIL THE MIC. DOCKS AS REQUIRED.
ADJUSTABLE LIMIT SWITCH
INSIDE BEZEL BORE
Dust Cap
NOTE: * If needed, adjust slightly for secure position.
*Tension Spring
*
With adjustable limit switch feature.
Installation Instructions
The new BZ-3 Ceiling Bezel is designed to accept various Multi Capsule Ceiling Microphones such as; The Polycom HDX ClearOne Ceiling Microphone Array - Audix M3 or other larger microphone. This Bezel also provides a new function that
permits a final trim of the microphone when retracted inside the bezel. This adjustment trim can be performed from inside the
room – using the “Hook” adjustment tool as shown below. Deploy the microphone out of the way, push the guide up to reveal
the adjustment slot; engage the hook end into the limit switch carrier; push up to allow the microphone more entry or pull the
carrier down to stop the microphone sooner. Try small increments until desired docking is achieved. See photos below.
Slide-Guide / Magnet carrier / dust cap
The hole size for the BZ-3 is 2.625” Pushing the bezel firmly against the ceiling from inside the room, slide the clamp down -
tightly against the ceiling material; tightening the clamp to the Bezel then carefully tighten the two Jack Screws to remove any
slack remaining by pulling the Bezel tightly against the inside ceiling.
NOTE-1: The white bezel slide/magnet carrier is stored inside the BZ-3 body for shipping. It is retained at the Flange end by
a retaining ring, but can slide out the top. NOTE: Please take care when unpacking not to let the White Slide-Guide fall out and
possibly be damaged. Prior to assembly as shown above, insert the Microphone followed by the magnet carrier into the top of
the bezel making sure that it is free to move inside the bore. Clean the bore to remove any debris.
NOTE-2: If the white slide is not free to move inside the bezel bore, if possible eliminate any dents, adhesive or
other foreign material impeding smooth movement. If the guide is damaged, please call for a free replacement.
Should you have any questions, please call: 800-431-8900 or 718-464-9400
XEDIT Corporation 218-31 Ninety Seventh Avenue, Queens Village, NY 11429 [email protected] www.servoreelers.com
 Loading...