

Page 1
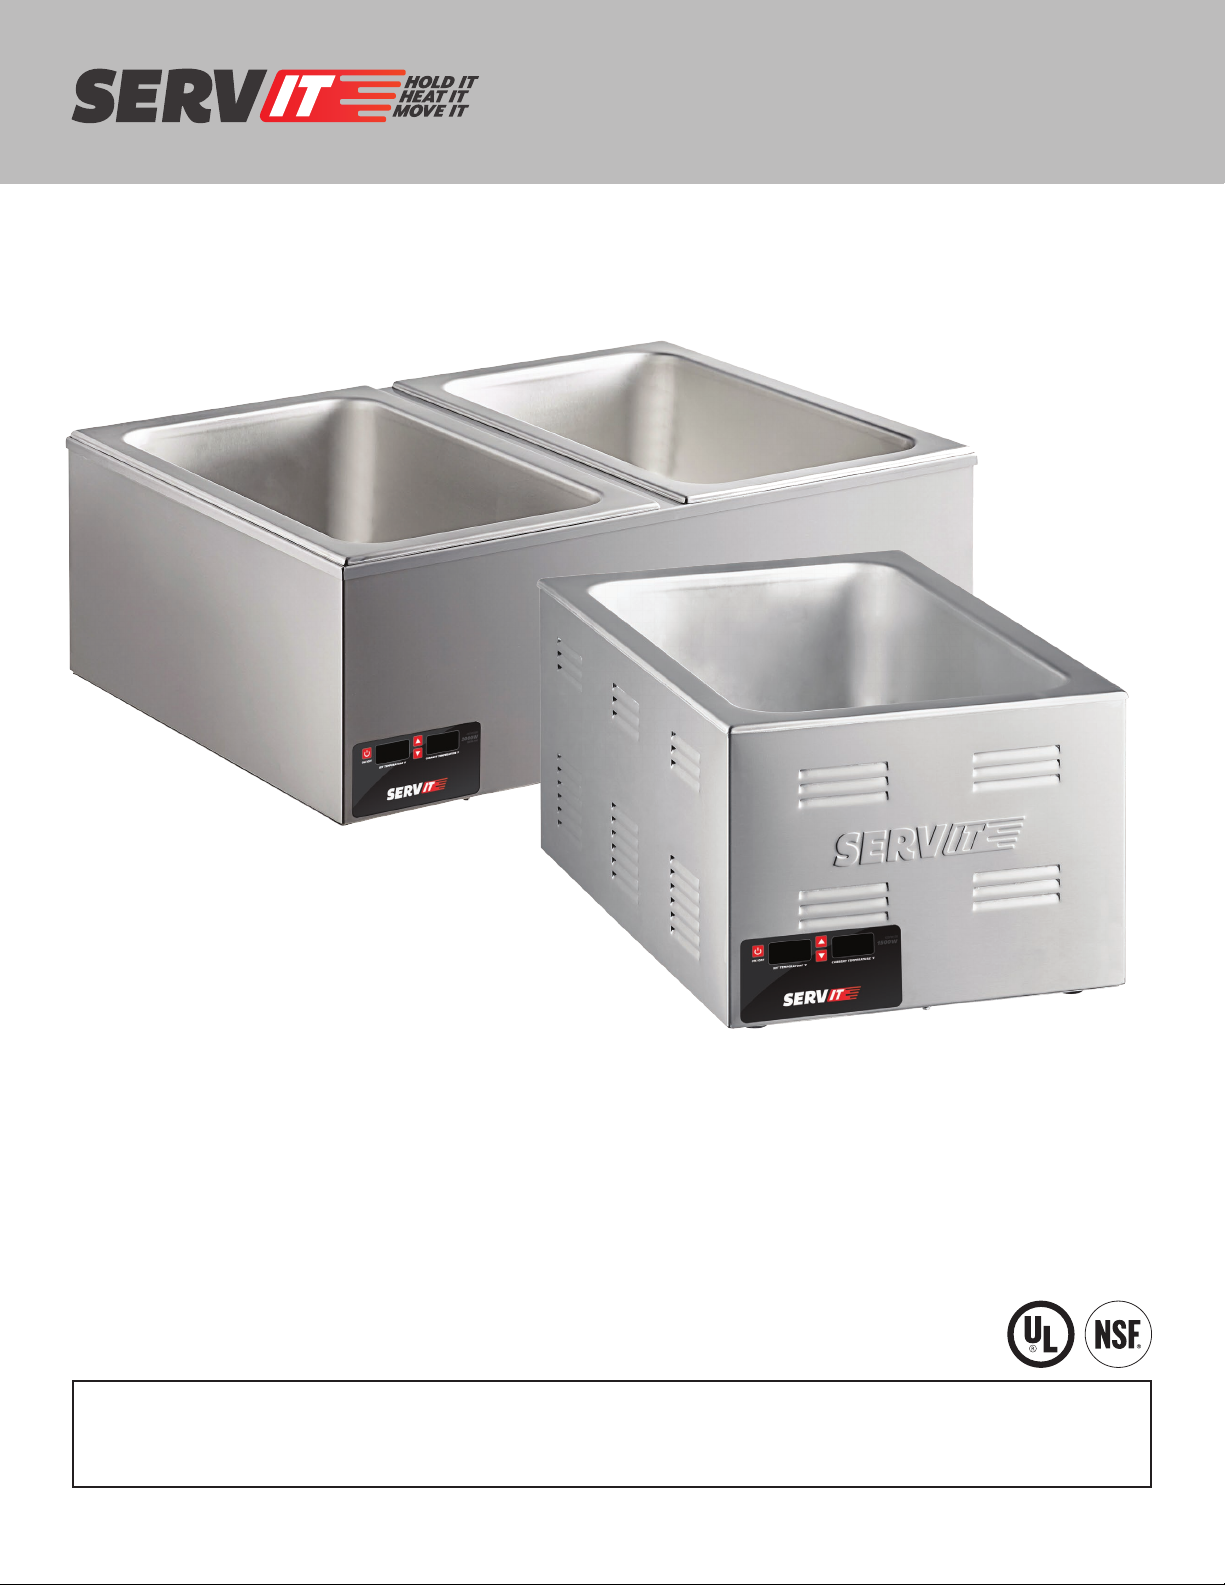
USER MANUAL
Electric
Countertop Food
Warmers and Cookers
RETAIN THIS MANUAL FOR FUTURE REFERENCE.
UNIT MUST BE KEPT CLEAR OF COMBUSTIBLES AT ALL TIMES.
Models: 423F W150, 423FW150L, 423FW200D
01/2021
1
Page 2

USER MANUAL
TABLE OF CONTENTS
Owner's Information ............................................................................................................................... 3
Safety Warnings .................................................................................................................................4 -5
Specifications ......................................................................................................................................... 6
Operating Instructions .........................................................................................................................7-8
Recommended Settings Chart ................................................................................................................ 9
General Cleaning ................................................................................................................................... 10
Troubleshooting .................................................................................................................................... 11
Food Warmer Wiring Diagram .............................................................................................................. 11
Food Warmer Exploded Views/Parts Lists ..................................................................................... 12 - 17
Warranty ............................................................................................................................................... 18
2
Page 3
USER MANUAL
OWNER'S INFORMATION
Please complete this information and retain this manual for the life of the equipment. For warranty purposes,
please fill out and retain this information. An example of the serial plate(s) for these units are included below
for reference.
Model No.
Serial No.
Date of Purchase:
Serial Plate Example:
MADE IN CHINA
ITEM: 423FW150
MODEL : SERVIT 423FW150
DESCRIPTION :
COUNTERTOP COOKER/
WARMER 12" x 20" 8" DEEP WELL
VOLTAGE : 120V ~ 60 Hz
WATTAGE : 1500W
SERIAL # :
3
Page 4
USER MANUAL
ServIt Electric Countertop Food Warmers are designed to keep foods at optimum serving temperatures without
affecting quality. They are built for tough kitchen duty with rugged stainless steel construction, heavy-duty
hardware, thick 360° blanket insulation, and easy-to-use digital controls. Food Warmers keep everything from meat
to vegetables to rolls hot and flavor-fresh until served, with easy control for a variety of foods through the built-in
digital controls with independent readout screens for set and actual temperatures.
ServIt Food Warmers also come with an industry leading 8” deep well that can support up a 6” deep pan, making
this a unique piece of equipment for high-volume use. It doubles as a micro countertop steam table, allowing you
do to more with limited countertop space. The sides are flat, non-vented stainless steel for easy cleaning, and help
keep the heat inside the well and directed to your food with the heavy insulation. Even on double units each well is
individual insulated to keep heat transfer between wells minimal and food at optimal temperature.
This manual provides the installation, safety, and operating instructions for Food Warmers. ServIt recommends all
installation, operating, and safety instructions appearing in this manual to be read prior to installation or operation of
the unit.
SAFETY WARNINGS
ServIt Food Warmers are designed, built, and sold for commercial use and should be operated by trained personnel
only. Clearly post all CAUTIONS, WARNINGS, and OPERATING INSTRUCTIONS near each unit to ensure proper
operation and to reduce the chance of personal injury and/or equipment damage.
WARNING: Do not store or use gasoline or other flammable vapors and liquids in the vicinity of this or any other
appliance. Keep the area free and clear of combustible materials.
WARNING: Improper installation, adjustment, alteration, service, or maintenance can cause property damage, injury,
or death. Read the Installation, Operating, and Maintenance Instructions thoroughly before installing or servicing this
equipment.
CAUTION: These models are designed, built, and sold for commercial use only. If these models are positioned so
the general public can use the equipment, make sure all cautions, warnings, and operating instructions are clearly
posted near each unit so that anyone using the equipment can use it correctly and not injure themselves or the
equipment.
CAUTION: Make sure food product has been heated to the proper food-safe temperature before placing in unit.
Failure to heat food product properly may result in serious health risks. This unit is for holding preheated food
product only.
4
Page 5

USER MANUAL
CAUTION: Locate unit in an area that is convenient for use. The location should be level and strong enough to support
the weight of the unit and contents.
ELECTRIC SHOCK HAZARD:
• Wire unit into properly grounded electrical panel of the correct voltage, size, and configuration.
• Turn OFF power switch, unplug power cord/turn off power at circuit breaker, and allow unit to cool before
performing any cleaning, adjustments, or maintenance.
• DO NOT submerge or saturate with water. Unit is not waterproof. Do not operate if unit has been submerged or
saturated with water.
• Unit is not weatherproof. Locate unit indoors where ambient air temperature is a minimum of 70°F (21°C).
• Do not clean unit when it is energized or hot.
• Do not steam clean or use excessive water on the unit.
• This unit is not “jet-proof” construction. Do not use jetclean spray to clean this unit.
• Do not pull unit by power cord.
• Discontinue use if power cord is frayed or worn.
• This unit must be serviced by qualified personnel only. Service by unqualified personnel may lead to electric
shock or burn.
FIRE HAZARD:
• Locate unit a minimum of 1" (25 mm) from combustible walls and materials. If safe distances are not maintained,
discoloration or combustion could occur.
• Do not use harsh chemicals such as bleach (or cleaners containing bleach), oven cleaners, or flammable cleaning
solutions to clean this unit. Use warm soapy water. Reference cleaning instructions on page 9-10 for more
information.
BURN HAZARD:
• Some exterior surfaces on unit will get hot. Use caution when touching these areas.
• Use caution when removing steam table pans from wells. Hot air escapes when a pan is removed.
5
Page 6
USER MANUAL
SPECIFICATIONS
• Cordset Configuration: 120V, NEMA 5-15P or 5-20p, 3 wire grounded cord
• If the supply cord is damaged, the manufacturer or an authorized service agent or a similarly qualified person
must replace it to avoid a hazard or voiding the warranty.
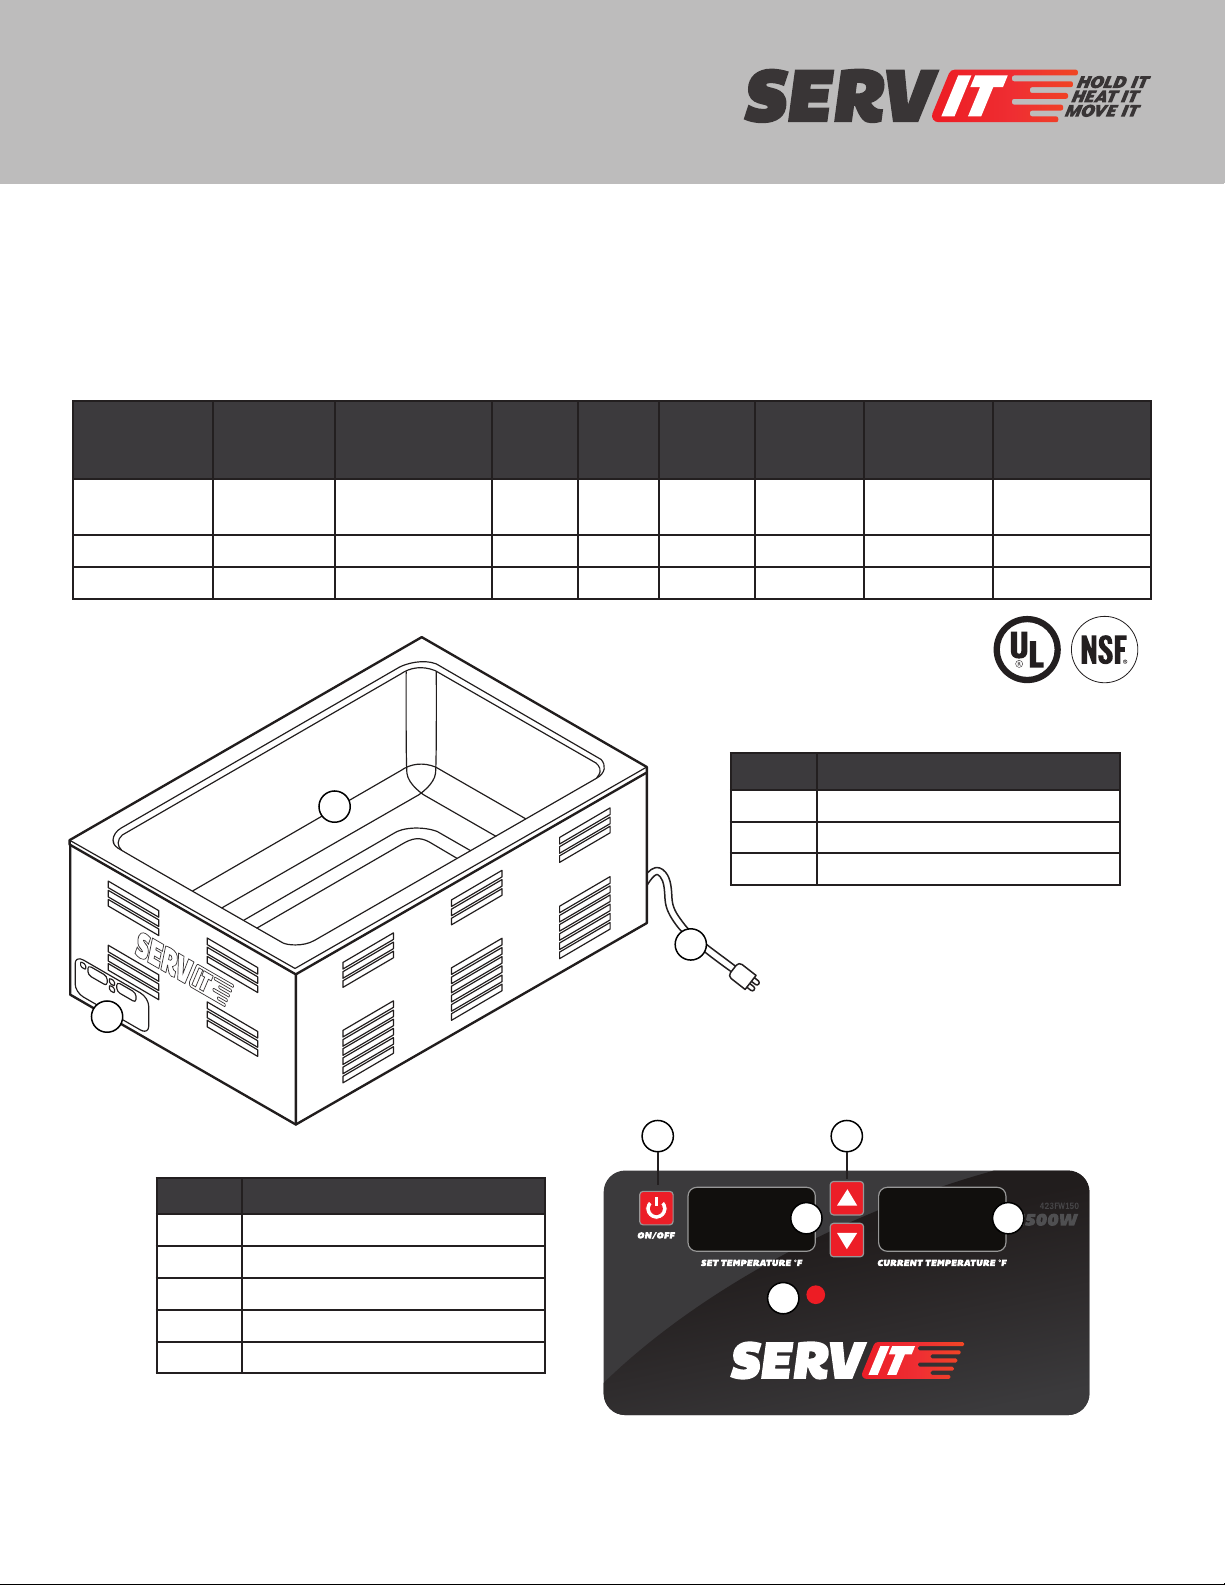
Item # Style Well Size
423FW150
423FW150L Warmer 4/3 - 12" x 27" 120V 6" 120V 1500W 5-15P 120 - 212°F
423FW200D Warmer Full - 12" x 20" 120V 6" 120V 2000W 5-20P 120 - 212°F
Warmer/
Cooker
Full - 12" x 20" 120V 6" 120V 1500W 5-15P 120 - 212°F
1
# of
Wells
Max
Pan
Depth
Voltage Wattage Plug Config. Temp. Range
# DESCRIPTION
1 Stainless Steel Water Well
2 Cord & Plug
3 Digital Control Panel
2
6
3
# DESCRIPTION
4 On/O Button
5 Set Temp. Screen
6 Up/Down Temp Buttons
7 Current Temp Screen
8 Preheat Signal
4
8
6
5
7
Page 7

USER MANUAL
OPERATING INSTRUCTIONS
General Information:
• Always clean equipment thoroughly before first use. (See general cleaning instructions on page 10).
• Check rating label for your model designation and electrical rating.
• Ensure unit is proper installed by a qualified electrician.
WARNING: ELECTRICAL SHOCK HAZARD. FAILURE TO FOLLOW THE INSTRUCTIONS IN THIS MANUAL COULD
RESULT IN SERIOUS INJURY OR DEATH. Electrical Ground is required on this appliance. Do not modify the
power supply cord plug. If it does not fit into the outlet, have the proper outlet installed by a qualified
electrician. Do not use an extension cord with this appliance. Check with a qualified electrician if you are
unsure as to whether the appliance is properly grounded.
General Operating Instructions:
• All foodservice equipment should be operated by trained personnel.
• Do not place arms or hands or other objects not desired to be heated in the well.
• Use caution when removing pans from wells, use hot mitts where appropriate.
• Never pour cold water into wells, always use warm or hot water for best performance.
• Do not cook, warm or hold food directly in liner pans (well pans). Always use steamtable pans/insets, etc.
• Never hold perishable food below 150°F (66°C).
Installation and First Use Instructions:
CAUTION: Food Warmers are heavy and may require two people to install.
1. Remove unit from carton and all packaging materials form the unit.
2. Remove the manual/information packet from the unit.
3. Place unit in desired location.
NOTE: Place where the ambient air temperature is constant and a minimum of 70°F. Avoid areas that are subject
to active air movements or currents. Make sure the unit is located on a solid, level area and at a proper height for
convenient use and also following health standards.
4. Fill the unit with warm/hot water up to the “MAX” fill line but not below the “MIN” fill line.
NOTE: Failure to keep proper water level way result in lower performance or even burnout.
5. Locate an outlet of the correct plug and voltage type for the unit and plug in.
6. Press the “On/Off Button”.
7. Using the Up Arrow and Down Arrow buttons, set the desired temperature. See “Recommended Settings Chart”
section below for proper Food Holding Guidelines.
8. The Set Temperature Screen will blink a few times to confirm set temperature.
7
Page 8

USER MANUAL
Installation and First Use Instructions (continued)
9. Allow the unit up to 15 minutes to preheat (covering with a steam table pan will allow quicker preheating)
CAUTION: Initial heating of unit may generate smoke or fumes and muse be done in a well-ventilated area. This is
standard and may last up to 60 minutes during initial startup. Operate unit without food until smoke and
fumes have dissipated.
10. Once preheated by comparing the Set Temperature readout to the Actual Temperature readout, place pre-cooked
food product directly in stainless steel drawer pans or use a combination of different compatible sizes of food
pans up to 6” (152mm) deep.NOTE: There may by up to a 5 degree F different in Set versus Actual temperature
readouts, this is normal. For HAACP and record keeping purposes, taking the temperature of the actual food is
most accurate and sanitary. It is not recommended to use the Actual Temperature readout for record purposes, it
is merely a visual cue.
11. When the unit is no longer needed during the day, or needs to be cleaned, turn the unit “OFF” and allow up to
1 hour to cool down. Once cool, empty the well and complete necessary procedure. Removing any steam table
pans will accelerate the cooldown process.
8
Page 9
USER MANUAL
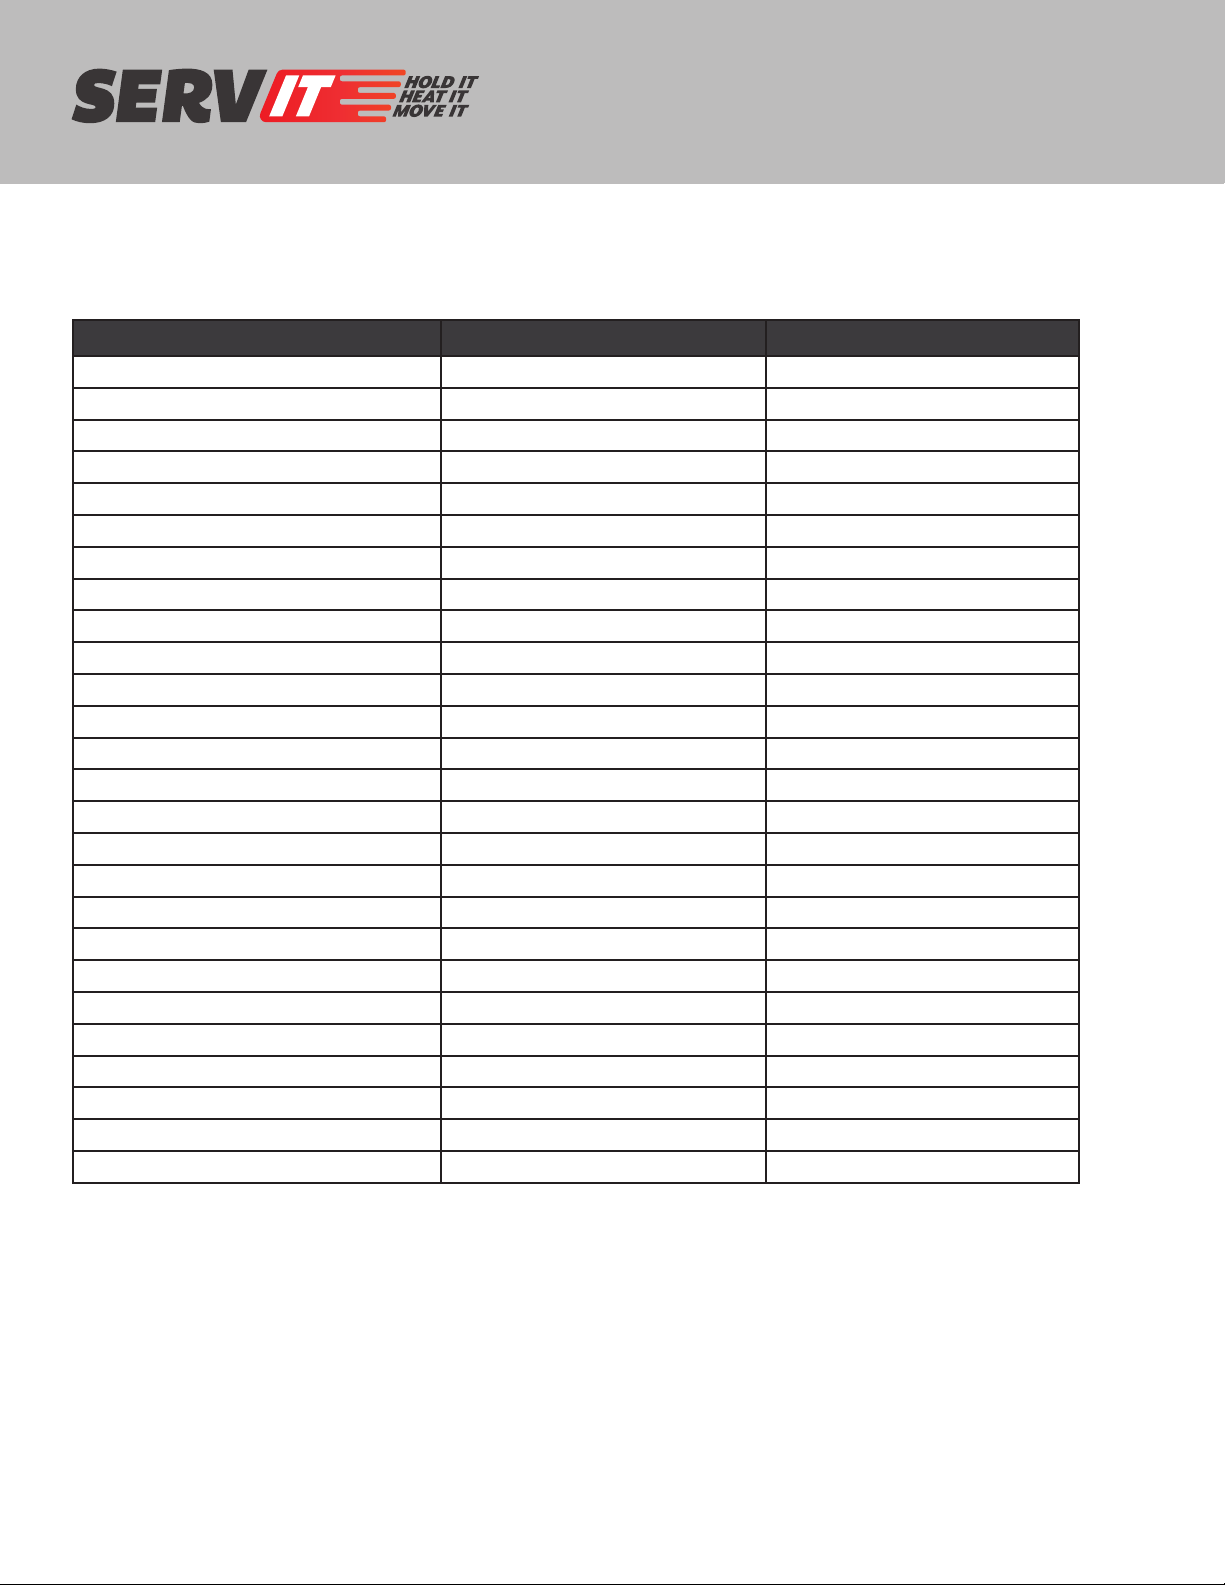
RECOMMENDED SETTINGS CHART
FOOD PRODUCT COVERED/UNCOVERED TEMP SETTING
Baked Fish Uncovered 175°F
Baked Potatoes Uncovered 180°F
Biscuit Covered 180°F
Broccoli Uncovered 170 - 175°F
Chicken Nuggets Covered 175°F
Corn on the Cob Uncovered 170 - 175°F
Croissants Covered 175°F
Egg Patties Uncovered 180°F
French Fries Uncovered 185°F
Fried Chicken Uncovered 180 - 185°F
Fried Fish Uncovered 180°F
Hamburgers Covered 180°F
Lasagna Covered 185°F
Mashed Potatoes Covered 175°F
Mixed Veggies Covered 170 - 175°F
Pancakes Covered 175°F
Pastas Covered 180°F
Peas Covered 170 - 175°F
Pizza Uncovered 175 - 180°F
Roast Beef Uncovered 170 - 180°F
Roast Pork Uncovered 170 - 180°F
Scalloped Potatoes Covered 175°F
Strip Steak Uncovered 160 - 170°F
Turkey Uncovered 170 - 180°F
Waes Covered 175°F
Whole Chicken Uncovered 170 - 180°F
9
Page 10

USER MANUAL
GENERAL CLEANING INSTRUCTIONS
• NEVER clean any electrical unit by immersing it in water. Turn off before surface cleaning.
• Always clean equipment thoroughly before first use. Clean unit daily. Except where noted on charts: Use warm,
soapy water. Mild cleansers and PLASTIC scouring pads may be used to remove baked-on
food and water scale.
• Turn off electrical units before cleaning or servicing.
Instructions:
1. Follow General Cleaning instructions (above).
2. Remove any inset pans and pans. Wash thoroughly in the sink or dishwasher.
3. If Lime or Mineral build-up occurs, follow below guide on “Removing Lime and Mineral Deposits”.
Removing Lime and Mineral Deposits:
Turn unit off the unit, and allow the unit to cooldown.
1. After the unit has cooled, remove and empty the water pan.
2. Fill the water pan with a mixture of 75% water and 25% white vinegar to a level where it covers the lime and
mineral deposits.
3. Install the water pan with deliming solution into the unit.
4. Plug in and turn on the unit. Allow the unit to run for 30 minutes.
5. Turn off the unit and unplug the power cord.
6. Allow the water pan to stand with the deliming solution for at least two hours (the time required will vary
depending on the amount of deposits in the water pan).
7. Remove the water pan and empty the deliming solution.
8. Continue to fill and rinse the water pan with clean water until the pan is clean.
9. Install the clean water pan into the unit. Plug in the unit and fill the water pan as usual for daily operation (1/4"
of water is recommended). NOTE: If lime and mineral deposits are still present in the water pan, repeat this
procedure and increase the amount of time the de-liming mixture stands in the water pan.
10
Page 11
USER MANUAL
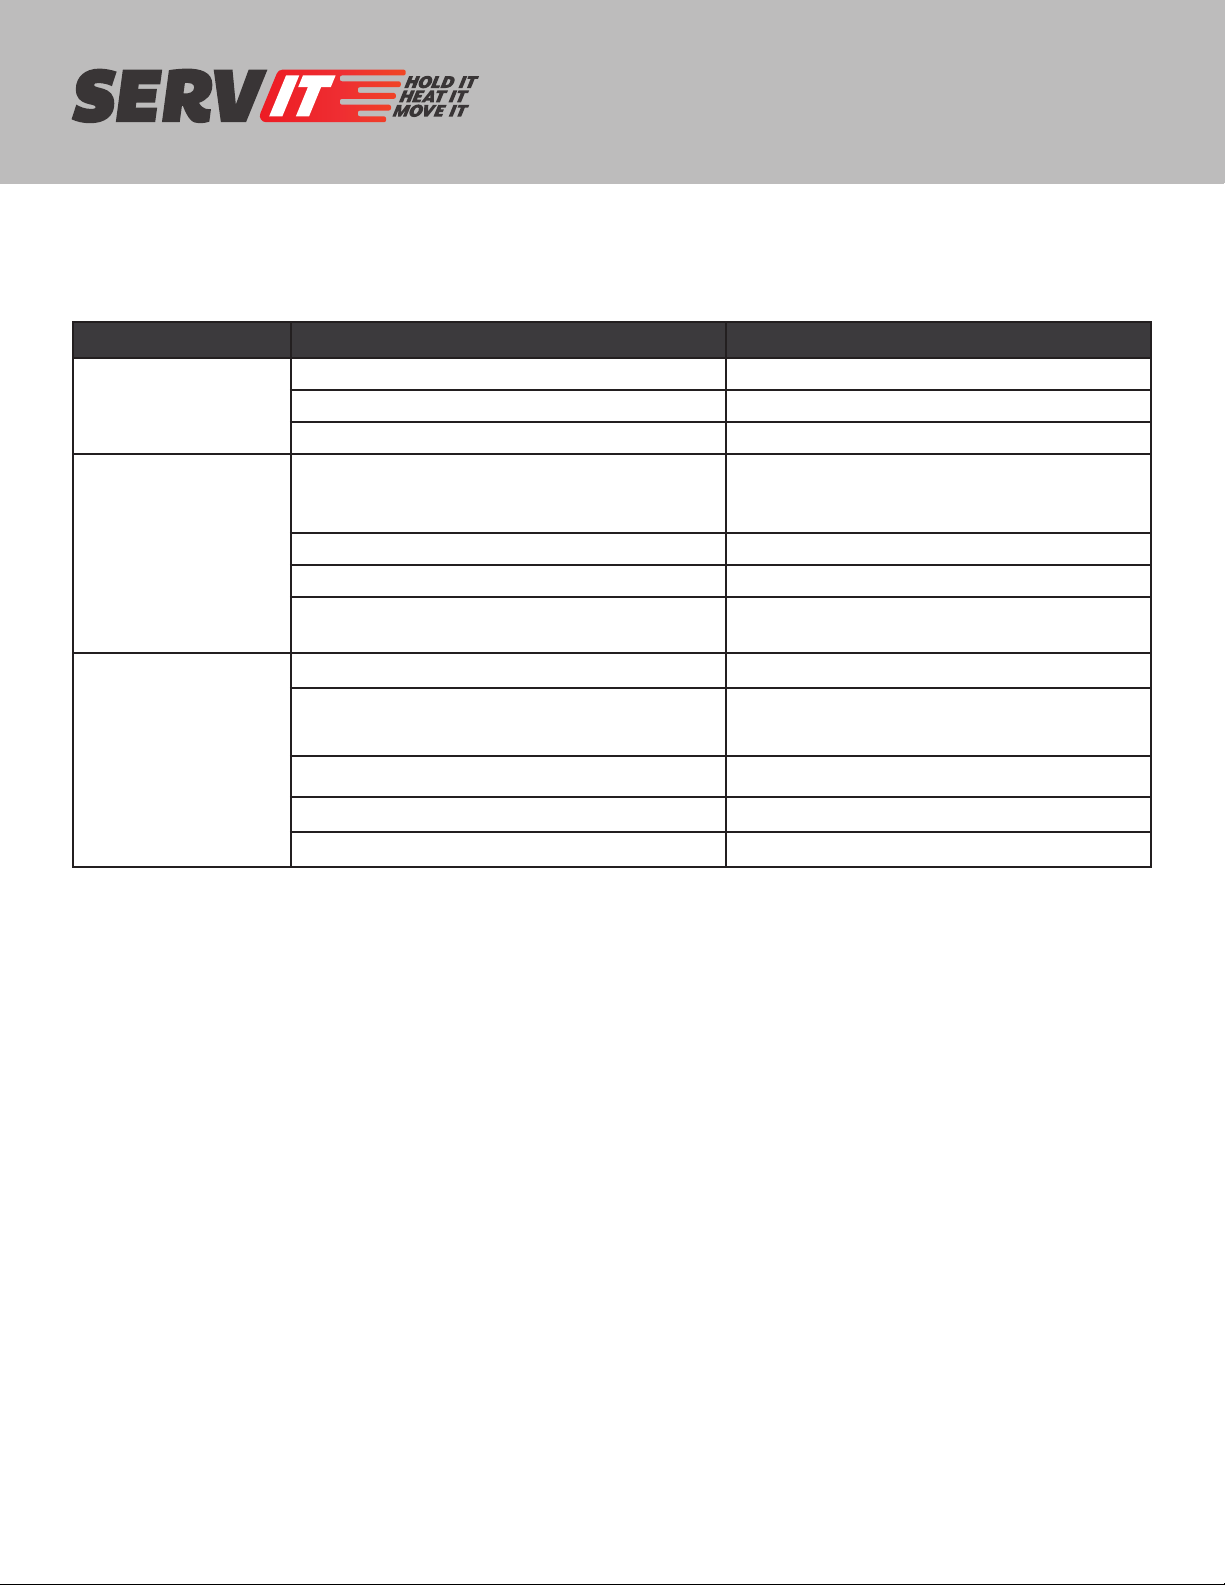
TROUBLESHOOTING
ISSUE POTENTIAL CAUSE SOLUTION
Temperature control is set too high Change the temperature to a lower setting
Unit is too hot
Unit is not hot enough
Unit is connected to incorrect power supply Contact an authorized electrician
Defective internal thermostat Contact an authorized electrician
Unit has not had enough time to preheat
Temperature control is set too low Change the temperature to a higher setting
Defective internal thermostat Contact an authorized electrician
Water level is low
Unit is not plugged in Plug unit into proper power supply
Allow unit 30 minutes to reach operating
temperature. This can be accelerated by
closing the drawer vent(s).
Fill well with warm/hot water up to “MAX” fill
line
Unit is not
working at all
Unit is not turned on Press the On/O switch on the digital control
Circuit breaker tripped Reset circuit breaker
Control knob is defective Contact an authorized electrician
Heating element is burned out Contact an authorized electrician
11
Page 12
USER MANUAL
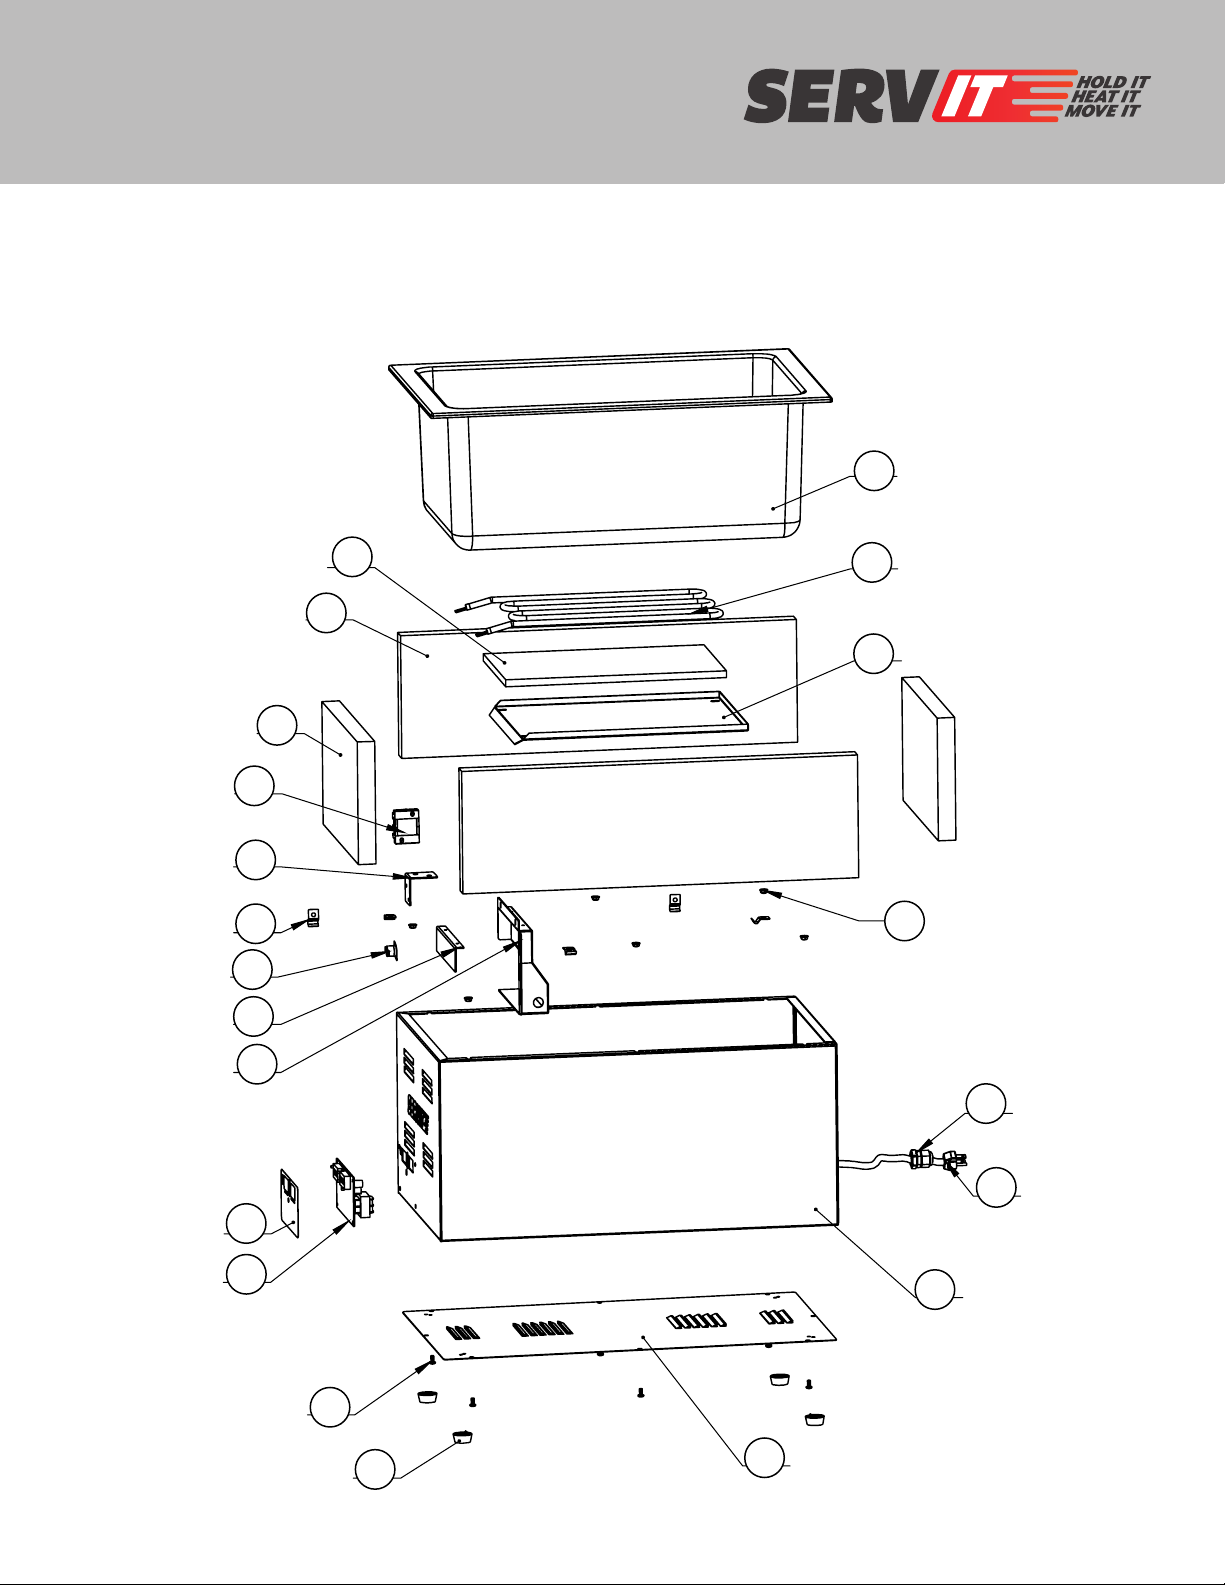
423FW150 EXPLODED VIEW
1
14
13
12
11
19
18
15
16
17
2
3
21
7
12
10
6
9
20
8
5
4
Page 13
USER MANUAL
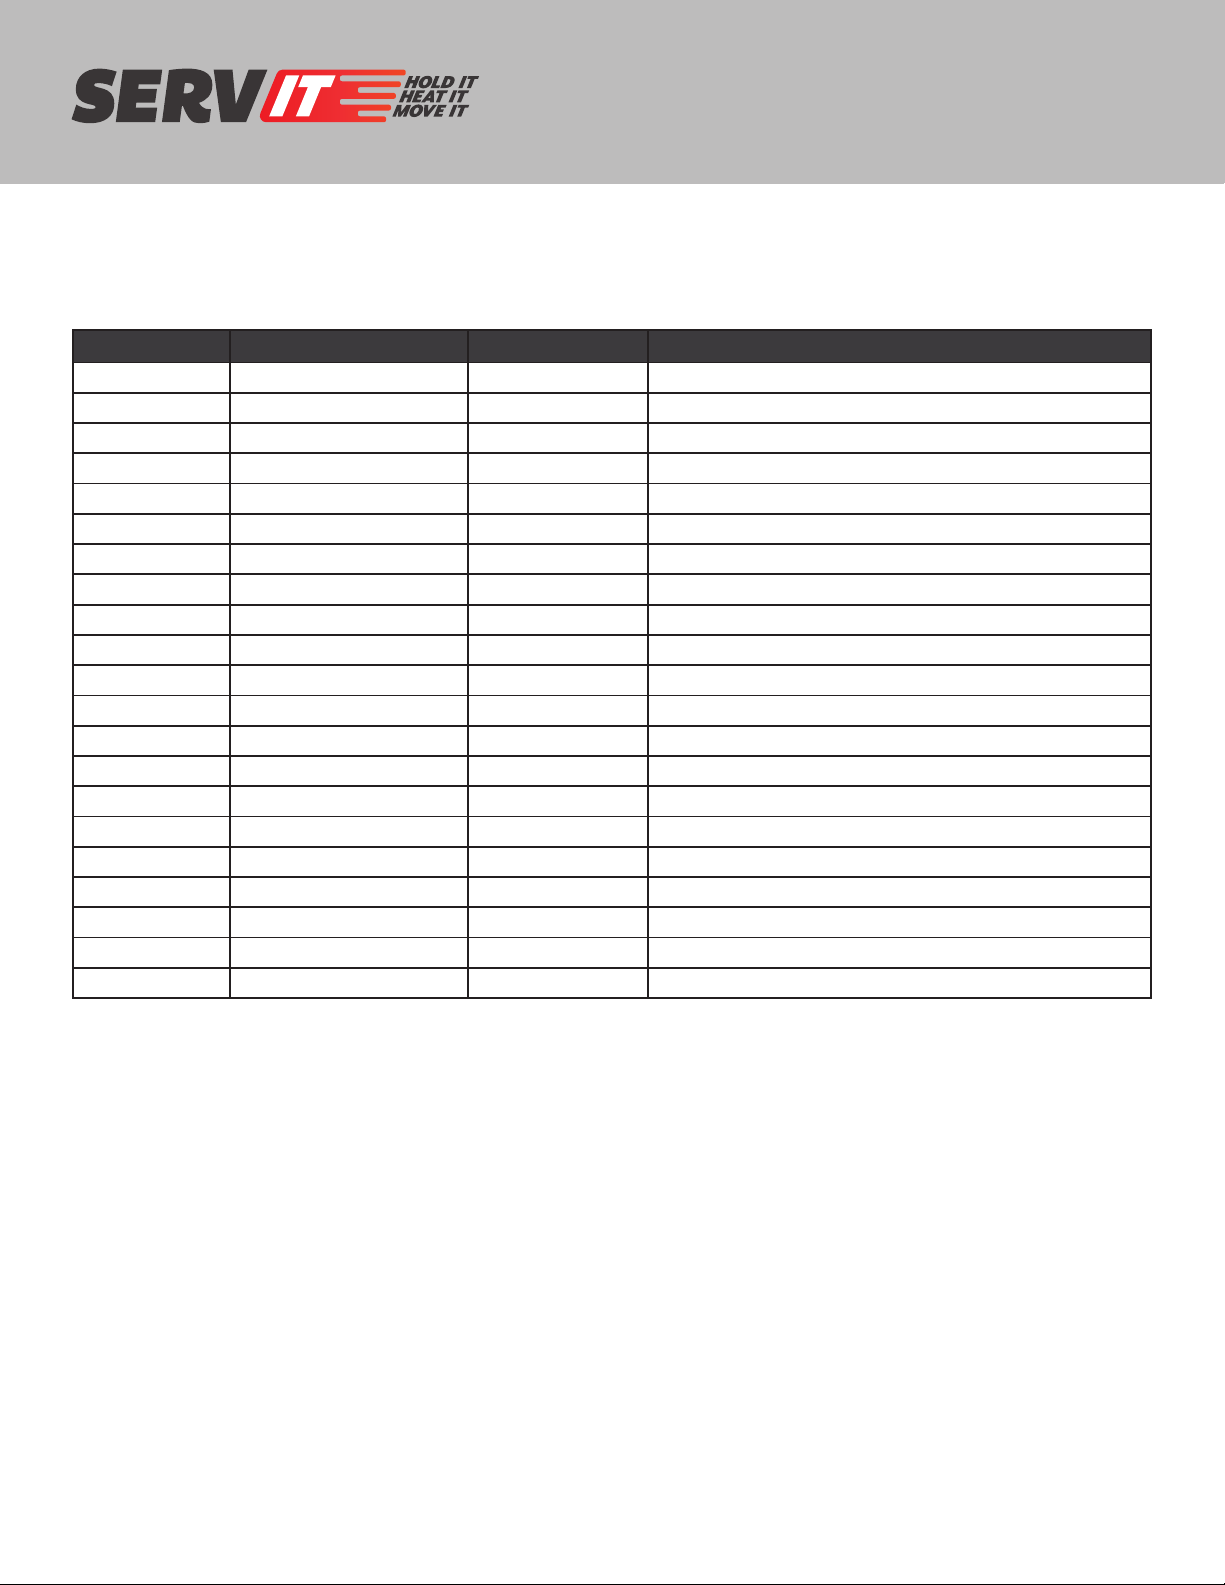
423FW150 PARTS LIST
ITEM PART # QTY DESCRIPTION
1 455001 1 Well
2 455002 1 Heating Element
3 455003 1 Dissipator Plate
4 455004 1 Body
5 455005 1 Bottom Cover
6 B00056 1 Power Cord
7 B00065 1 Bushing
8 B00063 4 Plastic Pad
9 B00095 1 Digital Thermostat
10 B00096 1 Operate Panel
11 B00069 1 Limit Thermostat
12 415006 5 Clamp
13 415007 1 L-Shaped PLate
14 B00070 1 Terminal Block
15 B00075 2 F&B Insulation Foam
16 B00077 2 Side Insulation Foam
17 B00071 1 Bottom Insulation Foam
18 415008 1 Box
19 415009 1 Box Bracket
20 B00060 10 M4x9 Self-tapping Screw
21 B00062 21 M5 Flange Nut
13
Page 14
USER MANUAL
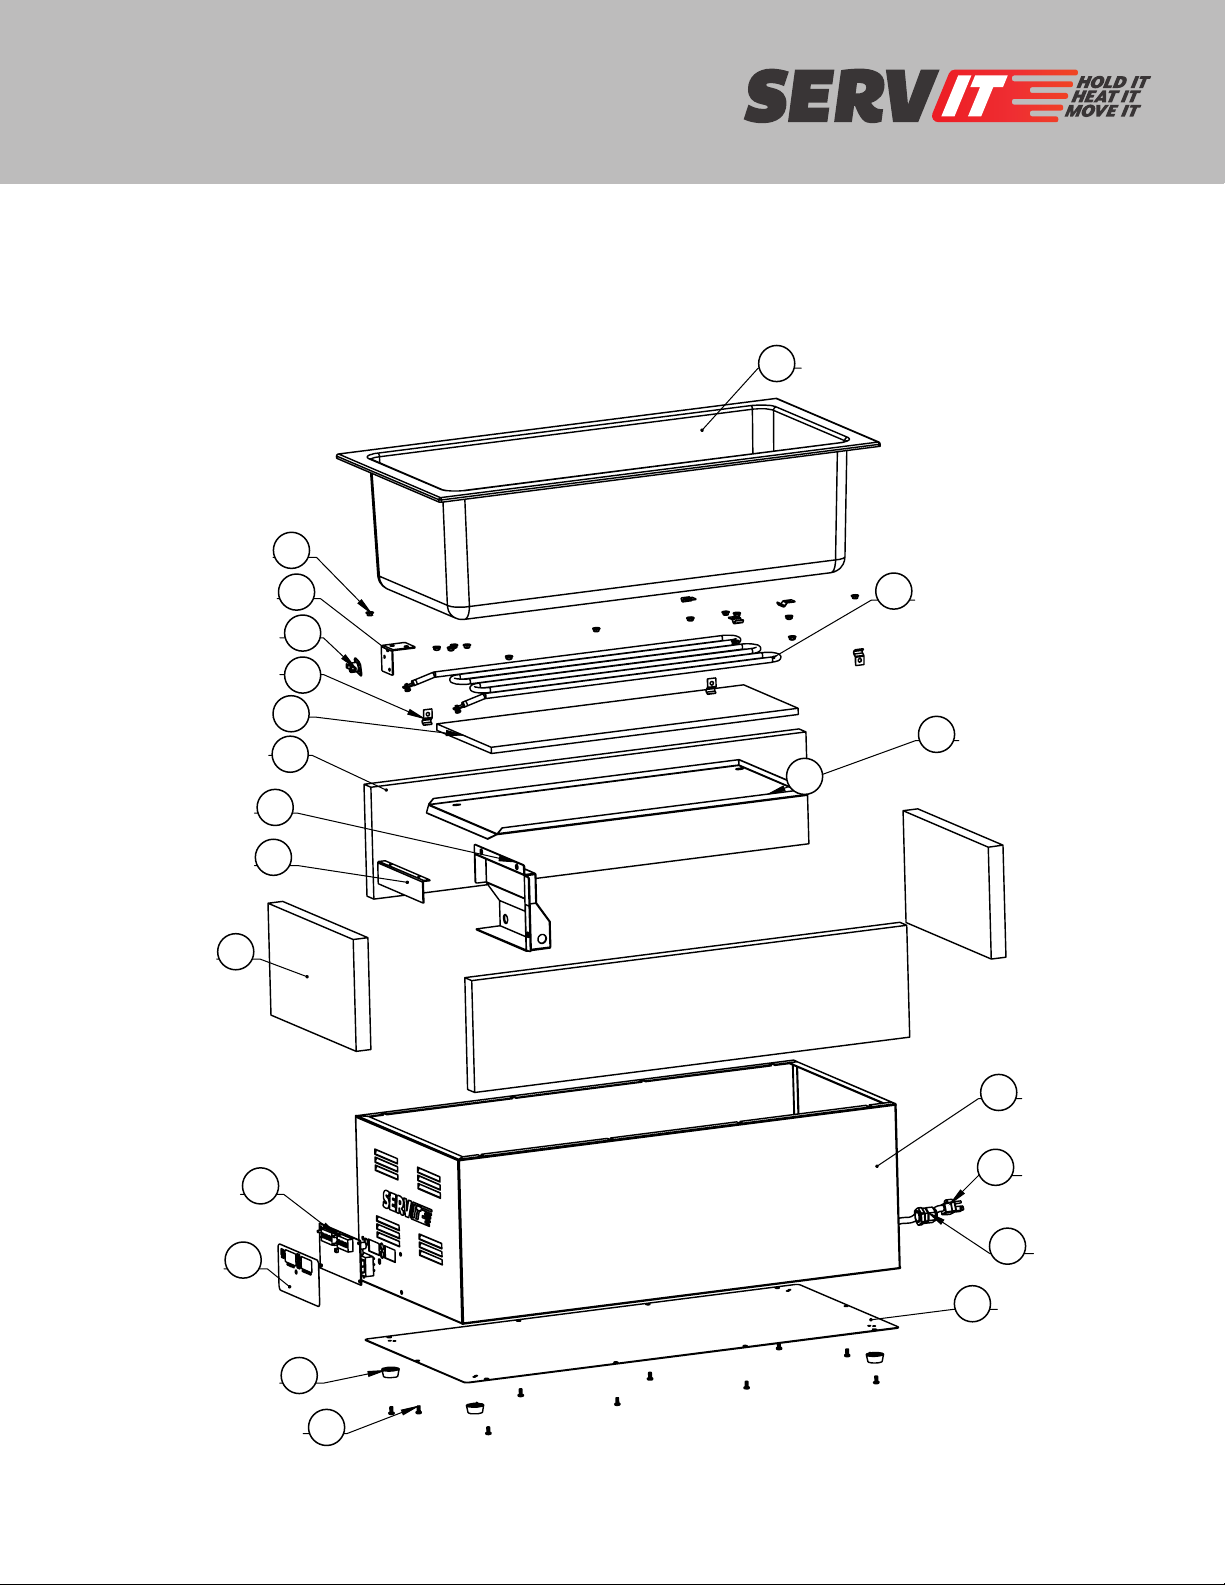
423FW150L EXPLODED VIEW
20
20
1
1
14
14
13
13
11
11
12
12
16
16
15
15
21
17
17
18
18
9
9
2
2
3
3
4
4
6
6
14
10
10
7
7
5
5
8
8
19
19
Page 15
USER MANUAL
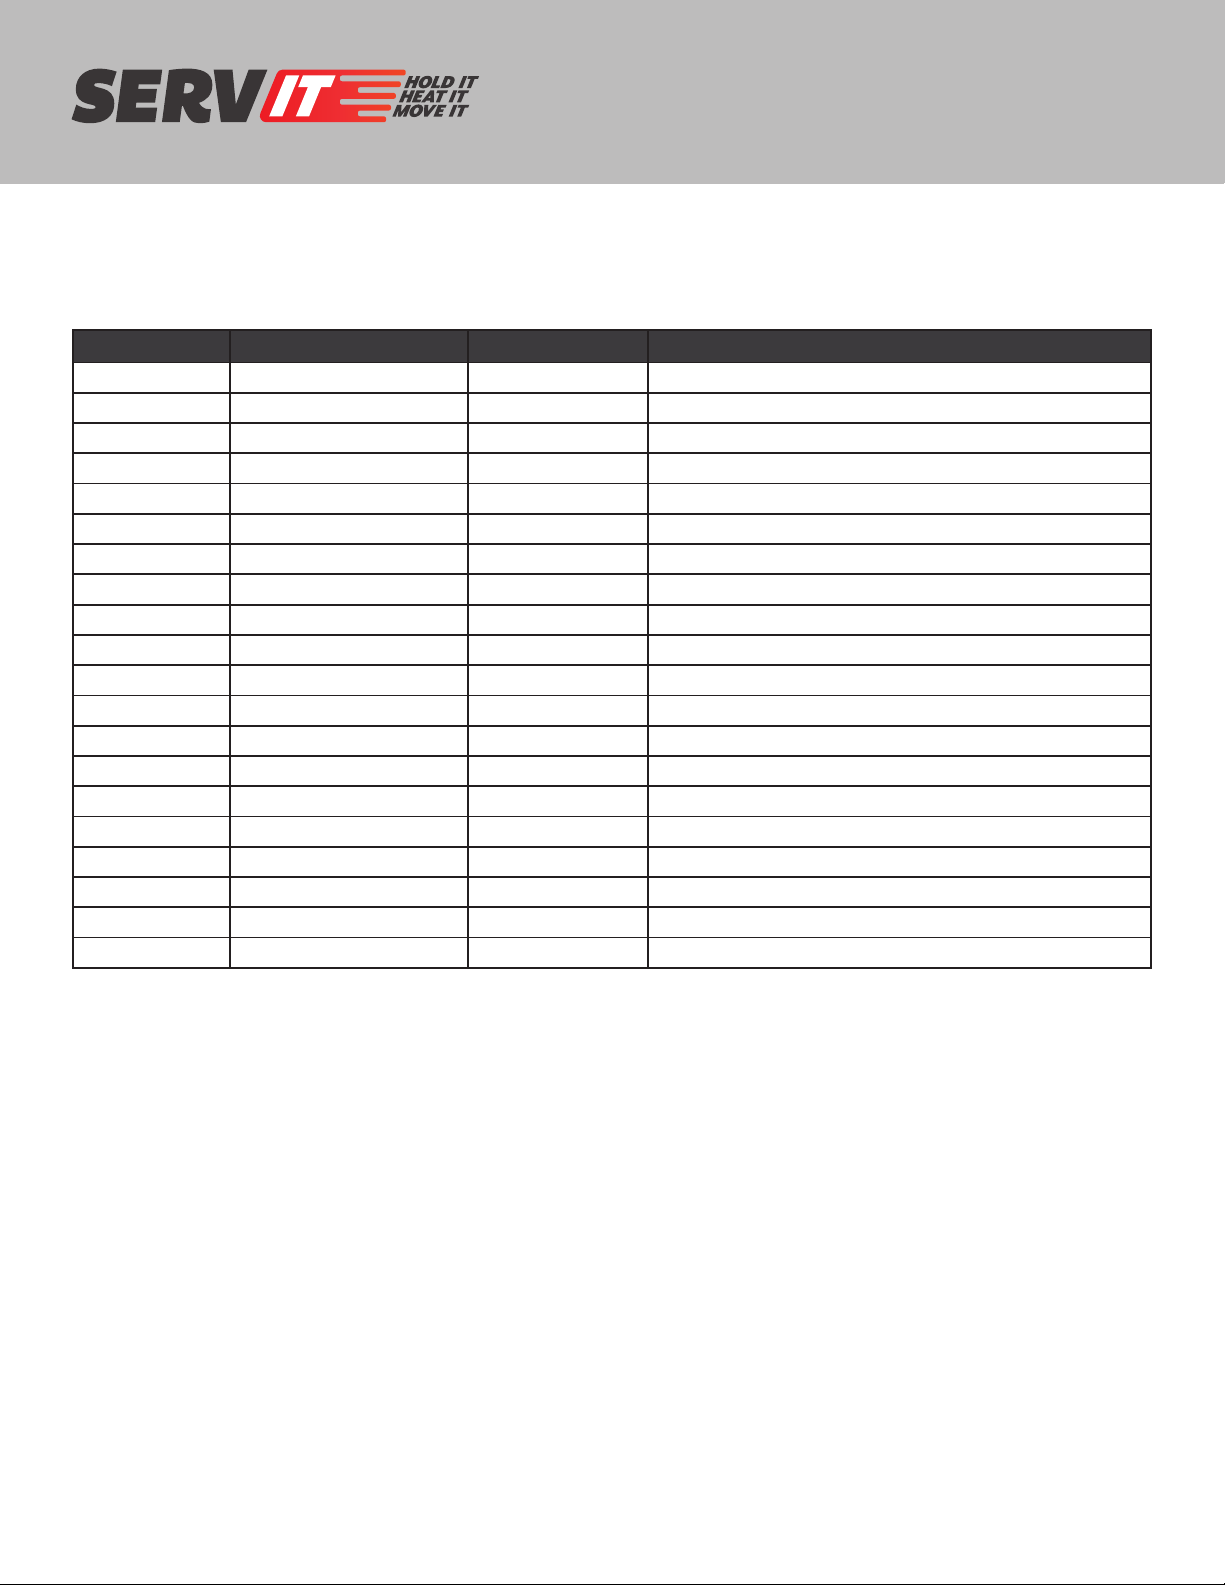
423FW150L PARTS LIST
ITEM PART # QTY DESCRIPTION
1 445001 1 Well
2 435002 1 Heating Element
3 435003 1 Dissipator Plate
4 445004 1 Body
5 435005 1 Bottom Cover
6 B00057 1 Power Cord
7 B00065 1 Bushing
8 B00063 4 Plastic Pad
9 B00095 1 Digital Thermostat
10 B00096 1 Operate Panel
11 B00069 1 Limit Thermostat
12 415006 6 Clamp
13 415007 1 L-Shaped PLate
14 B00075 2 F&B Insulation Foam
15 B00078 2 Side Insulation Foam
16 B00072 1 Insulation Foam
17 415008 1 Box
18 415009 1 Box Bracket
19 B00060 12 M4x9 Self-tapping Screw
20 B00062 23 M5 Flange Nut
15
Page 16
USER MANUAL
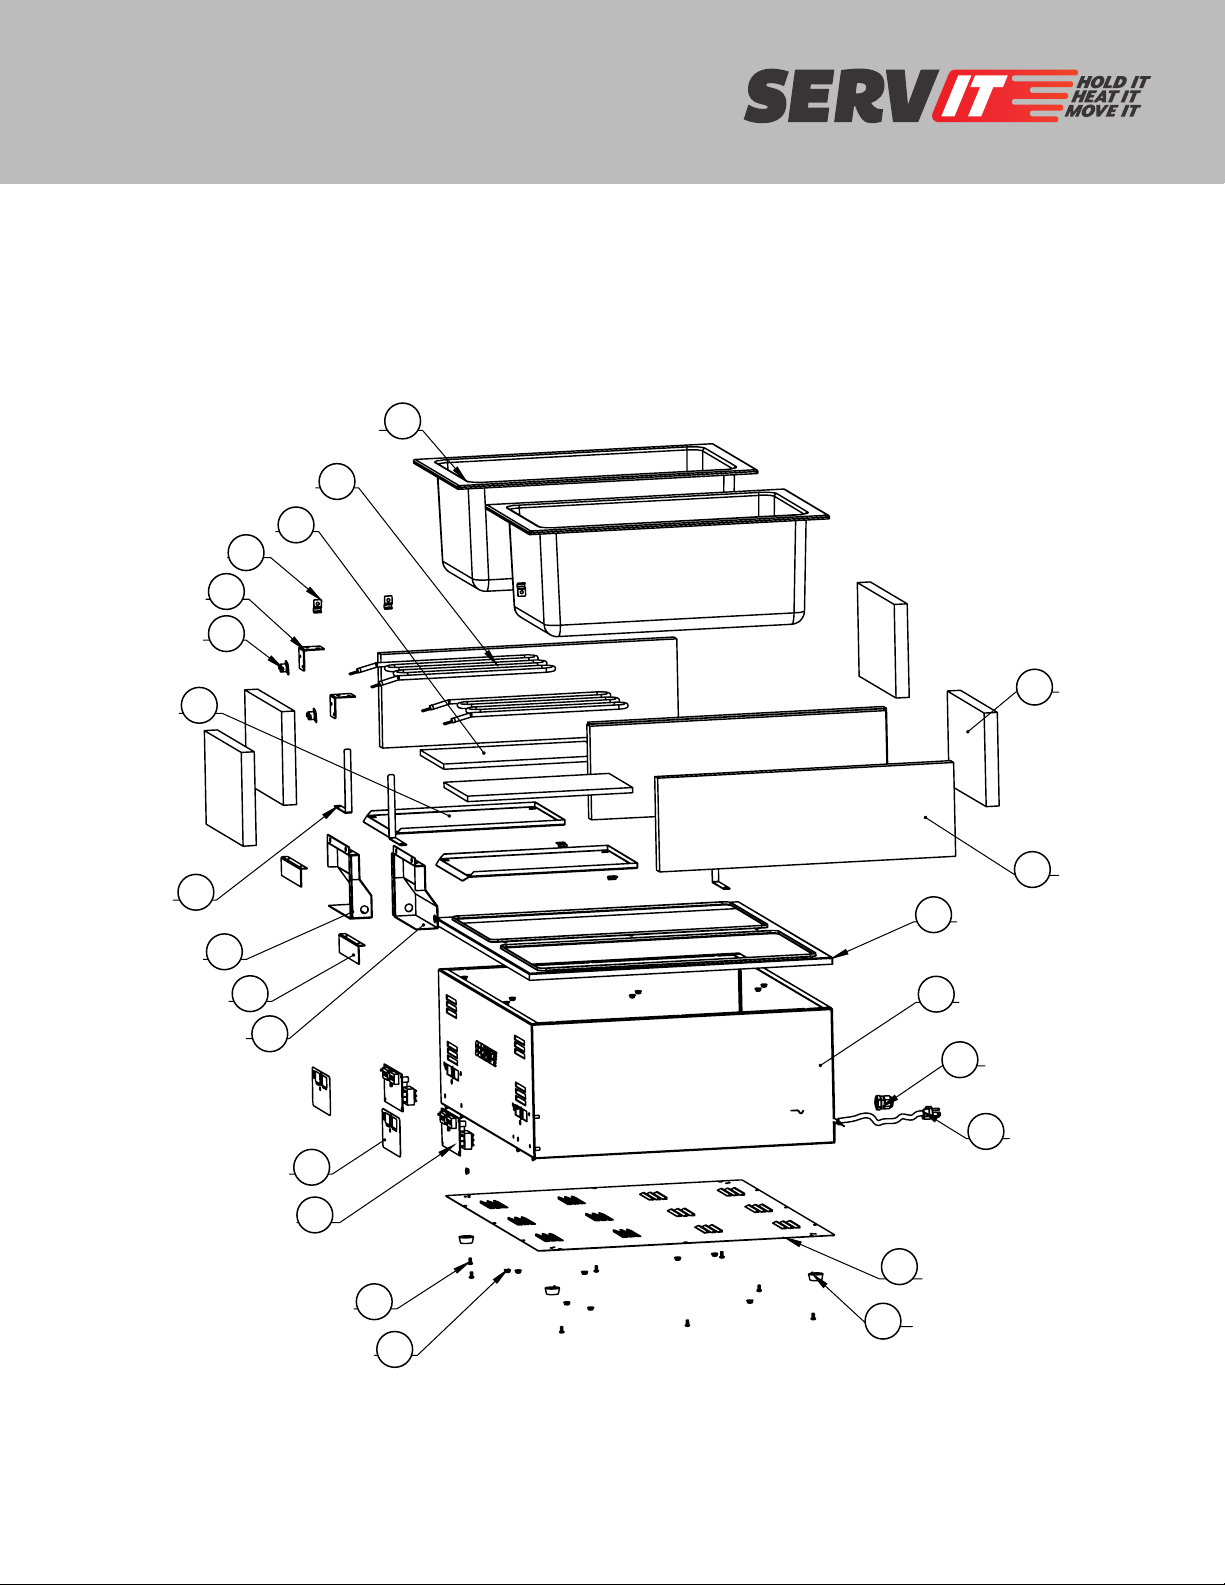
423FW200D EXPLODED VIEW
1
2
17
12
13
11
18
3
14
19
20
21
10
9
4
7
5
15
16
6
16
23
8
22
Page 17
USER MANUAL
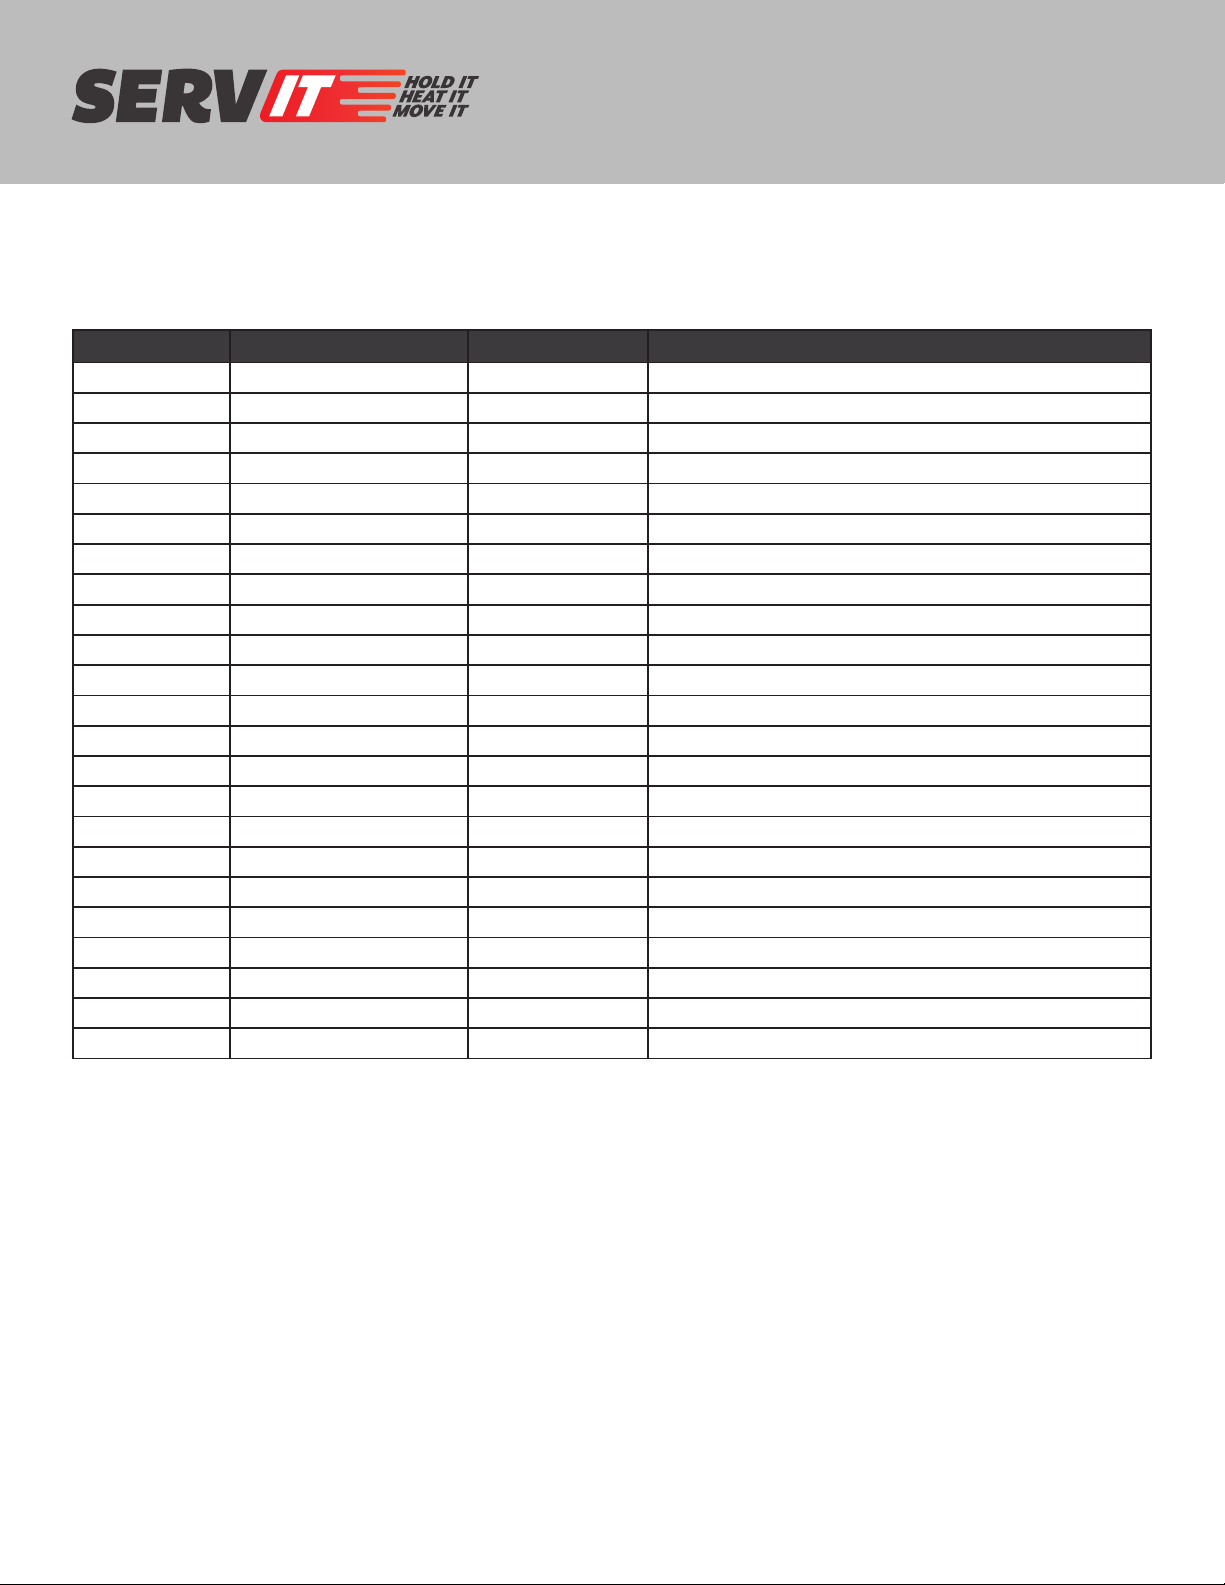
423FW200D PARTS LIST
ITEM PART # QTY DESCRIPTION
1 475001 2 Well
2 475002 2 Heating Element
3 415003 2 Dissipator Plate
4 475004 1 Body
5 475005 1 Bottom Cover
6 B00058 1 Power Cord
7 B00069 1 Bushing
8 B00063 4 Plastic Pad
9 B00095 2 Digital Thermostat
10 B00096 2 Operate Panel
11 B00069 2 Limit Thermostat
12 415006 9 Clamp
13 415007 2 L-Shaped PLate
14 475006 1 Waterproof Panel
15 B00075 4 F&B Insulation Foam
16 B00077 4 Side Insulation Foam
17 B00071 2 Bottom Insulation
18 B00057 4 Bracket
19 415008 1 Box
20 415009 2 Box Bracket
21 415010 1 Mirror Box
22 B00062 39 M5 Flange Nut
23 B00060 14 M4x9 Self-tapping Screw
17
Page 18

USER MANUAL
EQUIPMENT LIMITED WARRANTY
ServIt warrants its equipment to be free from defects in material and workmanship for a period of 1 year. This is the sole and
exclusive warranty made by ServIt covering your ServIt brand equipment. A claim under this warranty must be made within
1 year from the date of purchase of the equipment. Only the equipment’s original purchaser may make a claim under this
warranty. ServIt reserves the right to approve or deny the repair or replacement of any part or repair request. The warranty is
not transferable. ServIt Equipment installed in/on a food truck or trailer will be limited to a period of 30 days from the original
date of purchase.
To Make a Warranty Claim:
For Warranty Inquiries contact the location where you purchased the product:
• WebstaurantStore.com: Contact [email protected]. Please have your order number ready.
• The Restaurant Store: If you purchased this unit from your local store, please contact your store directly.
• TheRestaurantStore.com: Online purchases, call 717-392-7261. Please have your order number ready.
Failure to contact the designated location prior to obtaining equipment service may void your warranty.
ServIt makes no other warranties, express or implied, statutory or otherwise, and HEREBY DISCLAIMS ALL IMPLIED
WARRANTIES, INCLUDING THE IMPLIED WARRANTIES OF MERCHANTABILITY AND OF FITNESS FOR A PARTICULAR
PURPOSE.
This Limited Warranty does not cover:
• Equipment sold or used outside the Continental United States
• Use of unfiltered water (if applicable)
• ServIt has the sole discretion on wearable parts not covered under warranty
• Equipment not purchased directly from an authorized dealer
• Equipment used for residential or other non-commercial purposes
• Equipment that has been altered, modified, or repaired by anyone other than an authorized service agency
• Equipment where the serial number plate has been removed or altered.
• Damage or failure due to improper installation, improper utility connection or supply, and issues resulting from improper
ventilation or airflow.
• Defects and damage due to improper maintenance, wear and tear, misuse, abuse, vandalism, or Act of God.
Any action for breach of this warranty must be commenced within 1 year of the date on which the breach occurred. No
modification of this warranty, or waiver of its terms, shall be effective unless approved in a writing signed by the parties.
The laws of the Commonwealth of Pennsylvania shall govern this warranty and the parties’ rights and duties under it. ServIt
shall not under any circumstances be liable for incidental or consequential damages of any kind, including but not limited to
loss of profits.
18
 Loading...