

Page 1
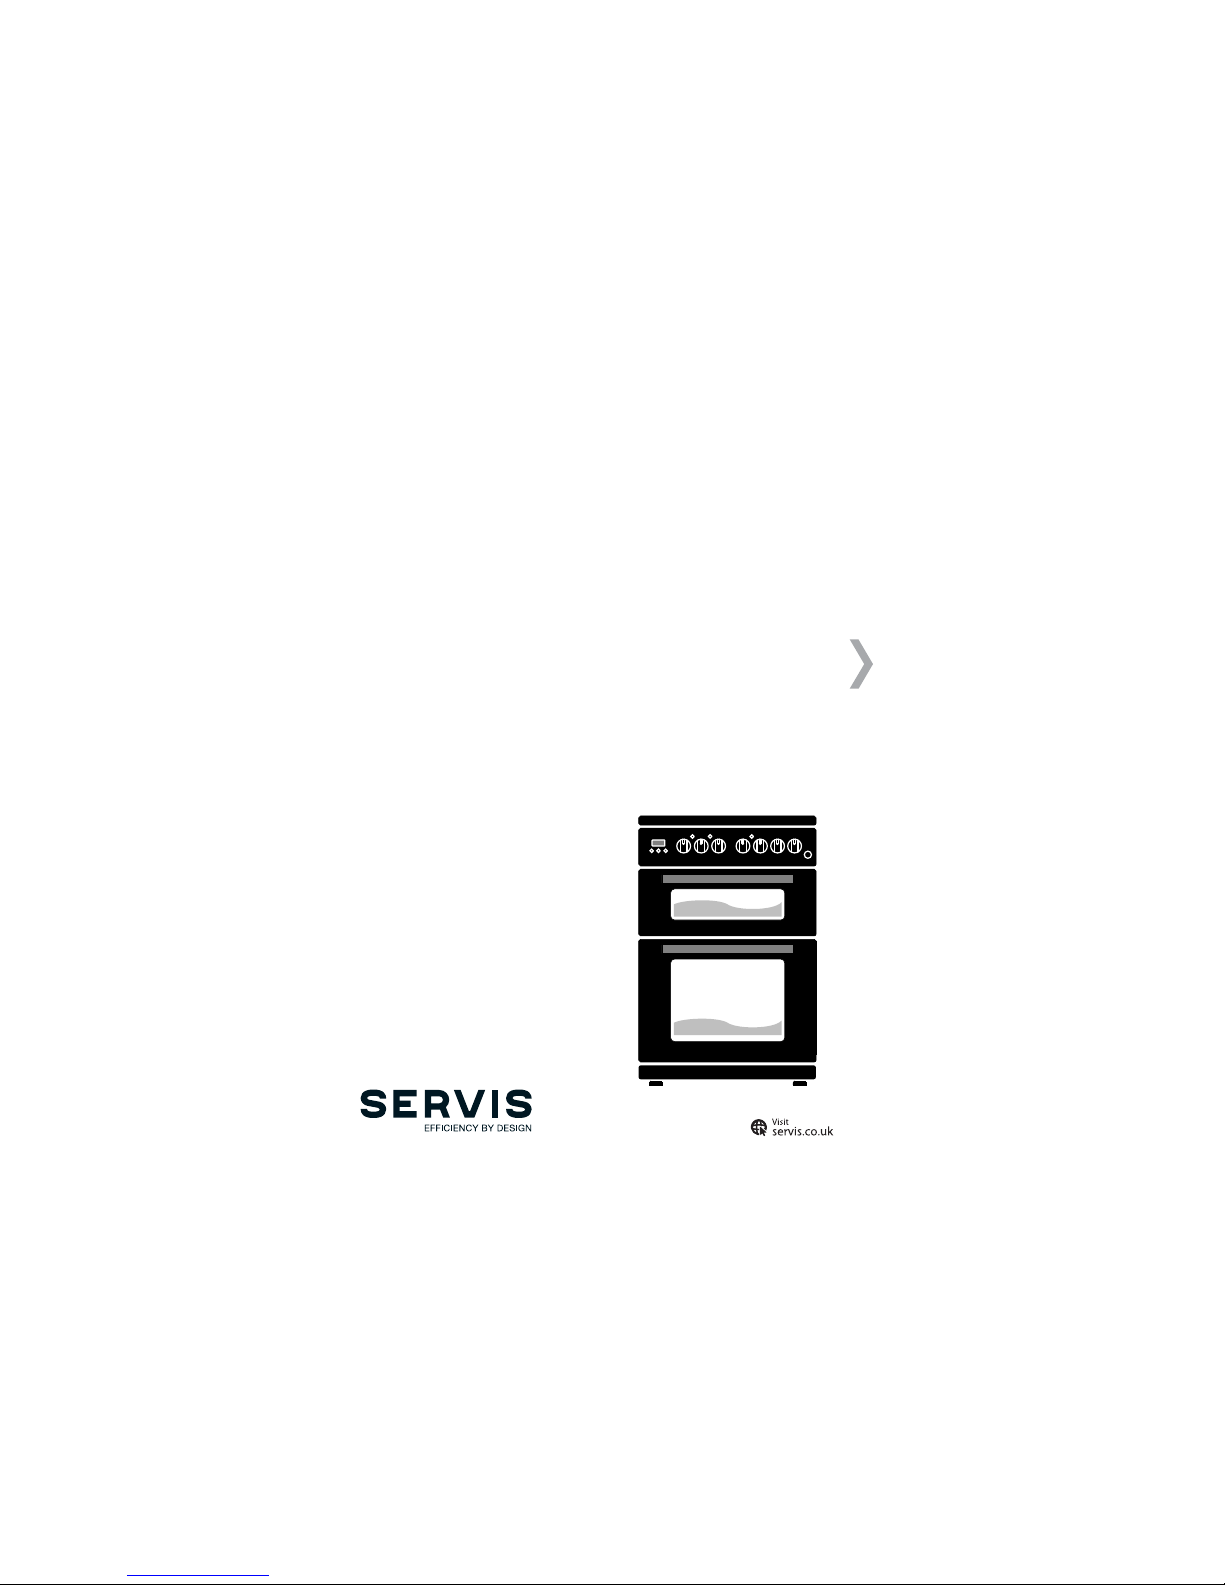
DUAL FUEL
COOKER
User Manual
Model Number: DD60W
Page 2
Contents
01 Welcome
02 Safety Instructions
07 Your Cooker
11 Technical Specifi cation
13 Installation
17 Usage
33 Cleaning and Care
37 Troubleshooting
39 Guarantee
41 Index
PARTS WARRANTY
2 YEAR
REGISTER TO
ACTIVATE YOUR
Your appliance comes with a free one year parts and labour warranty.
Register within 30 days of purchase to receive a free second year
parts warranty.
SERVIS.CO.UK 0333 577 7232
T: 0333 577 7232 T: 0333 577 7232
Page 3
01 02
T: 0333 577 7232 T: 0333 577 7232
WELCOME SAFETY INSTRUCTIONS
WELCOME
Thank you for choosing this Ser vis Dual Fuel Cooker, which has been designed and manufactured
to give you many years of trouble-free service.
You may already be familiar with using a similar product but please take time to read these
instructions, which have been written to ensure you get the very best from your purchase.
Servis provides you with a guarantee which will protect you should your Cooker develop a
fault during the guarantee period. To ensure that you get a prompt and efficient service, please
register your Cooker immediately.
You will find a warranty card included within the packaging. To register, complete the form, or:
Visit us at w ww.servis.co.uk
Call us on 0333 577 7232
WARRANTY
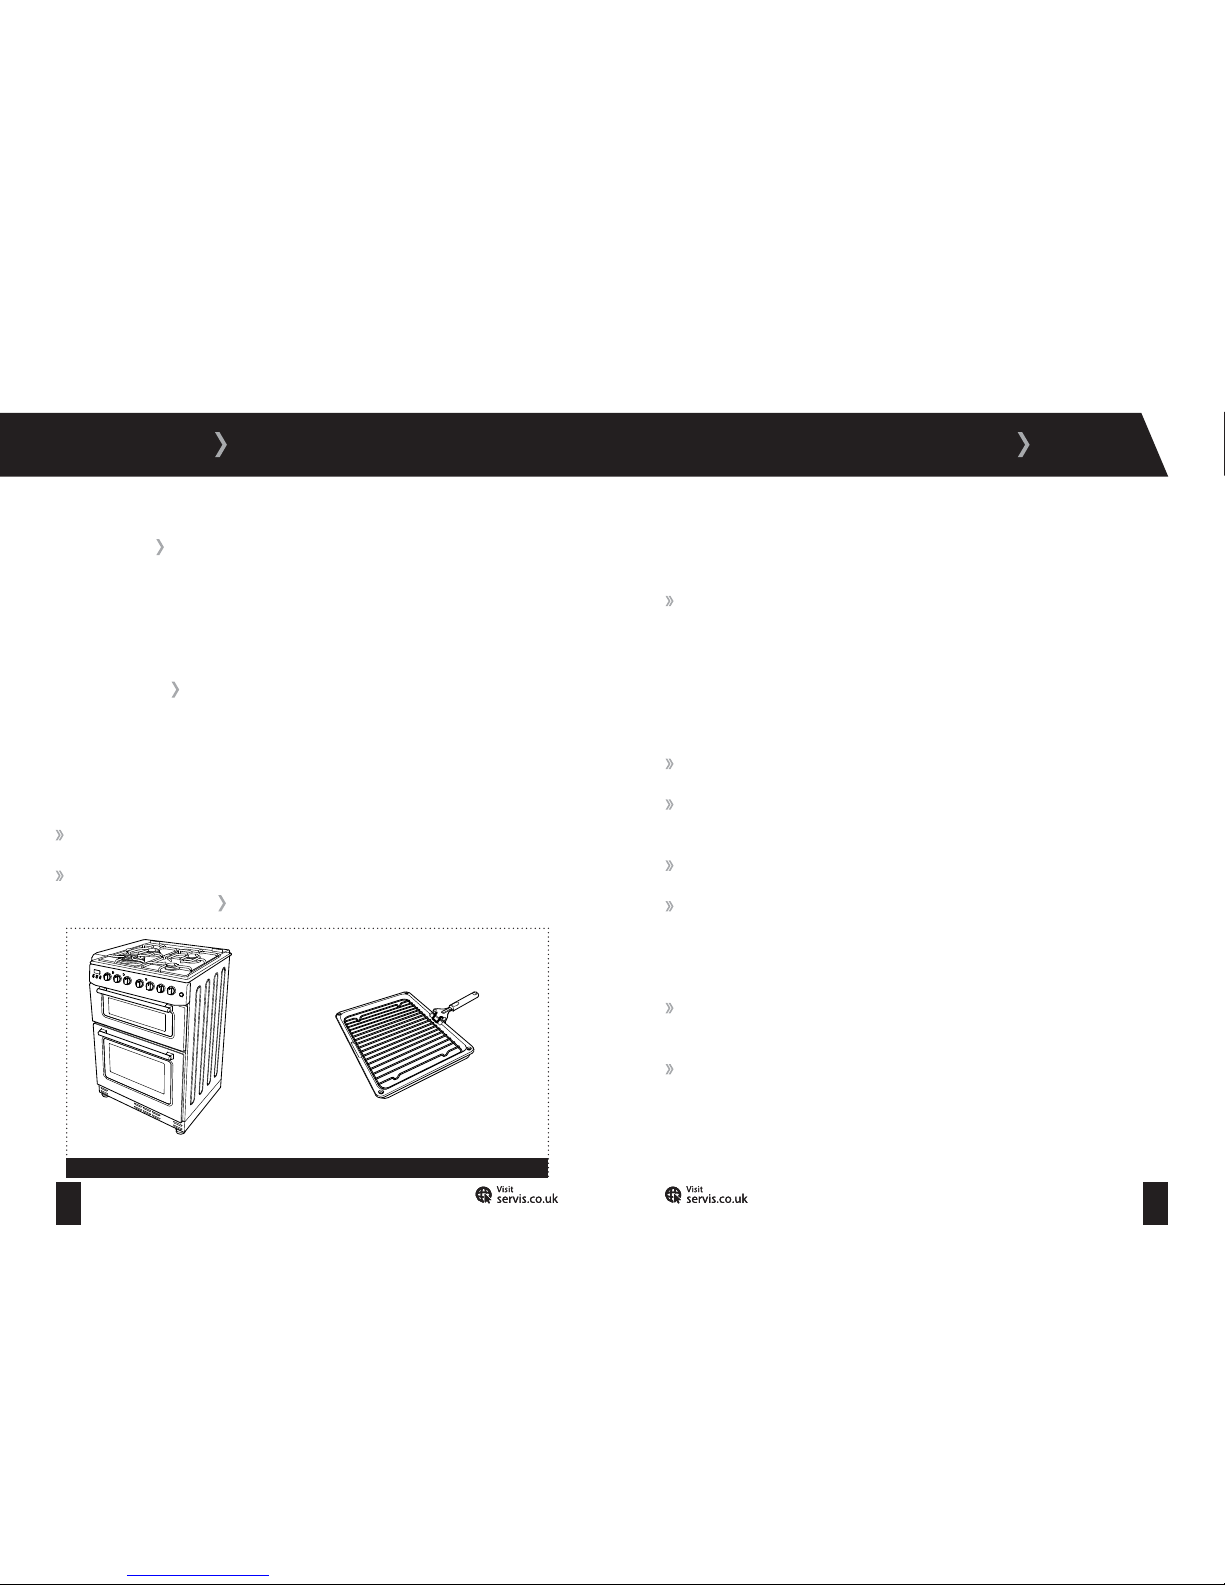
ITEMS INCLUDED
Cooker with Racks
Figure 1
Grill Pan and Handle
To ensure your safety and the safety of others, please read the
following safety precautions before you use your Cooker.
This appliance can be used by children aged from 8 years and above
and persons with reduced physical, sensory or mental capabilities or
lack of experience and knowledge if they have been given supervision
or instruction concerning use of the appliance in a safe way and
understand the hazards involved. Children shall not play with the
appliance. Cleaning and user maintenance shall not be made by
children without supervision.
To prevent the Cooker tipping the stabilising brackets must be fitted.
The Cooker will become hot in use. Allow the Cooker to fully cool
before touching any of its surfaces.
Handles may become hot in use.
Do not move away from the Cooker while cooking with fat or oil.
Flaring may occur in the case of overheating. Never pour water into
flaring oil, but switch off the Cooker and cover the flame with a lid or
fire blanket.
Do not operate the Cooker by means of an external timer or remote
control system.
Do not store items on the cooking surfaces as there is a danger of fire.
Page 4
03 04
T: 0333 577 7232 T: 0333 577 7232
SAFETY INSTRUCTIONS
Do not use harsh abrasive cleaners or sharp metal scrapers to
clean the oven doors. They can scratch the surface, damaging it and
increasing the possibility that it will crack or shatter.
If any surface is cracked or damaged, switch off the Cooker and
contact Servis.
Do not use steam cleaning appliances to clean the Cooker.
Disconnect your Cooker from the electrical supply and make sure the
gas is off before changing the lamp.
For models which incorporate a hob lid, clean any spillages off the lid
before using and allow the Cooker to cool before closing the lid.
Installation and Maintenance Safet y Advice
The Cooker must be installed and maintained by a suitably qualified gas registered technician
in accordance with current safet y legislation.
Unpack and examine your Cooker for any damage. If you think there is a defect, contact Servis.
Remove and dispose of all packaging responsibly, following local laws and regulations. Do not
leave packaging within the reach of children as it can be a source of danger.
Do not use the oven door handles to lift or move the Cooker.
Before installation, make sure the local distribution conditions (nature of the gas and gas
pressure) and the adjustment of the Cooker are compatible. The adjustment specifications are
shown on a label at the rear of the Cooker.
Before connecting your Cooker to the mains electrical supply, make sure the specifications on
the Cooker correspond with the specifications of the electricity and gas supplies.
If the power supply cable is damaged, contact Servis. T he cable must only be replaced by
authorised personnel.
Make sure that electrical cables from other devices cannot come into contact with the hot
parts of your Cooker.
Use the adjustable feet to make sure that your Cooker is stable and balanced before using for
the first time.
Gas appliances require regular air exchange to ensure trouble free per formance. Ensure that
the room in which the appliance is installed is well ventilated. Additional ventilation such as
the opening of a window may also be required.
The Cooker is not connected to a ventilation device. The openings and slots used for ventilation
and heat dispersion must not be covered.
When you first use your Oven you may notice a slight smell. This is perfectly normal and is
caused by the insulation materials on the heater elements. We suggest that before using
your Oven for the first time you leave it empt y, and set at maximum temperature for 45
minutes.
Your Cooker has been produced to conform with all relevant safety regulations relating to
electrical and gas appliances.
Do not make any alterations to your Cooker, unless authorised to do so by Servis.
Maintenance and repair work must only be carried out by authorised service technicians.
Installation and repair work per formed without following these instructions may be dangerous.
Page 5
05 06
T: 0333 577 7232 T: 0333 577 7232
SAFETY INSTRUCTIONS
General Safety Advice
Protect your Cooker from atmospheric effects such as rain, snow, sun and dust.
Your Cooker has been designed for non-professional domestic use only. The Cooker is designed
for indoor use only.
Do not use the Cooker to heat a room.
If you have small children make sure you do not allow pan handles to project over the edge
of the cooker top. If you do they may be able to pull the pans down and spill the contents on
themselves.
Only use flat-bottomed pans with thick bases.
Make sure the bottom of the pan is dry before placing it on the burners.
Always use oven gloves when removing or replacing food in the ovens.
The trays incline when pulled out. Take care not to spill or drop hot food when removing it from
the ovens.
Switch off the mains switch and gas supply when the Cooker is not in use.
The Cooker will not operate unless the appropriate oven and burner switches are adjusted.
While using the grill burner, keep the top oven door open. Do not use the grill burner with the
oven door closed.
While using the Top Oven as an oven, keep the door closed.
Do not keep flammable materials close to the Cooker when it is in operation.
Do not place anything on the oven door when it is open. This could disrupt the balance of the
oven or damage the door.
Do not place cutlery or pan lids on the hob as they may get hot and cause burns.
Make sure that your Cooker is turned off at the mains before carrying out any cleaning or
maintenance.
Do not remove the control knobs w hen cleaning the control panel.
Gas Safety
If you smell gas or suspect a gas leak, open the windows to ventilate the room and contact a
registered gas engineer.
CE Declaration of Confor mity
Your Cooker has been designed to be used only for cooking. Any other use (such as heating a room)
is improper and dangerous.
Your Cooker has been designed, constructed and marketed in compliance with:
Safety requirements of the ‘Gas’ Directive 2009/142/EC.
Safety requirements of the ‘Low voltage’ Directive 2006/95/EC.
Safety requirements of the ‘EMC’ Directive 2004/108/EC
Requirements of the Directive 93/68/EC.
Page 6
07 08
T: 0333 577 7232 T: 0333 577 7232
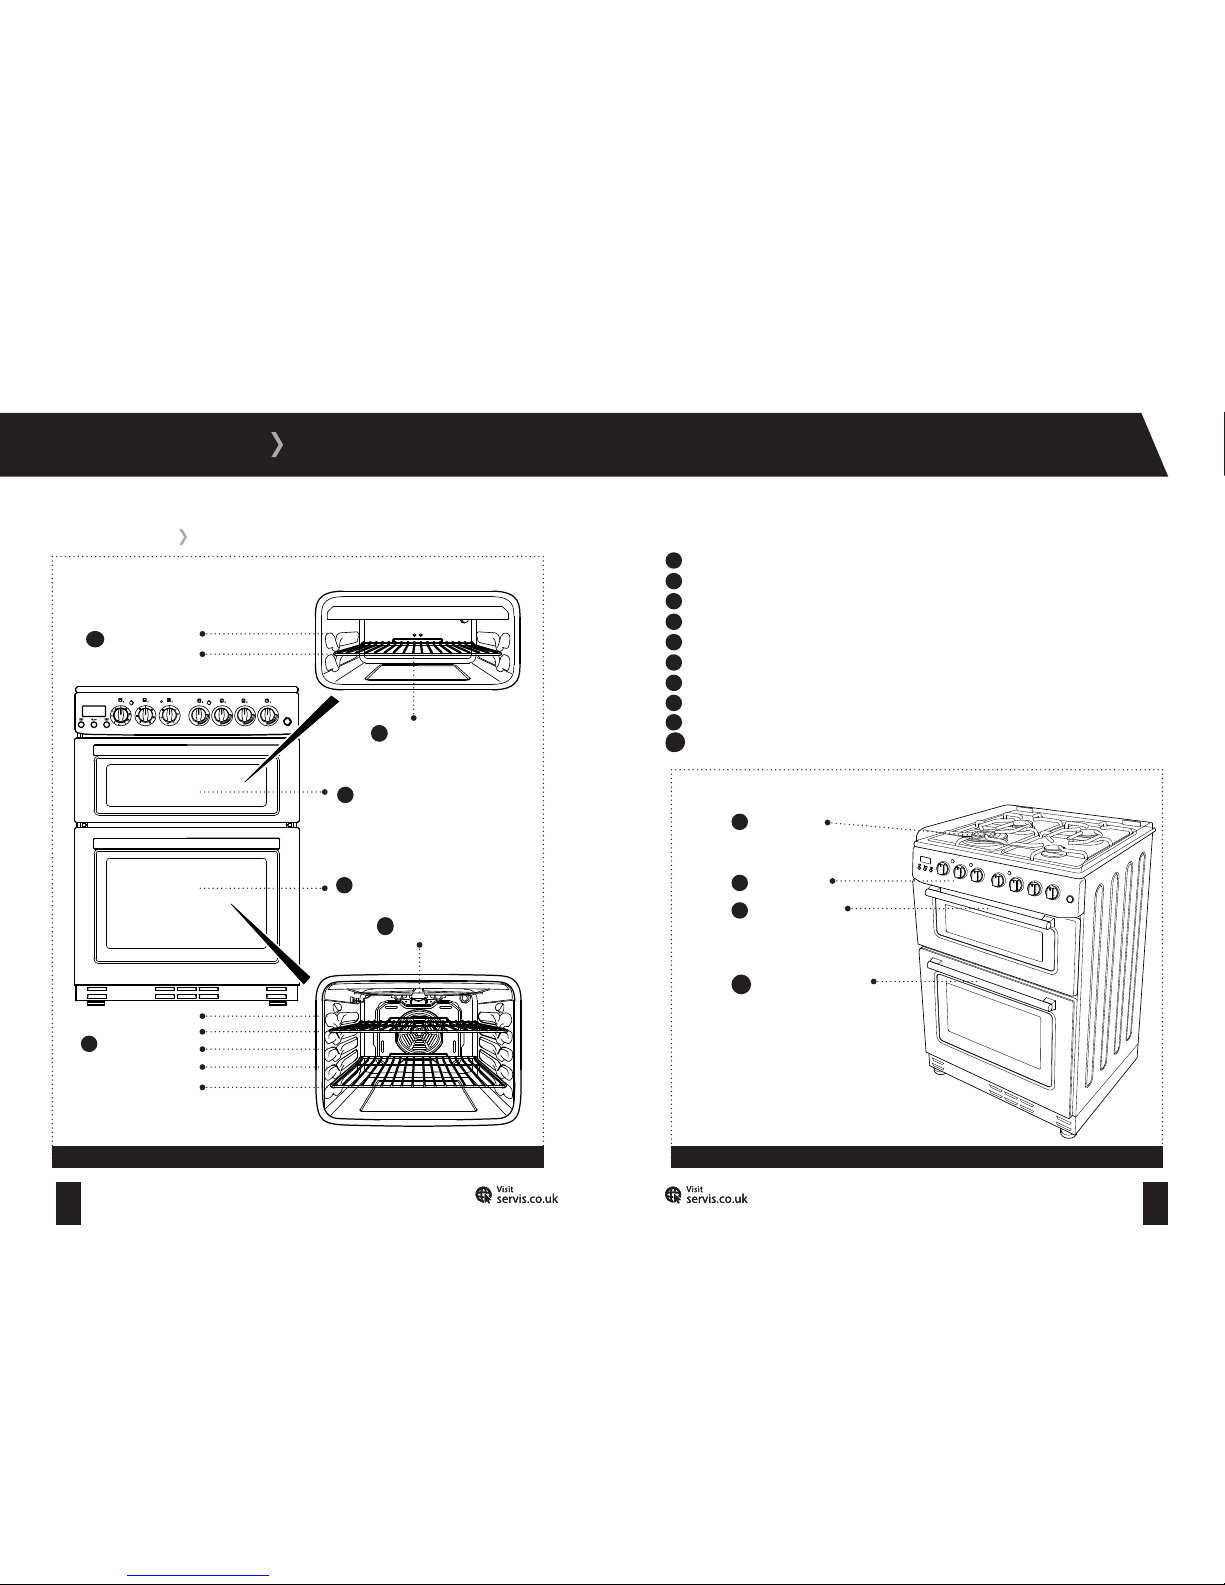
YOUR COOKER
5
2
FRONT VIEW
Figure 2
1
Rack Positions; available rack positions for the Top Oven
2
Oven Rack
3
Top Oven (see page 21)
4
Main Oven (see page 24)
5
Oven Lamp
6
Rack Positions; available rack positions for the Main Oven
7
Gas Burners (see page 19)
8
Control Panel: allows you to adjust the different settings (see page 17)
9
Top Oven Handle
9
Main Oven Handle
10
1
3
8
4
Figure 3
Rack Position 1
Rack Position 2
Rack Position 3
Rack Position 4
Rack Position 5
Oven Lamp
Main Oven
Top Ov en
Oven Rack
Rack Position 1
Rack Position 2
Control Panel
Top Oven Handle
Main Oven Handle
6
Gas Burners
7
10
2
5
9
Page 7
09 10
T: 0333 577 7232 T: 0333 577 7232
YOUR COOKER
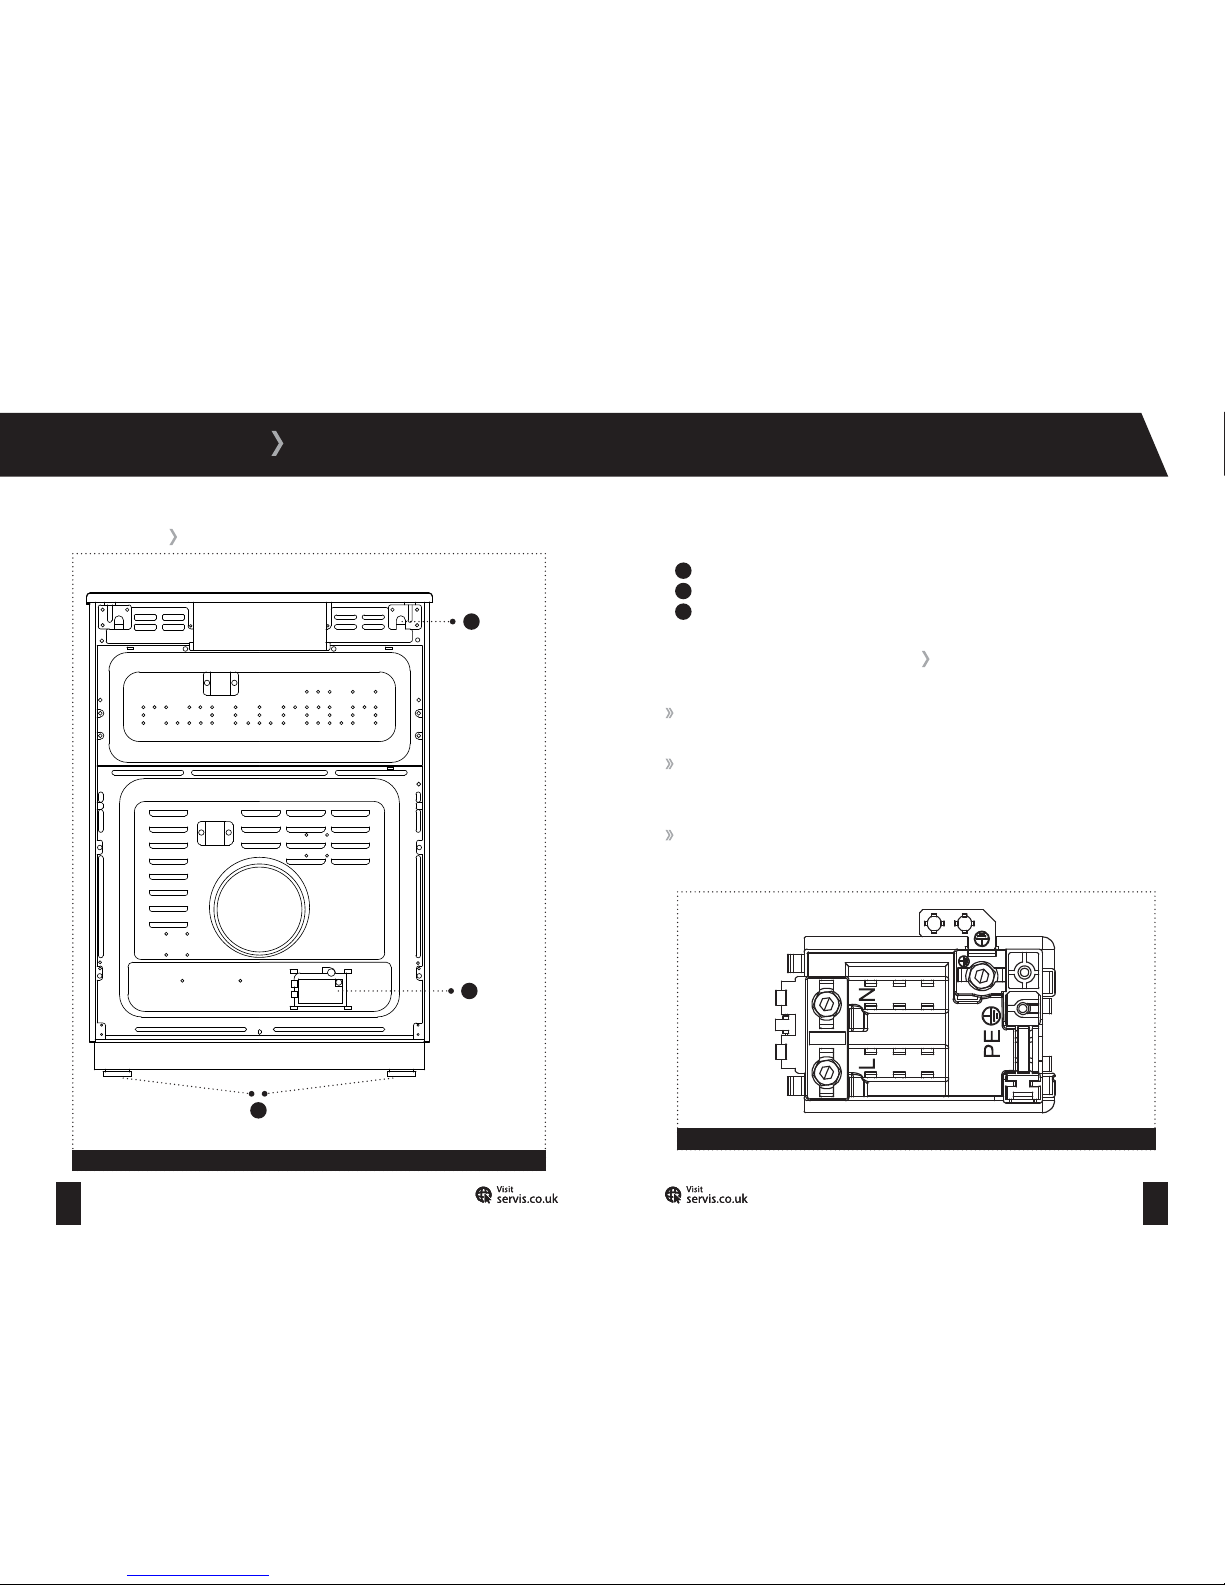
REAR VIEW
Figure 4
1
Gas Connection; connect your Oven to the gas supply.
2
Electrical Connection Terminals; connect your Oven to the mains supply.
3
Adjustable feet; allow you to level your Oven.
ELECTRICAL INFORMATION
Your Oven requires a 220 -240V, 50Hz mains supply. Do not use any other supply.
Please remember that your
Oven must be installed and maintained only by a suitably qualified
technician in accordance with current safety legislation
.
This appliance must be ear thed. For this connection, Twin and Ear th 6242Y type cable
should be used. See Figure 5 for the connection diagram.
Electrical
Connection
Ter min als
Adjustable
feet (2 of 4)
Gas
Connection
1
3
2
Figure 5
Page 8
11 12
T: 0333 577 7232 T: 0333 577 7232
TECHNICAL SPECIFICATION
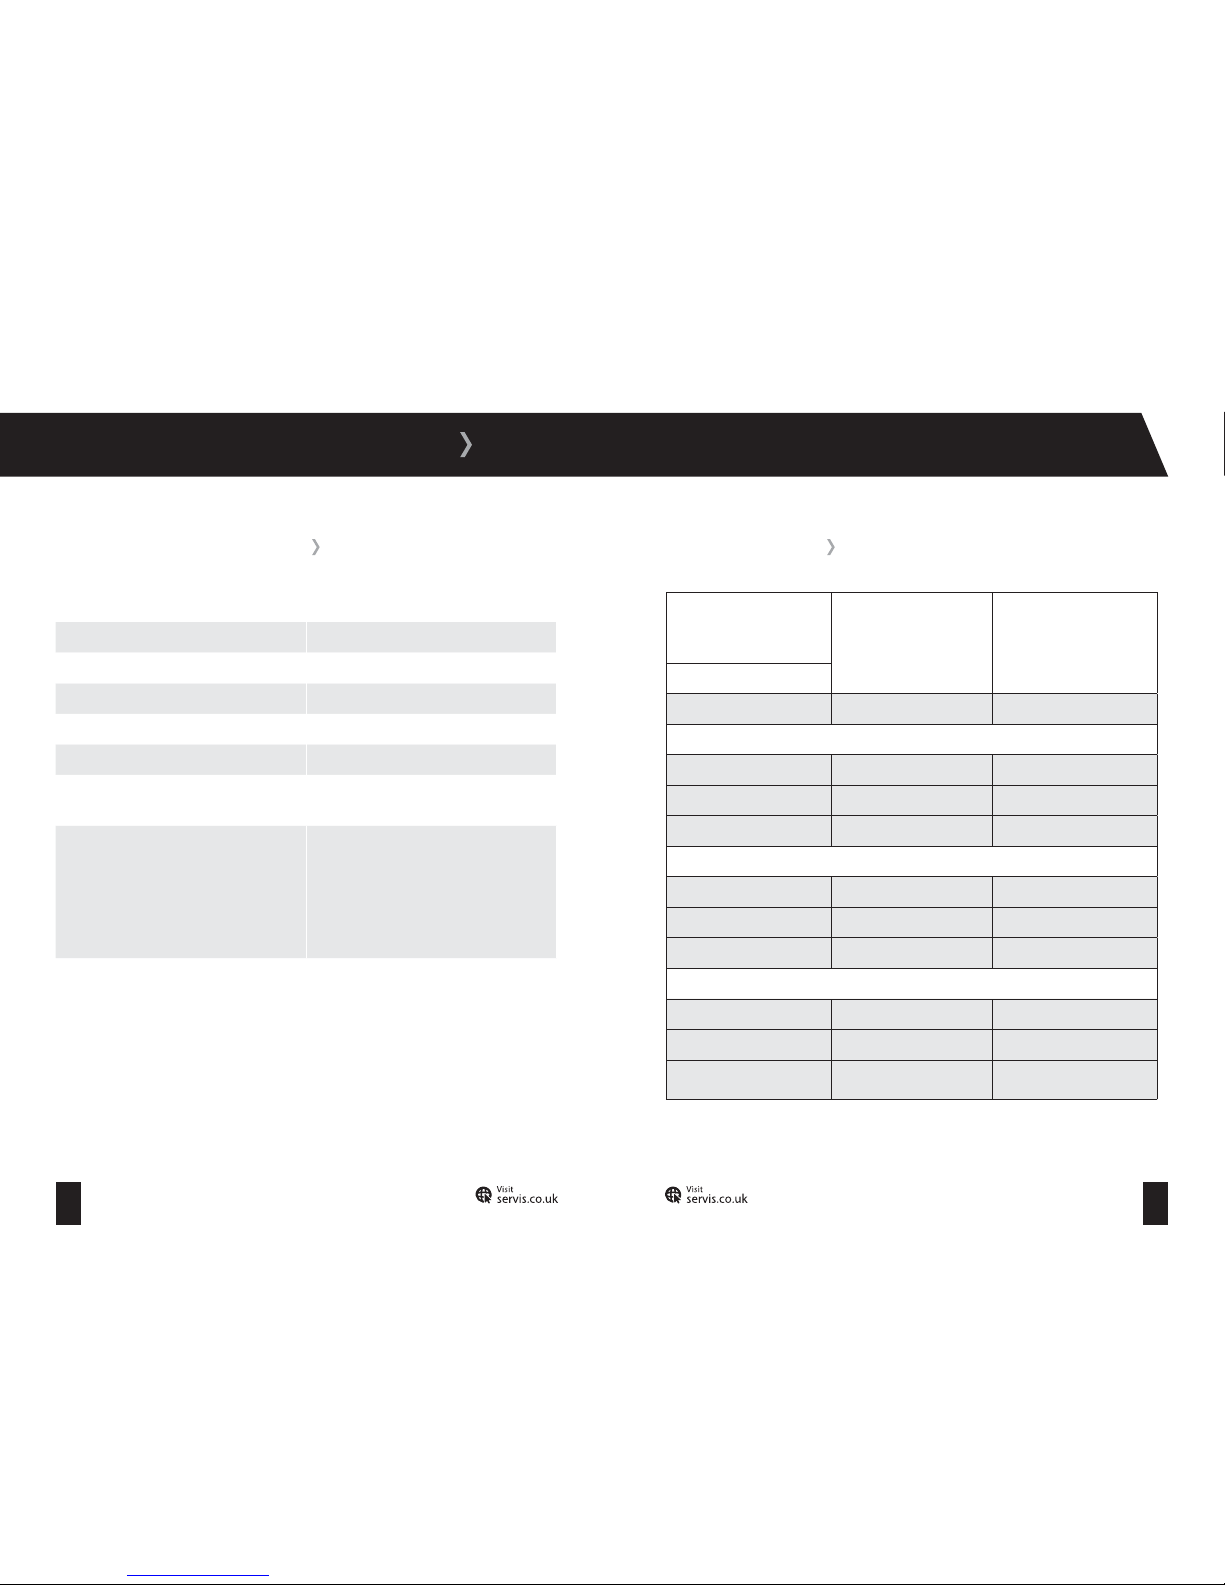
TECHNICAL SPECIFICATION
Model Number DD60W
Power Supply 220-240 V AC, 50Hz
Maximum Power (W) 4600 W
Size (H x W x D) (mm) 900 x 600 x 600
Oven Volume (Main Oven / Top Oven) 56lt / 35lt
Electric Cooker Energy Rating
(Main Oven /Top Oven)
A / B
Energy Consumption Main Oven;
Conventional: 0.88 kWh
Fan Air Convection: 0.79 kWh
Top Ov en:
Conventional: 0.85 kWh
INJECTOR TABLE
Tot al Consu mption:
G30 28~30 mbar 7.5 kW
545 g/h
NG LPG
Gas Category: II2H3+
Destination: GB Class:1 G20 20 mbar G30/G31 28-30/37 mbar
Large Burner
DIA. of Injector (1/100mm) 115 85
Nominal Rating (kW) 3 3
Consumption 285.7 lt/h 218.1 gr/h
Medium Burners
DIA. of Injector (1/100mm) 97 65
Nomin al Rating (kW) 1.75 1.75
Consumption 166.7 lt/h 127.2 gr/h
Small Burner
DIA. of Injector (1/100mm) 72 50
Nominal Rating (kW) 1 1
Consumption 95.2 lt/h 72.7 gr/h
Page 9
13 14
T: 0333 577 7232 T: 0333 577 7232
INSTALLATION
INSTALLATION REQUIREMENTS
Before unpacking and manoeuvring your Cooker, please take the time to read and become
familiar with the following points:
To avoid risk of injury, please take care when moving your Cooker. It is heavy and we
recommend that a minimum of two people move the Cooker.
To unpack the Cooker and manoeuvre it into position, one person should hold it by the front
feet and the other person at the edge of the lid at the rear. Do not use the oven door handles
to lift or move the Cooker.
Unpack and examine your Cooker for any damage. If you think there is a defect, contact Servis.
Remove and dispose of all packaging responsibly, following local laws and regulations. Do not
leave packaging within the reach of children as it can be a source of danger.
Please be aware of the following safety points when installing your Cooker:
Your Cooker is 600 mm wide. Ensure that the installation area can accommodate the Cooker
and allow sufficient ventilation.
Ensure that there are no combustible or flammable materials such as curtains or cushions in
the vicinity of the installation.
Cabinets and furniture surrounding your Cooker must be of material resistant to
temperatures greater than 1000C.
Make sure that electrical cables from other devices cannot come into contact with the hot
parts of your Cooker.
Ensure that there is at least a 20 mm gap between the back wall and the rear of your
Cooker. This is to allow ventilation and provide suf ficient air circulation.
Do not cover or block the openings and slots on the Cooker used for ventilation and heat
dispersion.
If a cooker hood is to be used, it must be at a height of at least 65 cm from the Oven top. In
the absence of a cooker hood there must be at least 70 cm clearance from the Oven top.
STABILISING THE COOKER
For safe operation, it is important that your Cooker is stable and balanced. To prevent the Cooker
tipping when in use the stabilising brackets must be fitted. See the instructions with the anti-tilting
kit.
Page 10
15 16
T: 0333 577 7232 T: 0333 577 7232
INSTALLATION
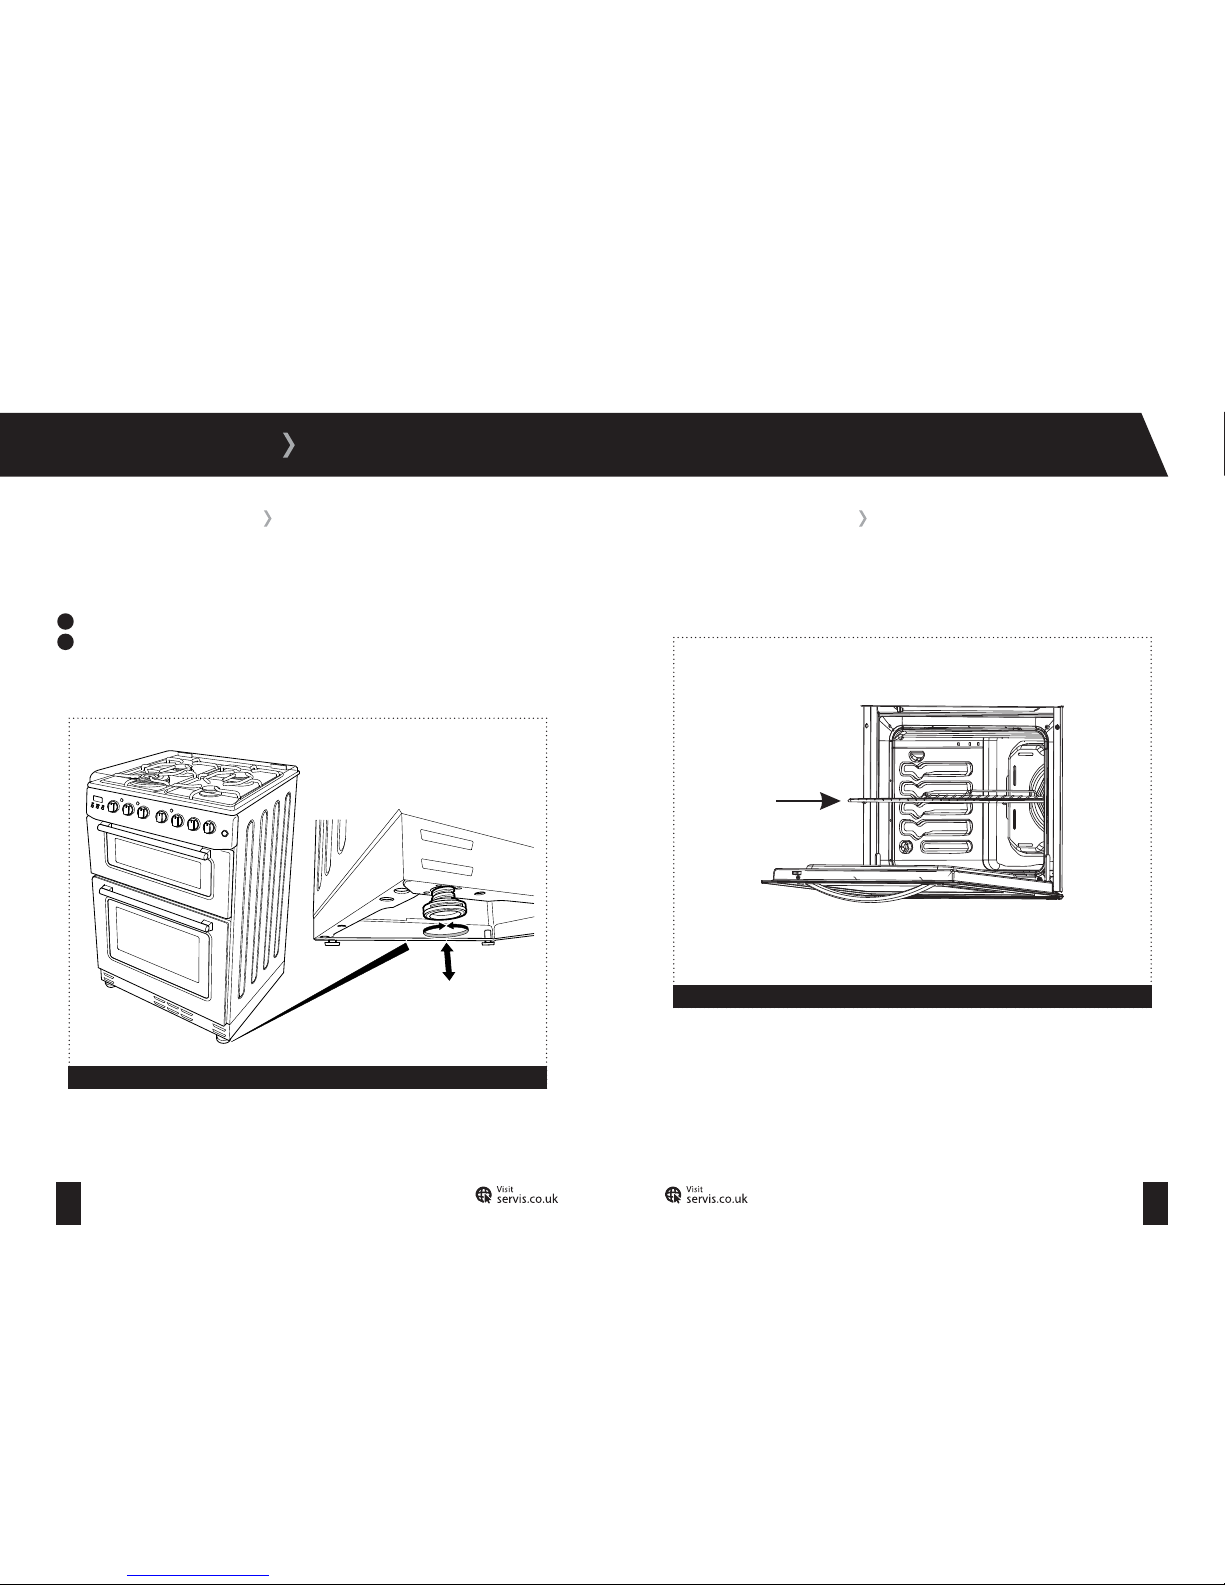
FITTING THE RACKS
For safe operation, fit the racks correctly in your Cooker. Insert the rack into a corresponding slot
in the sides of the oven and push it to the end (Figure 7).
Figure 7
ADJUSTING THE FEET
For safe operation, it is important that your Cooker is stable and balanced. The four adjustable
feet are used to level your Cooker. Make sure that your Cooker is level prior to cooking.
1
To increase the height of the Cooker, turn the feet anti-clockwise (Figure 6).
2
To decrease the height of the Cooker, turn the clock wise (Figure 6).
Figure 6
Page 11
17 18
T: 0333 577 7232 T: 0333 577 7232
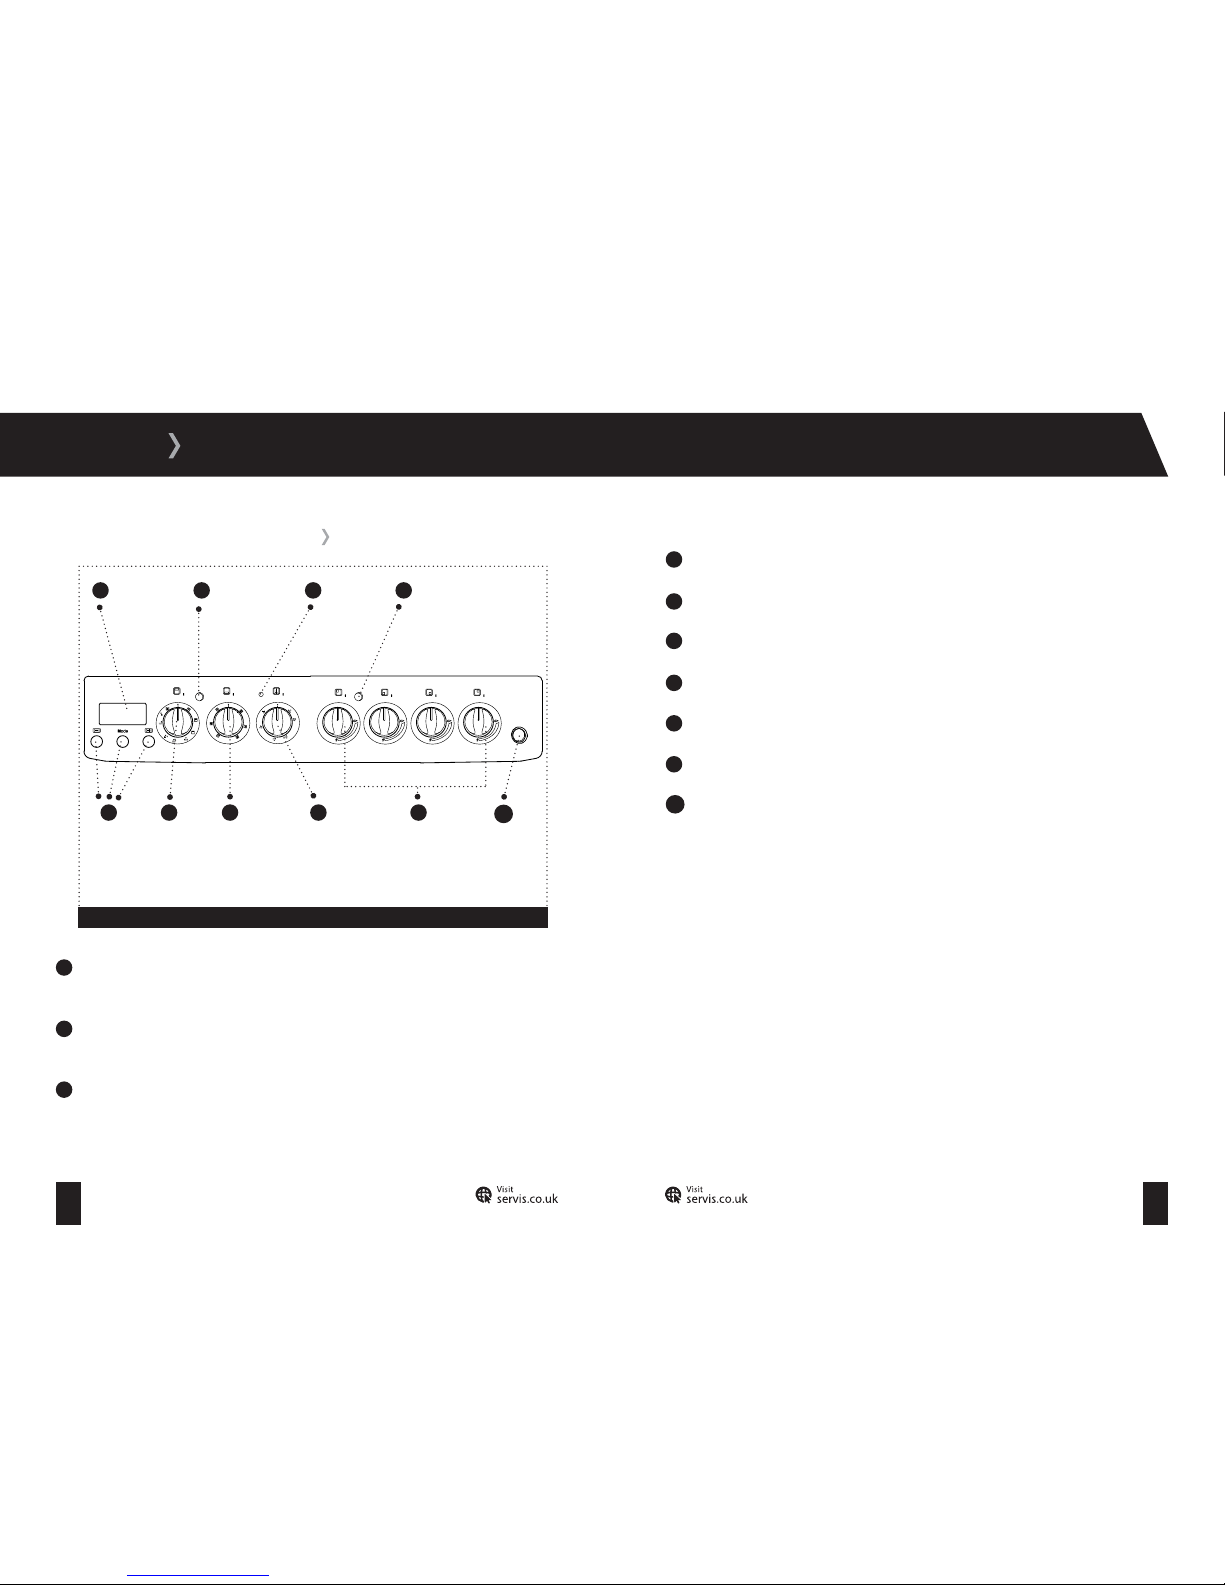
1
Digital Clock; displays the current time and can act as a timer to assist with meal
preparation. See page 27.
2
Top Oven Thermostat Light; when illuminated, indicates that the top oven has not yet
reached the set temperature.
3
Main Oven Thermostat Light; when illuminated, indicates that the main oven has not yet
reached the set temperature.
CONTROL PANEL OVERVIEW
Figure 8
USAGE
1
6
2
7
3
8
4
Digital
Clock
Top Ov en
Control
Knob
Main Oven
Control
Knob
Main Oven
Thermostat
Knob
Burner Control
Knobs
Burner
Warning
Light
Top Ov en
Thermostat
Light
Main Oven
Thermostat
Light
4
Burners Warning Light; when illuminated, indicates that a burner is still warm.
5
Timer Buttons (+, - and Mode); used to set timer and programme settings. See page 27.
6
Top Oven Control Knob; used to select cooking settings for the top oven. See page 21.
7
Main Oven Control Knob; used to select cooking settings for the main oven. See page 24.
8
Temperature Control Knob; used to adjust the temperature of the selected cooking setting.
9
Burner Control Knobs; allow you adjust each Burner individually. See page 19.
10
Main Oven Light Button; turns the main oven light on or off.
5
Timer
Buttons
10
Main Oven
Light Button
9
Page 12
19 20
T: 0333 577 7232 T: 0333 577 7232
USAGE
Please take note of the following safety advice:
Gas Burners: Your hob is equipped with a flame failure device to provide securit y in the
case of accidently extinguished flames. If such a case occurs, the device will block the
burners gas channels to avoid an accumulation of unburned gas. Wait 90 seconds before
re-igniting an extinguished gas burner.
To ignite a gas burner:
Push in the knob of the burner you wish to ignite and keep it pressed while turning anti-
clockwise until the knob is in the ‘max’ position. Continue pressing the knob until you see a
stable flame on the burner.
The position symbol above each control knob determines the burner that the knob controls:
‘off’ (0), ‘min’ (small flame symbol) and ‘max’ (large flame symbol).
After you ignite the burner in the ‘max’ position you can adjust the flame length bet ween
the ‘max’ and ‘min’ positions by turning the Control Knob clock wise or anti-clockwise. Do
not operate the burners when the gas burner knob position is bet ween the ‘max’ and ‘off’
positions.
After ignition visually check the flames. If you see a yellow tip, lifted or unstable flames,
turn the gas flow off, then check the assembly of burner caps and crowns once they have
cooled. Make sure there in no liquid in the burner cups.
If the burner flames go out accidently, turn the burners off, ventilate the kitchen with fresh
air and wait at least 90 seconds before attempting re-ignition.
To turn the gas burners off:
Turn the gas burners knob clockwise so that the gas burners knob shows the off position or
the marker on the gas burners knob points upwards.
Your hob has burners of different diameters. You will find that the most economical way of using
gas is to choose the correct size gas burner for your cooking pan size and to bring the flame to the
minimum position once the boiling point is reached. We recommend that you always cover your
cooking pan.
To obtain maximum performance from the main burners, we suggest you use pots with the
following flat bottom diameters. Using pots smaller than the minimum dimensions shown below
will cause energy loss.
Rapid Burner: 22-26 cm
Medium Burner: 14-22 cm
Auxiliary Burner: 12-18 cm
Please note the following safety advice when using the gas burners:
Only use pans that have been designed for use with gas hobs.
Make sure that the tips of the flames do not spread out from the outer circumference of the
pan as this may harm the plastic accessories, such as handles.
Ensure that the base of the pan is dry before placing it on the burners.
After use, the hob remains ver y hot for a prolonged period of time. Do not touch it and do
not place any object on top of it.
Any items placed on the hob will get hot and may cause serious burns if touched.
USING THE GAS BURNERS
Page 13
21 22
T: 0333 577 7232 T: 0333 577 7232
USAGE
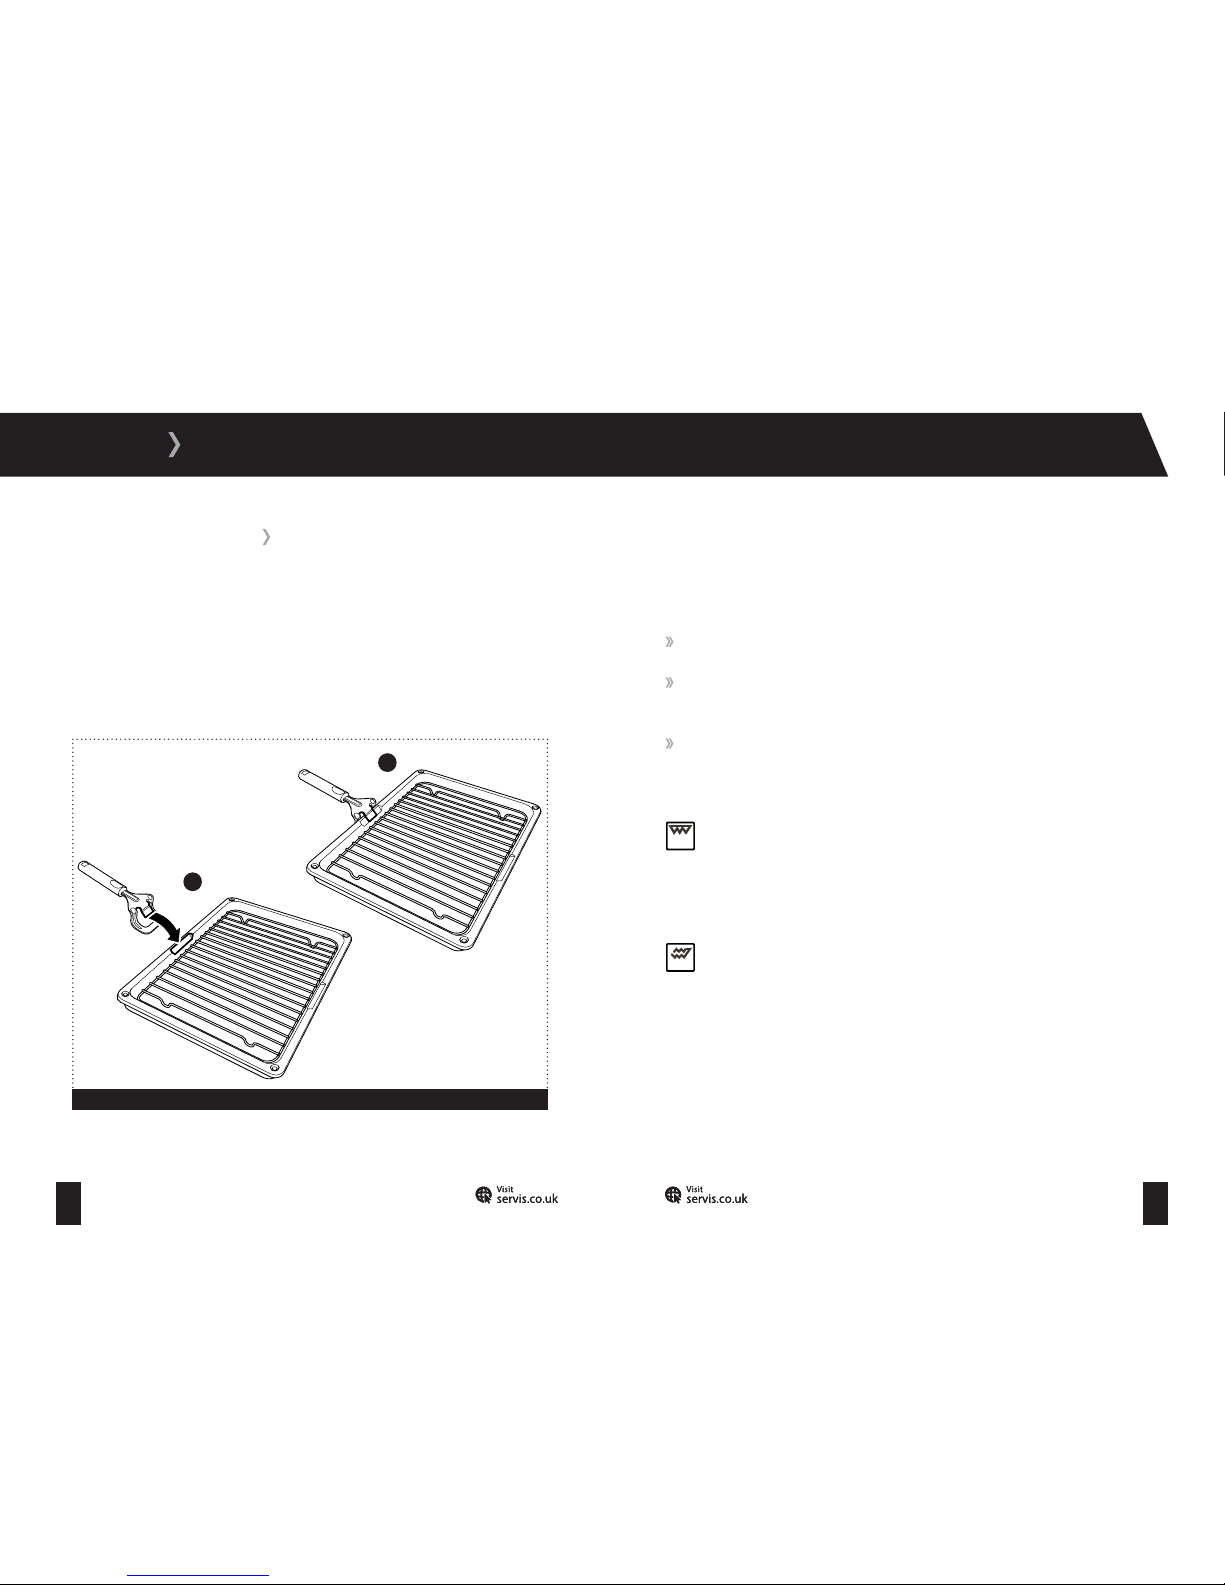
Using the Grill Pan:
The Grill Pan has a detachable handle. When using the Grill Pan Handle, make sure that it is
centralised and secure as shown in Figure 9.
Do not leave the handle in position when grilling as it will become very hot.
Using the Top Oven:
The Top Oven control knob allows you to select a set ting suitable for your cooking needs. To
make a selection:
Turn the top oven knob, until the desired setting is selected.
When the temperature inside the top oven reaches the set value, the thermostat will switch
off the heating element and the thermostat light will go off.
Please ensure that the top oven control knob is in the of f position after use.
The available settings are as follows:
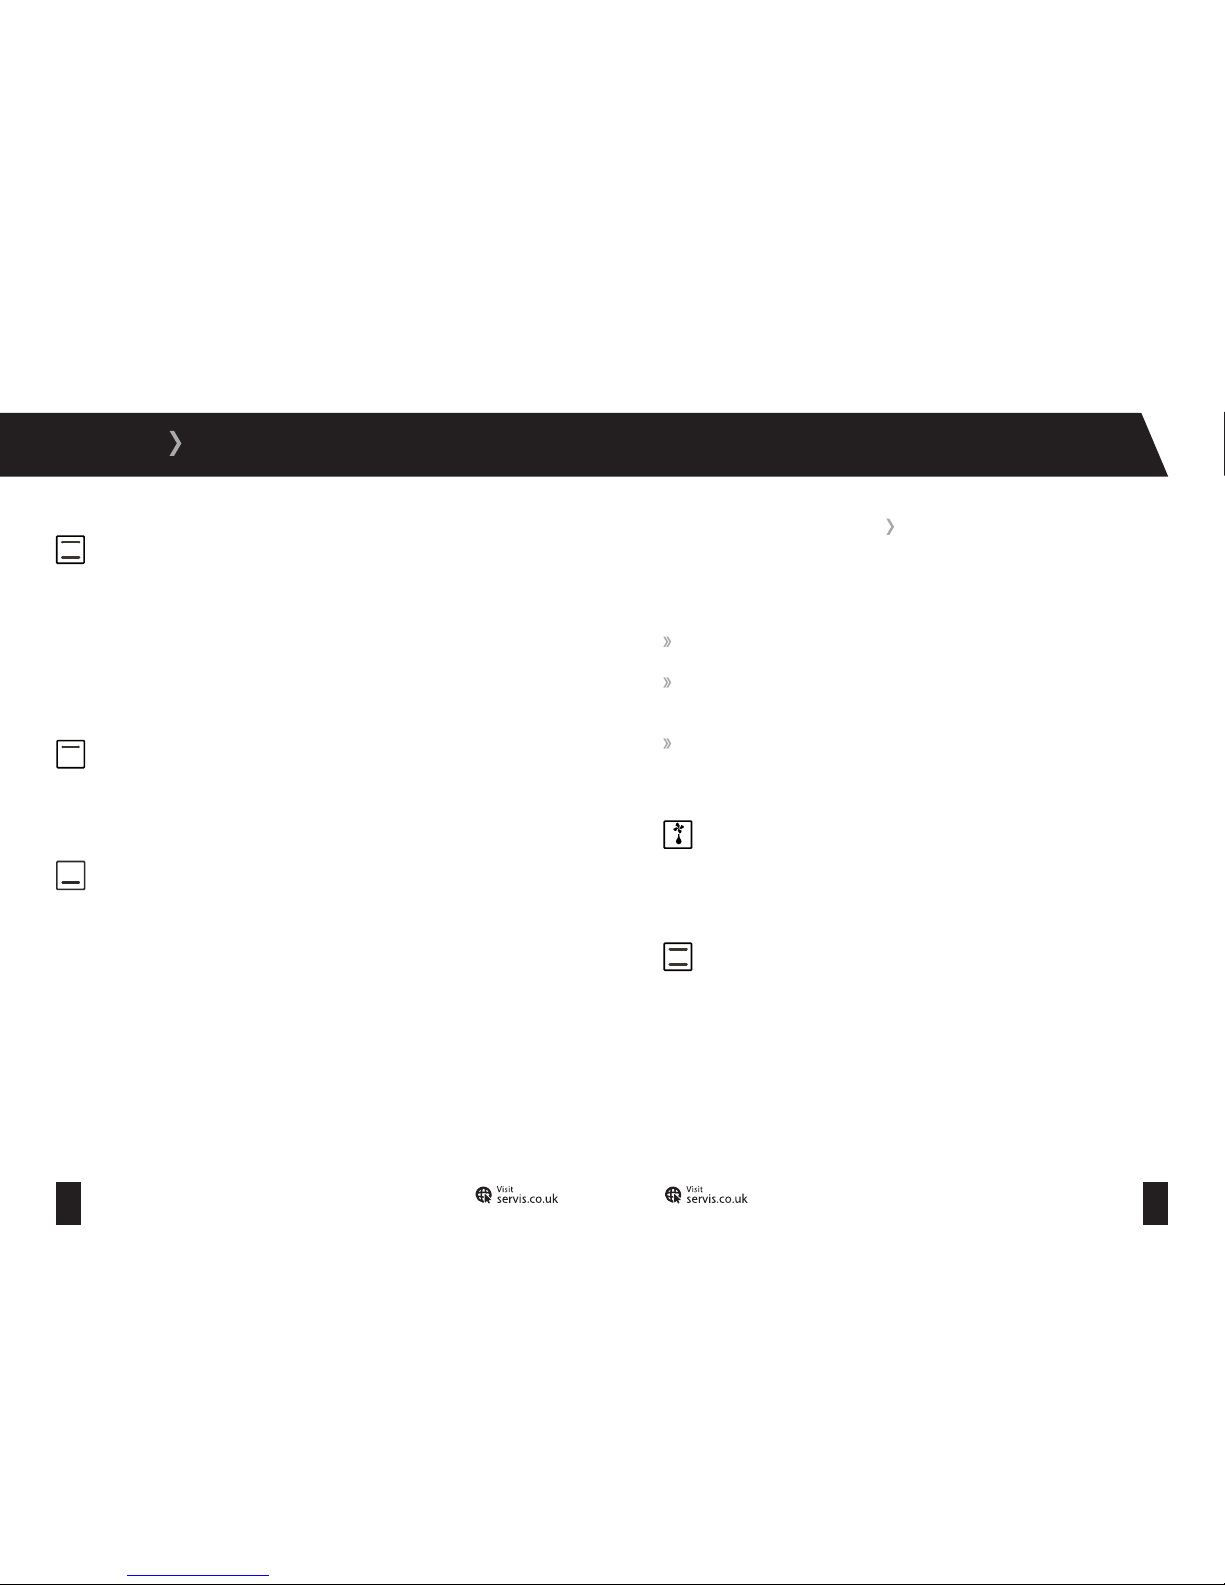
Grill: Use this setting for grilling. When grilling please use the Grill Pan and Handle set
provided and always remove the Grill Pan by using the handle.
The top oven door must always be open when grilling.
Double Grilling: This setting is intended for wider area grilling. When grilling please use
the Grill Pan and Handle set provided and always remove the Grill Pan by using the handle.
The top oven door must always be open when grilling.
Figure 9
b
a
USING THE TOP OVEN
Page 14
23 24
T: 0333 577 7232 T: 0333 577 7232
USAGE
Top and Bottom Heating: With this setting, the heat generated by the upper and lower
heating elements ensures that your food is cooked evenly, top and bottom.
When using this setting we recommend that you pre-heat the top oven for 10 minutes. You will
find this setting ideal for cooking cakes, flans, spaghet ti, lasagne and pizza. Please refer to the
table on page 32 for further information.
The top oven door must always be closed when using this setting.
Top Heating: Select this set ting for browning the upper side of food that has already
been cooked or for heating pre-cooked food.
The top oven door must always be closed when using this setting.
Bottom Heating: Select this setting for heating pre-cooked food.
The top oven door must always be closed when using this setting.
If you use the top oven after you have used the main oven, turn the main oven off, open the
main oven door and wait 5 minutes until the main oven has cooled down. If the main oven is not
allowed to cool down, it may af fect the temperature and cooking profile of the top oven.
USING THE MAIN OVEN
The main oven control knob allows you to select a setting suitable for your cooking needs. To
make a selection:
Turn the main oven control knob, until the desired set ting is selected.
When the temperature inside the main oven reaches the set value, the thermostat will
switch off the heating element and the thermostat light will go off.
Please ensure that the main oven control knob is in the off position after use.
The available settings are as follows:
Defrost: This setting is intended to defrost your food in a shor t period of time. Place the
food to be defrosted a rack in the third position (see Figure 2 for information on rack positions). We
also recommend placing a tray on the bottom rack to collect any water formed during the defrosting
process.
Top and Bottom Heating: With this setting, the heat generated by the upper and lower
heating elements ensures that your food is cooked evenly, top and bottom.
When using this setting we recommend that you pre-heat the Main Oven for 10 minutes. You will
find this setting ideal for cooking cakes, flans, spaghetti, lasagne and pizza. Please refer to the table
on page 32 for fur ther information.
Page 15
25 26
T: 0333 577 7232 T: 0333 577 7232
USAGE
Main Oven Thermostat Knob
The Main Oven Thermostat Knob allows you to set the desired temperature for a selected
cooking setting. To adjust the temperature:
Turn the Main Oven Thermostat Knob until the desired temperature is selected.
The light above the Main Oven Thermostat Knob will illuminate when a temperature has
been selected.
Please ensure the Main Oven Thermostat Knob is in the off position after use.
Fan and Circular Heating: This setting spreads hot air equally throughout the oven and
is appropriate for cooking with one or more trays. When using this setting, pre-heat the oven for
10 minutes.
Please bear in mind that when cooking with more than one tray additional cooking time will
be required and that each tray may not necessarily cook at the same rate. We recommend
alternating the position of the trays to achieve an even cooking time.
Top and Bottom Heating with Fan: When this set ting is selected, the hot air generated
by the upper and lower heating elements is circulated by the oven fan. We recommend preheating the main oven for 10 minutes when using this setting.
This setting is best suited for single tray cooking and cooking pastries. Please refer to the
cooking chart on page 32 for further information on the best use of your oven.
Grill: Use this setting for grilling. When grilling please use the Grill Pan and Handle set
provided and always remove the Grill Pan by using the handle.
The main oven door must always be open when grilling.
Grill with Fan: Use this setting for roasting and grilling at the same time.
The main oven door must always be closed when using this setting.
Page 16
27 28
T: 0333 577 7232 T: 0333 577 7232
USAGE
Setting the Timer:
The Digital Clock can be used as a timer to assist with your cooking preparations. At the end of
the timer period an alarm is sounded. The timer can be set for any period up to a maximum of 23
hours and 59 minutes.
To set the timer:
Press the Mode but ton below the Digital Clock display. The display will flash.
Set the desired time using the + and - buttons. When the buttons have not been pressed for
a few seconds, the time will be set. The symbol will be displayed and the timer will begin
counting down.
At the end of the selected time period, your Cooker will produce an audible beep but
continue carrying out the selected cooking setting. Turn all knobs to the off position to turn
the Oven off. To silence the timer, press one of the buttons below the Digital Clock display.
To change the tone of the audible beep:
While the current time is displayed, press and hold the - button until you hear an audible
beep. Press the - button again to cycle through the three available options. Once you have
selected the desired tone wait for the display to return to the current time setting.
Your Cooker includes a clock and timer which can be used to programme the Cooker to operate at
set times.
Setting the Clock:
When you first set up the Cooker, the Digital Clock display will flash (this will also occur after a
power cut). Before you can programme your Cooker or use the oven, you must set the clock. To set
the clock:
Simultaneously press the + and - buttons below the Digital Clock display until the dot in the
centre of the display starts to flash.
Set the correct time using the + and - buttons. When the buttons have not been pressed for
a few seconds, the time will be set.
PROGRAMMABLE FUNCTIONS
Figure 10
Page 17
29 30
T: 0333 577 7232 T: 0333 577 7232
USAGE
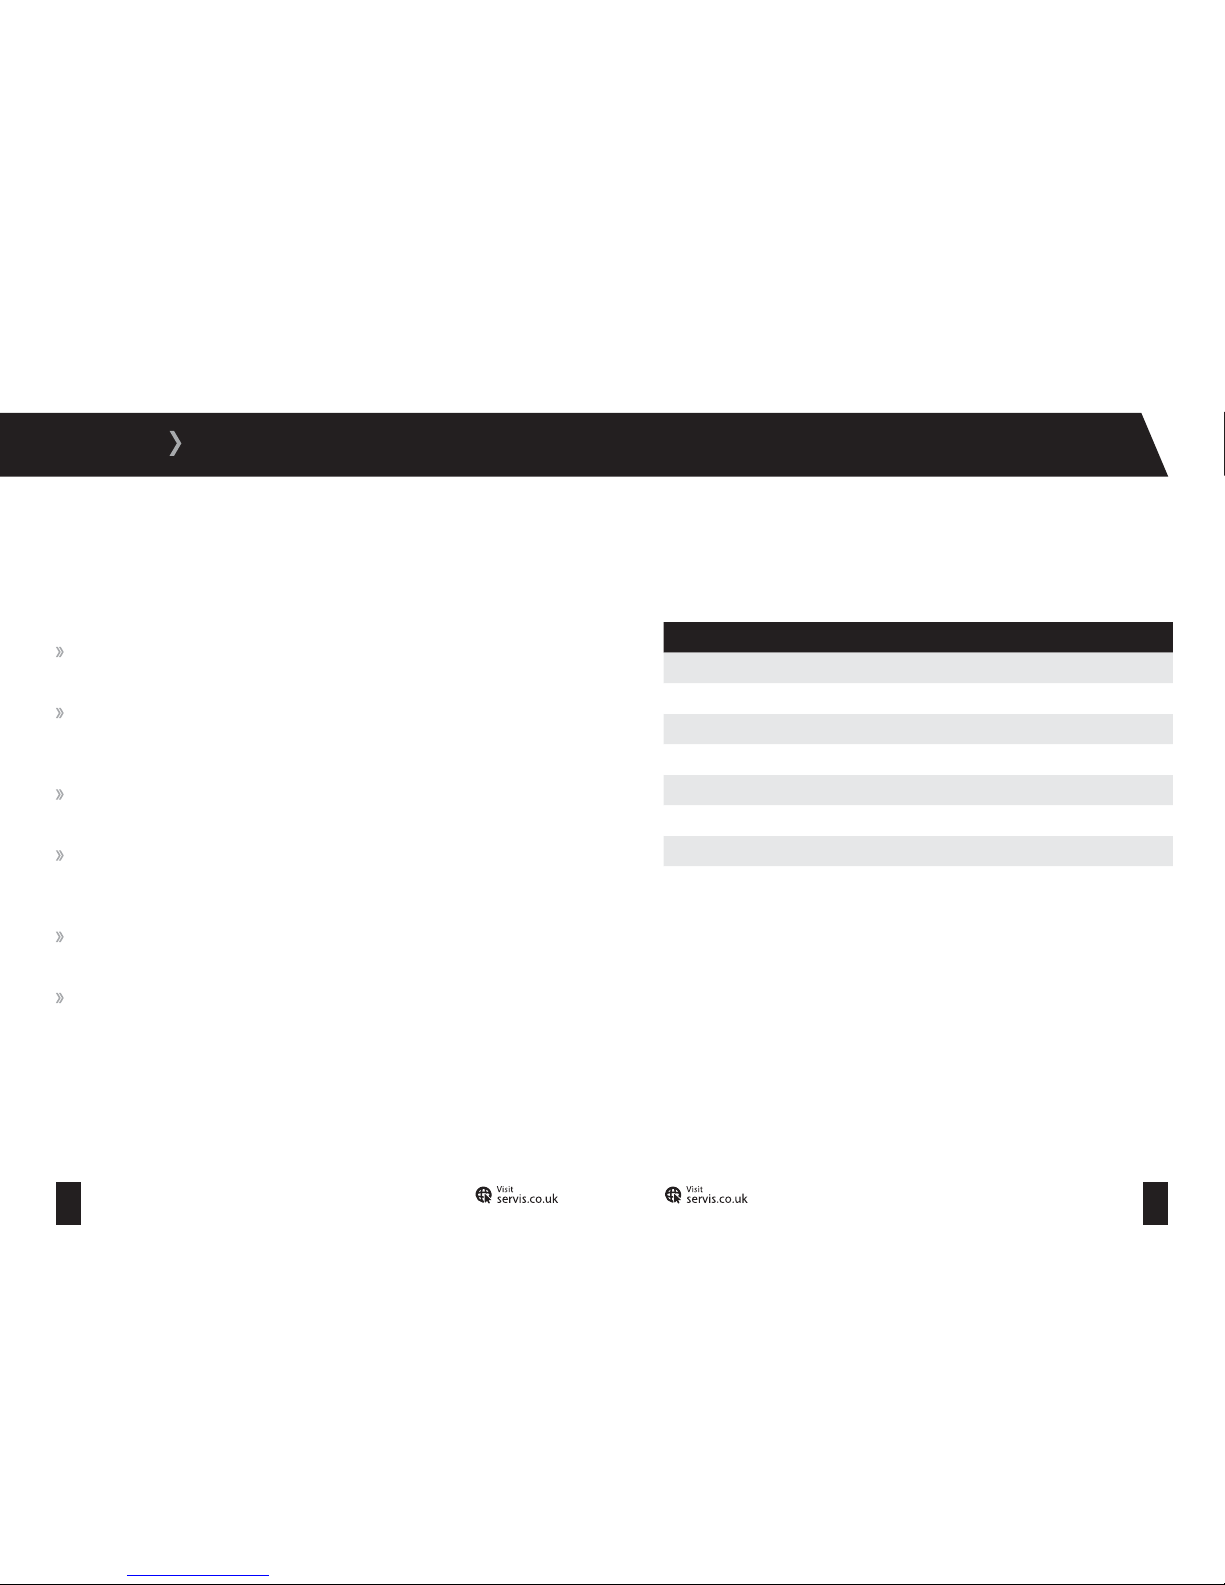
Setting Cooking Duration:
You can set the main oven to cook for a set period of time of up to 10 hours. This is useful if you
know how long the meal should cook but not when you . To set the duration time:
Press the Mode but ton below the Digital Clock display repeatedly until the display shows
Dur and the A flashes (see Figure 12).
Set the desired duration using the + and - buttons. When the buttons have not been pressed
for a few seconds, the time will be set. The A symbol will be displayed and the clock will
show the time of day.
Set the oven function and temperature (see page 24) and place your food in the oven. The
oven will start cooking immediately and will stop at the end of the set duration.
At the set finish time, your Cooker will produce an audible beep. To silence the timer, press
one of the buttons below the Digital Clock display.
Setting Cooking Finish Time:
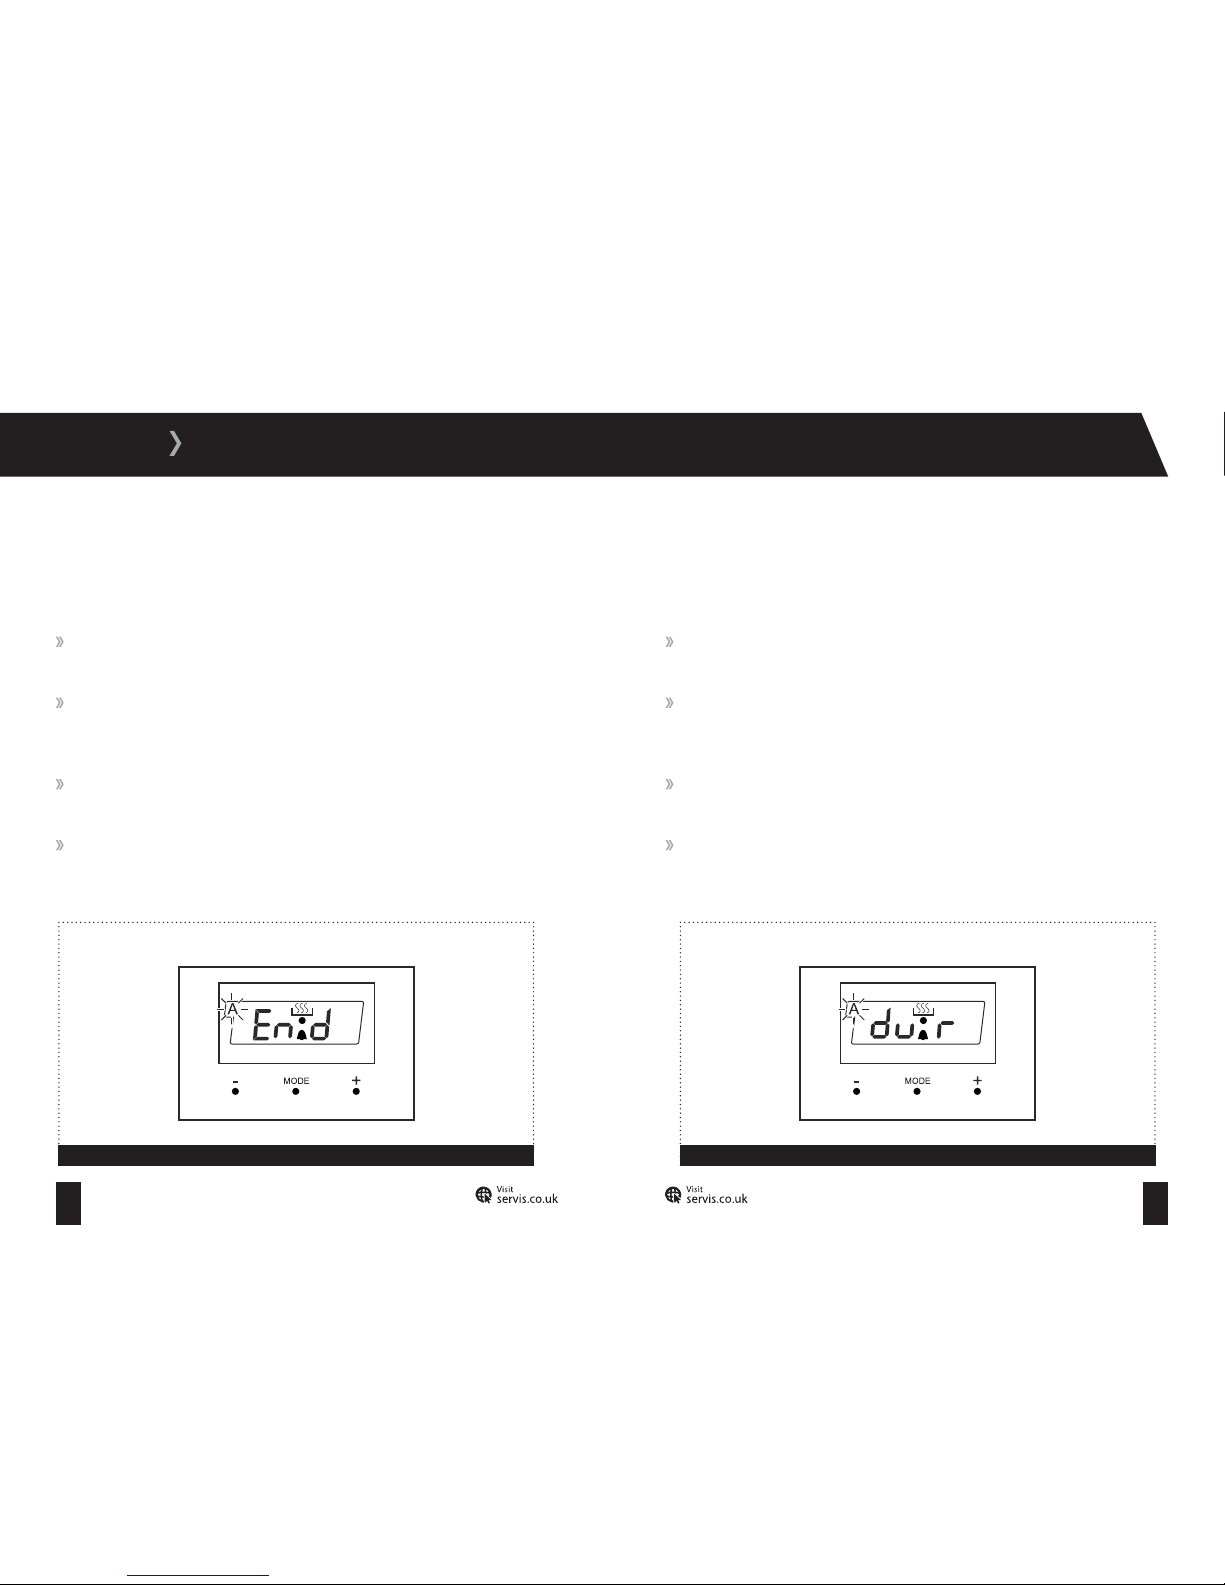
You can set the main oven to finish cooking at a pre-set time, up to 10 hours ahead. This is useful
if you know when you want the meal to be ready. To set the finish time:
Press the Mode but ton below the Digital Clock display repeatedly until the display shows
End and the A flashes (see Figure 11).
Set the desired finish time using the + and - buttons. When the but tons have not been
pressed for a few seconds, the time will be set. The A symbol will be displayed and the
clock will show the time of day.
Set the oven function and temperature (see page 24) and place your food in the oven. The
oven will start cooking immediately and will stop at the set finish time.
At the set finish time, your Cooker will produce an audible beep. To silence the timer, press
one of the buttons below the Digital Clock display.
Figure 11 Figure 12
Page 18
31 32
T: 0333 577 7232 T: 0333 577 7232
USAGE
Setting Cooking Start and Finish Time:
You can set the main oven to switch on and off at pre-set times. This is useful when you want to
set up the meal before you go to work and you want the meal to cook automatically to be ready
when you return from work. To set the start and finish times:
Press the Mode but ton below the Digital Clock display repeatedly until the display shows
Dur and the A flashes (see Figure 12).
Set the desired duration using the + and - buttons. When the buttons have not been pressed
for a few seconds, the time will be set. The A symbol will be displayed and the clock will
show the time of day.
Press the Mode but ton below the Digital Clock display repeatedly until the display shows
End and the A flashes (see Figure 11).
Set the desired finish time using the + and - buttons. When the but tons have not been
pressed for a few seconds, the time will be set. The A symbol will be displayed and the
clock will show the time of day.
Set the oven function and temperature (see page 24) and place your food in the oven. The
oven will start cooking at the correct time to match the set duration and finish time.
At the set finish time, your Cooker will produce an audible beep. To silence the timer, press
one of the buttons below the Digital Clock display.
Cooking Chart
We have included a cooking chart to help you get the best from your ovens. Please refer to the table
below for helpful information on cooking times, temperatures and rack positions.
Food Cooking Temperature Time (Min) Rack Position
Top Oven:
Small Cakes 160-185
0
C20-25 1
Burgers Max Setting 20-25 2
Beef Max Setting 25-30 2
Toa st Max Set tin g 5-10 2
Main Oven:
Small Cakes 160-185
0
C20-25 2-3
Larger Cakes 150-160
0
C30-40 2
Page 19
33 34
T: 0333 577 7232 T: 0333 577 7232
Before cleaning your Cooker ensure that all control knobs are in the off position and that all parts
have been allowed to cool.
Interior Cleaning:
Avoid using harsh abrasive cream and powder based cleaners.
Do not use steam cleaners when cleaning your oven.
General cleaning of the interior of your Cooker can be carried out using a wet cloth and
warm soapy water.
Use an approved oven cleaner from time to time, or if your oven interior becomes especially
dirty.
In order to prevent damage to your Cooker, always test an approved cleaner on a small area
first and follow the manufacturer’s instructions for use.
Exterior Cleaning:
Avoid using abrasive cleaners or scouring pads as they may damage enamel surfaces.
Use a warm wet cloth and mild detergent when cleaning metallic and enamelled surfaces.
Use a glass cleaner to clean the interior surfaces of windows and doors.
CLEANING AND CARE
CLEANING AND CARE
Cleaning the Hob:
Lift up the saucepan supports, caps and crowns of gas burners.
Wipe and clean the back panel with a soapy cloth.
Wash the caps and crowns of the gas burners and rinse them. Dry them immediately with
paper cloth.
After cleaning, make sure that you have re-assembled all cleaned parts correctly.
When cleaning, make sure that no water flows inside the burner caps as this may block the
injectors.
Burner Caps:
Periodically wash enamelled pan supports, enamelled covers and burner heads with warm
soapy water. Dry them thoroughly before replacing.
Enamelled Parts:
Clean frequently with warm soapy water and then dry with a cloth.
Do not wash enamelled parts while they are hot and never use abrasive powders or
abrasive cleaning materials.
Do not allow vinegar, coffee, milk, salt, water, lemon or tomato juice to remain in contact
with the enamelled par ts for long periods of time.
Page 20

35 36
T: 0333 577 7232 T: 0333 577 7232
CLEANING AND CARE
Stainless Steel:
Clean frequently with warm soapy water and a soft sponge. Dry with a soft cloth.
Do not use abrasive powders or abrasive cleaning materials on stainless steel parts.
Do not allow vinegar, coffee, milk, salt, water, lemon or tomato juice to remain in contact
with stainless steel parts for long periods of time.
Gas Connection Pipe:
Periodically check the gas connection pipe. If there is a defect contact Servis. We recommend
the gas connection components are changed annually. If there is a defect found when operating
the control knobs, cooker or oven, contact Servis or a registered service engineer.
Changing the Oven Lamp:
We recommend that the Oven lamp be replaced by authorised personnel. The rating of the
replacement bulb should be 230V, 25W Type E14, heat resistant to 1000C.
Transportation:
Before transpor ting your Oven, make sure that it is disconnected from the gas and electrical
supply.
If you need to transpor t your Oven, use the original case and follow the transportation
instructions on the case:
Securely tape the upper parts of the cooker and the caps, crowns and pan supports to the
cooker panels. Place some paper between the upper cover and the cooking panel.
Cover the upper cover, and then tape it to the side surfaces of the Oven. Use tape to secure
cardboard or paper onto the front cover of the Oven’s interior glass.
Cover the wire grill and trays in paper to prevent them from damaging the Oven while in
transit.
If you do not have the original casing, prepare a carriage box so that the ex ternal surfaces (both
glass and painted) and protected from exterior forces.
Page 21
37 38
T: 0333 577 7232 T: 0333 577 7232
TROUBLESHOOTING
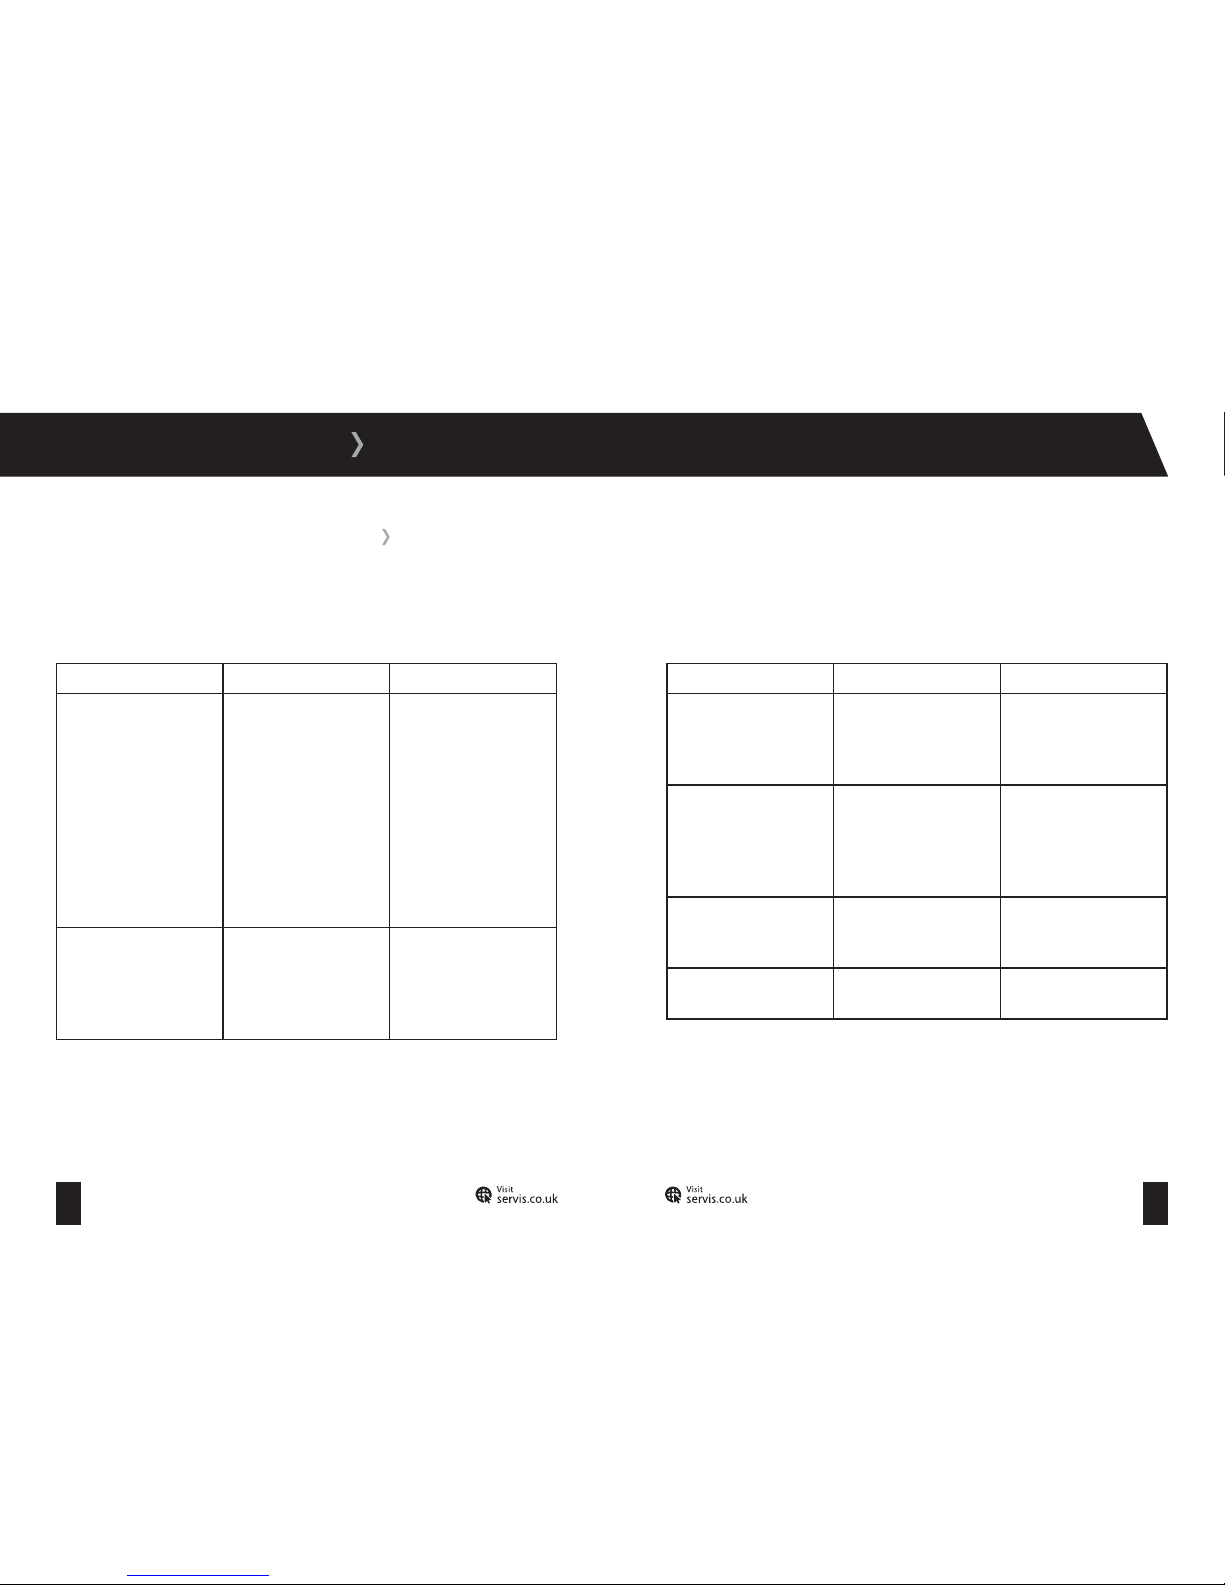
If your Cooker is not operating as expected, you may find a simple solution listed in the table
below.
If you are experiencing a fault not covered in the manual, please contact Servis.
Fault Possible Cause Solution
There is a smell of gas. One of the burners is on but
not lit.
The Cooker or pipework is
damaged and gas is leaking,
Turn the burner off and
ventilate the area. Wait 90
seconds before re-igniting
the burner.
Turn off the Cooker and
ventilate the area. Contact a
registered gas engineer. Do
not use the Cooker until the
gas engineer has repaired
the leak.
The oven does not heat to the
level expected.
The control knob may not be
on the required setting.
The oven door may be left
open.
Make sure the control knob is
on the required setting.
Close the oven door.
TROUBLESHOOTING INFORMATION
Fault Possible Cause Solution
The Cooker does not operate. There is no power to the
Cooker.
Make sure that the electrical
connections are working and
that the switches are in the
on or open position.
The oven Lamp does not
illuminat e.
The lamp has failed.
There is no power to the
Cooker.
See page 35 for further
information.
Make sure your electrical
supply is turned on.
The gas burners do not
operate correctly.
The burner par ts may not be
assembled correctly.
Make sure that the burner
parts are assembled
correctly.
The Oven is cooking food
unevenly.
The Oven racks are
incorrectly positioned.
Position the racks following
the cooking guidelines.
Page 22
39 40
T: 0333 577 7232 T: 0333 577 7232
GUARANTEE
For your Ser vis guarantee to be valid, you will need to retain your original purchase
receipt and be able to provide it when you make a claim.
The above summar y does not include all of the terms and conditions and exclusions which can
be found on our website w ww.servis.co.uk.
Household contents insurance
Your household insurance may cover you for accidental damage, fire or thef t of your product.
Data Protection Act (1988)
Please note that any information provided will be processed by us or our agents in compliance
with the provisions of the Data Protection Act 1988, for the purpose or providing cover and
handling claims, if any, which may necessitate providing such information to third parties.
KNOW YOUR RIGHTS
All packaging and materials used are environmentally friendly and recyclable. Please dispose
of any packaging in an environmentally friendly manner. Consult your local council for further
details.
Please refer to the rear cover for disposal instructions.
The Servis guarantee covers the cost of parts/labour/call out charges to repair an appliance
should any covered component fail in its normal functions necessitating a repair or replacement
to resume those functions.
The Servis guarantee
does not
cover:
Accidental damage
.
Use in a commercial environment
.
Incorrect or faulty installation
.
Deliberate damage or neglect
.
Repairs to cosmetic parts
.
Damage caused by foreign objects or substances
.
Claims in respect to routine inspection or maintenance
.
The Servis guarantee is not transferable.
DISPOSAL
GUARANTEE
Page 23
41 42
T: 0333 577 7232 T: 0333 577 7232
INDEX
I
Injector table .................................................12
Installation requirements..............................13
Interior cleaning ........................................... 33
P
Programmable functions...............................27
R
Racks, fitting .................................................16
S
Safety, gas .................................................... 06
Safety instructions ........................................02
Setting cooking duration ..............................30
Setting cooking finish time ...........................29
Setting start and finish time ........................31
Setting the clock ...........................................27
Setting the timer ...........................................28
Stabilising the cooker ...................................14
Stainless steel, cleaning ...............................35
A
Adjusting the feet .........................................15
B
Bottom heating (top oven) ............................23
Burner caps, cleaning................................... 34
C
Changing the audible beep ...........................28
Changing the oven lamp ...............................35
Cleaning the hob .......................................... 34
Control panel .................................................17
Cooking chart ................................................32
D
Defrost (main oven) .......................................24
Disposal .........................................................39
Double grilling (top oven) ..............................22
Duration, setting ...........................................30
T
Technical specifications ................................11
Thermostat knob (main oven) .......................26
Timer ..............................................................28
Top and bottom heating (main oven)............24
Top and bottom heating (top oven) ..............23
Top and bottom heating with fan ................25
Top heating (top oven)...................................23
Transportation ...............................................36
Troubleshooting .............................................37
U
Using the main oven .....................................24
Using the top oven ........................................21
W
Warranty ........................................................01
E
Electrical information ...................................10
Enamelled parts, cleaning ........................... 34
Exterior cleaning ...........................................33
F
Fan and circular heating (main oven) ...........25
Feet, adjustment ...........................................15
Finish time, setting .......................................29
Fitting the racks ...........................................16
G
Gas burners, using ...................................... ..19
Gas connection ..............................................10
Gas connection pipe .....................................35
Gas safety......................................................06
Grill pan ..........................................................21
Grill (main oven) .............................................25
Grill (top oven) ...............................................22
Grill with fan (main oven) ..............................25
Guarantee ......................................................39
Page 24
T: 0333 577 7232
E: [email protected]
0000000000
The symbol on the product or on its packaging indicates that this product may not be treated as household waste. Instead it shall be handed over to the applicable collection
point for the recycling of electrical and electronic equipment. By ensuring this product is disposed of correctly, you will help prevent potential negative consequences for
the environment and human health, which could otherwise be caused by inappropriate waste handling of this product. For more detailed information about recycling of this
product, please contact your local city offi ce, your household waste disposal service or the shop where you purchased the product.
 Loading...