

Page 1
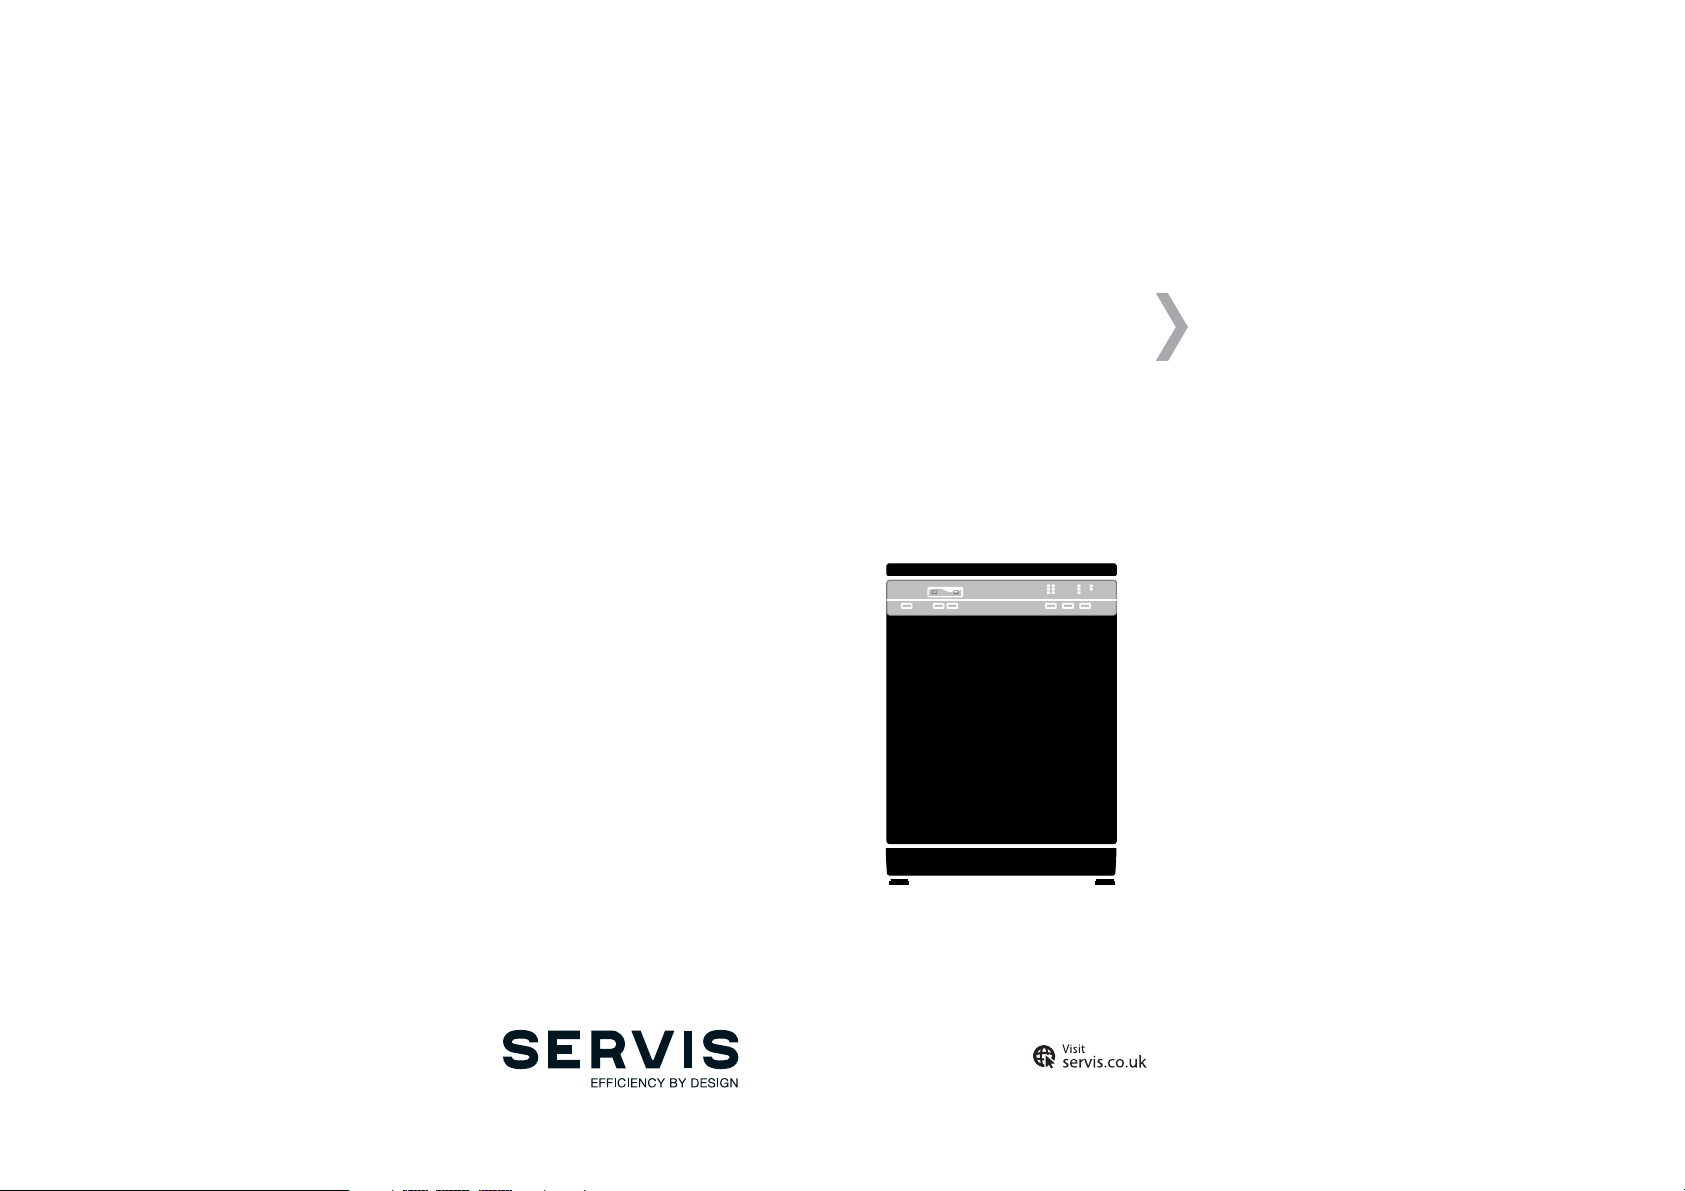
DISHWASHER
User Manual
Model Number:
DC6652W
Page 2
Contents
01 Welcome
02 Safety Instructions
REGISTER TO
ACTIVATE YOUR
2 YEAR
GUARANTEE NOW
SERVIS.CO.UK 0800 0124382
Parts & Labour for 2 years. Go to www.servis.co.uk
for more information
07 Your Dishwasher
11 Technical Specifi cation
12 Installation
19 Setting Up Your Dishwasher
23 Using Your Dishwasher
35 Maintenance
41 Troubleshooting
48 Product Fiche
49 Guarantee
51 Index
T: 0800 0124 382T: 0800 0124 382
Page 3
WELCOME SAFETY INSTRUCTIONS
WELCOME
Thank you for choosing this Servis Dishwasher, which has been designed and manufactured to
give you many years of trouble-free service.
You may already be familiar with using a similar product but please take time to read these
instructions, which have been written to ensure you get the very best from your purchase.
WARRANTY
Servis provides you with a guarantee which will protect you should your Dishwasher develop an
electrical or mechanical fault during the guarantee period. To ensure that you get a prompt and
efficient service, please register your Dishwasher immediately.
You will find a warranty card included within the packaging. To register, complete the form, or:
Visit us at www.servis.co.uk
Call us on 0800 0124 382.
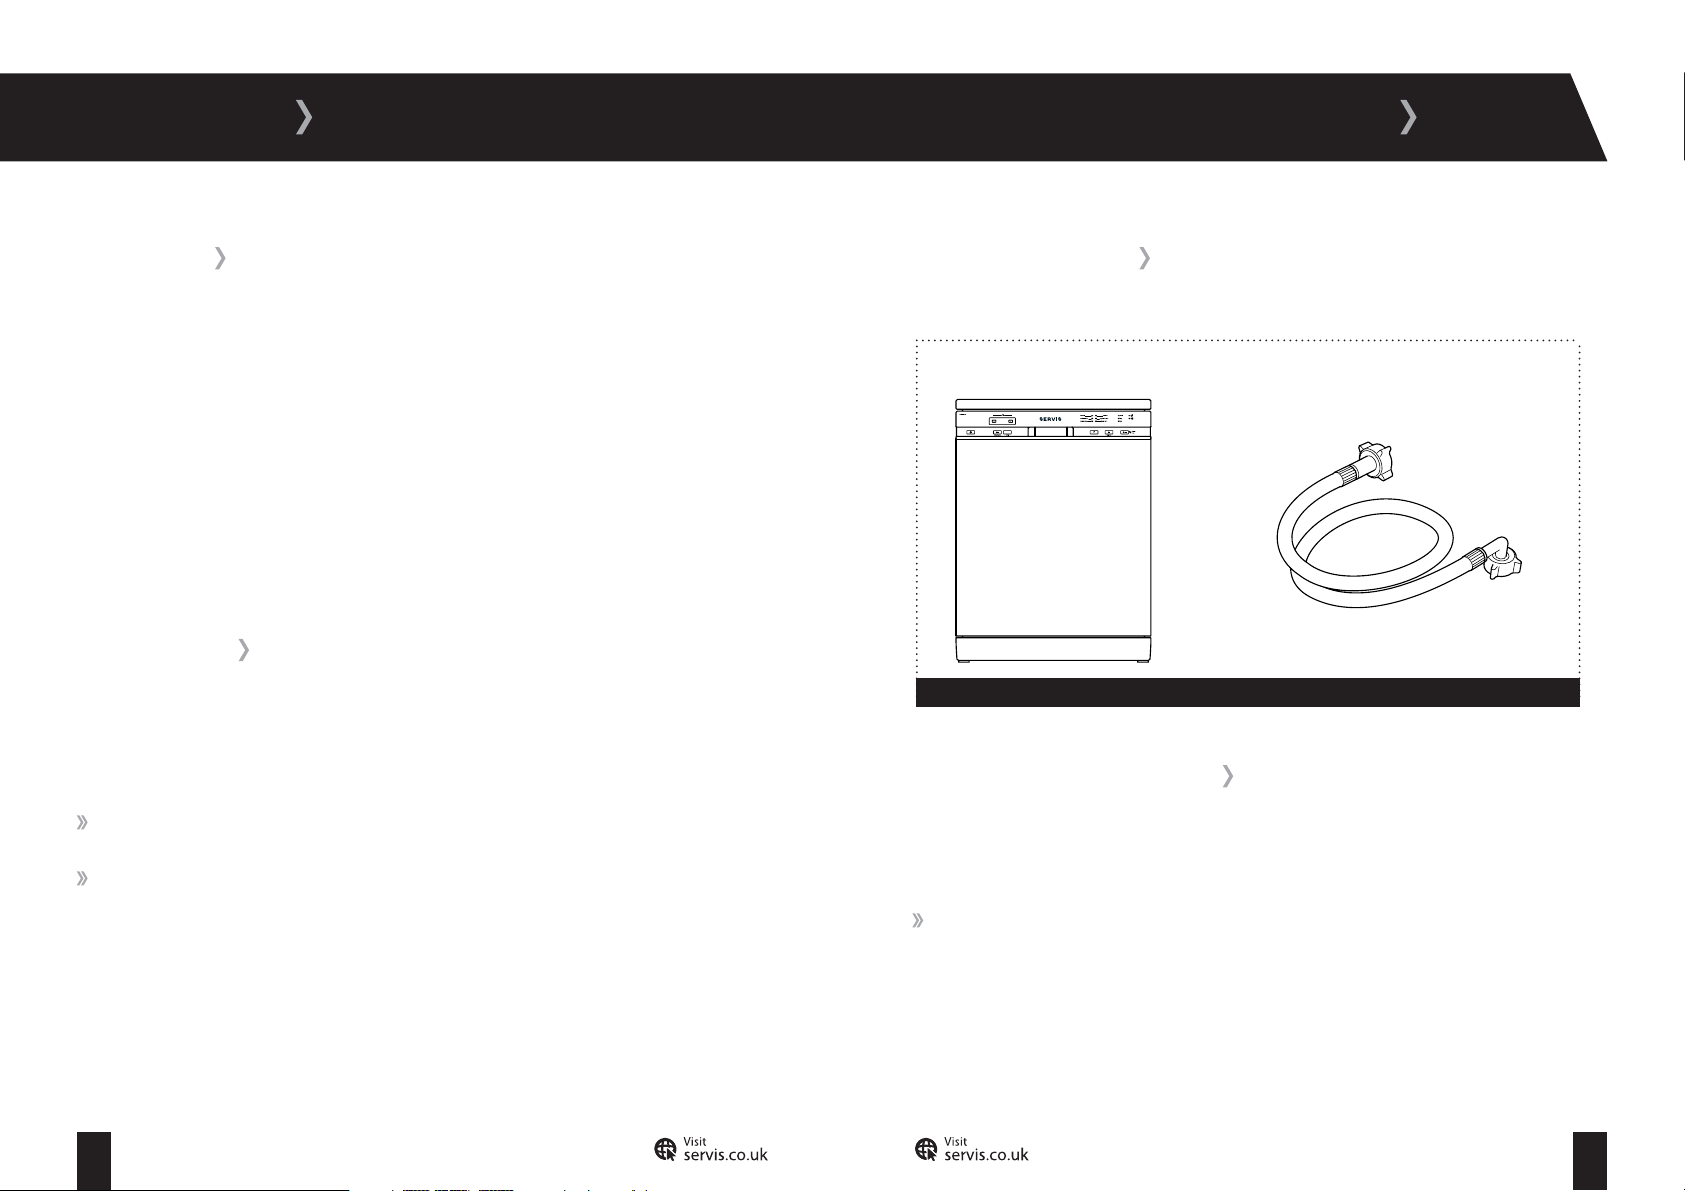
ITEMS INCLUDED
Dishwasher
Fill hose
Figure 1
SAFETY INSTRUCTIONS
To ensure your safety and the safety of others, please read the following safety
precautions before you operate your Dishwasher.
Your Dishwasher conforms to current safety requirements. Inappropriate use can, however,
lead to personal injury and damage to property. To avoid the risk of accidents and damage to
your Dishwasher, read this user guide carefully before using it for the first time. It contains
important information on the installation, safety, use and maintenance of your Dishwasher.
Retain this user guide for future use and pass it on to any new owners.
Read this user guide before using or installing your Dishwasher.
01 02
T: 0800 0124 382 T: 0800 0124 382
Page 4
SAFETY INSTRUCTIONS
Your Dishwasher is for domestic use only and is only intended to wash and dry items which
are specified by the manufacturer to be dishwasher-safe. Do not use your Dishwasher for
any purpose not expressly specified in this user guide.
Before setting up your Dishwasher, check for any external visible damage. Do not install or
use your Dishwasher if it is damaged. Prolonged intensive use of your Dishwasher may call
for additional ventilation.
Before connecting your Dishwasher, ensure that the voltage and connected load information
in this guide matches that of the mains electricity supply. If in doubt, consult a qualified
electrician.
Before connecting your Dishwasher, ensure that all electrical connections match the values
on the rating plate. Servis cannot be held responsible for any damage that may occur due to
improper connections. If in doubt, consult a qualified electrician.
Do not connect your Dishwasher to the mains electricity supply using an extension lead or
multi socket. These types of connection can cause overheating.
Make sure that the power supply cable is positioned where you can reach it if required.
A damaged power cord/plug can cause fire or give you an electric shock. When damaged it
must be replaced. This should only be done by qualified personnel.
Never remove the plug from the socket by pulling the cord. Always hold the plug.
Never touch the power cord/plug with wet hands as this could cause a short circuit or
electric shock.
Do not touch your Dishwasher if your hands or feet are wet.
Your Dishwasher can reach high temperatures in use. Do not place it next to a refrigerator
or freezer.
Do not put your Dishwasher in any location where the room temperature is likely to fall below
0 0C.
Do not mount heat sources such as ovens near or on the Dishwasher. Heat from these devices
may damage your Dishwasher.
This Dishwasher is designed to be used in houses and similar places. (IEC 60335-2-5/A2)
Faulty components must only be replaced by a suitably qualified Service Agent using
genuine spare parts.
Unauthorised repairs could result in unforeseen dangers for the user. Repairs should only be
undertaken by an approved service agent.
In the event of a fault or for cleaning purposes, your Dishwasher is only completely isolated
from the electricity supply when it is unplugged from the mains.
Your Dishwasher must only be connected to your water supply using the supplied new fill
hose. Old hoses must not be reused.
Make sure that the drain hose is not kinked or compressed or the water may not drain away
from the Dishwasher properly.
03 04
T: 0800 0124 382 T: 0800 0124 382
Page 5
SAFETY INSTRUCTIONS
Do not make any alterations to your Dishwasher, unless authorised to do so by Servis.
The packaging of the Dishwasher could be hazardous to children. Please refer to the
disposal instructions on the rear cover.
Please ensure that you have removed all of the packaging materials and protective tape
from inside and outside your Dishwasher before using.
Keep the document bag that contained this user manual out of reach of children and babies to
prevent the risk of suffocation.
Keep the small items found in the document bag out of reach of small children and babies.
Only use detergents and rinse aids which are designed specifically for use with dishwashers.
Use soft grain or powder softener salt. Do not use table salt or sea salt in your Dishwasher.
Never use your Dishwasher without a filter.
Do not overload the drawers or place items where they can block the rotary spray arms.
Never force the door open when your Dishwasher is running.
For energy and water saving, remove coarse residues and food waste from your dishes before
placing your dishes in the Dishwasher.
Place hollow items, such as bowls, glasses and pots into the Dishwasher face-down wherever
possible. However, do not place tall glasses so that their stems can block the rotary spray arm.
Place cutlery point down in the cutlery basket, or flat in the top basket.
Check whether plastic items are heat-resistant before washing them in the Dishwasher.
Do not touch the drain hose or any discharged water while your Dishwasher is running. The
high temperatures involved pose a burn risk.
Clean the rotary spray arms and the filter at least once a week.
Check the rinse aid indicator regularly and top up with rinse aid when required.
Your Dishwasher is not intended for use by people (including children) with reduced physical,
sensory or mental capabilities, or lack of experience or knowledge, unless they have
been given supervision or instruction concerning the use of your Dishwasher by a person
responsible for their safety.
To avoid risk of injury do not allow children to play on or near your Dishwasher or to play with
its controls.
Do not sit or stand on the open door of your Dishwasher as it may fall over.
05 06
T: 0800 0124 382 T: 0800 0124 382
Page 6
YOUR DISHWASHER
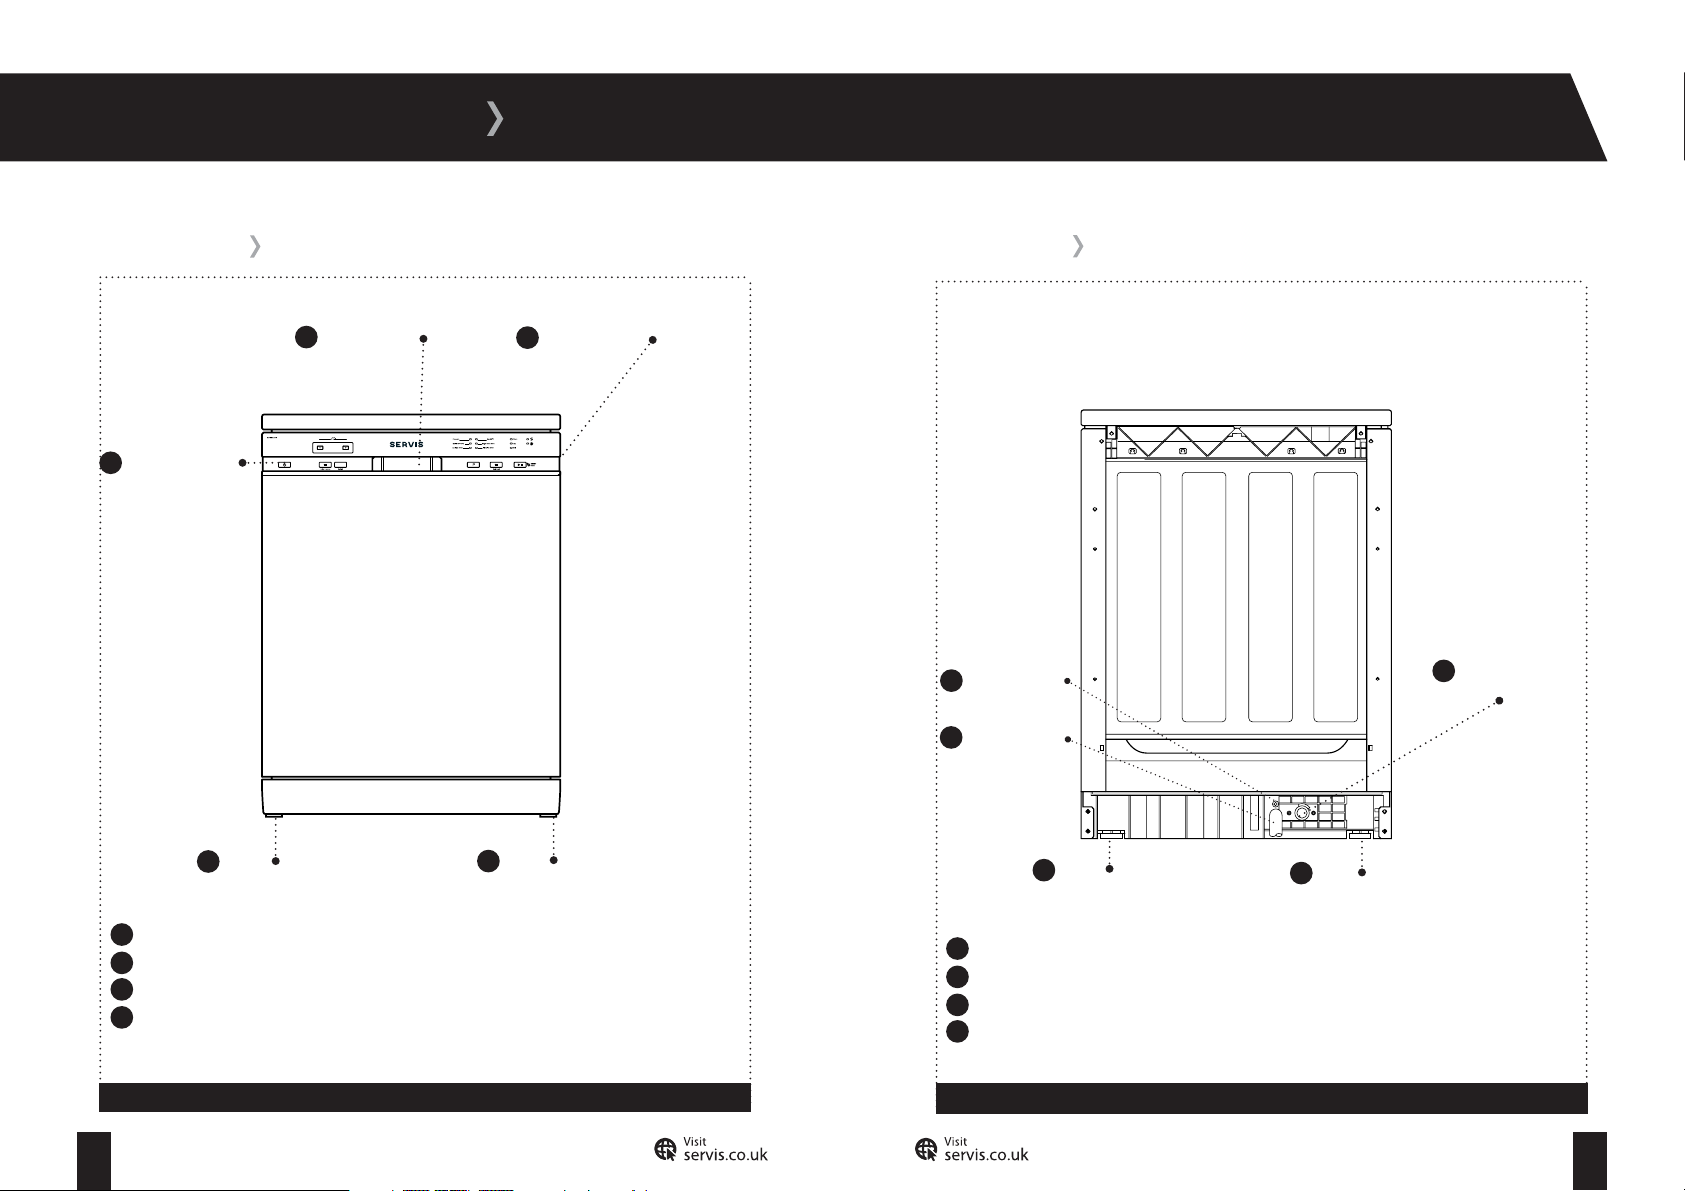
FRONT VIEW REAR VIEW
1
On/off switch
2
Door Handle
Feet
4
4
Control Panel
3
Feet
Power Cable
1
2
Drain hose
Cold water
3
inlet
Feet
4
Feet
4
On/off switch.
1
Door handle.
2
3
Control panel.
4
Feet.
Figure 2
07 08
T: 0800 0124 382 T: 0800 0124 382
Power cable.
1
Drain hose; provides an outlet for the dirty water from your Dishwasher.
2
Cold water inlet; connects your Dishwasher to your cold water supply.
3
4
Feet.
Figure 3
Page 7

YOUR DISHWASHER
INSIDE VIEW (WITH DRAWERS)
1
Upper Drawer
2
Cutlery Box
Lower Drawer
3
Door
4
INSIDE VIEW (WITHOUT DRAWERS)
Drying nozzle
1
Detergent
2
compartment/
Rinse aid
compartment
Salt Compartment
3
4
Filters
Upper basket.
1
Lower basket.
2
3
Cutlery box.
4
Door.
Figure 4
09 10
T: 0800 0124 382 T: 0800 0124 382
Drying nozzle (one each side).
1
Detergent compartment/Rinse aid compertment.
2
3
Salt compartment.
Filters.
4
Light (Not shown)
5
Figure 5
Page 8
TECHNICAL SPECIFICATION
INSTALLATION
TECHNICAL SPECIFICATION
Capacity 12 place settings
Height 845 mm
Height (without worktop) 815 mm
Width 596 mm
Depth 598 mm
Net Weight 46 kg
Electricity Input 220-240 V, 50 Hz
Total Power 2200 W
Heating Power 2000 W
Pump Power 100 W
Drain Pump Power 30 W
Water Supply Pressure 0.03 MPa (0,3 bar) - 1 MPa (10 bar)
INSTALLATION REQUIREMENTS
To avoid risk of injury, please take care when moving your Dishwasher. It is heavy and we
recommend that a minimum of two people move your Dishwasher.
To unpack your Dishwasher and manoeuvre it to the installation area, one person should hold it
by the front feet and the other person at the edge of the lid at the rear.
Your Dishwasher measures 84.5 x 59.6 x 59.8cm and will require an installation area with the
space to allow the door to fully open and provide easy access to the plumbing and electrical
connections.
The most suitable installation surface for your Dishwasher is a concrete floor as it is less prone
to vibration. Soft floor surfaces such as carpets and rugs are not suitable.
If possible, install your Dishwasher in the corner of the room as it is often the most stable part of
the floor.
Do not install your Dishwasher in rooms where temperatures below freezing may occur as frozen
hoses may burst or split.
Current 10 A
11 12
T: 0800 0124 382 T: 0800 0124 382
Page 9

INSTALLATION
ADJUSTING THE FEET
For safe operation, it is important that your Dishwasher is level and securely positioned on all
four feet. Incorrect installation may cause the Dishwasher to vibrate and increase your water and
electricity consumption. Never place cardboard, wood or similar materials under your Dishwasher
to increase stability.
The four adjustable feet are used to level the Dishwasher. To adjust the feet (fig 6):
To increase the height of the Dishwasher, turn the feet anti-clockwise.
To decrease the height of the Dishwasher, turn the feet clockwise.
After making adjustments, use a spirit level to check that the Dishwasher is level.
WATER SUPPLY CONNECTION
Your Dishwasher uses an energy efficient cold fill system, which means that the
filled with cold water which is then heated to wash the dishes. As a result, no heat is lost in the
pipeline from the hot water supply.
Connect your Dishwasher to your cold water supply only. If your previous
and cold fill, check that the hot tap on your water supply is closed to avoid leakage. Only use the
fill hose supplied and not one from your old Dishwasher. Only one hose is required to install your
Dishwasher to the cold water supply. The inlet hose provided with your Dishwasher connects the
rear of your
supply:
1
Connect the angled end of the fill hose to the cold water inlet on the rear of your
Dishwasher
Dishwasher by screwing the threaded connector clockwise (fig 7). Take care not to
overtighten the connection. Hand tight is sufficient.
and the cold water supply. To connect your Dishwasher to the cold water
Dishwasher
Dishwasher
is
had a hot
Figure 6
Figure 7
13 14
T: 0800 0124 382 T: 0800 0124 382
Page 10
INSTALLATION
WATER SUPPLY CONNECTION
2
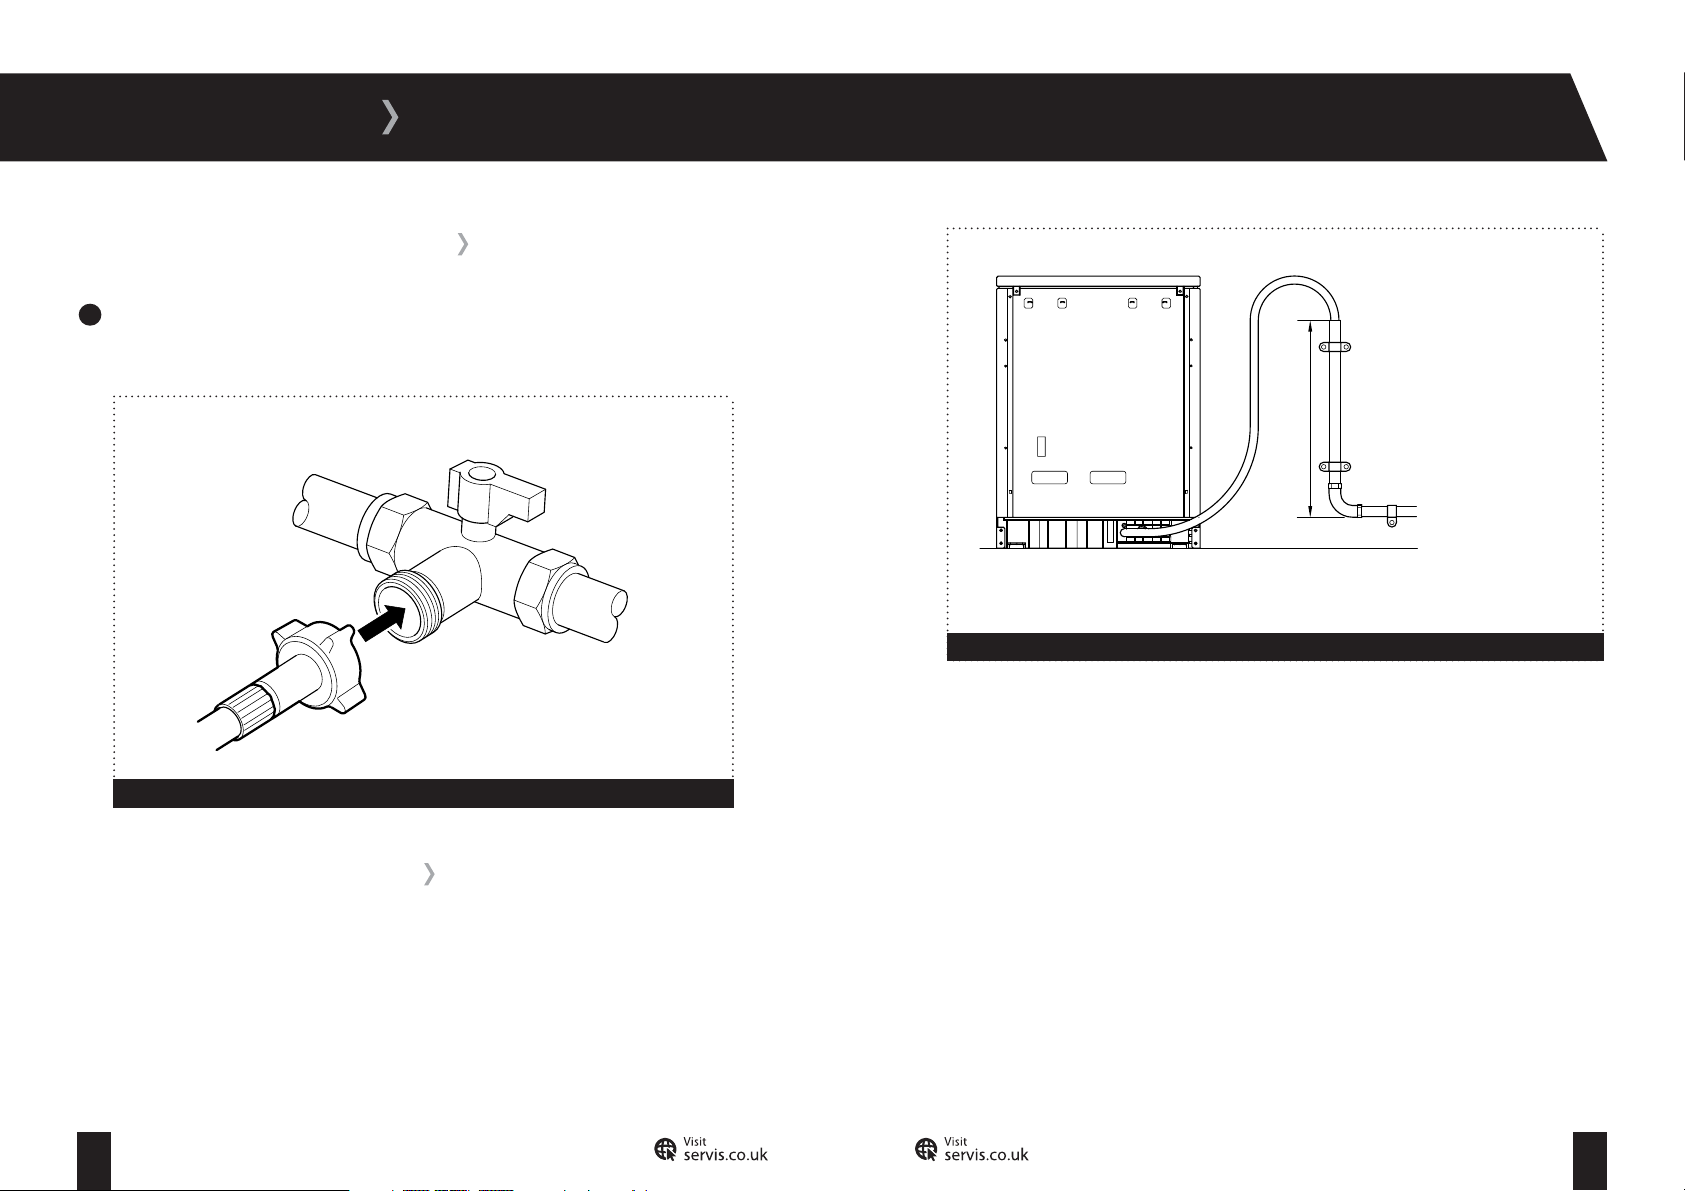
Screw the straight end of the hose clockwise to a 19mm (3/4’’) cold water tap until hand
tight (fig 8). Take care not to trap or kink the hose.
Figure 8
DRAIN HOSE CONNECTION
The drain hose
can be connected
to a standpipe, as
shown. The hose
must be between
50cm to 110cm
from the ground.
Figure 9
The cold water pressure for a normal household system ranges from netween 0.1 to 1 Mpa. Your
Dishwasher will run at optimum efficiency in this range.
Once you have made all of the connections, carefully turn your cold water supply on and check
for leaks.
Do not connect your Dishwasher to a surface water drain.
Connect your Dishwasher to your household drainage system (fig 9).
For your Dishwasher to function properly the outlet end of the drain hose must be at a minimum
of 50cm and a maximum of 110cm from the ground.
CAUTION: Check to ensure that the hose is not trapped, kinked, twisted, folded or crushed.
Do not attempt to extend the drain hose by adding extra sections.
15 16
T: 0800 0124 382 T: 0800 0124 382
Page 11
INSTALLATION
ELECTRICAL CONNECTION
Your Dishwasher requires a 220-240V, 50Hz mains supply. Do not use any other supply.
Your Dishwasher may be fitted with a moulded plug, which cannot be rewired.
If the fuse cover becomes damaged, you must not use the plug.
If your plug requires changing because it is not suitable for your socket, or it is damaged,
you should consult a qualified electrician.
Fuse:
Replacement fuses should be ASTA-approved to BS1362 and have the correct 13 Amp
rating.
Replacement fuses can be purchased from an electrical supplier.
PREPARING YOUR DISHWASHER FOR FIRST USE
Remove all packaging from the
Set the water softener level (see page 20).
Add 2 kg of salt to the salt compartment and fill with water until it is almost overflowing
(see page 21).
Fill the rinse aid compartment (see page 22).
Run the Dishwasher unloaded (see page 29).
Dishwasher
.
17 18
T: 0800 0124 382 T: 0800 0124 382
Page 12
SETTING UP YOUR DISHWASHER
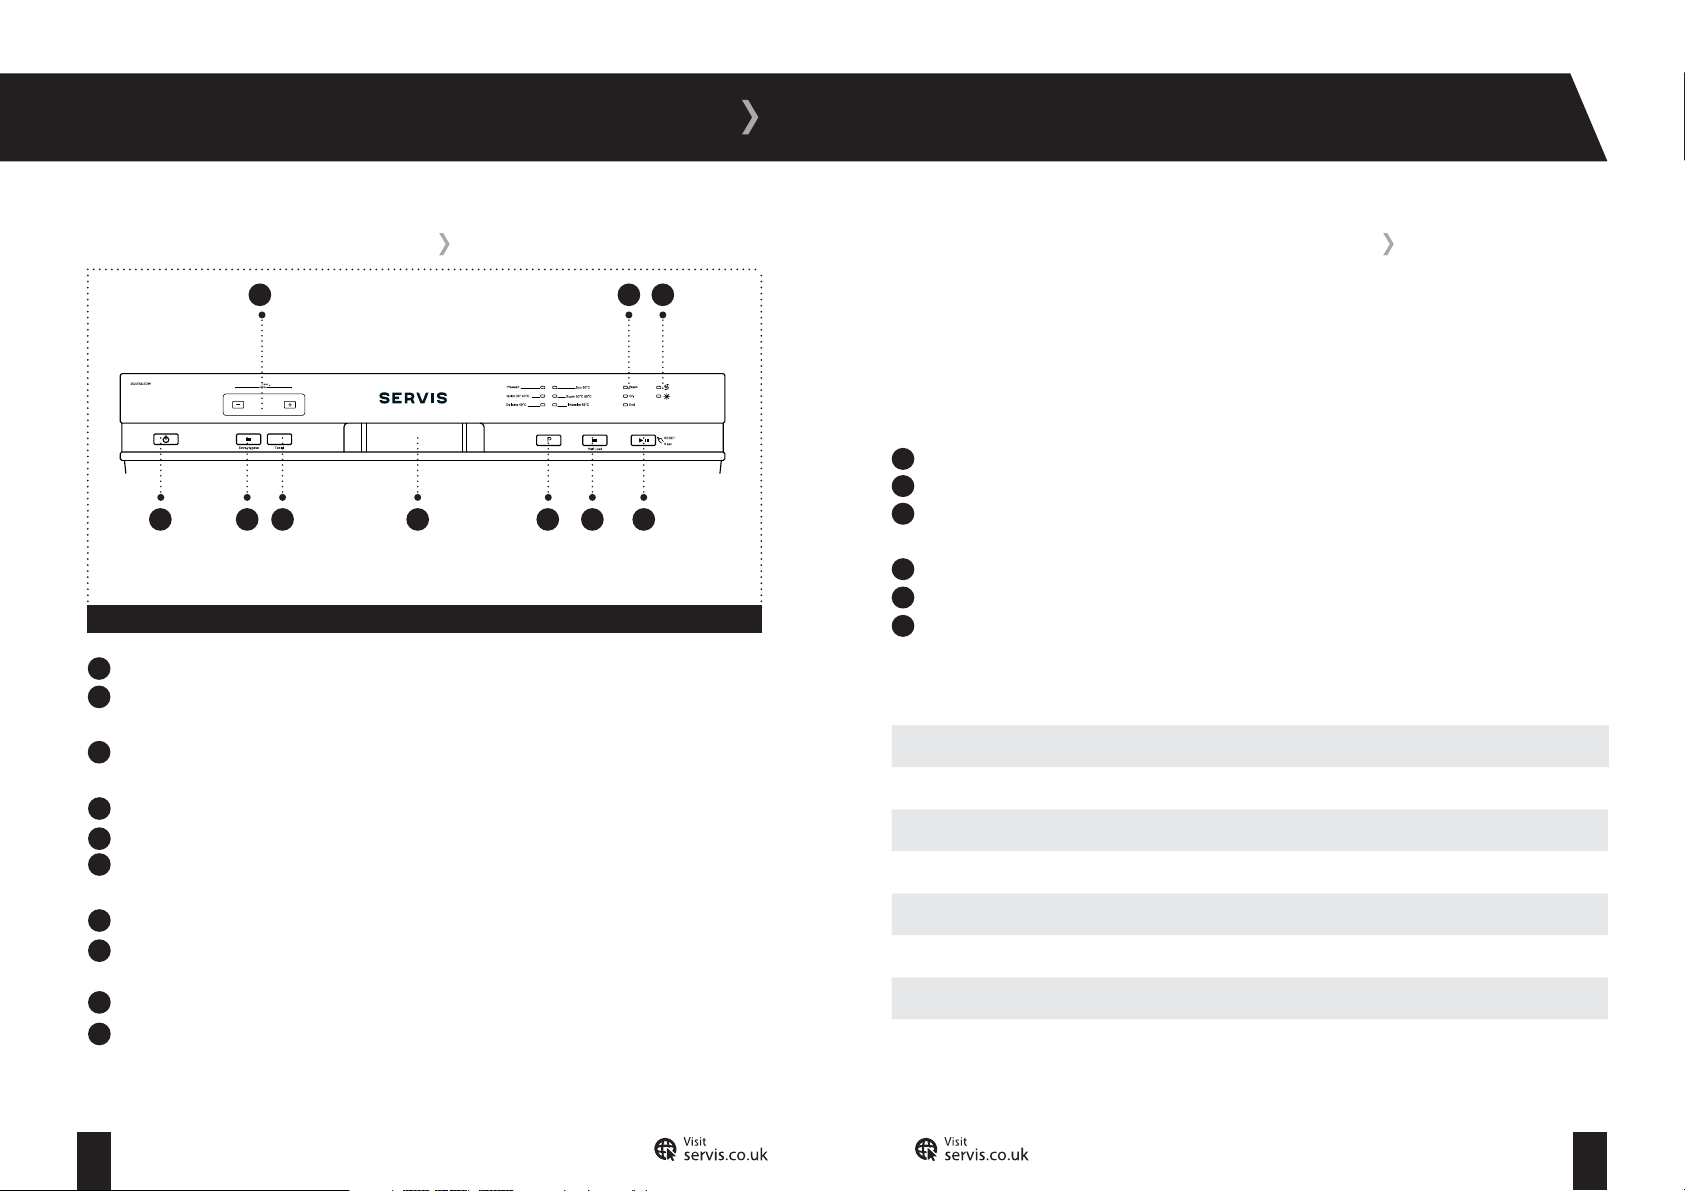
CONTROL PANEL OVERVIEW
8
10
1 2 6 7
Figure 10
On/Off Button.
1
Extra Hygiene Button. Select if you want a cleaner, more hygienic washing process. This
2
increases the water temperature and washing time.
3
Tablet Detergent Button. Select if you are using combined detergent which contains salt,
rinse aid and extra functions.
Door Handle.
4
Programme Selection Button.
5
Half Load Button. Select if you have a half load to reduce the duration of the programme
6
and decrease your power and water consumption.
Start/Pause Button: Start or pause the selected programme.
7
Salt Level Warning. If shown, refill the salt compartment (see page 21).
8
Rinse Aid Warning. If shown, refill the rinse aid compartment (see page 22).
9
Washing Cycle Progress Indicators. Shows the progress of the washing cycle.
Remaining Time Indicator. The amount of time the programme has left to run.
10
Delay Time. The amount of time the programme is delayed.
3 4 5
9
SETTING THE WATER SOFTENER LEVEL
The effectiveness of your Dishwasher depends on the softness of the water supply. For this
reason, your Dishwasher is equipped with a system to reduce the hardness in the mains water.
To find out the water hardness level in your area, contact your water company.
To set your Dishwasher to compensate for the water hardness level:
On the control panel hold down the Programme Selection Button.
1
2
Switch on your Dishwasher using the
3
Continue holding down the Programme Selection Button until the letters SL stop being
displayed.
4
Release the Programme Selection Button. The current water hardness setting is displayed.
5
Use the + or - buttons to select the required hardness level.
6
Press the
Hardness Levels
Hardness British Hardness (dE) French Hardness (dF) German Hardness (dH)
On/Off Button
L1 0-6 0-9 0-5
L2 7-14 10-20 6-11
L3 15-21 21-30 12-17
L4 22-28 31-40 18-22
L5 29-39 41-55 23-31
L6 40-63 56-90 32-50
to save the setting.
On/Off Button.
19 20
T: 0800 0124 382 T: 0800 0124 382
Page 13
SETTING UP YOUR DISHWASHER
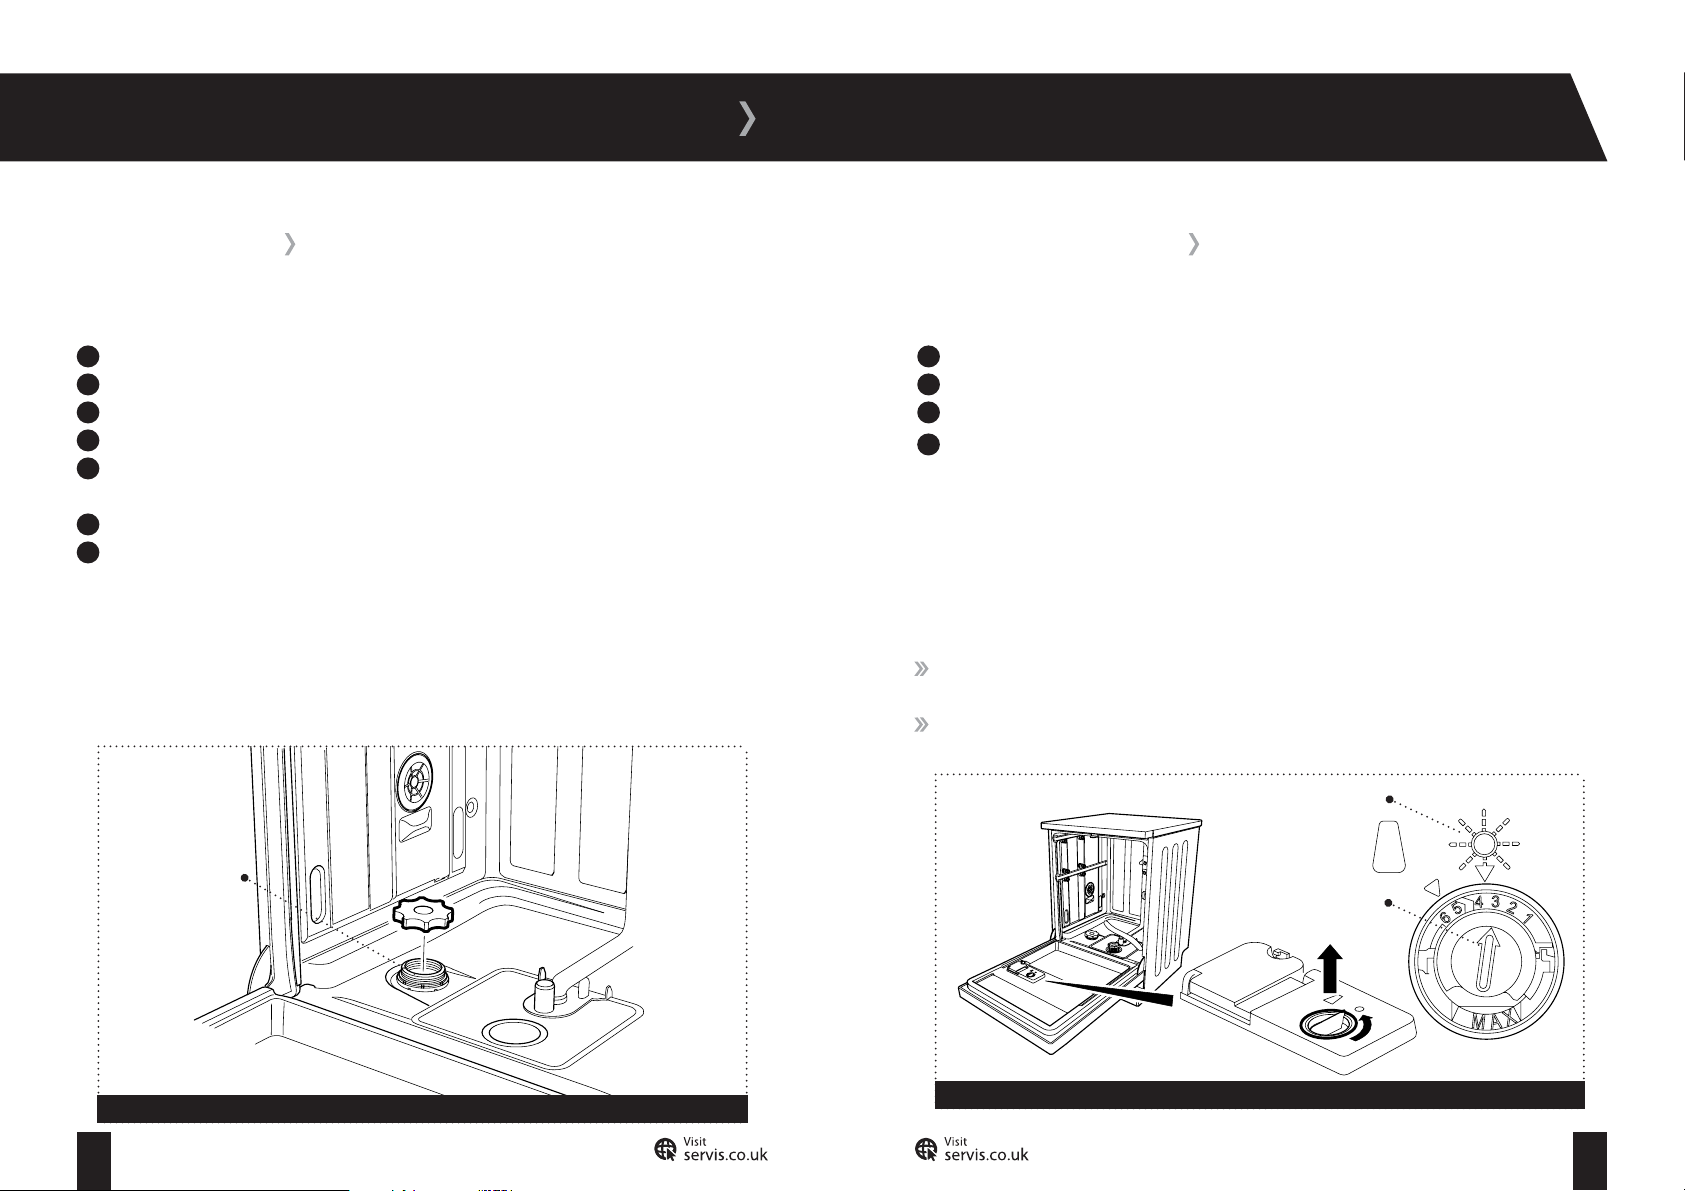
Filling With Salt Filling With Rinse Aid
To fill the salt compartment (fig 11):
1
Open the Dishwasher.
2
Remove the lower basket.
3
Open the salt compartment cap by turning it counter clockwise.
4
Fill the compartment with 2 kg of dishwasher salt.
5
Top up the salt compartment with water until it is almost overflowing (the first time
you fill the salt compartment only).
6
Replace the cap, turning it clockwise.
7
Replace the lower basket.
When the
to refill the salt compartment.
Salt Level Warning indicator
is displayed on the control panel, repeat the above steps
CAUTION: Use soft grain or powder softener salt. Do not use table salt or sea salt in your
Dishwasher.
Salt compartment
To fill the rinse aid compartment (fig 12):
1
Open the Dishwasher.
2
Remove the rinse aid compartment cap by turning it counter clockwise.
3
Fill the compartment with rinse aid until the rinse aid level indicator goes dark.
Replace the cap, turning it clockwise.
4
When the
the rinse aid compartment.
The rinse aid compartment includes a level adjuster, numbered 1 to 6, which controls how much
rinse aid is used in each wash. It can be adjusted using a screwdriver. If:
water stains form on your dishes, increase the adjustor setting towards 6.
blue stains form on your dishes, decrease the adjustor setting towards 1.
Rinse Aid Warning
is displayed on the control panel, repeat the above steps to refill
Level indicator
Level adjuster
Figure 11
21 22
T: 0800 0124 382 T: 0800 0124 382
Figure 12
Page 14
USING YOUR DISHWASHER
Loading Your Dishwasher
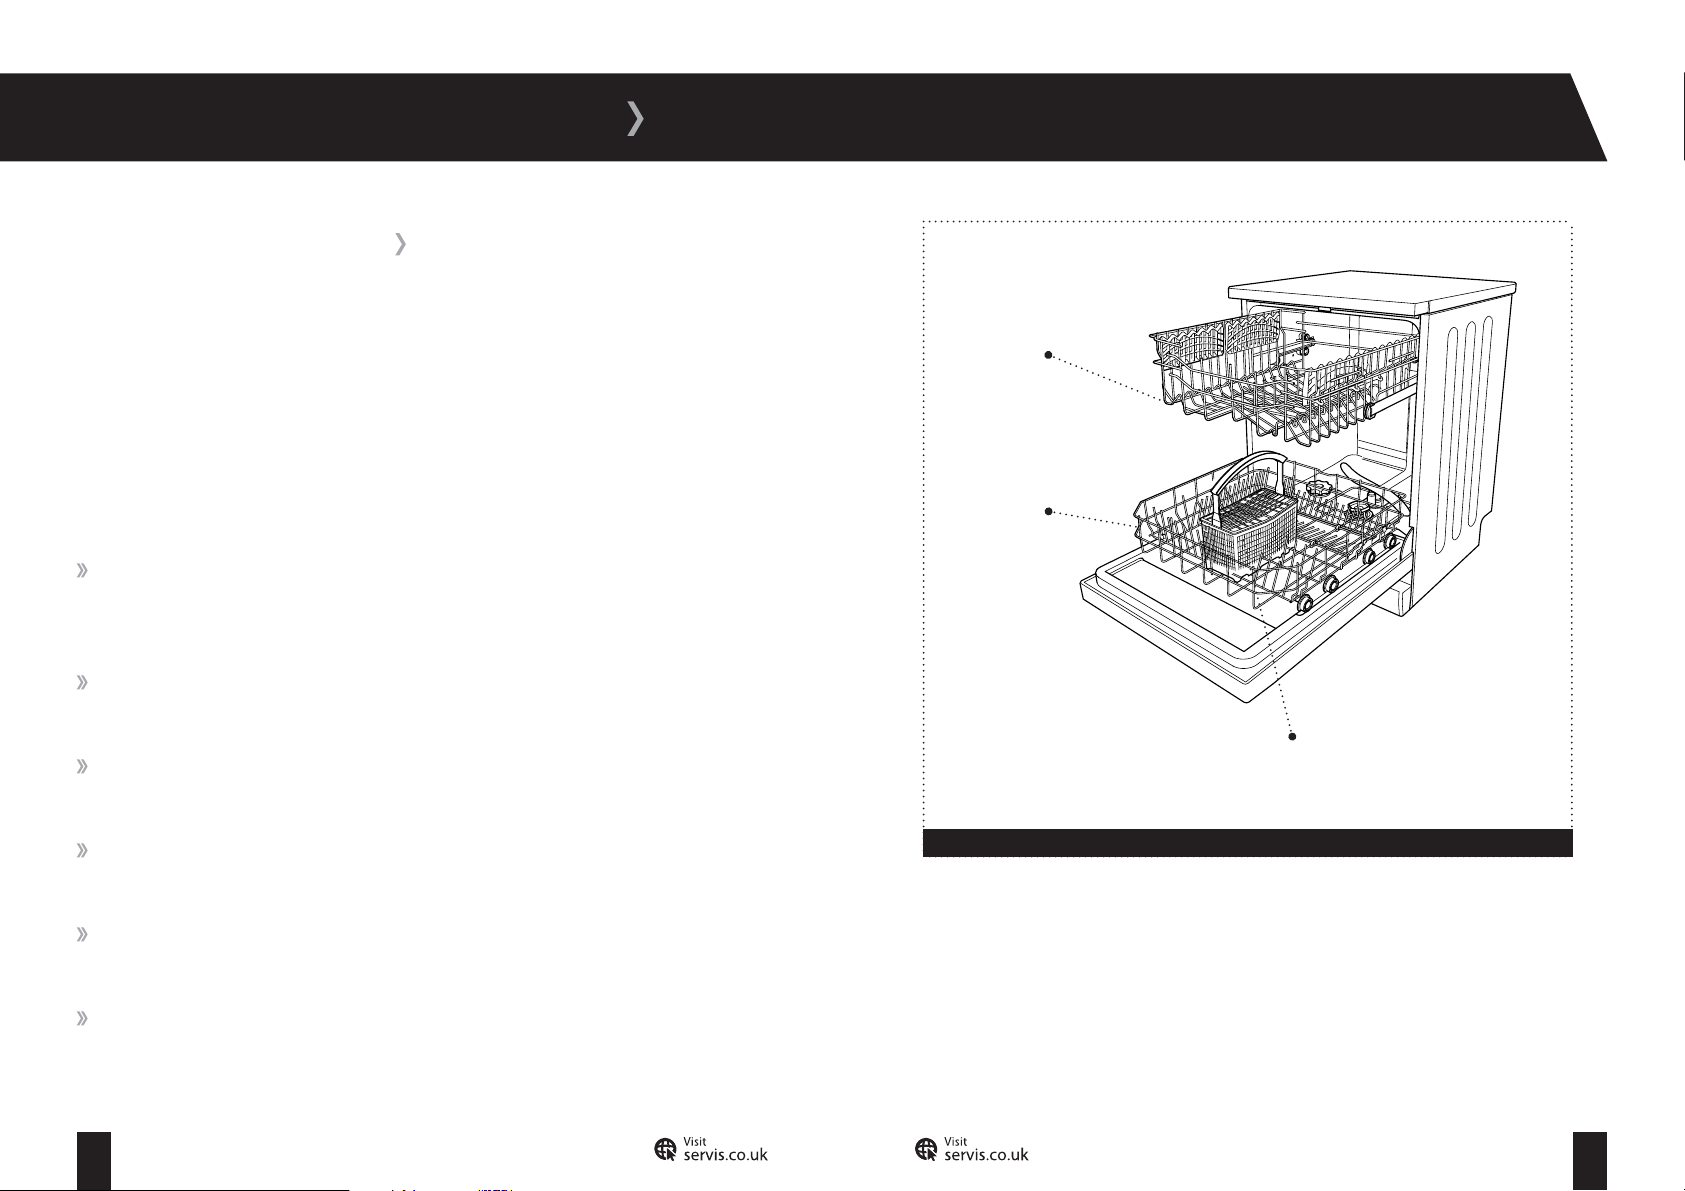
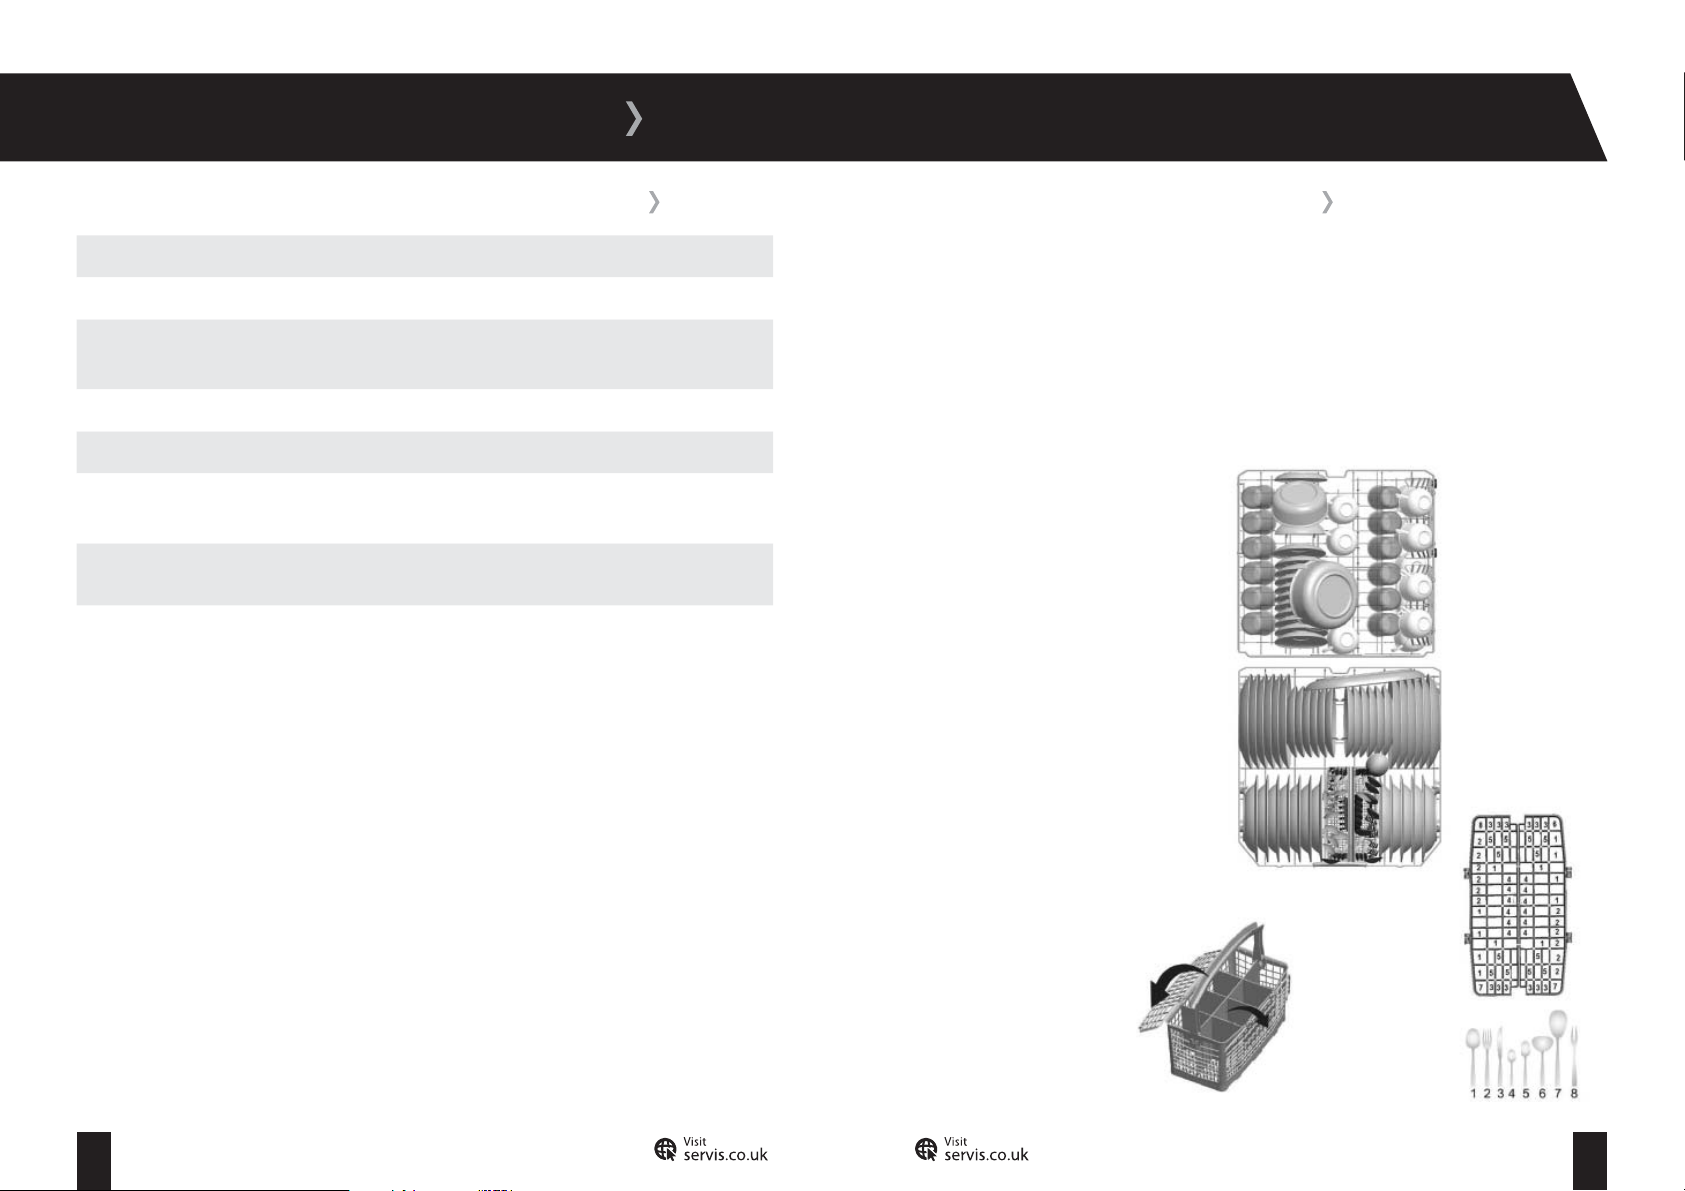
Your Dishwasher has two main baskets for your dishes and a cutlery box for cutlery and other
small items.
The upper basket is designed for tea plates, dessert plates, salad bowls, cups and glasses.
The lower basket is designed for larger or deeper items, such as pots with long handles, pot lids
and large plates.
Upper Drawer
Tips:
If placing long-stemmed glasses or goblets, place them against the basket edge, rack or
glass support wire. Do not place them against each other or other dishes as they may move
about and be damaged.
Place long-handled and sharp-pointed items (e.g. bread knife, carving knife) point
downwards or flat on the baskets to avoid any potential injury.
Do not block the free movement of the spinning arms. Place tall items flat or close to the
edges of the baskets.
Leave space between dishes for the water to spray freely. For example, do not stack plates
against each other.
Place hollow items, such as bowls, glasses and pots into the Dishwasher face-down wherever
possible.
Place spoons amongst other cutlery to prevent them sticking together and not being
washed properly.
Lower Drawer
Cutlery Box
Figure 13
23 24
T: 0800 0124 382 T: 0800 0124 382
Page 15
USING YOUR DISHWASHER
Do Not Block The Upper Spray Arm
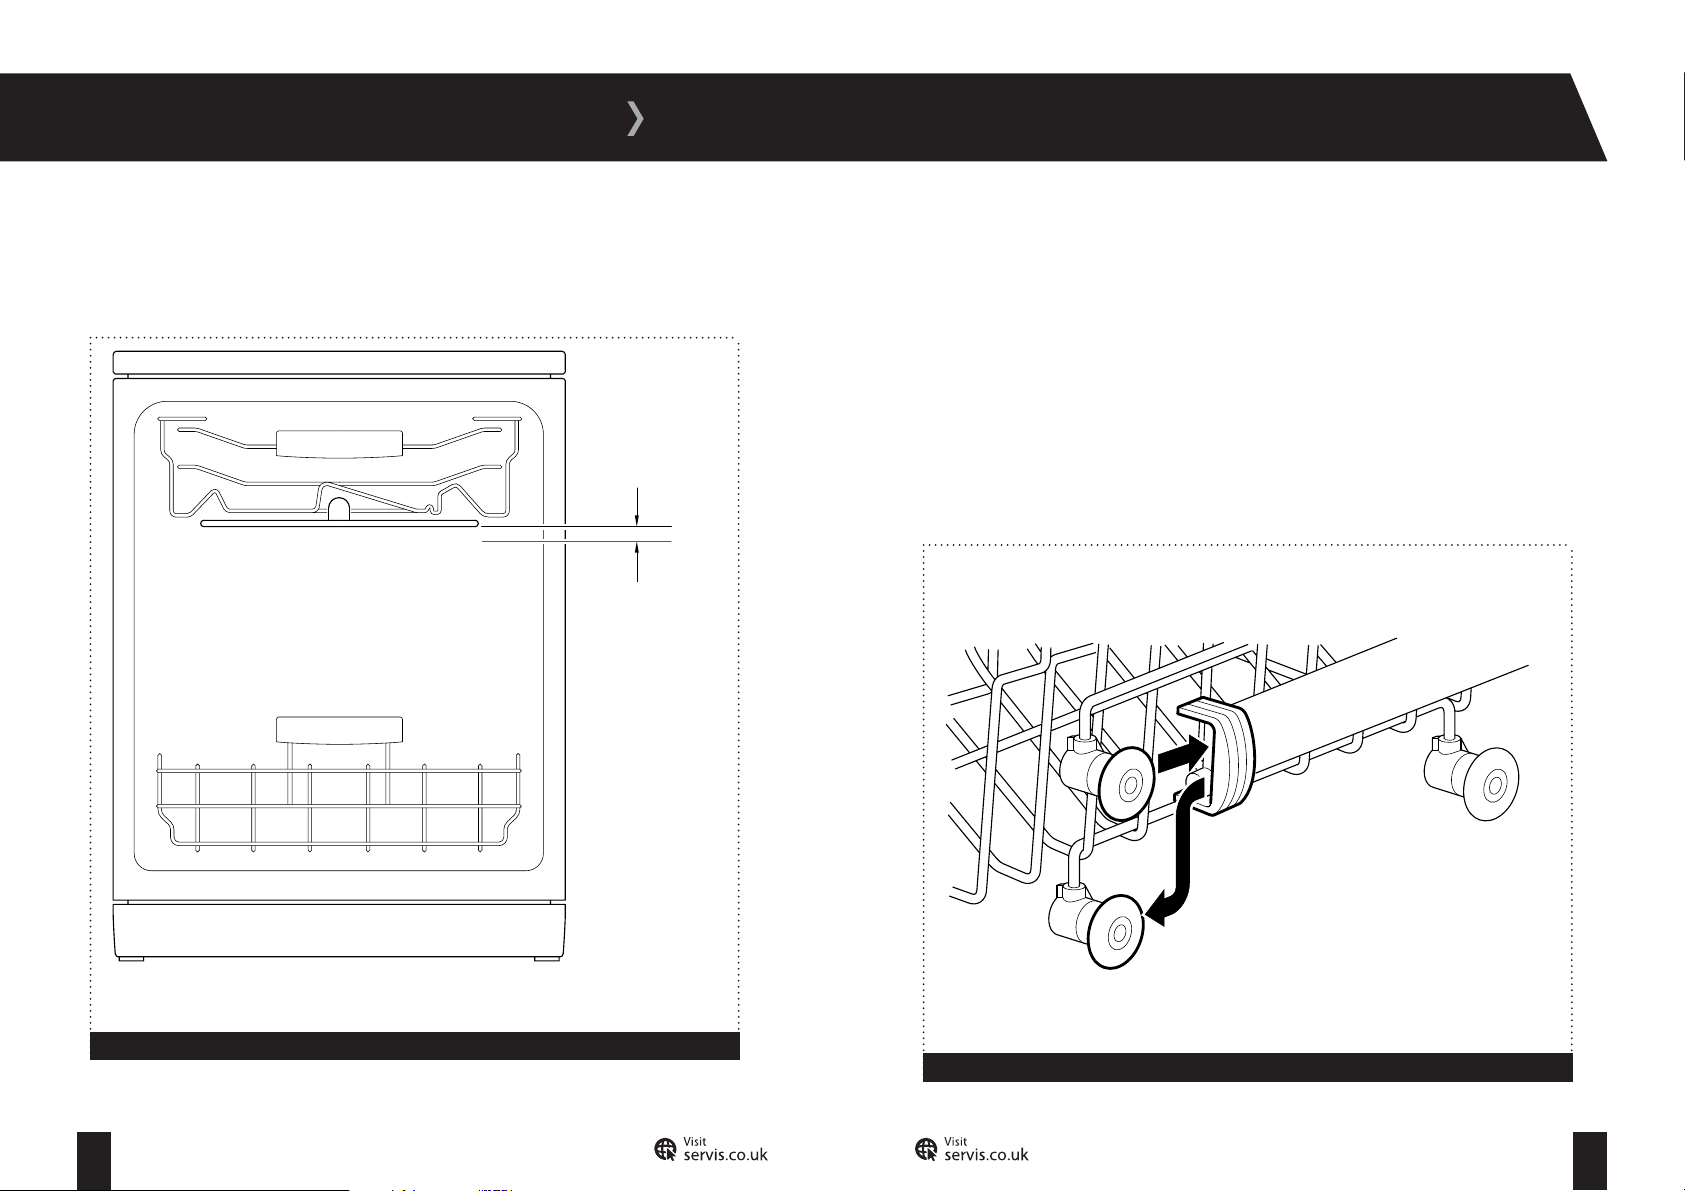
Do not overload the drawers or place items where they can block the rotary spray arms (fig 14). If
necessary, t
he upper basket can be raised to create a larger space in the lower basket.
Maximum
loading height
for lower basket
Adjusting The Upper Basket:
The upper basket can be raised to create a larger space in the lower basket (fig 15). This is
especially useful if you have tall items and need to keep the upper spray arm free.
The upper basket has two sets of wheels. To raise or lower the upper basket, pull the clip at the
end of the retaining arms to the side, slide out the drawer and re-insert it using the other set of
wheels.
CAUTION:
load it.
Make sure the basket is level (i.e. both sides in the same position) before you
Figure 14
Figure 15
25 26
T: 0800 0124 382 T: 0800 0124 382
Page 16
USING YOUR DISHWASHER
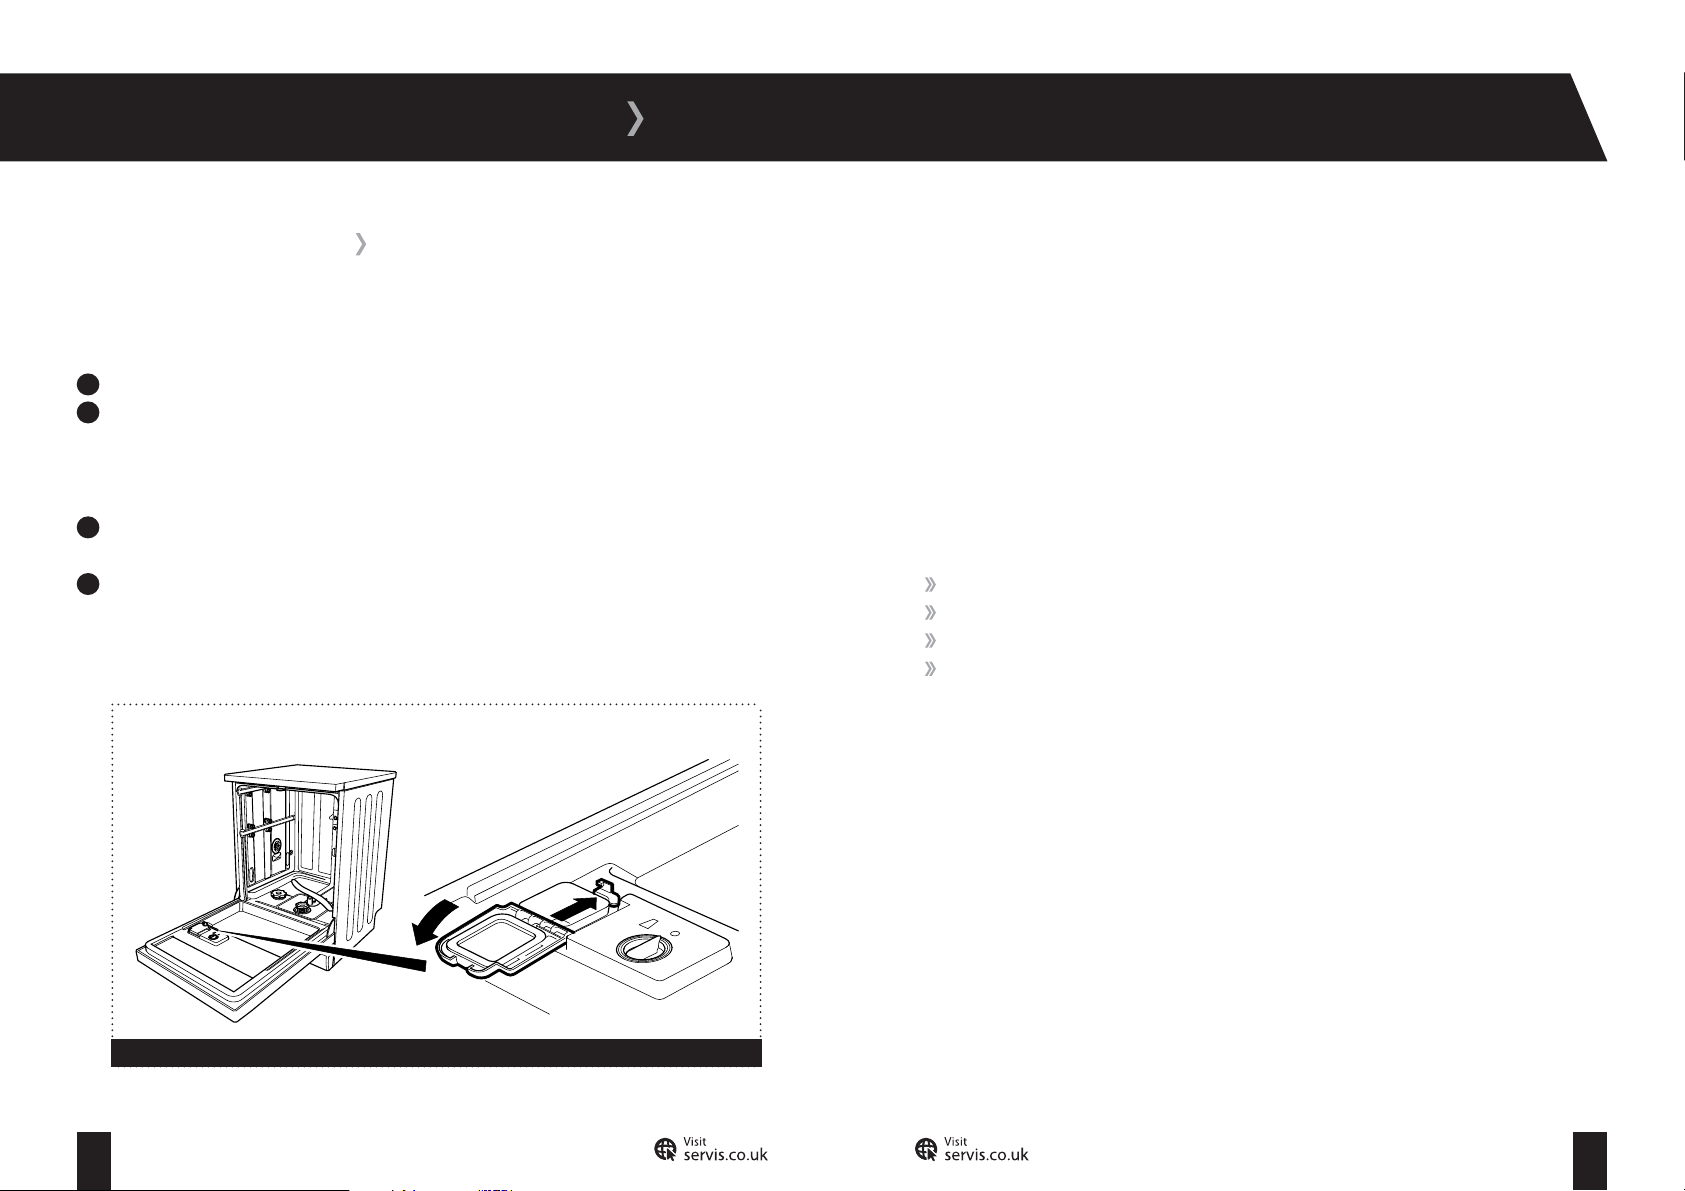
Filling With Detergent
Once you have loaded the Dishwasher, you must put in detergent. To fill the detergent
compartment (fig 16):
1
Push the latch to open the detergent compartment.
2
Use the fill markings in the compartment to put the correct amount of detergent into
the compartment:
25 cm³ if your dishes are heavily soiled
15 cm³ if your dishes are lightly soiled
3
(Optional) If there is dried food waste on your dishes, put 5 cm³ of detergent into the
prewash part of the compartment.
4
Close the detergent compartment.
If your detergent comes in tablet form, put the tablet in the detergent compartment. Do not put
the tablet in any other part of the Dishwasher.
Combined Detergents
Some manufacturers produced combined detergents. These contain a mixture of detergent,
salt and/or rinse aid. Check the labelling on the detergent product you are using and adjust the
amount of salt or rinse aid you use separately in your Dishwasher.
If You Stop Using Combined Detergents
If you stop using combined detergents after a long period of using them, do the following before
you next use your Dishwasher:
Fill the salt and rinse aid compartments.
Adjust the water hardness setting to the highest position and run an empty wash.
Set the water hardness setting to match your water hardness level.
Set the rinse aid setting if required.
Figure 16
27 28
T: 0800 0124 382 T: 0800 0124 382
Page 17
USING YOUR DISHWASHER
Running Your Dishwasher
Once you have loaded your Dishwasher:
1
Close the Dishwasher door.
2
Switch on your Dishwasher. The last programme used is automatically selected.
3
(Optional) Use the Programme Select Button to select a different wash programme.
4
(Optional) Press one of the option buttons (Extra Hygiene, Half Load or Tablet Detergent)
to select an additional option.
5
(Optional) Press the Delay button and use the + and - buttons to set a delay
before the programme will start.
Press the Start/Pause button. The programme will start immediately, unless you have set a
6
delay when it will start after the delay.
If you have set a delay, you can cancel it at any time before it runs out by holding the Start/
Pause button for 3 seconds.
When the selected programme starts you can monitor the progress of the wash cycle using the
wash cycle indicators on the control panel. When the wash programme has stopped, switch off
Dishwasher
the
Do not open the door while the Dishwasher is running.
before opening the door and emptying it.
Changing The Programme While It Is Running
To change programmes while the Dishwasher is running:
1
Press the Start/Pause button to pause the programme.
2
Use the Programme Select Button to select a different wash programme.
3
Press the Start/Pause button to restart the wash using the new programme.
Cancelling The Programme While It Is Running
To cancel the running Dishwasher programme:
1
Press and hold the Start/Pause button for 3 seconds until the finish light blinks.
2
Wait 30 seconds while the Dishwasher discharges any water inside the machine. The finish
light will blink while this takes place.
3
Press the On/Off button before opening the door.
CAUTION:
selected and the stage it had reached when you cancelled it. Be careful of escaping steam
when you open the Dishwasher door.
The interior of the Dishwasher may be hot, depending on the programme
Child Lock
After you have started a programme (or a delay) you can lock the control panel to prevent the
settings being changed while the Dishwasher is running.
To lock the control panel, hold down the + and - buttons for 3 seconds. The display will read ‘CL’.
To unlock the control panel, hold down the + and - buttons for 3 seconds.
29 30
T: 0800 0124 382 T: 0800 0124 382
Page 18
USING YOUR DISHWASHER
DISHWASHER PROGRAMMES
Programmes Wash
Tem p.
(°C)
Prewash 35 Fresh less dirty, coffee, milk, tea Small **B 18 0.45 7.7 18 0.45 7.7
Quick 40°C 30 Min. 40 Coffee, tea, milk,
Delicate 40 Cold meat, vegetables, not kept for
Eco 50 Coffee, tea, milk,
***Super 50 Min. 65°C 65 Soups, sauces, pasta, eggs, pilaf,
Intensive 65 Dishes with dense dirt waiting for
Types of food fragments Contamination
Level
Small A 30 0.90 12.4 30 0.90 12.4
cold meat, vegetables, not kept for
long
Small A 73 0.95 15.7 63 0.93 11.7
long
Medium A+B 160 0.95 12.4 145 0.93 8.7
cold meat, vegetables, not kept for
long
Medium A+B 50 1.43 12.7 46 1.28 12.7
potatoes, oven dishes, fried food
High A+B 113 1.64 17.2 94 1.37 12.2
a long time or requiring hygienic
washing
Amount of
Detergent
Required*
Prog.
Duration
(minutes)
Full Load Half Load
Power
Used
(Kw/hour)
Water
Used
(Litres)
Prog.
Duration
(minutes)
Power
Used
(Kw/hour)
Water
Used
(Litres)
* Amount of detergent required: A - 25 cm³/15 cm³. B - 5cm³.
** Only powder detergent should be used in cycle of prewash programme.
*** You can wash your dishes through washing performance A by using a cycle of Super 50 Min.
Note: Values above have been tested according to related standards in lab conditions. These values may vary due to environment conditions (mains voltage, water pressure, water inlet temperature
and the ambient temperature).
31 32
T: 0800 0124 382 T: 0800 0124 382
Page 19
USING YOUR DISHWASHER
DISHWASHER PROGRAMMES - WASH STEPS
Programmes Steps
Prewash Prewash End
Quick 40°C
30 Min.
Delicate Prewash 40°C wash Cold rinse Hot rinse Dry End
Eco Prewash 50°C wash Cold rinse Hot rinse Dry End
Super 50 Min.
65°C
Intensive 45°C wash 65°C wash Cold rinse Hot rinse Dry End
Note: The Prewash, Quick 40°C 30 Min.
drying step
40°C wash Cold rinse Hot rinse End
65°C wash Intermediate
rinse
and
.
Hot rinse End
Super 50 Min. 65°C
minute programmes have no
STANDARD LOADS AND TEST DATA
Capacity
Upper and lower baskets: 12 place settings. The upper basket should be adjusted to the lower
position (see page 26 for further information).
Detergent/Rinse Aid
5+ 25 cm³, in accordance with EN50242-DIN 44990 IEC 436 (international norms).
Rinse aid dosage adjustment: 2.
Programme Test
50°C, in accordance with
Eco
EN 50242 (international norms).
33 34
T: 0800 0124 382 T: 0800 0124 382
Page 20
MAINTENANCE
GENERAL MAINTENANCE
From time to time it may be necessary to carry out some routine maintenance of your
Dishwasher to ensure that it operates as intended. Before cleaning your Dishwasher:
1
Turn your mains power supply off and remove the plug from the socket.
2
Turn off the cold water supply.
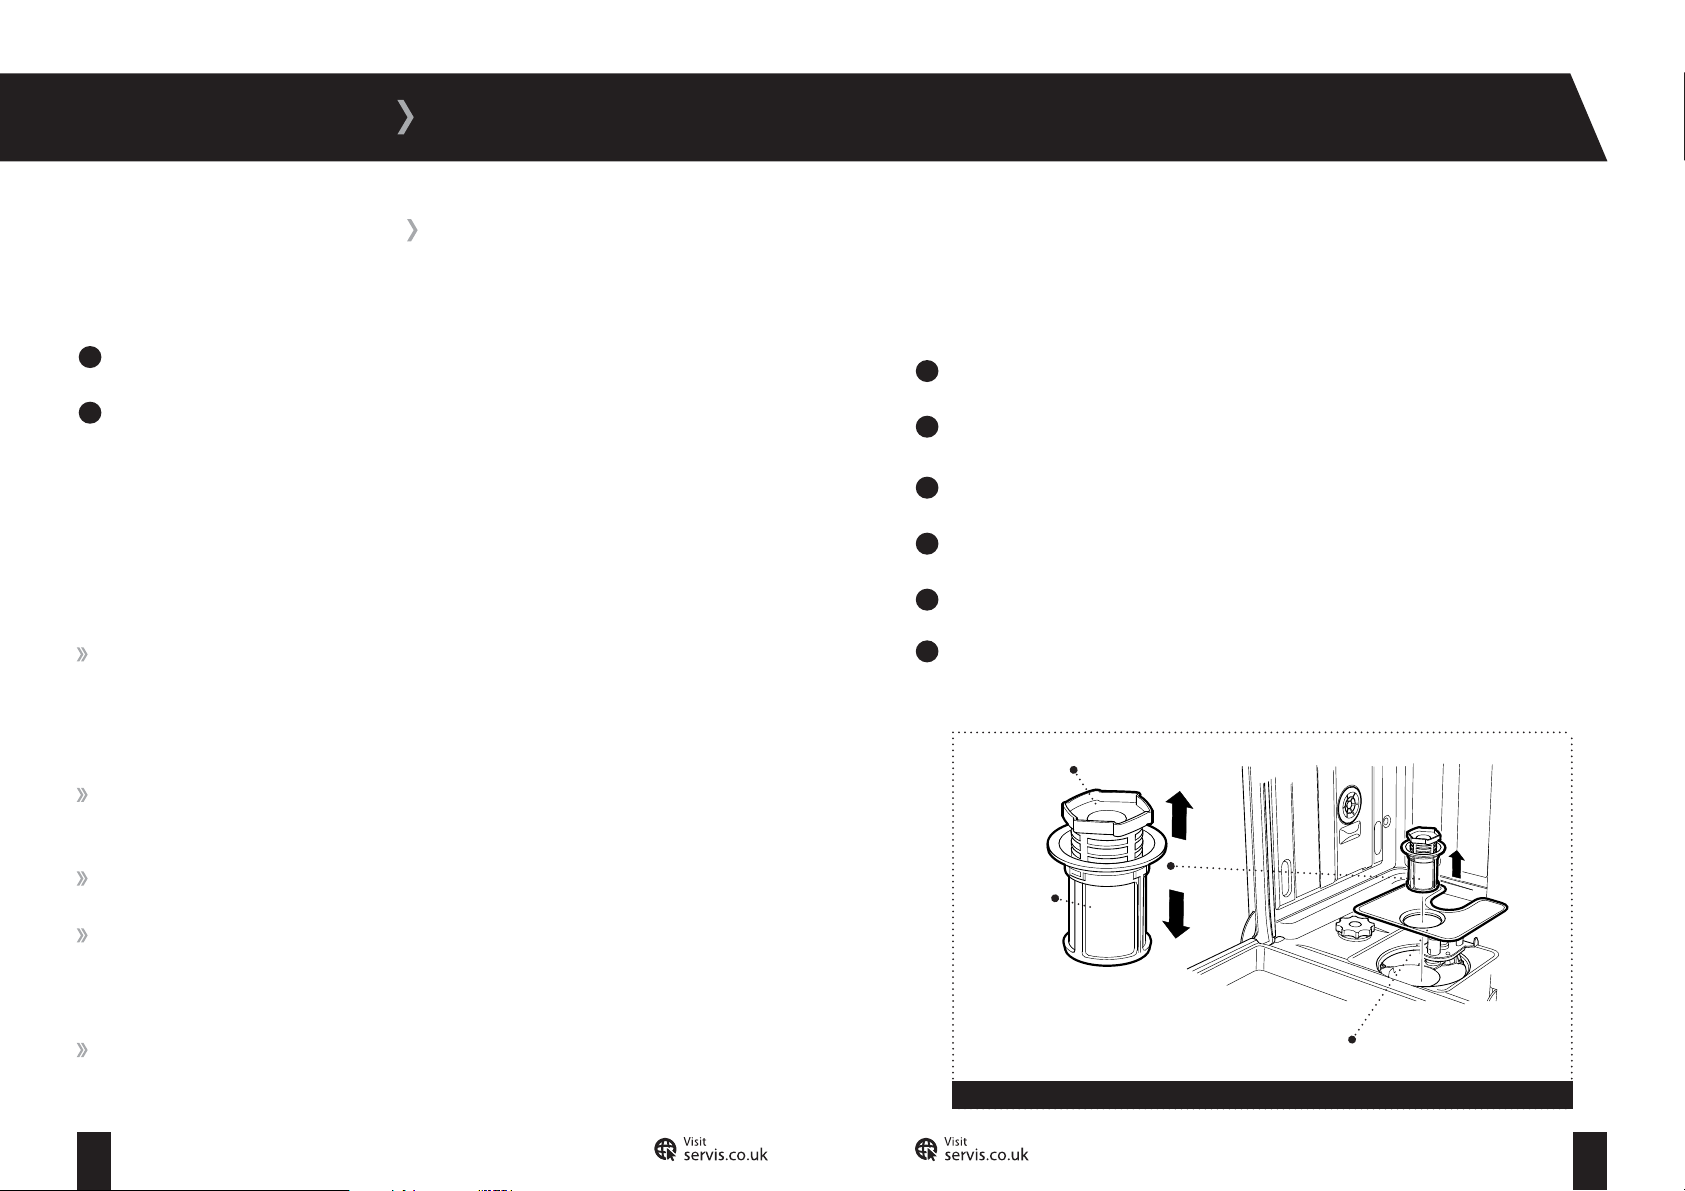
Filters:
If any food waste remains on the coarse and fine filters, remove them and clean them
thoroughly. To clean the filters:
1
Turn the filter assembly counter clockwise and lift it out (fig 17).
2
Lift the metal/plastic filter out.
CAUTION:
agents to clean your Dishwasher. They may damage the plastic surfaces and other components
with the chemicals they contain.
External Casing:
Use a mild, non-abrasive cleaning agent, or soap and water, to clean the external casing.
Wipe dry with a soft cloth.
Inside:
Use a suitable stainless steel cleaning agent to clean inside the Dishwasher. Follow the
manufacturer’s advice on the cleaning agent’s packaging.
Wipe the door seals regularly with a damp cloth to remove any accumulated residue.
Clean the filters and spray arms at least once a week.
Extra Cleaning:
Oil and lime may build up in your Dishwasher over time. If this occurs, fill the detergent
compartment with a cleaning agent designed for use with dishwashers, select a
programme which runs at high temperature and run the
Do not use solvents, abrasive cleaners, glass cleaners or all-purpose cleaning
Dishwasher
empty.
Separate the coarse and micro filters by pulling them apart.
3
Rinse the filters under the tap until free of residue.
4
Replace the metal/plastic filter.
5
6
Line up the arrows on the coarse and micro filters and clip them together, then replace the
filter assembly in the
Coarse Filter
Micro Filter
Filter Assembly
Figure 17
Dishwasher
, turning it clockwise until it locks in position.
Metal/Plastic Filter
35 36
T: 0800 0124 382 T: 0800 0124 382
Page 21
MAINTENANCE
Spray Arms:
Water Inlet Filters:
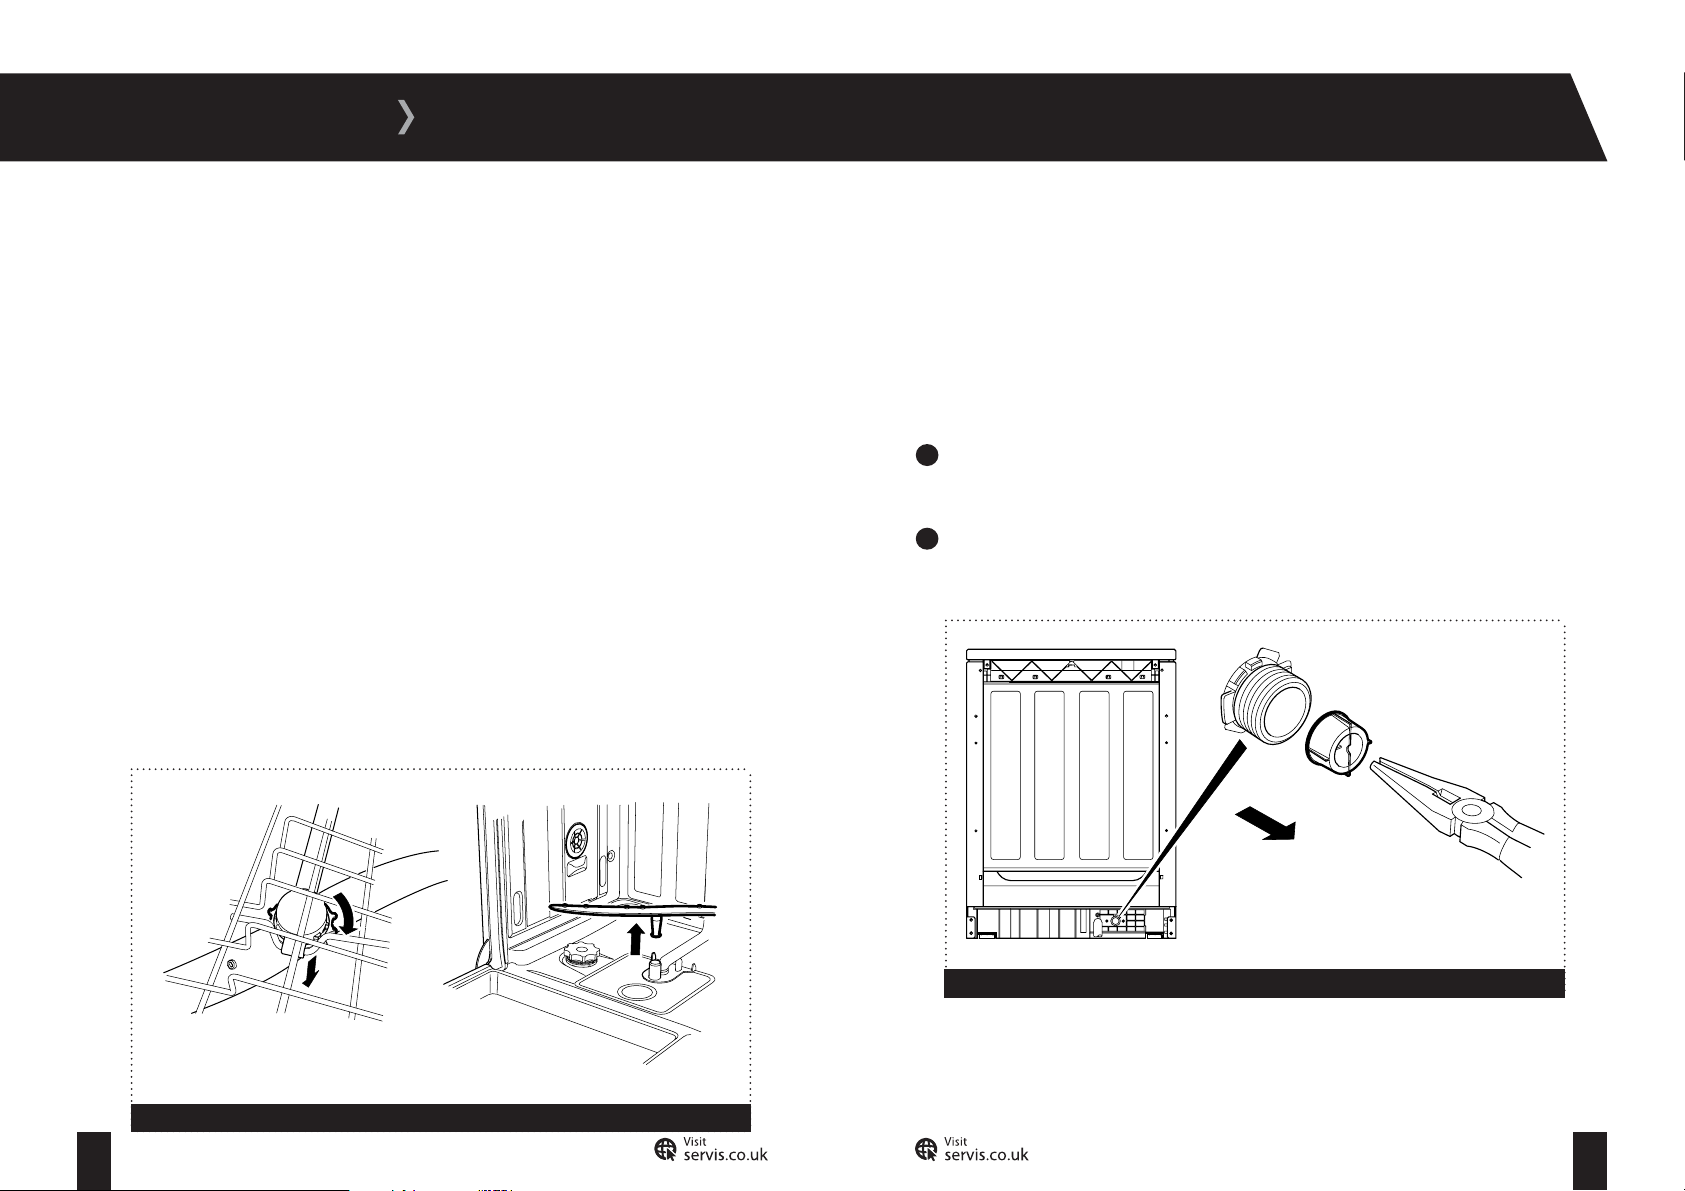
Your Dishwasher contains two spray arms (fig 18). One at the bottom of the
on the underside of the upper basket.
Make sure that the spray holes are not clogged and that no food waste is stuck to the spray
arms. If you need to clean the spray arms, remove them from the
under water.
To remove the lower spray arm, pull it upwards. To replace it, push it firmly until it clicks into
place.
To remove the upper spray arm, undo the nut holding it in position by turning it clockwise and
pulling it downwards. To replace it, push it upwards into the mounting, then turn it counter
clockwise until it clicks into position.
CAUTION:
operating the Dishwasher othersie the spray arm could detach in use and damage any dishes in
the lower basket.
Make sure that the nut holding the upper spray arm in position is tight before
Dishwasher
Dishwasher
and clean them
and one
Water inlet filters prevent dirt and foreign materials from entering your
recommended that these filters are cleaned when your
sufficient water, although your water supply is on and the tap is open.
To clean the water inlet filters (fig 19):
1
Unscrew the water inlet hose from the
gently pulling.
2
To remove the water inlet filter from the water inlet valve, use a pair of long-nosed pliers to
gently pull on the plastic bar in the filter.
Dishwasher
Dishwasher
by turning the hose anti-clockwise and
Dishwasher
is unable to receive
. It is
Figure 19
Upper Spray Arm Lower Spray Arm
Figure 18
37 38
T: 0800 0124 382 T: 0800 0124 382
Page 22
MAINTENANCE
3
Clean the filter thoroughly with a soft brush, wash with soapy water and rinse thoroughly.
4
Re-insert the filter by gently pushing it back into place.
A second water inlet filter is located in the tap end of the water inlet hose.
To remove the second water inlet filter:
1
Use a pair of long-nosed pliers to gently pull on the plastic bar in the filter.
2
Clean the filter thoroughly with a soft brush and wash with soapy water and rinse
thoroughly.
3
Re-insert the filter by gently pushing it back into place.
39 40
T: 0800 0124 382 T: 0800 0124 382
Page 23
TROUBLESHOOTING
TROUBLESHOOTING INFORMATION
If your Dishwasher is not operating as expected, you may find a simple solution listed in the
table below.
If your Dishwasher has developed a fault not covered in this manual, please contact the Servis
helpdesk.
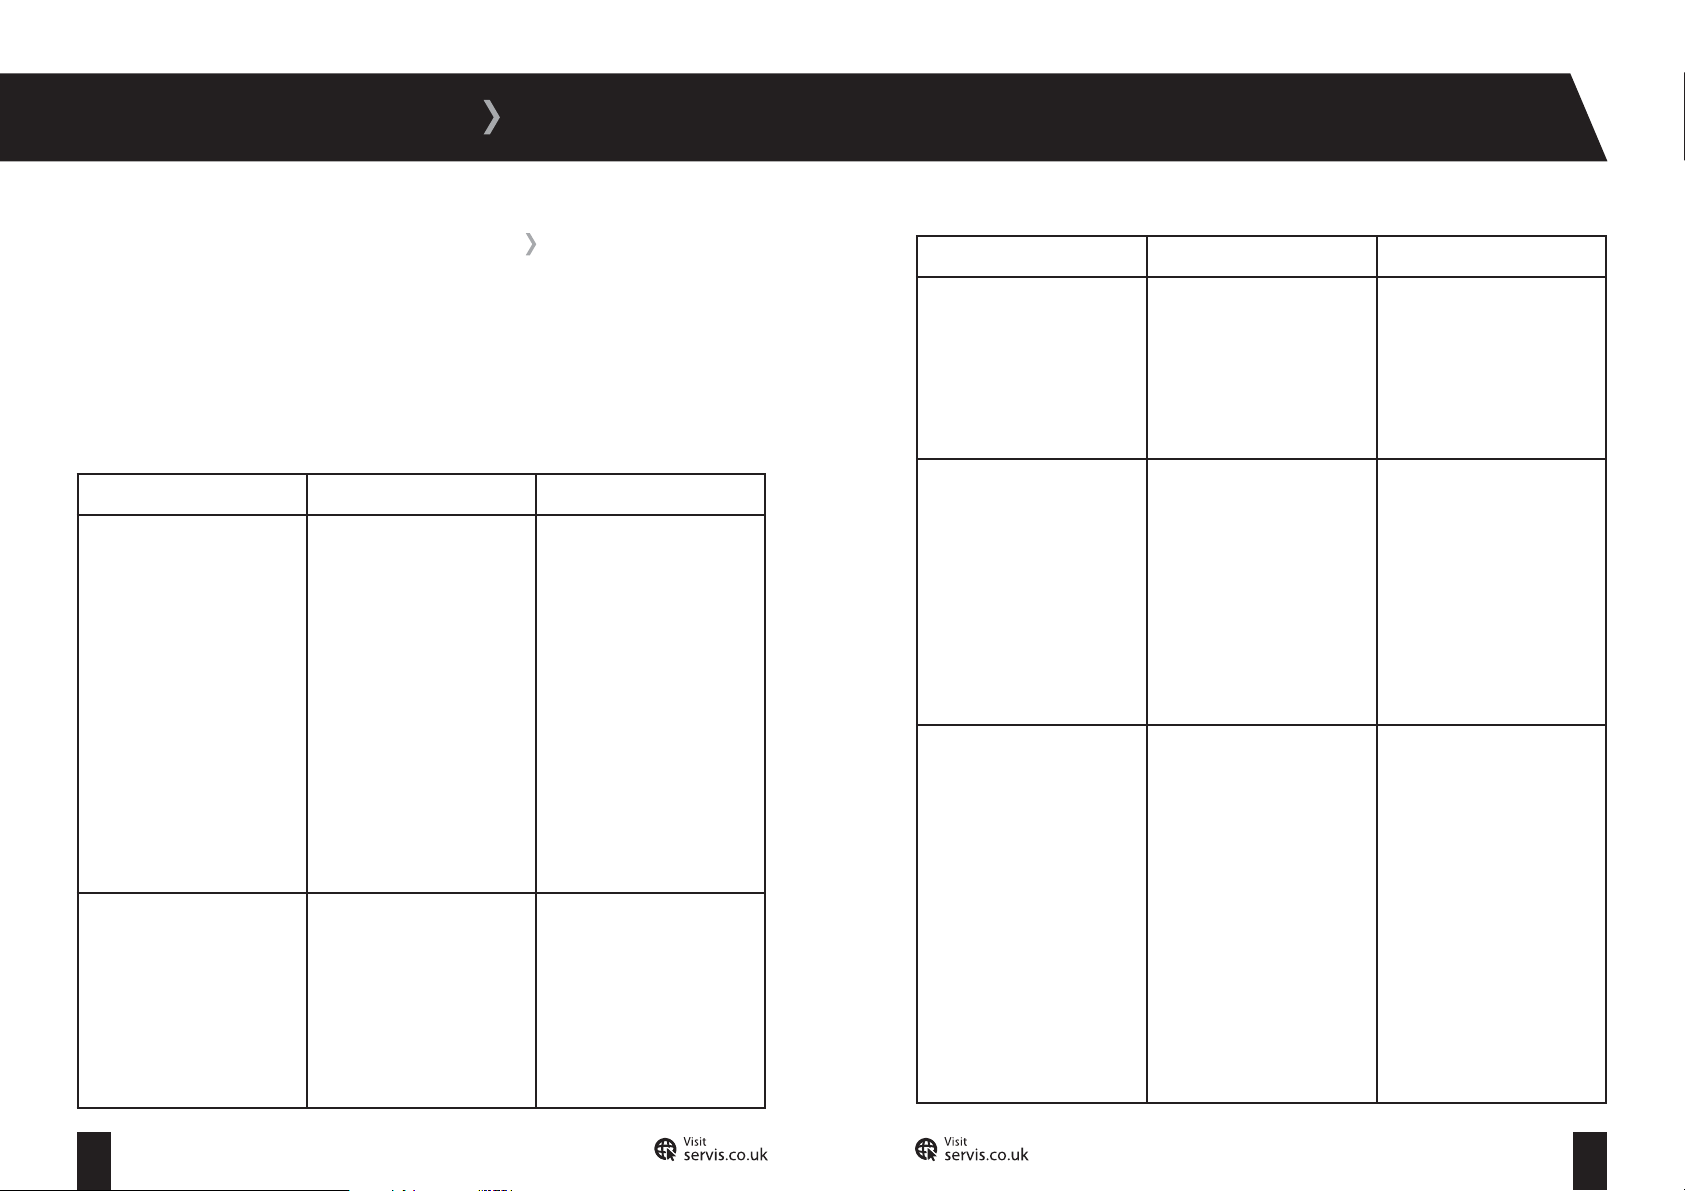
Fault Possible Cause Solution
Your Dishwasher does not
operate.
Your Dishwasher does not
receive water.
It is switched off at the
mains.
The on/off switch is in the off
position.
The door is not shut properly.
The cold water supply tap
is off.
The water fill hose is bent,
twisted, kinked or trapped.
Check that your Dishwasher
is plugged in and turned on at
the mains.
If problem persists check your
indoor fuses.
Press the on/off switch
and select the desired
programme.
Check that the door ‘clicks’
shut.
Check that the cold water
supply tap is fully turned on.
Check that there are no
bends, twists or kinks and
that the fill hose is not
trapped.
Fault Possible Cause Solution
Your Dishwasher does not
receive water.
Your Dishwasher is not
draining water.
Your Dishwasher stops during
a wash operation.
The door is not closed
properly.
The water inlet filters are
blocked.
The drain hose is bent,
twisted, kinked or trapped.
The filters are blocked.
The programme is not
finished.
The programme delay is set.
The water fill hose is bent,
twisted, kinked or trapped.
There is a power failure.
Close the door.
Clean the water inlet filters
(see page 38 for detailed
instructions).
Check the drain hose and
straighten out any kinks,
twists or bends.
Clean the filters (see page 36
for detailed instructions).
Leave the Dishwasher until
the programme is finished.
Wait for the delay to finish,
or reset the delay period
(see page 29 for detailed
instructions).
Check that there are no
bends, twists or kinks and
that the fill hose is not
trapped.
Wait for the power to come
back on. If necessary, re-run
the programme.
41 42
T: 0800 0124 382 T: 0800 0124 382
Page 24
TROUBLESHOOTING
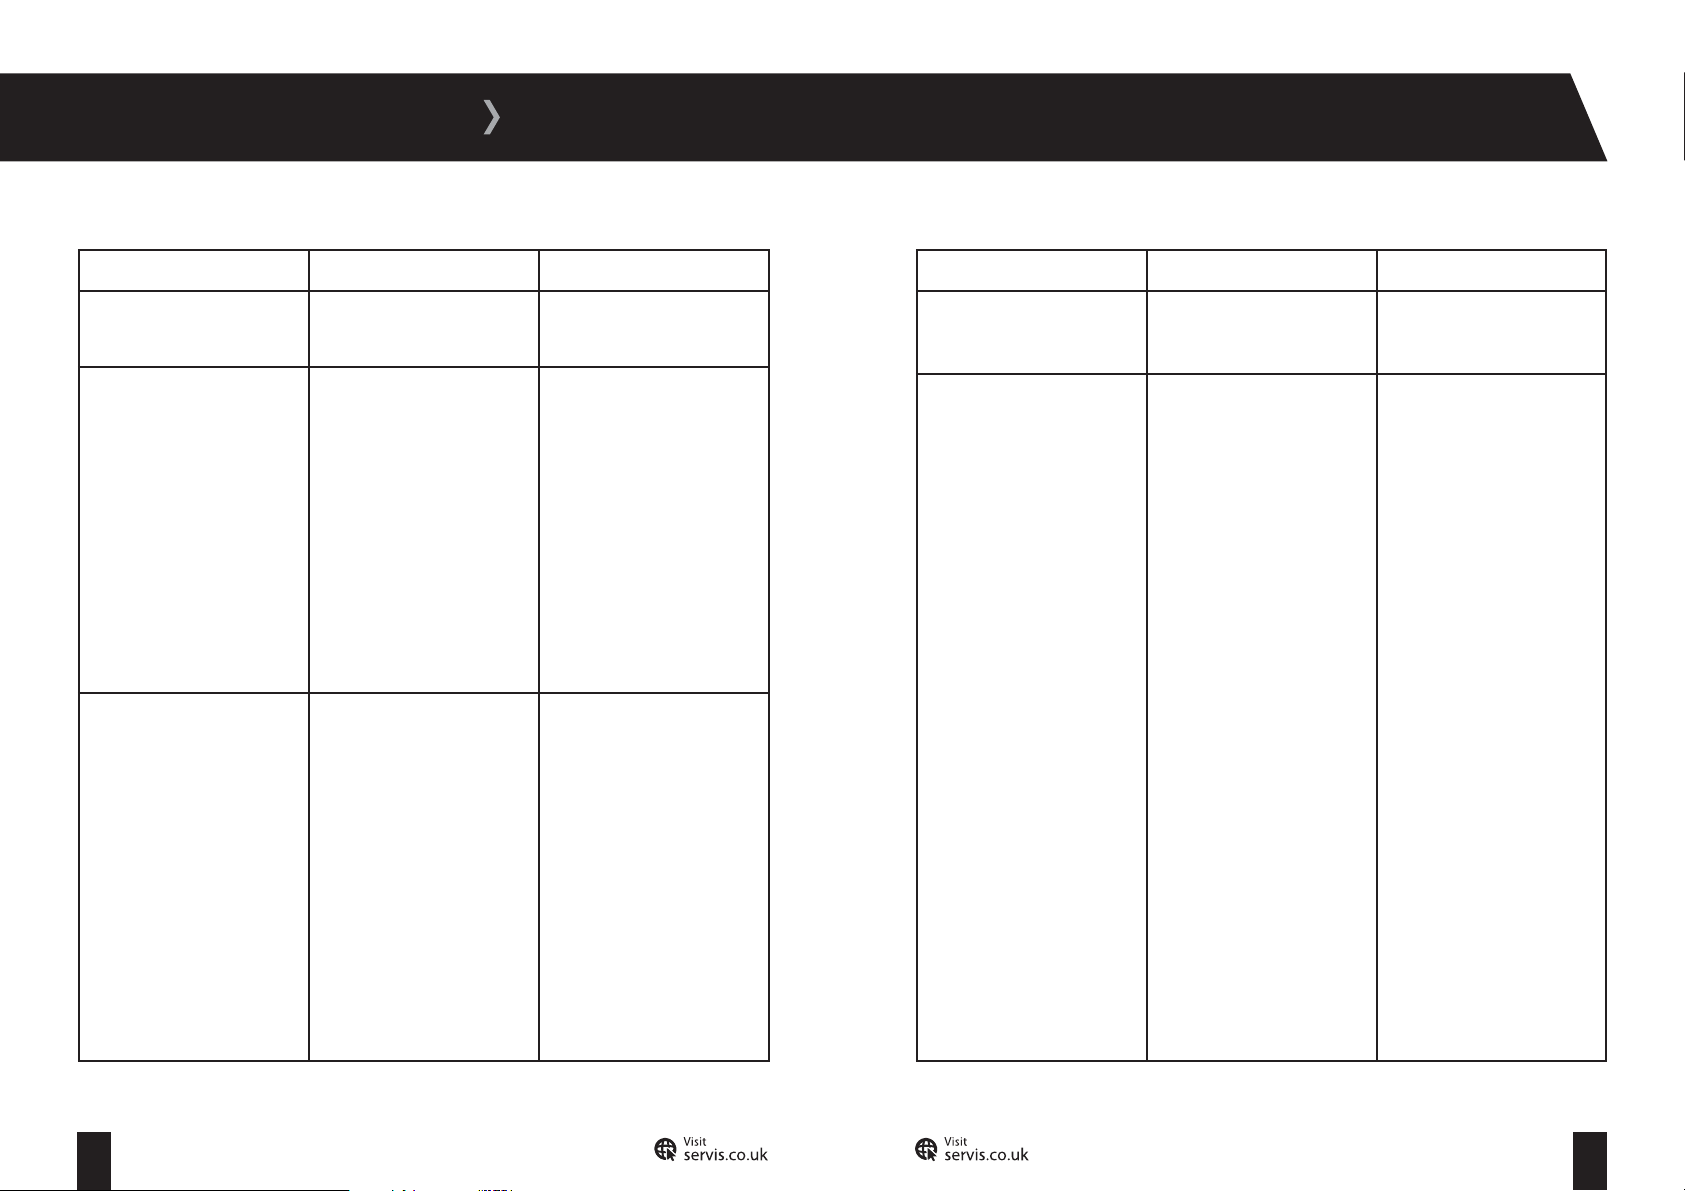
Fault Possible Cause Solution
Your Dishwasher is vibrating. The feet of your
are not correctly adjusted.
Knocking noises are coming
from inside your Dishwasher
during a wash programme.
White stains left on dishes
after washing.
Dishes are placed incorrectly
or are loose in the
Dishwasher
The spray arm is hitting the
dishes in the lower basket.
Not enough detergent used.
Rinse aid dosage set too low.
No special salt is being used,
despite high water hardness
level.
Water softener setting set
too low.
.
Dishwasher
Adjust the feet (see page 13
for further information).
Press the Start/Pause button
to pause the programme.
Open the Dishwasher
(CAUTION: the interior will be
hot and steam may come out)
and rearrange the dishes.
Pause Dishwasher, as
described above, and move
or remove items blocking the
spray arm.
Use more detergent.
Increase rinse aid dosage
setting (see page 22 for
further information).
Use Dishwasher salt
recommended for the water
hardness level in your area.
Set the water softener level
to a higher setting (see page
20 for further information).
Fault Possible Cause Solution
White stains left on dishes
after washing.
Food waste left on dishes
after washing.
Salt compartment cap not
closed properly.
Too much food waste left on
dishes when they are placed
in the Dishwasher.
Close salt compartment cap
properly.
Remove coarse residues and
food waste from your dishes
before placing your dishes in
the Dishwasher.
Not enough detergent used.
Wrong wash programme
selected.
Spray arms clogged with food
waste.
Filters clogged.
Filters incorrectly fitted.
Water drain pump clogged.
Basket overloaded.
Use more detergent.
Use a more powerful wash
programme.
Clean spray arms (see page
37 for further information).
Clean filters (see page 36 for
further information).
Check filters are correctly
fitted.
Remove filters and clear
water drain.
Do not overload baskets.
43 44
T: 0800 0124 382 T: 0800 0124 382
Page 25
TROUBLESHOOTING
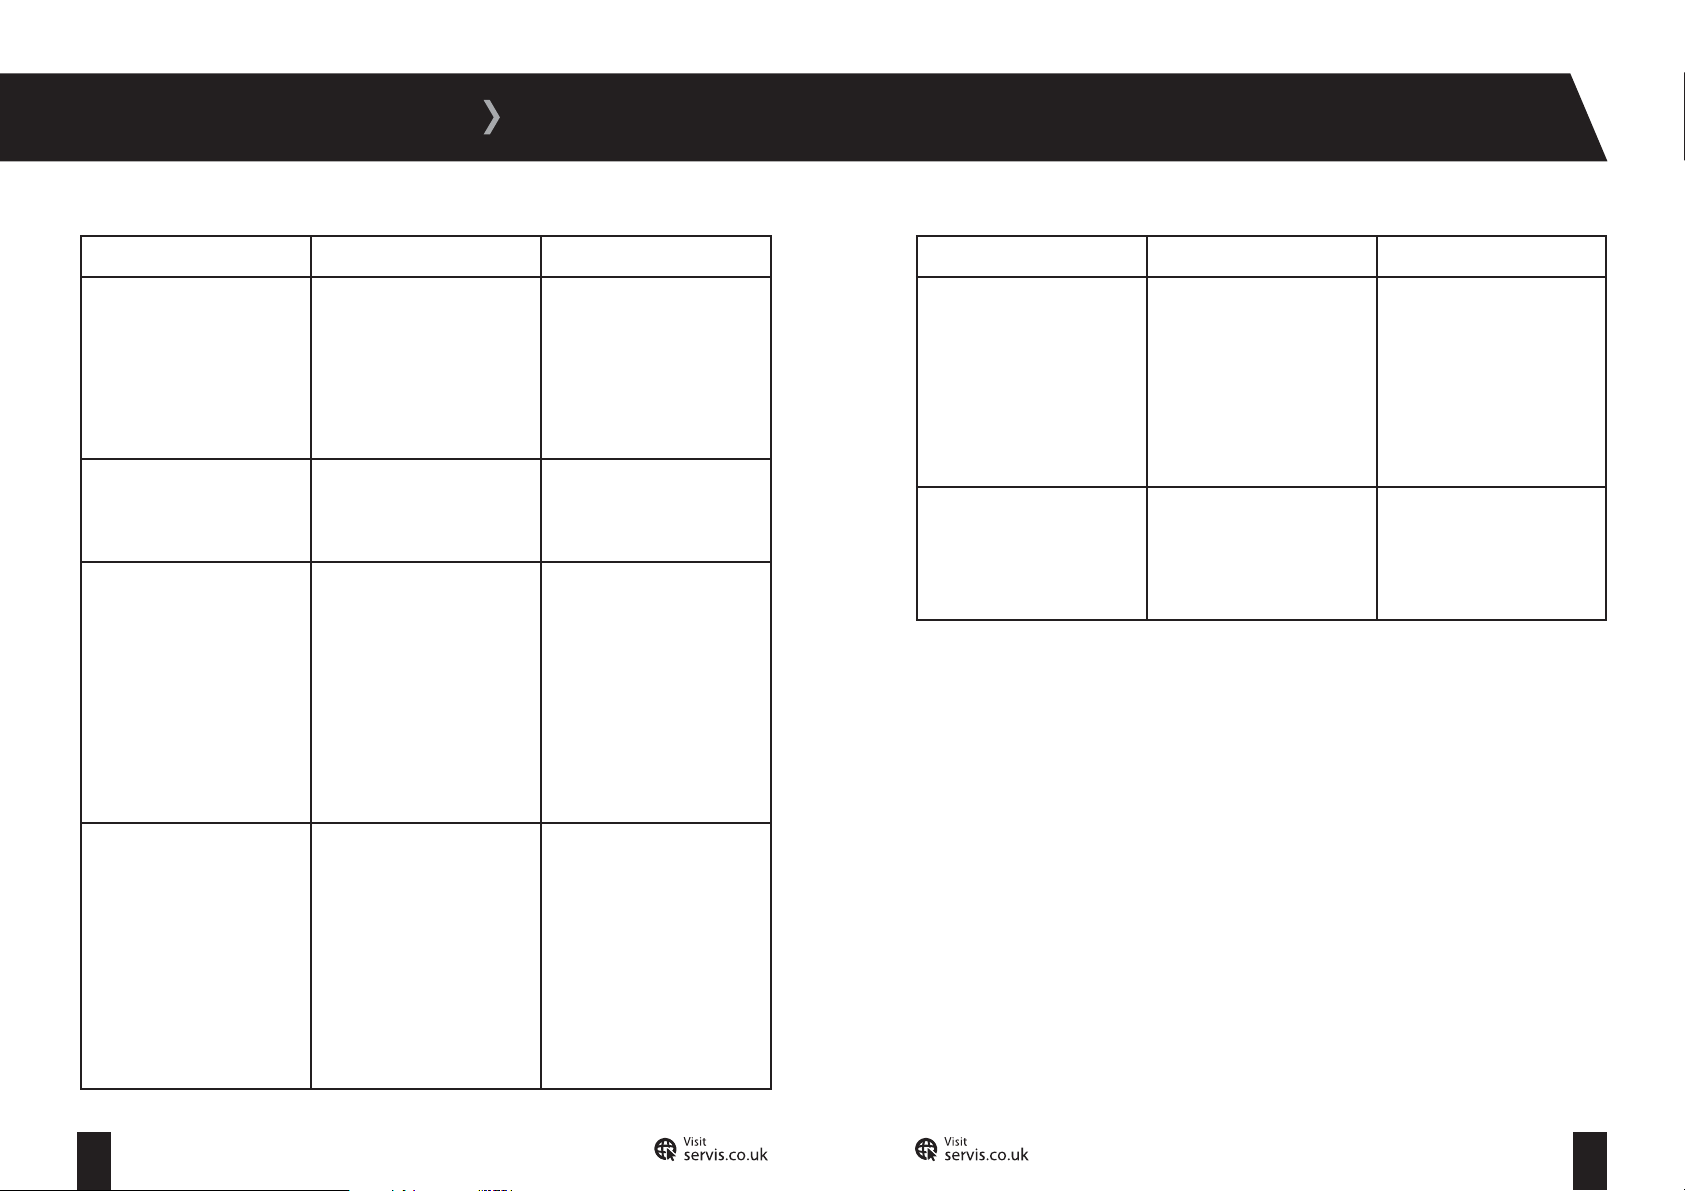
Fault Possible Cause Solution
Food waste left on dishes
after washing.
Detergent residue left in
detergent compartment.
Dishes aren’t dry. Programme without a dry
Dishes placed incorrectly,
sprayed water not reaching
affected dishes.
Dishes leaning against one
another.
Detergent was added when
detergent compartment was
wet.
operation selected.
Rinse aid dosage set too low.
Dishes unloaded too fast.
Do not overload baskets.
Do not overload baskets.
Make sure detergent
compartment is dry before
use.
Select another programme.
Increase rinse aid dosage
setting (see page 22 for
further information).
Allow dishes to stand before
unloading the
Dishwasher
Fault Possible Cause Solution
Rust stains on dishes. Satinless-steel quality of
dishes is insufficient.
Unhealthy mains grounding.
Scratched glasses. Too much detergent used.
Salt compartment cap not
closed properly.
If problems persist or you experience any malfunctions not described here, contact an authorised
Servis engineer.
.
Contact the manufacturer of
the dishes. Alternatively, do
not wash the affected dishes
in your Dishwasher.
Consult a qualified electrician
immediately.
Use less detergent.
Close salt compartment cap
properly.
Rust stains on dishes. Salt compartment cap not
closed properly.
Too much salt spilled in the
Dishwasher
with salt.
High level of salt in wash
water.
45 46
T: 0800 0124 382 T: 0800 0124 382
while filling it
Close salt compartment cap
properly.
Clean excess salt from the
Dishwasher
Contact your water company.
.
Page 26
TROUBLESHOOTING
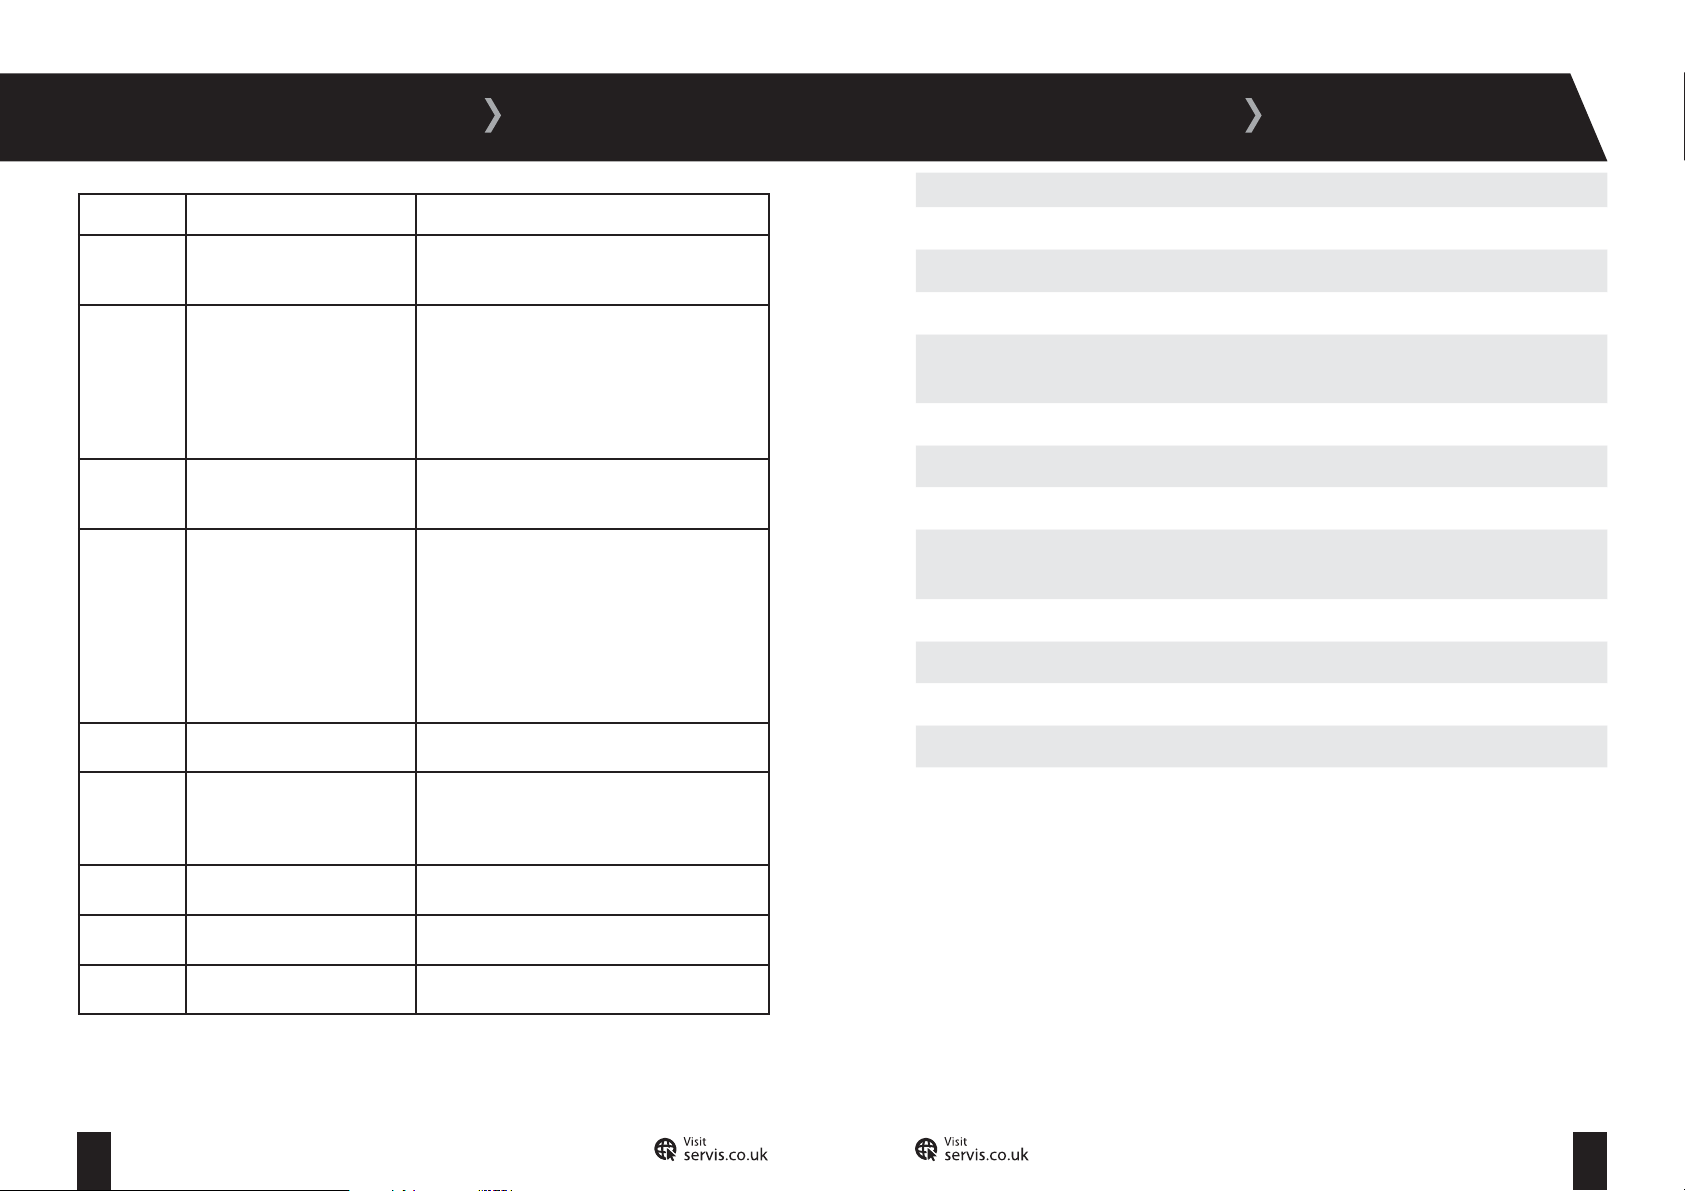
Error Code Error Description Solution
F1 Alarm is active against water
overflow
F2 Waste water in the machine
cannot be discharged
F3 Error of continuous water
input
Switch off the Dishwasher and the tap, then
contact an authorised Servis engineer.
Check that the water discharge hose is not
clogged or pinched.
Check the filters are not clogged.
Cancel the programme and switch off your
Dishwasher.
Switch off the tap, then contact an authorised
Servis engineer.
PRODUCT FICHE
Supplier’s trade mark SERVIS
Supplier’s model DC6652W
Capacity of dishwasher (place settings) 12
Energy efficiency class A+
Annual energy consumption in kWh per year
(AEc) (280 Cycle)*
Energy consumption (E
Off mode power consumption (W) (P
Left on mode power consumption (W) (P1) 1.0
) (kWh per cycle) 0.95
t
) 0.05
0
273
F5 Inadequate water supply Check that the water input tap is fully open.
Check that your mains water supply has not
been cut off.
Close the water input tap, remove the
water input hose and clean the filter at the
connection end of the hose.
F6 Faulty heater sensor Contact an authorised Servis engineer.
F7 Overheating error (the
temperature in the
Dishwasher is too high)
F8 Heater error Contact an authorised Servis engineer.
F9 Divisor position error Contact an authorised Servis engineer.
FE Faulty electronic card Contact an authorised Servis engineer.
If problems persist contact an authorised Servis engineer.
Contact an authorised Servis engineer.
Annual water consumption in litres per year
(AWC) (280 Cycle)**
Drying efficiency class*** A
Standard programme name**** Eco 50°C
Programme time for standard cycle (min) 160
Noise dB(A) 52
Notes
* Energy consumption 273 kwh per year, based on 280 standard cleaning cycles using cold water
fill and the consumption of low power modes. Actual energy consumption will depend on how
the appliance is used.
** Water consumption 3360 litres per year based on 280 standard cleaning cycles. Actual water
consumption will depend on how the appliance is used.
*** Drying efficiency class A on a scale from G (least efficient) to A (most efficient).
**** The
relates. It is the most efficient program in terms of combined energy and water consumption.
Eco 50°C is the standard cleaning cycle to which the information in the label and fiche
3360
47 48
T: 0800 0124 382 T: 0800 0124 382
Page 27
GUARANTEE
DISPOSAL OF YOUR OLD DISHWASHER
All packaging and materials used are environmentally friendly and recyclable. Please dispose
of any packaging in an environmentally friendly manner. Consult your local council for further
details.
To ensure safety when disposing of an old
break the door hinges or lock.
Please refer to the rear cover for disposal instructions.
Dishwasher
, cut off the main power supply cable and
GUARANTEE
The Servis guarantee covers the cost of parts/labour/call out charges to repair an appliance
should any covered component fail in its normal functions necessitating a repair or replacement
to resume those functions.
The Servis guarantee
does not
cover:
The Servis guarantee is not transferable.
For your Servis guarantee to be valid, you will need to retain your original purchase
receipt and be able to provide it when you make a claim.
The above summary does not include all of the terms and conditions and exclusions which can
be found on our website www.servis.co.uk.
KNOW YOUR RIGHTS
Household contents insurance
Your household insurance may cover you for accidental damage, fire or theft of your product.
Data Protection Act (1988)
Please note that any information provided will be processed by us or our agents in compliance
with the provisions of the Data Protection Act 1988, for the purpose or providing cover and
handling claims, if any, which may necessitate providing such information to third parties.
Accidental damage.
Use in a commercial environment.
Incorrect or faulty installation.
Deliberate damage or neglect.
Repairs to cosmetic parts.
Damage caused by foreign objects or substances.
Claims in respect to routine inspection or maintenance.
49 50
T: 0800 0124 382 T: 0800 0124 382
Page 28
INDEX
A
Adding detergent ..........................................27
Adding rinse aid ............................................22
Adding salt.....................................................21
A djusting the feet...........................................13
A djusting the upper basket .... ......................26
C
Cancelling the programme ...........................30
Changing the programme .............................30
Child lock........................................................29
Cleaning .........................................................35
Combined detergents ...................................28
Connection, drain hose .................................15
Connection, electrical ...................................17
Connection, water supply .............................14
Control panel .................................................19
D
Delay time function .......................................29
Detergent drawer ..........................................27
Disposal .........................................................49
Drain hose connection ............................... ...15
E
Electrical connection.....................................17
F
Feet, adjusting ...............................................13
Filling with detergent ....................................27
Filling with rinse aid ......................................22
Filling with salt ..............................................21
Filters, cleaning .............................................36
Front view ......................................................07
G
General maintenance ....................................35
Guarantee ......................................................49
H
Half load ........................................................19
Hardness levels .............................................20
I
Installation requirements..............................12
Items included ...............................................02
L
Loading your dishwasher ..............................25
P
Pausing a programme ...................................19
Preparing your dishwasher for first use.......18
Product Fiche ................................................ 48
Programmes ..................................................31
R
Rear view .......................................................08
Rinse aid, filling with.....................................22
Running your dishwasher .............................29
S
Safety instructions ........................................02
Salt, filling with .............................................21
Selecting a programme ................................29
Setting up your dishwasher ..........................19
Spray arms, cleaning .....................................37
Stain removal information ........................... 43
Starting your dishwasher .............................29
T
Tablet detergent button ................................19
Technical specification ............................... ..11
Troubleshooting information ........................41
W
Warranty ........................................................01
Water inlet filter ............................................38
Water softener level .....................................20
Water supply connection ..............................14
51 52
T: 0800 0124 382 T: 0800 0124 382
Page 29
T: 0800 0124 382
E: [email protected]
The symbol on the product or on its packaging indicates that this product may not be treated as household waste. Instead it shall be handed over to the applicable collection
point for the recycling of electrical and electronic equipment. By ensuring this product is disposed of correctly, you will help prevent potential negative consequences for
the environment and human health, which could otherwise be caused by inappropriate waste handling of this product. For more detailed information about recycling of this
product, please contact your local city offi ce, your household waste disposal service or the shop where you purchased the product.
0000000000
 Loading...