

Page 1
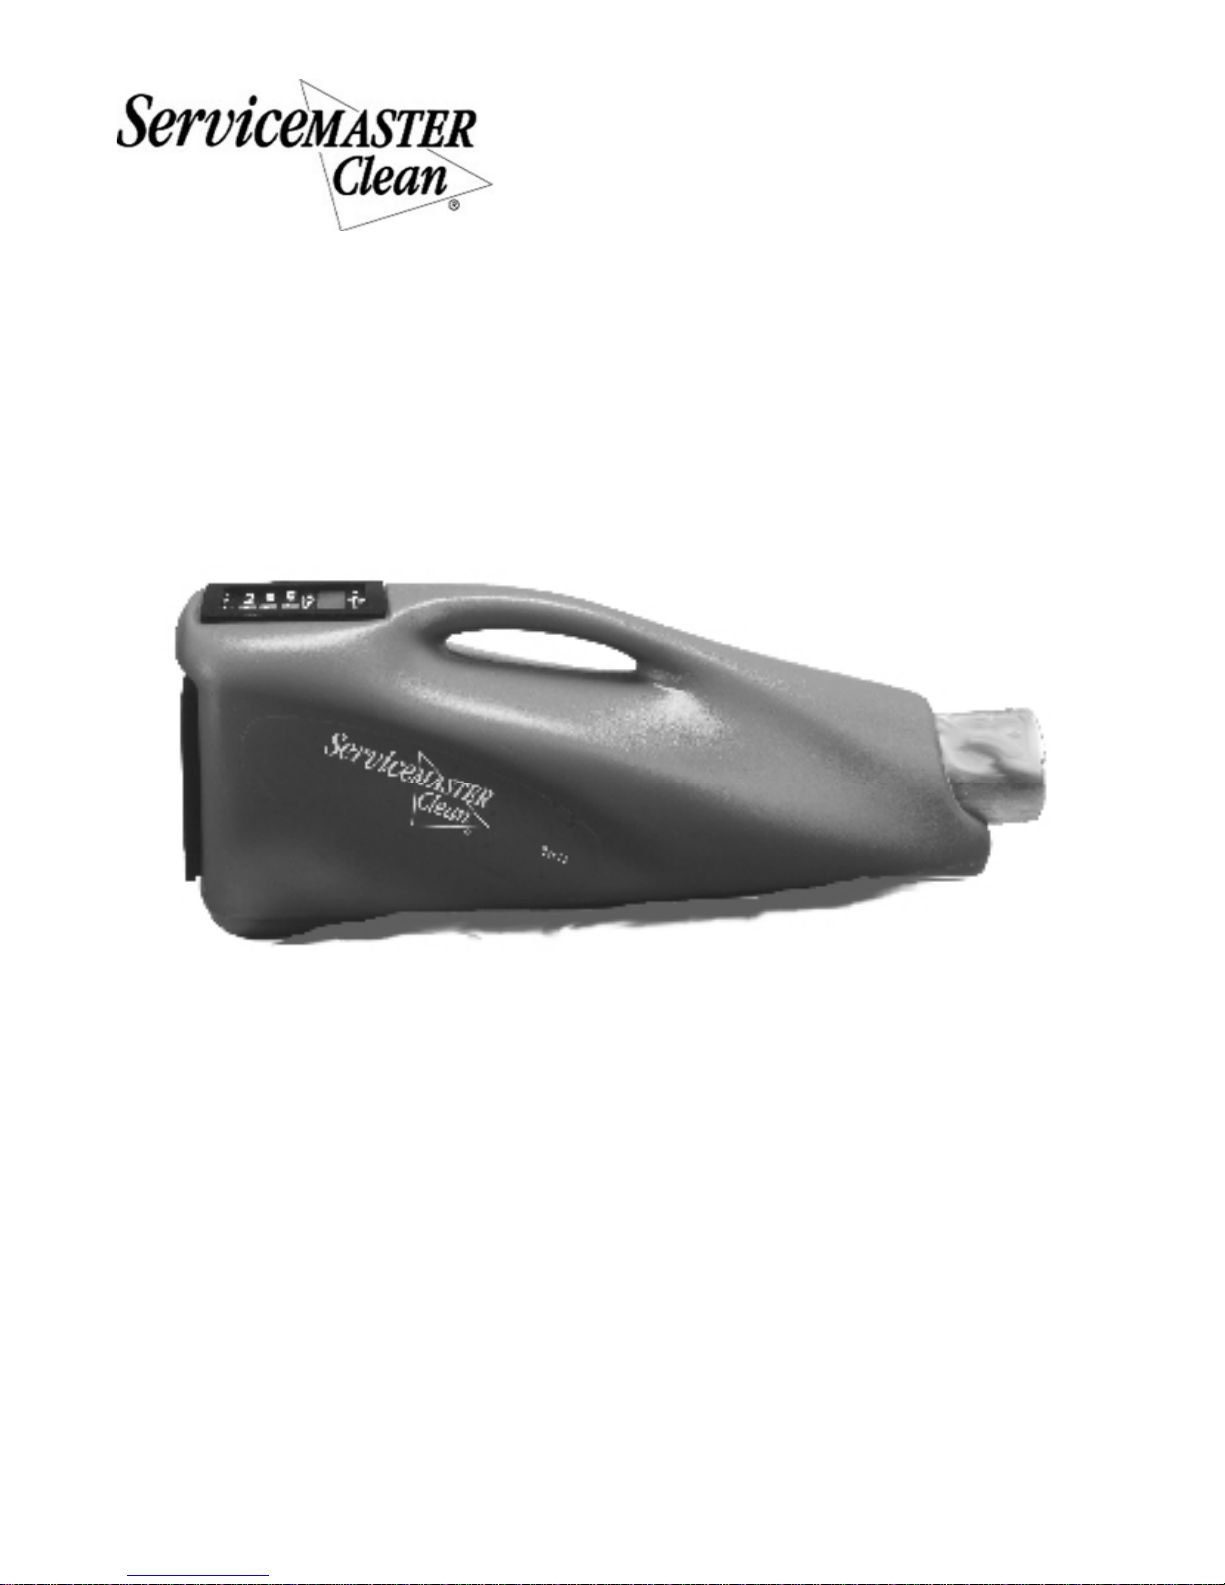
Owner’s Manual 19400
Title: Oasis Ozone Generator
Serial Number: ___________
The ServiceMaster Company
860 Ridge Lake Blvd.
Memphis, TN 38120
800-765-5656 (Tech Support)
ServiceMaster® Manual
Copyright 2004 by
ServiceMaster Clean
All rights reserved
2-10-2010 revised 2/11 FORM NO. 56041855
Page 2
OASIS OZONE GENERATOR
INFORMATION & OPERATING INSTRUCTIONS
READ ALL INSTRUCTIONS BEFORE OPERATING
OZONE IS A POWERFUL OXIDIZER AND MUST BE USED WITH CARE
WARNING: USE IN UNINHABITED AREAS ONLY. CONSULT MSDS SHEET BEFORE
USE. Ozone attacks mucous membranes. Limited exposure can cause irritation to eyes,
throat, and nose and may cause nausea. Do not re-inhabit a treated area until it has
been ventilated. Prolonged exposure can also affect certain organic materials such as rub-
ber, plastic, wire insulation.
Do not get the machine wet.
INSPECTION:
Carefully unpack and inspect the OASIS PLUS for shipping damage. Each unit is tested and inspected
before shipment. Any damage incurred is the responsibility of the carrier, who should be notifi ed immedi-
ately.
All cleaning and maintenance work should be completed before using the Ozone machine.
Ozone treatment should be the fi nal step in room maintenance.
NOTE: the air fl owing into the machine must be clean and dry.
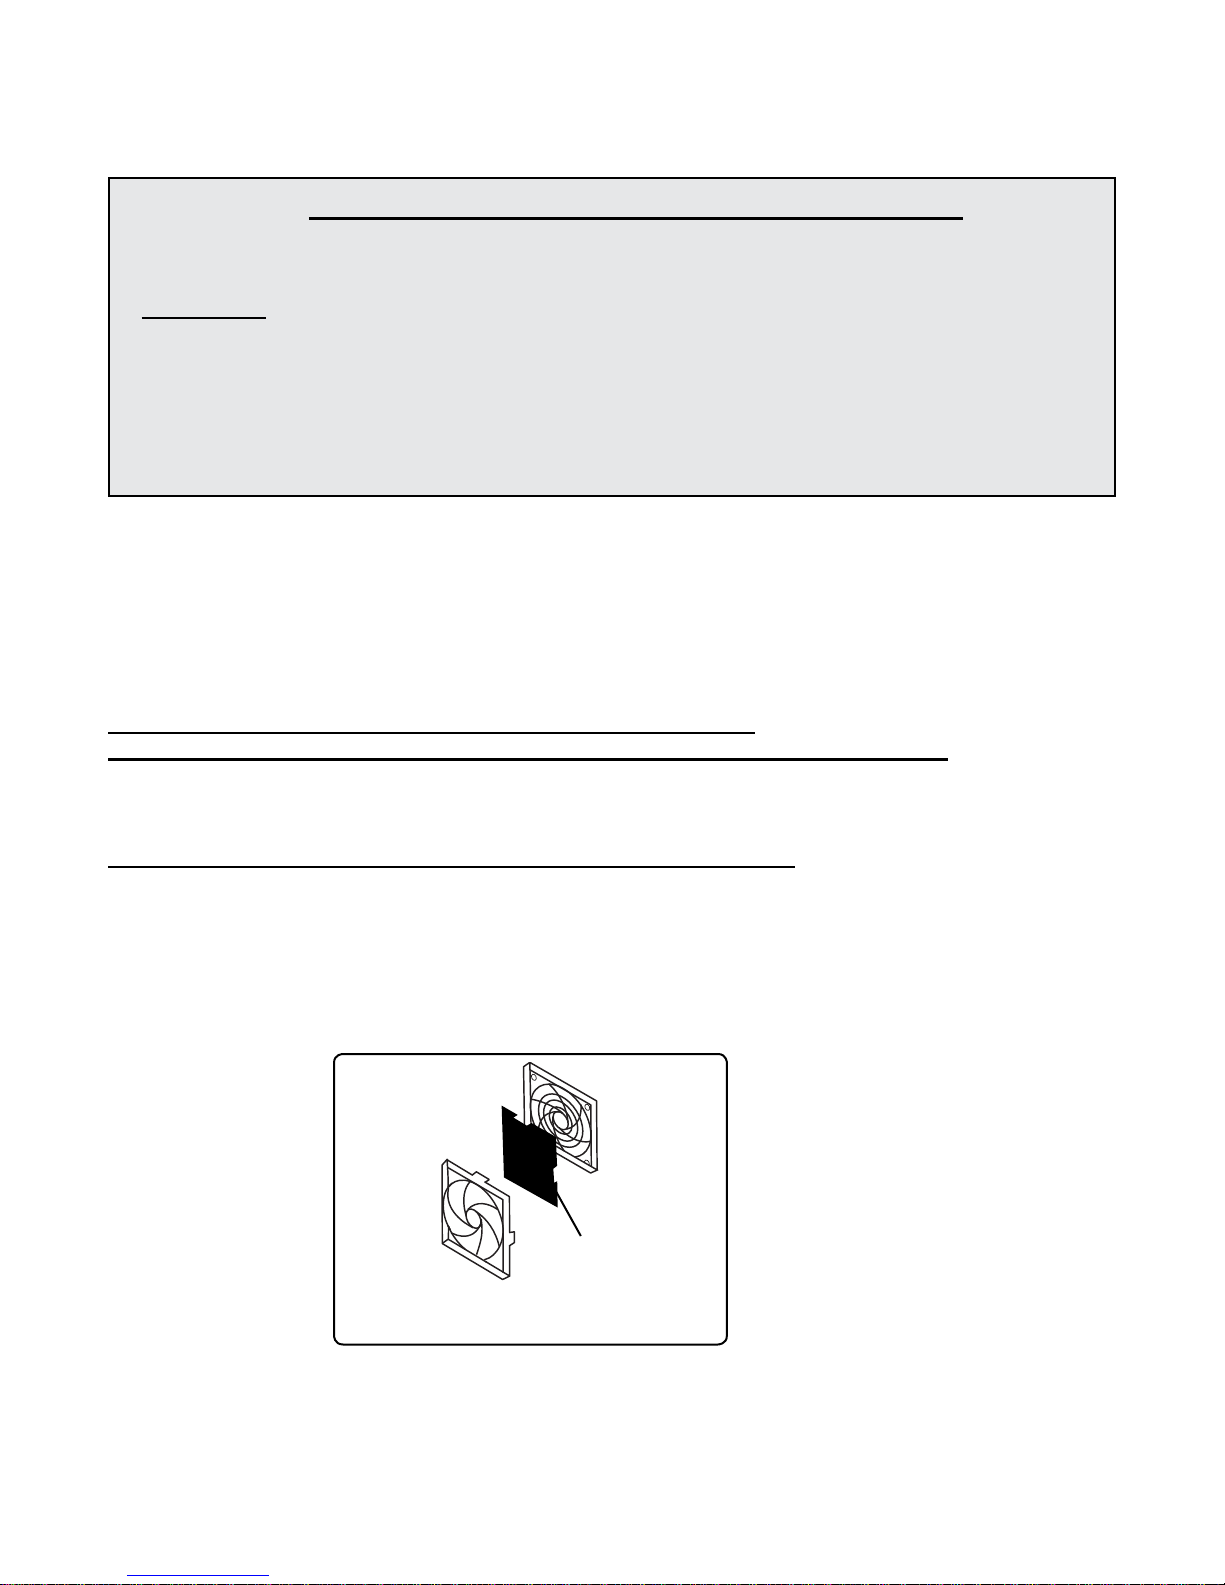
NOTE: if the air intake fi lter is dirty or missing, warranty is voided (see Figure 1).
OPERATION:
NOTE: Ozone is a toxic gas. Follow all safety precautions.
1. Make certain all people, pets, and plants are out of area.
Close all windows and doors.
2. Make sure the fi lter is installed and is clean.
Rear of
Machine
Figure 1
3. Place the Ozone generator on a shelf or tabletop, as high as possible in the area to be treated.
4 Plug the power cord into a grounded, 3-prong outlet.
Filter
Filter
Cover
FORM NO. 56041855 - 2
Page 3
TOP OF
MACHINE
POWER
TIMER
OUTPUT
25% 50% 75%
ON
OFF
>
>>
>
100%
Figure 2
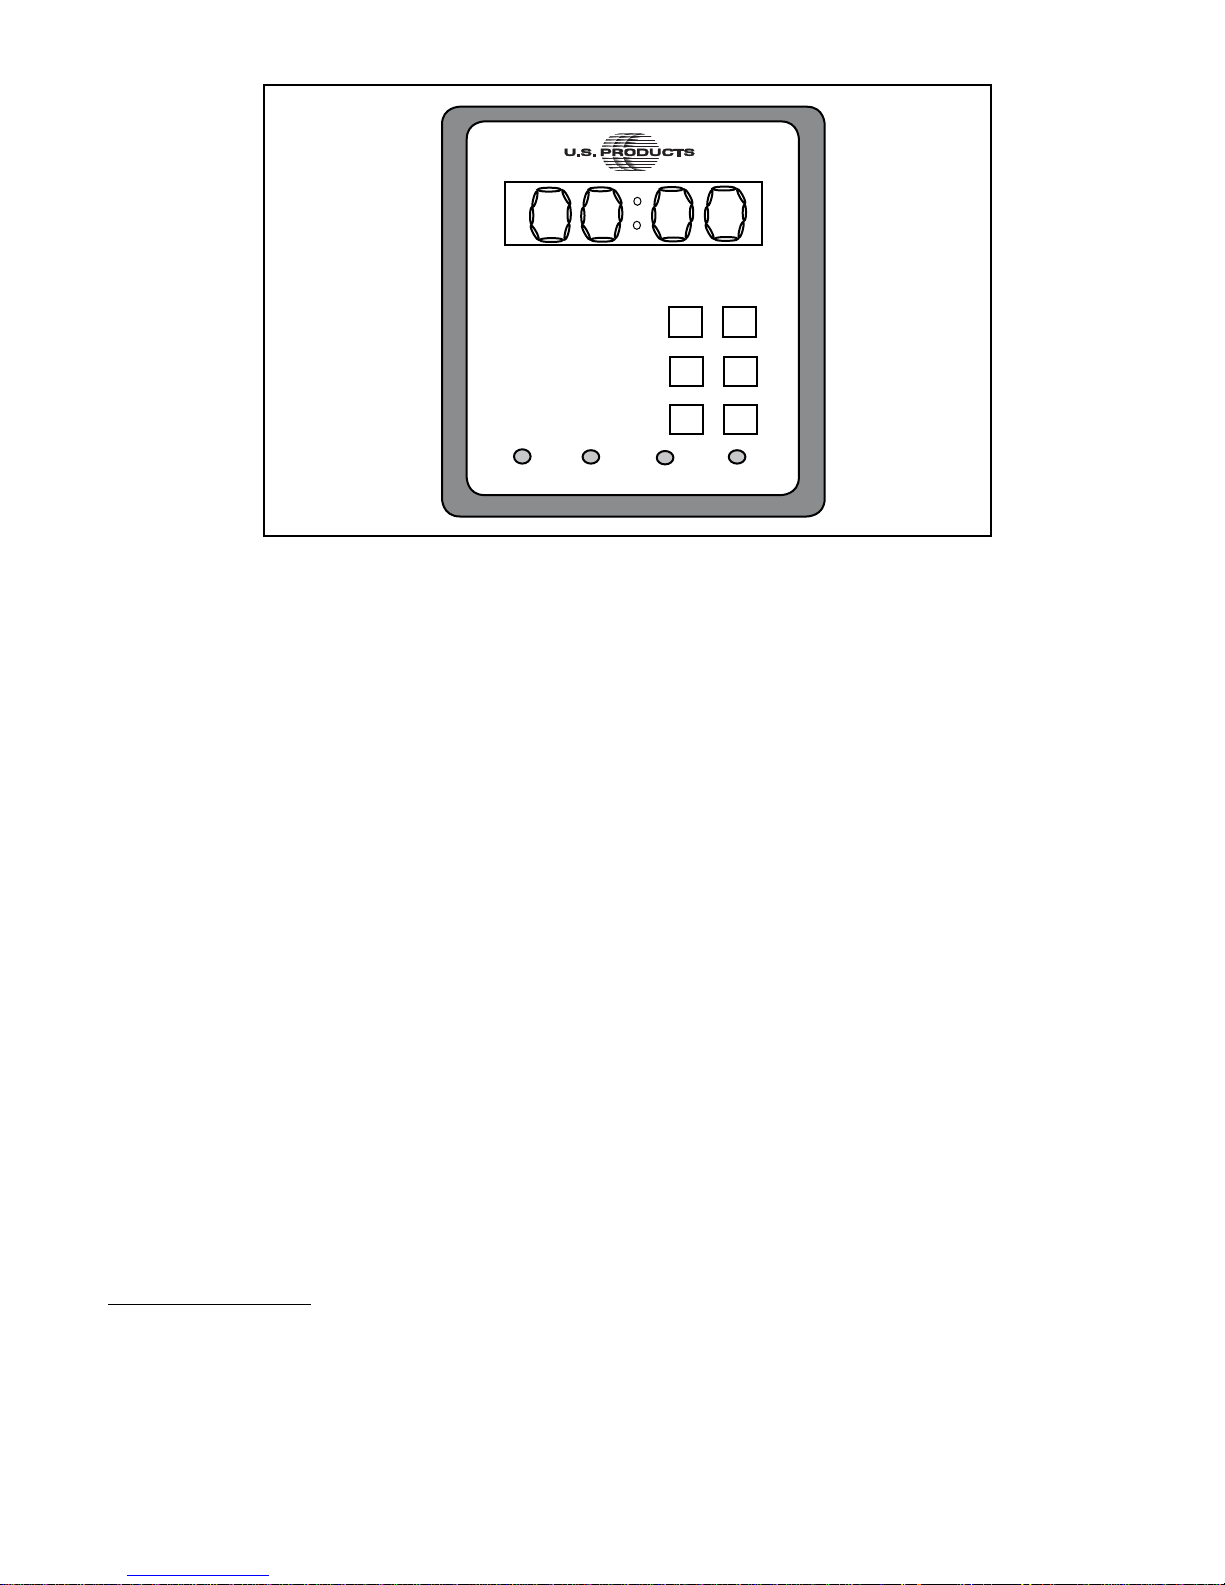
5. Refer to Figure 2, above.
Set the timer to the desired length of time: momentarily pressing the (UP) timer button for one
>
second will increase the time setting by one minute.. Hold the button for 1 -3 seconds to change
the time value by two minutes per second. Hold the button for longer than 3 seconds and the time
setting will change the time in 20 minute increments.
The maximum time setting is 29:59 hours. After reaching the maximum time, the timer will wrap
back to 00:00 and then continue increasing. When the time is being decreased and reaches 00:00,
it will wrap to 29:59 and continue decreasing.
>
6. Select the desired power level by pushing the or buttons, located to the right of the word
“OUTPUT”, until the red light is on above 25%; 50%; 75% or 100%. NOTE: the machine always
>
defaults to 100% when you plug it in.
When the output level is set to 100%, the machine makes ozone continuously until the timer runs
out or the OFF button is pressed. At other power level settings, the machine will produce ozone for
the fraction of a minute of the set ouptut level. For example, if the output level is set to 75%, the
machine will produce ozone for 75% (45 seconds) of each minute. At 50%, ozone is generated
for
half of (30 seconds) of each minute, and at 25%, the ozone generation lasts for 15 seconds
of each minute. On any setting other than 100%, the ozone generator will be cycling the
ozone ON and OFF.
7. Turn the unit on by pressing the ON button, after you have set the time and the output level.
Leave the area.
8. When treatment is complete, unplug the ozone machine and ventilate the area completely
until all smell of ozone is gone. Do NOT allow people, pets or plants back into the area
until the area has been ventilated and all smell of ozone is dissipated.
FORM NO. 56041855 - 3
Page 4
TIME GUIDELINES:
This Oasis Plus unit will control biological contamination and odor in areas up to 40,000 FT3.
Use the following times as a guideline.
Hotel/Motel Room: 20 -- 60 Minutes
Automobiles: 20 -- 30 Minutes
Fire & Flood Restoration: 12 -- 72 Hours
For Automobiles:
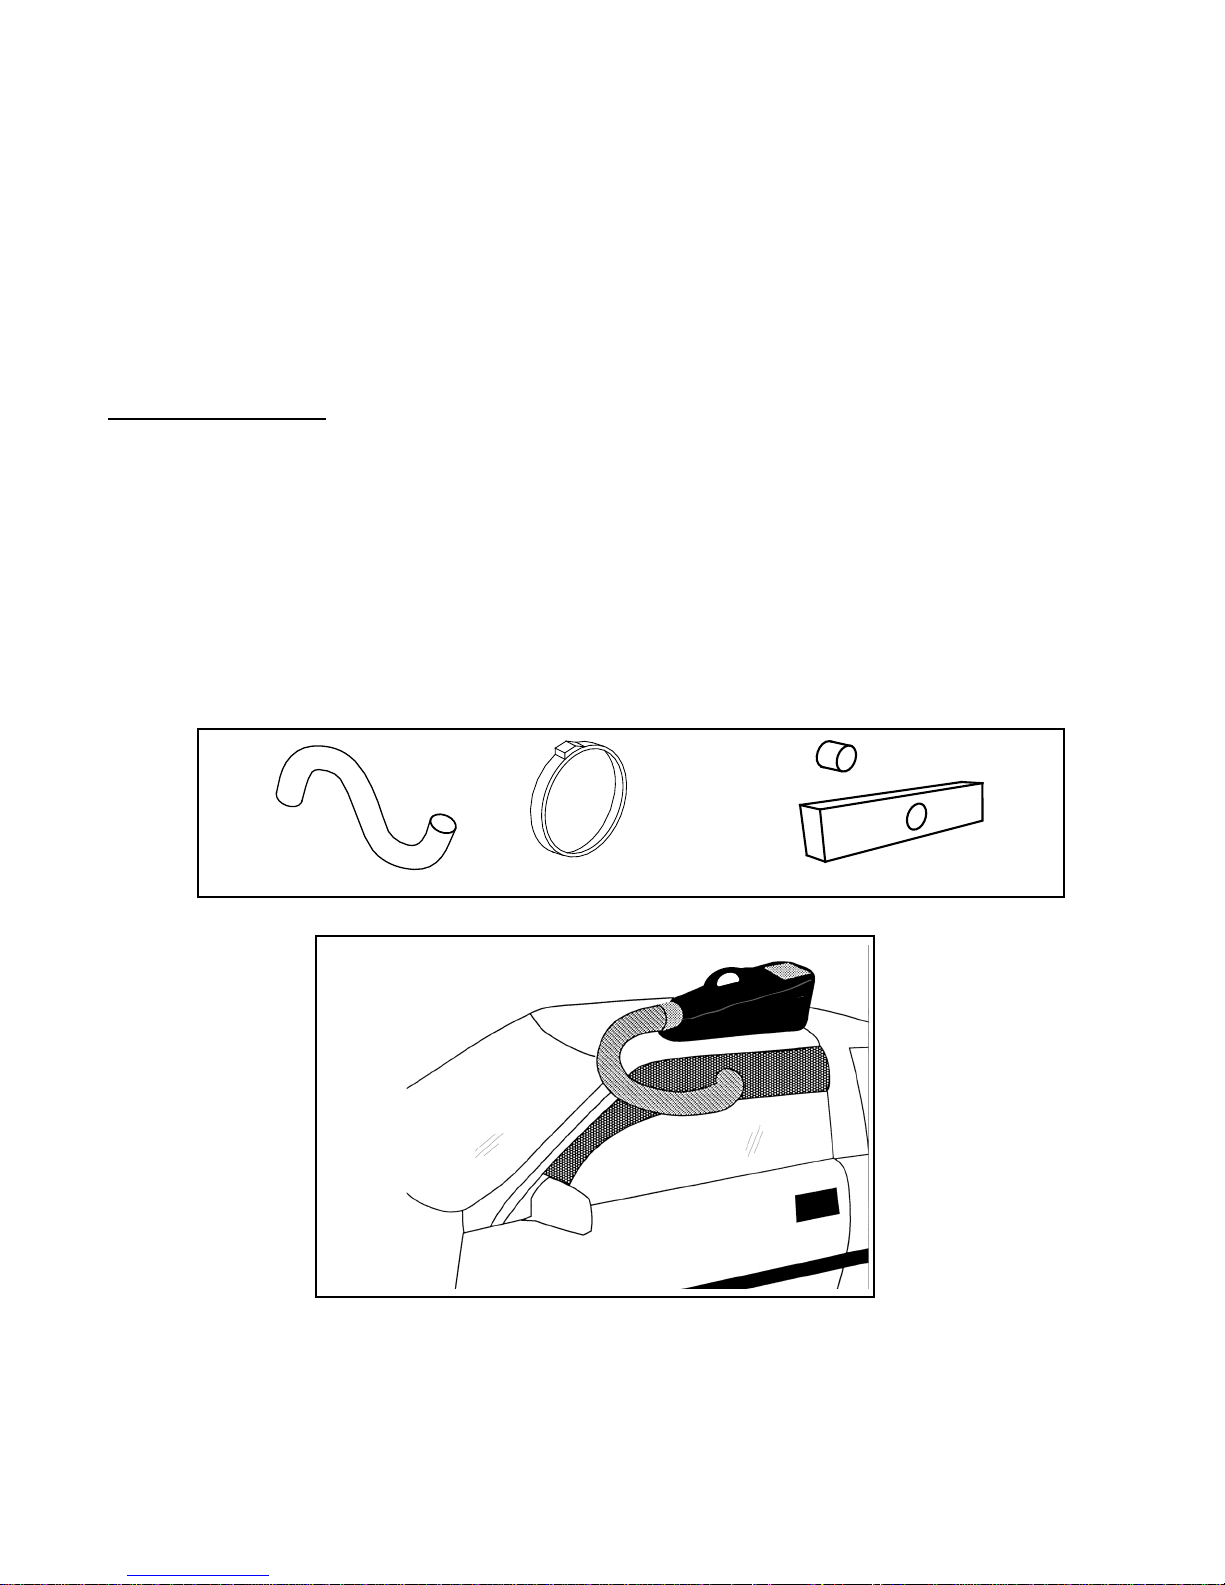
See Figure 3 and Figure 4 below.
1. Install the hose over the electrode chamber. Secure the hose with the hose clamp.
2. Set the ozone unit on top of the car, on a cart, or on a table next to the car.
3. Install the foam block into a partially open car window, and insert the hose into the hole
in the foam.
4. Set the desired time and output level.
5. Turn the ozone machine ON.
When treatment is complete, ventilate the car completely. Repeat treatment if necessary.
Figure 3
NOTE: Ozone destroys odor causing molecules, thus eliminating the source of the odor. The
length of time this process takes will vary depending on the amount of contaminants the ozone
has to work on, the amount of area being treated, temperature and humidity, the amount and
type of furniture in the area, etc.
NOTE: the process can produce a haze in the treatment area.
HOSE
Figure 4
CLAMP
FOAM
FORM NO. 56041855 - 4
Page 5

OZONE ACTUALLY SEEKS OUT AND DESTROYS THE BAC-
TERIA AND MOLECULES THAT CAUSE ODORS
Not a simple coverup or ionizer, the OASIS Ozone generator is an economical environmental
odor neutralizer that actually destroys the source of the odor and leaves pure, fresh oxygen in
its place.
This large capacity ozone generator is ideal for commercial use. It is excellent for removing
odors from smoke damage, mold, mildew, pet and other sources commonly eccountered in
building maintenance and refurbishing.
The OASIS ozone generator will eliminate odor in any indoor location, including basements,
kitchens, bathrooms, and more. It also provides rapid deoderizing or hotel/motel rooms, meeting rooms, and used cars, boats and RVs.
NOTE:
Ozone treatment is not a substitue for cleaning and source removal.
Ozone treatment should be the fi nal step in cleaning or restoration.
FEATURES AND SPECIFICATIONS
DESTROYS THE SOURCE OF THE ODOR: not just a cover-up or ionizer
REMOVES ODORS caused by smoke, pets, mold, mildew, etc.
30 HOUR DIGITAL TIMER/PROGRAMMER
VARIABLE OZONE OUTPUT SETTINGS
HIGH DENSITY ceramic and stainless steel electrodes (patented)
POWER SUPPLY OVERLOAD PROTECTION
OUTPUT: 6.6 ppm or 2.2 gr/hr
RUGGED CONSTRUCTION: Rotational molded hexane co-polymer body (lifetime war-
ranty)
DEMINSIONS: 8”H X 8”W X 22”L
WEIGHT: 12-1/2 lb
No plates or UV tubes to maintain
WARRANTY: 3 year with LIFETIME WARRANTY on the ozone electrodes (patented)
FORM NO. 56041855 - 5
Page 6
Ozone Generator 120V
TROUBLESHOOTING COMMON PROBLEMS
CAUTION: always unplug the machine when removing/adding wiring connections.
IF THIS CHECK THIS
Timer Resets to 00:00
The smell of ozone remains
long after the machine has stopped
running.
No Ozone output
Make sure the ozone machine is not plugged into an outlet on the same
circuit as a machine on which a generator, refrigerator, or heater is also
connected. The start-up of a power drawing component can cause a
momentary loss of power to all else on the circuit, and that can reset the
timer on the ozone machine.
Try connecting the power cord to another outlet in another part of the
room or the building.
When Ozone has organic molecules to work on, it is destroyed along with
the molecule it destroys. If there are a lot of malodorous organic molecules in the treatment area, most of the ozone atoms will be ‘used’ in the
deodorizing process; however, if many more ozone atoms are introduced
into the area than can be used to destroy the smell producing molecules,
they will be left to revert back to oxygen, and this can take hours.
Always try the shortest treatment time that you believe will take care of
the job. You will very quickly become adept at estimating the time needed
to remove odors in different situations.
Is the fan running? If the fan is not running, the ozone will not be
pushed out in a stream of air.
Has the 0.5 amp circuit breaker on the bottom of the machine tripped?
Reset the breaker and try the machine again.
If the circuit breaker keeps tripping, stop using the machine and call
your distributor to make arrangements to have your machine repaired.
Do you notice any unusual noises coming from the machine? An arcing sound -- louder than the sound of ozone production -- indicates
an internal short in the wiring or an electrode. Call the distributor from
whom you purchased the machine to make arrangements to get your
machine repaired.
If you are unable to make a diagnosis using this chart, contact the distrubutor
from whom you purchased your machine.
FORM NO. 56041855 - 6
Page 7
18
23
22
20
21
10A
19
12
11
1
7
8
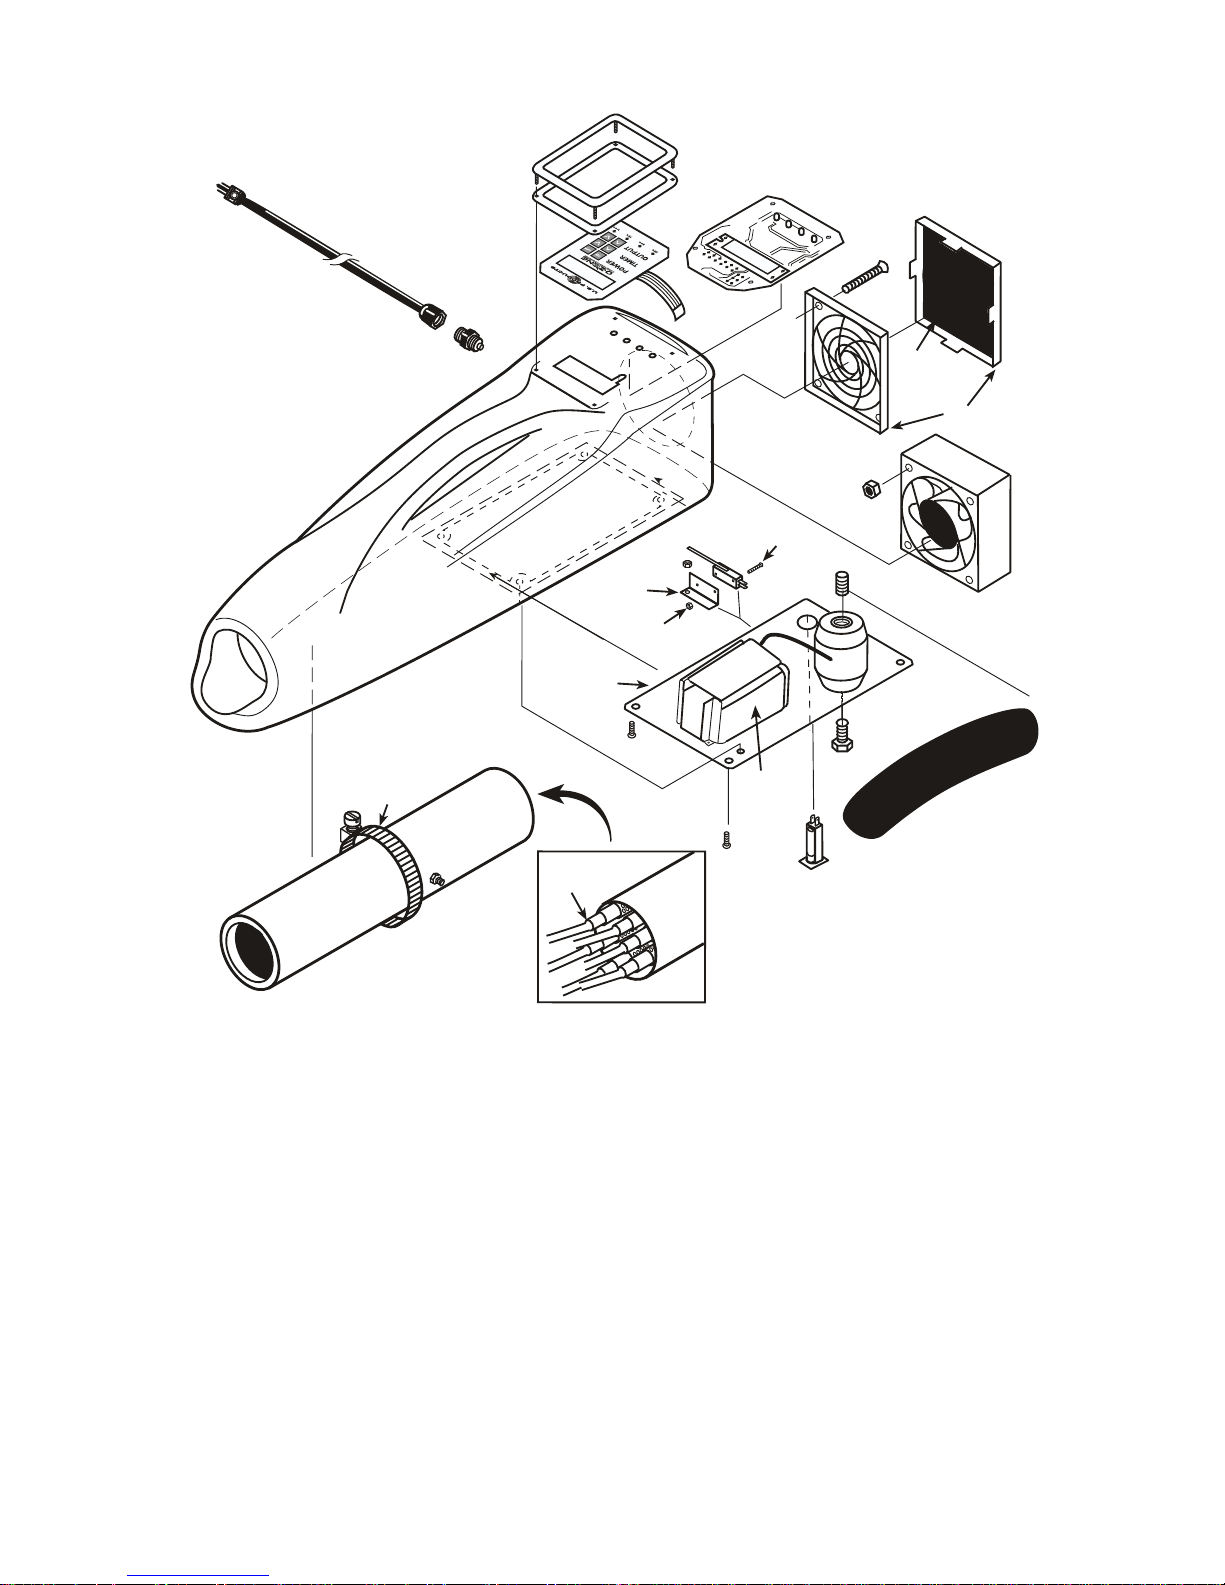
Item Ref. No. Qty Description
1
# SUBOZ-TEAL 1 Body Ozone Black
# OZ-10 1 Terminal Block High Voltage
2
3A# 326 1 Bolt 3/8 X 1/2 Hex S/S Full
3
# 327 1 Stud 3/8 X 1-1/4 S/S
# OZ-8 1 Switch Safety For Ozone
4
5# OZ-5 1 Circuit Breaker .5a For Eon-
6# 364 5 Bolt 10-32 X 1/2 Ph Phl S/S M
7# FP242 1 Ozone Electrode Chamber
7A
# FP241 6 Ozone Electrode 1 Ea. Long
# 198 1 Hose Clamp 48 3-1/2dia 9
8
9# 2014 1 Fan 4 100cfm 120 Volt Equip
10# 324 4 Nut Keps 8-32 S/S
10A# 323 4 Screw 8/32 X 2 1/2s/S Flat
11
# 2015A 1 Fan Cover & Filter Assy
# 2015B 1 Filter S/S Screen 100 Mesh
12
10
13
4
9
14
3
15
2
17
6
3A
16
6
7A
7
Item Ref. No. Qty Description
13# 328 2 Screw 4-40 X 5/8 M.S. S/S Pa
14# OZ-22 1 Bracket For Ozone Safety Switch
15# 18 6 Nut Nylon Lock 4-40 Stainless
16# SUBOZ-4PTI-1 1 Transformer 120v. High Voltage
17# OZ-18AC 1 Mounting Plate Bottom Panel Oz
18# OZ-11 1 Power Cord 16/3 Sjtw 8 Bl
19# 230 1 Retainer Power Cord Water Tight
[ ]# 230A 1 Lock Nut Nylon For Cord Retainer
20# 56381735 1 Pcb Assy-Ozone Gen 120v
21# OZ-20A 1 Membrane For Ozone Blank
22# OZ-16A 1 Gasket Ozone Bezel1/16 Epdm
23# OZ-16 1 Bezel For Control Panel Display
24# OZ-23E 2 Label-ServiceMaster Oasis
[ ]# 56380998 1 Decal-Oasis Ozone Warning
[ ] = Not Shown
# = Revised or new since last update
5
9
24
FORM NO. 56041855 - 7
Page 8
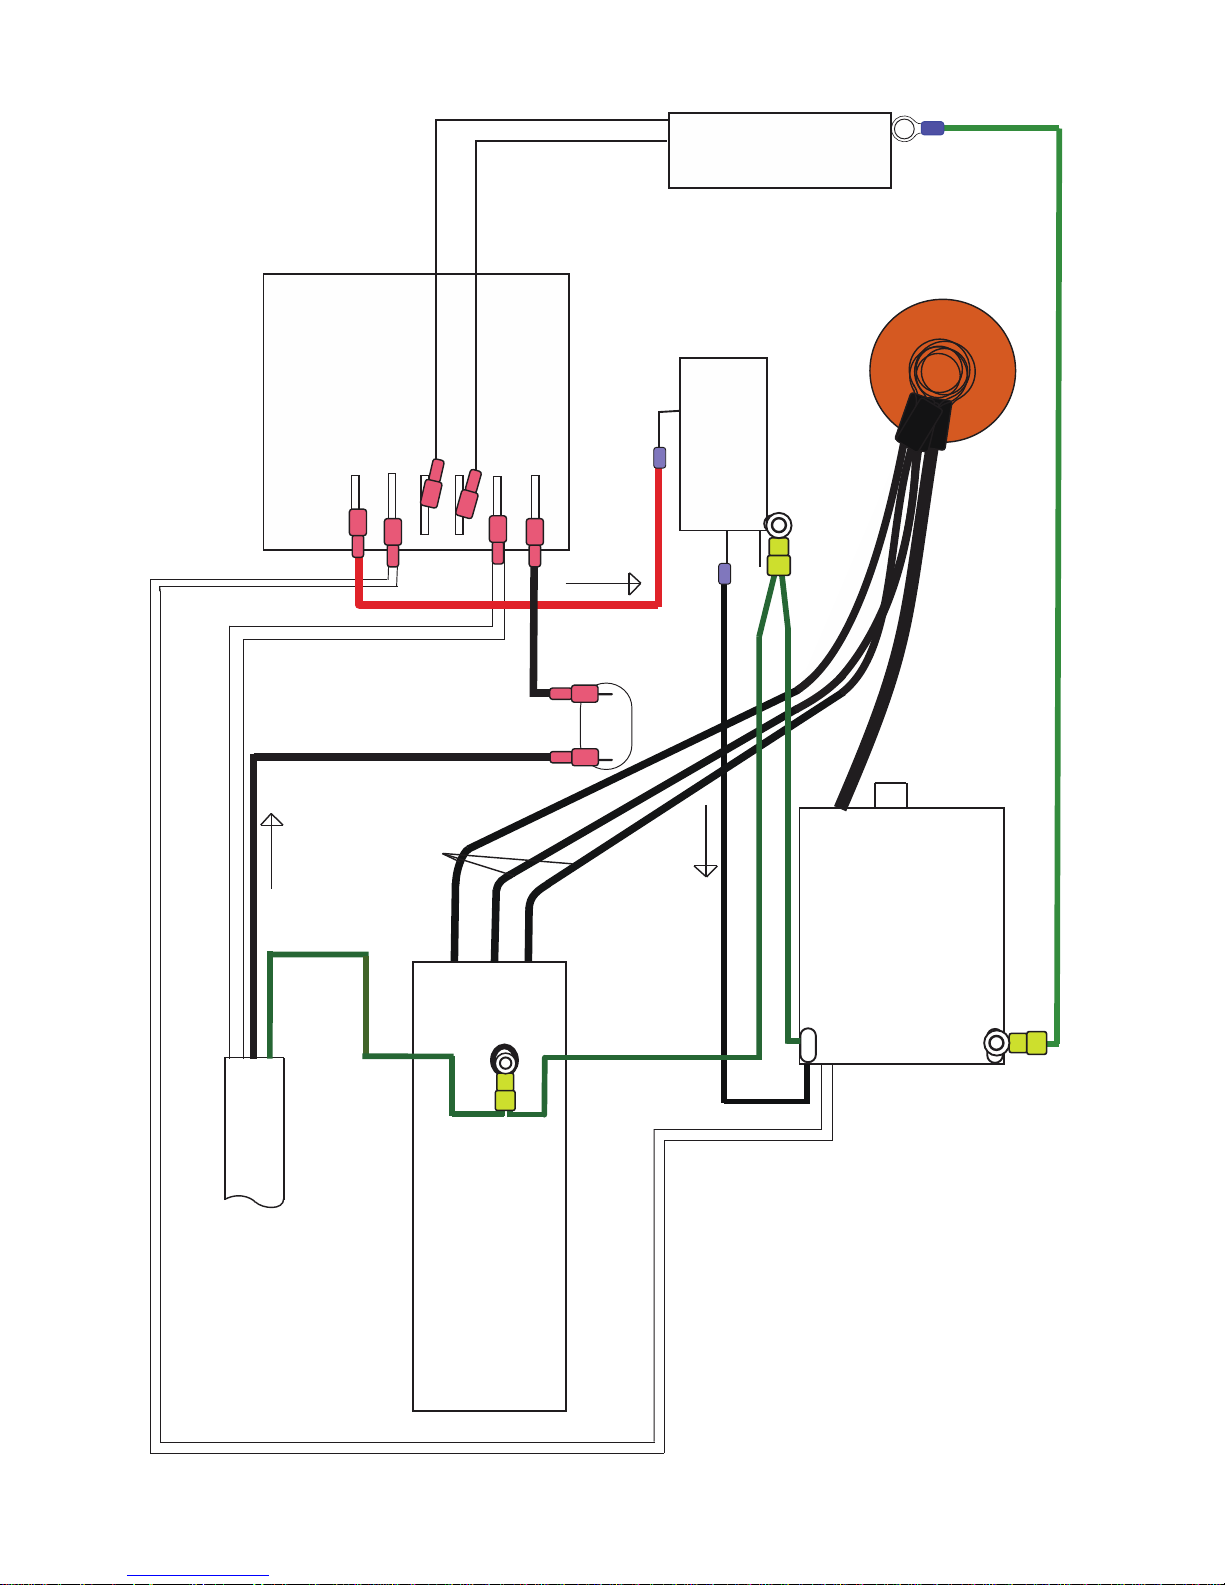
12”
12”
* cover the metal
on both #320
with heat shrink
FAN
#334
RING
CONNECTOR
AC HOT
AC NEUTRAL
16”
SAFETY
SWITCH
EMPTY
#64
PRINTED CIRCUIT BOARD
OZ HOT
FAN HOT
OZ NEUTRAL
FAN NEUTRAL
RED 14GA
BLACK 16 GA
16-1/2”
CIRCUIT
BREAKER
GREEN 18 GA 9”
GREEN 14 GA 16-1/2”
BLACK 18 GA 9”
8”
BLACK 9”
8”
(BLUE ON 240V)
(BROWN ON 240 V )
3PAIR
(6 WIRES)
8”
8”
WHITE16GA8”
GREEN
6-1/2 ”
6-1/2 ”
120V OR 240V
TRANSFORMER
HIGH VOLTS O UT
GREEN 14 GA 9-1/4”
OZ-11
POWER
CORD
#2019 FOR 240V
GROUND
HIGH VOLTAGE
ELECTRODE CHAMBER
FORM NO. 56041855 - 8
#2051
SCREW
WASHER #1096
LOCKNUT #358
WHITE 18GA 22”
Page 9

Page 10

NOTES:
#19400
Oasis Ozone Generator
The ServiceMaster Company
860 Ridge Lake Blvd.
Memphis, TN 38120
800-756-5656 (Tech Support)
 Loading...