

Page 1
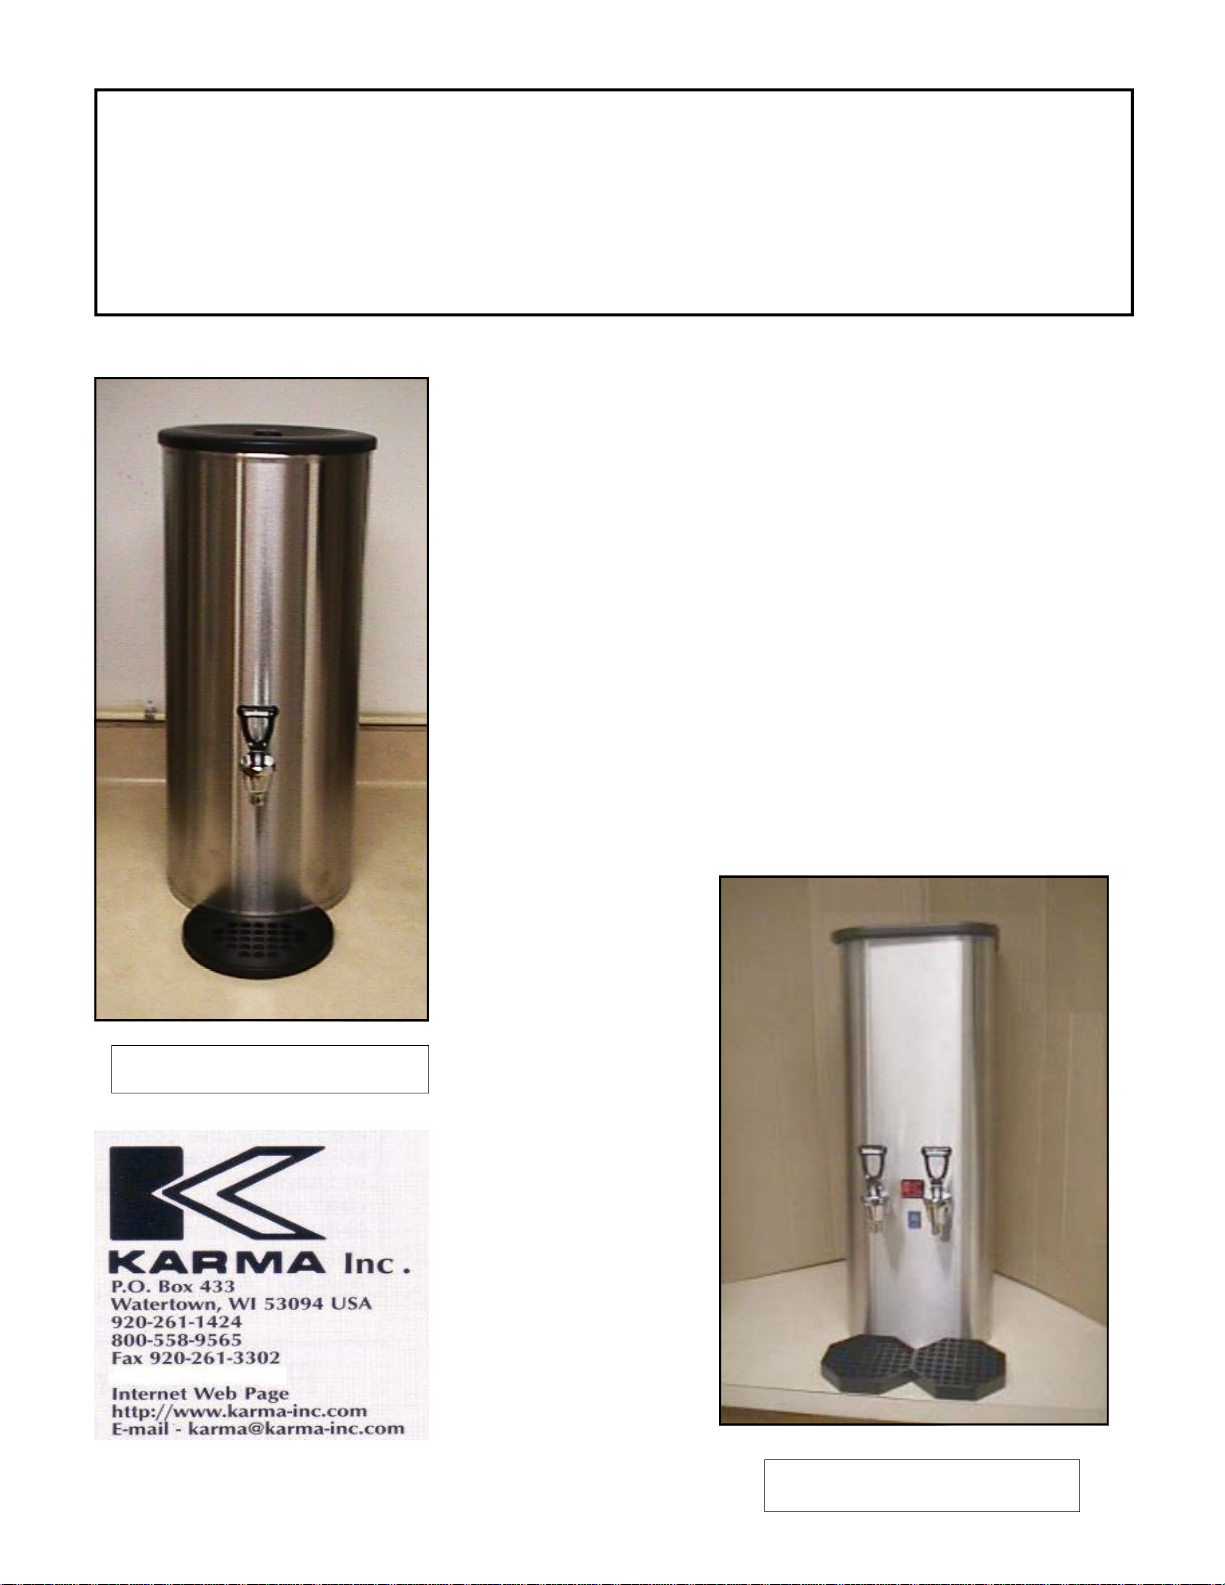
MODEL 875 MODEL 872
TEA-MASTER SERIES
POST-MIX ICED TEA DISPENSERS
FOR USE WITH ONE-GALLON JUG OR BAG-IN-BOX
The Tea-Master Series utilizes a venturi valve to mix the tea
syrup with the water. A built-in water pressure regulator
ensures the proper amount of syrup is being mixed with the
proper amount of water. This built-in pressure regulator is
factory adjusted for a static pressure of 18 pounds.
The Model 875 is also available in a two– flavor model.
MODEL 875
P/N 5594 5/06
MODEL 872
Page 2
SPECIFICATIONS
Plumbing: ¼” flared copper or flex
hose. 25 PSI minimum
Model 875
Dimensions: 9½" X 8½"d X 26½" h
Weight: 15 lbs Shipping 30 lbs
Model 872
Dimensions: 9½" X 18”d X 23¼" h
depth includes faucet/water connection)
(
Weight: 20 lbs Shipping 30 lbs
Agency: NSF Approved
Standard (18)
1. Open the BIB along the perforated edges.
Pull out the dispensing spout. Place the
spout in the cardboard opening.
2. Remove the cap from the spout.
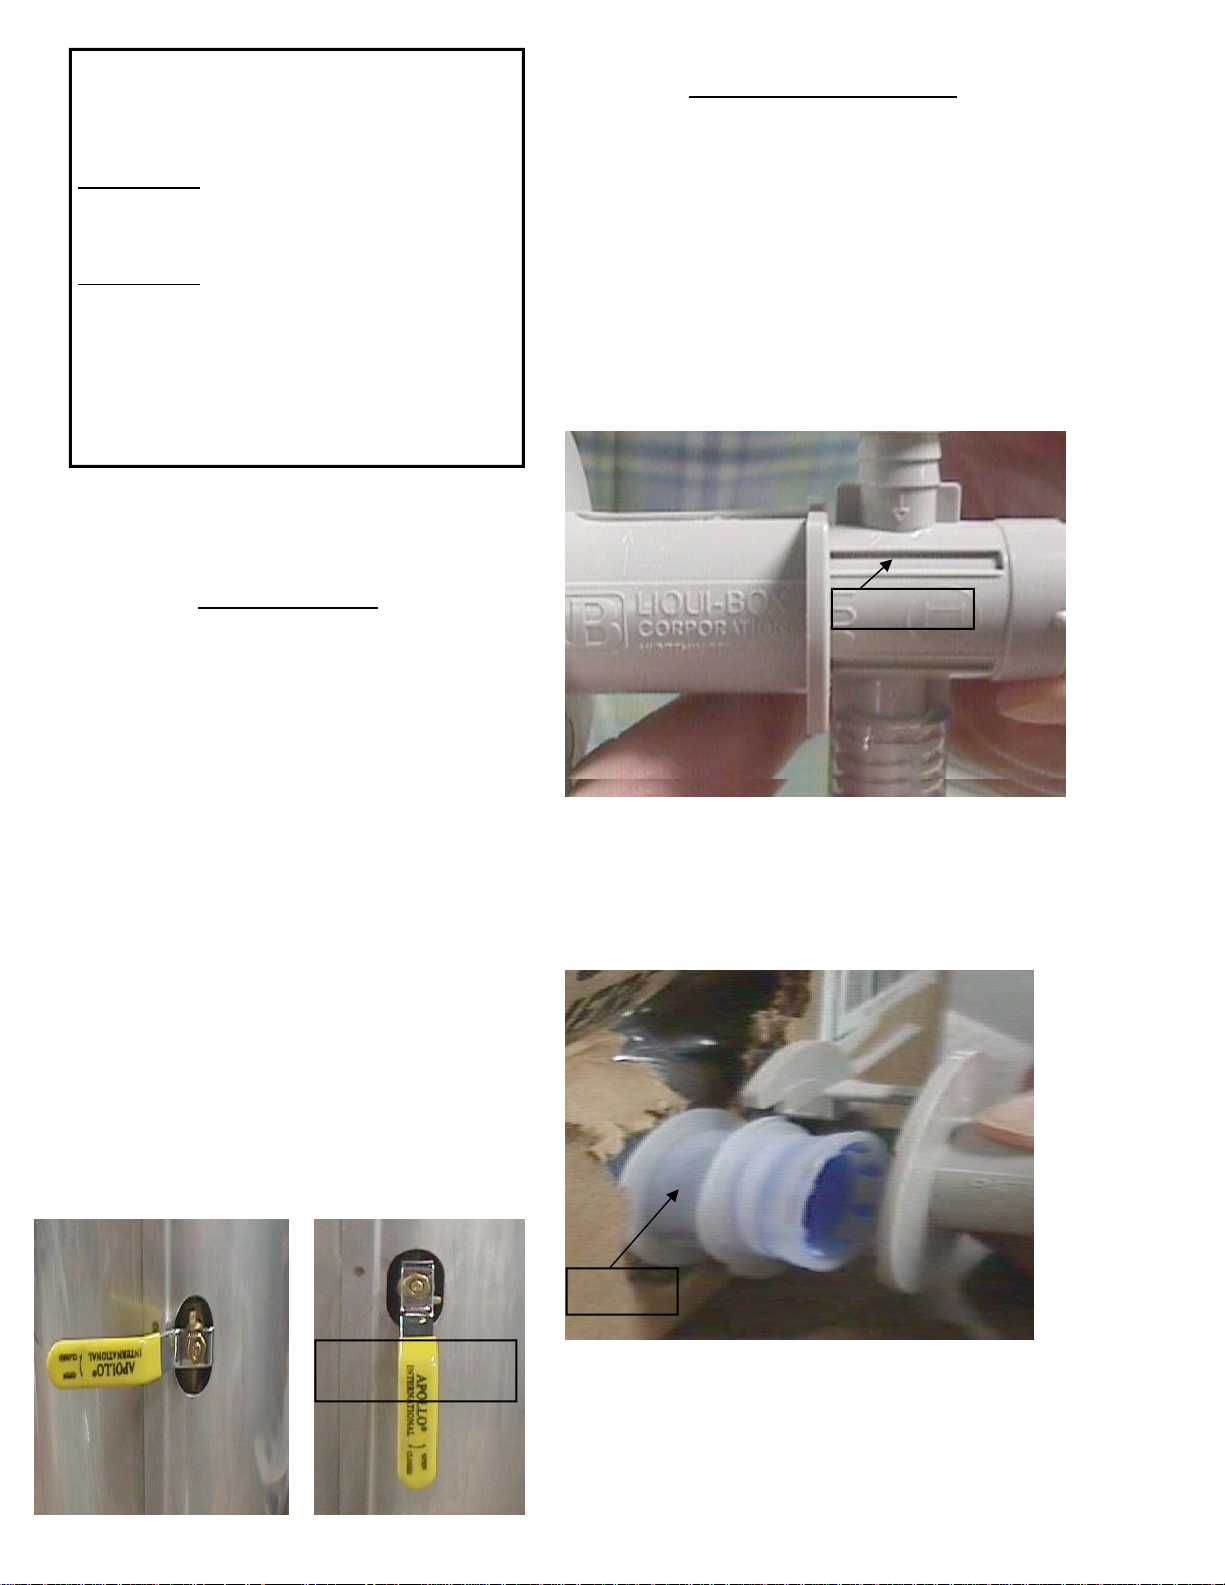
3. Connect the QCD fitting to the dispensing spout.
Note: THE FITMENT MUST BE PUSHED
ALL THE WAY OUT SO THAT THE
WORD OUT IS EXPOSED ON THE TOP
OF THE FITMENT.
Product Loading
Installation
1. Carefully remove the dispenser from the
shipping carton.
2. Before attaching the waterline to the
dispenser, flush the waterline to remove any foreign particles that may
be in the line.
NOTE: It is advisable to use a lime, scale,
sediment, taste and odor purification charcoal water filter where water quality is a
concern.
3. Using the ¼” flare nut connect a ¼”
flared flexible or copper waterline to the
male fitting on the back of the dispenser.
4. Turn on the water source to the
dispenser.
5.Turn the yellow handle to the ON position
to allow water to flow through the urn.
4. Place the QCD into the neck of the
dispensing spout at the ridge as
shown on the illustration.
OUT
WATER ON
Ridge
Page 3
5. Press QCD towards the dispensing
spout until it is flush with the collar
of the QCD.
FLUSH POSITION
6. The BIB box should lie horizontally
• Avoid loops in the product line
• Use the minimum amount of
product line required.
• Check for air bubbles in the product
line to trouble shoot for priming
PRIME SYSTEM
7. After the BIB has been connected
to the QCD valve dispense approximately 12 ounces of product.
8. Dispense another 8 ounces of product and sample for taste.
NOTE: Be sure there are no air bubbles in the product line.
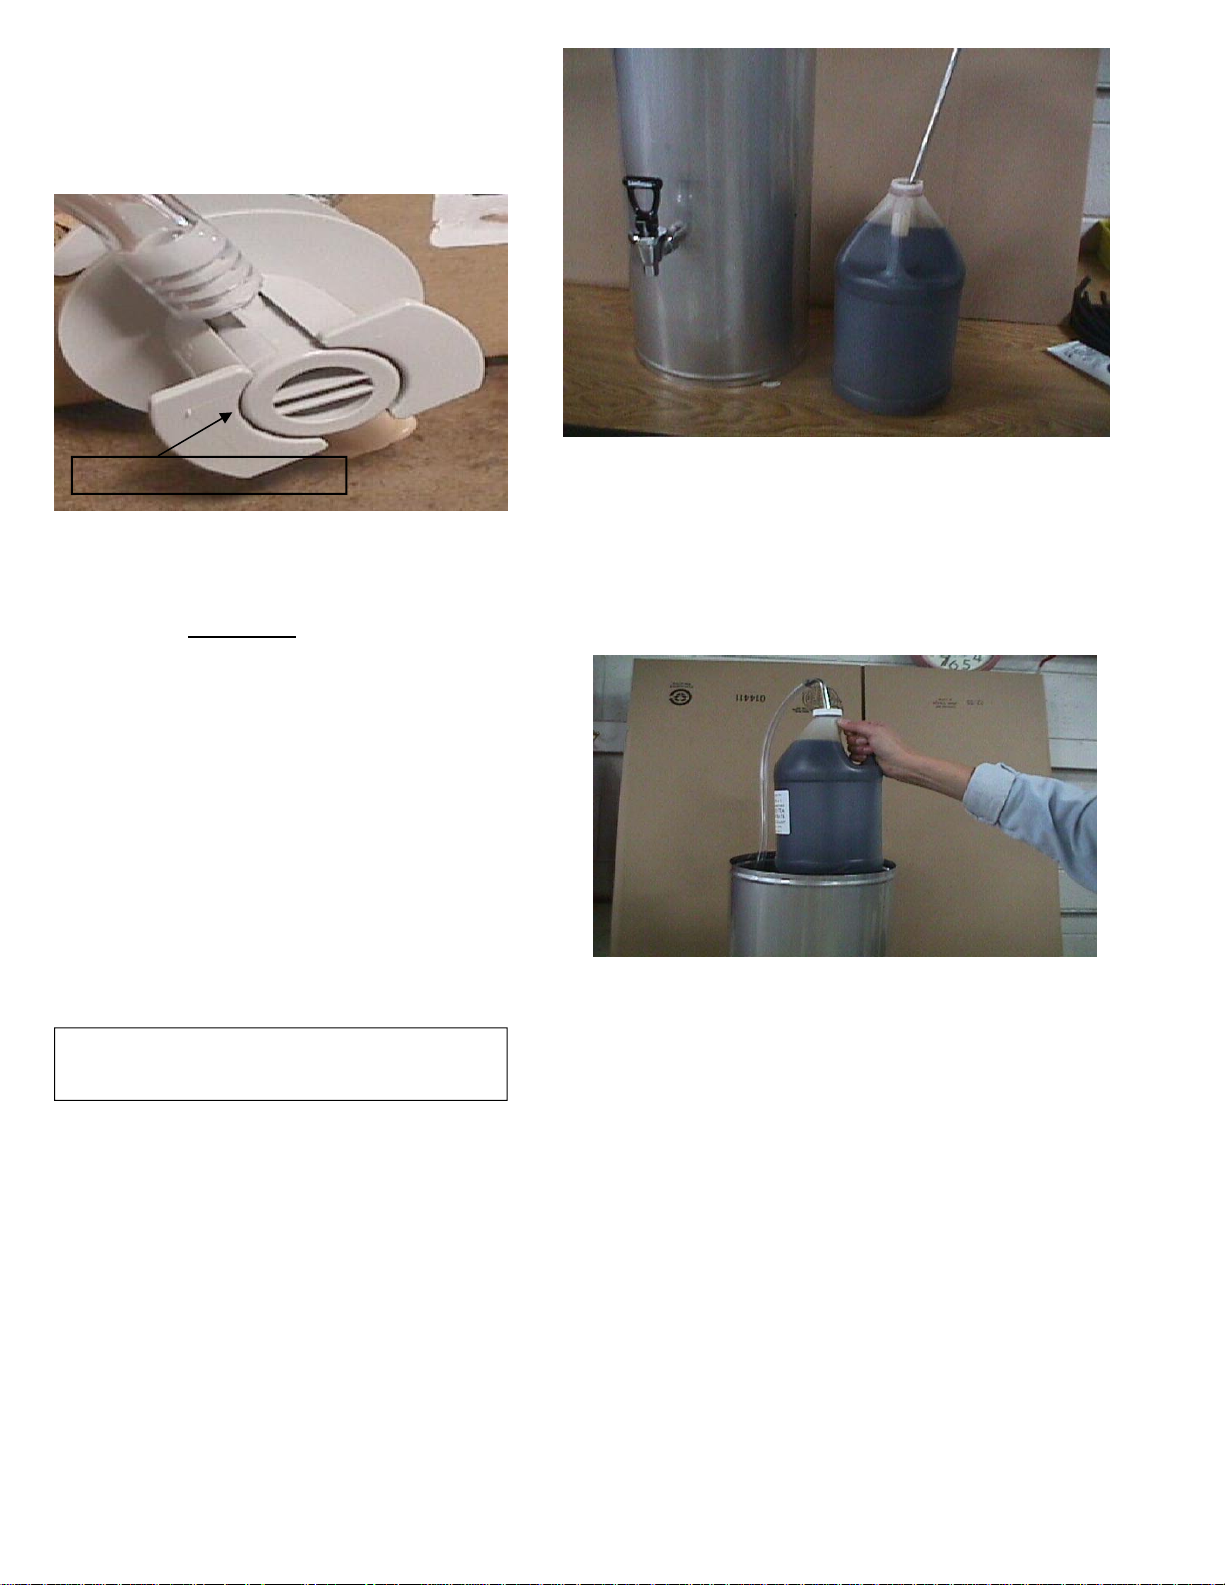
Gallon Jug Model 875
1. Remove the cover. Lift the product hose and dip tube out of the
dispenser. Remove the bottle cap
from the concentrate jug.
2. Place the dip tube into the concentrate.
Tighten the white bottle cap on the dip
tube to the concentrate jug. Place the
gallon jug of concentrate into the dispenser.
Note: The product hose will wrap loosely
around the bottom of the concentrate jug.
CHECK FOR ANY KINKS IN THE
PRODUCT HOSE.
3. Place a glass under the faucet.
4. PULL THE FAUCET HANDLE ALL
THE WAY DOWN. Hold the handle down
until the glass begins to fill with tea.
5. Release the faucet.
6. Dispense a second glass and sample for
taste. If an adjustment is necessary refer to
Drink Richer/Leaner Adjustment Section
Page 4

Taste Calibration
Note: There is an adjustment rod for
each dispense head. The dispenser has
been factory adjusted to the proper
strength range.
To fine tune the drink strength:
1. Tilt the dispenser backwards.
Reach underneath and grasp the
proper adjustment rod very slightly
1/8th turn at a time).
(
Turn the adjustment rod as shown:
5. Disconnect bag from QCD
and connect a new BIB to
fitment.
Clean Dispenser and Faucet
1. Turn off water source to dispenser
Cleaning Instructions
(to be done when changing box or
gallon jug )
Clean Syrup Line
1. Remove bag from box
2. Cut away the majority of the bag
3. Place bag and QCD in container
of hot water
4. Hold faucet handle down until
clear water runs from faucet.
(This cleans the product line and the
fitment)
Water off
2. Open and close the faucet handle
to relieve system of water.
Page 5

3. Unscrew the faucet/handle cap
assembly from the faucet.
Cap
Handle
Seat cup
WEEKLY SANITIZING
BAG-IN-BOX
1. Remove the quick disconnect from Bagin-Box (BIB).
2. Shut off water supply valve on the back
of the dispenser.
3. Open and close faucet handle to relieve
system of water.
4. Unscrew the faucet handle/cap assembly
from faucet.
5. Wash the faucet/cap/seat cup assembly
in a mild dishwashing soap and warm
water.
6. Re-install assembly to faucet body taking care not to cross-thread when install-
4. Wipe inside of faucet body with a
mild dishwashing soap and hot
water.
5. Do the same to handle, cap, and
seat cup.
6. Re-install assembly to faucet body,
taking care not to cross thread when
installing. Finger tight is adequate.
7. Turn water source to on position.
8. Dispense approximately 12 ounces
Gallon Jug
1. Remove the product container.
2. Replace the product container with a
container of very hot water. ( at least
32 ounces at 140°)
3. Hold the faucet down until container
is empty.
4. Refill the container with lukewarm
water about 110° and one tablespoon
of a mild dish soap such as Ivory.
Follow step 3.
5. Repeat steps 2 and 3 until there is no
evidence of soap.
6. Reload the system with concentrate.
Hold the faucet down and dispense
an eight ounce drink to prime the
system.
ing. Finger tight is adequate.
7. Turn water supply on.
8. Mix one ounce of San-I-Queen sanitizer
or the equivalent which will equal 650
parts per million of chlorine when mixed
with one gallon of 100° warm water.
9. Open the quick disconnect and place into
the one gallon vessel of sanitizing solution.
10. Place a large vessel under the faucet.
Lock the faucet open until the container
of sanitizing solution is empty.
(DO NOT FLUSH UNTIL THE
FOL LOWING MORNING.)
11. Flush by reloading the dispenser
with concentrate. Lock the faucet
handle down until the tea is dispensed
from the faucet. Dispense three eight
ounce servings and discard.
Gallon Jug
1. Remove product container.
2. Replace the product container with the following: Mix one ounce of San-I-Queen
sanitizer or the equivalent which will equal
650 parts per million of chlorine when
mixed with one gallon of 100° warm water.
Page 6

3. Hold the faucet down until container is
empty.
(DO NOT FLUSH UNTIL THE FOLLOWING MORNING)
4. Flush by reloading the dispenser with
concentrate. Reload the gallon jug. Hold
the faucet down and dispense three eight
ounces servings and discard.
Do’s and Don’ts
OPERATION
1. Do fully activate faucet handle when dispensing drinks.
2. Do clean & sanitize dispensing assembly
monthly.
3. Do keep dispenser primed with concentrate
at all times.
4. Do reload immediately when out of concentrate.
5. Do flush and clean lines regularly.
6. Don’t forget to clean & sanitize faucet seat
cup
7. Do follow all cleaning and sanitizing procedures, remove and store concentrate if
urn will not be used for an extended period
of time; ie: more than two days.
INSTALLATION
1. Do connect dispenser to a filtered waterline.
2. Do flush filters before connecting to dispenser.
3. Do sample finished drink before making adjustments.
4. Do make very slight drink adjustments then sample.
5. Don’t forget to flush filters before installation.
6. Don’t make any pressure regulator adjustments
on urn. (Do NOT attempt to adjust the urn regulator. If a regulator adjustment is required call
the factory at 1-800-558-9565. The adjustment
should be made by a qualified service technician.)
7. Don’t forget to get sample approval from customer.
Page 7

Page 8

TROUBLESHOOTING
PROBLEM
Difficulty priming dispenser.
Pulled faucet handle, no
product, no water.
Drink too foamy or bubbly 1. Concentrate BIB empty.
Drink inconsistent 1. Waterline pressure dropping
1. Product adjustment screw
turned in too far.
1. Water supply not on. 1. Turn water supply on.
2. Hole or tear in product
tubing prior to BIB
connection.
3. Loose syrup line connection.
below machine’s preset
pressure regulator
adjustment.
CAUSE
CORRECTIVE ACTION
1. Turn adjustment rod ¼ turn
clockwise (richer/leaner ad justment.
2. Regulator adjustment is re quired. Call the factory for
assistance.
1. Load new BIB
2. Replace tubing
3. Check syrup line
connections from check
valve.
2. Regulator adjustment is re-
quired. Call the factory for
assistance.
Water only—no product 1. Concentrate BIB empty.
2. Product hose clogged.
3. Product hose kinked.
4. Check valve not seating.
5. Adjustment screw in too far.
Faucet dripping 1. Foreign particles on seat
cup.
2. Damaged seat cup.
3. Pressure set too high.
Drink too weak 1. Adjustment screw in too far.
2. Check valve not seating.
Air bubbles in syrup 1. Loose tubing connection at
QCD or at check valve barb.
2. Worn O-ring on QCD
plunger.
3. Air in bag.
1. Load new BIB.
2. Clean product hose or
replace.
3. Check for kinks.
4. Disassemble and clean check
valve.
5. Turn adjustment screw out
using adjustment rod.
1. Follow seat cup cleaning.
2. Replace seat cup.
3. Regulator adjustment is
required. Call the factory for
assistance.
1. Turn adjustment screw out
Richer/Leaner adjustment.
2. Disassemble and clean check
valve.
1. Ensure tubing is slid all the
way on to the QCD and
check valve barb.
2. Replace QCD.
3. Stand BIB upright, open
faucet handle and prime
syrup line until all air
bubbles are gone.
 Loading...