

Page 1

DVI USB KVM Combo Switch with Audio, Mic & USB Hub 2.0
KR08DHU KR16DHU
User's Manual
RoHS
Features and functions may be added or changed
after the manual was written. Please visit our
website t o download the latest version of manual
for reference.
◘
◘
Page 2

INTRODUCTION........................................................................ 2
PACKAGE CONTENTS.............................................................. 2
FRONT & BACK PANEL............................................................. 3
KR08DHU Front and Back Panel..................................... 3
KR16DHU Front and Back Panel..................................... 4
INSTALLATION........................................................................... 5
OPERATION............................................................................... 5
FCC/CE STATEMENTS.............................................................. 5
QUICK REFERENCE SHEET..................................................... 6
www.serveredge.com.au | 1 |
Page 3

INTRODUCTION
The KR08DHU/KR16DHU is rack-mountable KVM Switch with the DVI video interface. The
KR08DHU/KR16DHU cancontrol 8 / 16 PCs from a single keyboard, mouse and monitor console. It also
provides multimedia keyboard plus audio support. It can connect to each of the computers audio input and
output through a microphone and a set of speakers one at a time.
PACKAGE CONTENTS
Please check whether you have all the following items within this box.
* 1 x KR08DHU/KR16DHU Switch Unit
* 1 x Quick Installation Guide
* 1 x Power Adapter DC 9V
www.serveredge.com.au | 2 |
Page 4
FRONT & BACK PANEL
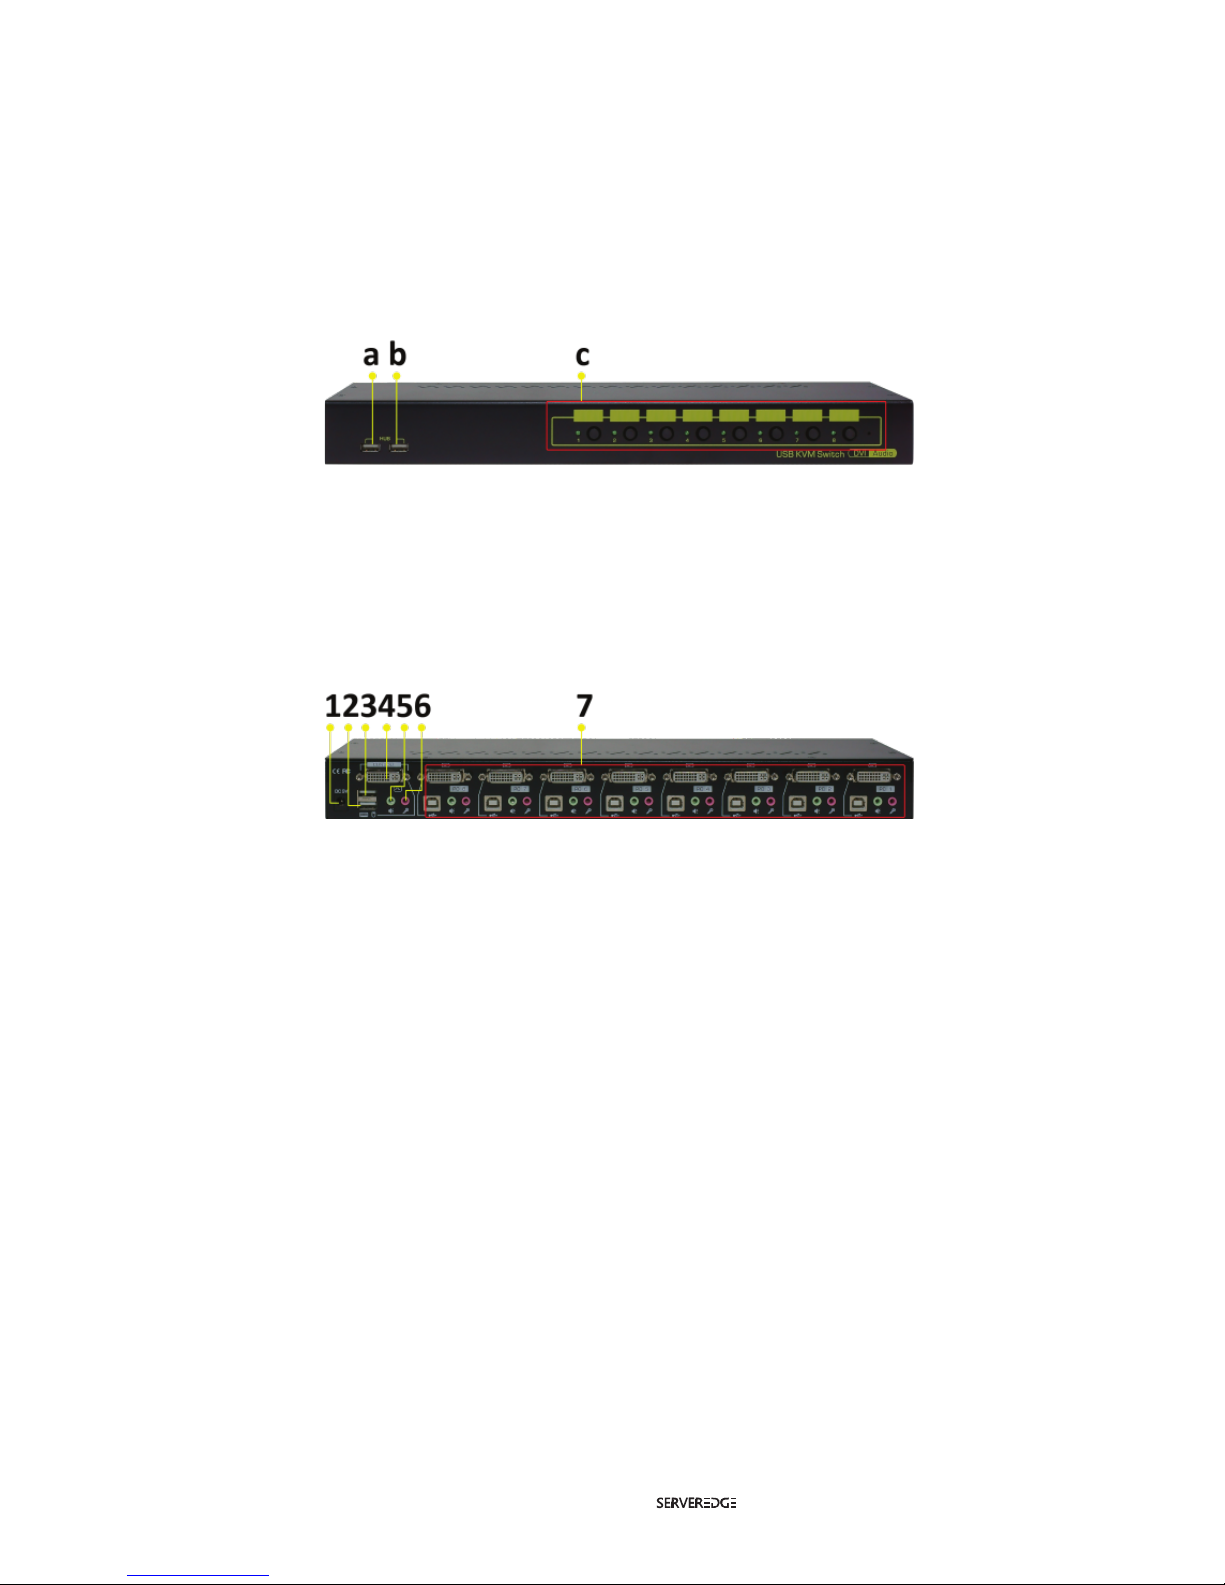
The below shows where the various connectors are located on the KR08DHU/KR16DHU Units front-panel and
back-panel. Before you connect this unit to any cabling or peripherals, please familiarise yourself with the main
connectors you are going to encounter while setting up the system.
www.serveredge.com.au | 3 |
a. USB Device Port (Type A, Female)
b. USB Device Port (Type A, Female)
c. Computer port LEDs and push buttons (1~8)
1. Power Socket
2. USB Port for Keyboard (Type A)
3. USB Port for Mouse (Type A)
4. DVI-I Port connect to Monitor (Console)
5. Speaker jack (Console)
6. Microphone jack (Console)
7. PC1~PC8 (right to left as marked) DVI-I Port, USB
Port (Type B), Speaker and Mic jacks
KR08DHU Front & Back Panel
KR08DHU Front panel overview
KR08DHU Back panel overview
Page 5
www.serveredge.com.au | 4 |
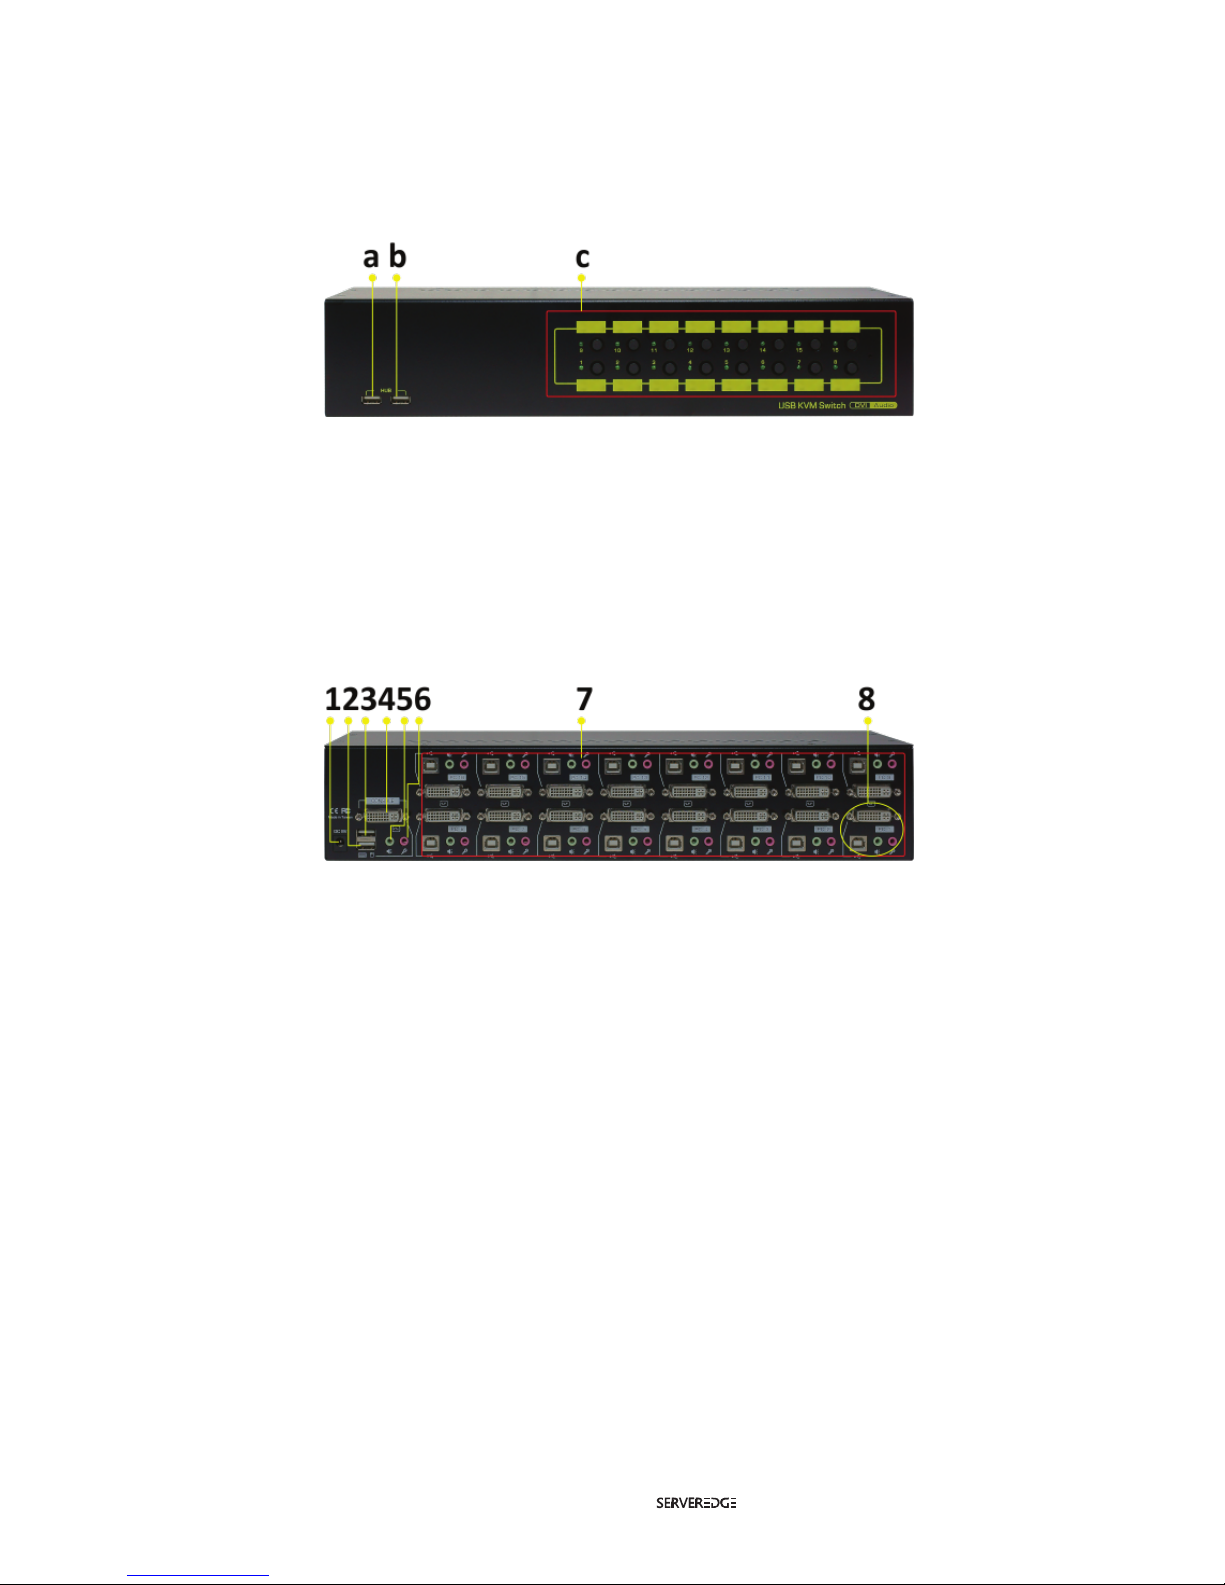
a. USB Device Port (Type A, Female)
b. USB Device Port (Type A, Female)
c. Computer Port LEDs and push buttons (1~16)
1. Power socket
2. USB Port for Keyboard (Type A)
3. USB Port for Mouse (Type A)
4. DVI-I Port connect to Monitor (Console)
5. Speaker jack
6. Microphone jack
7. PC1~PC16 (down row, right to left as marked)
8. PC1: DVI-I Port, USB Port (Type B), Speaker and Mic jacks.
KR16DHU Front & Back Panel
KR16DHU Front-panel overview
KR16DHU Front-panel overview
Page 6
RoHS
1. Please ensure that your KVM Switch, monitor, and computers are powered off.
2. Connect keyboard to USB port (2)
3. Connect mouse to USB port (3)
4. Connect DVI-I port to PC DVI (4)
5. Connect Speakers to Speaker jack (5)
6. Connect Microphone to Microphone jack (6)
7. Power on the Monitor.
8. Power on the KVM Switch by plugging in the External Power Adapter.
9. Connect each KVM Switch PC port to the Computers.
10. Power on the Computers.
11. Connect each of your USB devices to the USB Hub ports; you can now begin to use the KVM Switch.
INSTALLATION
There are two methods to control your KVM Switch for PC/Hub port / Audio & Microphone ports selection:
Front-panel push buttons and Keyboard Hotkeys.
1. Front-panel push buttons
The Front-panel push buttons allows you to directly control the KVM Switching operations. Simply push
desired button to switch rapidly to the respective PC port. For more information about the push button
operation, please refer to the “Quick Reference Sheet”
2. Keyboard Hotkeys
For Keyboard Hotkeys, please refer to the “Quick Reference Sheet”.
OPERATION
FCC Statement: This equipment has been tested and found to comply with the regulations for a class B digital
device, pursuant to Part 15 of the FCC Rules. These limits are designed to prove reasonable protection against
harmful interference when the equipment is operated in a commercial environment. This equipment generates,
uses, and can radiate radio frequency energy and, if not installed and used in accordance with this Quick Installation Guide, may cause harmful interference to radio communications. Operation of this equipment in a residential
area is likely to cause harmful interference in which case, the user will be required to correct the interference at
his/her own expense.
CE Statement: This is a Class B product in a domestic environment, this product may cause radio interference, in
which case the user may be required to take adequate measures.
FCC / CE STATEMENTS
www.serveredge.com.au | 5 |
Page 7
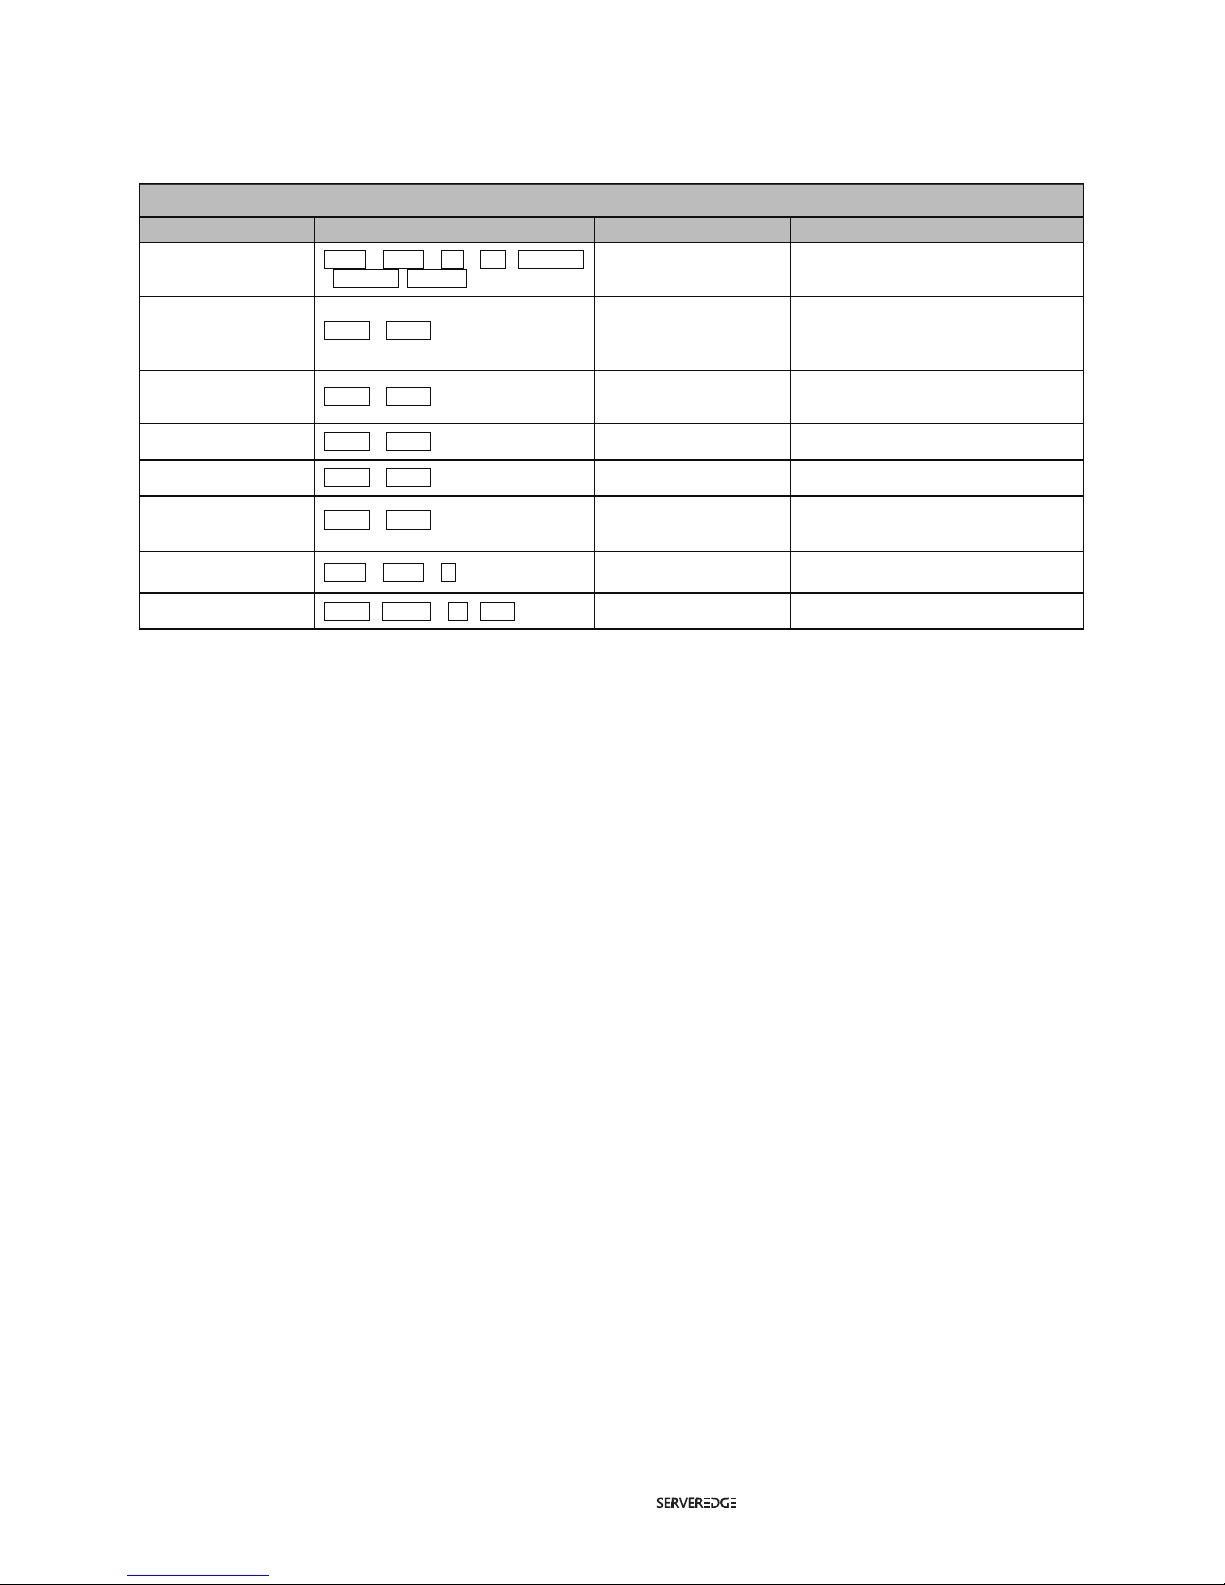
Quick Reference Sheet – KR08DHU / 1166 Switch Operation – Hotkeys / Front-panel Buttons
Command
Hotkeys
Description
Define Hotkey Preceding
Sequence
ScrLk + ScrLk + [H] + F12 / NumLock
/ CapsLock / ScrLock ]
--
Define Hotkey Preceding Sequence
Bind PC and Hub Port
Control Switching
ScrLK + ScrLK + Z
--
Enable the binding of PC port and hub port
control switching (Once this feature is enable,
any PC and/or hub port control switching is
bound together) (Factory default)
Unbind PC and Hub Port
Control Switching
ScrLK + ScrLK + X
--
Disable the binding of PC port and hub
port control switching
Next lower PC port
ScrLK + ScrLK + [Up Arrow]
Press corresponding button
switch for port selection
Next lower PC port
Next higher PC port
ScrLK + ScrLK + [Down Arrow]
Next higher PC port
Previous PC Port
ScrLK + ScrLK + [BackSpace]
Toggle between the previous port and
current port
Beep Sound On/Off
[Default = ON]
ScrLk + ScrLk + B
--
Toggle On/Off the beep sound
Autoscan Period
[Default = 10 seconds]
ScrLK + ScrLK + [S] +[1~9]
--
Specify the scanning period [10~90 seconds]
Press corresponding button
switch for port selection
Press corresponding button
switch for port selection
Front Panel Buttons
QUICK REFERENCE SHEET
www.serveredge.com.au | 6 |
Page 8

 Loading...