

Page 1

Server Express
Used with pouches up to
1½ gallons with 16mm tments.
MODELS:
SE
SE-SS
SS-1SE
SS-2SE
SE-2
SE-3
SE-3DI
SE-4
SE-4DI
SE-5
SE-5DI
®
Thank You
for purchasing our Server Express® Pouched Condiment
Dispenser. This portion controlled unit is sealed and
sanitary, achieves excellent evacuation and has only a few
parts for easy clean-up.
SIMPLIFY CONDIMENT MANAGEMENT— GO POUCHED
Page 2
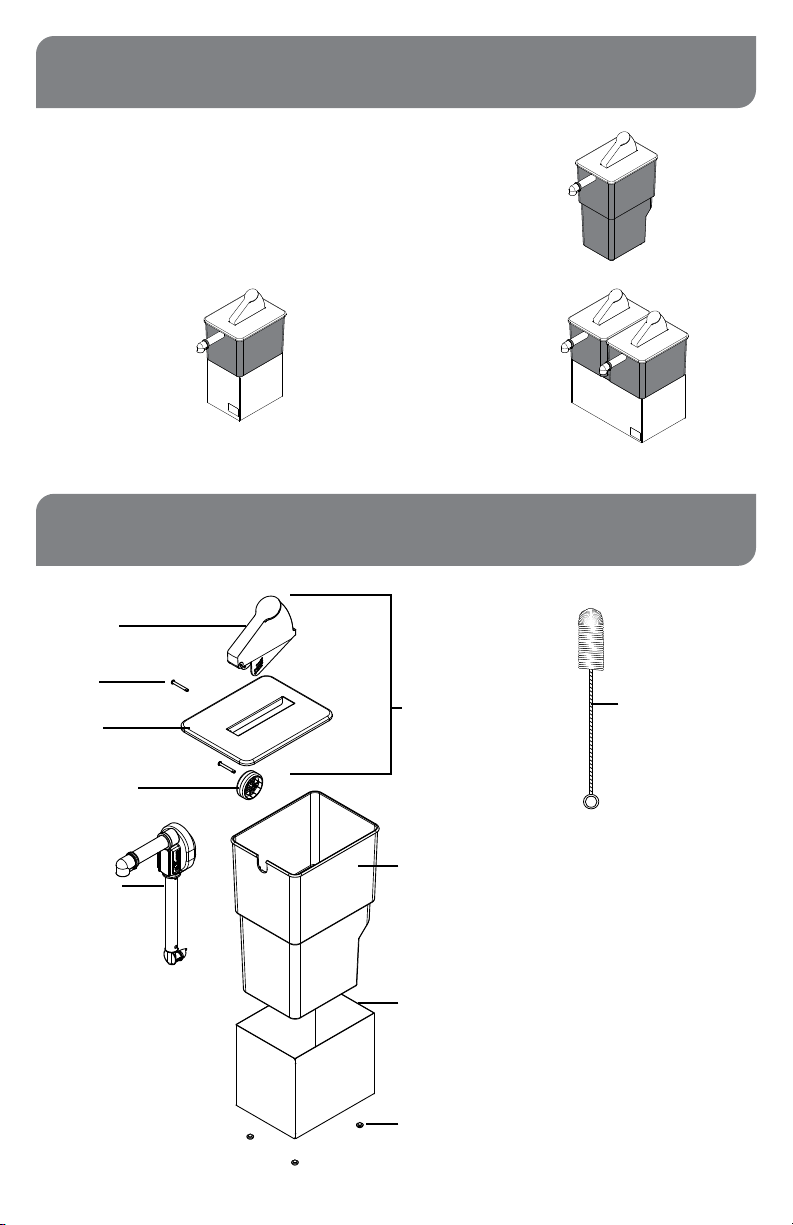
SERVER EXPRESS® MODELS
Your model may vary.
See pages 2—4.
Examples include:
SE
07000
Rectangular Black
SS-1SE
67760
Rectangular Single Stand
PARTS
LEVER
07014
HINGE PIN
(2)
07161
LID
07048
ROLLER
07056
PUMP
07794
See page 6
for individual
pump parts.
SS-2SE
07300
Twin Stand
LID
ASSEMBLY
07053
RECTANGULAR
BLACK VESSEL
07046
(Unit 07000 Does not include a shroud.)
Unit 67760: SINGLE STAND SHROUD 67699
Unit 07300: TWIN STAND SHROUD 07304
11" BRUSH
82049
Page 2
Replacement Feet Available
Units 67760, 07300: FEET 92098
Unit 07000: FEE T 07429
Page 3
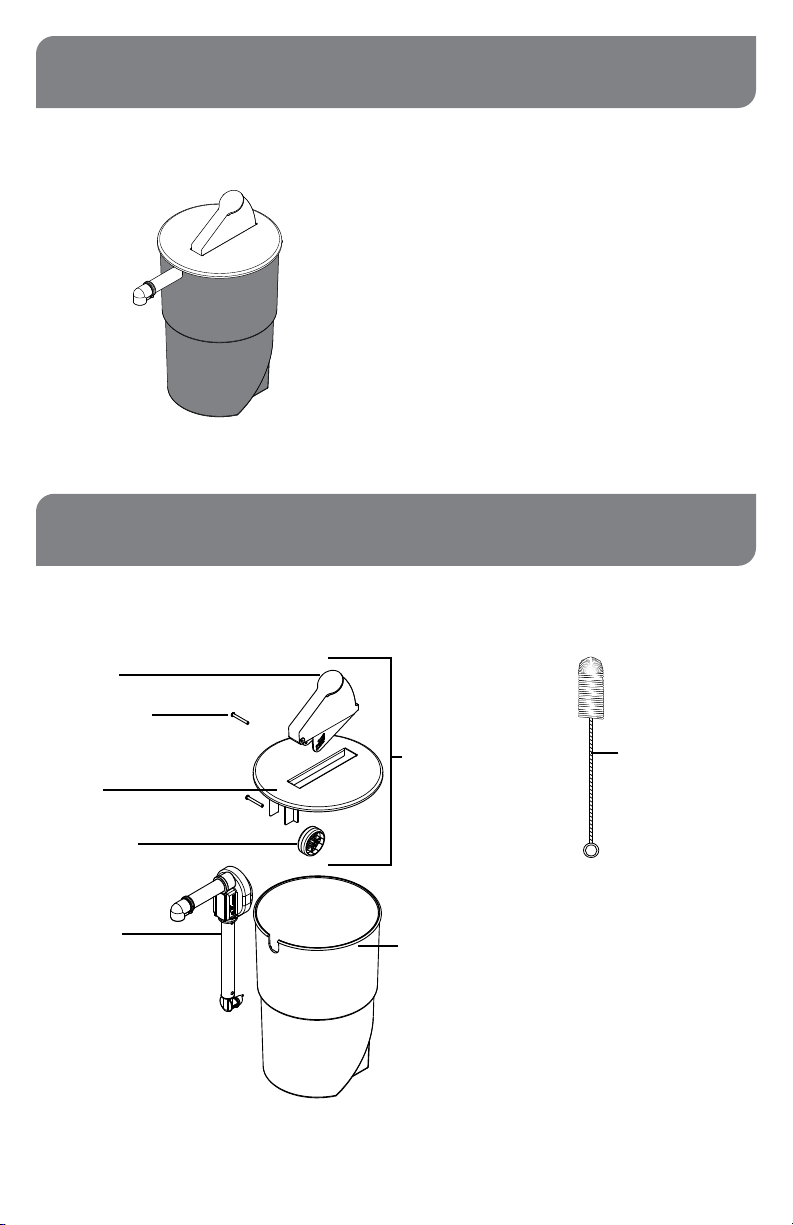
SERVER EXPRESS® MODEL
SE
07010
Round Black
PARTS
LEVER
07014
HINGE PIN
(2)
07161
LID
07051
ROLLER
07056
PUMP
07794
See page 6
for individual
pump parts.
LID
ASSEMBLY
07052
ROUND VESSEL
07047
11" BRUSH
82049
Page 3
Page 4
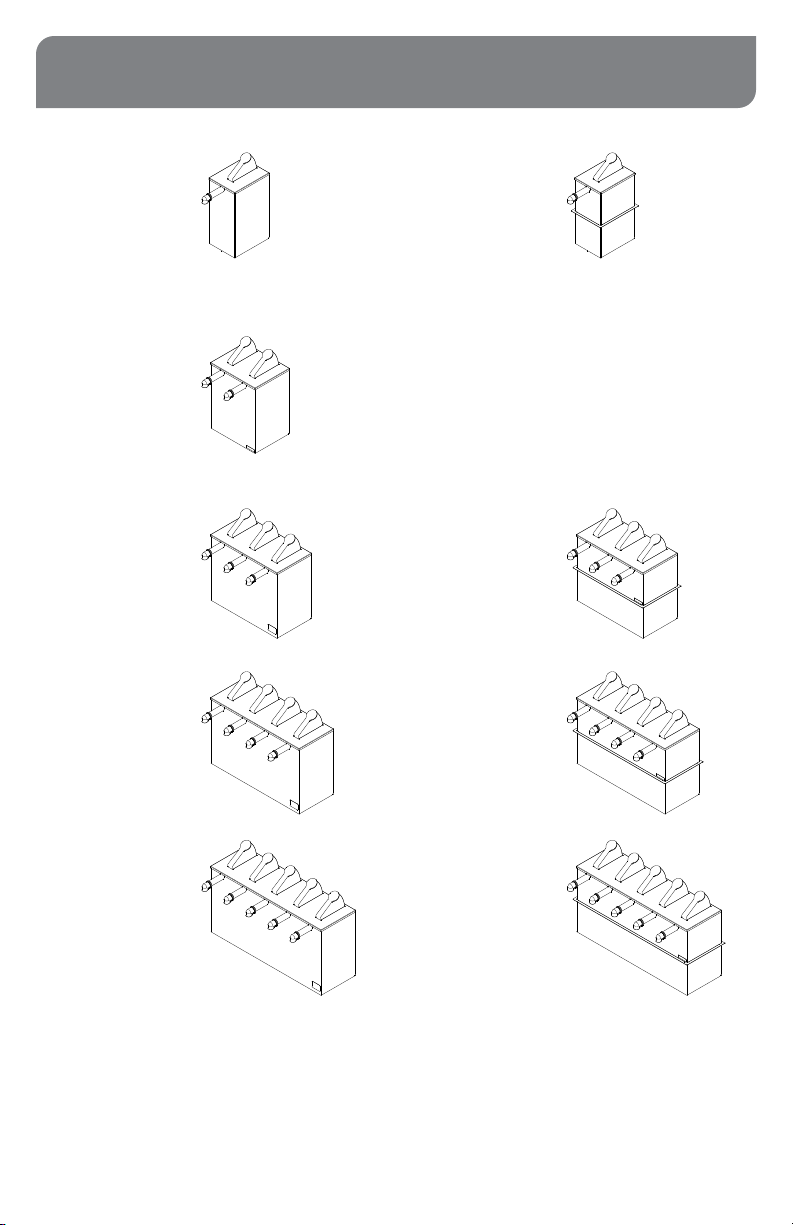
SERVER EXPRESS® MODELS
SE-SS
07125
Single
SE-2
07140
Twin
SE-3
07040
Triple
SE-4
07200
Quadruple
SE-SS
07020
Single Drop-In
SE-3DI
07050
Triple Drop-In
SE-4DI
07210
Quadruple Drop-In
Page 4
SE-5
07060
Quintuple
SE-5DI
07070
Quintuple Drop-In
Page 5
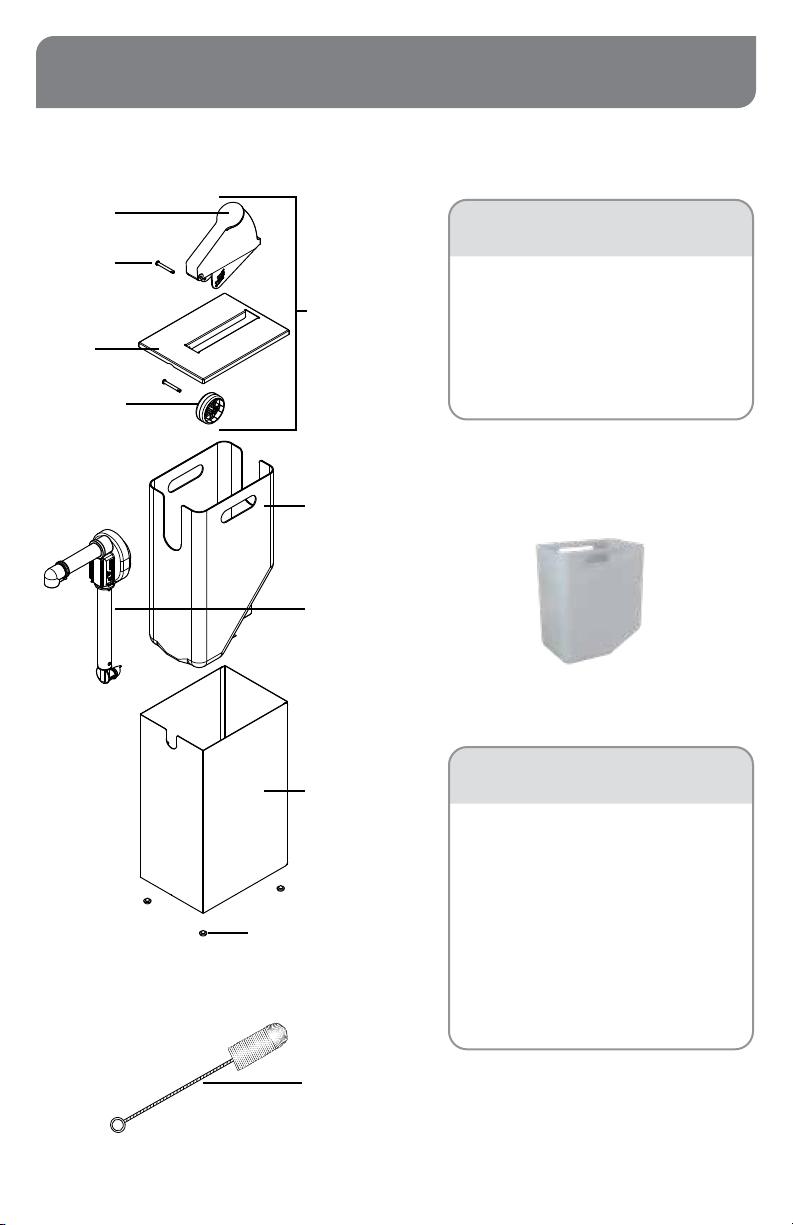
PARTS
LEVER
07014
HINGE
PIN
(2)
07161
LID
ROLLER
07056
LID
ASSEMBLY
POUCH
SUPPORT
07159
PUMP
07794
See page 6
for individual
pump parts.
SHROUD
Replacement
Feet Available
92098
MODEL(S) LID LID
ASSEMBLY
07125, 07020 07055 07057
07140 07341 07342
07040, 07050 07079 07083
07200, 07210 07185 07186
07060, 07070 07104 07105
For Express Singles, an
07159 pouch support
may be substituted with
a 100280 vessel. These
parts are interchangable
and function the same.
100280 VESSEL
MODEL REPLACEMENT
SHROUD
07125 07345
07020 07327
07140 07343
07040 07328
07050 07329
07200 07331
07210 07332
07060 07333
07070 07334
11" BRUSH
82049
Page 5
Page 6
SAFETY
According to food and safety regulations, most
foods must be stored and/or served at certain
temperatures or they could become hazardous.
Check with local food and safety regulators for
specic guidelines. Server Products, Inc. cannot be
responsible for the serving of potentially hazardous
product.
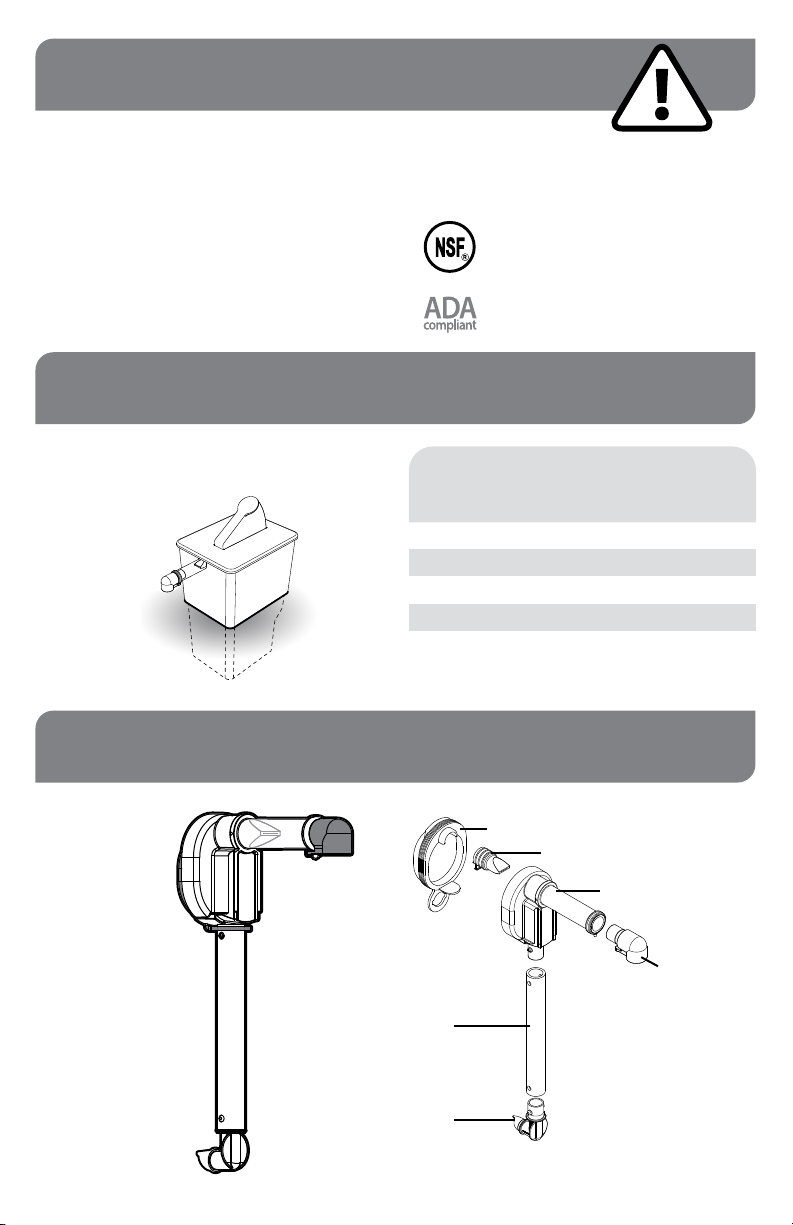
DROP-IN UNITS
Drop-in units can be used either on a countertop
surface or can be dropped into an opening in
a countertop.
IMPORTANT
Clean, rinse, sanitize, and dry parts daily or regularly to
comply with local sanitization requirements.
NSF International lists this pump as:
“Not acceptable for dispensing potentially
hazardous foods.”
MODEL RECOMMENDED
NUMBER COUNTERTOP
OPENING SIZE
07000, 07020 6 3/8" x 8 1/2"
07010 8 1/2" diameter
07050 16 3/8" x 8 1/2"
07210 21 13/16" x 8 1/2"
07070 27 3/16" x 8 1/2"
PUMP MODEL 07794
Page 6
TUBE
07089
CONNECTOR
07381
DOME 07383
PINCH VALVE 07798
PUMP HOUSING
07388
DISCHARGE
FITTING
07795,
07796,
or
07797
Page 7
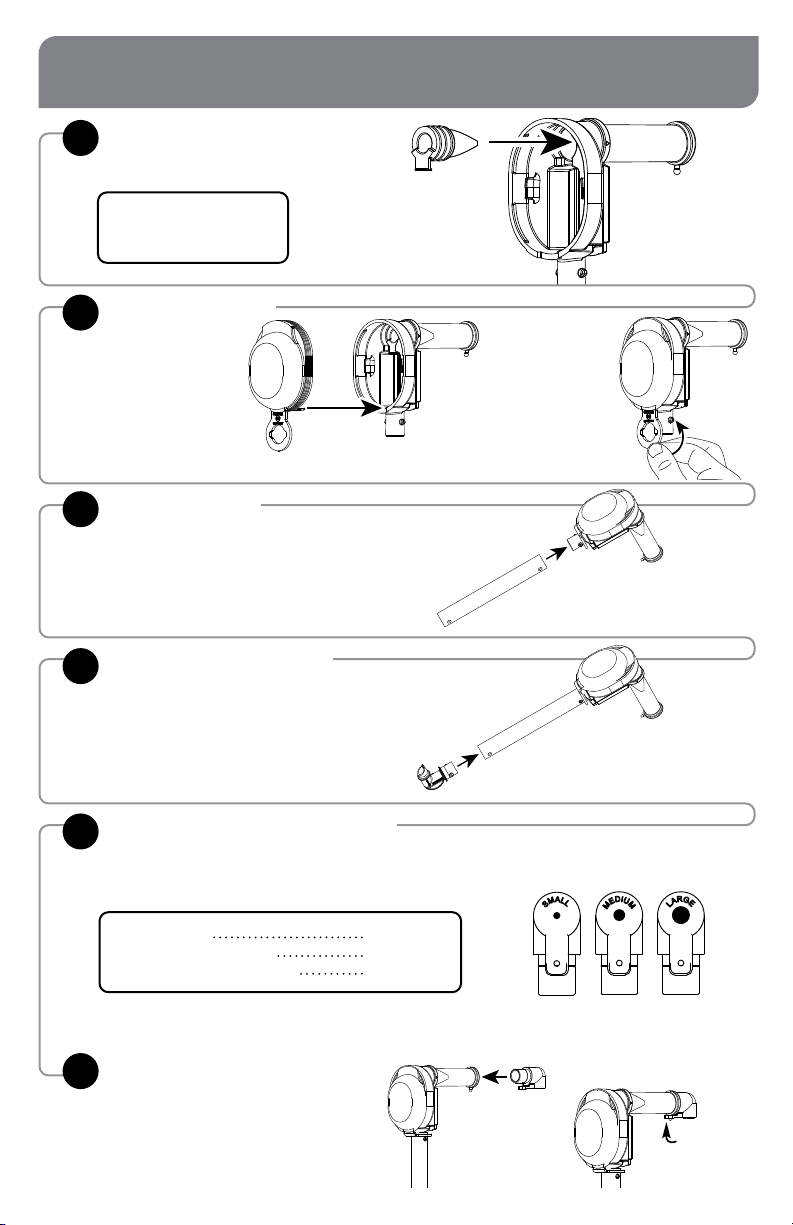
PUMP ASSEMBLY
INSERT PINCH VALVE
1
into pump housing.
TIP: Squeeze the pinch valve
open before installation to
ensure it isn’t stuck shut.
INSTALL DOME
2
Press dome into
housing fully.
Ensure valve ap
covers bottom
opening.
INSTALL TUBE
3
Lubricate with a small amount of clean water.
Rotate and position until both pegs on
housing t into holes on tube.
WASH ALL PARTS
PROPERLY BEFORE USE.
Wrap loop
around lower
opening to
secure dome.
See page 11.
INSERT CONNECTOR
4
Lubricate with a small amount of clean water.
Rotate and position until both pegs on
connector t into holes on tube.
Connector must point away from end of
discharge tube.
SELECT DISCHARGE FITTING
5
CONSISTENCY OF
WHAT YOU DISPENSE
THIN (hot sauce)
THICK (ketchup or mustard)
THICKER (relish or tartar sauce)
INSERT DISCHARGE FITTING
6
into pump housing discharge tube.
Place loop of tting around peg on end of
discharge tube to secure.
SUGGESTED
FITTING SIZE
SMALL
MEDIUM
LARGE
Fittings are marked small,
medium or large on bottom.
Page 7
Page 8

SETUP
PRACTICE SAFETY.
WASH ALL PARTS PROPERLY BEFORE USE.
ATTACH POUCH TO PUMP
1
Firmly press piercing connector into
center of pouch tment.
An audible click indicates
a secure connection.
See page 11.
TIP: Prime the pump. Push
the dome to draw food up
towards the discharge tube.
INSTALL PUMP
2
Slide pouch and pump into
pouch support within shroud.
Align pump guides into slots in shroud.
CLICK
Page 8
Page 9
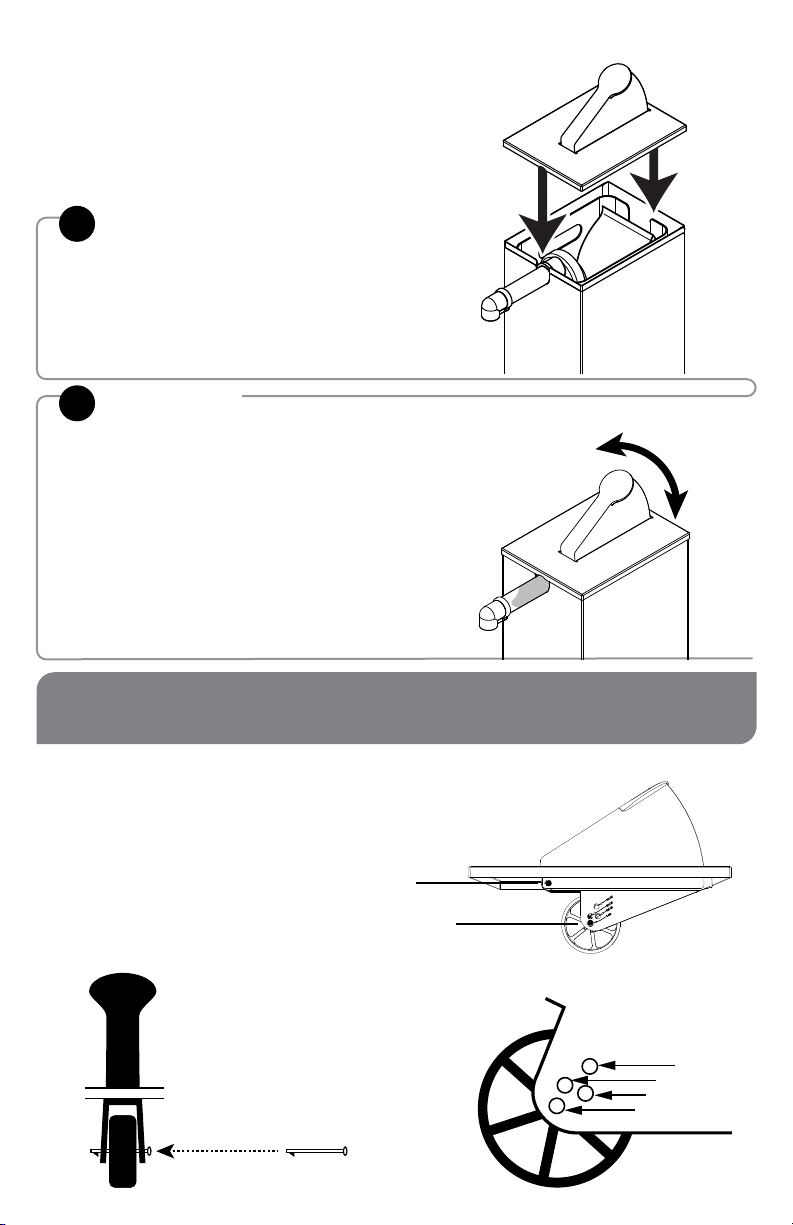
PLACE LID ON TOP
3
PRIME PUMP
4
Press lever several times until you see
product in discharge tube.
PORTION CONTROL
THE LID IS SET TO DELIVER 1 OZ PORTIONS.
If lid reassembly is needed,
or to specify a different portion size:
One hinge pin attaches lever to lid.
Second hinge pin attaches roller to lever.
(Controls portion dispensed.)
Install hinge pin through center
roller hole and desired portion
hole on lever.
Pin snaps into place.
1/4 OZ
3/4 OZ
1/2 OZ
1 OZ
Page 9
Page 10

TAKE-DOWN & DISASSEMBLY
REMOVE LID
1
REMOVE PUMP & POUCH
2
DETACH PUMP FROM POUCH
3
FLUSH & RINSE PUMP
4
Place lower end of pump into container of
hot water. Pump until all remaining product is
expelled and only water ows from discharge
tube.
5
Page 10
DISASSEMBLE
Page 11
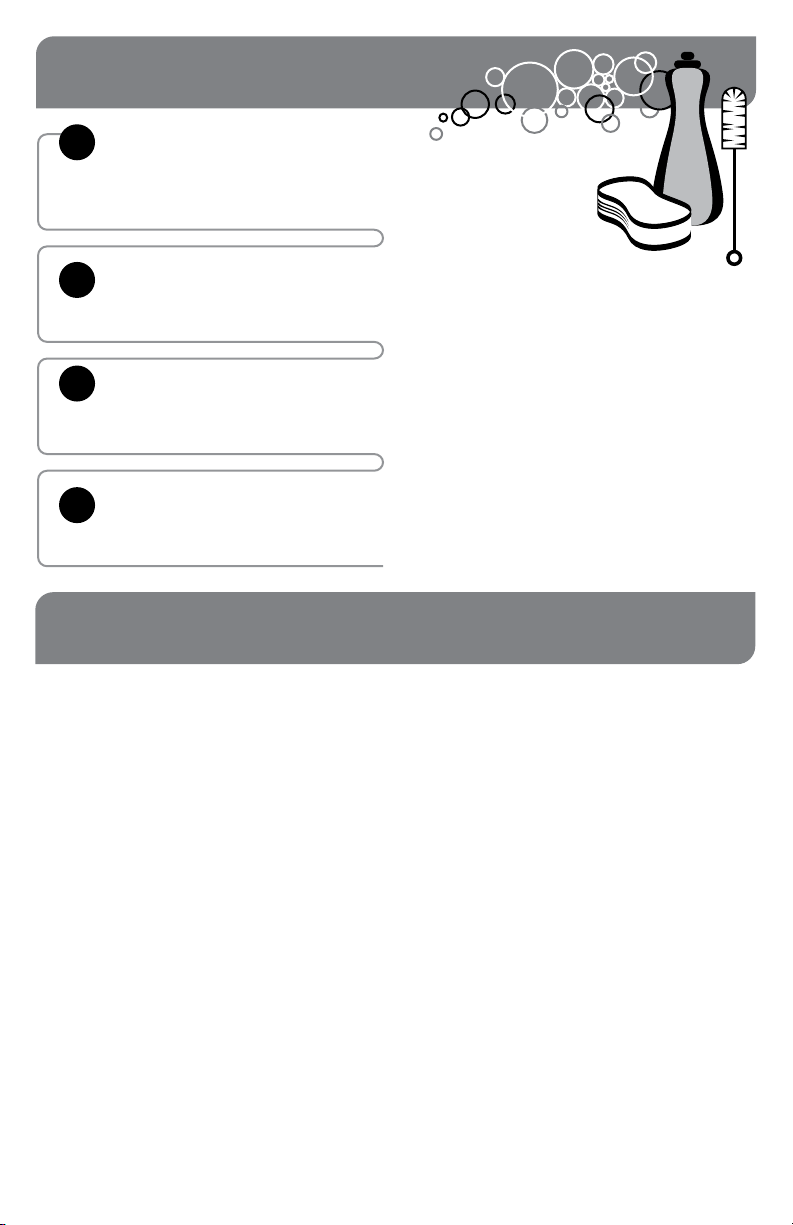
CLEANING
CLEAN
1
After disassembling,
clean all washable parts
with soap and hot water.
YES!
Use dishwashing
RINSE
2
fully with clear water.
SANITIZE
3
all parts according to local sanitization
requirements. All parts in contact with
food must be sanitized.
AIR DRY
4
all parts fully.
soap and hot water
• External surfaces may be wiped clean with
a clean damp cloth.
• Glass and surface cleaners approved for
use in food contact areas may be used.
• Do not use abrasive, caustic or ammonia
based cleansers.
• Do not use metal scrapers or cleaning
pads that could scratch surfaces.
CARE OF STAINLESS STEEL
This unit is constructed with
stainless steel— one of the best
materials for food serving and
storage.
If you notice corrosion beginning on
any stainless steel surface, you may need to
change the cleansing agent, sanitizing agent, or
the cleaning procedures you are using.
• A mildly abrasive nylon or brass brush may
be used to remove any stubborn food or
mineral deposits on interior surfaces of unit.
• Fully rinsing and drying all parts can help
prevent corrosion. Elements and minerals in
tap water can accumulate on stainless steel
parts and create corrosion.
• Do not use products containing acids,
alkalines, chlorine, or salt. These agents can
corrode stainless steel.
Page 11
Page 12
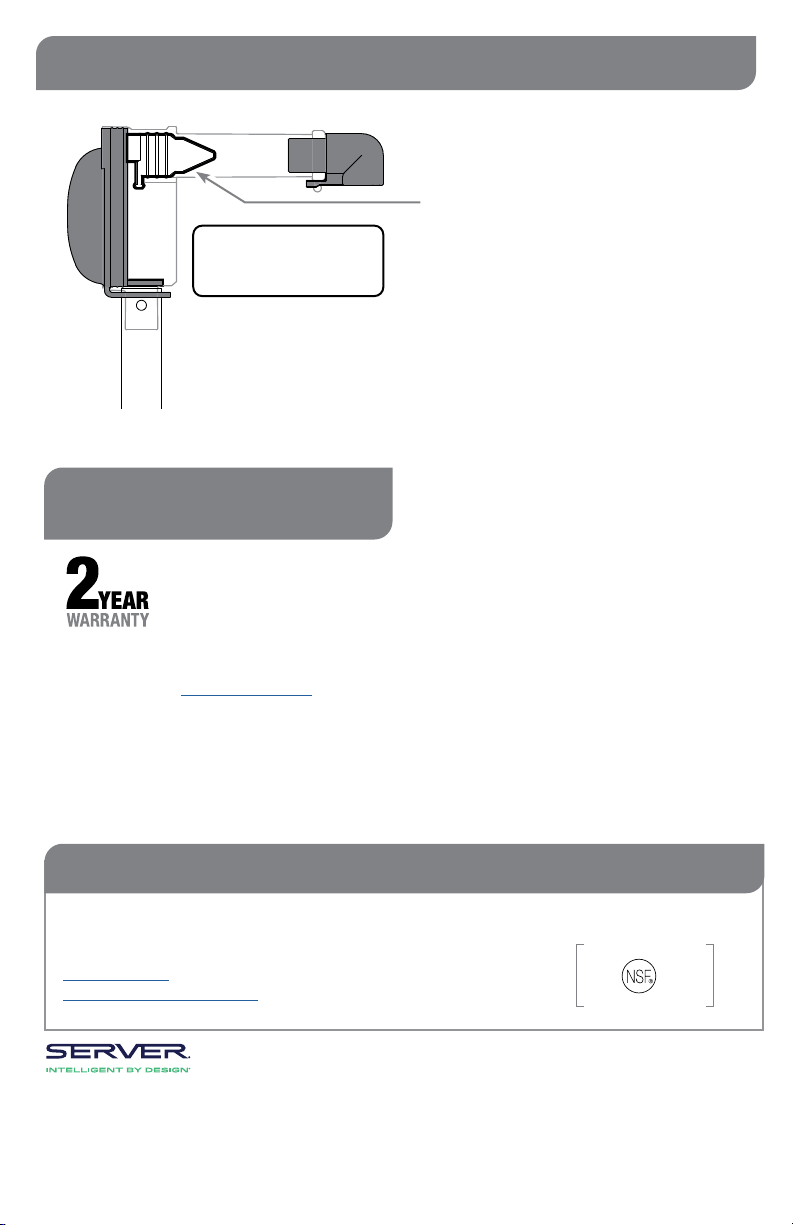
TROUBLESHOOTING
DIFFICULT TO ATTACH PARTS?
• Wet parts with clean water to help t.
PRODUCT DOESN’T PUMP?
• Ensure pinch valve is inserted in housing.
• Ensure connector is snapped fully in place to
TIP: Squeeze the pinch valve
open before installation to
ensure it isn’t stuck shut.
SERVER PRODUCTS
LIMITED WARRANTY
tment in pouch.
• Ensure pump is properly attached to pouch.
• Clean pump thoroughly.
• Ensure pump is properly installed into retaining
slots inside front wall of shroud.
DOME POPS OFF?
• Clean thoroughly. Food residue could prevent
a tight seal between dome and housing.
• Ensure dome edges are ush with housing.
This Server product is backed by a two-year
limited warranty against defects in materials and
workmanship. See Server-Products.com for details.
NEED HELP?
Server Products Inc.
3601 Pleasant Hill Road
Richfield, WI 53076 USA
Chat with us!
262.628.5600 | 800.558.8722
Page 12
Please be prepared with your Model, P/N and
Series located on the lid or base of the unit.
Example:
MODEL
XXXX
P/N
#####
Manual #EM_01534-RevS 110822
SERIES
##X ##X
 Loading...