

Page 1
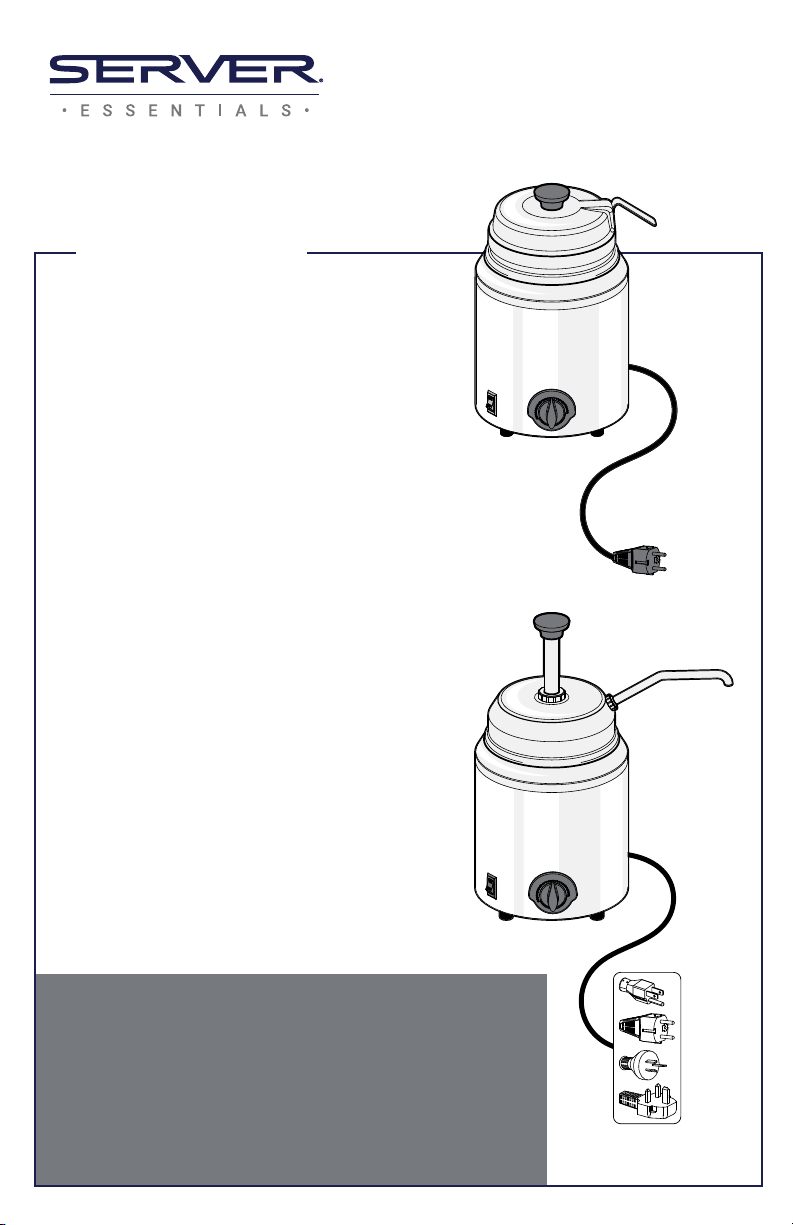
Fudge Server
MODEL: FS COMPLETE BASE ONLY
120V USA 82500 82066
230V CONT. EUROPE 82510 81020
230V AUSTRALIA 82540 82280
230V UNITED KINGDOM 84620 84750
Fudge Server with Pump
MODEL: FSP COMPLETE BASE ONLY
120V USA 82060 82066
230V CONT. EUROPE 82110 81020
230V CUSTOM 81003 81020
230V AUSTRALIA 82270 82280
230V UNITED KINGDOM 84580 84750
Thank You
for purchasing our topping warmer.
Its temperature sensing thermostat helps reduce food
costs while delivering a superior product.
SERVE BETTER WITH DISTINCTIVE DESSERTS
Page 2
SAFETY
According to food and safety regulations, most
foods must be stored and/or served at certain
temperatures or they could become hazardous.
Check with local food and safety regulators for
WARNING-
ELECTRICAL SHOCK COULD OCCUR
This unit must be earthed or grounded.
This requires all three prongs (terminals) on cord
plug to be plugged into power source.
specic guidelines.
Be aware of the product you are serving and the
temperature the product is required to maintain.
Server Products, Inc. can not be responsible for the
serving of potentially hazardous product.
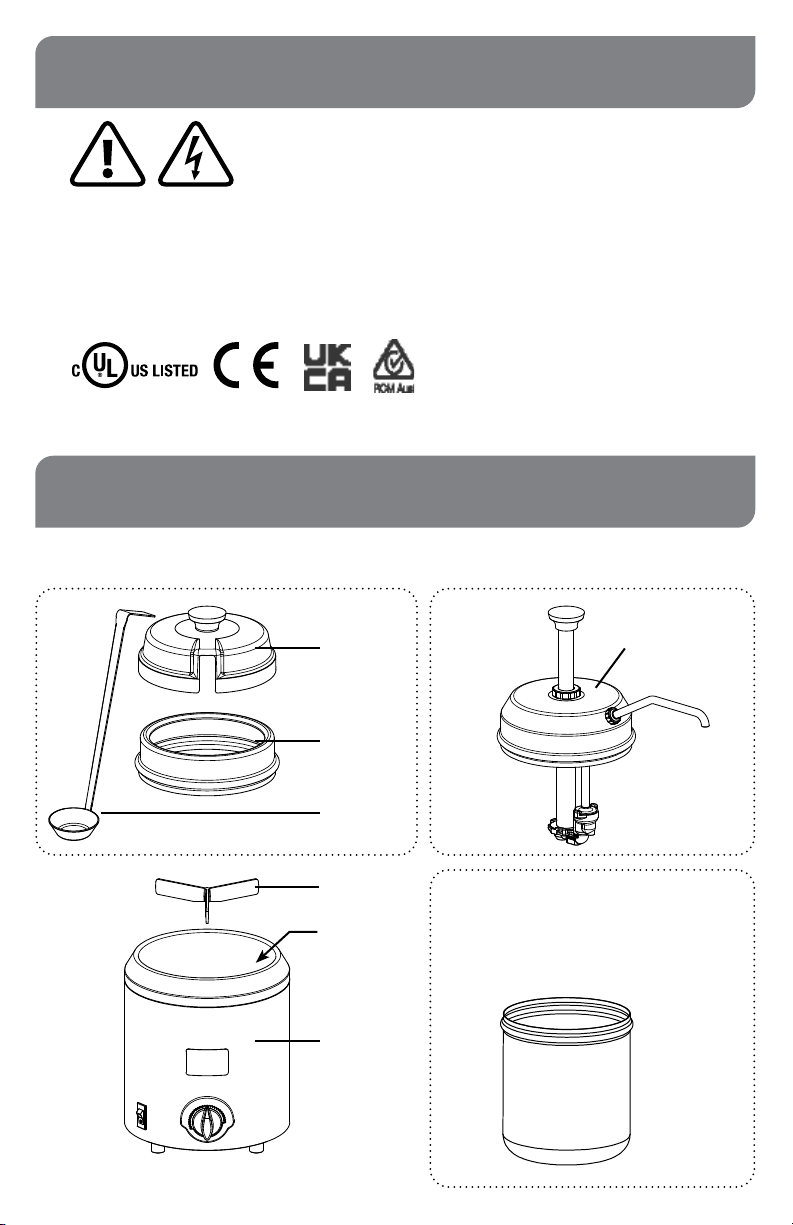
PARTS
PARTS MAY VARY DEPENDING ON UNIT
FS FSP
LID
82509
PUMP
81320
Page 2
ADAPTER
82507
LADLE
82561
SPACER
82063
WATER
VESSEL
BASIN
BASE
(see cover for
part number)
UNITS 82510, 82540, 84620,
82110, 82270 & 84580 include:
STAINLESS STEEL JAR
94009
Page 3
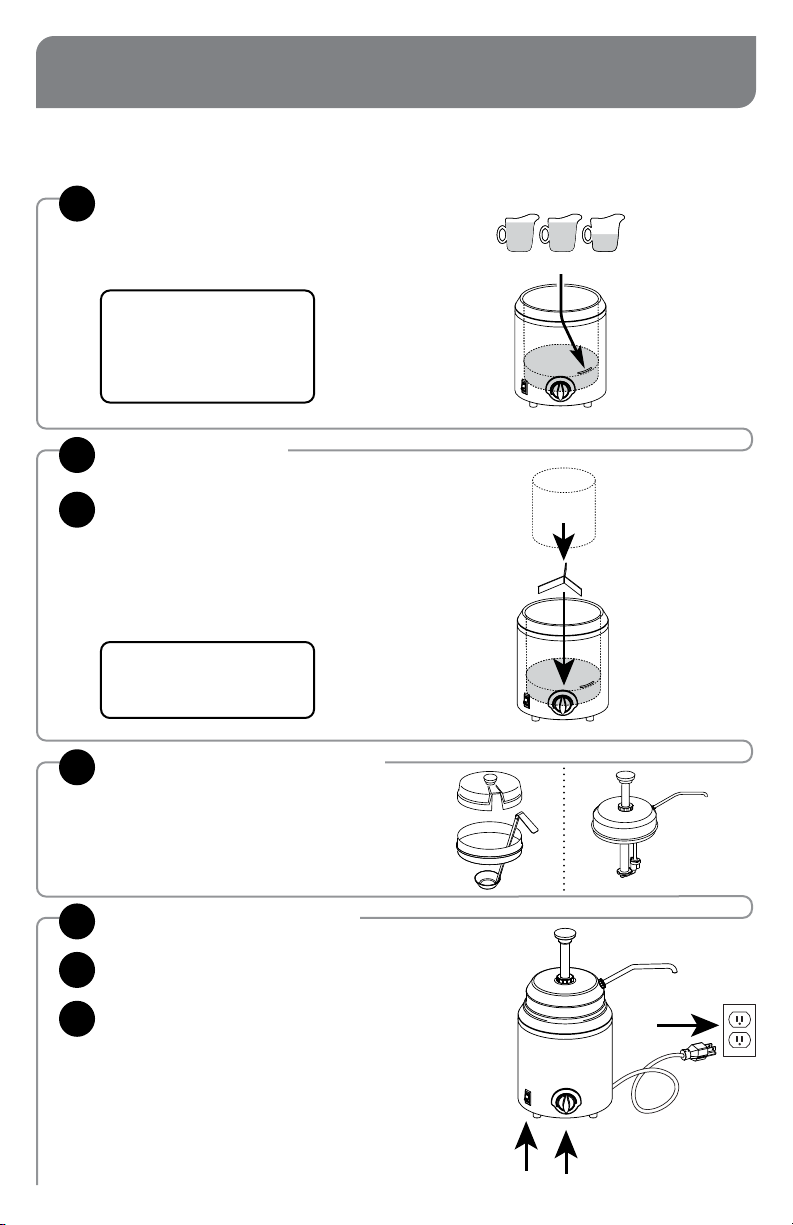
UNIT SET-UP
WASH ALL PARTS PROPERLY BEFORE EVERY USE. See page 6.
SEE SEPARATE PUMP MANUAL FOR PUMP INSTRUCTIONS.
FILL WATER VESSEL BASIN
1
• Fill 2.5 cups (20 oz/0.59 liter) of water up
to water level line inside basin.
• Do not overll.
TIP: Check water levels
throughout the holding period
to ensure even heating.
Filtered water is recommended
to deter corrosion.
INSERT SPACER
2
PUT FOOD CONTAINER INTO
3
WATER VESSEL BASIN
• Product being served must be
inside #10 can or stainless steel jar.
Never place food directly into water
vessel basin of unit.
TIP: Simplify change-outs
with a stainless steel jar.
Order item #94009.
INSTALL LID ACCESSORIES OR
4
PUMP
PLUG CORD into power source.
5
PRESS SWITCH to the “ON” position.
6
SET THERMOSTAT KNOB
7
to recommended serving temperature.
• Pull knob out to turn and adjust.
• Push knob in to lock.
• Dial indicator uses increments of 5ºF.
• Thermostat range is 75º—210º F.
(24º—99º C)
• To heat unit faster, thermostat may
TEMPORARILY be rotated to maximum.
Page 3
Page 4
RETHERMALIZATION HOT FOOD HOLDING
Rethermalization of food products is achieved by
this appliance when it elevates the food product
temperature from a refrigerated 40°F (4°C) to a
safe serving temperature of 165°F (74°C) within a
period of 2 hours.
PRE-HEAT UNIT
1 1
for at least 5 minutes
• Correct amount of water in basin.
• Lid closed.
• Thermostat knob set at maximum setting.
ADD FOOD PRODUCT
2 2
• Put food container into the water
vessel basin.
• Maximum capacity of food product is
3 quarts (96 oz./12 cups). Do not overll.
MAINTAIN SAFE
3
HOT FOOD HOLDING
•
After food reaches safe serving temperature
of 165°F (74°C), maintain product
temperature at or above 150°F (66°C).
• Adjust controller if needed to avoid
overheating food.
with:
NSF International and ANSI (American National Standards Institute) list this unit as a
“Rethermalization and Hot Food Holding unit (Standard 4).”
Hot Food Holding is achieved with this appliance
when it maintains a food product temperature at or
above 150°F (66°C), in all locations throughout the
product, for a minimum of 2 hours, even if any lid,
cover, or pump is removed. The lid, cover, or pump is
recommended to help maintain product temperature.
PRE-HEAT UNIT
for at least 5 minutes
• Correct amount of water in basin.
• Lid closed.
• Thermostat knob set at maximum setting.
with:
ADD FOOD PRODUCT
• Put food which has already been
preheated to 150°F (66°C) into
container in water vessel basin.
• Maximum capacity of food product is
3 quarts (96 oz./12 cups). Do not overll.
MONITOR FOOD CLOSELY FOR FOOD SAFETY.
The United States Public Health Service
recommends that hot food be held at a minimum
of 140°F (60°C) to help prevent bacteria growth.
COLD FOOD IS NOT TO BE ADDED TO THE UNIT
FOR RETHERMALIZATION WHILE HOT FOOD IS
BEING HELD.
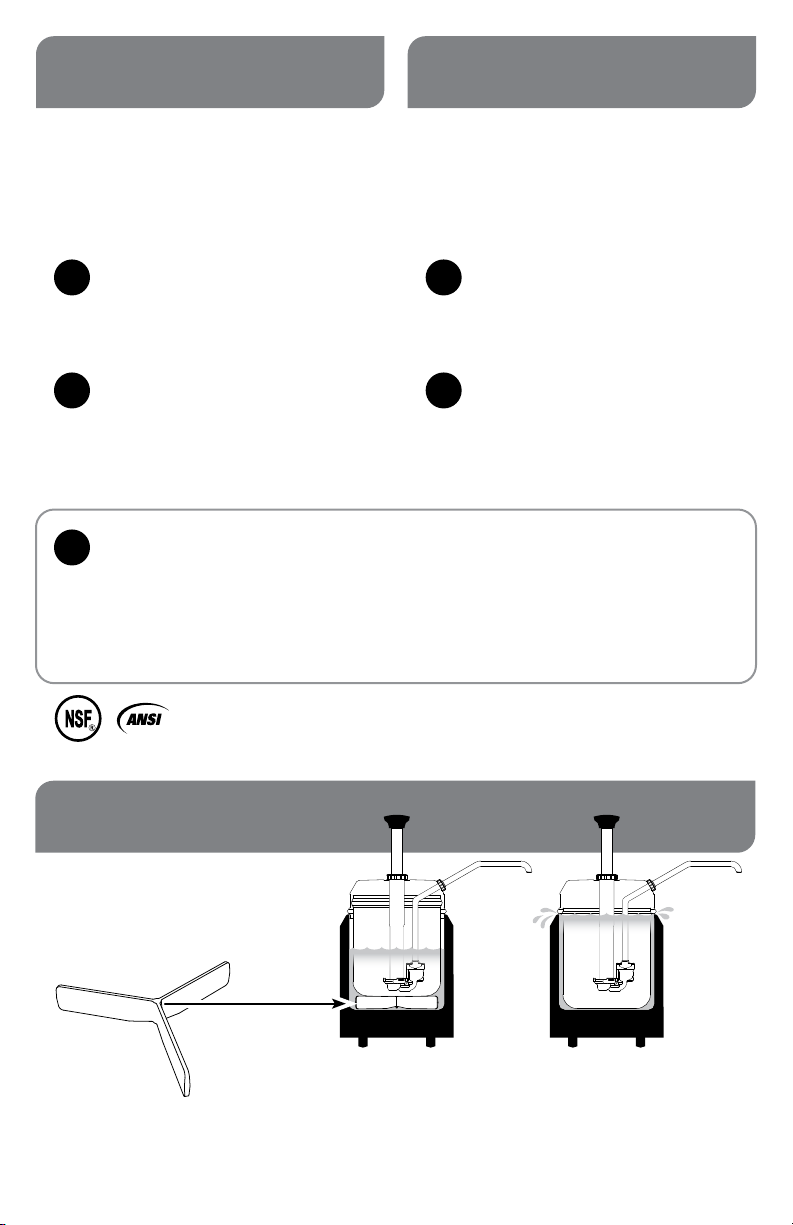
SMART TIP
ALWAYS USE SPACER
BENEATH FOOD CONTAINER
Page 4
WITH SPACER
WITHOUT SPACER
Food may overheat from resting
on the bottom.
Water may overow into food
container.
Excess product may be left in
food container.
Page 5
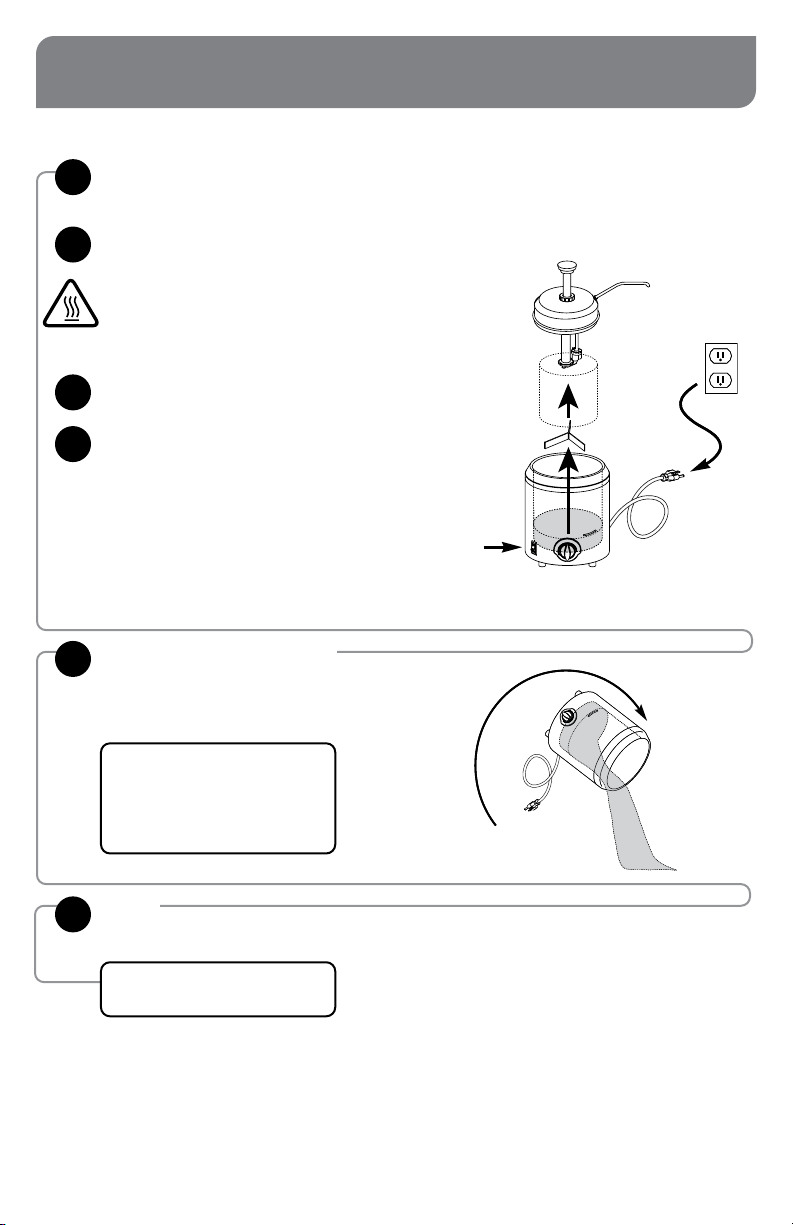
UNIT TAKE-DOWN
SEE SEPARATE PUMP MANUAL FOR PUMP INSTRUCTIONS.
PRESS SWITCH to the “OFF” position.
1
UNPLUG CORD
2
CAUTION- HOT
Allow unit to cool before continuing.
REMOVE PUMP OR LID
3
REMOVE FOOD CONTAINER &
4
SPACER
EMPTY WATER FROM
5
WATER VESSEL BASIN
after each use.
TIP: Remember to empty the water
each day rather than add—
This will greatly extend the life of
your warmer.
DRY
6
thoroughly with a soft dry cloth.
Proper drying after each use helps
maintain the stainless steel.
Page 5
Page 6
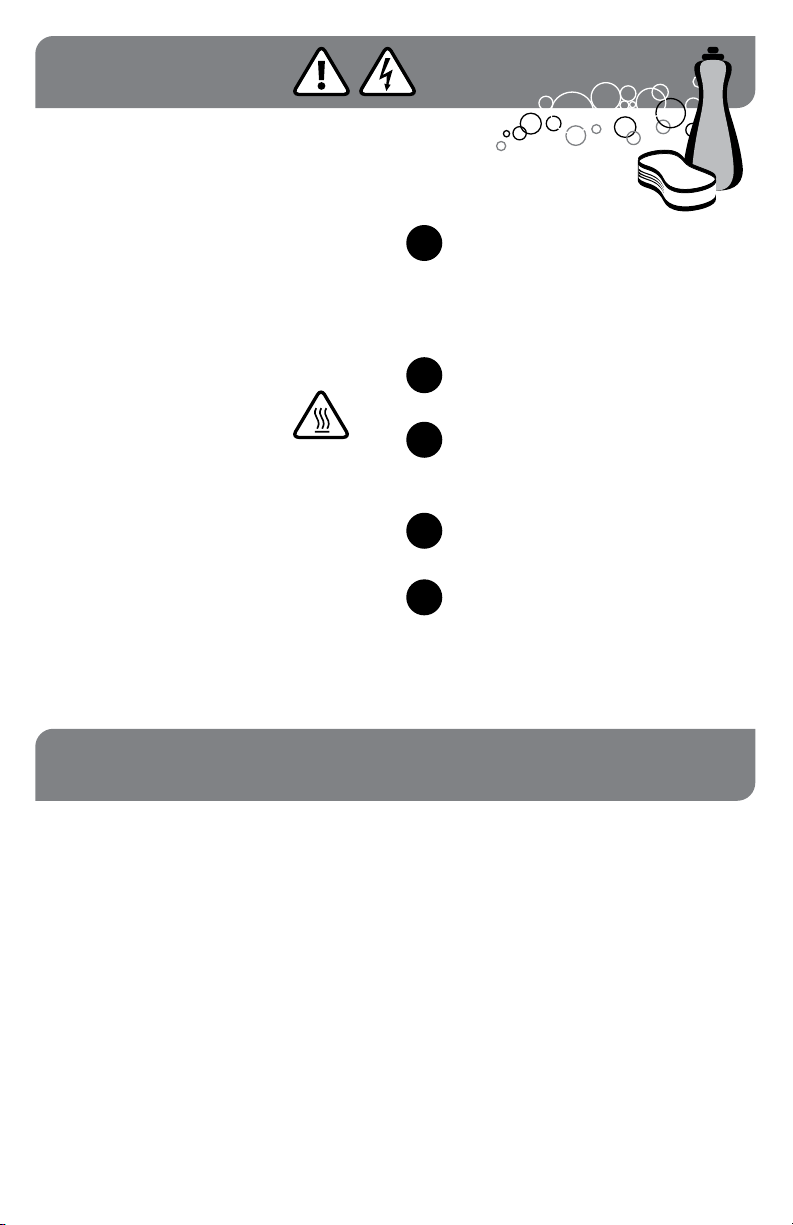
CLEANING
SEE SEPARATE PUMP MANUAL
FOR PUMP INSTRUCTIONS.
WARNING-
ELECTRICAL SHOCK COULD OCCUR
• Electrical components of unit could be
damaged from water exposure or any liquid.
• Never immerse unit into water or any liquid.
• Never use any water jet or pressure sprayer
on unit.
• Ensure unit is “OFF” and unplugged.
CAUTION- HOT
Allow unit to cool before cleaning.
WASH REMOVABLE PARTS
1
• Before rst use and after use daily,
disassemble and clean unit.
• Ensure unit is “OFF” and unplugged.
• Wash with dishwashing soap and hot water.
RINSE fully with clear water.
2
SANITIZE all parts according to local
3
sanitization requirements. All parts in contact
with food must be sanitized.
DRY all parts fully with a clean soft cloth.
4
CLEAN EXTERNAL SURFACES
5
• Wipe daily with a clean damp cloth.
• Dry with a clean soft cloth.
• Glass and surface cleaners approved for use
in food contact areas may be used.
CARE OF STAINLESS STEEL
This warmer and accessories
are constructed of stainless
steel— one of the best materials
for food serving and storage.
If you notice corrosion beginning on any stainless
steel surface, you may need to change the
cleansing agent, sanitizing agent, or the cleaning
procedures you are using.
Page 6
• A mildly abrasive nylon or brass brush may
be used to remove any stubborn food or
mineral deposits on interior surfaces of unit.
• Fully rinsing and drying all parts can help
prevent corrosion. Elements and minerals in
tap water can accumulate on stainless steel
parts and create corrosion.
• Do not use abrasive, caustic or ammonia
based cleansers.
• Do not use products containing acids,
alkalines, chlorine, or salt. These agents can
corrode stainless steel.
• Do not use metal scrapers or cleaning pads
that could scratch surfaces.
Page 7
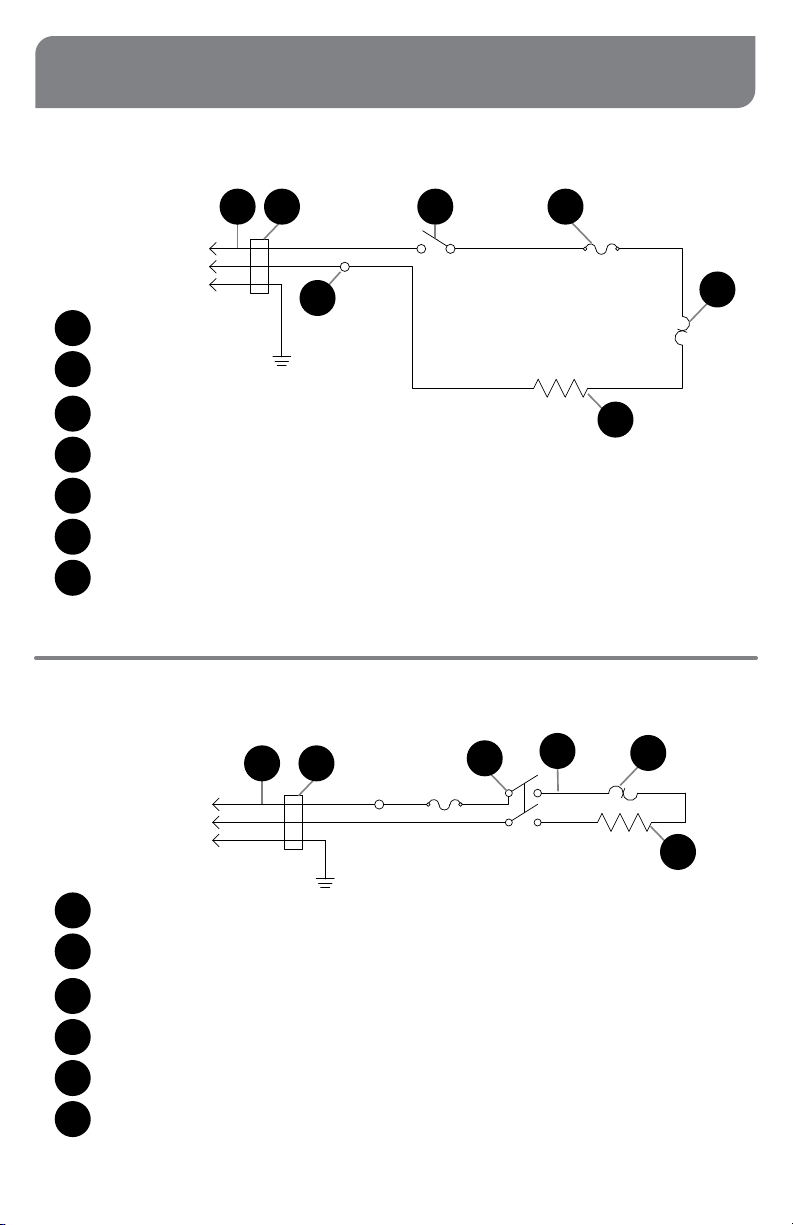
WIRING
UNIT 82066 | 120V | USA
1 2 3
BLACK
WHITE
GREEN
4
7
Cord Assembly
1
Bushing/Strain Relief
2
Rocker Switch
3
Thermal Cutout
4
Thermostat
5
500W Heating Element
6
Terminal Splice
7
6
UNITS 81020, 82280, 84750 | 230V | CONT. EUROPE, AU, UK
4
FLAG FLAG
1A2A1
2
BROWN
BLUE
GREEN/YELLOW
1 2
3
5
FLAG
2
1
5
6
Cord Assembly
1
Bushing/Strain Relief
2
Rocker Switch
3
Wire Assembly
4
Thermostat
5
500W Heating Element
6
Page 7
Page 8
TROUBLESHOOTING
UNIT DOES NOT HEAT?
• Ensure cord is securely plugged in.
• Ensure power is available from source.
• Ensure unit is on.
• Ensure thermostat knob is set correctly.
that the correct amount of water is in basin.
• Ensure
• Do not allow any of the electrical components
to get wet. Moisture may cause the unit to
trip breaker or GCFI. If moisture is suspected,
discontinue use. Allow unit to fully air dry.
SERVER PRODUCTS
LIMITED WARRANTY
This Server product is backed by a two-year
limited warranty against defects in materials and
workmanship. See Server-Products.com for details.
PREVENT PITTING ON INSIDE
SURFACE OF VESSEL
• Empty water from water vessel basin each day.
• Thoroughly dry basin each day.
• If possible, use ltered water to ll vessel basin.
GENERAL SERVICE,
REPAIR OR RETURNS
Before sending any item to Server Products for service,
repair, or return, contact Server Products customer
service to request a Return Authorization Number.
Merchandise must be sent to Server Products with this
number. Service is extremely prompt. Typically, units
are repaired and ship out within 48 hours of receipt.
Merchandise being returned for credit must be in new
and unused condition and not more than 90 days
old and will be subject to a 20% restocking charge.
Electrical parts (thermostats, heating elements, etc.)
are not returnable.
Servicing Cord: Specic tools are required for safe and
proper power supply cord removal and installation. If
cord must be replaced, only a representative of the
OEM (original equipment manufacturer) or a qualied
technician may replace cord. Cord must meet code
designation H05 RN-F requirements.
NEED HELP?
Server Products Inc.
3601 Pleasant Hill Road
Richfield, WI 53076 USA
Chat with us!
262.628.5600 | 800.558.8722
Page 8
Please be prepared with your Model, P/N and
Series located on the lid or base of the unit.
Example:
MODEL
XXXX
P/N
#####
Manual #EM_01802_RevF 030822
SERIES
##X ##X
 Loading...