

Page 1
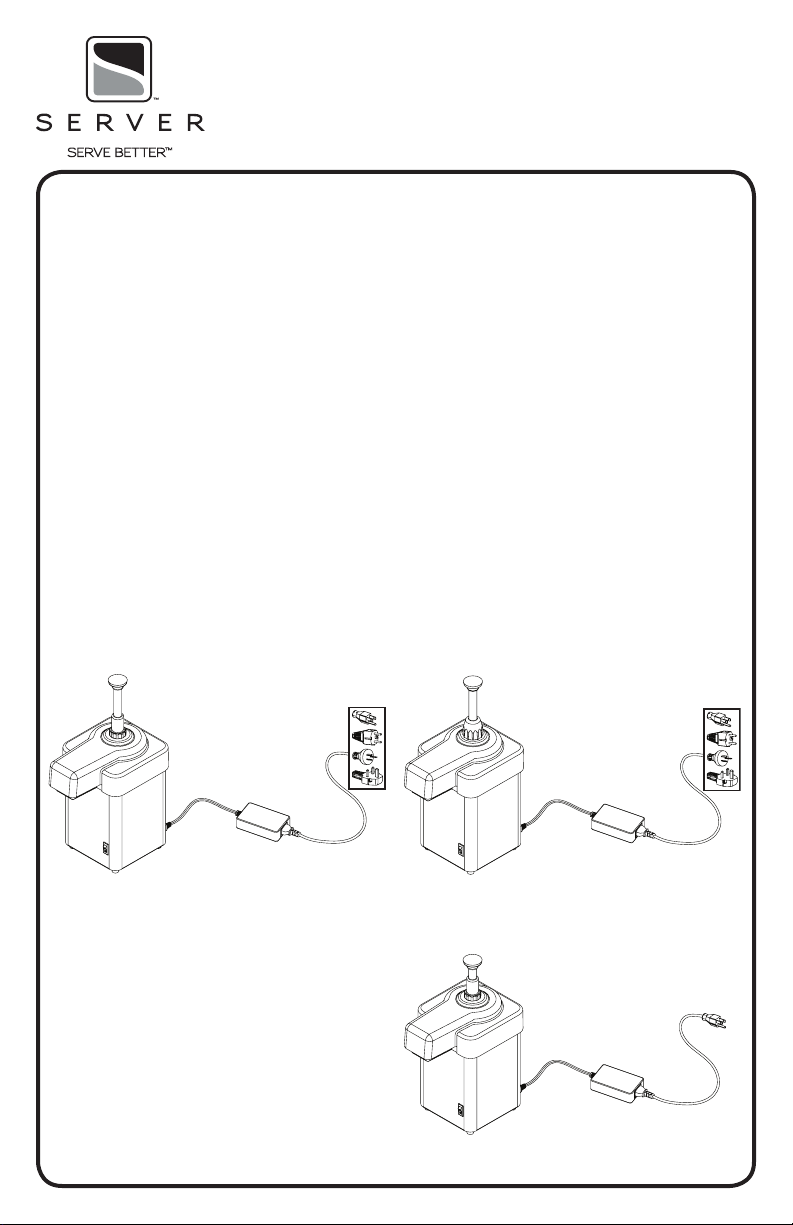
MODEL:
CSP
01672-REVE_102813_ENGLISH
CHILLED SERVER
WITH PUMP1 OUNCE
120V
Series 12G
94060
CHILLED SERVER
WITH PUMP2 OUNCE
120V
Series 12G
94050
230V Continental Europe
Series 12G
94142
230V Australia
Series 12G
94143
230V United Kingdom
Series 12G
94144
PUMP, CSP-1 OZ
Series 12G
94040
EZ-CREAM
5/16 OUNCE
120V
Series 13E
94160
230V Continental Europe
Series 12G
94145
230V Australia
Series 12G
94146
230V United Kingdom
Series 12G
94147
PUMP, CSP-2 OZ
Series 12G
94140
PUMP, CSP-5/16 OZ,
EZ-CREAM
Series 13E
94150
Page 2
SAFETY GUIDELINES WHEN
USING THIS UNIT:
C EWarning- Electrical shock could occur:
• This unit must be earthed or grounded.
• This requires all three prongs (terminals)
on cord plug to be plugged into power
source.
According to food and safety regulations, most foods
must be stored and/or served at certain temperatures
or they could become hazardous. Check with local food
and safety regulators for specic guidelines.
Be aware of the product you are serving and the
temperature the product is required to maintain.
Server Products, Inc. can not be responsible for
the serving of potentially hazardous product.
Stainless steel is one of the best materials for food
serving and storage, but there are many products which
can corrode it. If you notice corrosion beginning on
any stainless steel surface, you may need to change
the cleansing agent, sanitizing agent, or the cleaning
procedures you are using.
• Products containing: acids, alkalines, chlorine,
or salt can corrode stainless steel.
• Sauerkraut and Au Jus sauces corrode stainless
steel. Server Products, Inc. regrets that we can
not honor warranty claims on stainless steel
parts that have been affected by sauerkraut
or Aus Jus.
Do not place plastic lid, plastic cover, plastic
top or plastic chiller block insulation assembly
under, in, or near to high heat, as this can melt
the plastic.
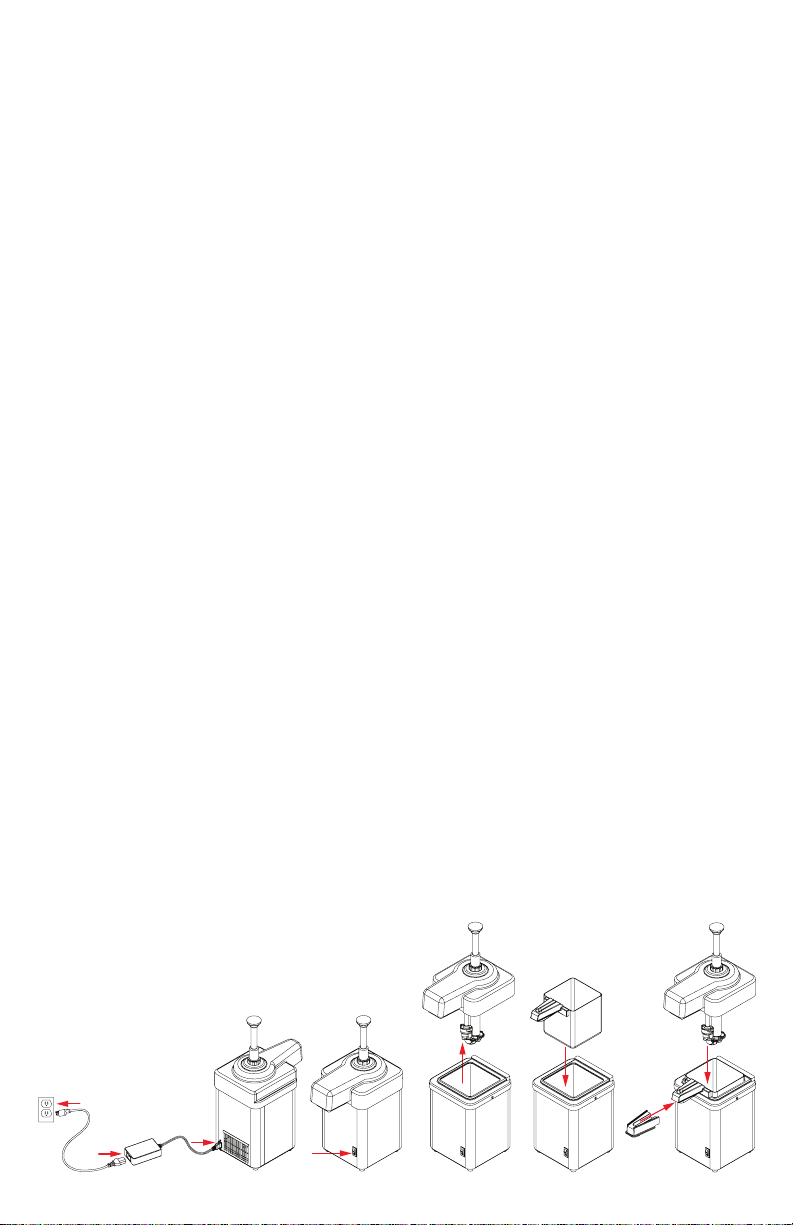
UNIT SET-UP
ALWAYS CLEAN UNIT THOROUGHLY BEFORE EACH
USE. SEE UNIT TAKE-DOWN, SAFETY GUIDELINES, AND
UNIT CLEANING. SEE SEPARATE PUMP MANUAL FOR
PUMP INSTRUCTIONS.
1 PLUG CORD INTO POWER SOURCE.
• Verify that cord is securely plugged into the
unit, the power supply (adaptor), and the power
source (outlet).
2 PRESS SWITCH TO THE “ON” POSITION.
• Allow unit to pre-cool for 20 minutes.
3 REMOVE PUMP.
4 INSERT PRODUCT VESSEL INTO BASIN OF UNIT.
FOOD PRODUCT MUST ALWAYS BE INSIDE
PRODUCT VESSEL. NEVER PLACE FOOD PRODUCT
DIRECTLY INTO UNIT BASIN WITHOUT A VESSEL.
• Food product vessel maximum capacity is
two (2) quarts. Do not overll.
5 INSTALL PUMP TO MAINTAIN MAXIMUM COLD
TEMPERATURE.
• Temperature can be monitored by viewing
temperature strip located on side of product
vessel.
• For best unit cooling and performance, always
keep unit on continuously all day and all night,
every day and every night, to prevent pre-cool
period. Unit should remain on, as a refrigerator.
Server Products Inc. claims no responsibility
for actual serving temperature of product. It is
the responsibility of the user to ensure that any
product is held and served at a safe temperature.
UNIT SET-UP
1
3 4 5
2
Page 3
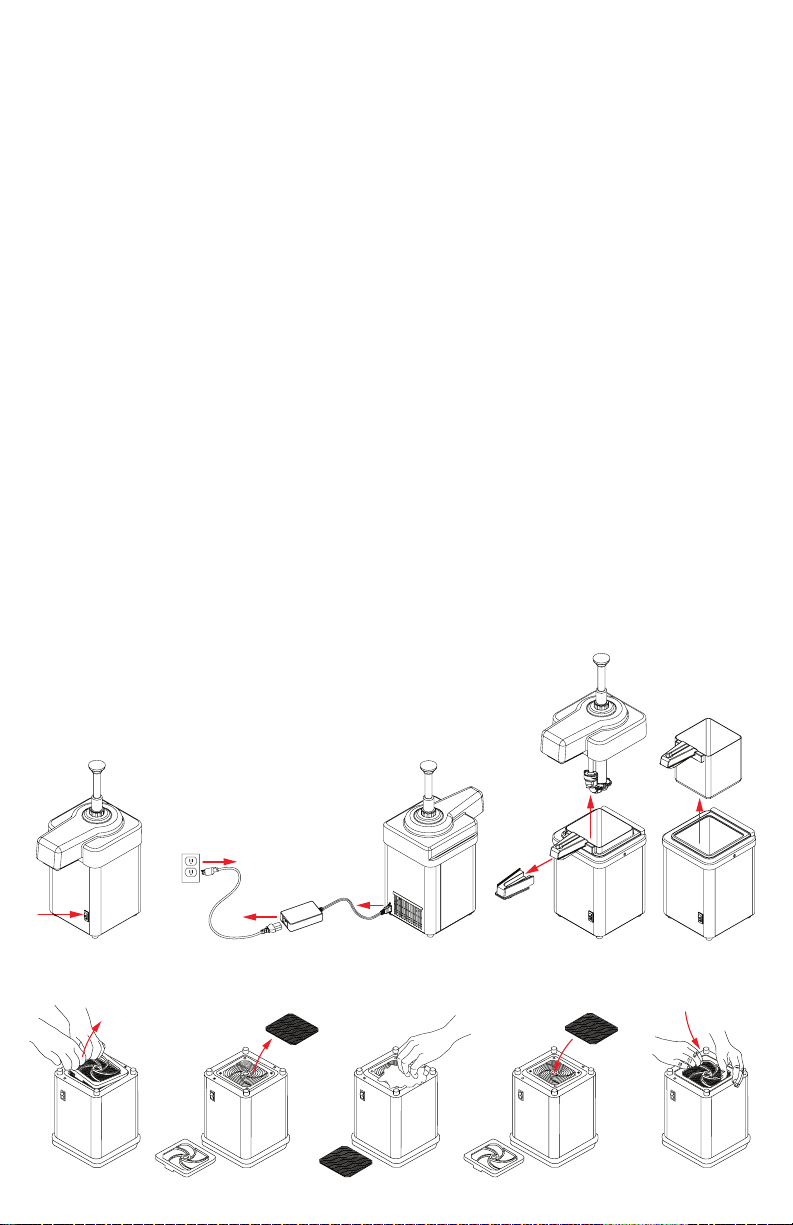
UNIT TAKE-DOWN
1 PRESS SWITCH TO “OFF” POSITION.
2 UNPLUG CORD.
3 REMOVE PUMP.
4 REMOVE PRODUCT VESSEL.
SEE SEPARATE PUMP MANUAL FOR PUMP
INSTRUCTIONS.
CHANGING OR CLEANING
FILTER
FOR BEST UNIT COOLING AND PERFORMANCE,
CHANGE OR CLEAN FILTER AT A MINIMUM OF ONCE
PER MONTH.
1 SEE UNIT TAKE DOWN.
2 ENSURE UNIT IS “OFF” AND UNPLUGGED.
3 TURN UNIT OVER TO ACCESS FILTER HOLDER
AND FILTER ON UNDERSIDE OF UNIT.
4 LIFT OFF FILTER HOLDER BY PULLING IT OFF
FROM ONE EDGE.
5 REMOVE FILTER AND CLEAN OR REPLACE.
• Server Products Inc. Pack of 5 Replacement lters:
86067
• Filter can be cleaned with hot water and
dishwashing detergent. Fully rinse.
6 IF NECESSARY, WIPE DOWN FAN COVER AND
SURROUNDING AREA ON UNDERSIDE OF UNIT
WITH CLOTH DAMPENED WITH DISHWASHING
LIQUID OR MILD SANITIZING DETERGENT.
C EWarning- Electrical shock could occur:
• Be sure to wring out any excess water from
cloth before wiping near fan of unit.
• Dripping water into unit can cause electrical
damage to unit.
7 PLACE NEW OR CLEANED FILTER OVER FAN COVER.
8 REPLACE FILTER HOLDER.
UNIT TAKE-DOWN
2
1
CHANGING OR CLEANING FILTER
4
5 6 7
3 4
8
Page 4
PUMP DISASSEMBLY
BEFORE FIRST USE AND AFTER USE DAILY,
DISASSEMBLE AND CLEAN PUMP.
1 PUMP OUT ALL (IF ANY) REMAINING FOOD
PRODUCT FROM INSIDE PUMP BODY.
2 WASH AND RINSE OFF OUTSIDE OF PUMP BODY.
3 FLUSH OUT AND RINSE THROUGH INSIDE OF
PUMP.
• Place lower end of pump into container full
of water and operate pump until all (if any)
remaining product is expelled and only warm
water ows from discharge tube. Then remove
pump from container of water to disassemble.
• Use a container to collect small parts of pump to
prevent any loss.
4 REMOVE PLUNGER ASSEMBLY AND LID FROM
PUMP BODY BY TURNING LOCKING COLLAR AND
DISCHARGE TUBE NUT COUNTERCLOCKWISE.
5 REMOVE CYLINDER AND DISCHARGE TUBE FROM
VALVE BODY BY ROTATING COUNTERCLOCKWISE
TO RELEASE FROM SLOTS IN VALVE BODY.
6 REMOVE RUBBER GASKET OR O-RING FROM VALVE
B OD Y.
7 REMOVE SMALL O-RING FROM DISCHARGE TUBE.
• Be careful not to damage o-ring when prying it
off of discharge tube.
8 REMOVE KNOB FROM PLUNGER ASSEMBLY BY
ROTATING COUNTERCLOCKWISE.
• Firmly hold head tube towards piston head while
unscrewing knob. Pressure on spring will release
and push knob off rapidly.
9 REMOVE LOCKING COLLAR FROM HEAD TUBE.
• Remove gaging collar(s), if used, from head tube
by sliding them off.
J REMOVE HEAD INSERT FROM INSIDE HEAD TUBE.
K REMOVE SPRING FROM PISTON.
L REMOVE WASHER FROM PISTON.
M REMOVE SEAL ASSEMBLY FROM PISTON HEAD.
• Be careful not to damage seal when prying it off
of piston head.
N REMOVE O-RING FROM INSIDE SEAL
• Be careful not to damage o-ring when prying it
out of seal.
IMPORTANT PUMP AREAS TO CLEAN:
CLEAN ALL SIDES OF STAINLESS STEEL BALLS
CLEAN VALVE BODY PASSAGEWAY
CLEAN VALVE BODY OPENINGS
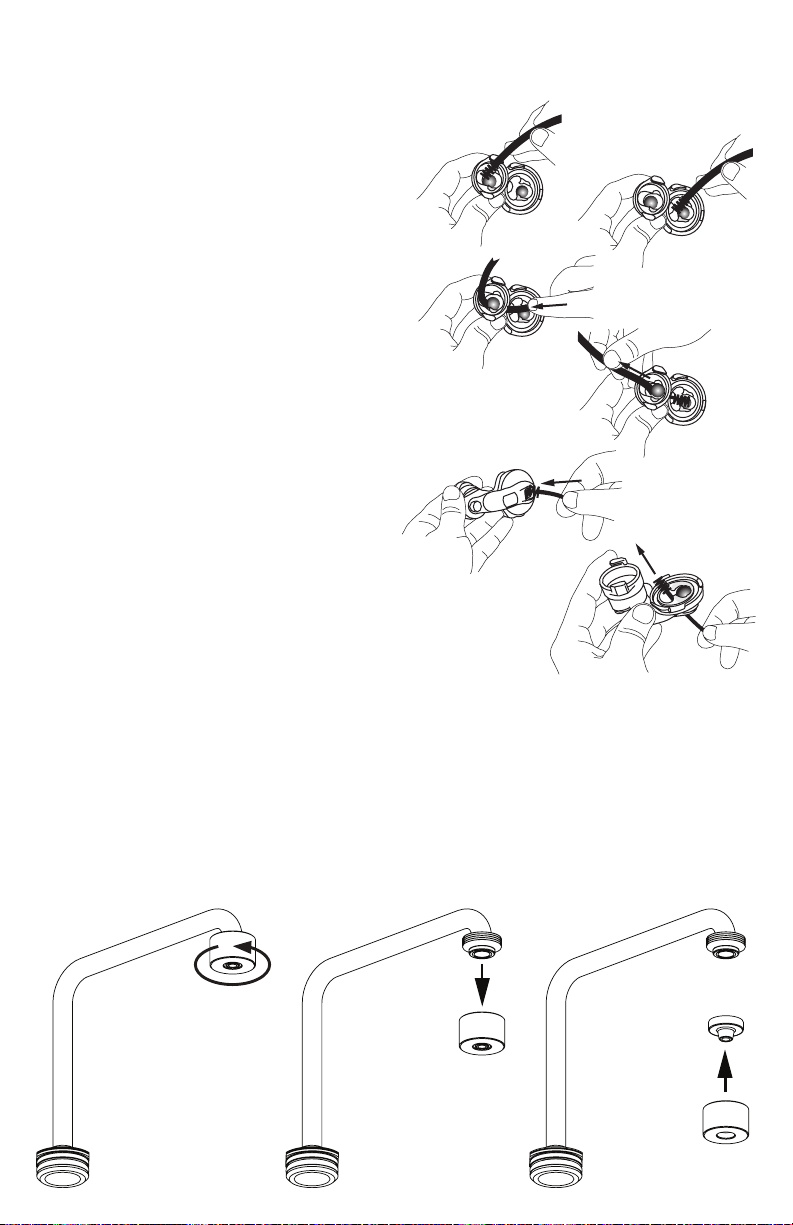
VALVE COVER DISASSEMBLY
REMOVE VALVE COVER FROM DISCHARGE TUBE BY
a
ROTATING VALVE COVER COUNTER CLOCKWISE.
b REMOVE CONE WASHER FROM VALVE COVER.
Do not use any sharp tools for disassembly, this
can damage parts.
a
a
b
Page 5

CLEAN-IN-PLACE PROCEDURE
FOR PUMPS
CLEAN-IN-PLACE IS A BASIC FOUR STEP PUMP
FLUSHING PROCESS: CLEAN, RINSE, SANITIZE, AND
RINSE.
CLEAN:
1 PUMP OUT ALL (IF ANY) REMAINING FOOD
PRODUCT FROM INSIDE PUMP.
2 WASH AND RINSE OFF OUTSIDE OF PUMP.
3 FLUSH OUT AND RINSE THROUGH INSIDE OF
PUMP.
• Place lower end of pump into container full
of water and operate pump until all (if any)
remaining product is expelled and only warm
water ows from discharge tube.
4 MIX 2 OZ (5 ML) OF DISHWASHING DETERGENT
(DAWN DISHWASHING LIQUID) WITH 1 QUART
(.95 L) OF HOT TAP WATER (APPROXIMATELY
110°F/43°C).
5 PLACE LOWER END OF PUMP INTO THIS
CLEANING MIXTURE AND REPEATEDLY OPERATE
PUMP UNTIL ALL CLEANING MIXTURE IS PUMPED
THROUGH PUMP.
RINSE:
6 PLACE LOWER END OF PUMP INTO 2 CUPS (.5 L)
OF HOT TAP WATER (APPROXIMATELY 110°F/43°C)
AND REPEATEDLY OPERATE PUMP UNTIL ALL TAP
WATER IS PUMPED THROUGH PUMP.
SANITIZE:
7 MIX ONE 1 OZ (30 ML) PACKET OF KAY-5
SANITIZER/CLEANER (EPA REG NO. 5389-15)
WITH
2.5 GALLONS (9.5 L) OF TAP WATER
(APPROXIMATELY ROOM TEMPERATURE).
8 PLACE LOWER END OF PUMP INTO THIS
SANITIZING MIXTURE AND REPEATEDLY OPERATE
PUMP UNTIL 1 QUART (.95 L) SANITIZING
MIXTURE IS PUMPED THROUGH PUMP.
RINSE:
9 PLACE LOWER END OF PUMP INTO 1 CUP (.24 L)
OF HOT TAP WATER (APPROXIMATELY 110°F/43°C)
AND REPEATEDLY OPERATE PUMP UNTIL ALL TAP
WATER IS PUMPED THROUGH PUMP.
PUMP CLEANING
BEFORE FIRST USE AND AFTER USE DAILY,
DISASSEMBLE AND CLEAN PUMP.
STAINLESS STEEL PARTS CAN CORRODE.
IT IS IMPORTANT TO CLEAN, RINSE, SANITIZE, AND
DRY THESE PARTS DAILY AND PROPERLY.
FAILURE TO COMPLY WITH ANY OF THESE
INSTRUCTIONS MAY VOID UNIT WARRANTY.
1 SEE PUMP DISASSEMBLY.
2 WASH AND SCRUB ALL PARTS WITH
DISHWASHING DETERGENT AND HOT WATER
DAILY.
• Wash small parts in a pan or other
container to prevent part loss.
• Use supplied brushes to clean all conned
areas. Maintain a clean and efcient pump
by using the brushes supplied with pump
to prevent product build up inside pump.
• IMPORTANT PUMP AREAS TO CLEAN:
Clean inside cylinder thoroughly with
brush 82049. Clean inside discharge tube
and valve body thoroughly with brush
82526/82824.
• Do not use abrasive cleansers, scrapers, steel
pads, steel wool, or other cleaning tools that can
scratch surfaces.
• A general purpose, nonabrasive cleaner may be
used on hard to remove food deposits.
• Do not use cleansing agents with high
concentrations of acid, alkaline or chlorine.
These agents can corrode stainless steel.
• Do not use ammonia to clean pump parts.
Ammonia can damage plastic parts.
• A nontoxic glass cleaner may be used for
cleaning any stainless steel parts.
3 FULLY RINSE ALL PARTS THOROUGHLY WITH
CLEAR WATER.
• Fully rinsing all parts can help prevent corrosion.
4 DRY ALL STAINLESS STEEL PARTS WITH A CLEAN
SOFT CLOTH.
• Various elements and minerals, such as chlorides
in tap water, can accumulate on stainless steel
parts and create corrosion.
• To prevent corrosion on any stainless steel parts,
it is important to fully dry with a clean soft cloth
regularly.
5 SANITIZE PARTS FOLLOWING YOUR LOCAL
SANITIZATION REQUIREMENTS.
ALL PARTS IN CONTACT WITH FOOD MUST BE
SANITIZED.
• Allow parts to fully air dry after sanitization.
• Dishwasher safe.
Page 6
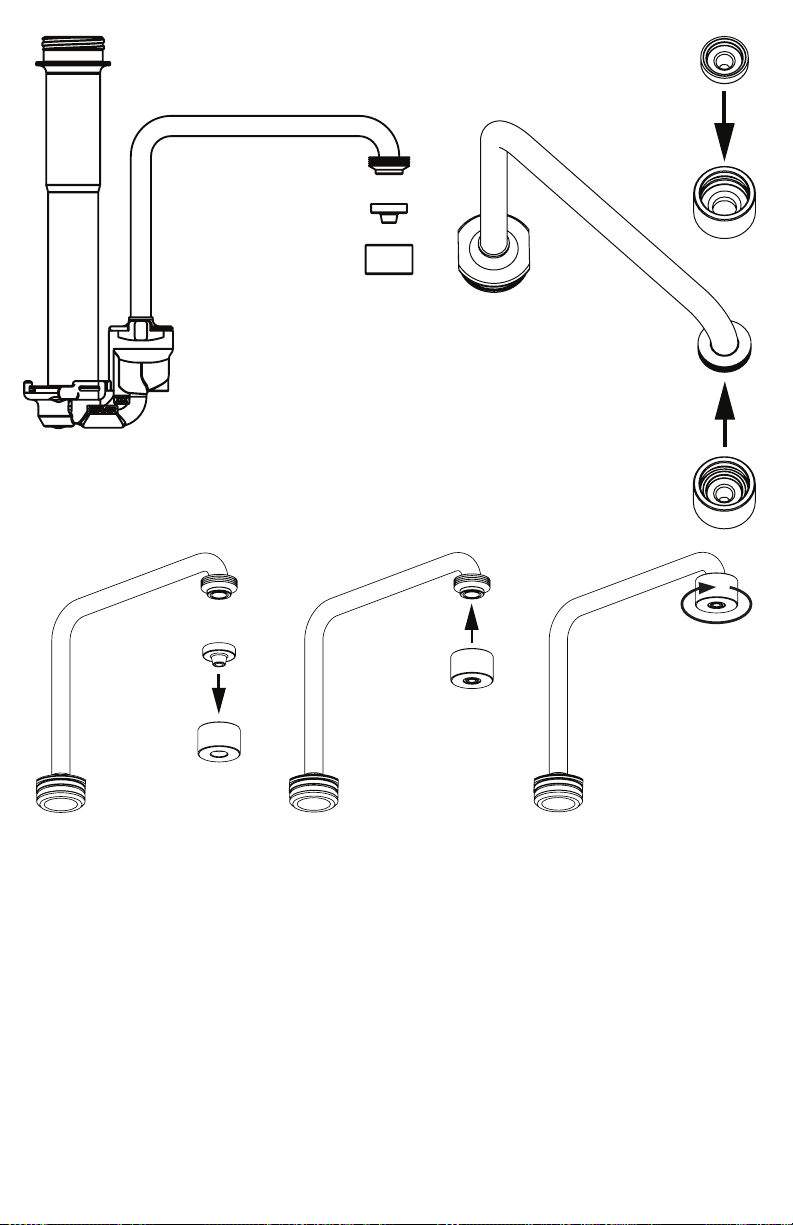
cone washer
a
valve cover
VALVE COVER ASSEMBLY
INSTALL CONE WASHER INTO VALVE COVER.
a
b INSTALL VALVE COVER, WITH CONE WASHER
INSIDE, ONTO DISCHARGE TUBE THREADING.
c ROTATE VALVE COVER CLOCKWISE TO SECURE TO
THREADS OF DISCHARGE TUBE.
Do not use any sharp tools for assembly,
this can damage parts.
VALVE COVER ASSEMBLY
a
b
c
a
UNIT TROUBLESHOOTING
POSSIBLE PROBLEM:
Unit does not cool.
•
POSSIBLE SOLUTIONS:
•
Ensure cord is securely plugged in.
Verify that cord is securely plugged into the unit,
the power supply (adaptor), and the power source
(electrical outlet).
• Ensure power is available from source.
• Ensure unit is on.
• Ensure fan is on/running.
• Ensure lter is clean or replace if necessary.
b
PUMP TROUBLESHOOTING
PROBLEMS WITH PUMP OPERATION AND/OR FLOW:
• Clean pump.
PUMP DISPENSES LITTLE OR NO PRODUCT.
• Product may be too stiff or contain a solid
that will not pass through pump.
PORTION CONTROL IS NOT CONSISTENT.
• Inspect gaging collar for any damage and/
or proper installation.
PUMP PLUNGER DOES NOT RETURN TO TOP OF
STROKE AFTER DISPENSING PRODUCT.
• Inspect spring for any damage; bent or
broken. Replace spring if necessary.
PUMP DRIPS.
• Clean discharge tube with supplied
cleaning brushes.
• Ensure product is not being heated by
any external source(s) causing product to
expand and drip from pump.
Page 7
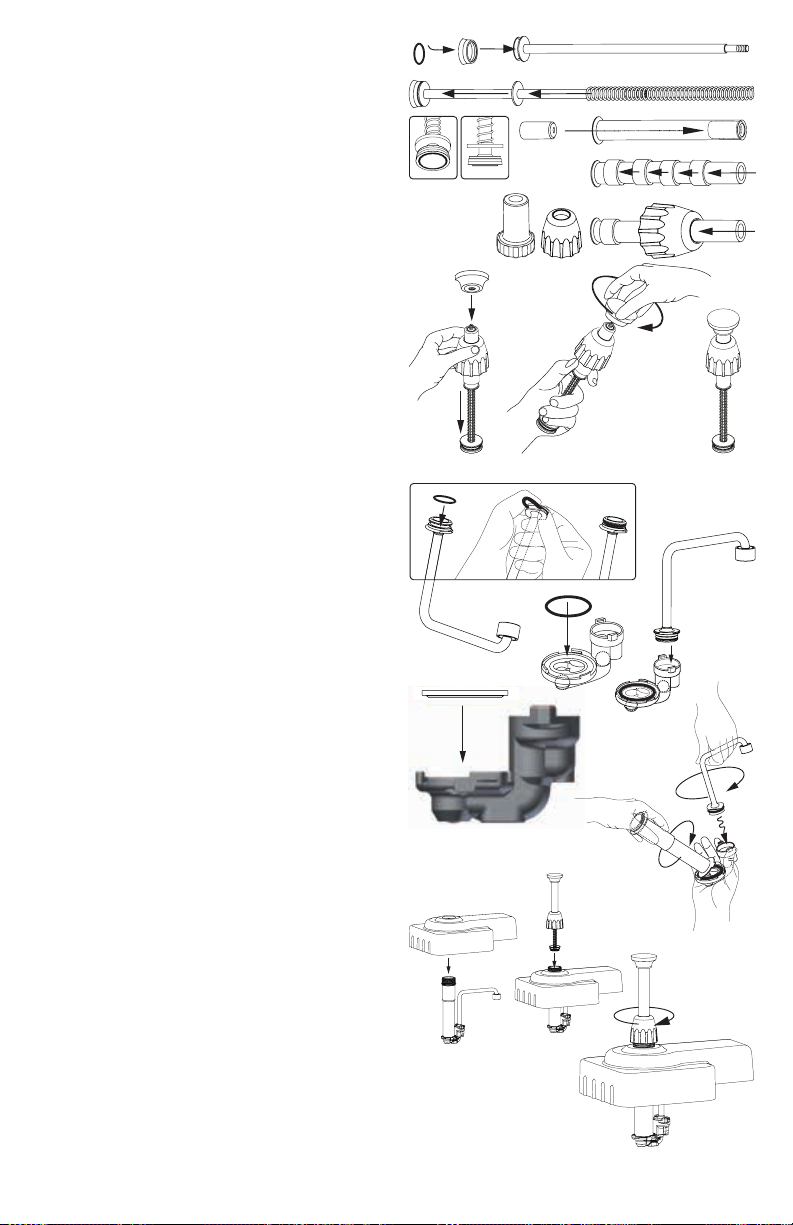
PUMP ASSEMBLY
BEFORE FIRST USE AND AFTER USE DAILY,
DISASSEMBLE AND CLEAN PUMP.
ASSEMBLE PLUNGER:
1 INSTALL SEAL O-RING INSIDE SEAL.
• Apply food equipment lubricant on seal o-ring.
2 INSTALL SEAL ASSEMBLY ONTO PISTON HEAD.
• Apply food equipment lubricant inside seal
assembly.
3 INSTALL WASHER ONTO THREADED END OF PISTON.
4 INSTALL SPRING ONTO THREADED END OF PISTON.
5 INSTALL HEAD INSERT INSIDE HEAD TUBE.
• Beveled edge of head insert should be facing inside
of head tube.
6 INSTALL GAGING COLLAR(S), IF NEEDED, AND
LOCKING COLLAR ONTO HEAD TUBE BY SLIDING
THEM ON.
• Position locking collar with threading inside locking
collar facing gaging collar(s) and/or head tube
ared end.
7 INSTALL HEAD TUBE ASSEMBLY ONTO PISTON
ASSEMBLY.
8 INSTALL KNOB ONTO PLUNGER ASSEMBLY AND
ROTATE CLOCKWISE TO SECURE ONTO THREADED
END OF PISTON.
• Firmly hold head tube towards piston head,
compressing spring, while screwing knob on.
INSTALL O-RINGS AND ASSEMBLE PUMP BODY:
9 INSTALL SMALL O-RING ONTO DISCHARGE TUBE.
• Apply food equipment lubricant on o-ring.
• Be careful not to damage o-ring while installing
and/or rolling onto discharge tube.
J INSTALL SILICONE GASKET OR O-RING INTO VALVE
B OD Y.
• Apply food equipment lubricant on silicone gasket.
• If installing silicone gasket: at side facing up and
toward cylinder.
K INSTALL CYLINDER ONTO VALVE BODY.
• Rotate cylinder clockwise and press down rmly to
secure into slots on valve body.
L INSTALL DISCHARGE TUBE ONTO VALVE BODY.
• Rotate discharge tube clockwise and press down
rmly to secure into slots on valve body.
INSTALL LID ONTO PUMP BODY AND SECURE
WITH LOCKING COLLAR:
M INSTALL LID ONTO DISCHARGE TUBE AND
CYLINDER ASSEMBLY(PUMP BODY).
• Install hole on lid onto cylinder threading.
N INSTALL PLUNGER INTO CYLINDER AND SECURE
PLUNGER TO CYLINDER BY ROTATING LOCKING
COLLAR CLOCKWISE.
Page 8

UNIT CLEANING
BEFORE FIRST USE AND AFTER USE DAILY,
DISASSEMBLE AND CLEAN UNIT AND PUMP. STAINLESS
STEEL PARTS CAN CORRODE. IT IS IMPORTANT TO
CLEAN, RINSE, SANITIZE, AND DRY THESE PARTS DAILY
AND PROPERLY. FAILURE TO COMPLY WITH ANY OF
THESE INSTRUCTIONS MAY VOID UNIT WARRANTY.
1 SEE UNIT TAKE DOWN, PUMP DISASSEMBLY, AND
PUMP CLEANING.
2 ENSURE UNIT IS “OFF” AND UNPLUGGED.
C EWarning- Electrical shock could occur:
• Electrical components of unit could be
damaged from water exposure or any liquid.
• Never immerse unit into water or any liquid.
• Never use any water jet or pressure sprayer
on unit.
3 WASH PRODUCT VESSEL AND PUMP WITH
DISHWASHING DETERGENT AND HOT WATER DAILY.
RINSE THOROUGHLY AND DRY WITH A CLEAN SOFT
CLOTH.
• A general purpose, nonabrasive cleaner may be
used on hard to remove food deposits.
• A mildly abrasive NYLON or brass brush may be
used to remove any stubborn food or mineral
depositson interior surfaces of unit.
• Do not use abrasive cleansers, scrapers,
steel pads, steel wool, or other cleaning tools
that can scratch surfaces.
• Do not use cleansing agents with high
concentrations of acid, alkaline or chlorine.
These agents can corrode stainless steel.
• Fully rinsing all parts can help prevent corrosion.
• Various elements and minerals, such as chlorides
in tap water, can accumulate on stainless steel
parts and create corrosion.
• To prevent corrosion on any stainless steel parts,
it is important to fully dry with a clean soft cloth
regularly.
4 WIPE EXTERNAL SURFACES OF UNIT DAILY WITH
A CLEAN DAMP CLOTH. DRY WITH A CLEAN SOFT
CLOTH.
• A nontoxic glass cleaner may be used for cleaning
any stainless steel parts.
5 SANITIZE ALL PARTS FOLLOWING LOCAL
SANITIZATION REQUIREMENTS. ALL PARTS IN
CONTACT WITH FOOD MUST BE SANITIZED.
• Allow parts to fully air dry after sanitization.
• Fully air drying all parts will prevent condensation
from developing between food vessel and unit
basin.
Plastic Lid, Plastic Cover, Plastic Top and
Plastic Chiller Block Insulation Assembly:
• Not dishwasher safe.
• Hand Wash Only.
Do not place plastic lid, plastic cover, plastic top or plastic
chiller block insulation assembly under, in, or near to high
heat, as this can melt the plastic.
GENERAL SERVICE, REPAIR,
OR RETURNS
Before sending any item to Server Products for service,
repair, or return, contact Server Products customer
service to request a Return Authorization Number.
Merchandise must be sent to Server Products with this
number.
Merchandise being returned for credit must be in new
and unused condition and not more than 90 days old
and will be subject to a 20% (percent) restocking
charge. Electrical parts (thermostats, heating elements
etc.) are not returnable.
Server Products maintains a fully staffed service department with highly skilled factory trained personnel.
Service is extremely prompt. Under normal circumstances, a repaired unit is shipped out the day after it is
received. Labor charges are reasonable.
SERVICE
Contact your dealer or Server Products Inc.
customer service department for the following:
ORDERING REPLACEMENT PARTS
Be prepared to give this information:
• Model Letters/Name/Numbers
• Part Numbers- P/N
• Series Numbers/Letters
• Part Description
This information and other important data is stamped
on the lid or cylinder of pumps or on the bottom or
back side of every unit.
SERVER PRODUCTS
LIMITED WARRANTY
All Server Products equipment is backed by a
two-year limited warranty against defects in materials
and workmanship. For complete warranty information
go to: www.server-products.com
NSF International listed.
Server Products Inc.
3601 Pleasant Hill Road
Richfield, WI 53076 USA
262.628.5600
800.558.8722
262.628.5110
www.server-products.com
 Loading...