

Page 1
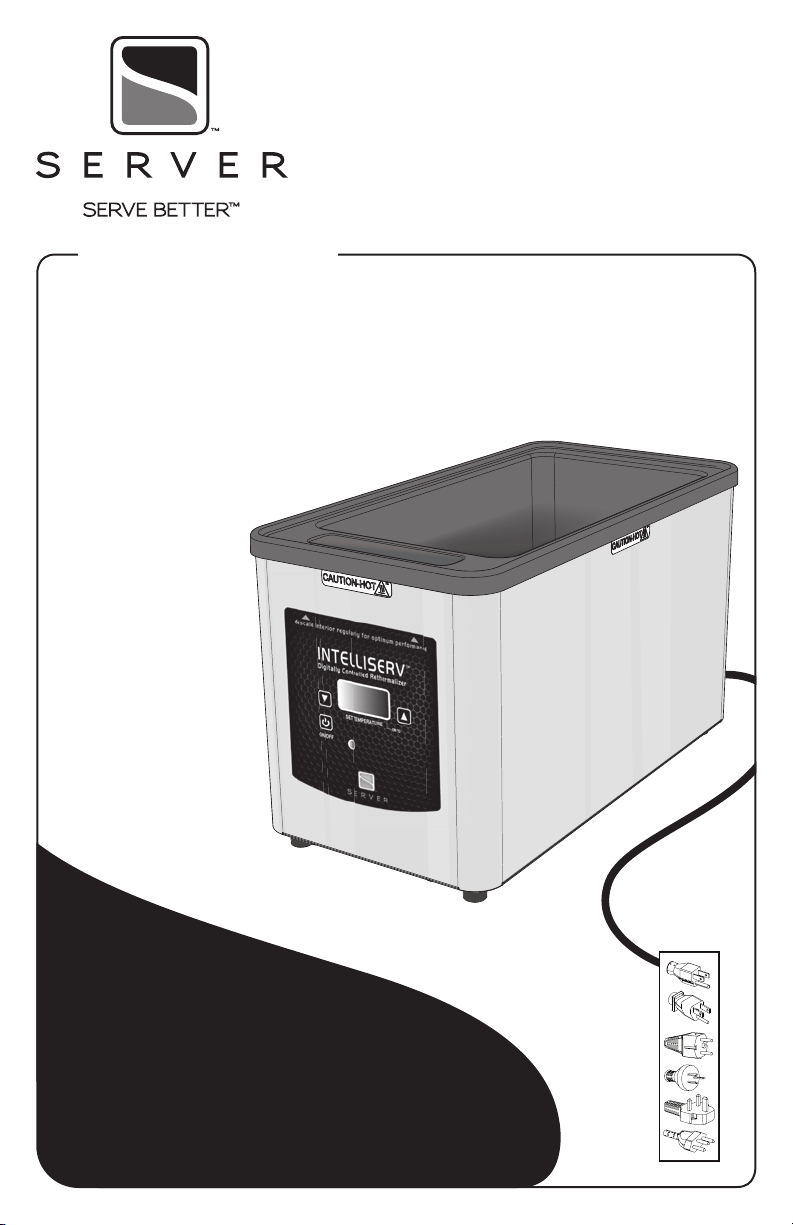
IntelliServ™
1/3-Size Pan Warmer
MODEL: IS-1/3
120V USA
86090
120V USA
86254 (custom)
120V Canada
86481
100V Japan
86479
230V
Continental Europe
86338
230V Australia
86339
230V United Kingdom
86341
230V Brazil
86478
Thank You
...for purchasing our IntelliServ™ warmer. Its
digital temperature control ensures accurate holding
of toppings and sauces from the first serving to the last.
DON'T COMPROMISE YOUR MENU—INTELLISERV™!
Page 2
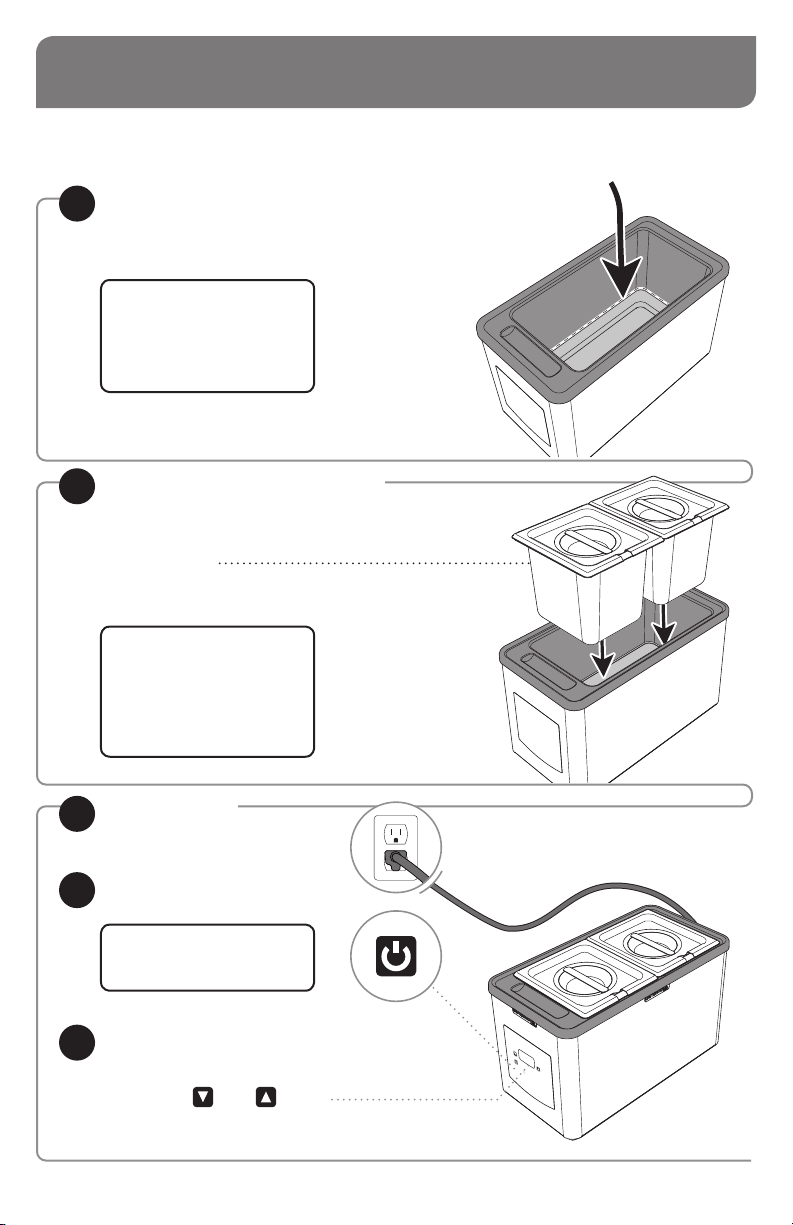
UNIT SET-UP
WASH ALL PARTS PROPERLY BEFORE EVERY USE. See page 5.
FILL UNIT BASIN WITH WATER
1
• Fill 1 liter of water up to
fill-line-ridge inside basin.
TIP: Check water levels
throughout the holding period
to ensure even heating.
Filtered water is recommended
to deter corrosion.
PUT PAN(S) INTO BASIN
2
• Product being served must always
be inside pan(s).
Never place food directly
into basin of unit.
TIP: Food pan(s) not included–
modular design lets you
choose pan(s), pump(s) or
high-temp squeeze bottles for
your food application.
See page 11.
3
4
5
Page 2
PLUG CORD
into power source.
PRESS POWER BUTTON
to turn unit on.
UNITS WITH 230 VOLTS
also have a power switch.
Press to ON position.
SET THERMOSTAT
to recommended
serving temperature.
• Press Down
to set temperature.
• See page 6 for control function details.
or Up buttons
Page 3
SAFETY
According to food and safety regulations, most
foods must be stored and/or served at certain
temperatures or they could become hazardous.
Check with local food and safety regulators for
WARNING-
ELECTRICAL SHOCK COULD OCCUR
This unit must be earthed or grounded.
This requires all three prongs (terminals) on cord
plug to be plugged into power source.
RETHERMALIZATION HOT FOOD HOLDING
specific guidelines.
Be aware of the product you are serving and the
temperature the product is required to maintain.
Server Products, Inc. can not be responsible for
the serving of potentially hazardous product.
Rethermalization of food products is achieved by
this appliance when it elevates the food product
temperature from a refrigerated 40°F (4°C) to a
safe serving temperature of 165°F (74°C) within a
period of 2 hours.
PRE-HEAT UNIT
1 1
for at least 5 minutes
• Correct amount of water in basin.
• Lid(s) closed.
• Temperature set at maximum setting.
ADD FOOD PRODUCT
2 2
• Put food into pans.
• Do not overfill.
MAINTAIN SAFE
3
HOT FOOD HOLDING
•
After food reaches safe serving temperature
of 165°F (74°C), maintain product
temperature at or above 150°F (66°C).
• Adjust controller if needed to avoid
overheating food.
with:
NSF International and ANSI (American National Standards Institute) list this unit as a
“Rethermalization and Hot Food Holding unit (Standard 4).”
Hot Food Holding is achieved with this appliance
when it maintains a food product temperature at or
above 150°F (66°C), in all locations throughout the
product, for a minimum of 2 hours, even if any lid,
cover, or pump is removed. The lid, cover, or pump is
recommended to help maintain product temperature.
PRE-HEAT UNIT
for at least 5 minutes
• Correct amount of water in basin.
• Lid(s) closed.
• Temperature set at maximum setting.
with:
ADD FOOD PRODUCT
• Put food which has already been
preheated to 150°F (66°C) into pans.
• Do not overfill.
MONITOR FOOD CLOSELY FOR FOOD SAFETY.
The United States Public Health Service
recommends that hot food be held at a minimum
of 140°F (60°C) to help prevent bacteria growth.
COLD FOOD IS NOT TO BE ADDED TO THE
UNIT FOR RETHERMALIZATION WHILE HOT
FOOD IS BEING HELD.
Page 3
Page 4
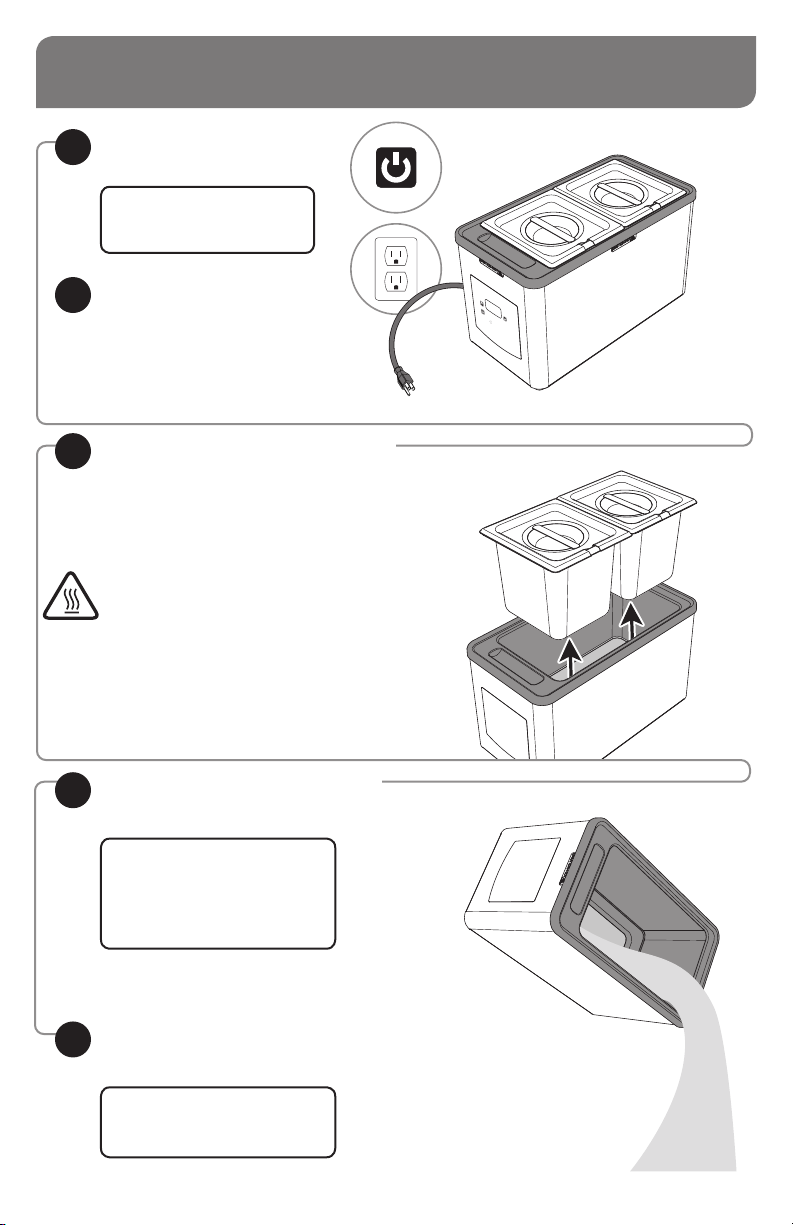
UNIT TAKE-DOWN
PRESS POWER BUTTON
1
to turn unit off.
UNITS WITH 230 VOLTS
also have a power switch.
Press to OFF position.
UNPLUG CORD
2
REMOVE PAN(S) FROM BASIN
3
CAUTION- HOT
Allow unit to cool before continuing.
4
5
Page 4
EMPTY WATER FROM BASIN
after each use.
TIP: Remember to empty the
water each day rather than add—
This will greatly extend the life
of your warmer.
DRY
thoroughly with a soft dry cloth.
Proper drying after each use helps
maintain the aluminum heat plate
and the stainless steel.
Page 5

CLEANING
WARNING-
ELECTRICAL SHOCK COULD OCCUR
• Electrical components of unit could be
damaged from water exposure or any liquid.
• Never immerse unit into water or any liquid.
• Never use any water jet or pressure sprayer
on unit.
• Ensure unit is “OFF” and unplugged.
CAUTION- HOT
Allow unit to cool before cleaning.
REMOVE LIME SCALE
RECOMMENDED ONCE A MONTH OR AS NEEDED:
Use a non-corrosive lime scale remover to eliminate
mineral buildup on the interior of the basin.
This will greatly extend the life of your warmer.
CLEAN
1
• Before first use and after use daily,
disassemble and clean unit.
• Ensure unit is “OFF” and unplugged.
• Wash with dishwashing soap and hot water.
RINSE fully with clear water.
2
SANITIZE all parts according to local
3
sanitization requirements. All parts in contact
with food must be sanitized.
DRY all parts fully with a clean soft cloth.
4
CLEAN EXTERNAL SURFACES
5
• Wipe daily with a clean damp cloth.
• Dry with a clean soft cloth.
• Glass and surface cleaners approved for use
in food contact areas may be used.
CARE OF STAINLESS STEEL
This warmer is constructed of
stainless steel— one of the best
materials for food serving and
storage.
If you notice corrosion beginning on
any stainless steel surface, you may need to
change the cleansing agent, sanitizing agent, or
the cleaning procedures you are using.
• A mildly abrasive nylon or brass brush may
be used to remove any stubborn food or
mineral deposits on interior surfaces of unit.
• Fully rinsing and drying all parts can help
prevent corrosion. Elements and minerals in
tap water can accumulate on stainless steel
parts and create corrosion.
• Do not use abrasive, caustic or ammonia
based cleansers.
• Do not use products containing acids,
alkalines, chlorine, or salt. These agents can
corrode stainless steel.
• Do not use metal scrapers or cleaning pads
that could scratch surfaces.
Page 5
Page 6

CONTROL FUNCTIONS
DISPLAY MESSAGES
COL = COOL
Heating element is off and cooling down to set
temperature.
PRE = HEAT
Heating element is on and warming up to set
temperature.
ERR = ERROR
Control board is not functioning. Repair is required.
(Please see page 12 for repairs.)
DOWN & UP BUTTONS
Press and hold the Down or Up
buttons to cycle through temperature range.
TEMPERATURE RANGES
For most units: 100°F (37°C)—220°F (104°C)
For unit 86254: 135°F (57°C)—220°F (104°C)
Temperature differential between cool and heat
is 10° F (5.5°C) of set temperature.
Display will switch between control functions
and set temperature until unit stabilizes.
POWER BUTTON
On/Off
HEATING INDICATOR
Light indicates heating element is active.
CELSIUS INDICATOR
Light indicates temperature display mode is °C.
No light indicates temperature display mode is °F.
TO SET DISPLAY °F OR °C
• Turn unit off.
• Press and hold Down button,
then simultaneously press and hold
Power button for 30 seconds.
• Celsius indicator will activate to display °C
or deactivate to display °F.
Page 6
Page 7

WIRING UNITS 86090, 86254, 86481 (120V)
A B C
1
2
3
4
T1L2T2NT3
CHASSIS GROUND
10
PROBE
11
H/L1T6LOAD
8
9
5
Cord Assembly
120V USA
1
2
3
4
5
White
A
Black
B
Green
C
Bushing/Strain Relief
Wire Nut
19" White Wire Assembly
6" White Wire Assembly
7
6
500W Heating Element
6
6" Black Wire Assembly
7
Thermal Cutout
8
Thermistor Assembly
9
Temperature Controller
10
3/4 Hole Shorty Bushing
11
Page 7
Page 8

WIRING UNIT 86479 (100V JAPAN)
A B C
1
12
2
3
L2L1L2
L1
CHASSIS GROUND
CHASSIS GROUND
11
4
10
5
PROBE
9
T1L2T2NT3
H/L1T6LOAD
8
6
7
Page 8
Cord Assembly
100V JAPAN
1
Blue
A
Brown
B
Yellow/Green
C
Bushing/Strain Relief
2
Thermal Cutout
3
4" White Wire Assembly
4
6" Black Wire Assembly
5
6" White Wire Assembly
6
500W Heating Element
7
6" Black Wire Assembly
8
3/4 Hole Shorty Bushing
9
Thermistor Assembly
10
Temperature Controller
11
5" Green Wire Assembly
12
Page 9

WIRING
UNITS 86338, 86339, 86341 (CONTINENTAL. EURO, AU, UK)
A B C
4
5
6
7
8
1
2
3
1 4
2 5
L2
L1L2L1
9
T1L2T2NT3
15
CHASSIS GROUND
CHASSIS GROUND
14
13
PROBE
12
H/L1T6LOAD
11
10
Cord Assembly
1
230V
Blue
A
Brown
B
Yellow/Green
C
Bushing/Strain Relief
2
Thermal Cutout
3
8" White Wire Assembly
4
8" Black Wire Assembly
5
Rocker Switch
6
6" White Wire Assembly
7
6" Black Wire Assembly
8
6" White Wire Assembly
9
10
500W Heating Element
11
6" Black Wire Assembly
12
3/4 Hole Shorty Bushing
13
Thermistor Assembly
Temperature Controller
14
5" Green Wire Assembly
15
Page 9
Page 10

WIRING UNIT 86478 (230V BRAZIL)
A B C
3
4
5
1
2
1 4
2 5
12
CHASSIS GROUND
CHASSIS GROUND
11
10
PROBE
9
T1L2T2NT3
H/L1T6LOAD
8
6
7
Page 10
Cord Assembly
1
230V BRAZIL
Blue
A
Brown
B
Yellow/Green
C
Bushing/Strain Relief
2
Rocker Switch
3
6" White Wire Assembly
4
6" Black Wire Assembly
5
6" White Wire Assembly
6
500W Heating Element
7
6" Black Wire Assembly
8
3/4 Hole Shorty Bushing
9
10
Thermistor Assembly
11
Temperature Controller
12
5" Green Wire Assembly
Page 11

ACCESSORY ITEMS
Customize your IntelliServ™
warmer with pans, pumps, ladles
or squeeze bottles for topping,
finishing or platescaping.
PAR T
NUMBER
Stainless Steel FP-1/6 Pump, 86312
1 oz (30 mL)
Magnetic Sign- Fudge 86788
Magnetic Sign- Caramel 86789
1/6-Size Squeeze Bottle Holder 87530
w/(3) 16 oz Bottles
1/3-Size, 6" (150mm) Deep Pan, 90083
6 qt (5.7 L)
1/6-Size, 6" (150mm) Deep Pan, 90089
2¾ qt (2.6 L)
1/6-Size Pan Lift-off Lid 90094
Stainless Steel 6" Ladle, 87213
1 oz (30 mL)
Page 11
Page 12

TROUBLESHOOTING
UNIT DOES NOT HEAT?
• Ensure cord is securely plugged in.
• Ensure power is available from source.
• Ensure unit is on.
• Ensure thermostat is set correctly.
that the correct amount of water is in basin.
• Ensure
UNIT TRIPS THE BREAKER?
(GROUND FAULT INTERRUPTER)
• Never expose electrical components to water
or liquid. This may result in damage.
Unit may not function.
If electrical components have gotten wet:
• Turn off unit and unplug.
• Allow unit to dry completely.
SERVER PRODUCTS
LIMITED WARRANTY
Server Products equipment is backed by a
two-year limited warranty against defects in
materials and workmanship.
For complete warranty information go to:
www.Server-Products.com
NEED HELP?
Server Products Inc.
3601 Pleasant Hill Road
Richfield, WI 53076 USA
262.628.5600 | 800.558.8722
SPSALES@SERVER-PRODUCTS.COM
GENERAL SERVICE,
REPAIR OR RETURNS
Before sending any item to Server Products for service,
repair, or return, contact Server Products customer
service to request a Return Authorization Number.
Merchandise must be sent to Server Products with this
number. Service is extremely prompt. Typically, units
are repaired and ship out within 48 hours.
Merchandise being returned for credit must be in new
and unused condition and not more than 90 days
old and will be subject to a 20% restocking charge.
Electrical parts (thermostats, heating elements, etc.)
are not returnable.
Servicing Cord: Specific tools are required for safe
and proper power supply cord removal and installation.
If cord must be replaced, only a representative of the
OEM (original equipment manufacturer) or a qualified
technician may replace cord. Cord must meet code
designation H05 RN-F requirements.
Please be prepared with your Model, Part and
Series Numbers. This information and other
important data is located on the base of the unit.
Page 12
Manual #01908-RevD 050517
 Loading...