

Page 1
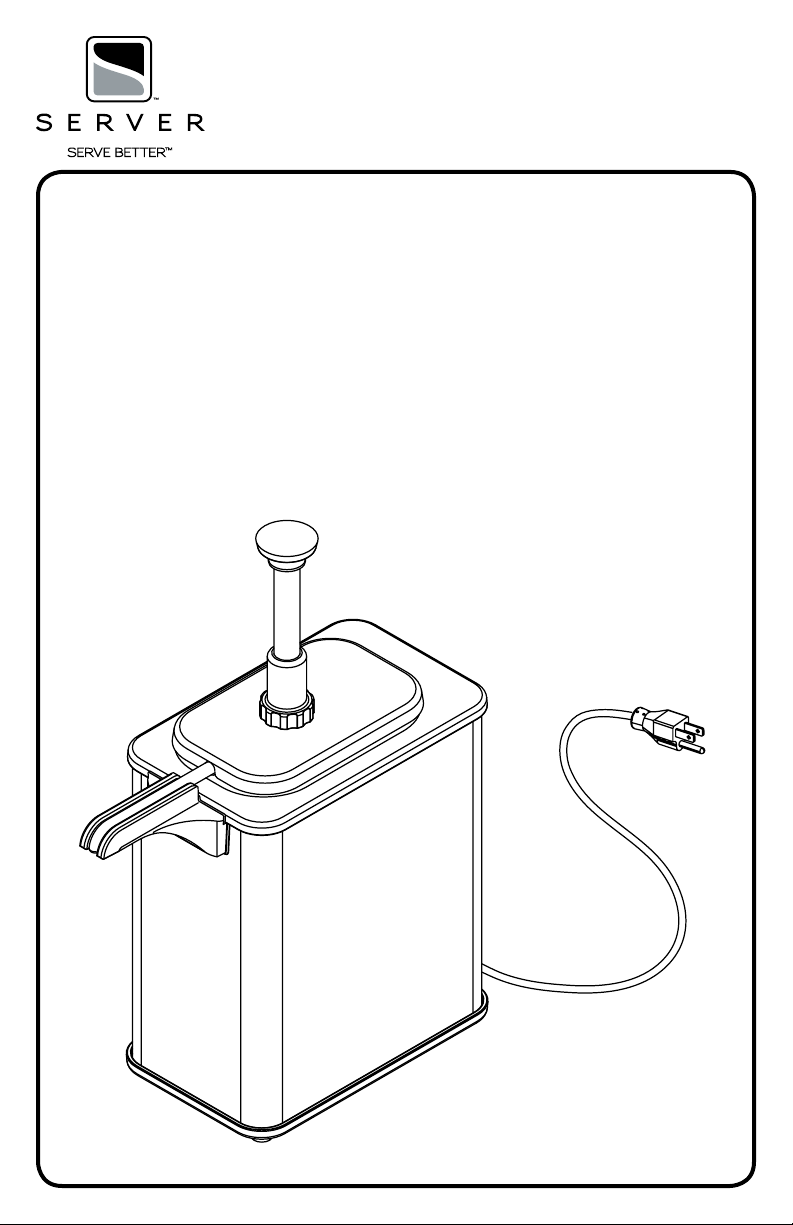
MODEL:
01744-REVA�080414�ENGLISH
EZT-S
EZ-TOPPER
TM
TALL, SINGLE,
ADJUSTABLE THERMOSTAT
120V
Series 12B
85790
Page 2

SAFETY GUIDELINES WHEN
USING THIS UNIT:
C EWarning- Electrical shock could occur:
• This unit must be earthed or grounded.
• This requires all three prongs (terminals) on
cord plug to be plugged into power source.
According to food and safety regulations, most foods
must be stored and/or served at certain temperatures or
they could become hazardous. Check with local food and
safety regulators for specic guidelines.
Be aware of the product you are serving and the
temperature the product is required to maintain.
Server Products, Inc. can not be responsible for
the serving of potentially hazardous product.
Server Products Inc. claims no responsibility for
actual serving temperature of product. It is the
responsibility of the user to ensure that any
product is held and served at a safe temperature.
Stainless steel is one of the best materials for food
serving and storage, but there are many products which
can corrode it. If you notice corrosion beginning on
any stainless steel surface, you may need to change
the cleansing agent, sanitizing agent, or the cleaning
procedures you are using.
• Products containing: acids, alkalines, chlorine,
or salt can corrode stainless steel.
• Sauerkraut and Au Jus sauces corrode stainless
steel. Server Products, Inc. regrets that we can not
honor Warranty claims on stainless steel parts that
have been affected by sauerkraut
or Aus Jus.
SAFETY GUIDELINES WHEN
CLEANING THIS UNIT:
Ensure unit is “OFF” and unplugged.
Caution- Hot:
• If unit has already been in use, unit may still
be hot. Allow unit to cool before continuing.
UNIT SET-UP
ALWAYS CLEAN UNIT AND PUMP THOROUGHLY BEFORE
EACH USE. SEE UNIT TAKE-DOWN, SAFETY GUIDELINES
AND CLEANING. SEE SEPARATE PUMP MANUAL FOR
PUMP INSTRUCTIONS.
C EWarning- Electrical shock could occur:
This is not a waterbath unit.
PRODUCT POUCH(ES) MAY BE PREHEATED IN UNIT:
• Product pouches may otherwise be preheated
in a microwave, convection oven, water bath, or
steam table according to product manufacturer’s
instructions
• Pre-heat time will vary depending on product
PRE-HEAT FOR AT LEAST 30 MINUTES WITH:
• pump(lid) installed
• thermostat knob set at maximum setting
AFTER PRE-HEAT:
• Adjust thermostat knob to recommended product
serving temperature.
1 ATTACH PUMP TO PRIMARY PRODUCT POUCH
BEFORE INSTALLING INTO UNIT.
• Place product pouch on a counter top with circular
pouch tment facing upward.
• Position pump connector directly over center
of circular pouch tment.
• Press pump connector down to pierce through
lm in circular pouch tment. Pump connector will
“snap” securely into tment.
• Connector is fully engaged into pouch tment
when surface of circular pouch tment touches
connector’s rim.
2 INSTALL PRIMARY PRODUCT POUCH, WITH PUMP
NOW ATTACHED, INTO FOOD VESSEL.
• Align pump discharge tube into spout heater slot on
front of unit.
3 PLUG CORD INTO POWER SOURCE.
4 PRESS SWITCH TO THE “ON” POSITION.
5 SET THERMOSTAT KNOB TO RECOMMENDED
TEMPERATURE.
UNIT TAKE-DOWN
1 PRESS SWITCH TO “OFF” POSITION.
2 UNPLUG CORD.
C EWarning- Electrical shock could occur:
• Electrical components of unit could be
damaged from water exposure or any liquid.
• Never immerse unit into water or any liquid.
• Never use any water jet or pressure sprayer
on unit.
Caution- Hot:
• If unit has already been in use, unit may still
be hot. Allow unit to cool before continuing.
3 REMOVE PUMP WITH PRIMARY PRODUCT POUCH
ATTACHED.
• Grasp both pump and pouch and pull them together
up and out of unit.
4 REMOVE POUCH SUPPORT, IF INSTALLED.
5 REMOVE RESERVE PRODUCT POUCH, IF INSTALLED.
6 DISCONNECT PUMP FROM PRIMARY PRODUCT
POUCH.
• Pull pump connector out of circular pouch tment.
7 FLUSH AND RINSE ALL INSIDE AND OUTSIDE
SURFACES OF PUMP THOROUGHLY WITH HOT
WATER.
8 DISASSEMBLE AND CLEAN PUMP.
SEE SEPARATE PUMP MANUAL.
Page 3
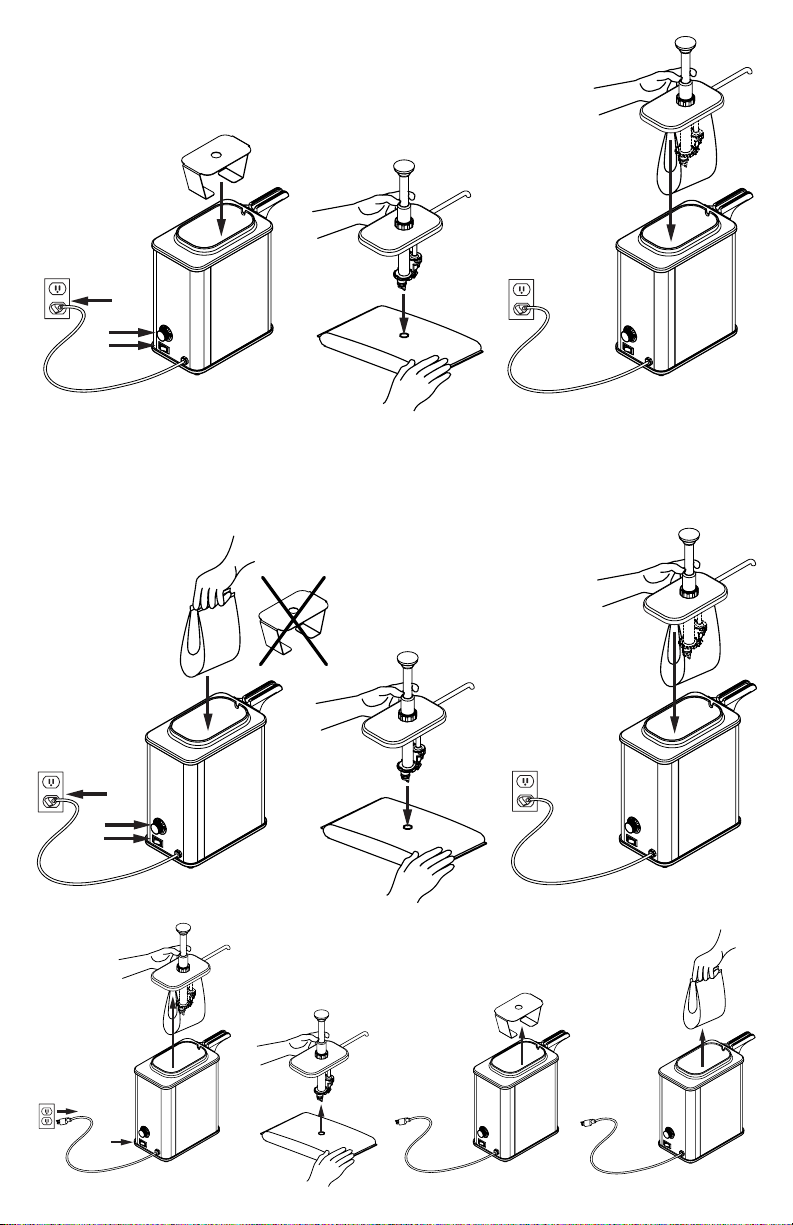
UNIT SET-UP (ONE POUCH)
• If only installing one product pouch, then pouch
support must be installed rst into product vessel
underneath product pouch.
4
6
1
3
2
UNIT SET-UP (TWO POUCHES)
• If installing a primary product pouch and a reserve
product pouch, then do not use pouch support.
• One reserve product pouch can be folded in half and
installed under primary product pouch.
4
1
3
2
5
6
5
UNIT TAKE-DOWN
3
2
1
4
5
6
Page 4

UNIT CLEANING
BEFORE FIRST USE AND AFTER USE DAILY OR
REGULARLY, DISASSEMBLE AND CLEAN PARTS.
FOR SAFE AND PROPER CARE, AND TO PREVENT
CORROSION, OF PARTS, IT IS IMPORTANT TO
CLEAN, RINSE, SANITIZE, AND DRY PARTS DAILY OR
REGULARLY. FAILURE TO COMPLY WITH ANY OF THESE
INSTRUCTIONS MAY VOID UNIT WARRANTY.
SEE SEPARATE PUMP MANUAL FOR SPECIFIC PUMP
CLEANING.
1 SEE UNIT TAKE DOWN.
2 ENSURE UNIT IS “OFF” AND UNPLUGGED.
C EWarning- Electrical shock could occur:
• Electrical components of unit could be
damaged from water exposure or any liquid.
• Never immerse unit into water or any liquid.
• Never use any water jet or pressure sprayer
on unit.
3 WASH CLEAN ALL WASHABLE PARTS WITH
DISHWASHING DETERGENT AND HOT WATER.
• Do not use scrapers, steel pads, steel wool, or other
cleaning tools that can scratch surfaces.
• Mildly abrasive NYLON or brass brush may be used
to remove any stubborn food or mineral deposits on
interior surfaces of unit.
• Do not use abrasive cleansers.
• Do not use caustic cleansers.
• Do not use cleansing agents with high
concentrations of acid, alkaline or chlorine.
• Do not use ammonia based cleansers.
4 FULLY RINSE ALL WASHED PARTS THOROUGHLY
WITH CLEAR WATER.
• To prevent corrosion on parts, it is important to
thoroughly and fully rinse washed parts.
5 WIPE CLEAN EXTERNAL SURFACES OF UNIT WITH A
CLEAN DAMP CLOTH.
• Nontoxic glass cleaner may be used to clean
stainless steel parts.
6 DRY ALL PARTS WITH A CLEAN SOFT CLOTH.
• Various elements and minerals, such as chlorides in
tap water, can accumulate on stainless steel parts
and create corrosion.
• To prevent corrosion on stainless steel parts, it is
important to thoroughly and fully dry with a clean
soft cloth regularly.
7 SANITIZE ALL PARTS FOLLOWING LOCAL
SANITIZATION REQUIREMENTS. ALL PARTS IN
CONTACT WITH FOOD MUST BE SANITIZED.
• Allow parts to fully air dry after sanitization.
GENERAL SERVICE, REPAIR,
OR RETURNS
Before sending any item to Server Products for service,
repair, or return, contact Server Products customer
service to request a Return Authorization Number.
Merchandise must be sent to Server Products with this
number.
Merchandise being returned for credit must be in new
and unused condition and not more than 90 days old
and will be subject to a 20% (percent) restocking
charge. Electrical parts (thermostats, heating elements,
etc.) are not returnable.
Server Products maintains a fully staffed service
department with highly skilled factory trained personnel.
Service is extremely prompt. Under normal
circumstances, a repaired unit is shipped out the day
after it is received. Labor charges are reasonable.
SERVICE
Contact your dealer or Server Products Inc.
customer service department for the following:
ORDERING REPLACEMENT PARTS
Be prepared to give this information:
• Model Letters/Name/Numbers
• Part Numbers- P/N
• Series Numbers/Letters
• Part Description
This information and other important data is stamped
on the lid or cylinder of pumps or on the bottom or
back side of every unit.
Servicing Cord
Specic tools are required for safe and proper power
supply cord removal and installation. If cord must be
replaced, only a representative of the OEM (original
equipment manufacturer) or a qualied technician may
replace cord. Cord must meet code designation H05
RN-F requirements.
SERVER PRODUCTS
LIMITED WARRANTY
All Server Products equipment is backed by a
two-year limited warranty against defects in materials
and workmanship. For complete warranty information
go to: www.server-products.com
UNIT TROUBLESHOOTING
POSSIBLE PROBLEM:
• Unit does not heat.
• Product pouch does not evacuate all product.
POSSIBLE SOLUTIONS:
• Ensure cord is securely plugged in.
• Ensure power is available from source.
• Ensure unit is on.
• Ensure thermostat knob is set correctly.
• Ensure proper pouch installation, see UNIT SET-UP.
Server Products Inc.
3601 Pleasant Hill Road
Richfield, WI 53076 USA
262.628.5600
800.558.8722
262.628.5110
www.server-products.com
 Loading...