

Page 1
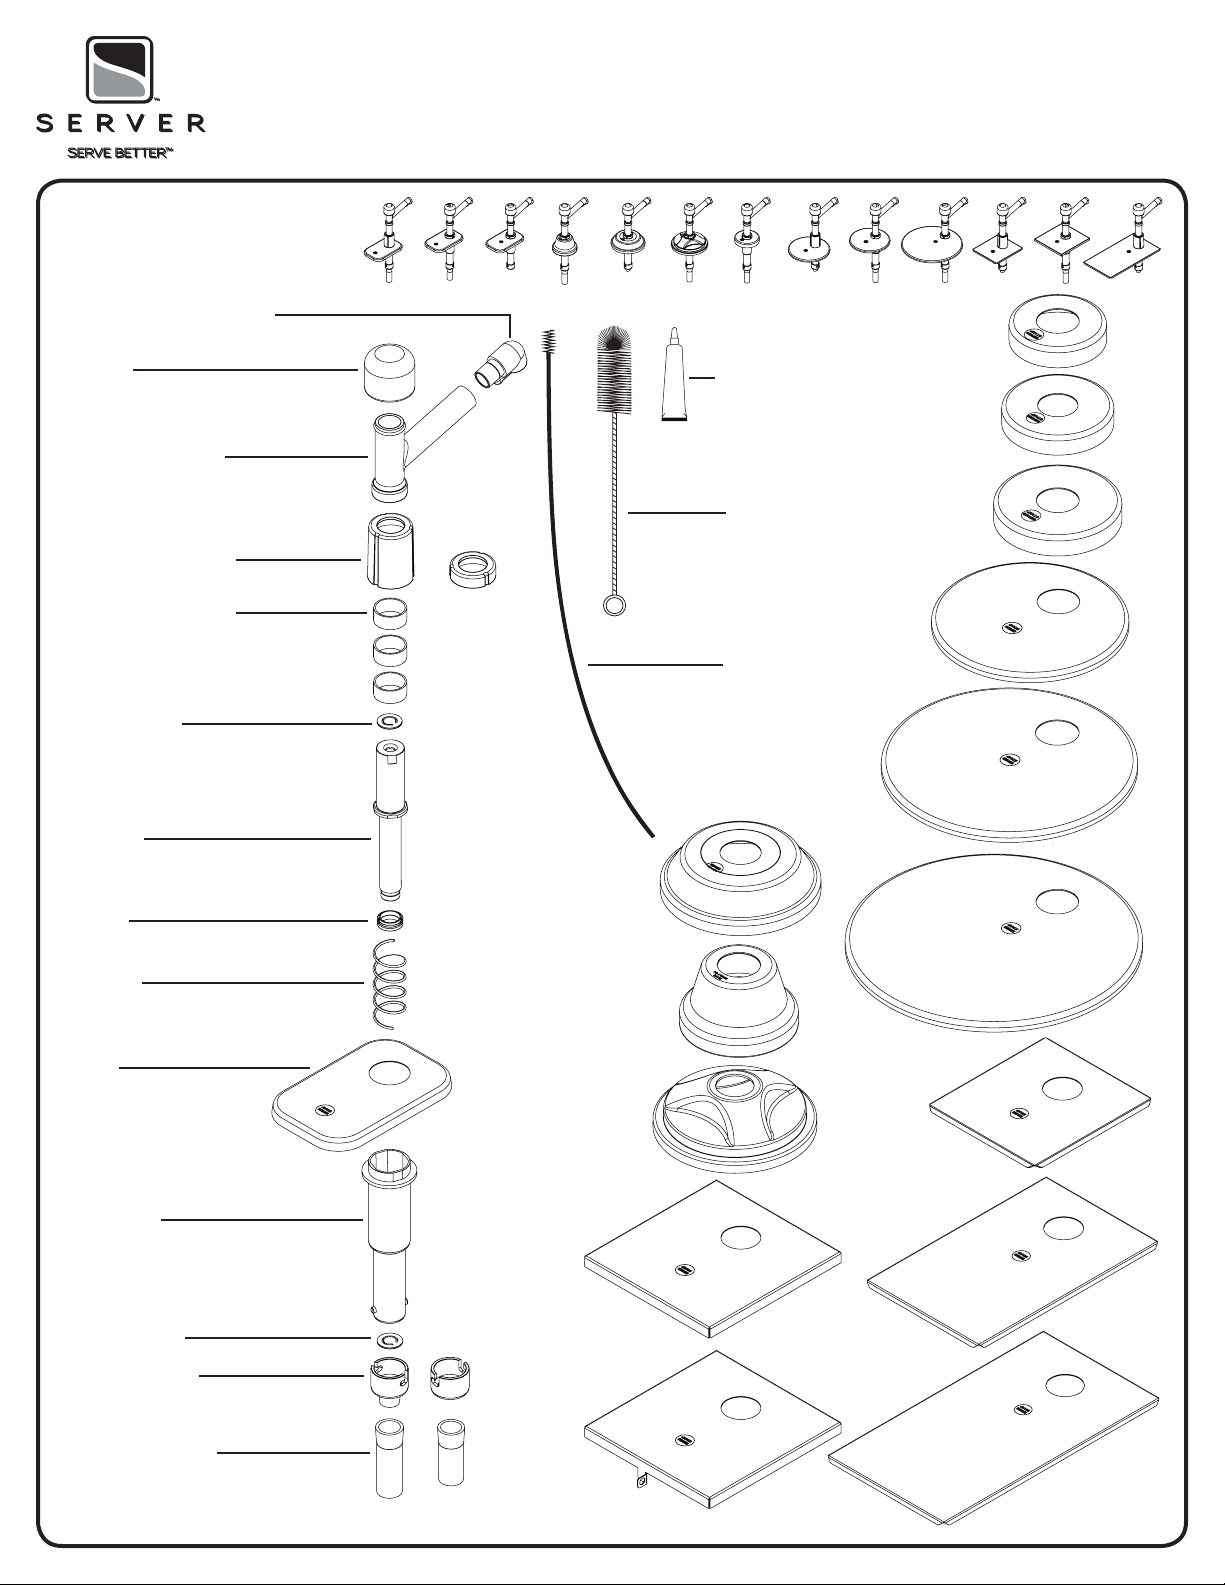
SOLUTIONTM PUMP PARTS
DISCHARGE FITTINGS
01570-REVI_050712_ENGLISH
TM
SOLUTION
Go to server-products.com for translations and for each pump parts breakdowns
PARTS INCLUDED VARY DEPENDING ON PUMP
PUMPS INSTRUCTION MANUAL
KNOB
DISCHARGE TUBE
LOCKING COLLARS
GAGING COLLARS
(Portion Control) Each collar
added reduces portion served
by .25 oz
BALL VALVE
PISTON
SEAL
FOOD EQUIPMENT
LUBRICANT 40179
1
BRUSH 82049 (1
/
BRUSH 82526 (21”)
” D)
4
SPRING
LIDS
CYLINDER
BALL VALVE
CONNECTORS
SUCTION TUBES
Page 2
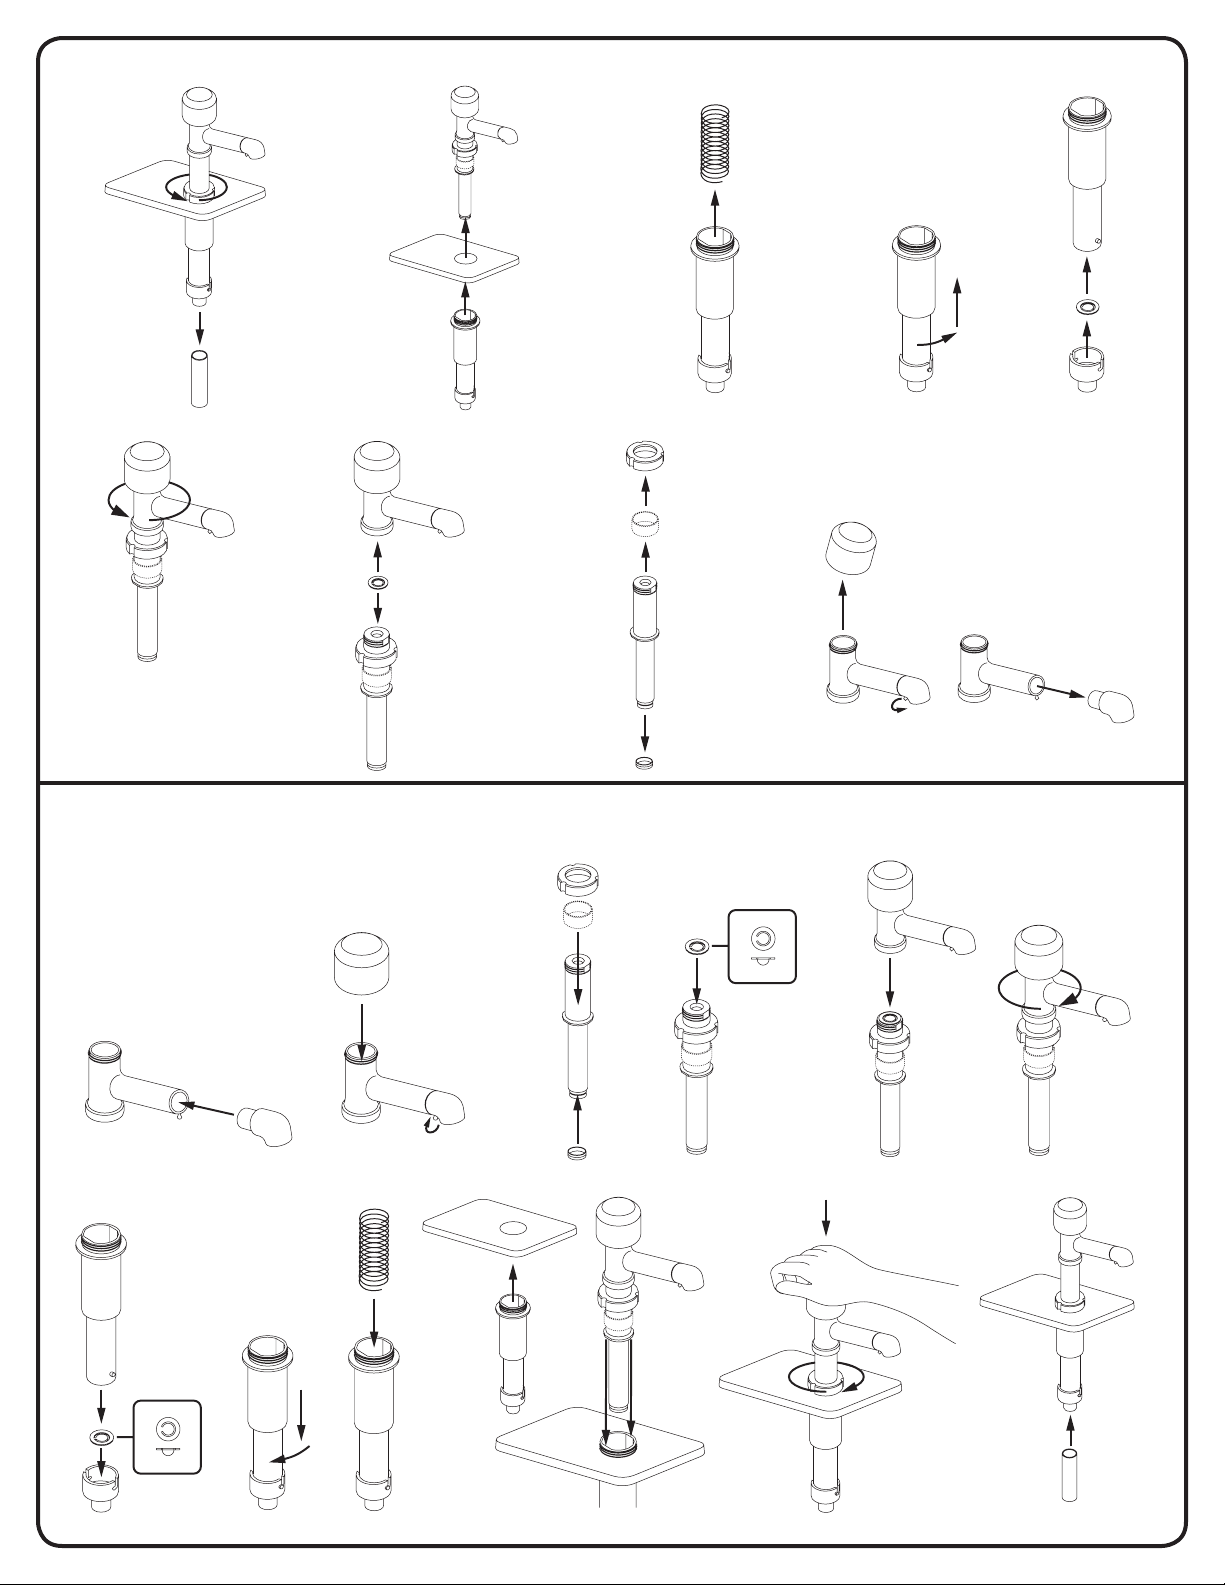
PUMP DISASSEMBLY
8
4
9
4
5
6
7
J
L
M
PUMP ASSEMBLY
1
9
2
1
J
4
M
K
6
5
6
3
L
7
8
K
M
Page 3

PUMP DISASSEMBLY
BEFORE FIRST USE AND AFTER USE DAILY, DISASSEMBLE
AND CLEAN PUMP.
1 PUMP OUT ALL (IF ANY) REMAINING FOOD PRODUCT
FROM INSIDE PUMP BODY.
2 WASH AND RINSE OFF OUTSIDE OF PUMP BODY.
3 FLUSH OUT AND RINSE THROUGH INSIDE OF PUMP.
• Place lower end of pump into container full of
water and operate pump until all (if any) remaining
product is expelled and only warm water ows from
discharge tube. Then remove pump from container
of water to disassemble.
• Use a container to collect small parts of pump to
prevent any loss.
4 REMOVE PLUNGER ASSEMBLY AND LID FROM
PUMP BODY BY TURNING LOCKING COLLAR
COUNTERCLOCKWISE.
5 REMOVE SPRING FROM PUMP BODY.
6 REMOVE CYLINDER FROM CONNECTOR. PUSH
CYLINDER INTO CONNECTOR TO COMPRESS
BALL VALVE WHILE ROTATING CYLINDER
COUNTERCLOCKWISE. ROTATE CYLINDER TO
RELEASE PINS FROM SLOTS ON CONNECTOR.
7 REMOVE BALL VALVE FROM INSIDE CONNECTOR.
8 REMOVE DISCHARGE TUBE BODY FROM
PISTON BY ROTATING DISCHARGE TUBE BODY
COUNTERCLOCKWISE.
• Be prepared for ball valve to fall loose when
removing discharge tube body from piston.
9 REMOVE BALL VALVE FROM PISTON, IF REMAINING
ON END OF PISTON.
J REMOVE LOCKING COLLAR AND GAGING COLLAR(S),
IF USED, FROM PISTON BY SLIDING THEM OFF.
K REMOVE SEAL FROM END OF PISTON BY ROTATING
AND PULLING OFF OF LIP ON PISTON.
L REMOVE KNOB FROM DISCHARGE TUBE BODY BY
PULLING KNOB AT AN ANGLE UNTIL KNOB FLANGES
RELEASE FROM LIP ON DISCHARGE TUBE BOD
M REMOVE DISCHARGE FITTING FROM DISCHARGE
TUBE BY RELEASING FITTING LOOP AND PULLING
FITTING AWAY FROM DISCHARGE TUBE.
• DO NOT USE FITTING LOOP ON DISCHARGE
FITTING AS A PULL.
y.
PUMP CLEANING
BEFORE FIRST USE AND AFTER USE DAILY, DISASSEMBLE
AND CLEAN PUMP.
STAINLESS STEEL PARTS CAN CORRODE.
IT IS IMPORTANT TO CLEAN, RINSE, SANITIZE, AND DRY
THESE PARTS DAILY AND PROPERLY.
FAILURE TO COMPLY WITH ANY OF THESE
INSTRUCTIONS MAY VOID UNIT WARRANTY.
1 SEE PUMP DISASSEMBLY.
2 WASH AND SCRUB ALL PARTS WITH DISHWASHING
DETERGENT AND HOT WATER DAILY.
• Wash small parts in a pan or other container
to prevent part loss.
• Use supplied brushes to clean all conned
areas. Maintain a clean and efcient pump
by using the brushes supplied with pump to
prevent product build up inside pump.
• Do not use abrasive cleansers, scrapers, steel pads,
steel wool, or other cleaning tools that can scratch
surfaces.
• A general purpose, nonabrasive cleaner may be
used on hard to remove food deposits.
• Do not use cleansing agents with high
concentrations of acid, alkaline or chlorine.
These agents can corrode stainless steel.
Do not use ammonia to clean pump parts.
•
Ammonia can damage plastic parts.
• A nontoxic glass cleaner may be used for cleaning
any stainless steel parts.
3 FULLY RINSE ALL PARTS THOROUGHLY WITH CLEAR
WATER.
• Fully rinsing all parts can help prevent corrosion.
4 DRY ALL STAINLESS STEEL PARTS WITH A CLEAN
SOFT CLOTH.
• Various elements and minerals, such as chlorides in
tap water, can accumulate on stainless steel parts
and create corrosion.
• To prevent corrosion on any stainless steel parts,
it is important to fully dry with a clean soft cloth
regularly.
5 SANITIZE PARTS FOLLOWING YOUR LOCAL
SANITIZATION REQUIREMENTS.
ALL PARTS IN CONTACT WITH FOOD MUST BE
SANITIZED.
• Allow parts to fully air dry after sanitization.
• Dishwasher safe.
PUMP ASSEMBLY
BEFORE FIRST USE AND AFTER USE DAILY, DISASSEMBLE
AND CLEAN PUMP.
1 INSTALL DISCHARGE FITTING INTO DISCHARGE
TUBE. SECURE DISCHARGE FITTING TO TUBE BY
HOOKING FITTING LOOP AROUND PROJECTION ON
END OF DISCHARGE TUBE.
2 INSTALL KNOB ONTO TOP OF DISCHARGE TUBE BODY
BY PUSHING TOGETHER UNTIL KNOB SNAPS ONTO
LIP OF DISCHARGE TUBE BODY.
3 INSTALL SEAL ONTO BOTTOM OF PISTON. SEAL IS
SECURE WHEN IT SNAPS ONTO LIP AROUND BOTTOM
OF PISTON.
4 INSTALL GAGING COLLAR(S), IF NEEDED, AND
LOCKING COLLAR ONTO THREADED END OF PISTON
BY SLIDING THEM ON. POSITION LOCKING COLLAR
WITH THREADING INSIDE LOCKING COLLAR FACING
SEAL AT BOTTOM OF PISTON.
5 INSTALL ONE OF THE BALL VALVES WITH BALL SIDE
SEATED DOWN INTO OPENING IN TOP OF PISTON.
6 INSTALL BOTTOM OF DISCHARGE TUBE BODY ONTO
THREADED TOP OF PISTON WITH BALL VALVE IN
POSITION RESTING ON TOP OF PISTON. ROTATE
DISCHARGE TUBE BODY CLOCKWISE UNTIL SECURE
WITH PUMP TUBE ASSEMBLY.
7 INSTALL THE OTHER BALL VALVE WITH THE BALL
SIDE SEATED DOWN INTO OPENING INSIDE
CONNECTOR.
8 INSTALL BOTTOM END OF PUMP BODY, WITH PINS,
INTO CONNECTOR WITH BALL VALVE IN POSITION
RESTING INSIDE CONNECTOR. COMPRESS BALL
VALVE SLIGHTLY AND ROTATE PUMP BODY INTO
CONNECTOR UNTIL PINS SECURE INTO SLOTS IN
CONNECTOR.
9 INSTALL SPRING INTO PUMP BODY.
J INSTALL LID ONTO PUMP BODY BY ALIGNING LARGE
HOLE IN LID TO REST ON THREADED LIP OF PUMP
BODY ASSEMBLY.
K INSTALL PLUNGER ASSEMBLY INTO PUMP BODY
ASSEMBLY. COMPRESS PUMP AND ROTATE UNTIL
FLATS ON PISTON ALIGN INTO POSITION WITH
FLATS INSIDE CYLINDER.
L WHILE COMPRESSING PUMP, ROTATE LOCKING
COLLAR CLOCKWISE TO SECURE ONTO THREADING
OF CYLINDER.
M IF SUCTION TUBE IS INCLUDED, INSTALL ONTO
BOTTOM OF CONNECTOR. THE SUCTION TUBE MAY
BE CUT WITH SCISSORS TO THE NEEDED LENGTH.
Page 4

PORTION CONTROL
After cleaning pump and during pump assembly, determine
amount of product to be dispensed with each full stroke of
pump. Gaging collars are included with pump to allow for
changing of portion control.
1 INSTALL DESIRED NUMBER OF GAGING COLLARS
ONTO THREADED TOP OF PUMP TUBE TO SET
PORTION CONTROL.
• Each gaging collar added reduces portion per pump
stroke by .25 ounces.
Portion desired
per pump
stroke
1 Ounce 0 A
3/4 Ounce 1 B
1/2 Ounce 2 C
1/4 Ounce 3 D
2 COMPLETELY ASSEMBLE PUMP.
SEE PUMP ASSEMBLY.
3 TEST PORTION CONTROL.
• Put pump in product container and operate pump
several times until only product without air bubbles
is delivered with each stroke of pump.
• Then measure amount of product being delivered
through discharge tube with each stroke of pump to
assure portion control is satisfactory.
A B C D
Number of
Gaging Collars
Needed
Illustration
SAFETY GUIDELINES WHEN
USING THIS PUMP:
According to food and safety regulations, most foods must
be stored and/or served at certain temperatures or they
could become hazardous. Check with your local food and
safety regulators for specic guidelines.
Be aware of the product you are serving and the
temperature the product is required to maintain.
Server Products, Inc. can not be responsible for the
serving of potentially hazardous product.
Stainless steel is one of the best materials for food
serving and storage, but there are many products which
can corrode it. If you notice corrosion beginning on
any stainless steel surface, you may need to change
the cleansing agent, sanitizing agent, or the cleaning
procedures you are using.
• Products containing: acids, alkalines, chlorine,
or salt can corrode stainless steel.
• Sauerkraut and Au Jus sauces corrode stainless
steel. Server Products, Inc. regrets that we can not
honor warranty claims on stainless steel parts that
have been affected by sauerkraut
or Aus Jus.
SERVER PRODUCTS
LIMITED WARRANTY
All Server Products equipment is backed by a
two-year limited warranty against defects in materials and
workmanship. For complete warranty information go to:
www.server-products.com
SCOPE OF WARRANTY
Server Products Inc. (“Server Products”) warrants that,
for a period of two (2) years from the date of purchase
(the “Warranty Period”), the equipment manufactured by
it will be free from defects in workmanship and materials
provided the equipment is used in the manner and in the
environment for which they were manufactured.
DISCLAIMERS AND LIMITATIONS
Other than as set forth above, Server Products specically
disclaims all express and implied warranties, including but
not limited to, warranties of merchantability and/or tness
for a particular purpose or use.
This warranty does not extend to repairs or alterations
undertaken without the prior written consent of Server
Products or for goods that are misused, abused or neglected or if the goods are not properly stored, maintained,
installed or operated.
Server Products shall not be liable for incidental, special,
indirect, exemplary, punitive or consequential damages
resulting from the use of the good or arising out of any
breach of this warranty; including but not limited to dam-
age to property or loss of prots or revenue.
CLAIMS ADMINISTRATION
All warranty claims must be made by calling our customer
service department for a return authorization during the
Warranty Period and any alleged defective unit must be
returned to Server Products factory, freight prepaid.
Upon receipt of any defective unit, Server Products, at its
option, may either: (i) replace any equipment proved to be
defective, (ii) remedy or repair such defect or (iii) refund
the purchase price of the defective equipment in the form
of a credit applicable to future purchases. Server Products
obligation and Buyer’s sole remedy will be limited to these
options. In the case of units or parts purchased by Server
Products from a third-party supplier: Server Products’ obligation and Buyer’s sole remedy against Server Products or
Server Products’s suppliers shall not exceed the settlement
which Server Products is able to obtain from its supplier.
TROUBLESHOOTING
PROBLEMS WITH PUMP OPERATION AND/OR FLOW:
• Clean pump.
• Replace cylinder if necessary.
PUMP DISPENSES LITTLE OR NO PRODUCT.
• Product may be too stiff or contain a solid
that will not pass through pump.
• Install correct discharge tting for product
being pumped.
PRODUCT OOZES OUT AROUND LOCKING COLLAR.
• Be sure to compress pump and spring while
aligning ats on piston with ats inside
cylinder during assembly. Tighten locking
collar with pump compressed.
PORTION CONTROL IS NOT CONSISTENT.
• Inspect gaging collar for any damage and/or
proper installation.
PUMP PLUNGER DOES NOT RETURN TO TOP OF STROKE
AFTER DISPENSING PRODUCT.
• Inspect spring for any damage. If bent or
broken, spring may cause permanent damage
to cylinder. Replace spring if necessary.
PUMP DRIPS.
• Clean discharge tube and discharge tting
with supplied cleaning brushes.
• Ensure product is not being heated by any
external source(s) causing product to expand
and drip from pump.
CHECK BALL VALVES AND SEAL FOR ANY DAMAGE.
REPLACE BALL VALVES AND SEAL IF NECESSARY.
• Make sure ball valves are installed correctly.
Balls must be facing downward with at of
valve facing upward.
GENERAL SERVICE, REPAIR, OR
RETURNS
Before sending any item to Server Products for service, repair, or return, contact Server Products customer service to
request a Return Authorization Number. Merchandise
must be sent to Server Products with this number.
Merchandise being returned for credit must be in new
and unused condition and not more than 90 days old and
will be subject to a 20% (percent) restocking charge.
Electrical parts (thermostats, heating elements etc.) are
not returnable.
Server Products maintains a fully staffed service department with highly skilled factory trained personnel. Service
is extremely prompt. Under normal circumstances, a repaired unit is shipped out the day after it is received. Labor
charges are reasonable.
SERVICE
Contact your dealer or Server Products Inc.
customer service department for the following:
ORDERING REPLACEMENT PARTS
Be prepared to give this information:
• Model Letters/Name/Numbers
• Part Numbers- P/N
• Series Numbers/Letters
• Part Description
This information and other important data is stamped on
the lid or cylinder of pumps or on the bottom or back side
of every unit.
Server Products Inc.
3601 Pleasant Hill Road
Richfield, WI 53076 USA
262.628.5600
800.558.8722
262.628.5110
spsales@server-products.com
www.server-products.com
 Loading...