

Page 1

Server Express
Pump
MODELS:
07604
07889
Used with pouches up to
1½ gallons with 16mm fitments.
™
Thank You
...for purchasing our Server Express™ Pump.
Express™ pouched condiment systems are sealed
and sanitary, achieve excellent evacuation and have
only a few parts for easy clean-up.
SIMPLIFY CONDIMENT MANAGEMENT— GO POUCHED
Page 2
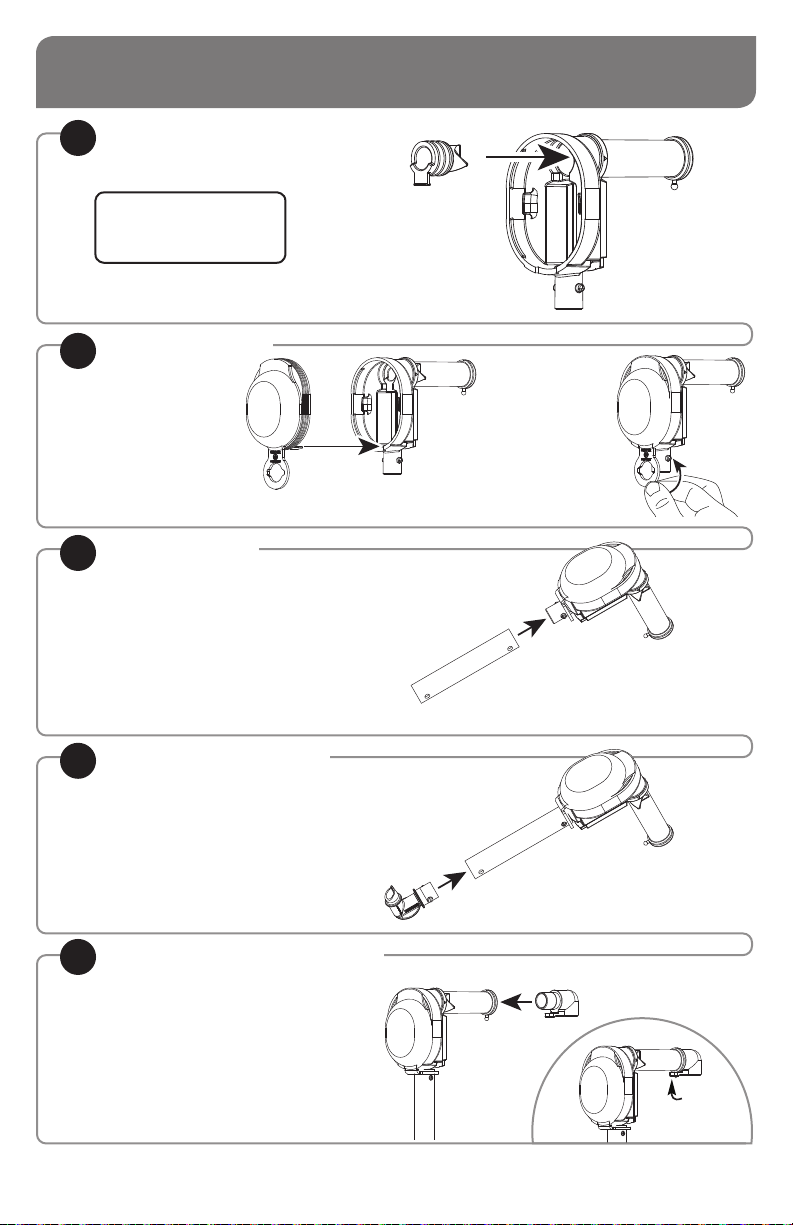
ASSEMBLY
INSERT PINCH VALVE
1
into pump housing.
TIP: Squeeze the pinch valve
open before installation to
ensure it isn’t stuck shut.
INSTALL DOME
2
Press dome into
housing fully.
Ensure valve flap
covers bottom
opening.
INSTALL TUBE
3
Lubricate with a small amount of clean water.
Rotate and position until both pegs on
housing fit into holes on tube.
WASH ALL PARTS
PROPERLY BEFORE USE. See page 3.
Wrap loop
around lower
opening to
secure dome.
4
5
Page 2
INSERT CONNECTOR
Lubricate with a small amount of clean water.
Rotate and position until both pegs on
connector fit into holes on tube.
Connector must point away from end of
discharge tube.
INSERT DISCHARGE FITTING
into pump housing discharge tube.
Place loop of fitting around peg on end of
discharge tube to secure.
Page 3

SAFETY DISASSEMBLY
IMPORTANT
Clean, rinse, sanitize, and dry parts daily or regularly
to comply with local sanitization requirements.
According to food and safety regulations, most foods
must be stored and/or served at certain temperatures
or they could become hazardous. Check with local food
and safety regulators for specific guidelines. Server
Products, Inc. cannot be responsible for the serving
of potentially hazardous product.
CLEANING
FLUSH & RINSE
1
all pump surfaces with hot water.
Place lower end of pump into container
of hot water and operate pump until all
remaining product is expelled and only hot
water is discharged.
DISASSEMBLE & CLEAN
2
all washable parts with soap and hot water.
Use brush to clean any confined areas.
RINSE fully with clear water.
3
SANITIZE
4
all parts according to local sanitization
requirements. All parts in contact with food
must be sanitized.
AIR DRY all parts fully.
5
YES!
Use dishwashing
soap, hot water
and nylon brush
• Dishwasher safe
• Do not use abrasive, caustic or ammonia
based cleansers.
• Do not use cleansing agents with high
concentrations of acid, alkaline or chlorine.
• Do not use metal scrapers or cleaning
pads that could scratch surfaces.
TROUBLESHOOTING
DIFFICULT TO ATTACH PARTS?
• Wet parts with clean water to help fit.
PRODUCT DOESN’T PUMP?
• Ensure pinch valve is inserted in housing.
• Ensure connector is snapped fully in place to
TIP: Squeeze the pinch valve
open before installation to
ensure it isn’t stuck shut.
fitment in pouch.
• Ensure pump is properly installed in unit.
• Clean pump thoroughly.
DOME POPS OFF?
• Clean thoroughly. Food residue could prevent
a tight seal between dome and housing.
• Ensure dome edges are flush with housing.
Page 3
Page 4

PUMP COMPONENT PART NUMBERS
PUMP PUMP PART
DOME
PINCH VALVE
07491
PUMP HOUSING
07388
TUBE
07089
CONNECTOR
07381
DISCHARGE
FITTING
MODEL DOME NUMBER
07604 BLUE 07399
07889 RED 07888
PUMP DISCHARGE PART
MODEL FITTING SIZE NUMBER
07604 .256, MEDIUM 07796
07889 .394, LARGE 07797
SERVER PRODUCTS
LIMITED WARRANTY
Server Products equipment is backed by a
two-year limited warranty against defects in
materials and workmanship.
For complete warranty information go to:
GENERAL SERVICE,
REPAIR OR RETURNS
Before sending any item to Server Products for service,
repair, or return, contact Server Products customer
service to request a Return Authorization Number.
Merchandise must be sent to Server Products with this
number. Service is extremely prompt. Typically, units
are repaired and ship out within 48 hours of receipt.
Merchandise being returned for credit must be in new
and unused condition and not more than 90 days old
and will be subject to a 20% restocking charge.
www.Server-Products.com
HELP or ORDERING REPLACEMENT PARTS
Server Products Inc.
3601 Pleasant Hill Road
Richfield, WI 53076 USA
262.628.5600 | 800.558.8722
SPSALES@SERVER-PRODUCTS.COM
Page 4
Please be prepared with the Part Numbers for your
items. Individual part numbers are listed above.
Manual #01767-RevB 012616
 Loading...