

Page 1
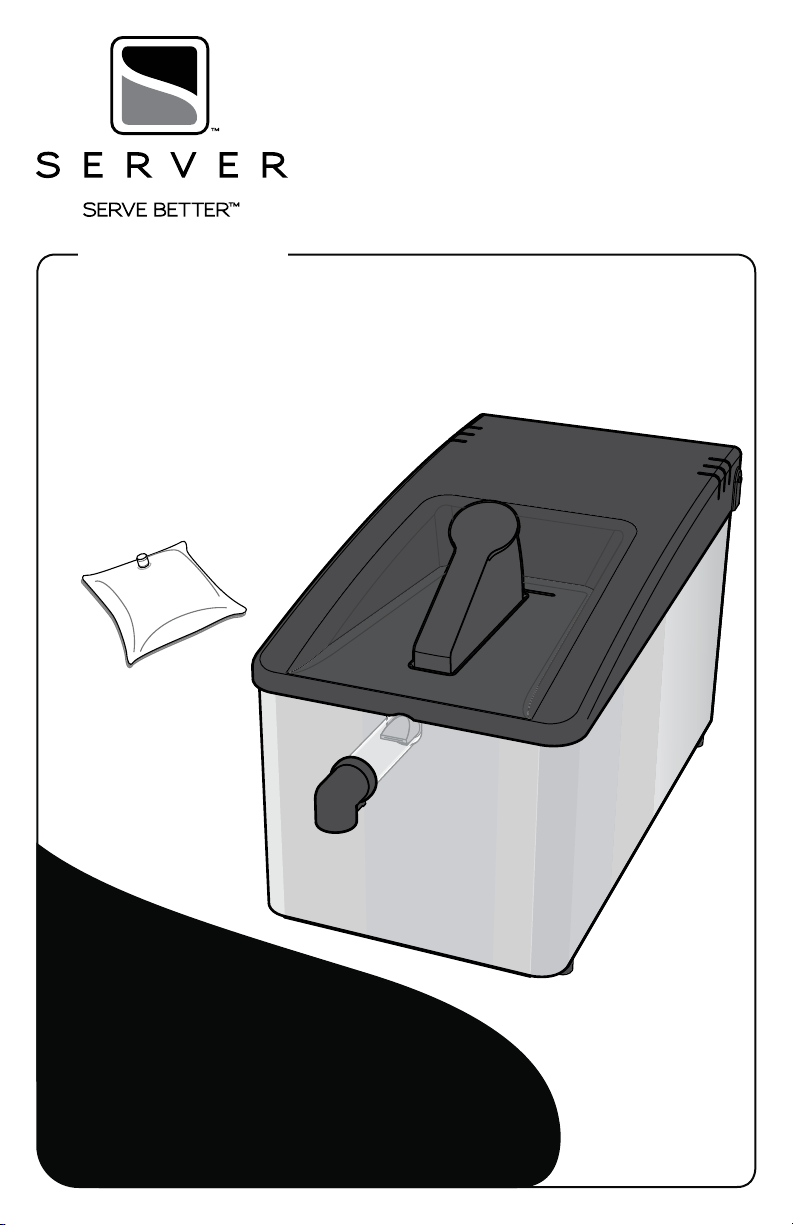
Extreme
™
Countertop Dispenser
MODEL: ECD
07500
07543 (CUSTOM)
Used with pouches up to
3 gallons with 38mm
threaded connector.
Thank You
...for purchasing our Extreme™ Countertop
Dispenser. This portion controlled, high-volume unit
is sealed and sanitary, achieves excellent evacuation
and has only a few parts for easy clean-up.
SIMPLIFY CONDIMENT MANAGEMENT— GO POUCHED
Page 2
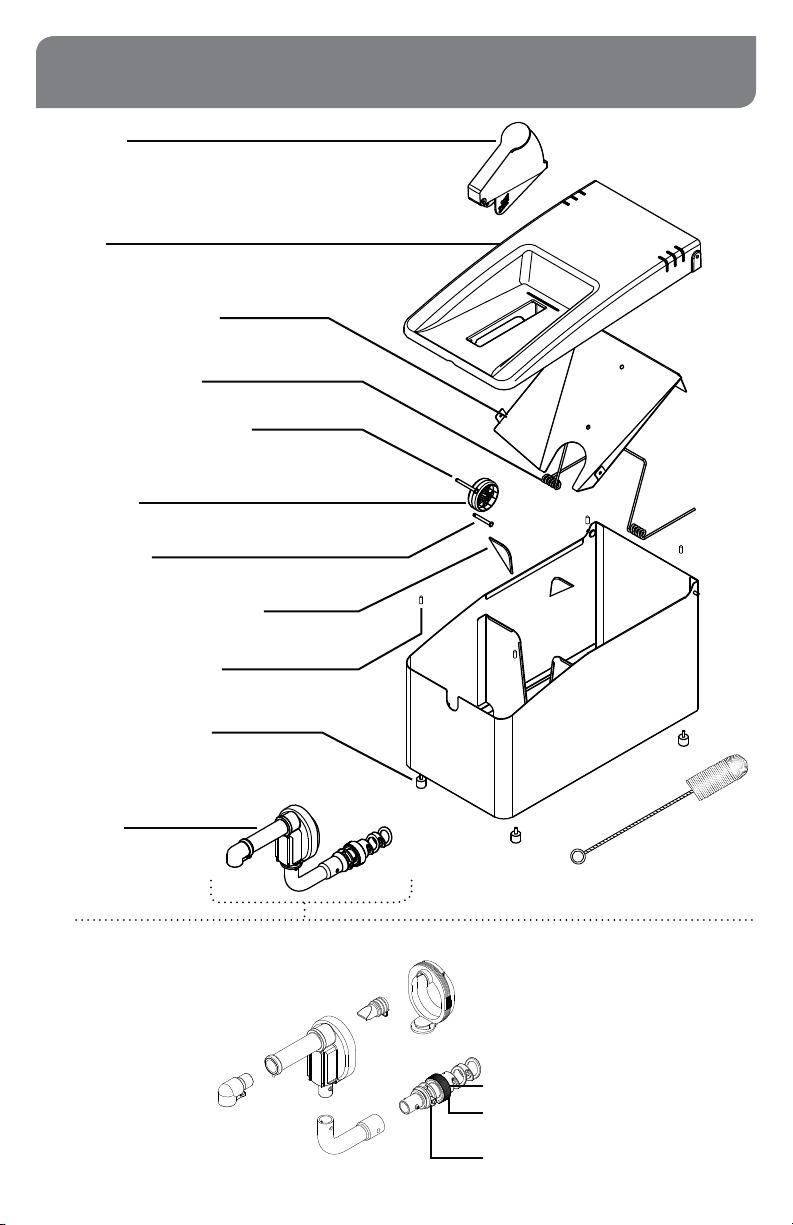
EXTREME™ DISPENSER PARTS
LEVER
07014
LID
07501
EVACUATION PLATE
07508
TORSION SPRING
07505
COTTERLESS HINGE PIN
81105
ROLLER
07056
HINGE PIN
07161
PROTECTIVE CORNERS (2)
07644
PROTECTIVE CAP (4)
86337
FOOT W/SCREW (4)
81058
PUMP
07518
PUMP PARTS
Page 2
DISCHARGE
FITTING
07796
PUMP
HOUSING
07388
HOSE
07502
PINCH
VALVE
07798
11" BRUSH
82049
DOME
07383
O-RING, 1-3/16"
85248
CAP
07517
CONNECTOR, ANTI-CHOKE
07507
Page 3
SAFETY
According to food and safety regulations, most
foods must be stored and/or served at certain
temperatures or they could become hazardous.
Check with local food and safety regulators for
specific guidelines. Server Products, Inc. cannot be
responsible for the serving of potentially hazardous
product.
IMPORTANT
Clean, rinse, sanitize, and dry parts daily or regularly
to comply with local sanitization requirements.
PORTION CONTROL
MAXIMUM PORTION IS
1 OZ PER PUSH
Adjustable in 1/4 oz increments
Hinge pin attaches roller to lever.
(Controls portion dispensed.)
NSF International lists this pump as:
“Not acceptable for dispensing potentially
hazardous foods.”
Install hinge pin through center
roller hole and desired portion
hole on lever.
Pin snaps into place.
1/4 OZ
3/4 OZ
1/2 OZ
1 OZ
Page 3
Page 4

PUMP ASSEMBLY
INSERT PINCH VALVE
1
into pump housing.
TIP: Squeeze the pinch valve
open before installation to
ensure it isn’t stuck shut.
INSTALL DOME
2
Press dome into
housing fully.
Ensure valve flap
covers bottom
opening.
INSTALL TUBE
3
Lubricate with a small amount of clean water.
Rotate and position until both pegs on
housing fit into holes on tube.
WASH ALL PARTS
PROPERLY BEFORE USE.
Wrap loop
around lower
opening to
secure dome.
See page 7.
4
5
Page 4
INSERT CONNECTOR
Lubricate connector with a small amount of clean water.
Rotate and position until both pegs on connector
fit into holes on tube.
INSERT DISCHARGE FITTING
into pump housing discharge tube.
Place loop of fitting around peg
on end of discharge tube to secure.
Page 5

UNIT SETUP
PREPARE POUCH
1
• Place condiment pouch on flat surface
with circular pouch fitment facing upward.
• Remove pouch cap.
ATTACH POUCH TO PUMP
2
• Insert pump connector into pouch fitment.
• Rotate locking collar clockwise to secure.
TIP: Make pump priming even easier.
Push condiment toward connector and
squeeze pump dome several times until
product is visible in pump.
INSTALL PUMP & POUCH INTO UNIT
3
• Place pouch in rear compartment of unit.
• Slide pouch connector grooves into unit
divider channel.
• Insert pump into slots inside front of unit.
WASH ALL PARTS
PROPERLY BEFORE USE.
See page 7.
SECURE POUCH
4
• Fold two back corners of pouch
over side walls.
• Close lid to secure pouch corners
for best product evacuation.
PRIME PUMP
5
Press lever several times until you see
product in discharge tube.
Page 5
Page 6

TAKE-DOWN & DISASSEMBLY
OPEN LID
1
REMOVE PUMP & POUCH
2
DETACH PUMP FROM POUCH
3
Rotate locking collar to release pouch.
IMPORTANT: Only throw away empty pouch.
Keep the pump connector.
FLUSH & RINSE PUMP
4
Place lower end of pump into container of
hot water. Pump until all remaining product
is expelled and only water flows from
discharge tube.
5
Page 6
DISASSEMBLE PUMP
Page 7

CLEANING
PUMP CLEANING
FLUSH & RINSE
1
all pump surfaces with hot water.
Place lower end of pump into container
of hot water and operate pump until all
remaining product is expelled and only hot
water is discharged.
YES!
Use dishwashing
soap, hot water
and nylon brush
DISASSEMBLE & CLEAN
2
all washable parts with soap and hot water.
Use brush to clean any confined areas.
RINSE
3
fully with clear water.
SANITIZE
4
all parts according to local sanitization
requirements. All parts in contact with food
must be sanitized.
AIR DRY
5
all parts fully.
UNIT CLEANING
• Pump is dishwasher safe
• Do not use abrasive, caustic or ammonia
based cleansers.
• Do not use cleansing agents with high
concentrations of acid, alkaline or chlorine.
• Do not use metal scrapers or cleaning
pads that could scratch surfaces.
PLASTIC LID:
Handwash Only
• External surfaces may be wiped clean with
a clean damp cloth.
• Glass and surface cleaners approved for
use in food contact areas may be used.
• Do not use abrasive, caustic or ammonia
based cleansers.
• Do not use metal scrapers or cleaning
pads that could scratch surfaces.
CARE OF STAINLESS STEEL
This unit is constructed
with stainless steel— one of
the best materials for food
serving and storage.
If you notice corrosion beginning on
any stainless steel surface, you may need
to change the cleansing agent, sanitizing
agent, or the cleaning procedures you
are using.
• A mildly abrasive nylon or brass brush may
be used to remove any stubborn food or
mineral deposits on interior surfaces of unit.
• Fully rinsing and drying all parts can help
prevent corrosion. Elements and minerals in
tap water can accumulate on stainless steel
parts and create corrosion.
• Do not use products containing acids,
alkalines, chlorine, or salt. These agents can
corrode stainless steel.
Page 7
Page 8

TROUBLESHOOTING
DIFFICULT TO ATTACH PARTS?
• Wet parts with clean water to help fit.
PRODUCT DOESN’T PUMP?
• Ensure pinch valve is inserted in housing.
• Ensure connector is snapped fully in place to
TIP: Squeeze the pinch valve
open before installation to
ensure it isn’t stuck shut.
fitment in pouch.
• Ensure pump is properly attached to pouch.
• Clean pump thoroughly.
• Ensure pump is properly installed into retaining
slots inside front wall of shroud.
DOME POPS OFF?
• Clean thoroughly. Food residue could prevent
a tight seal between dome and housing.
• Ensure dome edges are flush with housing.
SERVER PRODUCTS
LIMITED WARRANTY
Server Products equipment is backed by a
two-year limited warranty against defects in
materials and workmanship.
For complete warranty information go to:
www.Server-Products.com
NEED HELP?
Server Products Inc.
3601 Pleasant Hill Road
Richfield, WI 53076 USA
262.628.5600 | 800.558.8722
SPSALES@SERVER-PRODUCTS.COM
GENERAL SERVICE,
REPAIR OR RETURNS
Before sending any item to Server Products
for service, repair, or return, contact Server
Products customer service to request a Return
Authorization Number. Merchandise must be
sent to Server Products with this number. Service
is extremely prompt. Typically, units are repaired
and ship out within 48 hours of receipt.
Merchandise being returned for credit must be in
new and unused condition and not more than 90
days old and will be subject to a 20% restocking
charge.
Please be prepared with your Model, Part,
Series Number and Description.
This information is located on the base of the unit.
Individual Part Numbers listed on page 2.
Page 8
Manual #01725-RevH 062117
 Loading...