

Dot Matrix Fish finder
Operation Guide(TL58)
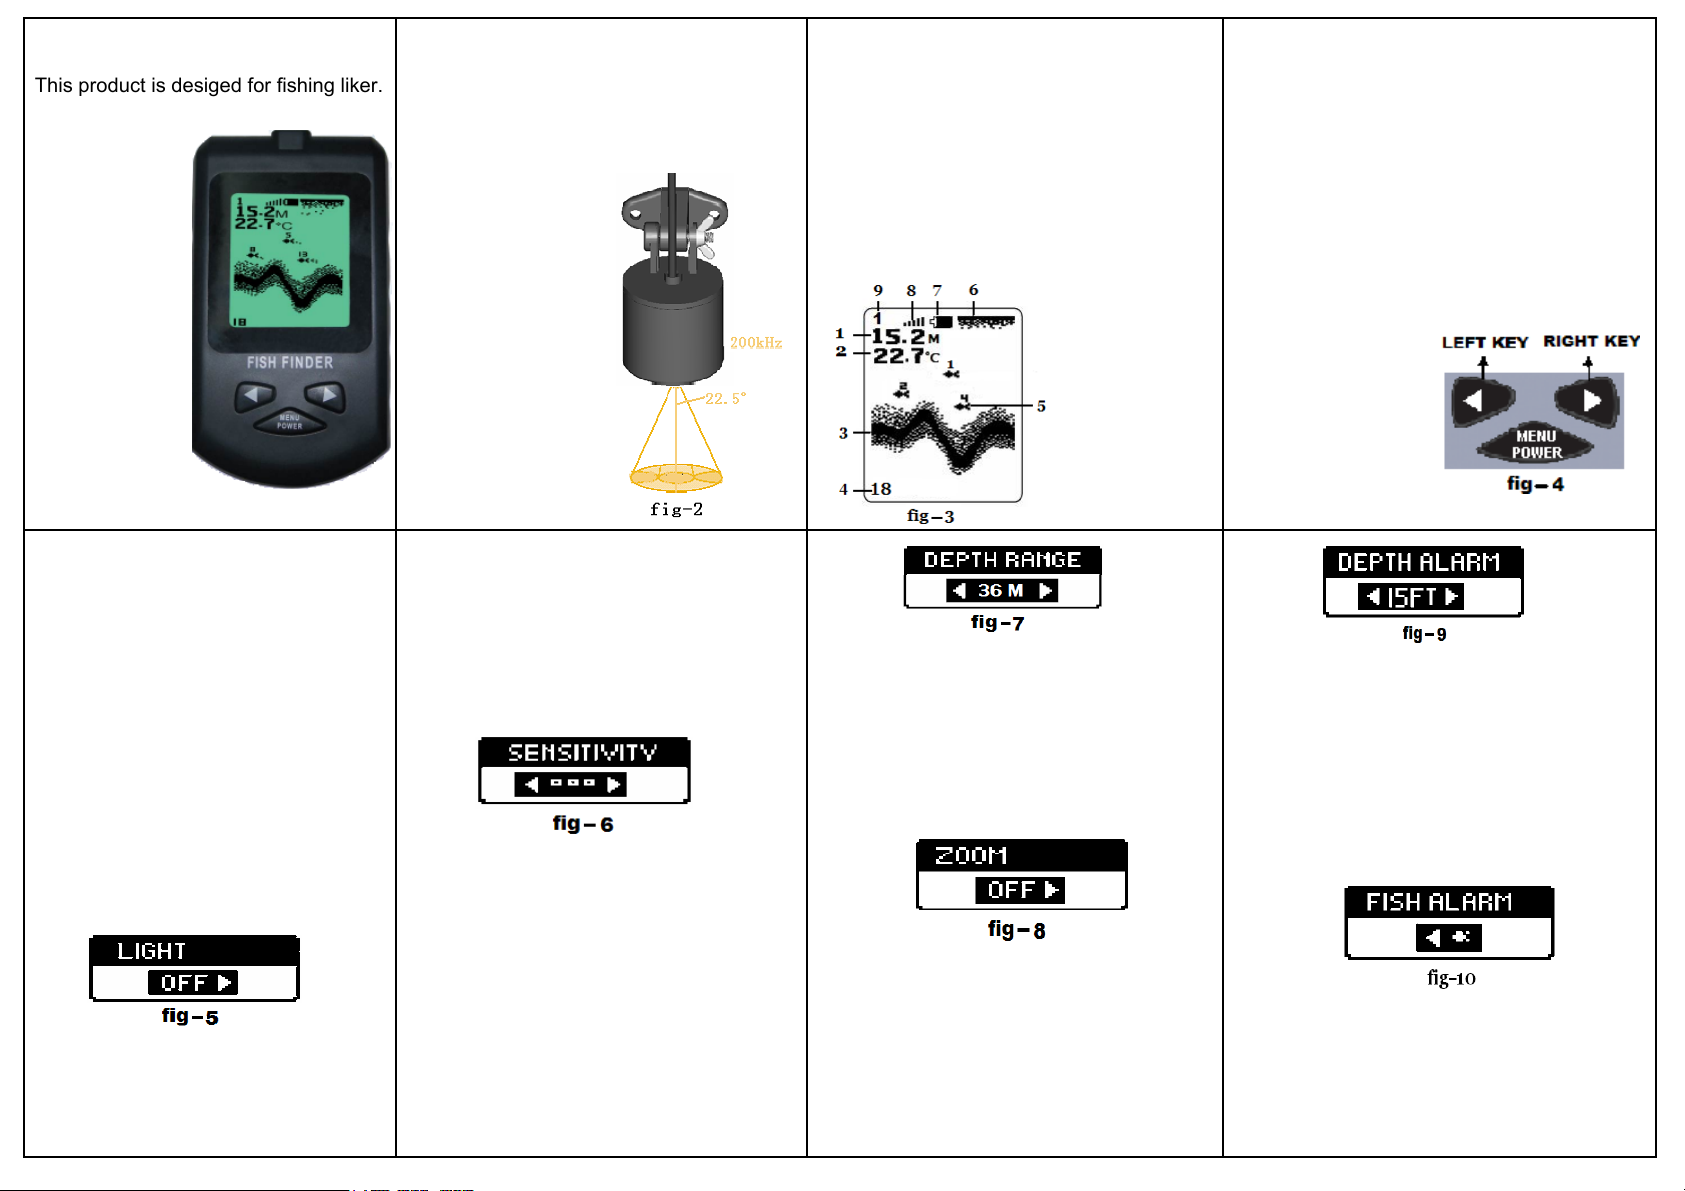
This product is desiged for fishing liker.
The unit can be used in the river,the
lake, or the sea.
It can help you
find out the fish
and measure the
depth of the water
.Especially,It can
bring pleasure to
you in fishing.If
you go fishing,you
need a helper!
. 1 .
fig-1
5.Parameter setting
The unit has a simple menu system.Through
Power/Menu key to select the parameter you
want,then use left/right key to set up the
parameter.When the unit at normal mode,
press any key will spring a menu.After 5
seconds the menu will disappear from the
screen.At normal mode,the unit will shut off
automatically within 5 minutes without
transducer.
5.1 Backlight setting
The unit has white LED backlight.You can
use it at night or under weak light.To extend
the battery life,please use the function only
when you really need it.
Operation:
press and release the"MENU"
key,until "light "is displayed on the screen
(fig-5).Through left/right key to turn on/off the
backlight.
5.2 Sensitivity setting
Sensitivity indicates the intensity of sonar
signal.The unit has 5-degree sensitivity for
user to select.Normally,if you want to get
2.Introduction to sonar theory:
Sonar technology is based on sound waves.
The system uses sonar to locate and define
structure bottom contour and composition,as
well as the depth under the transducer.The
transducer sends a sound wave signal and
determines distance
by
measuring transmission
time between the
transducer and the
detected object. then
uses the reflected
signal to interpret
.
location,size,and
composition of an
object.
. 2 .
more chances to detect the fish,you can choose
the higher sensitivity.User can select the
sensitivity as you want.When the water is shallow
or exist noise(made by ship's motor etc),you
should select low sensitivity.Thus the detection
will be more accurate.
press and release the"MENU" key,
Operation:
until "sensitivity "is displayed on the screen(fig-6).
Through left/right key to adjust the sensitivity.
5.3 Depth range setting
Depth range is the biggest depth of detect range.
The biggest depth detect rang is displayed at the
left of the bottom.If the detected rang is out of the
biggest rang,nothing will be displayed at the
location of depth.
Operation:
press and release the"MENU" key,
until "Depth range" is displayed on the screen
(fig-7). Through left/right key to adjust the depth
range.Select "AUTO" the Unit selects the depth
range automatically.At manual mode,the depth
range can be adjusted.The unit has 6 (4,9,18,36,
54,73M)ranges for consumer to select.
3.Display View
1.Water Depth
,
2.Water Temperature
3.Bottom Contour
4.Depth Range
5.Fish Icon with Depth
6.Water Surface Line
7.Battery Strength Indicator
8.Sensitivity Indicator
9.Upper Depth Range
. 3 .
5.4 Zoom on/off setting
Z
Zoom on/off function is off in default.When the
z
unit in zoom on,it will change the upper and lower
depth range constantly.Then keep the test area
just above upper and below the lower range .
press and release the"MENU" key,
Operation:
until "Zoom"is displayed on the screen(fig-8).
Through left/right key to adjust this function.
5.5 Depth alarm setting
Depth alarm is designed for user to set a number
(1-28M)of depth.When the test depth is equal or
less than the setting,it will alarm!
press and release the"MENU" key,
Operation:
until "Depth alarm"is displayed on the screen
(fig-9). Through left/right key to adjust the depth
alarm.
4.Key-Press Operation And Setting
POWER/MENU
Power/Menu key is a multi-function key.power on/off
the unit or menu selection will ues the key
Y
Left key
left key is a slecting key,only when the left arrow
is displayed,the key is active.
Right
Right key is a slecting key,only when the right arrow
is displayed,the key is active.
Key:
How to power on or shut off the unit :
Slide and remove the battery door,Install 4 AAA
batteries.
POWER/MENU key for 3
The start-up menu will
be displayed on the
screen.You can through
right key to enter
Simulation mode or
5 seconds later to enter
normal mode.Press
power/Menu key for 3
seconds,the unit will be
shut off.
Close the battery door completely.Press
seconds to turn power On,
. 4 .
5.6 Fish alarm setting
Fish alarm is turn on/off the alarm when the unit
detecting fish.When the fish alarm is on,it will alram.
If alarm is off,it won't alarm even if detecting fish.
User can setting this parameter according your own
needs.
press and release the"MENU" key,
Operation:
until "Fish alarm"is displayed on the screen
(fig-10).Through left/right key to adjust the fish
alarm.
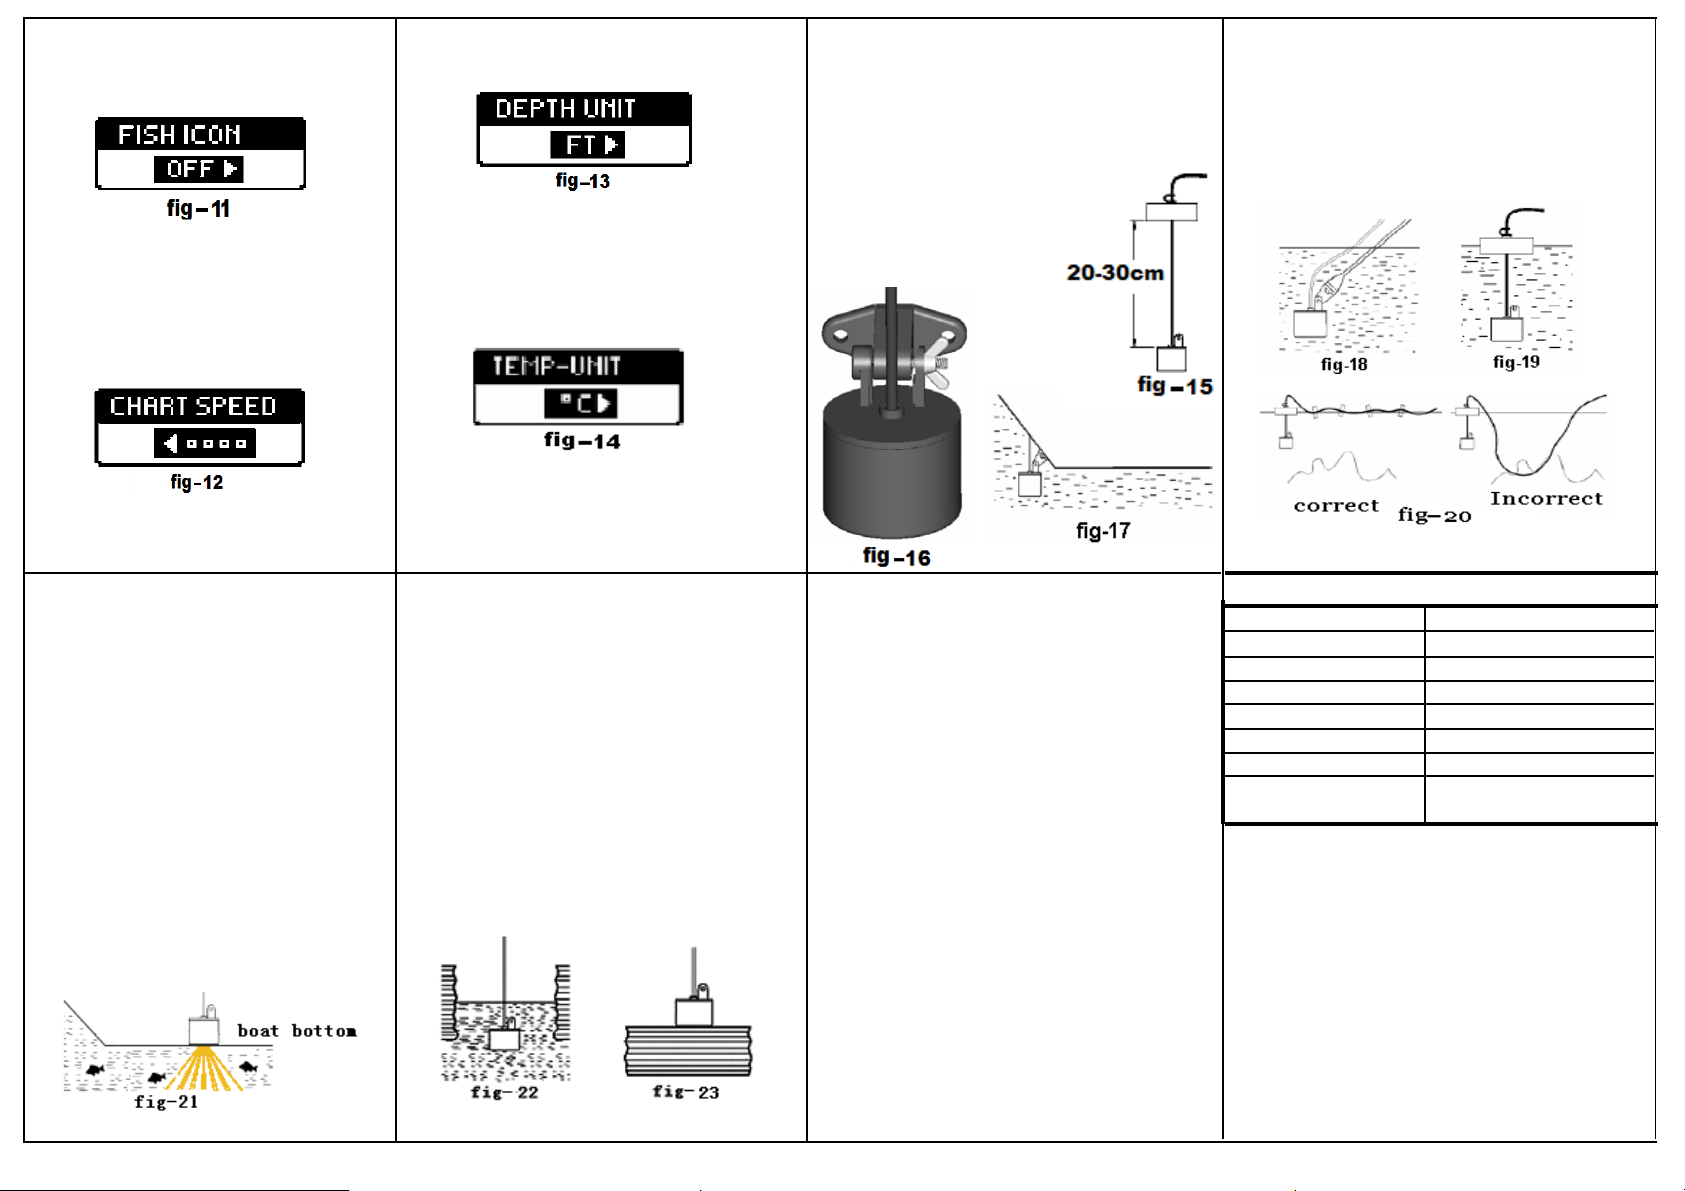
5.7 Fish Icon setting
"Fish Icon" is turn on/off fish icon when the unit
detecting fish.When the "fish Icon" is on,it will
display fish Icon with depth.If "fish Icon" is off,it
won't display even if detecting fish.
. 5 .
.6. . 7 . . 8 .
t
r
r
press and release the "MENU"
Operation:
key, until "Fish Icon"is displayed on the
screen(fig-11). Through left/right key to
adjust fish Icon on/off.
5.8 Chart Speed setting
"Chart Speed" is adjust the screen scan
speed.The unit have 4 grades("4" is the fast).
press and release the "MENU"
Operation:
key, until "Chart speed"is displayed on the
screen(fig-12), Through left/right key to
adjust scan speed.
5.9.Depth unit setting
Depth unit setting is the switch of depth unit.
. 9 .
Note:Incorrect using.Do not allow the cable
to sink into the bottom ,It maybe entangled
debris (fig-20).The float can be removed
from the cable. If you find that you do not
need it.Remove the rubber stopper from the
cable by siding and gently pulling the float
out off the cable toward the plug.
7.Fishing at the boat or on ice
7.1 Fishing at the boat
7.1.1Toss the sensor and float into the water
as the previous instructions.
7.1.2Attach the adapter to the boat hull
using the mounting tabs.
7.1.3"shoot- Thru" the hull of a boat. Place
the sonar sensor with petroleum jelly. and
press it against the hull bottom with a
twisting motion(fig-21.)
Note:If depth readings appear as "---"while
. 13 . . 14 .
press and release the "MENU"key,
Operation:
until "Depth unit"is displayed on the screen(fig-
13).Through left/right key to adjust depth unit.
5.10 Temperature unit setting
Temperature unit setting is the switch of
temperature unit.
press and release the "MENU"key,
Operation:
until "Temperature unit" is displayed on the
screen (fig-14).Through left/right key to adjust
temperature unit.
6.Fixing Sonar Sensor
6.1 Pull out the rubber stopper,adjust float so that
it is 20 to 30cm away from the sensor,or at your
desired depth.Replace the rubber stopper by
. 10 .
using one of these methods.Place the sonar
sensor directly in the water to verify that the fish
finder is operating properly. If it operates properly
while directly in the water.Reposition the sonar
sensor in a new location in the hull.and repeat
method 7.1.3. If it still does not work on all hull
and you maybe have to place the sensor directly
into the water for proper operation.
7.2 Fishing on ice
To achieve fishing on ice availability.It is highly
suggested that you cut a hole through the ice
and place the sonar sensor into the water directly
(fig-22).If you would like to check the area for
depth or fish before cutting a hole.Clear away
the snow from ice surface,making sure the
surface is smoolth.Place a small amount of liquid
pressing it firmly into the float.The Sensor float
must be adjusted so that It is a minimum of 20cm
away from the sensor(fig-15)
Toss the sonar sensor and float assembly
6.2
into water at your desired fishing location.To toss,
Place the sonar sensor and float in your hand,and
pitch underhand.Do not throw the cable, as this
maybe cause unrepairable
Before tossing,be sure that the cable
is free from tangle and is not
wrapped aroud anything.
6.3 Your fish finder includes
damage.
. 11 .
water on the ice.then set the sonar sensor on the
water allowing the water freeze around the unit
(fig-23).If there are any air bladder between the
sonar sensor and ice,or the water below the ice,
the unit will not work properly and will require to
try another spot or cut a hole in the ice to use.
Note:
To remove the sonar sensor from the freeze
ice ,tap sonar sensor gently at the base by your
hand.If it will not come loose,sprinkle a small
amount of water on the ice surface around the
base and repeat such actions until the sonar
sensor is easily moved.
Never use a blunt to strike the sonar sensor as
this may cause damage to the sensitive internal
electronics.
Cold weather is extremely hard on the electrical
components within the display housing .It is
suggested that you keep the unit in temperatures
above 0 degrees Fahrenheit(-18 degrees Celsius)
during operation.Remove the batteries from the
fish finder to prevent battery leakage and
corrosion.Clean the sonar sensor and cable with
fresh water and dry it off before storing.Do not
submerge or spray the fish finder screen
housing with water or use chemical to clean.
. 15 .
a combination adapter,mounting bracket for the
sonar sensor(fig-16).The adapter includes mounting
taps so that you can attach it to any flat surface or
boat hull (fig-17).and appropriate rod.The adapter
is removable and adjustable up to 180 degrees.
6.4 Use a pole to guide the sonar sensor to a
desirable position(Fig-18)or add floats on the cable
to float on the surface(Fig-19).
. 12.
8.Product specification
Display: FSTN - LCD
Backlighting:
White - LED
Power: 4-AAA alkaline batterie
Measure unit: feet /mete
Sensor beam angle: 45 degrees
Depth range Max: 73M/240Fee
Depth range Min: 0.6M/2 Feet
Operational
Temperature:
(-20℃-70℃)
9.Attachments:
1)Round transducer with 25ft cable
2)Transducer adapte
3)Stainless Bolt
4)Stainless wring nut
5)Neck strap.
6)product specification
. 16 .
 Loading...