

Serta Mid-Back Air, 44103 Assembly Instructions Manual

Mid-Back Air™ Chair
Silla Gerencia Aire
Assembly Instructions
Instrucciones de Ensamblaje
Model/ Modelo: 44103
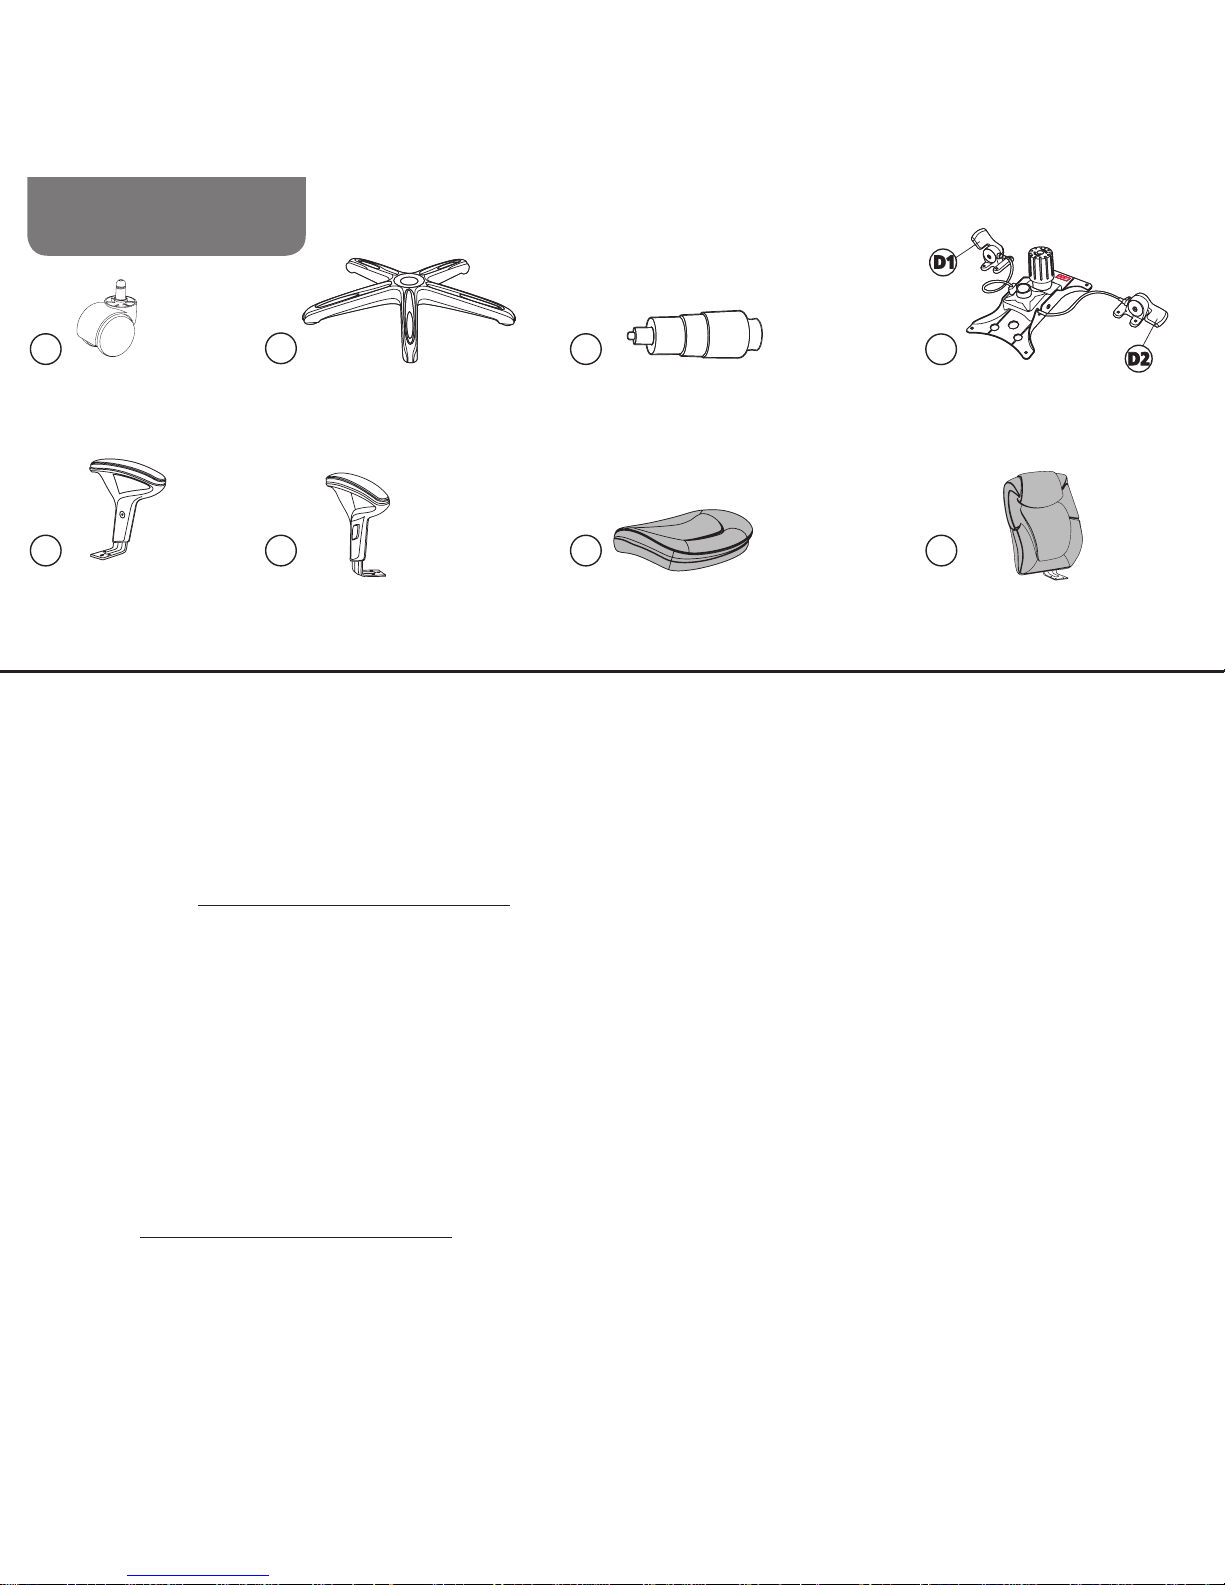
Parts/Partes
Casters
Ruedas
Quantity/cantidad: 5
Left Arm
Brazo izquierdo
Quantity/cantidad: 1
Chair Assembly Instructions
Carefully unpack all parts and identify them against the parts list before attempting to assemble. To avoid scratching the components,
assemble the chair on a protected surface.
Note: The casters sold with this chair are intended for use on carpet and not recommended for use on tile or hard wood floors. Using these
casters on tile or wood flooring may cause floor surface damage, so please consider purchasing a chairmat to protect your floor surfaces.
We are here to help if you have any questions, comments, or are in need of warranty replacement parts.
Visit our website at: www.truecustomersupport.com
Or call us toll free at: 1-855-372-2315
(Monday - Friday 6:00 am – 5:00 pm Pacific Time)
Instrucciones de ensamblaje
Desembale todas las partes con cuidado e identifíquelas usando la lista de partes antes de empezar el ensamblaje. Ponga la sillón sobre
una superficie protegida para evitar rayar los componentes al ensamblarlo.
Nota: Las ruedas que vienen con este sillón han sido diseñadas para pisos alfombrados. No es recomendable su uso en pisos de cerámica
o madera. Estas ruedas pueden causar daños en la superficie de los pisos de cerámica o madera, por lo que le sugerimos que coloque un
tapete debajo del sillón para proteger el piso.
Estamos aquí para ayudarle con cualquier pregunta, comentario, o necesidad de partes de repuesto de garantía.
Visítanos en: www.truecustomersupport.com
Por favor llámenos a nuestro
número gratuito: 1-855-372-2315
(Lunes-Viernes 6:00 am - 5:00 pm Horario Oficial del Pacífico).
Right Arm
Brazo derecho
Quantity/cantidad: 1
Seat Cushion
Cojín del asiento
Quantity/cantidad: 1
Star Base
Base en forma de estrella
Quantity/cantidad: 1
Gas Lift with Telescoping Cover
Elevador neumático y cubierta
telescópica
Quantity/cantidad: 1
Seat Plate
Mecanismo del asiento
Quantity/cantidad: 1
2
Back Cushion
Cojín del respaldo
Quantity/cantidad: 1
D
G
F
C
BA
E1 E2
3
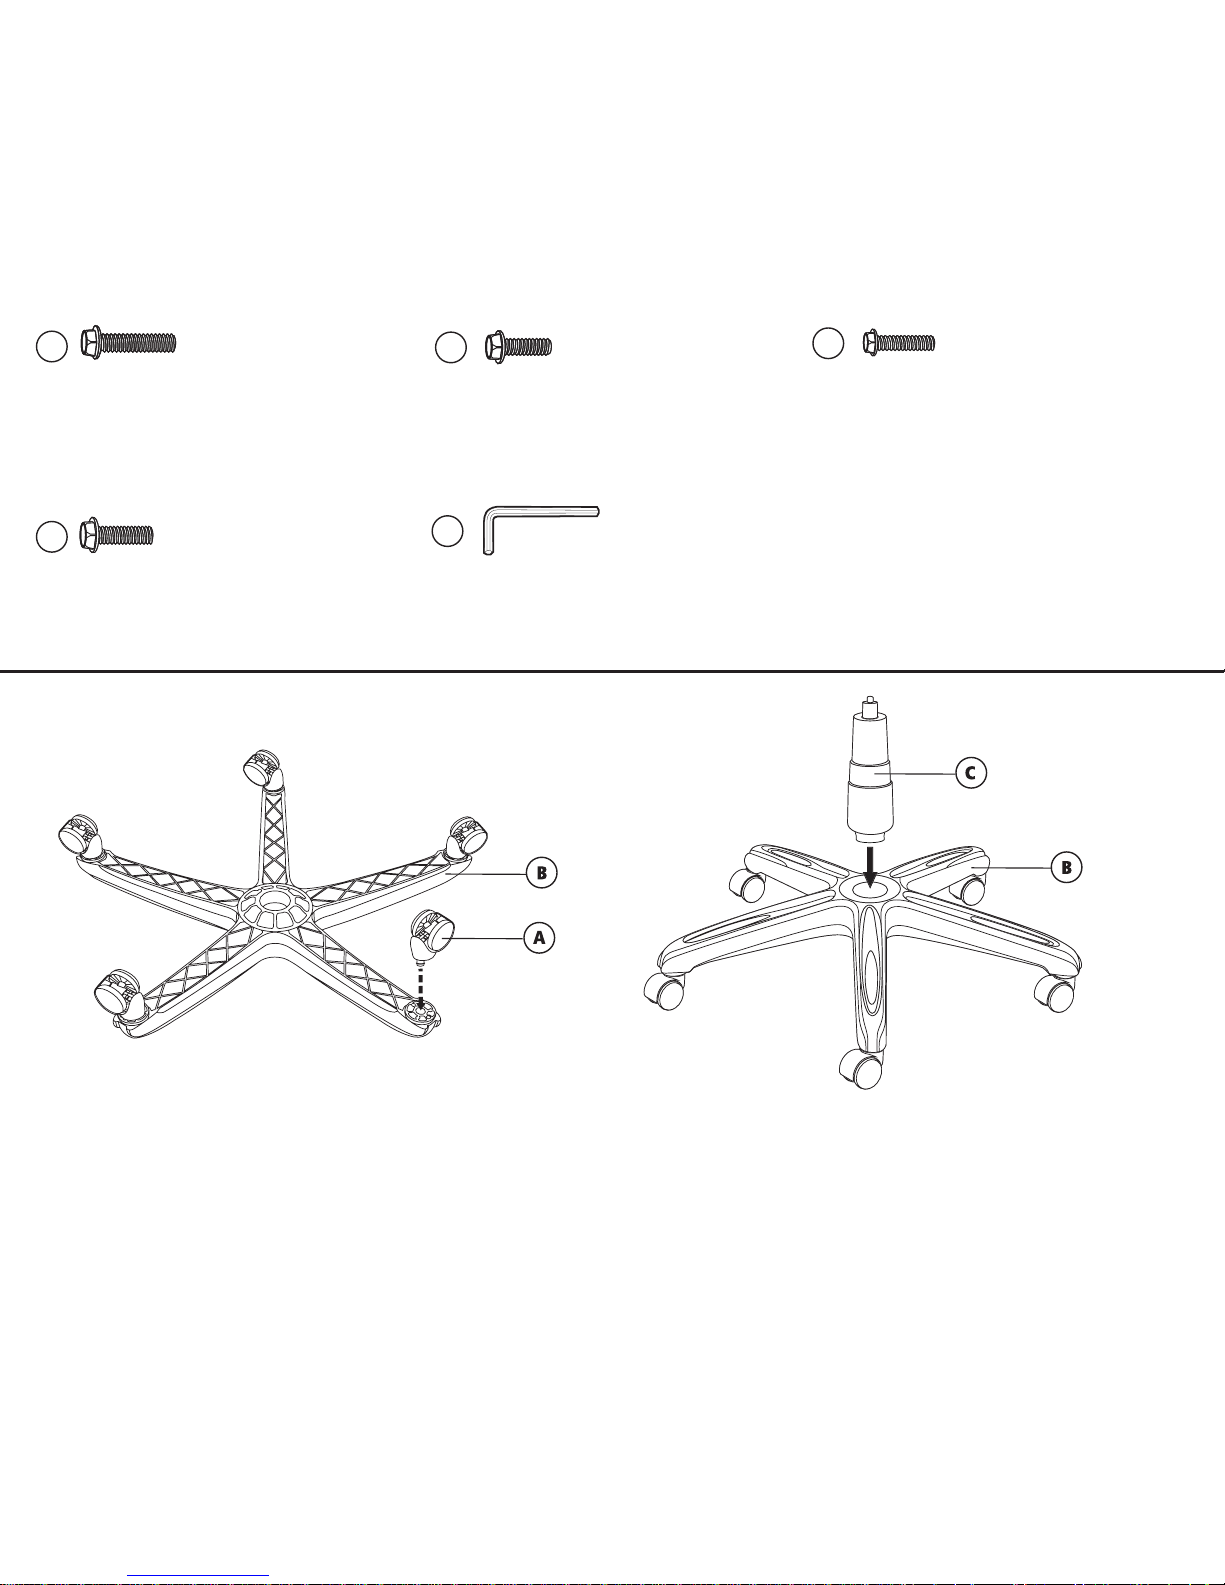
Step 1
Place the Star Base (B) upside down and insert
5 Casters (A) into the holes on the Star Base (B).
Paso 1
Ponga la base en forma de estrella (B) con las
patas hacia arriba e inserte las 5 ruedas (A) en
los hoyos situados en la base (B).
Step 2
Turn the Star Base (B) over and insert the Gas Lift
with Telescoping Cover (C) through the center hole
on top of Star Base (B).
Paso 2
Voltee la base en forma de estrella (B) e inserte el elevador
neumático con la cubierta telescópica (C) en el hoyo central
de la parte superior de la base (B).
1” Big Screws
Tornillos grandes de
25mm
Quantity/cantidad: 2
1-7/8” Big Screws
Tornillos grandes de
48mm
Quantity/cantidad: 2
1-1/4” Big Screws
Tornillos grandes de 32mm
Quantity/cantidad: 4
1-1/4” Small Screws
Tornillos pequeños de 32mm
Quantity/cantidad: 12
Allen Key
Llave allen
Quantity/cantidad: 1
J
H
I
K
L
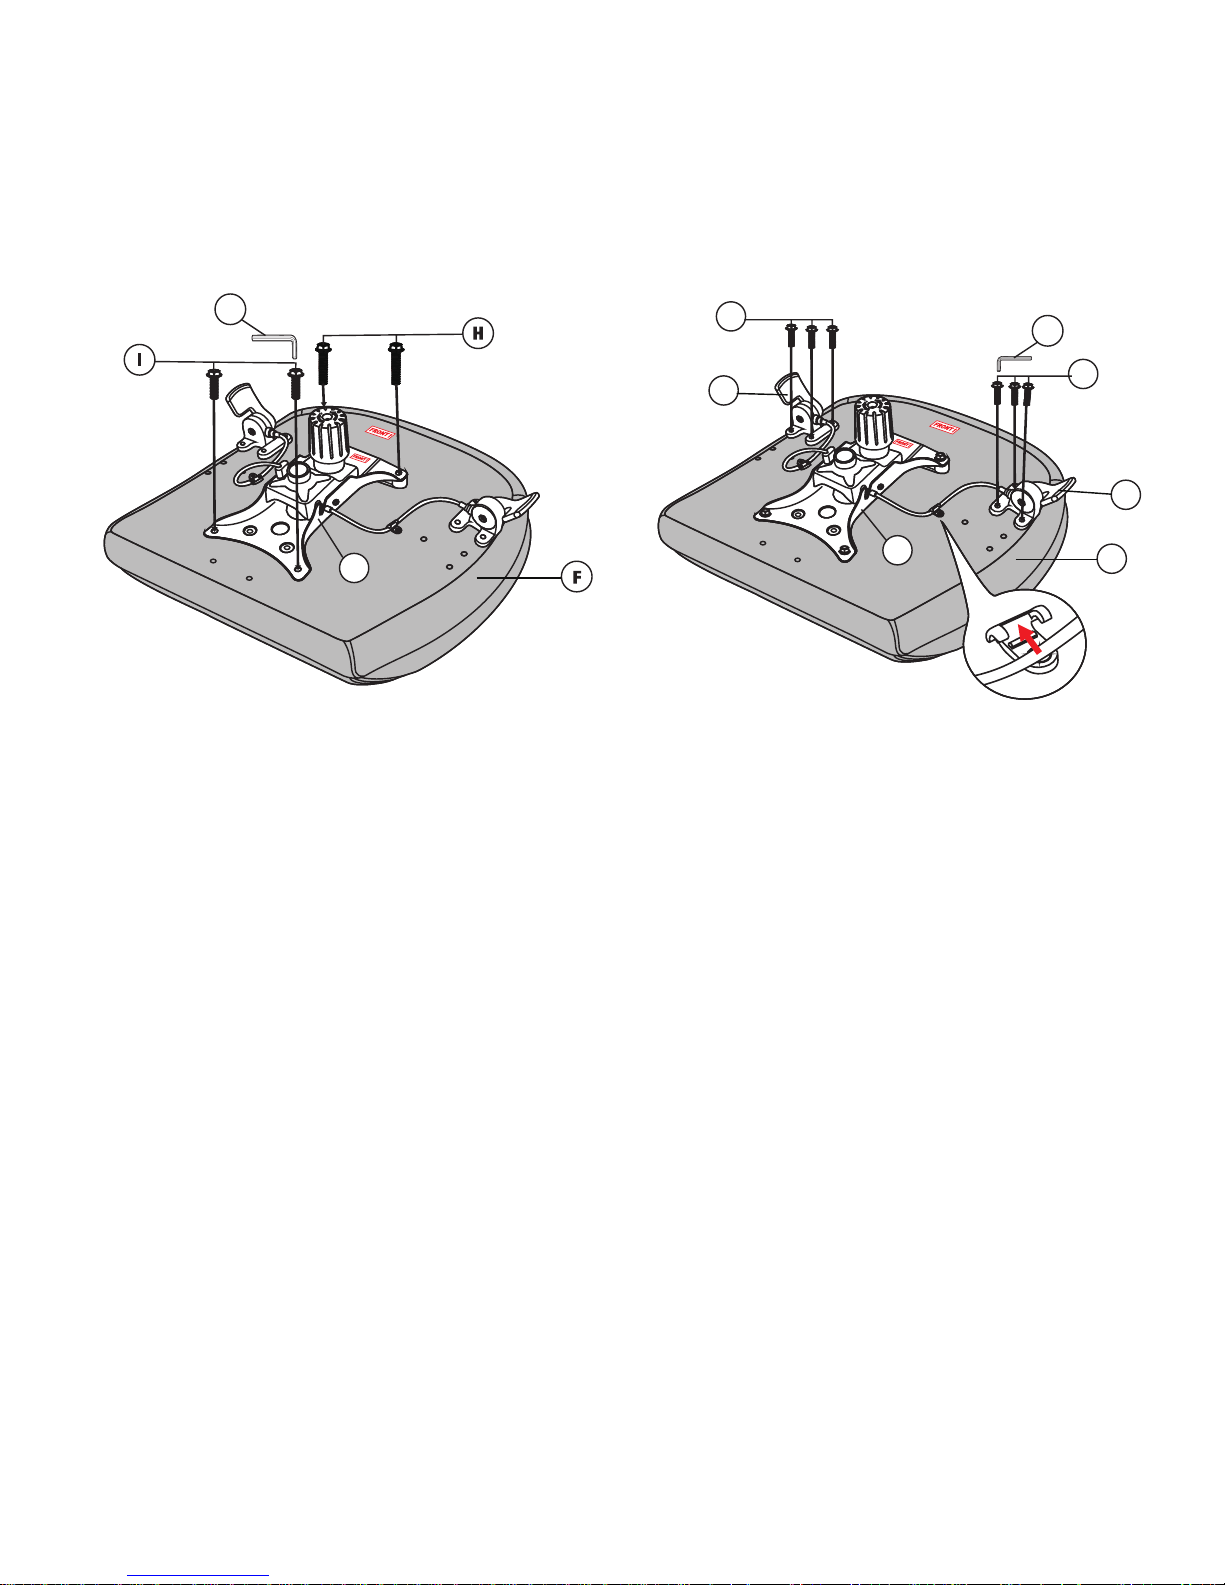
Step 3
Attach Seat Plate (D) to the bottom of the Seat Cushion
(F) (with the front of the seat plate facing the front of seat
cushion). Attach by using 1-7/8” Big Screws (H) for the front
holes of the Seat Plate (D) and 1” Big Screws (I) for the rear
holes of the Seat Plate (D) with the Allen Key (L).
*Note: Align the Seat Plate so the FRONT on the seat plate
matches the FRONT label on the bottom of the seat cushion.
Tighten the screws completely.
Paso 3
Fije el mecanismo del asiento (D) a la parte inferior del cojín
del asiento (F) (con el frente del mecanismo del asiento en
dirección del frente del cojín del asiento), insertando los tornillos
grandes de 48mm (H) en los hoyos anteriores del mecanismo
del asiento (D) y los tornillos grandes de 25mm (I) en los hoyos
posteriores del mecanismo del asiento (D) y ajústelos con la
llave allen (L).
*Nota: Alinee la plancha del asiento de forma que la parte
FRENTE de la misma coincida con la etiqueta FRENTE que
hay en la parte inferior del cojín del asiento. Ajuste los
tornillos completamente.
Step 4
Align Handles (D1 & D2) of Seat Plate (D) over pre-drilled
holes on the left and right on the underside of Seat Cushion
(F), attach the Handles (D1 & D2) to both sides of Seat
Cushion (F) by using 1-1/4” Small Screws (J) with the Allen
Key (L).
*Note: Tighten the screws completely. Fix the cable for the
seat plate into the plastic clips attached to the bottom of the
seat cushion.
Paso 4
Alinee las manijas (D1 y D2) de la placa del asiento (D) sobre
los orificios previamente perforados al costado izquierdo y
derecho de la parte inferior del asiento acojinado (F), fije las
manijas (D1 y D2) a ambos lados del asiento acojinado (F)
con tornillos pequeños de 32mm (J) y la llave allen (L).
*Nota: Ajuste los tornillos completamente. Fije el cable de la
placa del asiento a los sujetadores de plástico fijos a la parte
inferior del asiento acojinado.
4
D
L
F
D2
D1
J
J
L
D
D
 Loading...