

Page 1
The DV Rack Field Guide
Page 2

These words may be quite tiny but our lawyers still find deep meaning in
them:
DV Rack and its respective logos are trademarks of Serious Magic, Inc. All
other trademarks are the property of their respective holders. Patent pending.
Specifications, features, and prices are subject to change without notice. Some
images were simulated for print but reflect actual output of the product.
Please respect the copyrights of others.
No part of this manual may be distributed, transmitted, transcribed, stored in
a retrieval system, or translated into any human or computer language, in any
form or by any means without express written permission of Serious Magic.
Copyright Notice:
© 2004 Serious Magic, Inc. All Rights Reserved.
All DV Rack software and documentation are © 2004 Serious Magic, Inc. All
Rights Reserved. This document may not, in whole or in any part, be copied,
photocopied, reproduced, translated or reduced to any electronic medium or
machine readable format without prior written consent from Serious Magic,
Inc.
ii
Page 3

Foreword
Thank you for purchasing DV Rack. As you explore the powerful tool now in
your hands, you might guess that it could only have been created by passionate
video enthusiasts. You'd be right. We built DV Rack first and foremost because it's
a tool we wanted to use ourselves. Having done that, we're thrilled to now bring
it to others who share our passion for creating great video. Are you the kind of
person who stays in the movie theater until the end of the credits? Who listens to
the director's commentaries on DVDs? Who watches great movies more for inspiration than entertainment? If you're nodding your head, then DV Rack was made
for you.
At its heart, DV Rack was born from a simple idea. When computers became part
of the video editing process, a massive paradigm shift occurred. Our goal with
DV Rack is to unleash an equally seismic paradigm shift by introducing the
power of computers into the shooting process. DV Rack is comprised of ten components. However, as you use it, you’ll find that the whole is more than the sum
of its parts. The benefit of DV Rack is not ten separate functions; it’s the combination that provides the most important benefit, creative freedom. By automating,
integrating and streamlining so many technical aspects of production, DV Rack
lets you spend less time wrestling with your gear, and more time nurturing your
creative vision.
As videographers, part of our craft is learning to live with constant uncertainty.
As we work we are haunted by our doubts. Am I really getting the shot I think is
going to tape? Is the lighting going to hold up through DV compression? Was
there a continuity change between shots? Do I need to get one more take for
safety? Ending these doubts is one of DV Rack's most significant breakthroughs. It
dramatically elevates your confidence as you shoot, and that one thing can
change everything else. The feeling of freedom creeps up on you at first, then it
eventually becomes intoxicating. It inspires creativity, experimentation and even
serendipity. DV Rack may be difficult to define, but there’s no doubt that it is the
first of its kind. A unique tool that opens the door to uncharted, but tantalizing,
territory.
Like many pioneering technologies, inventing DV Rack required overcoming several mountain-sized hurdles. The journey ended up being harder than we'd imagined. However, the result also exceeded our highest hopes. For many, it would be
enough that DV Rack helps avert video disasters. That it lets you shoot faster
while maximizing the quality you get from your camera, lights and microphones.
But DV Rack can be more. Perhaps the words of one early DV Rack user say it
best, “I liked DV Rack immediately because it let me change how I shoot video.
Then I realized that it also changes how I feel when I'm shooting. That's when I
fell in love.” Our greatest hope is that DV Rack will do the same for you.
--- The DV Rack Team
P. S .
Let's talk! You can ask questions and discuss DV Rack directly with its creators
(and your fellow users) by discovering Serious Magic's best kept secret, our private user-only forums. Go to the support area at www.seriousmagic.com and use
your personal serial number to register. See you there...
iii
Page 4

DV Rack Documentation
• The DV Rack Field Guide - This Field Guide is designed to accompany
you on your shoot. It explains how to install the software and takes you
through the steps of setting up and calibrating your computer and camera.
It also teaches you about the software controls, (buttons and dials), guides
you through your most common shooting tasks and provides a few videography basics. If you’d like to find out more about a particular topic, press
F1 to search the Help system by keyword for additional information.
• The DV Rack User Guide PDF - The User Guide PDF file contains all of
the information from the Field Guide and more. The User Guide also
includes color images, clickable reference links, descriptions of less common tasks and additional shooting scenarios. The User Guide PDF file is
installed to the DV Rack folder on your hard drive and you can also download updates from the Serious Magic Web site.
• The DV Rack Help System - When you don’t have access to the Field
Guide or User Guide PDF, press the F1 key on your keyboard to access DV
Rack Help. Help contains all of the information from both the Field Guide
and the User Guide plus any updates.
iv
Page 5

Table of Contents
Installing and Starting DV Rack - - - - - - - - - - - -1
Set Up for Seriously Better Video- - - - - - - - - - - 3
Step 1 - Connect Your Camera and Start DV Rack - - - - - - - - - - - -3
Step 2 - Set Up to Color Bars - - - - - - - - - - - - - - - - - - - - - - - -4
Step 3 - Calibrate Your Camera with SureShot - - - - - - - - - - - - - - -5
Step 4 - Select a Native DV Format - - - - - - - - - - - - - - - - - - - - -6
Step 5 - Check Audio Levels - - - - - - - - - - - - - - - - - - - - - - - -7
Step 6 - Frame Your Shot - - - - - - - - - - - - - - - - - - - - - - - - - -7
Step 7 - Test Record - - - - - - - - - - - - - - - - - - - - - - - - - - - - -8
Improve Quality While Recording - - - - - - - - - - - 9
Use Zebra to Improve Lighting and Exposur - - - - - - - - - - - - - - - - 9
Analyze Your Clip Quality with DVR Clip Alerts - - - - - - - - - - - - - - - 9
Check Your Audio Signal for Consistency - - - - - - - - - - - - - - - - -10
Use the DVR to Review Clips - - - - - - - - - - - - - - - - - - - - - - - -10
Use Split Screen to Check for Consistency Between Clips - - - - - - - - -10
The DV Rack Software and Controls Overview - - - - 11
Window Controls - - - - - - - - - - - - - - - - - - - - - - - - - - - - - -11
The Scroll Bar - - - - - - - - - - - - - - - - - - - - - - - - - - - - - - -11
The Right-click Pop-up Menus- - - - - - - - - - - - - - - - - - - - - - - -12
The Field Monitor Buttons - - - - - - - - - - - - - - - - - - - - - - - - - -12
The Settings Menu - - - - - - - - - - - - - - - - - - - - - - - - - - - - -13
Changing Menu Settings - - - - - - - - - - - - - - - - - - - - - - - - -14
Using Dials - - - - - - - - - - - - - - - - - - - - - - - - - - - - - - - - - -14
Shortcut Keys - - - - - - - - - - - - - - - - - - - - - - - - - - - - - - - -14
Managing DV Rack Components - - - - - - - - - - - - - - - - - - - - -15
Adding Components - - - - - - - - - - - - - - - - - - - - - - - - - - -15
Removing Components - - - - - - - - - - - - - - - - - - - - - - - - -15
Arranging DV Rack Components - - - - - - - - - - - - - - - - - - - -15
Quitting DV Rack - - - - - - - - - - - - - - - - - - - - - - - - - - - - - -15
About Projects and Files- - - - - - - - - - - - - - - - - - - - - - - - - - -15
Managing Clips - - - - - - - - - - - - - - - - - - - - - - - - - - - - - - -16
Selecting a Clip File Format - - - - - - - - - - - - - - - - - - - - - - -16
Setting Default Clip Names - - - - - - - - - - - - - - - - - - - - - - -17
The “Clips in Use by DV Rack” Folder - - - - - - - - - - - - - - - - - -17
Using DV Rack Clip Files in Other Applications - - - - - - - - - - - - - -17
Removing Clips - - - - - - - - - - - - - - - - - - - - - - - - - - - - - -17
The DV Rack Components - - - - - - - - - - - - - 21
The Field Monitor - - - - - - - - - - - - - - - - - - - - - - - - - - - - - -21
Switching the Field Monitor between Clips and the Camera - - - - - -22
Using Zebra to Identify Light or Dark Areas in Your Picture - - - - - - -22
Framing Your Shot - - - - - - - - - - - - - - - - - - - - - - - - - - - -23
The Waveform Monitor - - - - - - - - - - - - - - - - - - - - - - - - - - -25
The Waveform Monitor Settings - - - - - - - - - - - - - - - - - - - - -26
v
Page 6

Table of Contents
Using the Waveform Monitor to Check for Dark and Bright Areas - - -26
The Vectorscope - - - - - - - - - - - - - - - - - - - - - - - - - - - - - -26
The DVR - Digital Video Recorder - - - - - - - - - - - - - - - - - - - - - -27
The Pre-Roll Recording Buffer - - - - - - - - - - - - - - - - - - - - - -27
Recording Clips - - - - - - - - - - - - - - - - - - - - - - - - - - - - - -28
Reviewing or Scrubbing Through Clips - - - - - - - - - - - - - - - - - -28
Creating and Editing Clip Notes - - - - - - - - - - - - - - - - - - - - -29
The Audio Spectrum Analyzer- - - - - - - - - - - - - - - - - - - - - - - -29
The Spectra 60 - - - - - - - - - - - - - - - - - - - - - - - - - - - - - - -30
The DV Grabber - - - - - - - - - - - - - - - - - - - - - - - - - - - - - - -30
Setting the Grabbed Still Pixel Ratio - - - - - - - - - - - - - - - - - - -30
Using the DV Grabber to Capture Still Images - - - - - - - - - - - - - -31
The DV Quality Monitor and Clip Alerts - - - - - - - - - - - - - - - - - - -32
Video Clipping Alerts - - - - - - - - - - - - - - - - - - - - - - - - - - -32
Audio Popping Alerts - - - - - - - - - - - - - - - - - - - - - - - - - - -32
Audio Clipping Alerts - - - - - - - - - - - - - - - - - - - - - - - - - - -33
Setting Clip Alert Thresholds in the DV Quality Monitor - - - - - - - - -33
The Shot Clock - - - - - - - - - - - - - - - - - - - - - - - - - - - - - - -33
Using the Shot Clock to Time Your Clips - - - - - - - - - - - - - - - - -34
Additional Ways to Improve Your Video - - - - - - - 35
Using the Audio Spectrum Analyzer to Analyze Audio Quality- - - - - - -35
Checking Audio Balance and Range - - - - - - - - - - - - - - - - - -35
Using Hold and Freeze to Analyze Audio - - - - - - - - - - - - - - - -36
Balancing Audio Between Two Microphones - - - - - - - - - - - - - -36
Improving Clip and Scene Continuity - - - - - - - - - - - - - - - - - - -37
Using the Clip List to Check Video Continuity - - - - - - - - - - - - - -37
Maintaining Consistent Color and Brightness Using a Green Screen- - - -38
Videography Basics - - - - - - - - - - - - - - - - 39
Color Bars - - - - - - - - - - - - - - - - - - - - - - - - - - - - - - - - - -39
White Balance and Why It’s Important - - - - - - - - - - - - - - - - - - -40
Zebra and How it Can Improve Your Video Quality - - - - - - - - - - - -41
A Different Breed of Zebra Using Dark Zebra to Preserve Shadow - - - - -41
Audio Clipping - - - - - - - - - - - - - - - - - - - - - - - - - - - - - - -42
Achieving Good Technical and Aesthetic Framing - - - - - - - - - - - -43
Overscan, Underscan and the Video Safe Area - - - - - - - - - - - -43
Technical Framing - - - - - - - - - - - - - - - - - - - - - - - - - - - -44
Aesthetic Framing - - - - - - - - - - - - - - - - - - - - - - - - - - - -44
Keeping Your Shot in Frame While Shooting - - - - - - - - - - - - - - -45
Zooming - - - - - - - - - - - - - - - - - - - - - - - - - - - - - - - - - - -45
Dynamic Range - - - - - - - - - - - - - - - - - - - - - - - - - - - - - - -45
vi
Page 7

Installing and Starting DV Rack
• Installing and Activating DV Rack
• Activating DV Rack
• Seriousmagic.com
• Starting DV Rack
Installing and Activating DV Rack
Thanks for purchasing DV Rack. Whether you are new to videography or a seasoned pro, we hope that DV Rack will save you time, energy, money, and perhaps
every once in a while, that ever-so-vital anatomical feature upon which you sit
when you get to your editing workstation.
1. Insert the DV Rack CD into your PC’s CD-ROM drive and wait for the
installation program to launch.
NOTE: If the program does not launch automatically, use the Windows Explorer to
view the contents of the CD and double-click the setup.exe file as follows:
1. Right-click the Windows Start button.
2. Click Explore and then click the CD-ROM drive icon.
3. Double-click the setup.exe file.
2. Follow the instructions in the Welcome window and then click Next.
If your system requires, the setup program will install or update DirectX and
other system components that you may need. You may be asked to restart
your PC. Setup will resume after restarting.
3. Click Yes to restart each time you are asked. This ensures that all system
components are installed in the correct order.
When all components have been installed, you’ll see the License Agreement.
4. Read the agreement and if you agree with the terms, click I Accept the
License Agreement and then click Next.
5. Enter your name, company name and email address if applicable, as well as
your Installation Key which you can find on your CD sleeve. Then click
Next.
NOTE: Please keep your Installation Key safe, as you will need it should you ever
reinstall the software.
6. When you are ready to begin the installation process, click Next and DV
Rack will be installed.
7. Click Finish and you are done!
The DV Rack icon will appear on your desktop.
Activating DV Rack
You will be asked to activate your software when you start DV Rack. Please
activate DV Rack within 7 days of installing it. Failing to activate after the 7th
Serious Magic DV Rack Field Guide
1
Page 8

day will not bring plague or pestilence but you will need to call Technical Support
to get up and running again. You can activate online or without an Internet
connection.
TIP: Should you fail to register by the 7th day, please call Technical Support and
recite this incantation to ward off said plague and pestilence: Wat ag Oof Ayam (3 times with
increasing intensity).
Activating with an Internet connection
1. When you see a message asking if you would like to activate now, click Yes.
2. You’ll see a message asking whether you have previously registered. If you
have registered one of our products such as Ultra or Visual Communicator
Studio, click Yes . Otherwise, click No.
• If you clicked No, fill out all the information in the fields provided. Then,
click the Activate button. You must include a first name, last name and valid
e-mail address. We respect your privacy and will NEVER misuse your
sacred e-mail address.
• If you clicked Yes, make sure the e-mail address listed matches the e-mail
address you previously registered and enter your Installation Key. Then,
click the Activate button.
NOTE: You can find your Installation Key on the DV Rack CD sleeve.
Activating without an Internet connection
If DV Rack does not detect an Internet connection at the time of activation, it will
present a screen with 3 choices:
1. Connect the current computer to the Internet and activate online.
2. Activate from another computer that is connected to the Internet.
3. Call Serious Magic Technical Support to activate.
If you choose option 1, connect your computer to the Internet and follow the steps
to activate online.
If you choose option 2, you will need a blank floppy disk or some type of external
write-able media to copy files between the two computers. Then, follow the
onscreen instructions to complete activation.
If you choose option 3, you will be given a telephone number and a series of
numbers to read off to a Serious Magic Representative. The representative will
then give you a set of numbers to enter.
Seriousmagic.com
You have free access to the carefully crafted information that we publish on our
web site and as a registered user you are more than welcome to visit our friendly
user forums. Get advice, share ideas and learn how others are using DV Rack.
Starting DV Rack
To run the program, double-click the DV Rack icon on your desktop. Or, click the
Windows Start button > Programs > Serious Magic > DV Rack.
2
Installing and Starting DV Rack
Page 9

Set Up for Seriously Better Video
• Step 1 - Connect Your Camera and Start DV Rack
• Step 2 - Set Up to Color Bars
• Step 3 - Calibrate Your Camera with SureShot
• Step 4 - Select a Native DV Format
• Step 5 - Check Audio Levels
• Step 6 - Frame Your Shot
•Step 7 - Test Record
This section is designed to get you on the road to shooting better video quickly.
“Before Recording” walks you through setting up to get great quality shots
before you hit the Record button. “Recording” tells you how to improve your
video while you’re rolling and review your clips for problems before leaving the
shoot. If you’d like to learn about each component in detail, see The DV Rack
Components and see Arranging DV Rack Components.
Step 1 - Connect Your Camera and Start DV Rack
1. Connect your camera’s FireWire cable to your computer.
2. Turn on your computer and ensure that your camera is plugged in or has
sufficient battery power.
If you’d like to simultaneously record to tape while recording to your hard
drive, insert a tape into your camera and use your camera’s record control.
NOTE: Some cameras may not support this functionality.
Turn your camera on and set it to Record/Camera mode.
3.
4. Double-click the DV Rack icon to load DV Rack. The picture from your
camera should now be displayed in the Field Monitor.
Serious Magic DV Rack Field Guide
3
Page 10
NOTE: When you start DV Rack with a live camera, by default, audio pass-through from
the camera to your computer speakers (or other audio output devices) is muted to prevent
feedback. To turn Auto Mute off, click the Menu button and set Auto Mute Camera to Off.
TIP: Position your computer screen at an angle which reduces the amount
of glare. When shooting in direct sunlight, you may want to consider using a
computer screen sunshade like this one for better visibility.
Step 2 - Set Up to Color Bars
Setting up to DV Rack Color Bars calibrates your computer screen to display levels of brightness, white and color that match what your camera records. This
important step ensures that what you see in DV Rack at the shoot is what you get
later in production. While you’re at the shoot, we recommend setting up to
Color Bars whenever lighting around your computer changes significantly. Also
see Color Bars.
NOTE: When adjusting settings on the DV Rack Field Monitor such as brightness, you are
changing how the Field Monitor displays the video. You are not changing or adjusting the
video signal itself. DV Rack always records the pure digital signal from your camera to the
hard drive just as it would be recorded to tape in the camera, (less any tape dropouts of
course!)
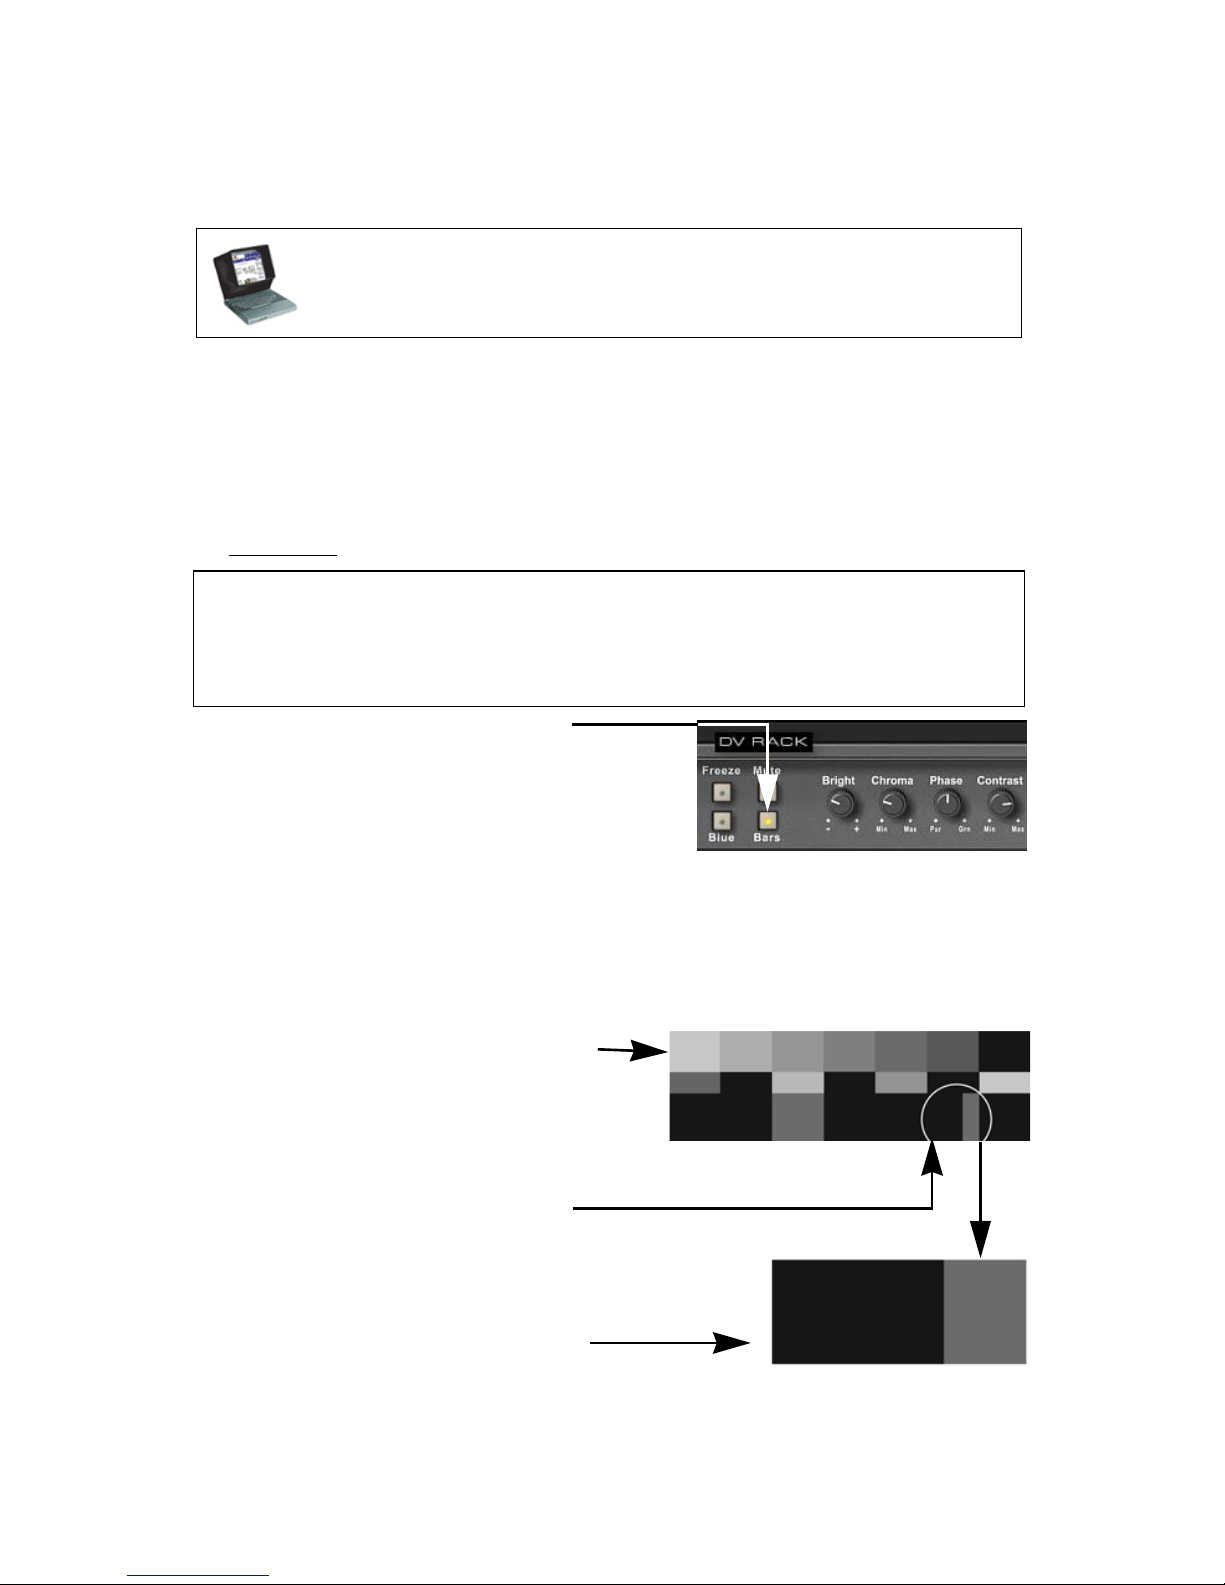
1. To display Color Bars, click the
Bars button.
2. Turn t he Chroma dial to the left
until all of the Color Bars become
black, gray or white.
3. Turn t he Contrast dial to the right
until all bars are distinguishable
in 7 different shades of gray. Try
to achieve a consistent gradient of
even steps from bar to bar. The
last bar at the far right should be
very dark gray, but not black. The
first bar should be light gray, not
bright white.
4. At the bottom of the 6th bar, there
are 3 small bars in varying shades
of dark gray to black. Turn the
Bright dial until you can barely
see a difference between the middle bar and the right bar, but cannot see a difference between the
left bar and the middle bar.
Keep adjusting the Bright dial
until the small bars look like this.
NOTE: Hold down the CTRL key
when turning dials to change the
value in smaller steps.
4
Set Up for Seriously Better Video
Page 11
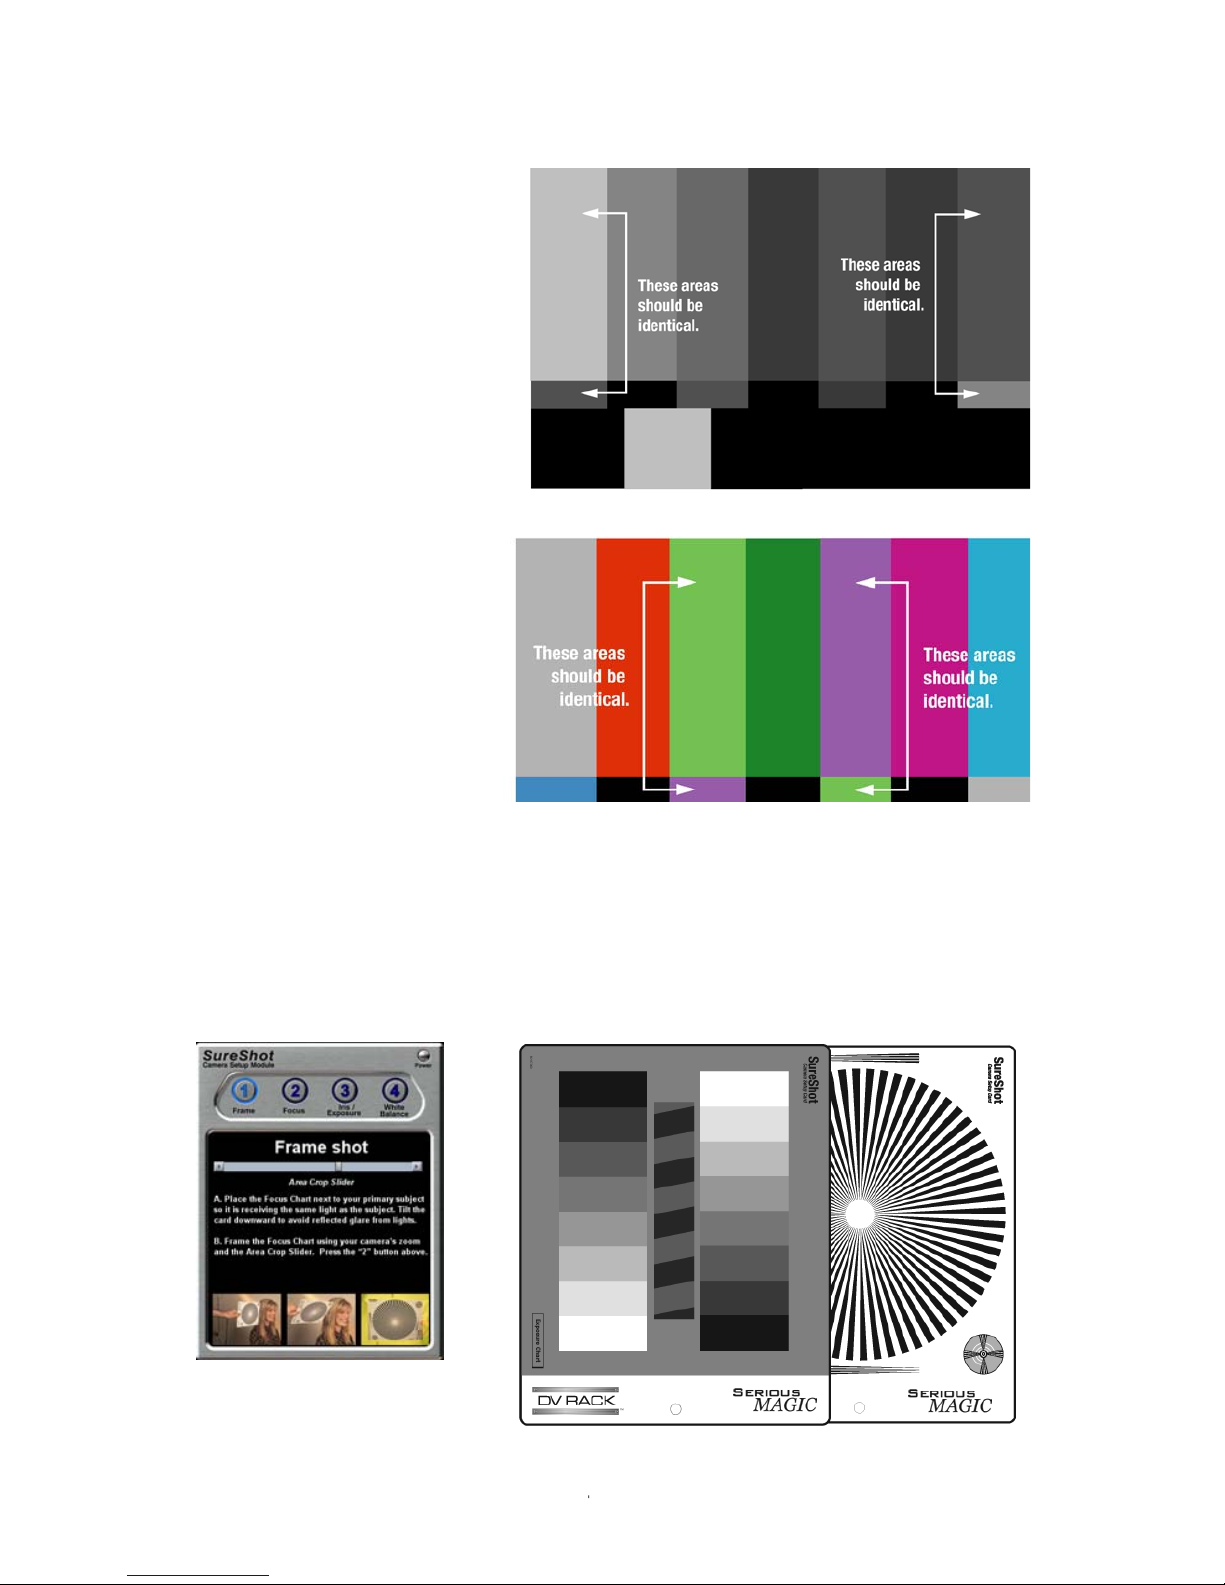
5. Click the Blue button.
6. Turn the Chroma dial
until both top and
bottom sections of the
outer bars are the
same shade of blue.
7. If needed, turn the
Phase dial until the
top and bottom of the
center bars are the
same shade of blue.
8. Click the Bars button
and the Blue button
again to turn these
features off.
Step 3 - Calibrate Your Camera with SureShot
Even the best and most expensive cameras are not worth their chips unless focus
and exposure are set accurately. You can get improved quality video even from
less expensive models if your camera exposure and scene lighting are calibrated
to record great dynamic range. The fastest way to calibrate your camera is by
using the DV Rack SureShot Camera Setup.
To order or replace SureShot
cards, visit seriousmagic.com.
Serious Magic DV Rack Field Guide
5
Page 12
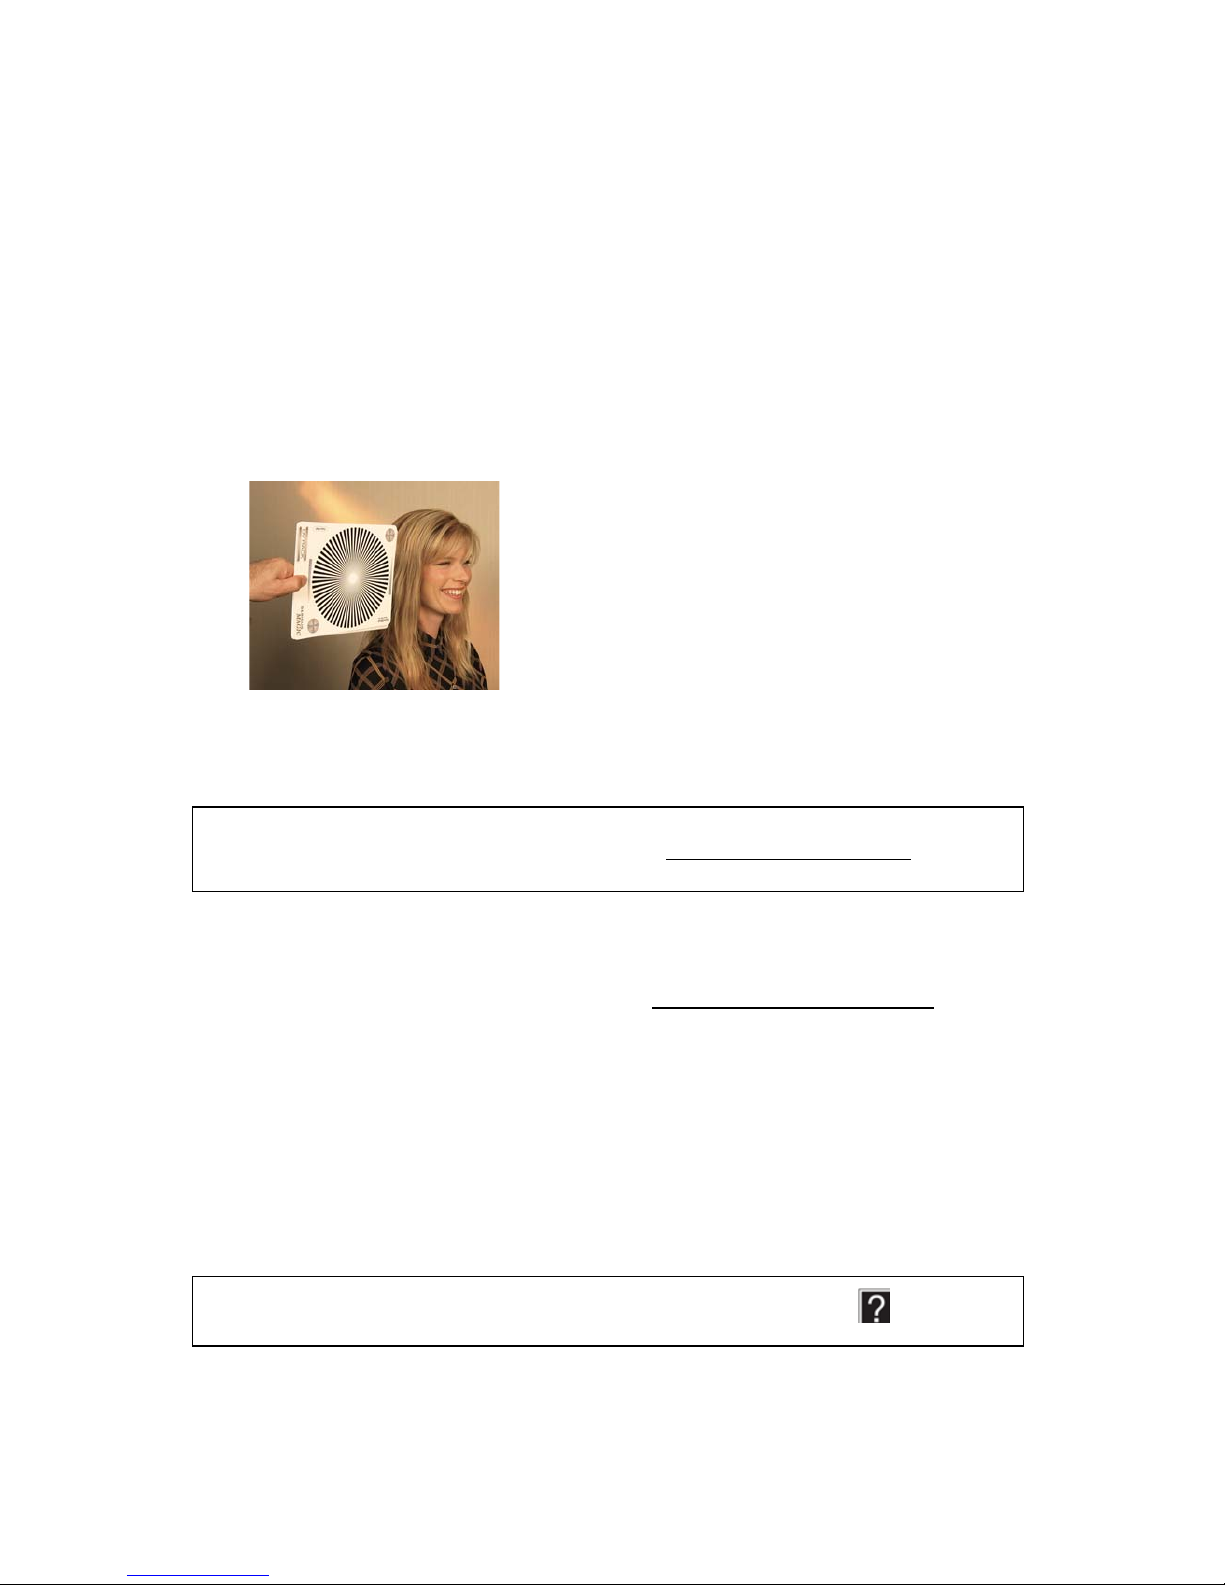
SureShot quickly walks you through these four camera calibration steps using the
Focus Chart, Exposure Chart and White Balance cards included with DV Rack.
• Frame your SureShot card
• Focus your camera lens
• Select the right camera iris exposure setting and lighting for your scene
• Select the best white balance setting on your camera
1. To begin, set up your camera and turn off any auto-focus and auto-white
balance features if your camera has them.
2. If you don’t see SureShot displayed, right-click and from the pop-up menu,
select Add Component and then SureShot.
3. Place the SureShot Focus Chart next to your subject so that it is the same dis-
tance from your camera lens as your subject.
4. Now, follow the remaining steps on the SureShot Wizard interface.
NOTE: You can also calibrate your camera manually using the Waveform Monitor,
Vectorscope and other DV Rack components. See The DV Rack Components
about these devices and how to use them.
to learn
Step 4 - Select a Native DV Format
Select a clip file format that is native to, or compatible with, your editing system.
If you’re not sure what format to choose, see Selecting a Clip File Format.
1. Click the Menu button and select Recorder Mode.
2. Drag the cursor to the right or left to select:
• T1 for Type 1 DV .avi files
• T2 for Type 2 DV .avi files (T2 is the default setting)
• QUIKTM for QuickTime .mov files
• CANOP for Canopus .avi files
3. Click the Menu button again to close the menu.
NOTE: Please check the Help system for other compatible file formats.
6
Set Up for Seriously Better Video
Page 13
Step 5 - Check Audio Levels
The Audio Spectrum Analyzer can help you create a better recording environment by showing you the tonal range of your audio. You can use this information
to determine better microphone placement and orientation. It can also be helpful
in setting the audio input levels on your camera since most cameras only display
the total volume of the signal. The Audio Spectrum Analyzer goes further by displaying how the audio energy is distributed across the dynamic range of the signal. This tool also provides a visual reference when directing your talent's vocal
performance. To learn more about analyzing your audio signal, see Using the
Audio Spectrum Analyzer to Analyze Audio Quality.
1. Place the microphone on your talent and turn it on. Take care not to place the
mic underneath a collar or too close or too far from the talent’s mouth.
2. Ask your talent to speak in a normal tone and volume. Guide them toward
the same volume levels and tone that they will use during recording. It's a
good idea to have your talent test words that represent a wide range of
sounds. Especially important to check are the “S” sound and the “P” sound.
3. If the audio is too “boomy” (toward the left side of the range) the micro-
phone may be too close to the sound source. Try pointing the microphone
slightly away from the sound source. If the audio is too thin or reedy
(toward the right side of the range) try moving the microphone closer or
reorient it to point more toward the sound source.
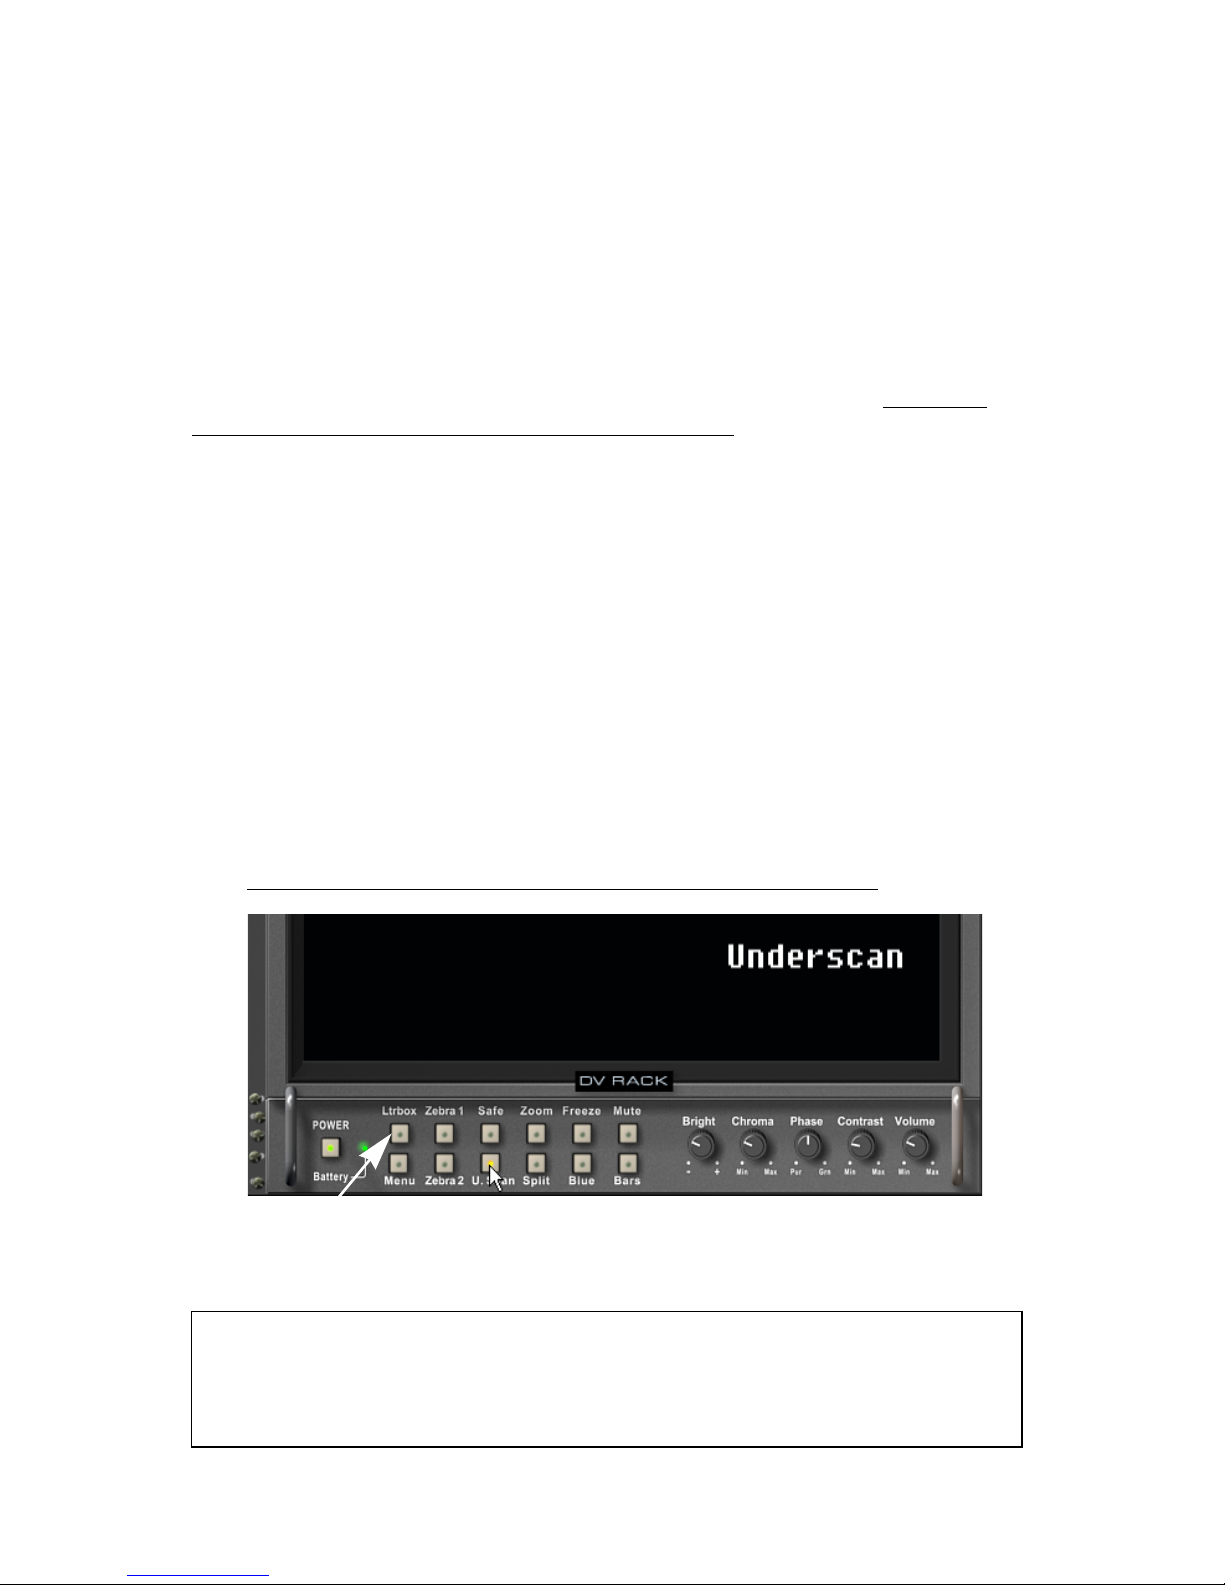
Step 6 - Frame Your Shot
1. View your video in Underscan, Overscan or Letterbox mode. Also, see
Using Underscan, Overscan and Letterbox to frame your shot.
Click the Ltrbox button to
view in Letterbox Mode
2. Click the U. Scan button to switch between U. scan and Overscan mode.
TIP: Pro video shooters often monitor in underscan mode so they can view the entire
recorded picture area to ensure no unintended objects enter the edges of the frame,
(such as a microphone). When viewing in U. Scan, click the Safe button to see the
“active picture area” outlined. Keep all important scene elements within this box
because anything outside this area will not be visible on many TVs.
The U. Scan button toggles between
Underscan and Overscan viewing
Serious Magic DV Rack Field Guide
7
Page 14
DV Rack has an optional grid overlay that
r
can be added to the Safe Area indicator.
This can be very useful when composing
shots. To learn how to turn these grids on,
see “Framing your Shot” on page 23.
The Field Monitor grid in Tickmark format
helps you frame your shot in thirds.
TIP: A frequently used composition principle is called “the Rule of Thirds”.
3. If you like, click the Menu button and turn Grid Mode on to display a
framing grid.
4. Keep your shot in frame while shooting.
Here are some quick tips for keeping your shot in frame:
• Practice keeping your subject’s eye-line in frame by slightly panning up
or down. Try this a few times if needed before you actually hit the Record
button. People have a tendency to lean or shift about, even in a simple
“talking head” interview segment. If you need to re-frame, use a light
touch on the tripod handle.
• Avoid zooming in and out of your shot while recording. There are
situations when this effect is appropriate but in many cases it disorients
the viewer and can distract them from the content of the shot.
• As you frame each shot, question everything that appears in the shot. Is
every person and object present in the frame for a reason?
For tips on framing, see Aesthetic Framing
.
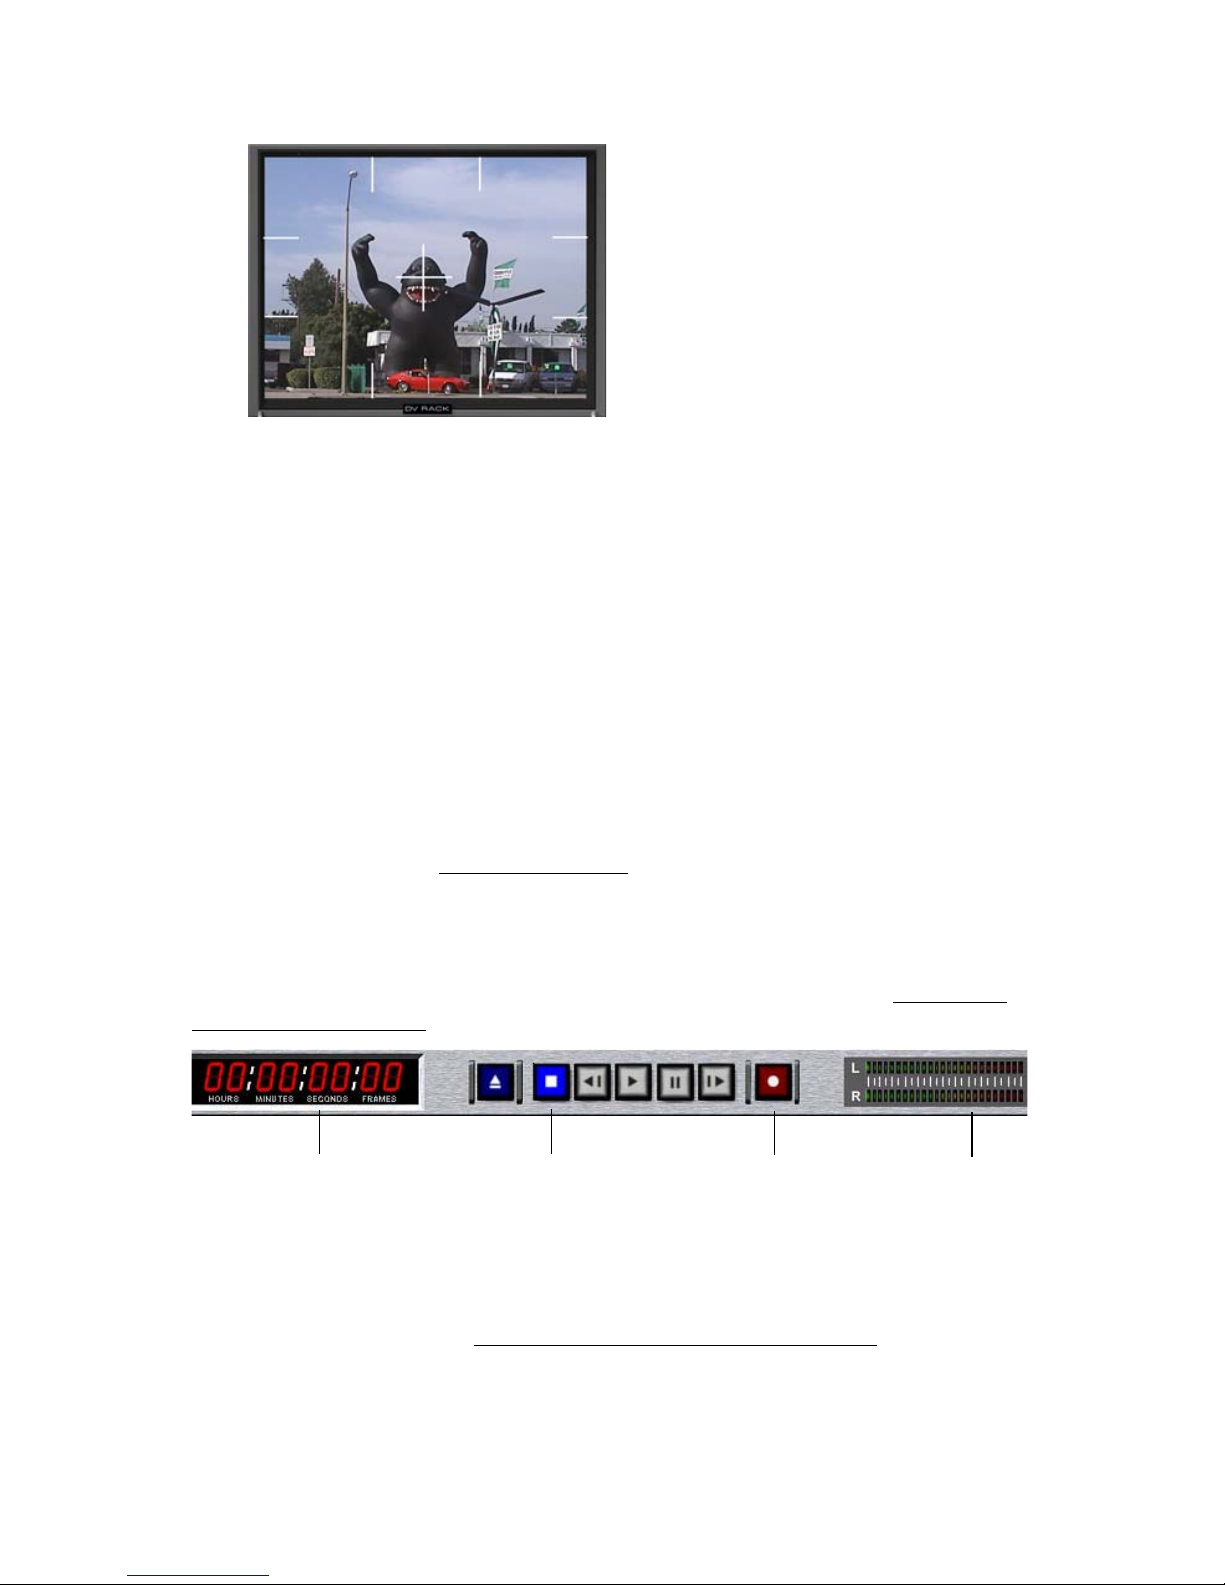
Step 7 - Test Record
Before you start recording, take a moment to record a test clip and become
familiar with the DVR buttons. To read an overview of the DVR, see The DVR Digital Video Recorder.
Frame counter Stop Record Audio Mete
• To begin recording, click the DVR Record button.
• To stop recording, click the Stop button. You can also click the Record
button again to quickly stop and start recording a new clip.
When you stop recording, the clip is automatically saved to the Clip List. To learn
more about using clips, see Reviewing or Scrubbing Through Clips
.
8
Set Up for Seriously Better Video
Page 15

Improve Quality While Recording
• Use Zebra to Improve Lighting and Exposure
• Analyze Your Clip Quality with DVR Clip Alerts
• Check Your Audio Signal for Consistency
• Use the DVR to Review Clips
• Use Split Screen to Check for Consistency Between Clips
Ok, you are ready to roll! Click the DVR Record button if you’re recording only to
your hard drive or press the record control on your camera if you are also recording to tape. (See DVR Slave to Cam to control recording from your camera.) Use
the Zebra patterns to identify any overly bright or dark areas in your picture. As
you record, keep an eye on your signal in the DVR for any Clip Alerts.
Use Zebra to Improve Lighting and Exposure
1. Click the Field Monitor Zebra 1 button to display a zebra stripe pattern over
the brightest areas of your video.
2. In the Field Monitor, evaluate your picture and look for areas that are too
bright. For example, “hot spots” on foreheads, reflective surfaces, etc.
• If you see the zebra pattern, your video may be too bright in these areas.
Close your camera iris down to reduce the amount of light in your video
or adjust the scene lighting.
• If you don’t see a zebra pattern, either you don’t have any areas that are
too bright or your thresholds are set too low. By default, Zebra 1 identifies
areas that have a level of 100 IRE or higher.
3. If you wish to change your brightness threshold or identify areas that may
be too dark, change your Zebra settings. To learn more,
4. Click the Zebra 1 button again to turn it off.
click here.
Analyze Your Clip Quality with DVR Clip Alerts
DV Rack provides you with problem alerts while you are still on location.
Decrease the number of fixes required in post-production by evaluating your signal for Clip Alerts.
Audio Clipping Alerts display as bright red bars at
the top (left channel) and
bottom (right channel) of
the signal.
Serious Magic DV Rack Field Guide
Video
Clipping Alerts
display as
yellow bars.
Audio Pop Alerts
display as dark
red boxes within
the signal.
9
Page 16

If you see Clip Alerts in your signal, make adjustments to your equipment or
talent, then re-record as needed. To learn more about Audio Clip Alerts, see
page 32.
Check Your Audio Signal for Consistency
Low audio levels are shown in the
signal where the talent’s head was
turned away from the microphone
for a short time.
• Visually check the clip's green audio waveform for any areas that may
represent unintentionally low audio levels. Flat or low signals can clue you
in to areas where the talent was mumbling or turned their head away from
the microphone. Scrub to these areas and play a few seconds to determine if
all or part of the clip needs to be reshot.
TIP: If you are not hearing the audio from your clips, make sure that the Field Monitor Mute
button is off and the volume is up on your PC speakers.
Use the DVR to Review Clips
Review your clips in the Digital Video Recorder. Click the desired clip in the DVR
Clip List to select it.
• To play a clip, click the DVR Play button.
• To s to p, click the Stop button. Clicking the Stop button will revert the
Field Monitor back to live camera input if a camera is connected and turned
on.
• To pause a clip, click the Pause button.
• To move to a particular spot in a clip, drag the cursor to the frame that you’d
like to start with and click to move the Scrub Bar to that frame. To learn
more about working with clips, click here.
Use Split Screen to Check for Consistency Between Clips
1. To split the Field Monitor window, click a clip in the Clip List or connect
your camera to display camera input in the monitor.
2. Click the Split button underneath the Field Monitor.
3. Click on a recorded clip in the DVR clip list and the Field Monitor will split.
The right half of the monitor will display the first clip or camera input and
the left half of the monitor will display the second clip that you selected.
For more information about improving continuity, click here.
To check for exact color matching, use the Spectra 60. Move the cursor over a
specific area in each clip and check the color space values for each sample in the
Spectra 60 window. For more information, see The Spectra 60
10
.
Improve Quality While Recording
Page 17
The DV Rack Software and
Controls Overview
• Window Controls
• The Right-click Pop-up Menus
• The Field Monitor Buttons
• The Settings Menu
• Using Dials
• Shortcut Keys
• Managing DV Rack Components
• Quitting DV Rack
• About Projects and Files
• Managing Clips
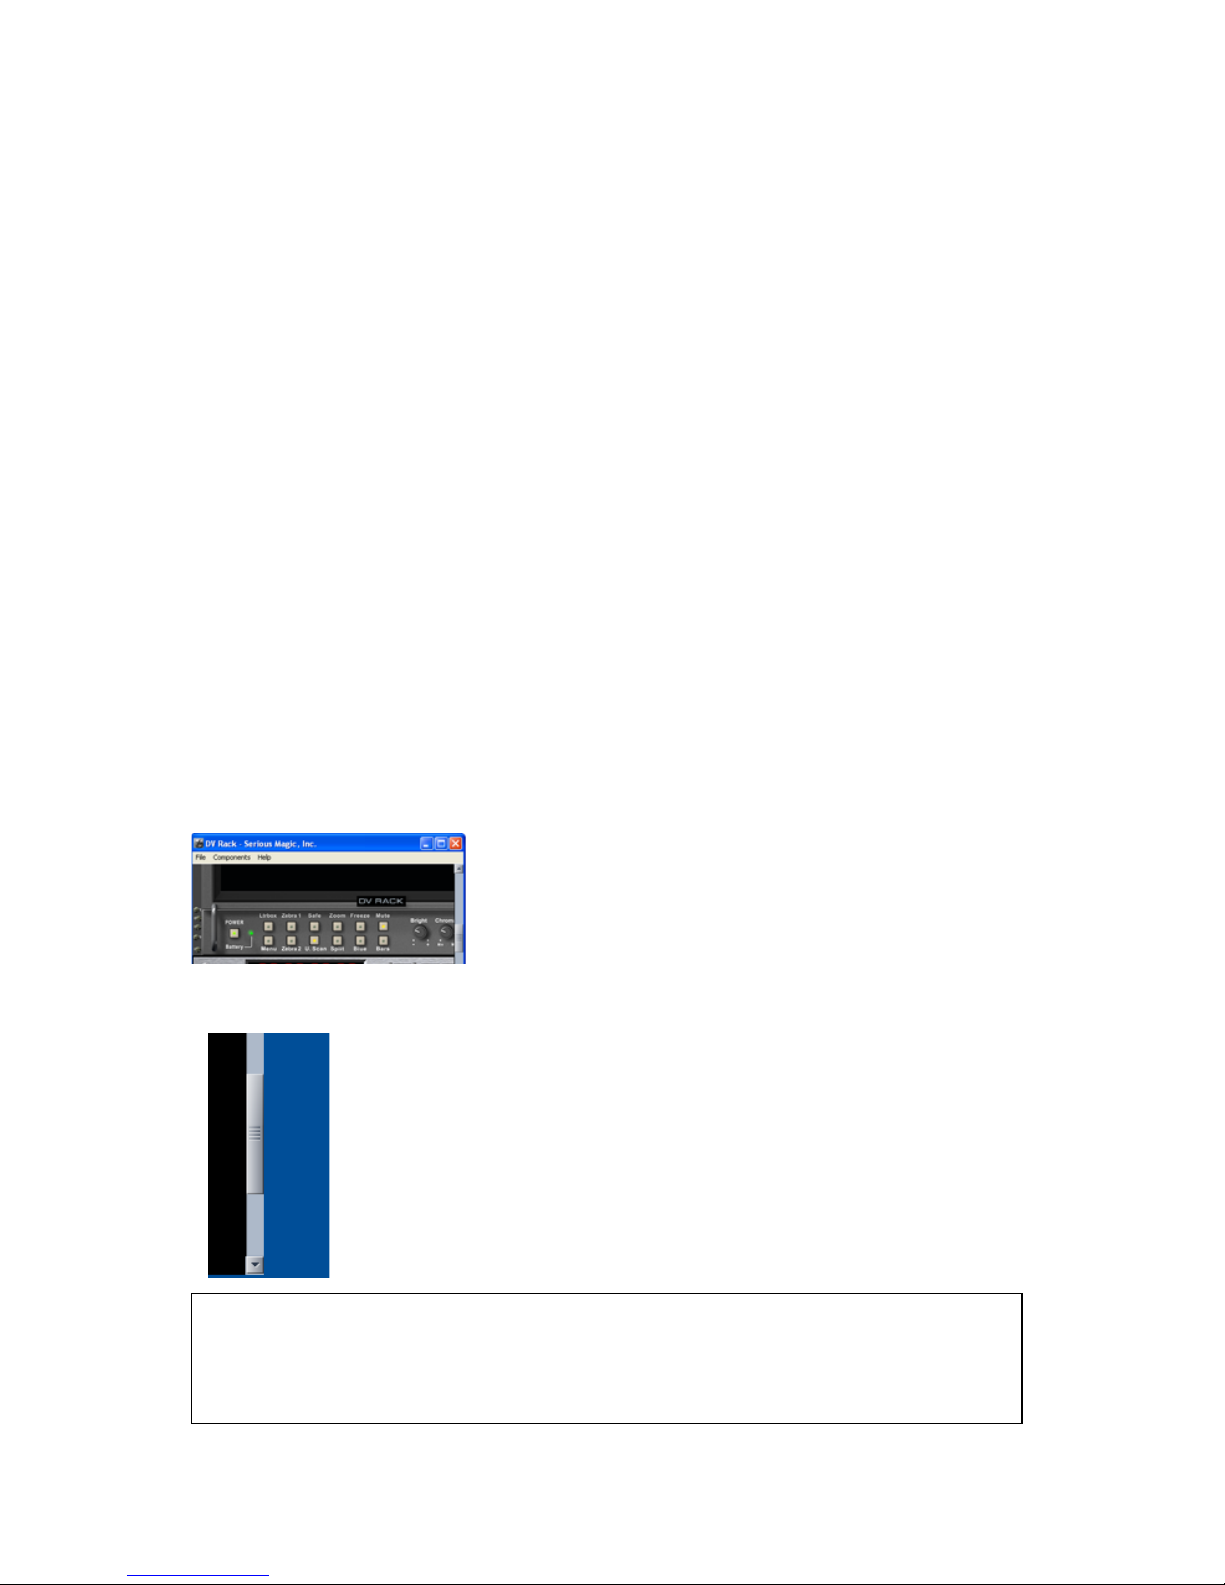
Window Controls
If your monitor resolution is set to higher than 1024 x 768 in Windows, DV Rack is
displayed in a Window. If it is set to 1024 x 768 resolution, DV Rack occupies the
entire screen to maximize display space. In either case, you can use the standard
Windows key combination of Alt + Tab to cycle through running applications.
Resolutions lower than 1024 x 768 are not supported.
If your computer monitor is set to a resolution
greater than 1024 pixels wide, DV Rack is displayed within a resizable window with typical Windows controls.
The Scroll Bar
Drag the scroll bar at the far right edge of the screen to scroll up and down
through components.
If you have a mouse that has a scrolling wheel, you can use it to scroll also.
When the pointer is over the DVR, the wheel scrolls through the Clip List.
When the pointer is over any other component, the wheel scrolls through
the entire rack.
To move up or down just a few pixels at a time, click the up or down arrows
above and below the scroll bar. (Each click equals 100 px or 1 U.)
TIP: If you don’t already own a mouse with a scrolling wheel, we recommend one. If you
are working on a laptop and don’t have extra table top space, spinning the mouse
wheel is much easier than using a touchpad or regular mouse. DV Rack employs the wheel
for scrolling clips in the Clip List, zooming in the Field Monitor and scrolling through
components.
Serious Magic DV Rack Field Guide
11
Page 18
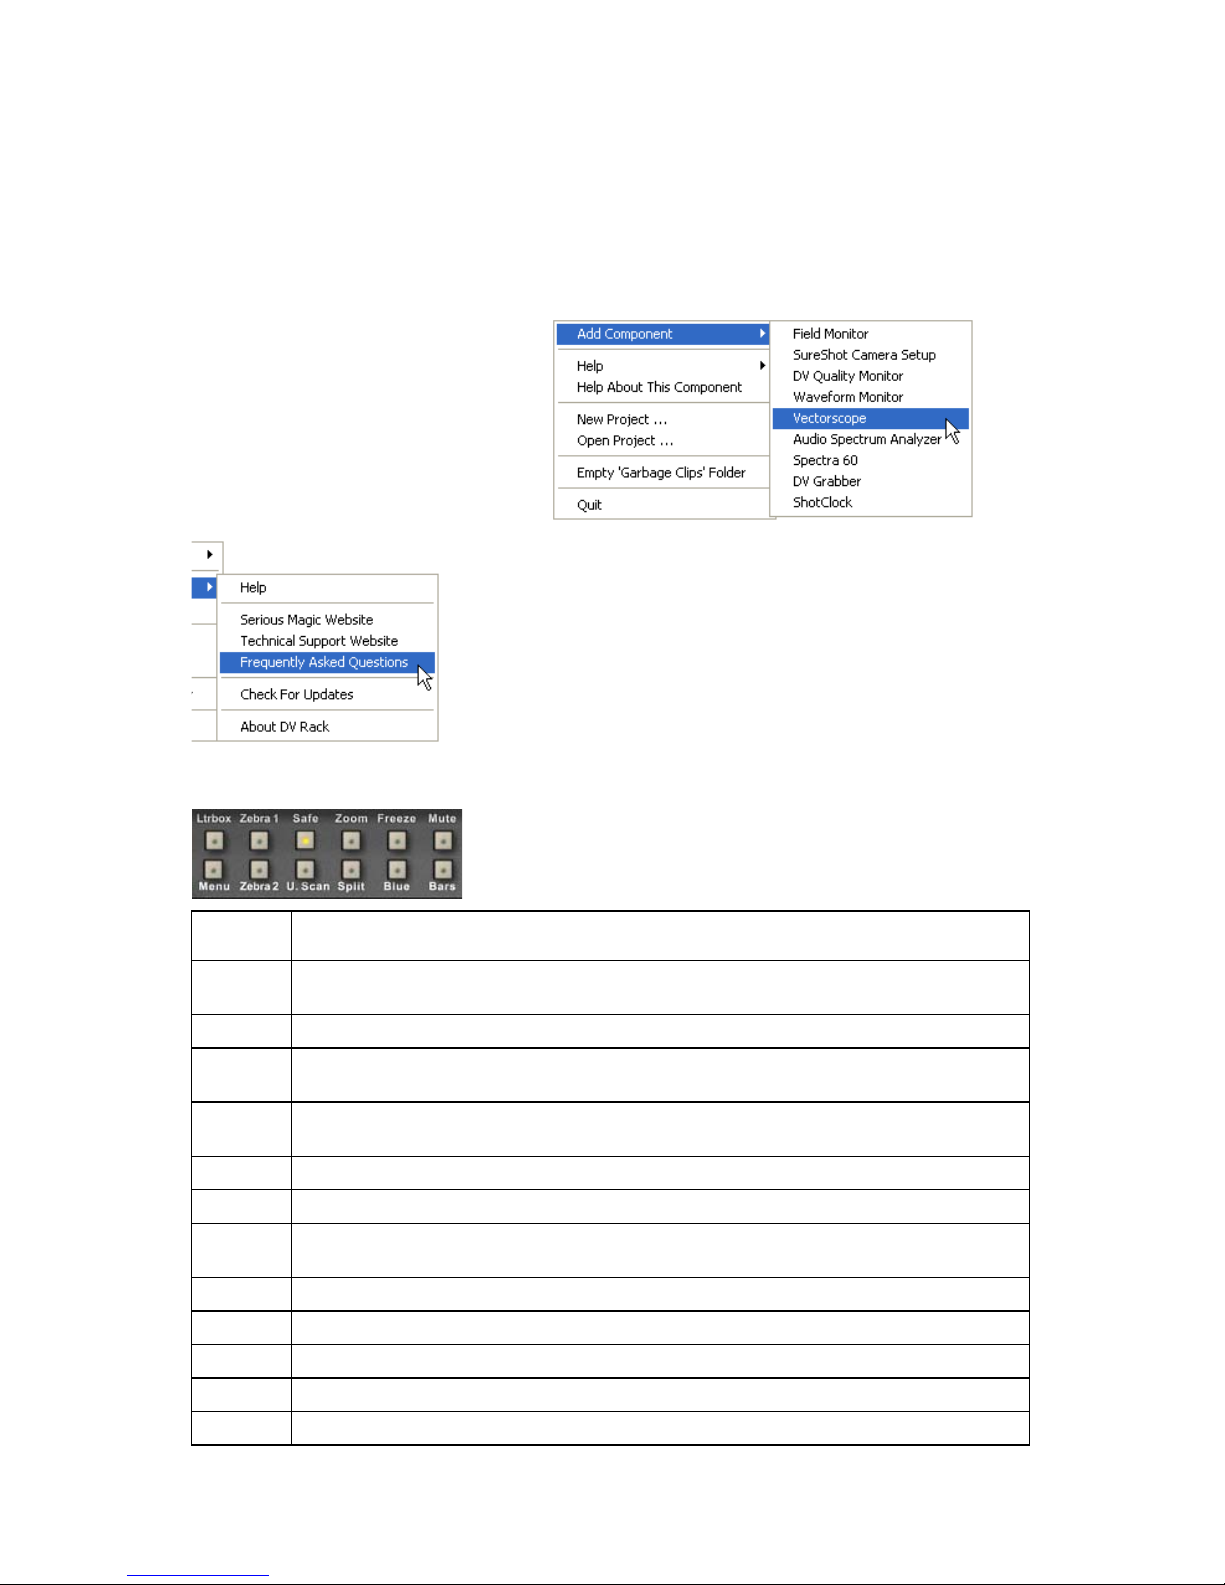
The Right-click Pop-up Menus
Click the right mouse button or touchpad
equivalent anywhere in DV Rack to display a popup menu where you can:
• Open the Add Component menu
• Open the Help menu
• Get Help about the component the
pointer is currently on
• Create a new Project
• Open an existing Project
• Empty the Garbage Clips folder
• Quit DV Rack
The Help submenu is where you can:
• Open the DV Rack Help System
• Go to the Serious Magic Web site
• Go to the Tech Support web pages.
• See Frequently Asked Questions
• Check for updated versions of DV Rack to download
• Get information about your DV Rack version
The Add Components menu
is where you can start the
Field Monitor, SureShot
camera calibration wizard or
any other DV Rack
component
The Field Monitor Buttons
Button What it does
Ltrbox Displays the video in the Field Monitor with a Letterbox mask over it to assist in
framing Letterbox shots.
Menu Displays the Settings Menu.
Zebra 1 Displays a Zebra pattern over areas that exceed a second level of brightness or
darkness in your video image.
Zebra 2 Displays a second Zebra pattern over areas that exceed a second level of
brightness or darkness in your video image.
Safe Shows a Video Safe Area indicator overlaid on the Field Monitor.
U. Scan Displays the entire video image including edge areas not visible on some TVs.
Zoom Turns on Zoom mode which allows you to magnify video on the Field Monitor.
Click + drag on video to pan. Shift + drag to zoom.
Split Splits Field Monitor screen for clip-to-clip or clip-to-camera comparisons.
Freeze Freezes the video image in the Field Monitor. Does not affect recording.
Blue Turns on Blue Only mode for Color Bar setup. Red & Green guns are turned off.
Mute Turns off audio output from DV Rack to speakers.
Bars Displays 75% Color Bars used for setting up the Field Monitor.
12
The DV Rack Software and Controls Overview
Page 19
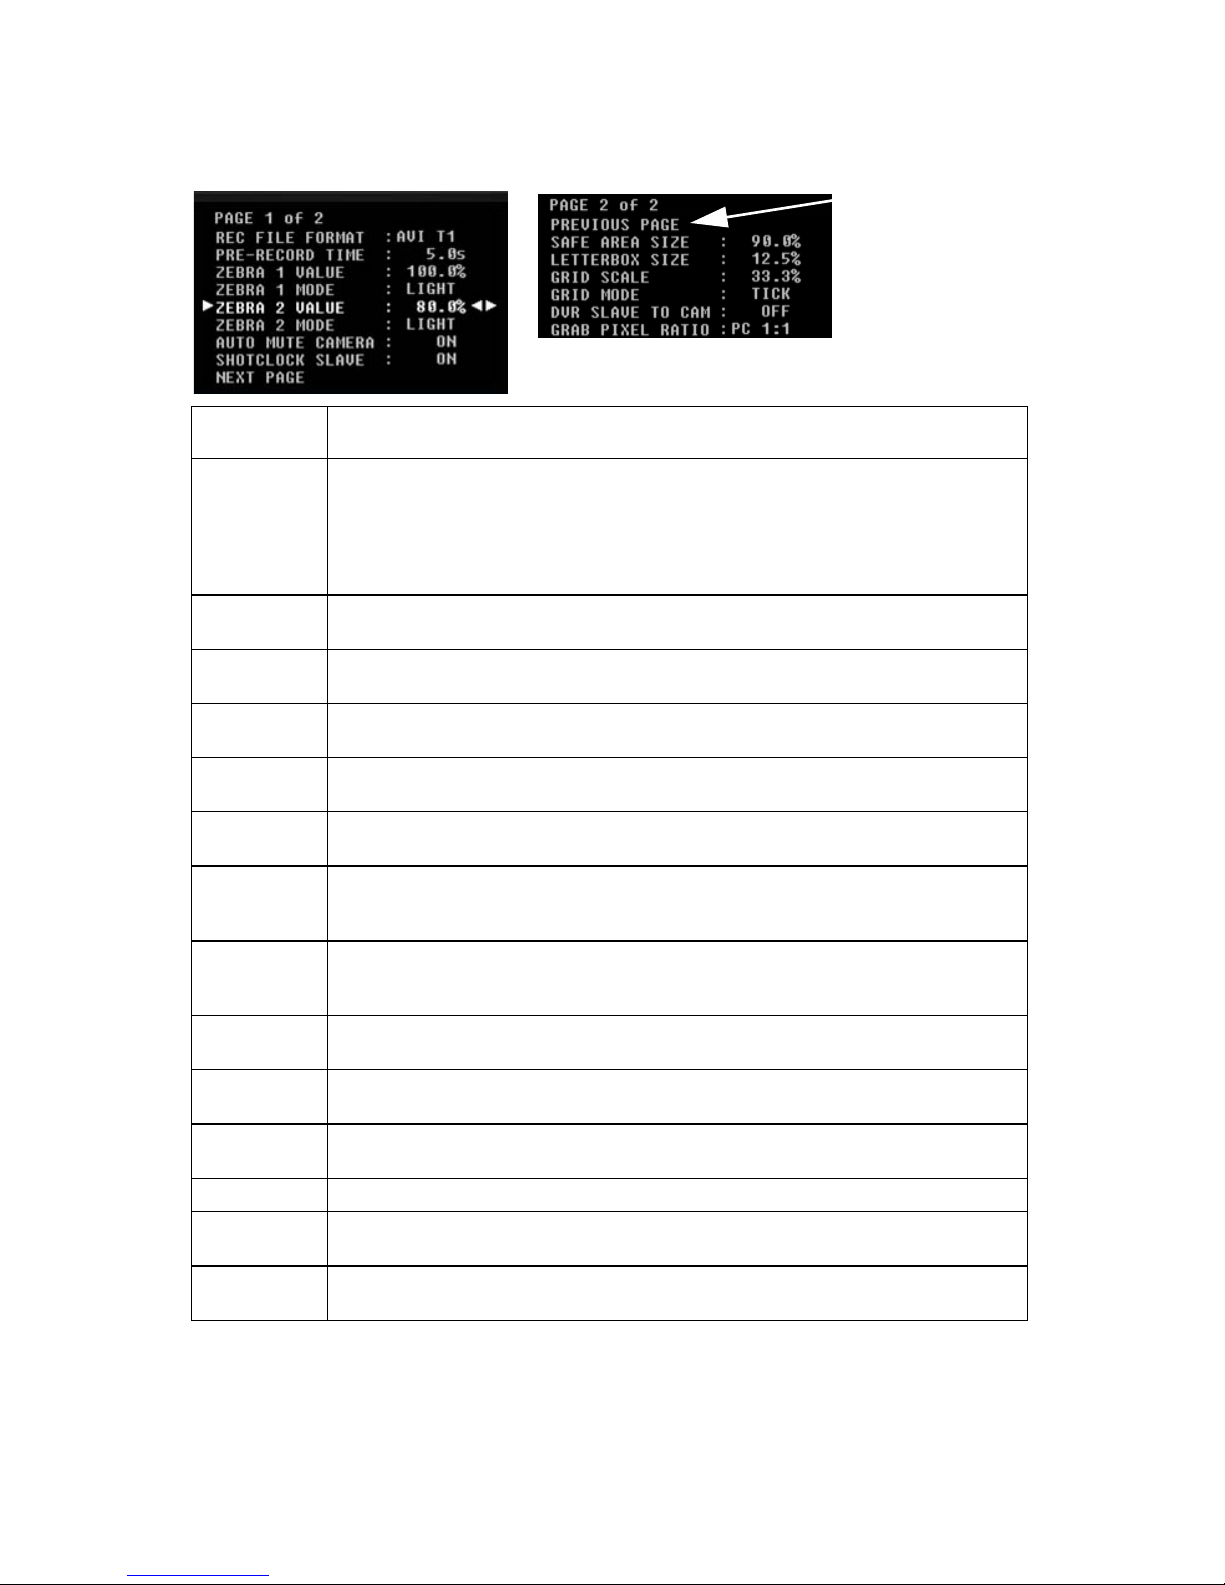
The Settings Menu
Setting What you can do with this setting
Click Next Page
or Previous
Page to move
between Menu
pages
Rec File
Format
Pre-record
Time
Zebra 1
Value
Zebra 1
Mode
Zebra 2
Value
Zebra 2
Mode
Auto Mute
Camera
Shot Clock
Slave
Safe Area
Size
Letterbox
Size
Grid Scale Set grid position by screen percentage. For example, 33% divides the
Grid Mode Change the Grid mode to Off, Tickmark or Line. (Default = Tick)
DVR Slave
to Cam
Grab Pixel
Ratio
Select the DV file format that DV Rack saves clips to:
• AVI T1 for Type 1 DV .avi files
• AVI T2 for Type 2 DV .avi files (Default setting.)
• QUIKTM for QuickTime .mov files
• CANOP for Canopus .avi files
For additional compatible file formats, press F1 for Help
Set the length of the DVR Preroll RAM buffer to Off, (0) or
1 through 29 seconds. (Default = 5 seconds)
Set the Zebra 1 threshold level. (Default = 100%)
Switch the Zebra 1 mode to detect areas that are darker or lighter than the
threshold value. (Default = Light)
Set the Zebra 2 threshold level. (Default = 80%)
Switch the Zebra 2 mode to detect areas that are darker or lighter than the
threshold value. (Default = Light)
Automatically turn computer audio output or speakers on or off when
recording or monitoring live input. Does not affect audio on playback.
(Default = On)
Set to determine whether the Shot Clock starts automatically when you
start recording. The Shot Clock time will not include any Pre-record time.
(Default = On)
Select the size of the Video Safe Area that is displayed when you click the
Safe button. (Default = 90%)
Set the size of the Letterbox mask. (Default = 12.5%)
screen into thirds. (Default = 33.3%)
Sets the DVR to automatically start and stop recording when the camera
does. (Default = On.)
Sets whether DV Grabber stills are saved for video use (.9 aspect ratio) or
for PC viewing (1.0 aspect ratio). (Default = PC.)
Serious Magic DV Rack Field Guide
13
Page 20
Changing Menu Settings
1. Underneath the Field Monitor, click the Menu button.
2. Click a setting to select it.
3. When the other settings disappear, drag the pointer to the left or right to
scroll through the options and select a new setting.
TIP: Use the up and down arrow keys to scroll up or down the menu options. Use the left
and right arrow keys to scroll through setting options.
Using Dials
• Click a dial and drag up to turn the dial clock-wise
• Drag down to turn it counter-clockwise
• Double-click some dials to return them to a default position
TIP: Hold down the CTRL key before you click to move the dials more slowly in smaller
increments for fine tuning.
Shortcut Keys
DV Rack includes many handy keyboard shortcuts and allows you to create your
own key combinations. Here are just a few:
Action Shortcut Key(s)
Open the Help system F1
Record F2
Play clip Press the space bar on your keyboard once to play
Pause clip Press the space bar again to pause
Jump to beginning of a clip Press the Home key
Jump to end of clip Press the End key
Full Screen Field Monitor Alt + Enter (Press Alt + Enter again to return to normal
view)
For a complete list of shortcuts, open the Keyboard Shortcuts.txt file located in the
DV Rack folder within your Documents and Settings folder. For example:
C:\Documents and Settings\<username>\Local Settings\Application Data\Serious Magic\DV Rack
Edit this file using the guidelines included to create your own key combinations.
14
The DV Rack Software and Controls Overview
Page 21

Managing DV Rack Components
Adding Components
To add a component, right-click to open the pop-up menu and select the Components submenu. Select the component that you wish to add. It will be placed as
close as possible to the position that you clicked. If the rack position is not wide
enough for the selected component, the device will be added in the next lowest
position on the rack.
Many of the components can be added more than once. For example, you can display one Waveform Monitor and use it in Parade mode and display another
Waveform Monitor in Luma mode.
Removing Components
Every component has an Off switch or button. Click the Off switch to remove a
component from the rack. To turn a component back on, click your right mouse
button anywhere in the DV Rack window to display the right-click pop-up menu
and select the component you would like to use.
If you would like to retain dial and button settings while moving a component to
a new position on the rack. Instead of closing and then reloading the component,
click and drag it to the new location.
Arranging DV Rack Components
You can rearrange the DV Rack components and change the order in which they
are stacked in the rack.
• Click and drag the edge or metal face of any component to it’s new vertical
or horizontal position on the rack.
Quitting DV Rack
• To exit DV Rack, right-click anywhere in the DV Rack window and select
Quit.
• You can also press and hold the ALT key while you press the F4 key on your
keyboard.
About Projects and Files
Videographers often have multiple productions in progress at the same time. To
help you stay organized, DV Rack files are grouped into projects. Each time you
create a new project, you enter a project name and a Windows folder by that name
is created to contain all that project's files. The default project location is My Documents/DV Rack/.
As you record clips, they are saved inside the current project's folder. Also, any
still grabs, ejected clips and garbage clips are saved in appropriately named folders within the current Project's folder. These folders are created automatically the
Serious Magic DV Rack Field Guide
15
Page 22
first time they are used. Take note of which project is currently open since that is
where all files will be placed as you work.
To create a new project:
1. Right-click and select New Project from the pop-up menu.
2. Navigate to the folder where you’d like your project to be saved, enter a new
project name and click Save. Use a descriptive name for example, one that
includes the client name or a job number.
DV Rack creates a .dvr file within a Windows folder. The file and the folder
share the project name that you created.
NOTE: The .dvr file is an important internal DV Rack data file. When you back up your files,
be sure to include the .dvr file.
To open an existing project:
1. Right-click and select Open Project from the pop-up menu.
2. Navigate to your project folder and double-click it, then double-click the
.dvr project file to open it.
For more information about DV Rack Projects and Files, see Help.
Managing Clips
Selecting a Clip File Format
Select a DV file format that is native to your editing system. If you are unsure of
which format to use, you may want to perform a test recording. Try dragging and
dropping the clip into your editor. If the clip reads properly and doesn’t require
re-rendering to preview, then this is a good format to use. To learn more about DV
Rack clip formats, see page 16.
If you don’t have access to your editor and are unsure of which format to use,
choose Type 2 DV-AVI. This is the most common format for DV files, and most
editing software will be able to read or import files of this type.
NOTE: DV Rack does not recompress or otherwise reprocess the DV video stream from
your camera. What is recorded to disk is exactly the compressed DV data received from
your camera. There is never any conversion or degradation of any video or audio signals.
Some editing software prefers the DV data to be formatted in different ways or with
different file headers. The clip format selection merely changes the “wrapper” that is
written around the data when it is written to the file.
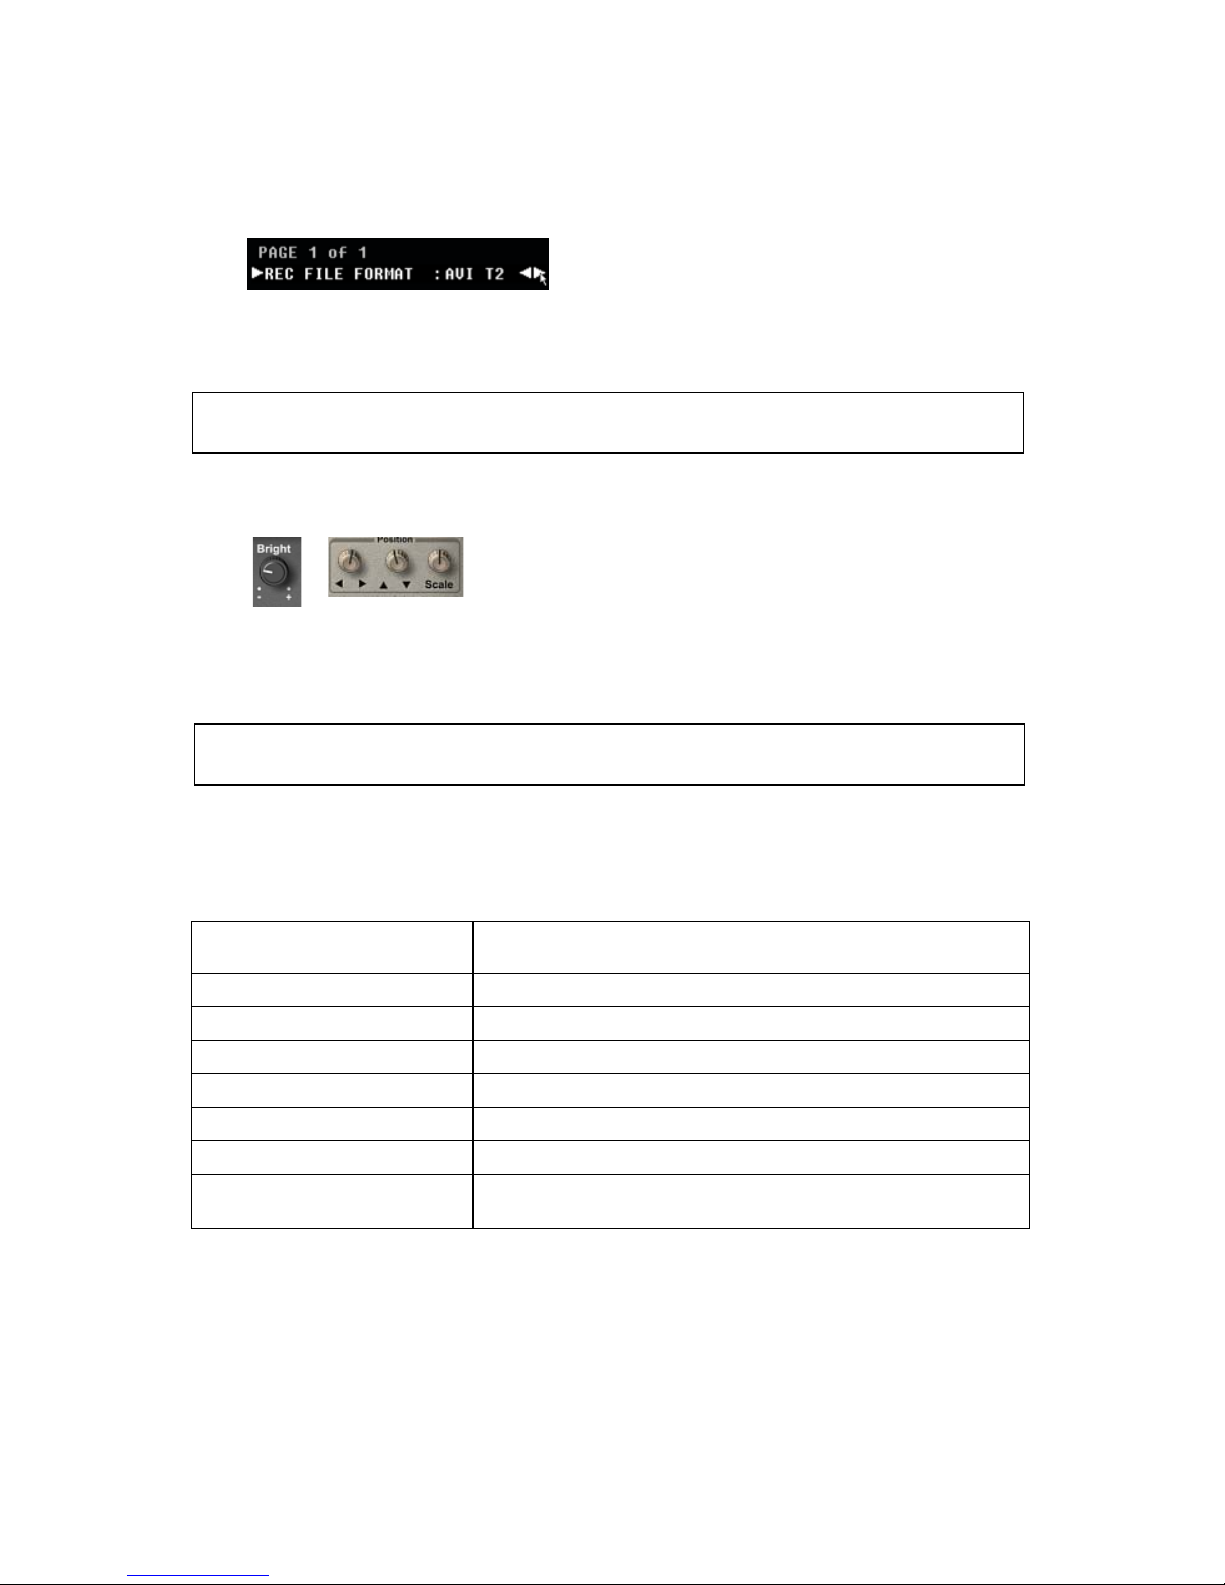
1. Click the Menu button and select Rec File Format.
2. Drag the cursor to the right or left to select:
• AV I T 1 for Type 1 DV .avi files
• AV I T 2 for Type 2 DV .avi files
• QUIKTM for QuickTime .mov files
• Canop for Canopus .avi files
16
The DV Rack Software and Controls Overview
Page 23

3. Click the Menu button again to close the menu.
Setting Default Clip Names
When clips are saved to your hard drive, DV Rack automatically names them
“Clip 01.avi”, “Clip 02.avi” and so on. You can change the default name by editing
it in the Clip List. Click the name, type a new name and then press Enter to save
the new name. This also sets the new default base name for future clips. DV Rack
automatically adds a number after the clip name. For example, if you rename a
clip from “Clip01.avi” to “Bob.avi”, the next clip you record is automatically
named “Bob01.avi”. The next clip recorded will be “Bob02.avi” and so on. This
minimizes the amount of typing required while shooting multiple takes.
For more information about naming clip files, see Help.
The “Clips in Use by DV Rack” Folder
Newly recorded clips appear at the top of the Clip List in the DVR. Clips in the
DVR Clip List are kept in the “Clips in Use by DV Rack” folder within the current
project folder. DV Rack uses this folder to keep track of your files. You should
never delete, move, rename, or edit clips within this folder; the only action you
should take within this folder is to make a copy. You can make copies of one or
more clips and move the copies into another folder on your hard disk.
Using DV Rack Clip Files in Other Applications
When a clip is recorded, it appears in the DVR Clip List until you eject or delete it.
If you’d like to use a clip in another program like a video editor, eject the clip to
the Ejected Clips folder. When you create a DV Rack project, a project folder with
the name and location that you specify (the default folder is My Documents) is
created. When you click the DVR Eject button, the currently selected clip is
removed from the DVR and placed in the Ejected Clips folder. Use Windows to
navigate to your Ejected Clips folder. You can use Windows to copy, move,
rename or delete clips in the Ejected Clips folder.
Removing Clips
DV Rack provides three methods of removing clips from the Clip List.
• Ejecting clips removes them from the Clip List but saves the clip file to the
Ejected Clips folder indefinitely. Use this method if you want to edit the
clips in another program such as a non-linear editor.
• Moving clips to the garbage folder removes them from the Clip List as well
but provides you with a prompt as you exit DV Rack asking if you want to
empty the Garbage folder and delete the files from your hard drive forever.
• Deleting clips is the option that you want to be absolutely certain about
because it deletes files from your computer immediately and permanently.
Serious Magic DV Rack Field Guide
17
Page 24
Ejecting Clips for Use in Other Programs
You can remove clips from the DV Rack Clip List and make them available for use
in other programs by ejecting them. Ejected clips are removed from DV Rack but
they are not deleted from your hard drive. Ejected clips can be found in the DV
Rack Ejected Clips folder in the current Project folder.
1. In the Clip List, click the clip you’d like to eject to select it.
2. Then, click the Eject button, or press the Delete key.
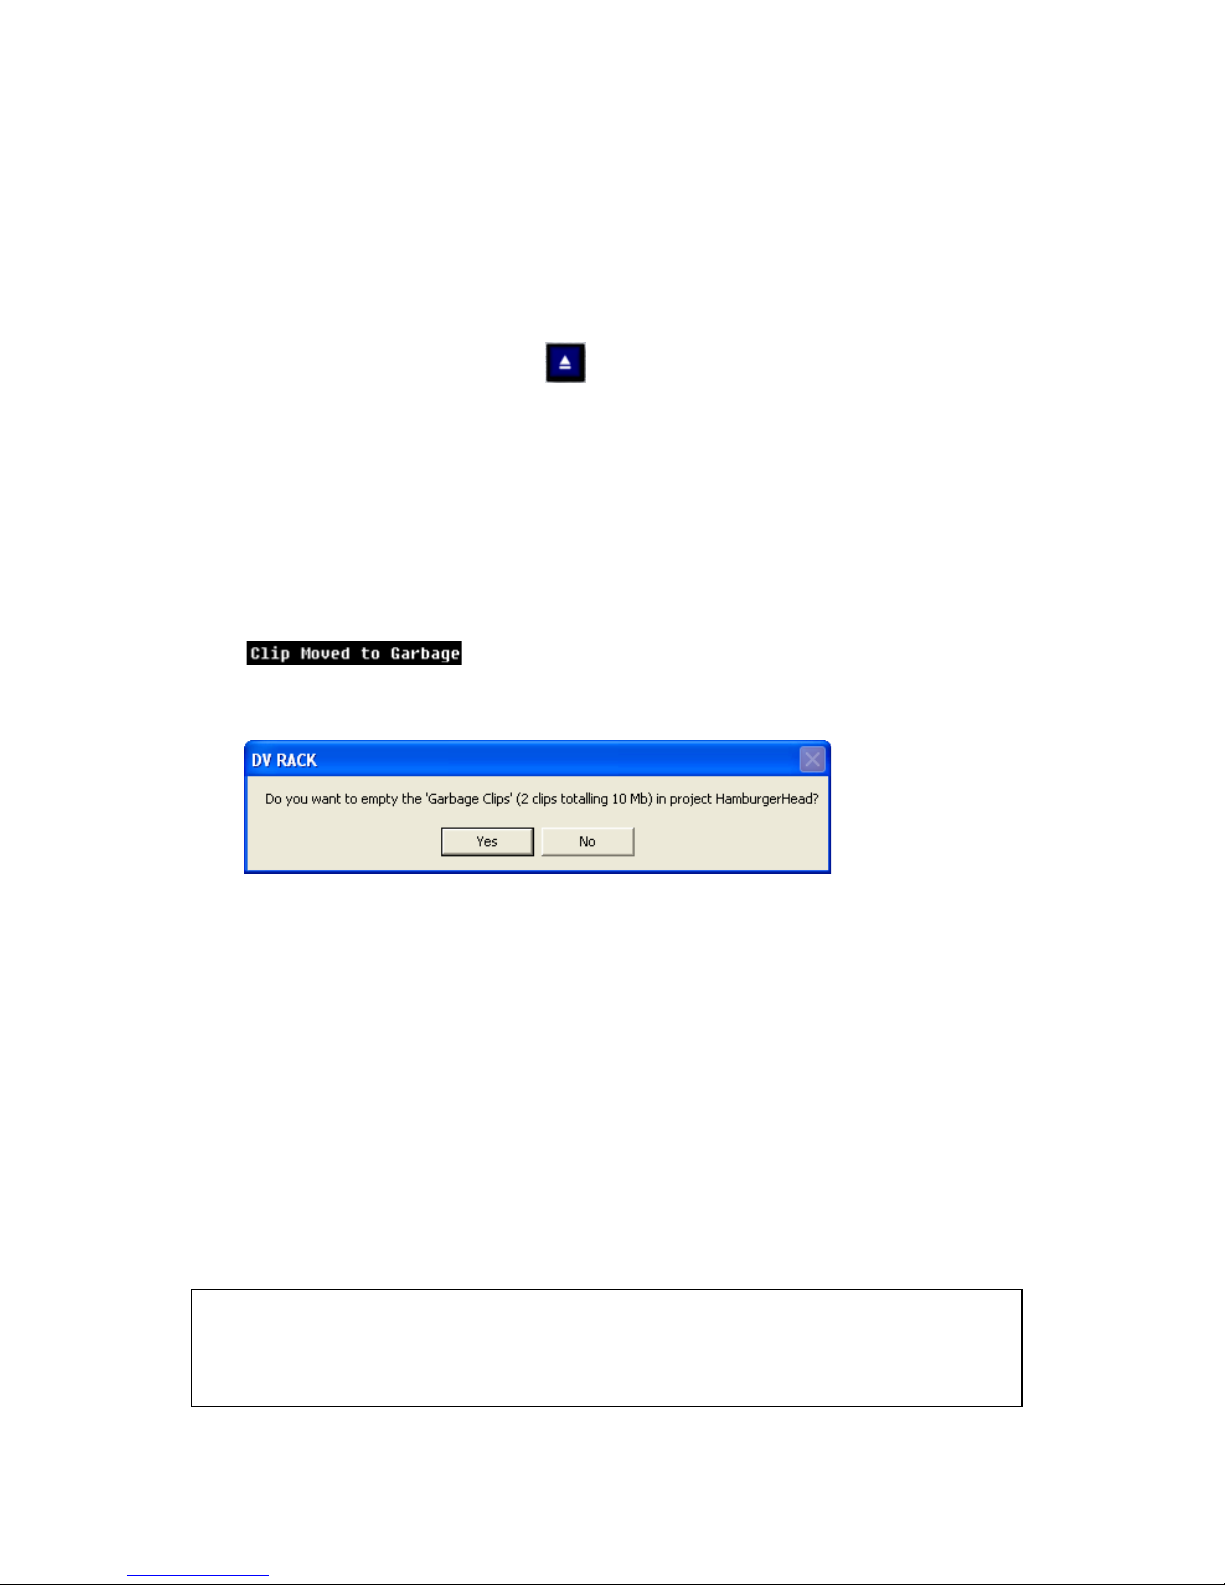
Moving Clips to the Garbage Folder
If you do not think you will have use for a clip but want to keep it available just in
case, then we recommend moving it to the Garbage folder. This ejects the clip
from the Clip List and moves it a Garbage folder within the current project folder.
1. In the Clip List, click the clip you’d like to move to the Garbage folder.
2. Then, hold down the CTRL key and click the Eject button or press CTRL +
Delete on your keyboard.
3. In the Field Monitor, you’ll see a message about your clip being moved to
the garbage.
4. When you exit DV Rack, you are given the option of emptying the garbage
or not.
5. Click Yes to empty the garbage and permanently remove the clip from your
computer. Click No to leave the clips in the Garbage folder just in case.
Emptying the Garbage Clips Folder
You can “empty” the Garbage Clips folder at any time by right-clicking and
selecting the Empty Garbage Clips Folder from the pop-up menu. This will per-
manently delete all garbage clips and free up hard disk space. A confirmation
message will be displayed and you should choose “Yes” only if you are certain
that you are ready to permanently delete all the clips in the Garbage Clips folder.
This might be when the project has been edited and/or backed up to removable
media or another computer. If you want to permanently delete some but not all of
the files, you can do so by using Windows' file delete functions.
TIP: The Garbage Clips folder can save the day when occasionally a bit of audio or video
from an otherwise bad clip can be creatively used to patch a mostly good clip. The
number of “garbage clips” you keep in this folder will depend on how much hard drive
space you want to devote to the project during production.
18
The DV Rack Software and Controls Overview
Page 25
Deleting Clips from Your Hard Drive Immediately and Permanently
If you are absolutely positive that a clip serves no earthly purpose and never will,
then you can destroy it for good, bypassing the Garbage folder. Since clips can be
very large, the clip will be permanently deleted-it will not be moved to the Windows Recycle Bin, so there is no way short of a miracle (or possibly some
advanced file recovery tools) that you will ever see it again.
1. In the Clip List, click the clip you’d like to delete from your computer.
2. Hold down the Ctrl key and the Shift key while you click the Eject button
and you will see a message. (You can also press Ctrl + Shift + Delete on
your keyboard.)
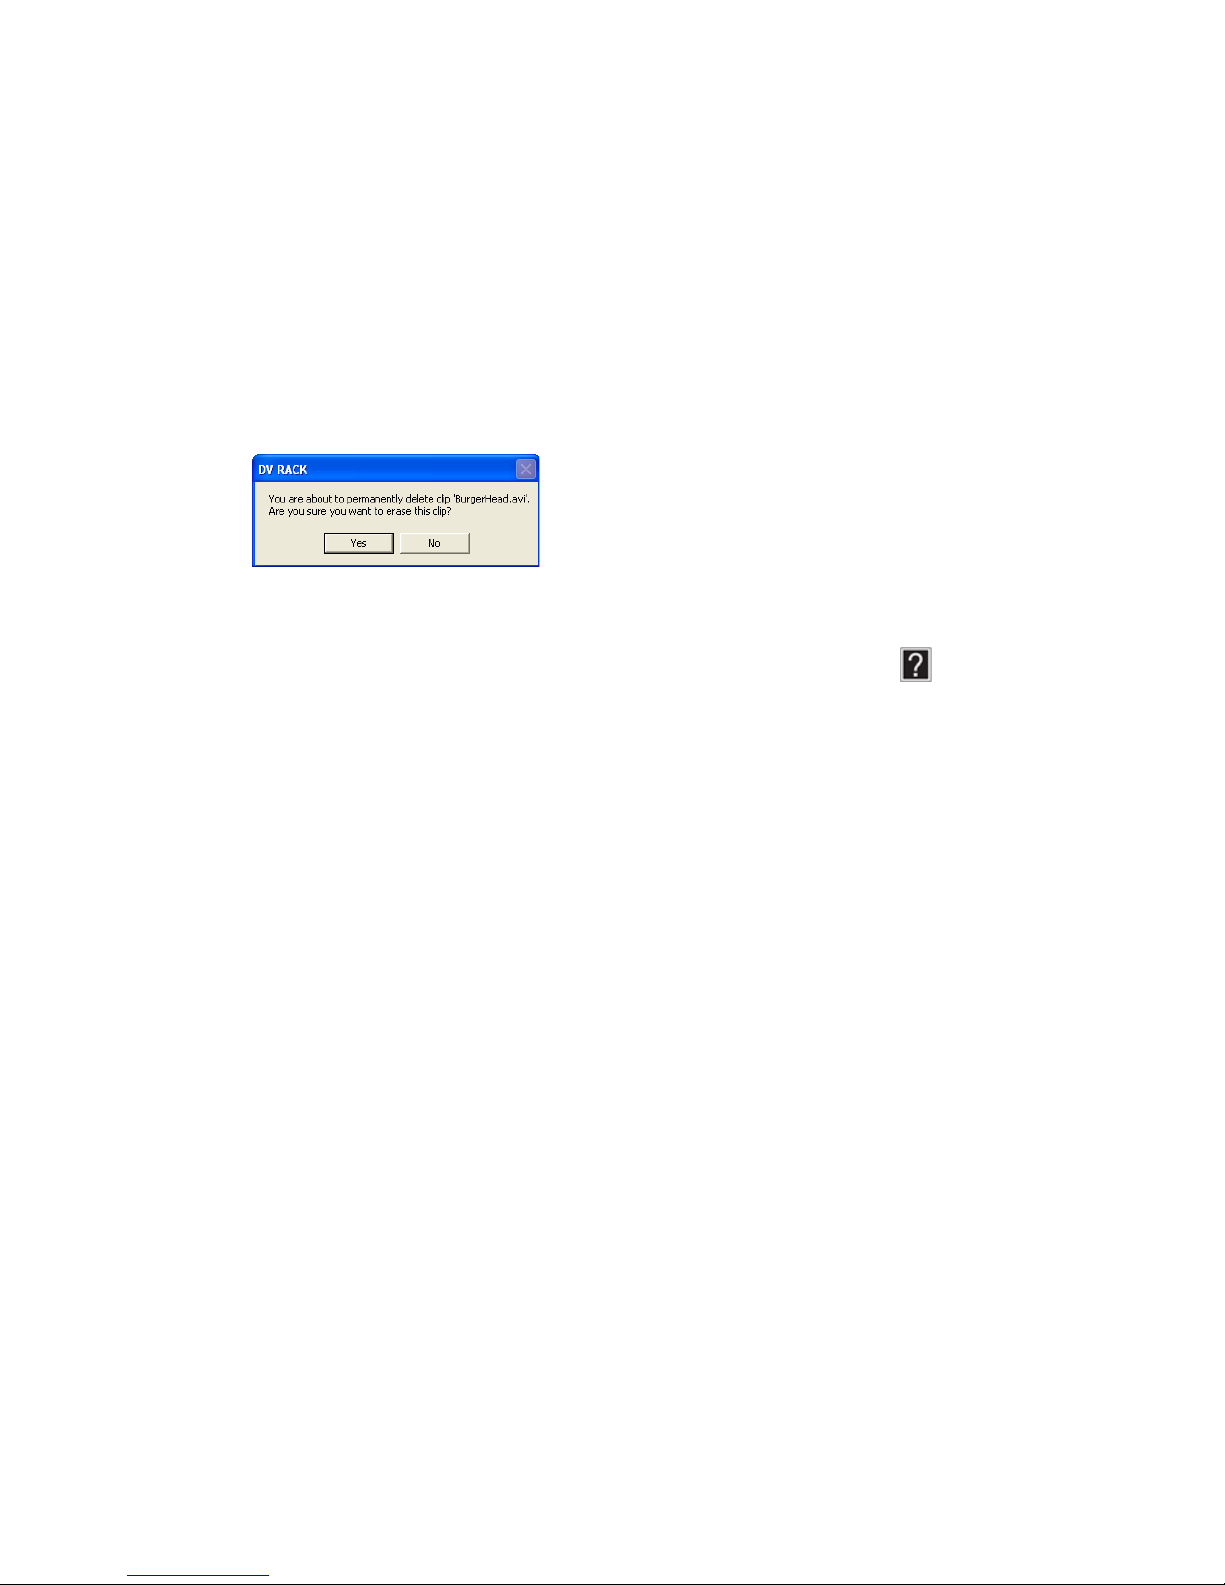
Please take a second to review the clip
name displayed in the message to make
sure you are deleting the intended clip.
3. Click Yes if you want to delete the clip from your computer immediately
and permanently.
See Help for complete information about ejecting and deleting clips.
Serious Magic DV Rack Field Guide
19
Page 26

20
The DV Rack Software and Controls Overview
Page 27

The DV Rack Components
• The Field Monitor
• The Waveform Monitor
• The Vectorscope
• The DVR - Digital Video Recorder
• The Audio Spectrum Analyzer
• The Spectra 60
• The DV Grabber
• The DV Quality Monitor and Clip Alerts
• The Shot Clock
This section of the Field Guide describes each of DV Rack’s components and how
they can help you improve the quality of your video. You’ll also find some basic
instructions that walk you through each component’s most common uses. You
can find more instructions in the Additional Ways to Improve Your Video
User Guide PDF file and in the DV Rack Help system. In DV Rack, press F1 to
access Help.
, in the
The Field Monitor
Click the buttons to turn features on. These buttons latch down in
the On position and the amber light on the button indicates that it is
on. Click a button again to turn it off.
Everyone who shoots video more than occasionally has come away from a shoot
thinking that their video was going to require minimal post production work only
to find when they start editing that the colors are flat, faces are washed out, and
some shots had crept out of frame. Using the DV Rack Field Monitor, you now can
quickly identify quality and consistency problems right at the shoot location.
The DV Rack digital Field Monitor is a native DV display meaning that, unlike
your camera's viewfinder or LCD screen, it shows what the video looks like after
it is compressed, exactly as it will be recorded to tape. This is crucial because your
camera's DV compression introduces spatial artifacts and also modifies the video
in subtle but significant ways including brightness, saturation, hue and resolution. The Field Monitor also lets you freeze and zoom frames and be alerted about
adverse lighting conditions before and during your shoot while you still have the
Serious Magic DV Rack Field Guide
21
Page 28

ability to make lighting and camera adjustments. Press Alt + Enter on your key-
board to view the Monitor in Full Screen mode. You can even split the screen for
clip-to-clip or clip-to-live camera signal analysis and continuity checking.
To get great results, make a habit of setting up the Field Monitor to Color Bars
whenever you set up at a new location with substantially different ambient
lighting. Calibrating the monitor is important in many other situations. Here are
some examples of when you should calibrate your Field Monitor:
• Your lighting conditions change mid-shoot
• Working under extra bright lights such as in a studio
• Shooting under sodium or mercury lamps
• Shooting at sunset or sunrise
• Shooting neon lights or fireworks
For more information see Step 2 - Set Up to Color Bars.
Switching the Field Monitor between clips and the camera
To change the Field Monitor display from a recorded clip to camera input, click
the DVR Stop button. To display the clip in the Field Monitor, click the desired
clip in the Clip List.
Using Zebra to identify light or dark areas in your picture
Although SureShot camera calibration helps you adjust your camera and lighting
for maximum dynamic range and accurate exposure in a given environment, not
every situation calls for that “high noon on a sunny day” look. Often, a
videographer will want to intentionally under expose or over expose certain
regions of the image or even entire scenes to create a mood or convey an
atmosphere. DV Rack’s two Zebras are useful for making these kinds of creative
adjustments as you shoot.
A more typical use of Zebra is to make sure that the most important parts of your
subject matter are being exposed at an appropriate level of brightness. Use Zebra
1 at it’s default level of 100% to alert you to areas that are too bright. Because your
subject matter is often a person, the default setting for the second Zebra tool,
Zebra 2, is 80% which is an approximate value for average skin tone. Ideally, you
want to adjust iris, exposure, shutter speed and gain on the camera or adjust your
lighting on the scene to “zebra paint” most of your talent's face. The exact
percentage setting is subjective depending on factors such as the overall ambience
of the scene and the complexion of the talent. Some videographers prefer 70% and
those crafting a “film-look” may use 60% or even lower.
You can also use two different Zebra modes to identify light or dark areas of your
picture. Set one Zebra to identify areas that are too bright and the second to
identify areas that are too dark or use both Zebras to identify two levels of
brightness or two different levels of darkness.
22
The DV Rack Components
Page 29

NOTE: By default, DV Rack sets the Zebra 1 threshold to highlight areas that are at
100% brightness or higher. In some cases, video brightness can reach up to 110%
but in most circumstances, a 100% setting is sufficient.
Using Zebra to identify light areas:
1. Click the Menu button.
2. Click Zebra 1 or 2 Mode and drag the setting to Light.
3. Click Zebra 1 or 2 Va lu e and drag to your desired setting.
4. Click the Menu button again to close it.
5. Click the Zebra 1 or 2 button.
• If you see the zebra pattern, the video may be too bright in these areas.
You can close your camera iris down to reduce the brightness in your
video. You can also try reducing the amount of lighting on the scene or
adjusting other camera settings such as gain, shutter speed, or neutral
density (ND) filter.
• If you don’t see a zebra pattern, either you don’t have any areas that are
too bright or your zebra thresholds are set too low. Lower the Zebra value
to increase the pattern’s light sensitivity.
6. Click the Zebra button again to turn it off.
Using Zebra to identify dark areas:
Dark Zebra makes it possible for you to introduce strong shadows into a scene but
still have confidence that enough detail remains in the desired areas to still resolve
an image. To learn more about this different kind of Zebra, click here.
1. Click the Menu button.
2. Click Zebra 1 or 2 Mode and drag the setting to Dark.
3. Click Zebra 1 or 2 Va lu e and drag the to the darkness level you want to
manage.
4. Click the Menu button again to close it.
5. Click the Zebra 1 or 2 button.
6. In the Field Monitor, evaluate your picture and look for Zebra patterned
areas as you adjust lighting, camera and composition.
• If you see a zebra pattern, evaluate these parts of your picture to make
sure you are getting the level of darkness that you want.
• If you don’t see a zebra pattern, either you don’t have any areas that are
too dark or your zebra thresholds are set too low. Change the Zebra Value
until it identifies the right level of darkness for your project. Lowering the
Zebra Value decreases it’s sensitivity to darkness.
7. Click the appropriate Zebra button again to turn it off.
Framing your Shot
DV Rack provides field monitoring tools that help you frame your picture as you
shoot. Use Overscan to see the area of the picture that viewers will see if they
Serious Magic DV Rack Field Guide
23
Page 30

watch your video on television. Use Underscan to see the entire recorded picture
which may be visible on video projectors, plasma screens, streaming video and
computer screens. You can also use the Grid feature to divide your screen into
thirds which can be helpful when determining framing and composition.
The Grid Tick Marks can help
you frame your shot
according to the Rule of
Thirds. See The Rule of
Thirds.
Click the Safe button to set
Safe Mode and use the
crosshairs to center your
picture within the Video Safe
area.
Using the Field Monitor Grid to frame your shot
1. Click the Menu button.
2. Click Next Page to view the second page of the Menu.
3. Click Grid Mode.
4. Drag the cursor left or right to change the Grid Mode from Off to Tick or
Line.
5. Click Grid Scale.
6. Drag the cursor left or right to select the Grid Scale. Drag to 33 to divide
your screen into thirds.
7. Click the Menu button again to close the menu.
Using Underscan, Overscan and Letterbox to frame your shot
1. Choose whether you’d like to view your video in Underscan or Overscan
mode.
•Click the U. Scan button to view the entire active picture area.
The entire active picture area displays your video as it will be shown
when it is played in a show like the ones that you create in
Visual Communicator, stream over the Internet or show on a projector.
•Click the U. Scan button again to turn it off and view your video in
Overscan. This is the smaller visible area that most viewers will see when
your video is displayed on a television set.
NOTE: Some televisions are unable to display as much as 10% of your broadcasted
video. See
information.
“Overscan, Underscan and the Video Safe Area” on page 43 for more
24
The DV Rack Components
Page 31

2. If you like, click the Ltrbox button to view your picture in “Letterbox”
mode. Letterbox size can be set by clicking the Menu button and does not
affect the recorded video.
3. Set up your camera and use the Underscan, Overscan or Letterbox modes to
frame your shot as you work.
4. Once you begin to record, frame each scene within these boundaries taking
care to keep the important parts of your scene within the active picture area.
For more information on how to position your subject within the picture, see
Aesthetic Framing.
The Waveform Monitor
Signals at the top of the scale are
the bright parts of your image.
Your video signal is represented in
green under an orange colored
grid called a graticule. The graticule provides a means of
measuring different aspects of your
video signal.
Signals at the bottom part of the
scale are the dark parts of your
image.
Line Select - Choose to show the
brightness value of the Full image,
or a single Line of video. Turn the
dial to select a line number.
Line 0 = top of the image,
480 = bottom.
The DV Rack Waveform Monitor, as its name implies, converts video signals to a
viewable waveform representing light, dark, luminance and saturation levels. It
allows you to see what you are shooting more accurately than the human eye. You
can evaluate the light and dark parts of your scene and use that information to
make adjustments to your camera in real time to improve the accuracy of the
video your camera produces.
The naked eye, viewing video on a monitor, is not a very reliable source of
information about your video signal. Our eyes and brain make adjustments to
what we see, making us unconsciously forgiving of poor lighting.
To make matters worse, the viewfinder and LCD screens found on many
camcorders do not accurately reproduce colors, brightness and framing. Some of
these LCD screens are little better than those found on a Game Boy®.
The Waveform monitor allows you to see what is happening with the light and
shadow in your picture in a more objective, consistent and measurable way. It
shows you exactly how white your white is and how black your black is, enabling
you to determine the best exposure and lighting for every situation.
Serious Magic DV Rack Field Guide
25
Page 32
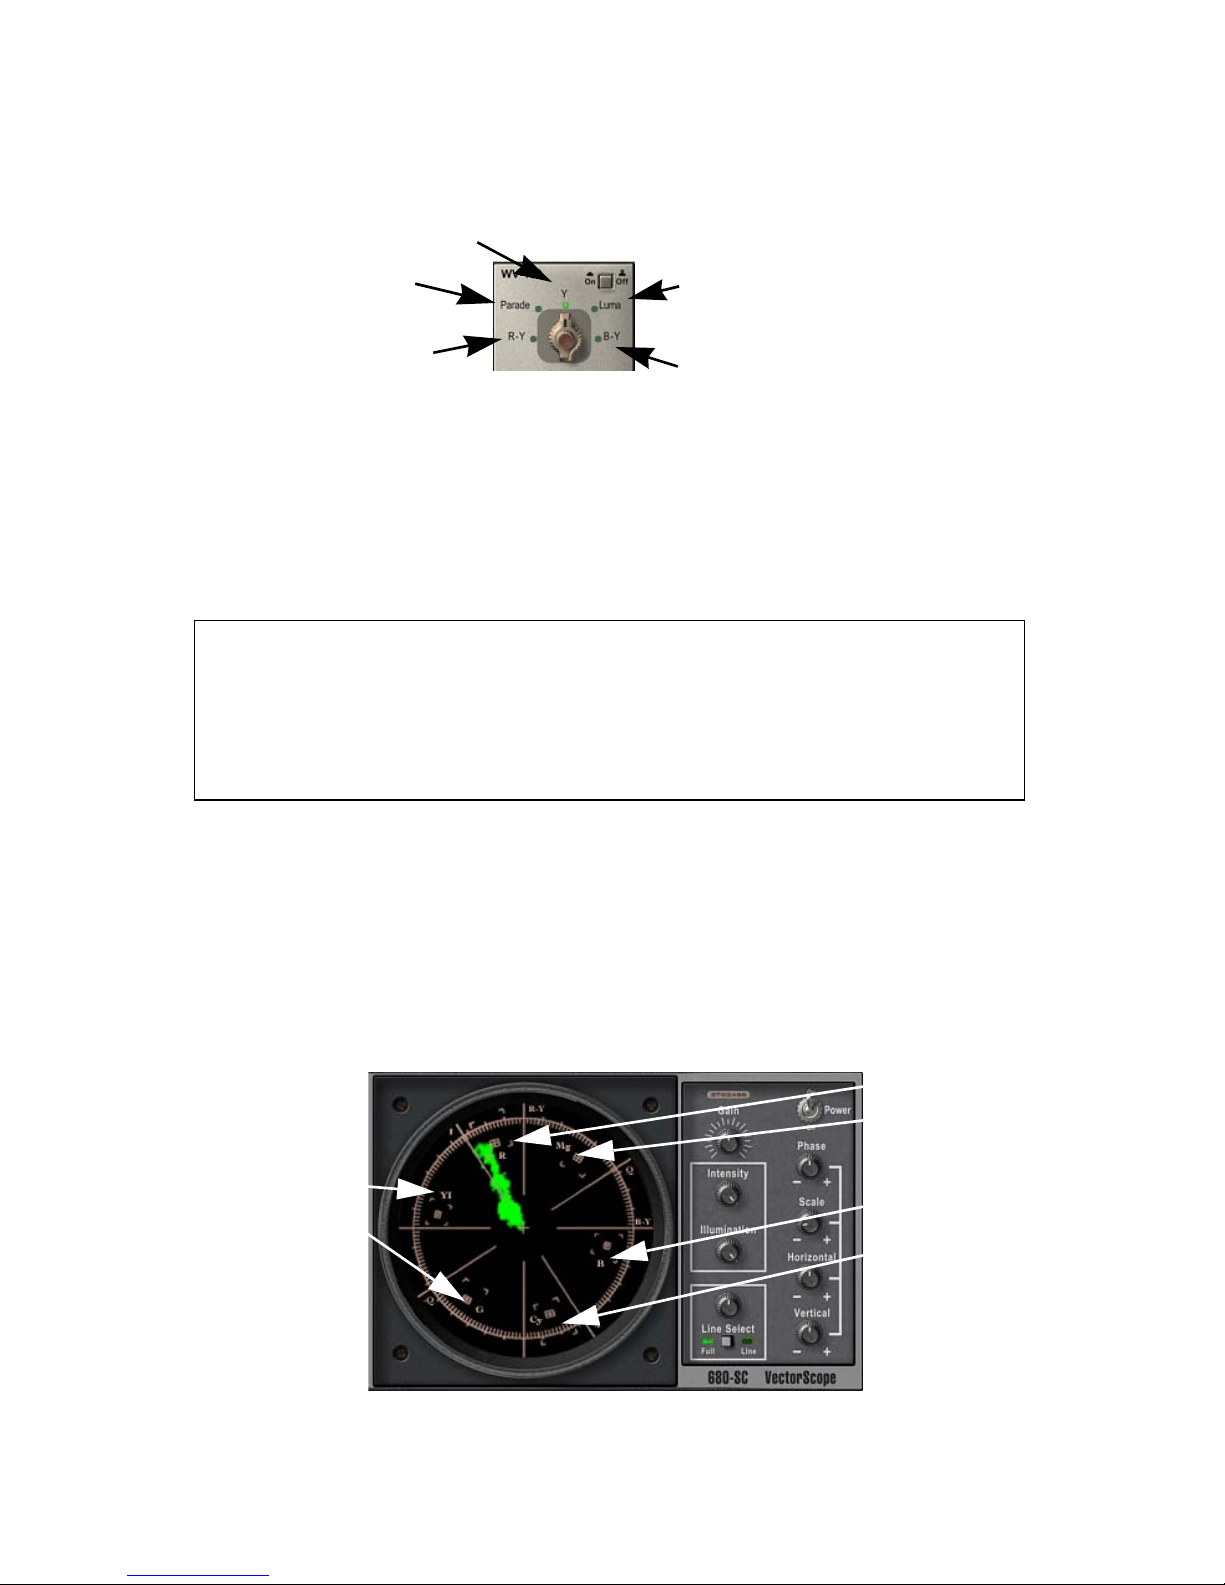
The Waveform Monitor Settings
Y – Displays the brightness value of the video signal. Signals at
the bottom of the scope are black, and signals at the top of the
scope are white.
Parade – Shows all 3
component signals at once;
Y, B-Y, R-Y.
R-Y – Shows just the red
channel.
Luma - A “histogram” mode. (See
description below.)
B-Y - Shows just the blue
channel.
All of the Waveform modes except for Luma display video information from left
to right. The far left portion of the waveform corresponds to the far left portion of
the video etc. Luma is a “Histogram” mode that displays brightness information
in a different way. Dark values are displayed on the left side of the scope, and
white values are displayed on the right. This is similar to the way graphics
software like Adobe® PhotoShop® represents brightness. If there’s a peak on the
left side of the scope, that means the video is mostly dark.
Example: Use the Luma mode to check lighting and camera settings. Try to get a
nice gentle “hump” in the middle of the scope. Then, use Y mode to double-check to
see that there isn’t any area of the video that is too bright.
R-Y and B-Y have specialized uses. You may want to use them in conjunction with the
Vectorscope to adjust a camera on a green screen shoot. If you know what the
R-Y and B-Y values should be for a certain camera viewing a particular scene, you would
be able to dial in a second camera, and get results similar to the first camera.
Using the Waveform Monitor to check for dark and bright areas
1. Turn t he Illum. dial to the left or right until you see the orange scale clearly.
2. Turn t he Intensity dial until you can clearly see the green signal.
3. Point your camera at the image you’d like to analyze and examine the green
video signal for appropriate dark and light ranges as you make changes to
the camera or lighting.
The Vectorscope
Yellow
Green
Red
Magenta
Blue
Cyan
26
The DV Rack Components
Page 33

The Vectorscope converts your video signal and displays it in green under a circular graticule divided by chrominance or color. The sections provide a means of
measuring the color amplitude and phase relationship of the red, green and blue
values of your video signal. The center of the graticule contains the black and
white portion of the signal.
For example, if you were to point your camera at a very red object, you would see
a signal much like the one in the Vectorscope pictured in this section which
appears exclusively within the red section. If you pointed the camera at a pure
white or black object, the signal would be displayed as a small dot in the center.
When viewing a white card, the Vectorscope can help indicate if the white balance
is off and in which direction. It is also useful for determining the degree of saturation in your signal which is crucial when setting up a green or blue screen shot.
LCDs are notorious for over-emphasizing saturation, particularly of primary colors.
Imagine a world where everyone owns their own Vectorscope. In this world, not
only could you improve the color and white balance of your video while you are
at the shoot, even the hopelessly color blind could pick out matching socks!
You can also use the Vectorscope to maintain color balance between clips and
multiple cameras. This is valuable if you are shooting a scene and the lighting
changes. Your subject may have one skin tone in an earlier scene and suddenly a
different one in the next. Or, in the case of using multiple cameras, shots from one
angle may have a different hue than shots taken from another angle.
The DVR - Digital Video Recorder
The DV Rack Digital Video Recorder enables you to record clips straight to your
hard drive. After you record clips, they’re added to the DVR Clip List. In the DVR
you can scrub through clips digitally and much faster than reviewing tape in your
camera. With one click, you can quickly jump to the frames that you’d like to analyze, identify any clip quality alerts and then make improvements by adjusting
your camera or lighting on the fly. You can also create clip notes as you go. To
learn more about clip files and formats, see Managing Clips
The Pre-Roll Recording Buffer
DV Rack actually starts recording before you hit the Record button. Pre-Roll
recording begins as soon as you connect your camera to DV Rack. You can set the
.
Serious Magic DV Rack Field Guide
27
Page 34
length of the Recorder Preroll RAM buffer to 0 through 29 seconds. The default
setting is 5 seconds.
NOTE: The buffer size can be limited to the available RAM on your computer.
Recording Clips
• To record a clip, click the Record button or if you are in DVR Slave To Cam
mode, you can use the record control on your camera.
A new clip will appear in the Clip List with the current default clip name,
date and time stamp. The time and frame counter will start and the clip
duration will begin to grow as your shot is recorded.
If the Pre-Record Buffer is on, the appropriate number of seconds of footage
will appear at the start of your clip. Your video signal should be visible in
the scopes if they are open.
• To stop recording, click the Stop button on the DVR to stop recording or
press Record on your camera again.
• To quickly start recording to a new clip, click the Record button again, (or
the Record control on your camera). A new clip, the one that you are actively
recording, is added to the Clip List.
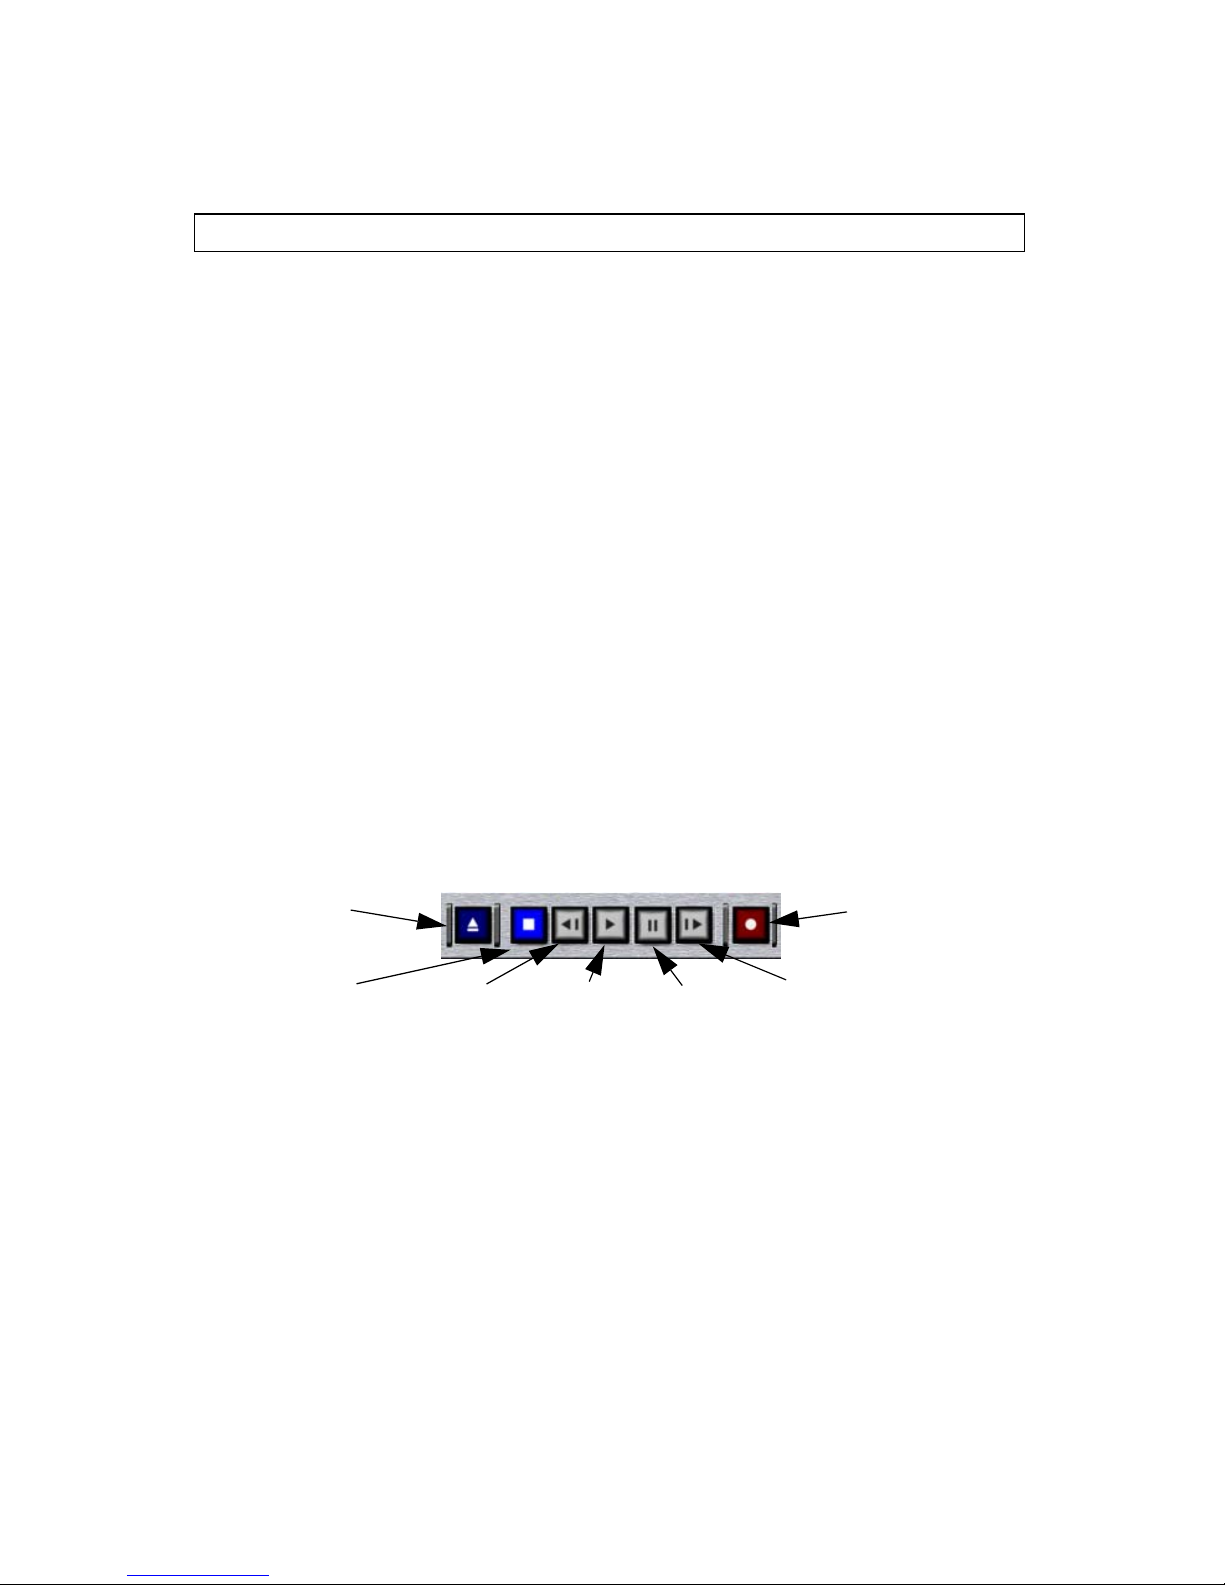
Reviewing or Scrubbing Through Clips
You can use the DVR buttons to delete clips, stop, move backward one frame,
play, pause, move forward one frame and record.
Use the Scrub Bar to quickly jump to the scenes that you’d like to analyze, identify
any Clip Alerts from the DV Quality Monitor and make quality improvements by
adjusting your camera or lighting and create clip notes as you go.
Eject
Stop 1 Frame Back Play Pause 1 Frame Forward
• To start recording, click the Record button.
• To select a clip, click the clip in the Clip List.
• To play a clip, click the DVR Play button. The clip will begin to play in the
Field Monitor.
• To play one frame forward, click the Forward button.
• To play one frame backward, click the Back button.
•To pause, click the Pause button. The still clip will remain on the Field Mon-
itor. To resume playing, click the Play button.
• To stop a clip and disconnect the DVR from the Field Monitor, click the Stop
button to stop playing or recording. If your camera is connected and turned
on, you will see live camera in the Field Monitor.
Record
28
The DV Rack Components
Page 35
• To remove a clip from the Clip List, click the Eject button.
Red Scrub Bar Click to move
Drag the cursor to the area
that you’d like
to work with.
the Scrub Bar to
that frame.
• To move to a particular spot in the clip, move the pointer arrow to the
region that you’d like to view and then click to move the Scrub Bar to that
location.
Creating and Editing Clip Notes
In the Clip List, click to the right of the Note: field. When the cursor appears,
enter any notes that you’d like to save about this clip. Your note will be saved and
viewable within DV Rack.
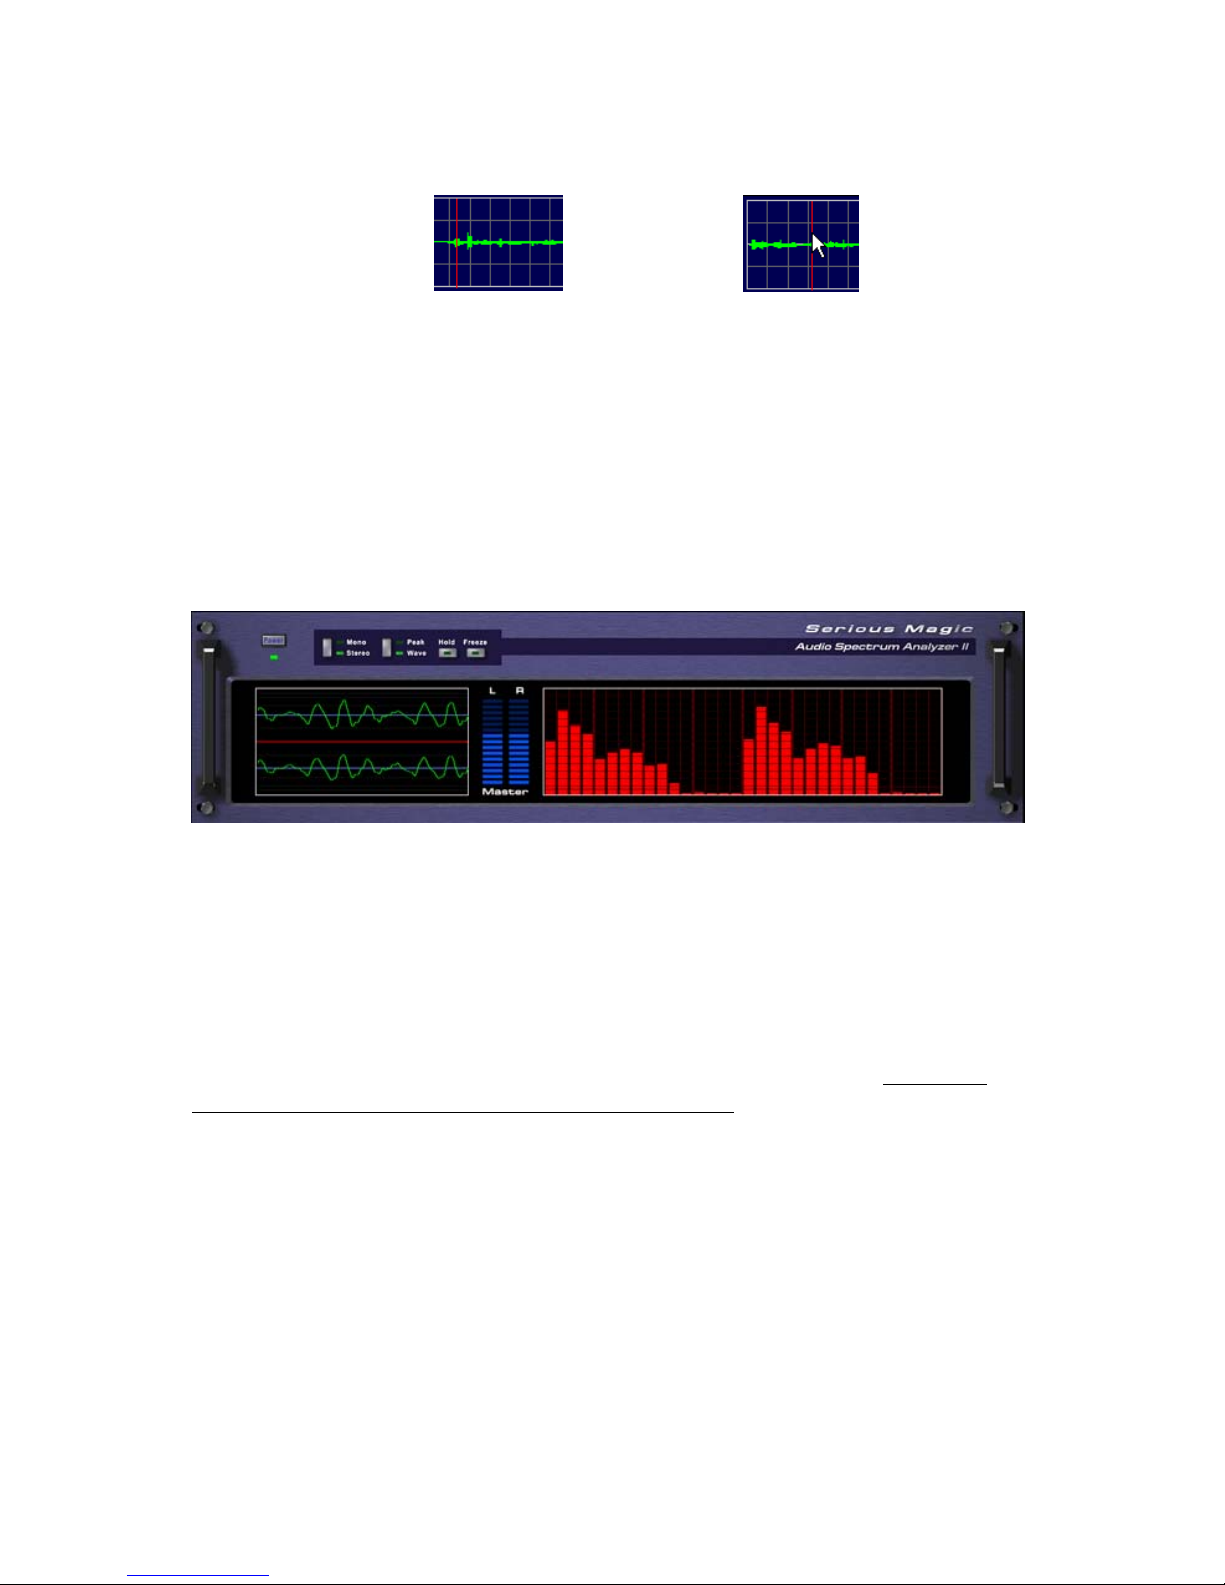
The Audio Spectrum Analyzer
The Audio Spectrum Analyzer can help you create a better recording environment by showing you the tonal range of your audio. You can use this information
to determine better microphone placement and orientation. It can also be helpful
in setting the audio input levels on your camera since most cameras only display
the total volume of the signal. The Audio Spectrum Analyzer goes further by displaying how the audio energy is distributed across the dynamic range of the signal. This tool also provides a visual reference when directing your talent's vocal
performance. To learn more about analyzing your audio signal, see Using the
Audio Spectrum Analyzer to Analyze Audio Quality.
Serious Magic DV Rack Field Guide
29
Page 36
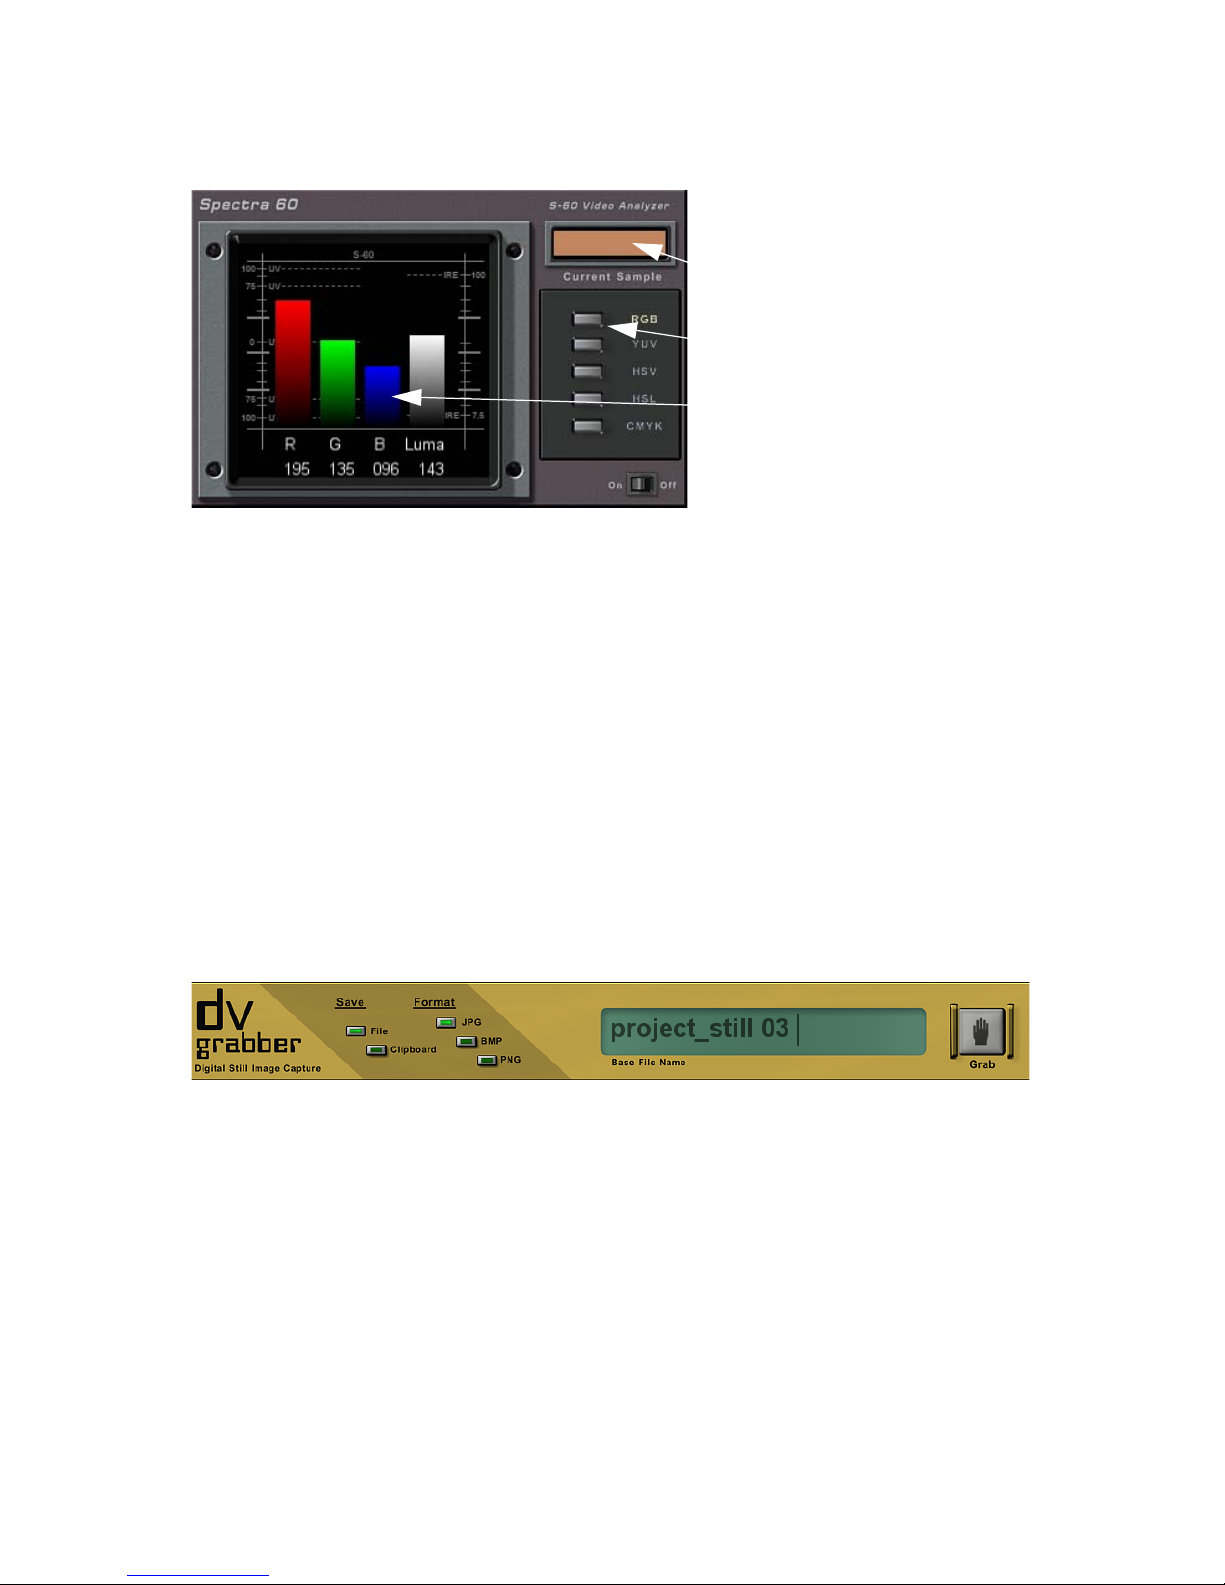
The Spectra 60
The current sample
displays the color of the
pixel that your pointer is
currently over in the Field
Monitor.
Use the buttons to select
a color space.
The bars represent the
amount of each color and
luma in the current
sample.
The DV Rack Spectra 60 enables you to digitally monitor and evaluate your video
with pixel-accurate chroma and luminance samples. It is different than traditional
analog analysis tools as it allows you to monitor any pixel in an image whereas
traditional scopes provide only scanline or full screen information. Place the cursor over any pixel in your image and the Spectra 60 reports precise information
about it’s color space. Available color space options include RGB, YUV, HSV, HSL
and CMYK.
1. Click the button for your desired color space.
2. Position the cursor over the pixel you’d like to sample on the Field Monitor.
3. The selected pixel’s color is displayed in the Current Sample box.
4. The Red, Green and Blue values of the current sample are represented in the
colored bars.
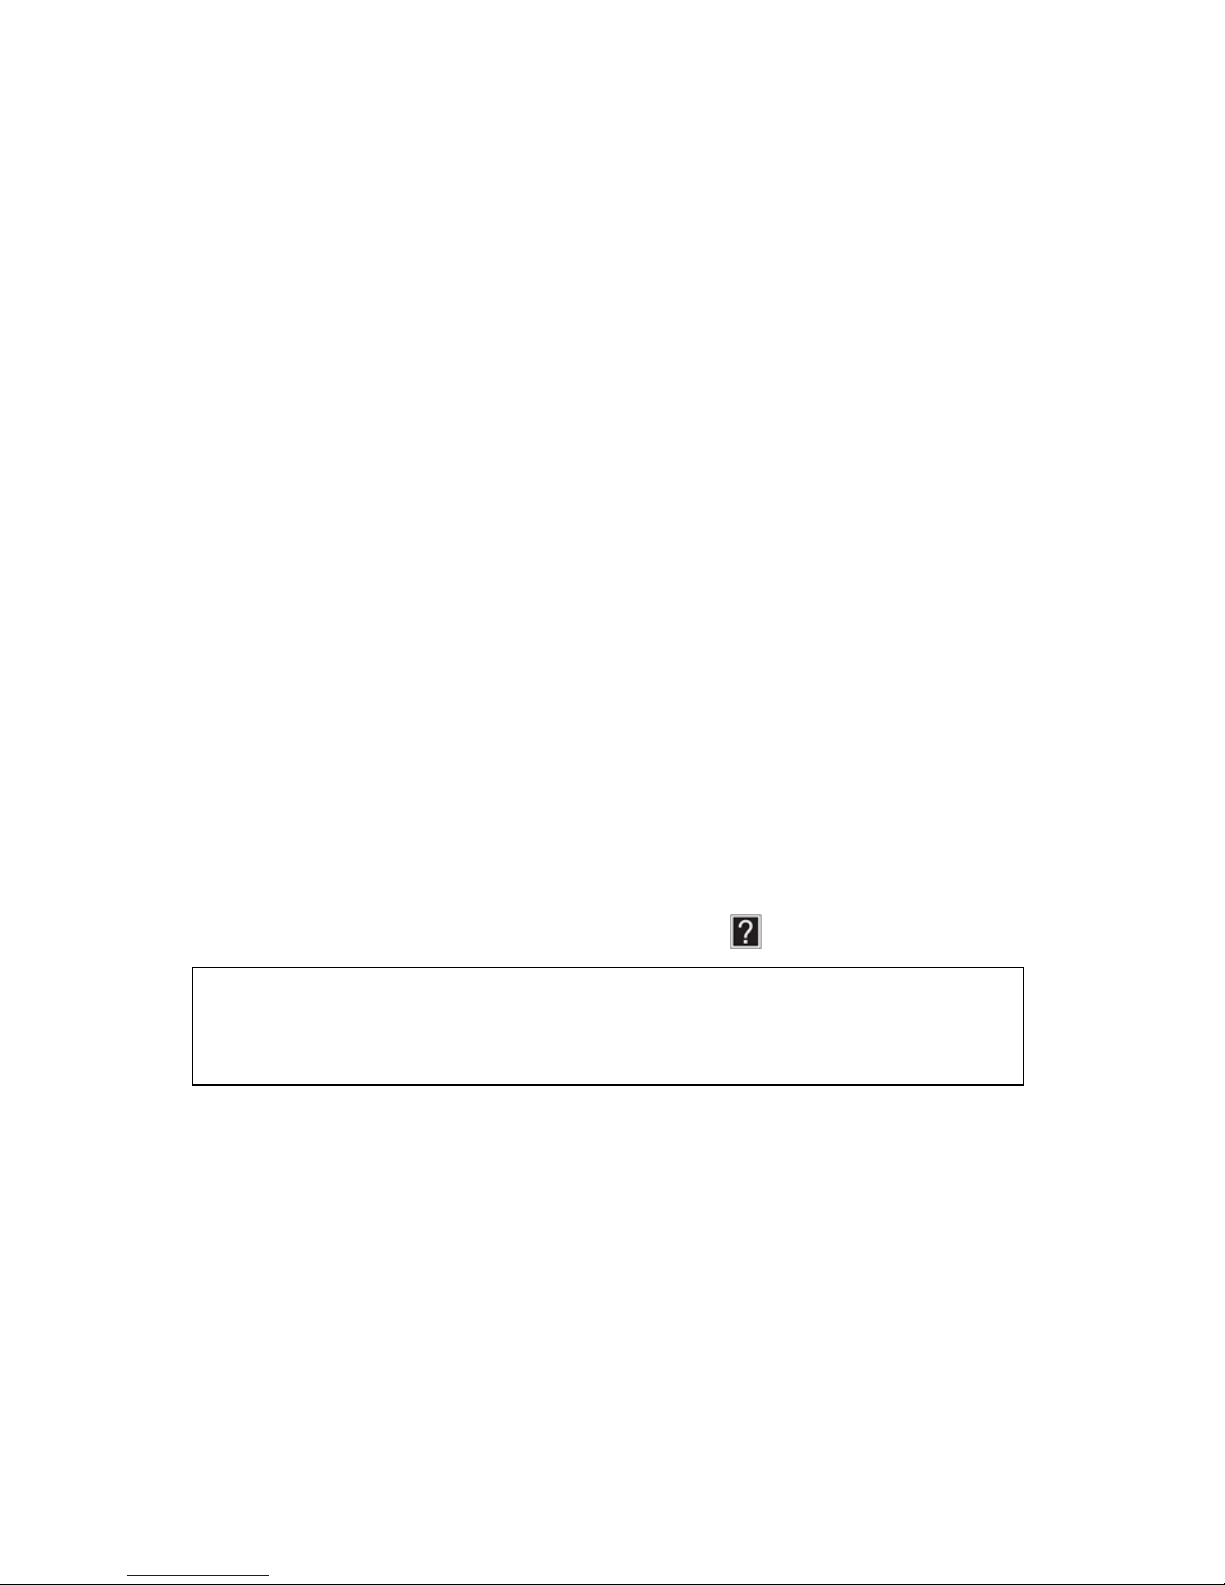
The DV Grabber
The DV Grabber enables you to capture still image files. You can quickly grab
high resolution stills from video clips or live video and save them to your hard
drive. Save still images to .jpg, .bmp or .png format and if you wish, edit them in
any standard image editing software. Use them in an NLE application like Sony®
Vegas® or image editing software like Photoshop® or Jasc® Paintshop Pro®. Use
image editing software to compress them to a smaller file size for emailing.
Setting the Grabbed Still Pixel Ratio
Before grabbing an image, make sure the correct pixel ratio is set to match your
intended use. If you intend to use the still in a video editing application you will
most likely want to set it for “Video” which creates a still at 720 x 480 resolution
with an aspect ratio of .9 to 1. If you intend to use the still on a computer (for
30
The DV Rack Components
Page 37
emailing, posting on a web site or editing in a paint program) you will want to set
it for “PC 1:1” which creates a still at 640 x 480 with an aspect ratio of 1:1. To set
the pixel ratio for your grabs:
1. Click the Field Monitor Menu button.
2. Click the Grab Pixel Ratio setting and drag it to the desired setting.
3. Click the Menu button again to close it.
Using the DV Grabber to Capture Still Images
1. On the DV Grabber, click the File or Clipboard button to choose where
you’d like the image to be saved. You can choose File, Clipboard or both.
•If you select Clipboard, your file is copied to the Windows Clipboard. To
paste the image into another program or file: open the second application
and press CTRL-V on the keyboard or use the Paste command.
•If you selected File as your destination, your image is saved to a file. Grab
files are saved to a Grabbed Stills folder within your current project
folder.
2. Click the JPG, BMP or PNG button to select a file format.
3. The name of the grabbed still is displayed in the Base File Name field.
4. If you wish to change the name, click in the field and edit the name.
5. The name of the next grab file is displayed in the Base File Name field.
• To grab a frame from a clip, click or drag to the frame that you wish to
capture in the DVR, then click the Grab button.
• To grab a frame from your camera, with a live picture displayed in the
Field Monitor, click the Grab button when you see the shot you would
like to grab.
See Help for more information about grabbed stills.
NOTE: If you save to the Clipboard and you shut down your computer before pasting the
still into another application, it will be lost. Also, because the clipboard can only hold one
object at a time, if you copy other items from DV Rack or any other application onto
the clipboard before pasting the still into an application, the still will be overwritten.
Serious Magic DV Rack Field Guide
31
Page 38
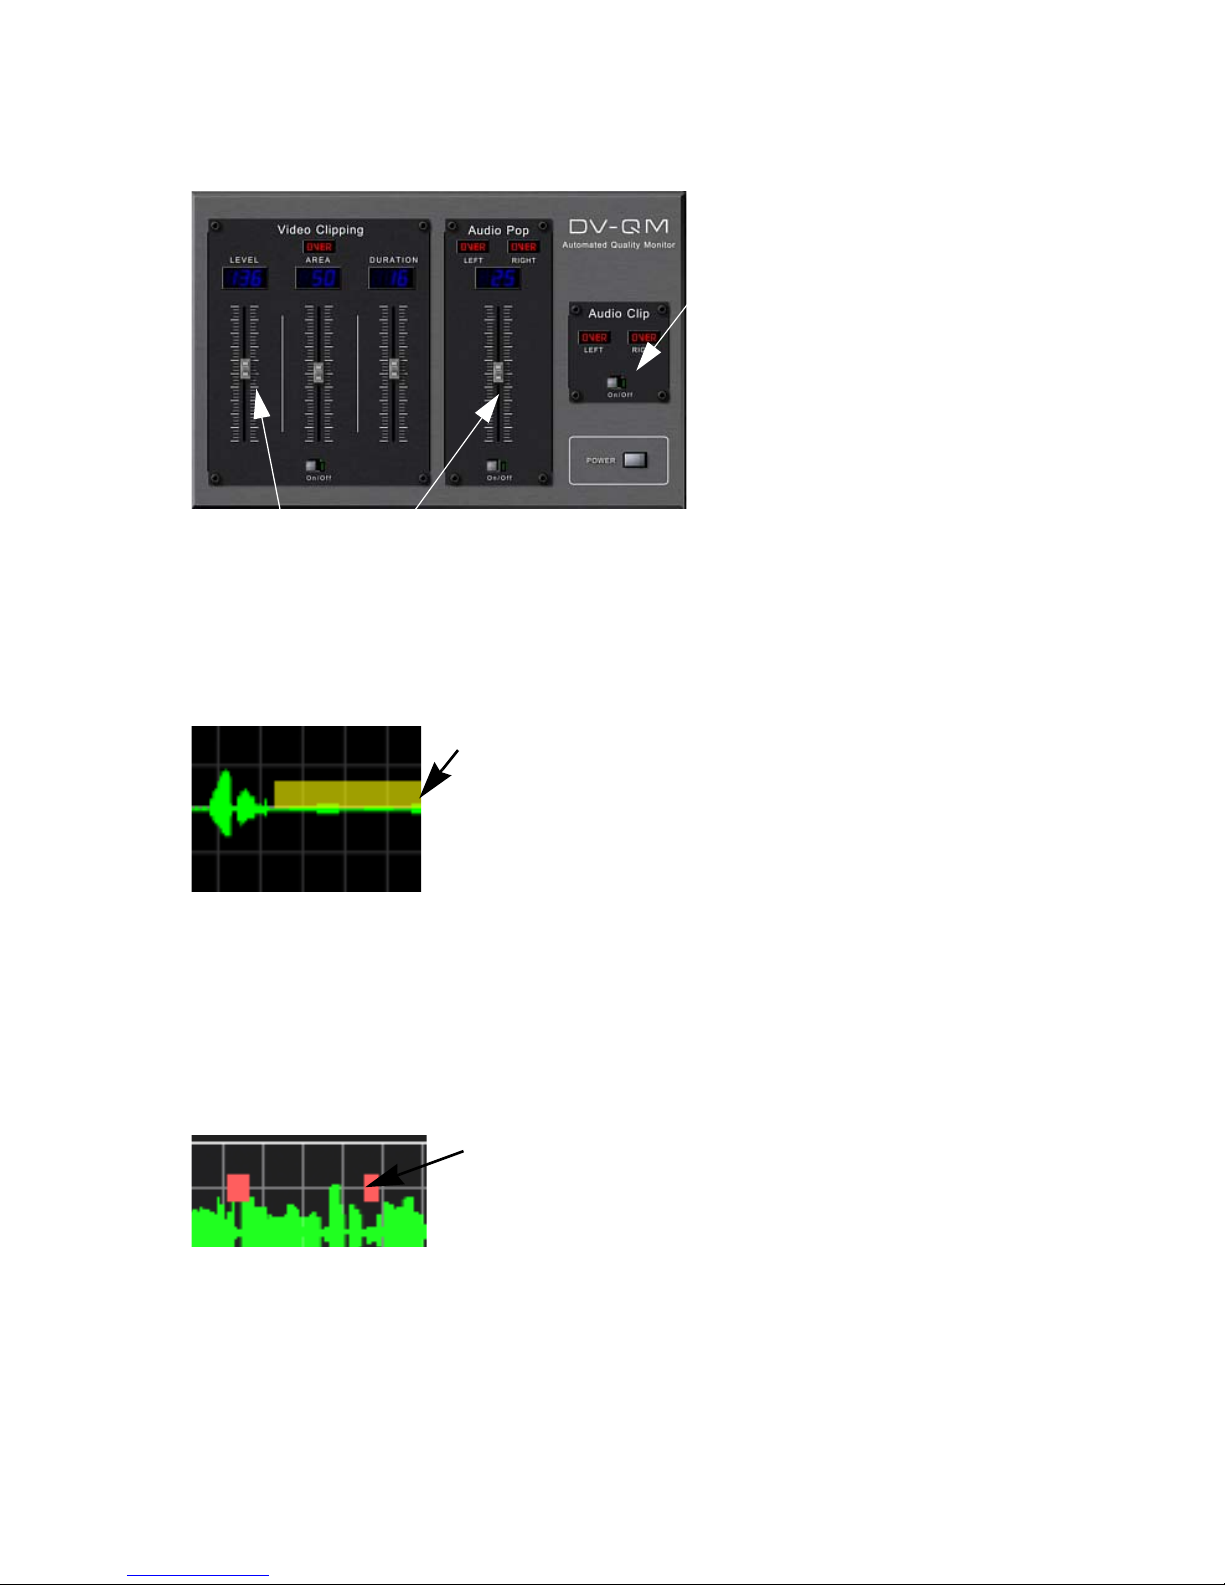
The DV Quality Monitor and Clip Alerts
Turn Audio Clip Alerts On or
Off
Drag the sliders up or down to set threshold levels for
Video clipping and Audio Popping
The DV Quality Monitor allows you to set allowable limits for audio and video
signal ranges. When your signals exceed these thresholds, Clip Alerts are
displayed in the DVR.
Video Clipping Alerts
Video Clip Alerts appear as yellow bars that run through the
middle of the green audio wave form in your clip. When you
see a Video Clip alert, this indicates that there may be clipping
in your video and your picture may be distorted.
Video clipping can occur when a quick, bright flash appears in your video such as
when a car with shiny hubcaps speeds by and momentarily catches the sun’s
reflection. You may not see the flash while you record but DV Rack will catch it
and display it as a video clipping alert in your DVR. You set the allowable luma
level, sample area and event duration thresholds and video Clip Alerts tell you
when your video quality exceeds all three threshold settings.
Audio Popping Alerts
Audio Pop Alerts appear as rectangular blocks along the
audio signal in your clip. Pop Alerts identify sudden surges in
sound that don't clip but are likely to result in unpleasant and
possibly, unusable audio.
Audio Pop Alerts indicate sudden or “popping” noises (sometimes associated
with “p” sounds in talent’s speech) or sudden level changes. You set the level of
“pop sensitivity”.
32
The DV Rack Components
Page 39
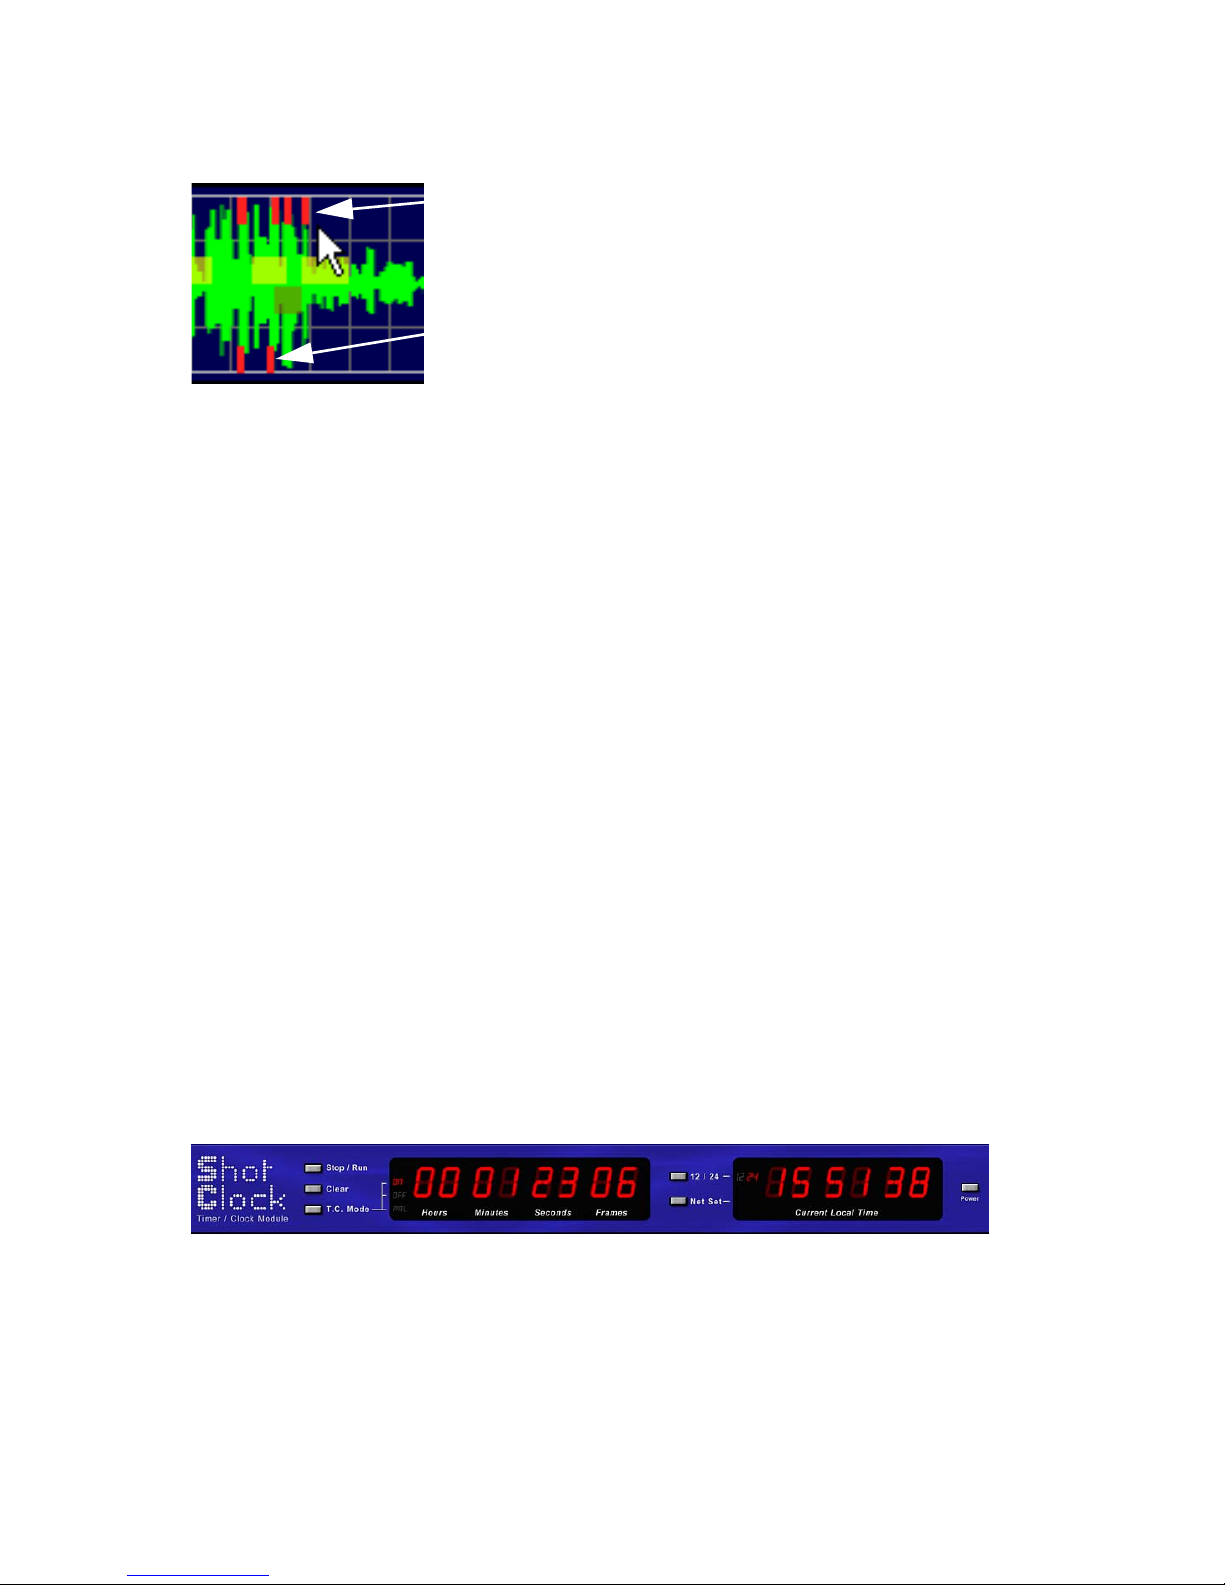
Audio Clipping Alerts
Alerts at the top
of the signal
are for the left
audio channel
Alerts at the
bottom are for
the right
channel.
Audio Clip Alerts appear as thin red
markers at the top and bottom of the
green audio wave form in your clip.
When you see an Audio Clip Alert, this
indicates that there may be a problem
with your audio. Review it and adjust
your equipment as needed.
Audio Clip Alerts indicate the presence of sounds beyond the recording range of
your microphone. This type of audio clipping may or may not be audible on location but can cause problems when editing. You can turn this setting on or off.
Setting Clip Alert Thresholds in the DV Quality Monitor
Video Clipping Settings
Video Clipping Alerts indicate whether there is too much light in your picture.
You define what “too much light” is by selecting the allowable luma level, sample
area size and event duration in frames. The light level must exceed all three of
these thresholds. The Video Clip Alert will extend for as long as all three thresholds are exceeded.
• Level - Drag the slider to set the amount of allowable luma in a sampled
pixel.
• Area - Drag the slider to set the maximum area in the recorded frames that is
allowed to contain pixels with over-threshold luma (by percentage).
• Duration - Drag the slider to set the maximum number of consecutive
frames that can contain over-threshold pixels before video Clip Alerts
appear.
Audio Popping Setting
• Level - Set the degree of sudden level change required to trigger an alert.
Audio Clipping
• Turn Audio Clip Alerts on or off.
The Shot Clock
The Shot Clock’s timer and production clock capabilities enable you to time
events in hours, minutes, seconds and video frames. You can time your clips
using a drop frame rate, non-drop frame rate or a PAL rate and choose between a
12 or 24 hour clock.
Serious Magic DV Rack Field Guide
33
Page 40

Using the Shot Clock to Time Your Clips
You can use the Shot Clock to time events or clips.
Times are recorded in hours, minutes, seconds and frames. The Shot Clock by
default is set to automatically run when you press the DVR Record button or
when you start recording from your camera. To turn off this feature, click the Field
Monitor Menu button and set the Shot Clock Slave to Off.
•Click the Stop / Run button to Start or Stop the shot timer.
•Click the Clear button to clear the shot timer.
•Click the Drop Frame button to set the clock to drop frame mode, (29.97
FPS), non-drop frame mode, (30 FPS) or use PAL frame rate, (25 FPS).
•Click 12 / 24 to change between a 12 and a 24 hour clock.
•Click the Net Set button to automatically set the clock via the Internet to the
atomic clock at the U.S. Naval Observatory. (Internet connection required.) If
you are not connected to the Internet, set the clock by setting your system
time in the Windows Control Panel.
34
The DV Rack Components
Page 41
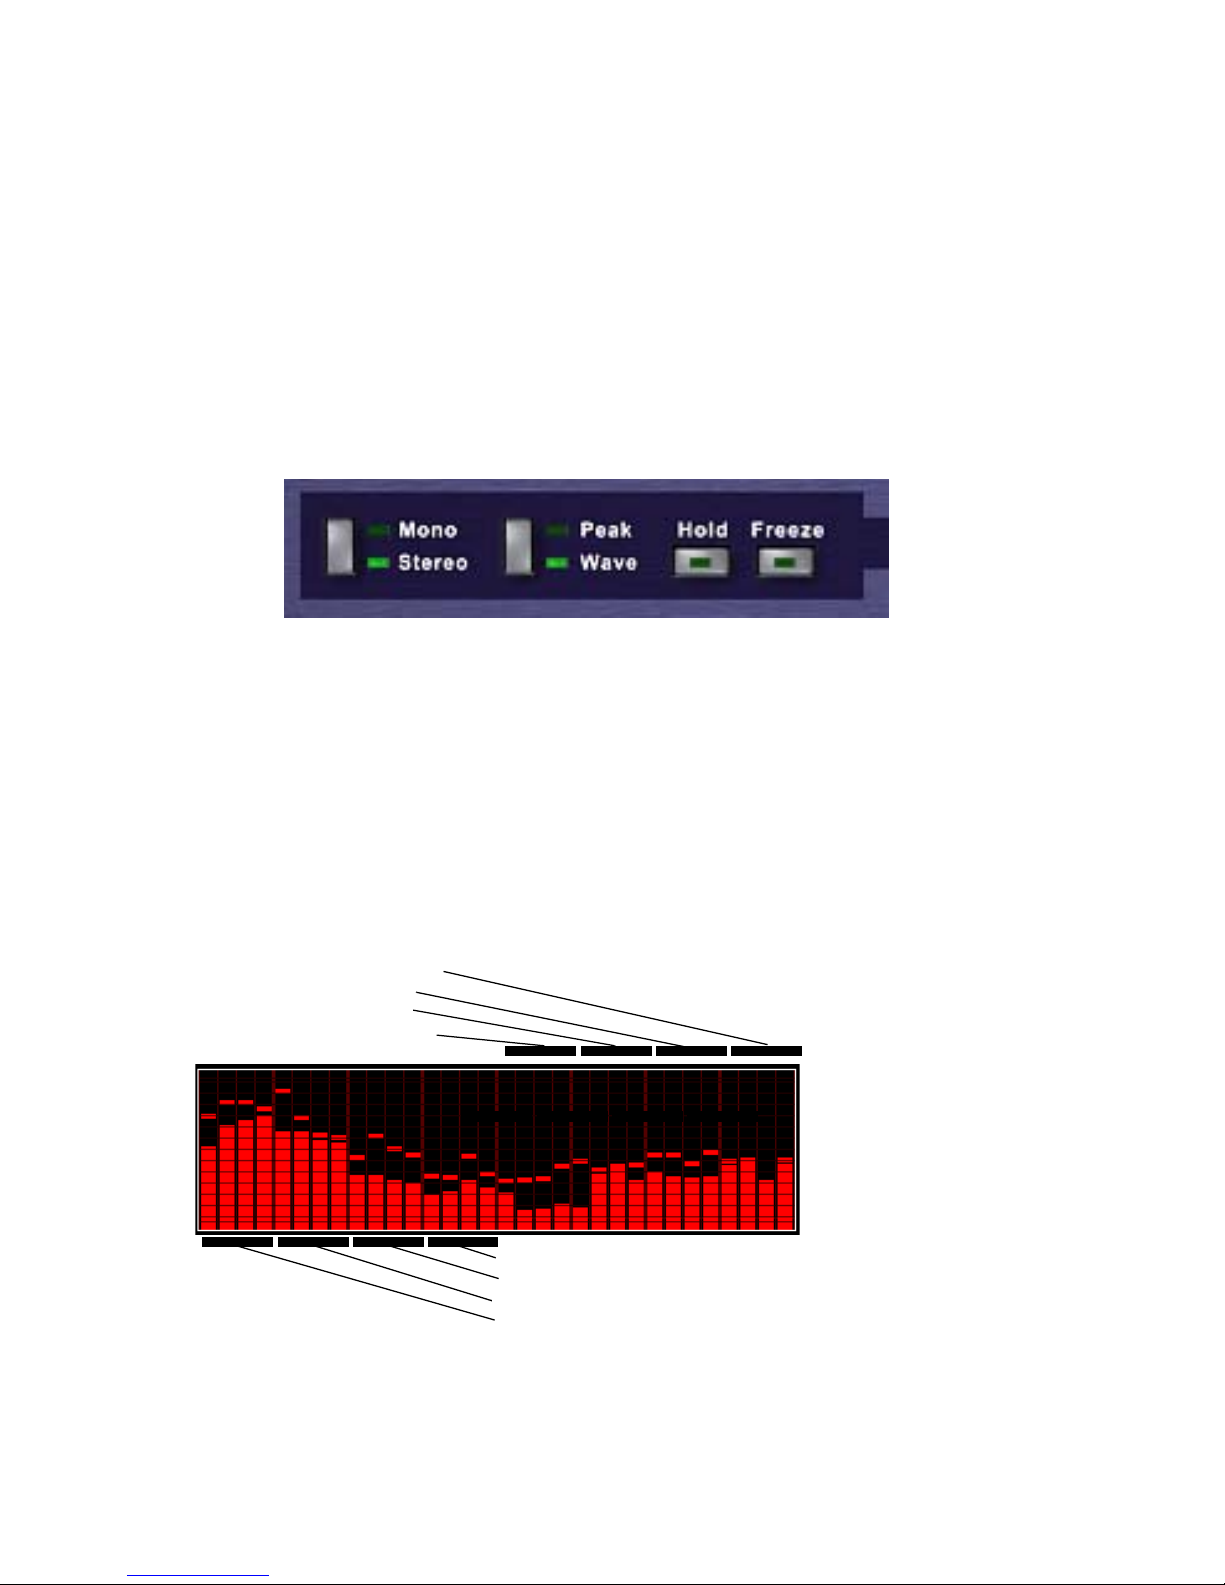
Additional Ways to Improve Your Video
• Using the Audio Spectrum Analyzer to Analyze Audio Quality
• Improving Clip and Scene Continuity
• Maintaining Consistent Color and Brightness Using a Green Screen
Using the Audio Spectrum Analyzer
to Analyze Audio Quality
Mono / Stereo mode Peak / Wave mode Hold Peak Marker Freeze Audio Bars
Checking Audio Balance and Range
Use the Audio Spectrum Analyzer to evaluate your audio and try to achieve an
evenly balanced range of audio. You may need to change audio levels on your
camera or change the orientation or position of the microphone. Use the panels in
Mono and Stereo modes to analyze your audio.
How to read Analyzer panels in Mono mode
Viewing the audio wave in Mono mode allows you to view 32 bands or range separations. This helps isolate problem sounds like ambient fan or motor noises.
Highest Treble
High Treble
Low Treble
Lowest Treble
Highest Bass
High Bass
Low Bass
Lowest Bass
Serious Magic DV Rack Field Guide
35
Page 42

How to read Analyzer panels in Stereo mode
In Stereo mode, the first 16
bands represent the audio
The second 16 bands represent the same audio
ranges for the Right channel.
ranges for the Left channel.
Highest Treble
Lowest Treble
Highest Bass
Lowest Bass
You can also monitor audio quality in the Clip List by watching for indicators that
tell you about excessive, clipping or popping. See The DV Quality Monitor and
Clip Alerts.
Peak Wave
lick the Peak / Wave button to toggle between Peak and Wave mode.
Using Hold and Freeze to Analyze Audio
Use the audio peak markers to quickly identify the highest audio energy level
reached in each band while playing or recording a clip.
Audio peak markers
in the signal.
•Click the Hold button to suspend just the audio peak markers in the signal.
•Click the Freeze button to freeze a snapshot of all the bars in the panel.
Balancing Audio Between Two Microphones
If you are using two microphones or other audio sources, monitor each input separately by switching the Audio Spectrum Analyzer to Stereo mode. Click the
36
Additional Ways to Improve Your Video
Page 43

Stereo / Mono button to split the panels between each source and compare the
ranges in each signal to ensure you are getting the signal that you want from each.
NOTE: Some cameras map Audio1 and Audio 2 to the Left and Right channels of the
signal.
Improving Clip and Scene Continuity
Any time you break production and set back up, it’s a good idea to double-check
continuity between your new setup and previously recorded clips. Even if you
just break for lunch, important aspects of your clips can change. Avoid continuity
problems by using the DV Rack split screen feature.
Using the Clip List to Check Video Continuity
Sometimes an instant full-screen cut between two pre-recorded scenes is a better
way to compare framing or catch continuity problems. You can easily do this in
the clip list. As you scrub clips, each clip remembers the last position you viewed
in the clip. The red Scrub Bar indicates this position even when the clip is no
longer selected. If you select a clip by clicking outside the audio waveform, the
clip will display the last frame viewed. By clicking this way back and forth
between two clips you get an instant cut.
Typical continuity and consistency problems
Here are some “gotchas” to look for:
• Lighting - If you’ve ever done a shoot outdoors, you know what problems
the changing sun can cause. Even subtle changes in outdoor light can cause
color balance to shift. Run SureShot to recalibrate your camera.
• Color Balance - Check skin tones, shirt color, etc. between shots to make
sure everything matches. If you are shooting out of sequence, it will be very
important that the camera has the same color balance from scene to scene.
To check for color matching, use the Spectra 60. Move the cursor over a specific area in each clip and check the color space values.
If color balance does shift, then either your camera or your lighting has
changed since the earlier footage was shot, and needs to be adjusted.
• Microphone Placement - Make sure lapel microphones are clipped in the
same spot in any shots that may be edited together.
• Hair Style - Make sure your talent’s hair hasn’t changed. Going to lunch on
a windy day can rearrange your talent’s hair style. Check the talent’s previ
ous footage before you begin again.
• Accidental Zoom - You meant to turn the focus ring but hit the zoom ring
instead. Trying to get the exact framing back is virtually impossible - with
out DV Rack.
• Make-Up - Under warm lights, talent can get increasingly “shiny” with
specular hotspots on cheeks and forehead. Your talent's make-up often
needs a touch up as the day wears on.
• Talent Framing and Position - As talent gets tired or relaxes, their posture
can change. Beware the “late afternoon slouch”! Although videographers try
-
-
Serious Magic DV Rack Field Guide
37
Page 44

to avoid it, sometimes the only talent seating available is a chair that rolls,
rocks or swivels. An accidental chair move of less than a foot forward or
back during a break can cause shots that don’t edit together well.
Maintaining Consistent Color and
Brightness Using a Green Screen
When setting up to shoot on a green or blue screen, refer to the Vectorscope,
Waveform monitor and Spectra 60 while making camera and lighting
adjustments. Your goal is to maximize the purity and saturation of the
background as much as possible without negatively impacting the foreground
subject. If you are continuing an existing green or blue screen shoot, make sure
that the color balance and brightness of the green screen hasn’t changed
significantly by using the scopes to compare with the existing clips. Make
adjustments to camera and lighting as necessary to ensure continuity of color and
saturation. This saves time in the edit suite by allowing you to use the same keyer
settings for all clips.
Another valuable application for DV Rack when shooting chroma key is to use the
Spectra 60 to detect background color spill onto your foreground subject. Spill is
the subtle color tinting on your subject from light bouncing off the floor back onto
the subject. It is particularly noticeable when the subject is wearing light colors.
Spill can be corrected in post-production (particularly if you're using Serious
Magic's Ultra) but it can take some tweaking in the edit suite. Fortunately, spill
can largely be eliminated by adjusting lighting and by covering up those areas of
the chroma color floor that aren't visible to the camera.
Spill can be difficult to see, especially on a camera's flip-out monitor. Use the
Spectra 60 in RGB mode and run the cursor over your foreground subject, paying
particular attention to areas close to the edge of the subject. Use Zoom and Freeze
as necessary. Look for
elevated areas of the chroma color, usually green or blue, and work with your
lighting, subject and environment to minimize the spill.
38
Additional Ways to Improve Your Video
Page 45

Videography Basics
• Color Bars
• White Balance and Why It’s Important
• Zebra and How it Can Improve Your Video Quality
• A Different Breed of Zebra Using Dark Zebra to Preserve Shadow
• Audio Clipping
• Achieving Good Technical and Aesthetic Framing
• Zooming
• Dynamic Range
Even if you've graduated from film school, most practical production knowledge
is still learned “on the job”. Hence, video production is much like astrophysics, no
one really “knows it all”. This section is designed to cover a few basics.
In these short recaps, we hope to give you enough essentials to understand how
you can use some of the DV Rack components to improve your video and audio
quality. For example, we believe that you can do a better job of using Zebra to
adjust exposure and lighting if you have some idea of how Zebra patterns work.
Color Bars
NOTE: Calibrating to DV Rack Color Bars provides a more accurate calibration than using
your camera’s color bars. The bars on your camera are compressed and then decom
pressed between your camera and your computer. DV Rack bars are more stable, accurate
and never compressed.
Color Bars and their names
-
Serious Magic DV Rack Field Guide
39
Page 46

White Balance and Why It’s Important
White balance is important because it is how cameras determine the proper hue of
colors in a given environment. An object's color is determined by how it absorbs
and reflects light. This means that the apparent color of things is dependent on the
light hitting them. All light sources have a hue or color tint that varies. Anyone
who has suffered an eight hour day under the glare of bad fluorescent lighting can
attest to this! Things seem to gain a ghastly greenish hue under fluorescent lights.
It's a substantially different hue than the sunlight found outdoors on a cloudless
day. Even sunlight varies its hue depending on the time of day and cloud cover.
The hue of the ambient light (sometimes called “color temperature”) makes
objects that receive that light appear different. It can even impact how people feel.
In the movie “Joe vs. the Volcano”, Tom Hank's character claimed that fluorescent
light can “suck the life out of you”. While that may not be entirely true in a scientific sense, we sometimes feel like it's not far off the mark.
The human eye actually adapts fairly well to ambient lighting changes and “corrects” for them. When you are in a room that has strong green light in it, a white
piece of paper actually looks greenish but your brain corrects for this and lets you
“see” that paper as mostly white. The problem is that a person seeing an environment through the magic of your camera lens isn't actually there and their eyes
aren't getting all those subtle cues about the hue of the ambient lighting in the
environment.
This is why cameras have a clever function that lets them “learn” what hue the
light is in a scene and adjusts for it. This function is called Manual White Balance
and it works by being shown something in the ambient light that is assumed to be
white. This function tells the camera, “Ok, whatever this looks like to you, adjust
your color tuning to make it look white”. In actuality the “white” probably
appears somewhat greenish under fluorescent lighting or reddish under incandescent lighting. This process allows the camera to adjust to the environment's
ambient lighting. Once the white object is adjusted to appear white, the other colors from red to blue to green will all appear proper under the current ambient
lighting.
Modern video cameras also have an Automatic White Balance function that
attempts to determine the proper hue adjustments based on what the camera sees
in the scene. As you can imagine, this can be a hit or miss proposition that
depends on the content of the scene. In the interests of career preservation, most
professional videographers religiously set the white balance on their cameras
manually. This prevents the camera from making a bad “automatic” assumption
during shooting and turning a fair-skinned person in front of a deep red curtain
into a slightly sunburned Smurf (don't laugh, it happens)!
If you want to get great looking video with color that's properly adjusted for the
current ambient lighting, spend a few moments setting the manual white balance
on your camera and verify it with DV Rack’s Sureshot component. In general it's
best to avoid ambient lighting transitions during a shot, if at all possible. In some
40
Videography Basics
Page 47

situations, such as moving from indoors to outdoors in one continuous shot, automatic white balance must be used. In this case, you should carefully review the
shot in the DV Rack digital recorder (using the freeze, zoom and Spectra 60 functions if necessary) to ensure that the camera's automatic white balance function
correctly tracked the changing scene.
Zebra and How it Can Improve Your Video Quality
Zebra is a pattern of diagonal black and white stripes that are overlaid on selected
areas of your video and displayed in the DV Rack Field Monitor. When you turn
Zebra on, an easily discernible striped pattern will appear in the area of your picture which may be too bright or too dark.
If an area is too bright, like a shiny spot on someone’s head, it can be distracting to
your audience. If an area is too dark, viewers may have problems discerning
detail in areas that are in the shadows. Zebra helps by alerting you to these problem areas. Your particular thresholds will be unique depending on where you set
them in the Menu button settings but DV Rack default settings attempt to approximate some common scenarios.
A Different Breed of Zebra
Using Dark Zebra to Preserve Shadow
The freedom to create areas of dark shadow in a scene is desirable because it can
meet so many different cinematic goals. But it can be particularly challenging to
create dark or moody ambience in the DV format because the format can be quite
unforgiving when areas of shadow get too dark. Undesirable noise is often introduced into the image which cannot be compensated in post-production.
When lighting and adjusting your camera to create dark ambience you are often
pushing the capabilities of your camera. Fortunately, many DV cameras can
deliver remarkably compelling images in such scenes. The problem is that the
margin for error is narrow and accurate. Objective monitoring of shadow areas is
crucial.
This situation is made especially difficult when using the flip-out screen on many
DV camcorders. In these small screens any region that gets too close to black,
often just appears entirely black. Additionally, the camera's screen, (or even an
external analog monitor), does not show the impact of DV compression on the
live video. It must first be recorded and then played back from tape to see what is
actually happening. DV Rack's native DV field monitor is invaluable in these situations because you can see the DV-compressed image in real-time as you make
changes.
DV Rack’s dark Zebra allows you to introduce strong shadows into a scene with
the confidence that there is enough detail remaining in the desired areas to still
resolve an image. For example, rich feature shadows on your talent's face can be
dramatic. However, it will look amateurish if there is no detail at all in the shadow
area. In another situation, you may want to ensure that the darkest parts of a
Serious Magic DV Rack Field Guide
41
Page 48
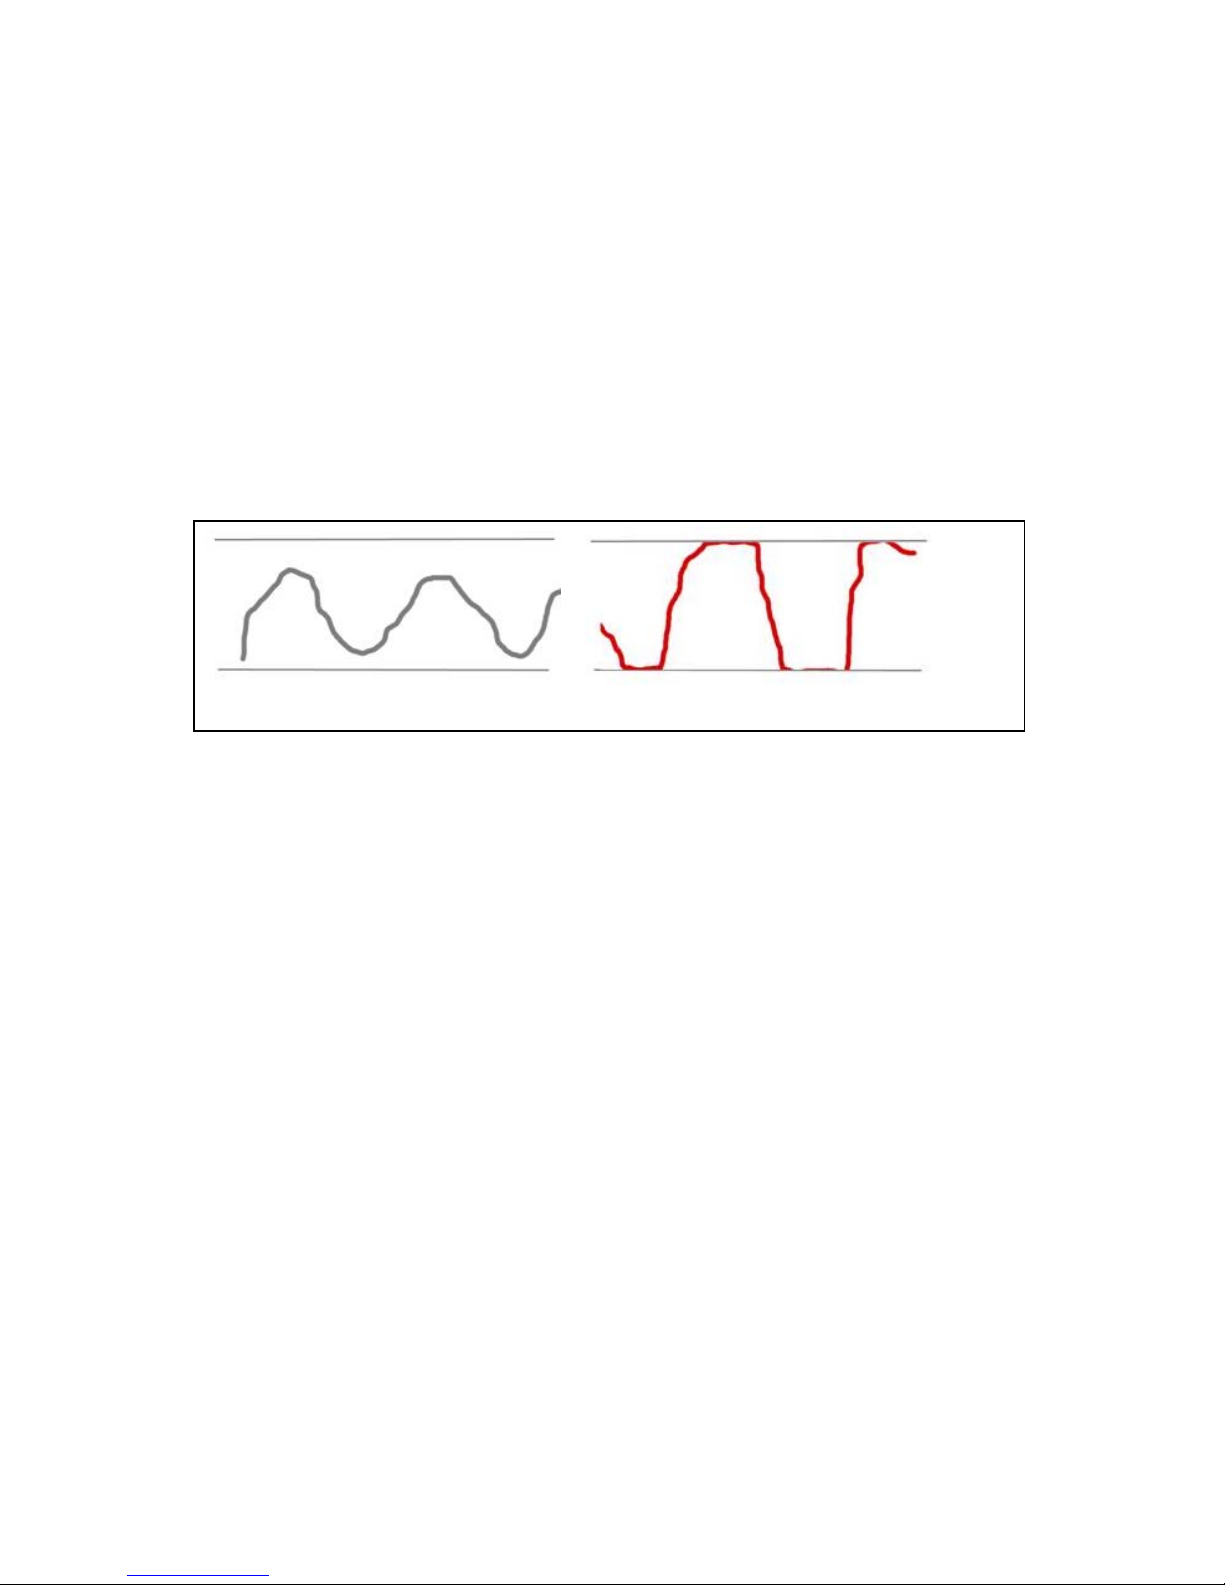
shadow area, such as the recesses of a corner, reach pure black. This maximizes
the dynamic range of the image and also provides greater flexibility should you
wish to later post-process the scene in your editing software.
When setting up the dark zebra feature, the values you'll want to use will vary
depending on your camera and your vision for the look you are trying to achieve.
Audio Clipping
DV Rack provides visual Audio Clip Alerts when the audio signal exceeds the
range that your camcorder can digitize. Microphones are analog devices that turn
sound waves into electrical signals. These electrical signals are turned into digital
values by a chip in your camcorder. These digital values have a finite range,
(about -32,000 to 32,000).
An example of an audio signal with clippingA properly recorded audio signal
Clipping occurs when parts of the signal go above the top of the digital range.
Since these values are above the range, there are no numbers large enough to represent them and they are lost forever. Back in the analog days you could get away
with some clipping but with today's digital signals, clipping is just about always a
really bad thing.
When clipping occurs, the most important thing is to detect it immediately since
there is nothing that can be done to fix the situation later. To stop clipping from
happening, you should use DV Rack to monitor the audio signal and adjust the
audio recording levels of your camera so that the loudest sound that will come
from the microphone will not be so loud that it clips. Other things that can be
done include:
• Reorienting the microphone, (pointing it further away from the loudest
sound)
• Repositioning the microphone farther from the sound source or
• Coaching your talent to reduce their dynamic range
Clipping does not always distort the sound to the human ear. In some cases, clipping occurs at brief intervals, for example, when a person says the word pepper
and makes a “popping” sound when they pronounce the letter “P”. In fact, a sudden and brief audio “pop” may not clip at all but will still become an undesirable
artifact in your audio signal. This is why DV Rack also has a pop detector
designed to identify sudden surges in sound that don't clip but are likely to result
in unpleasant, and possibly, unusable audio.
42
Videography Basics
Page 49

Modern cameras have an Automatic Gain Circuit (AGC) that can be enabled for
audio inputs. These circuits try to vary the recording level to match the incoming
signal. As you can imagine, this is a hit or miss process. Most professionals prefer
to monitor and adjust their audio levels manually except in certain circumstances
where this is not possible. DV Rack takes a great deal of the complexity and risk
out of recording audio in manual mode.
Achieving Good Technical and Aesthetic Framing
Overscan, Underscan and the Video Safe Area
Back in the day of the first television sets, TVs had screen sizes that seem paltry by
today's standards. A 12 inch screen was considered a luxury. And to make matters
worse, these expensive little screens actually shrunk as they got older.
As these older sets aged, the visible picture area of the screen shrank because the
electron gun that created the picture, much like you and I, didn’t move as well as
it got older. Try as they might, those poor electrons were unable to get around as
well as they used to and could not fill the entire screen.
Aging TVs sets would start to show a black border around the edges of the picture
where the top of Howdy Doody’s hat and belt buckle used to be. Well you can bet,
customers started to complain. They felt that if they paid the extra dollars for a 12inch screen, then the picture better darn well fill the whole 12 inches!
This created a conundrum. The electron gun could be recalibrated to fill the whole
screen, but this solution was time consuming and costly. How could TV manufacturers prevent this from happening? The answer was to “crank up” the electron
gun to Overscan the picture beyond the borders of the picture tube. This ensured
that as the television aged, the displayable area of the picture tube would remain
full, no black border would appear and children everywhere would never miss a
pixel of Howdy Doody. Once again, all was well in television land. However, it
has frustrated videographers and graphic designers to this day.
When camera operators frame a shot they must always take this television overscan condition into consideration by making sure each shot fills the overscan area
while at the same time, not losing any crucial parts of the picture outside of the
Video Safe area.
The DV Rack Video Safe indicator displays a white border on the Field Monitor
screen. The Video Safe border is centered on the true center of the picture that all
televisions see. To complicate things further, the industry uses the terms Overscan
and Underscan in a counter-intuitive way. When you view the Underscan area,
you actually see more of the picture than when you view the overscan area.
NOTE: Most LCD displays on camcorders try to simulate the Video Safe Area but they
don't accurately show the whole picture which can make it difficult to frame a shot
properly. There may be objects creeping into your shot around the edges of the
screen that you won’t see until you leave the shoot. This is where a Field Monitor with an
Underscan capability like the one in DV Rack becomes important.
Serious Magic DV Rack Field Guide
43
Page 50
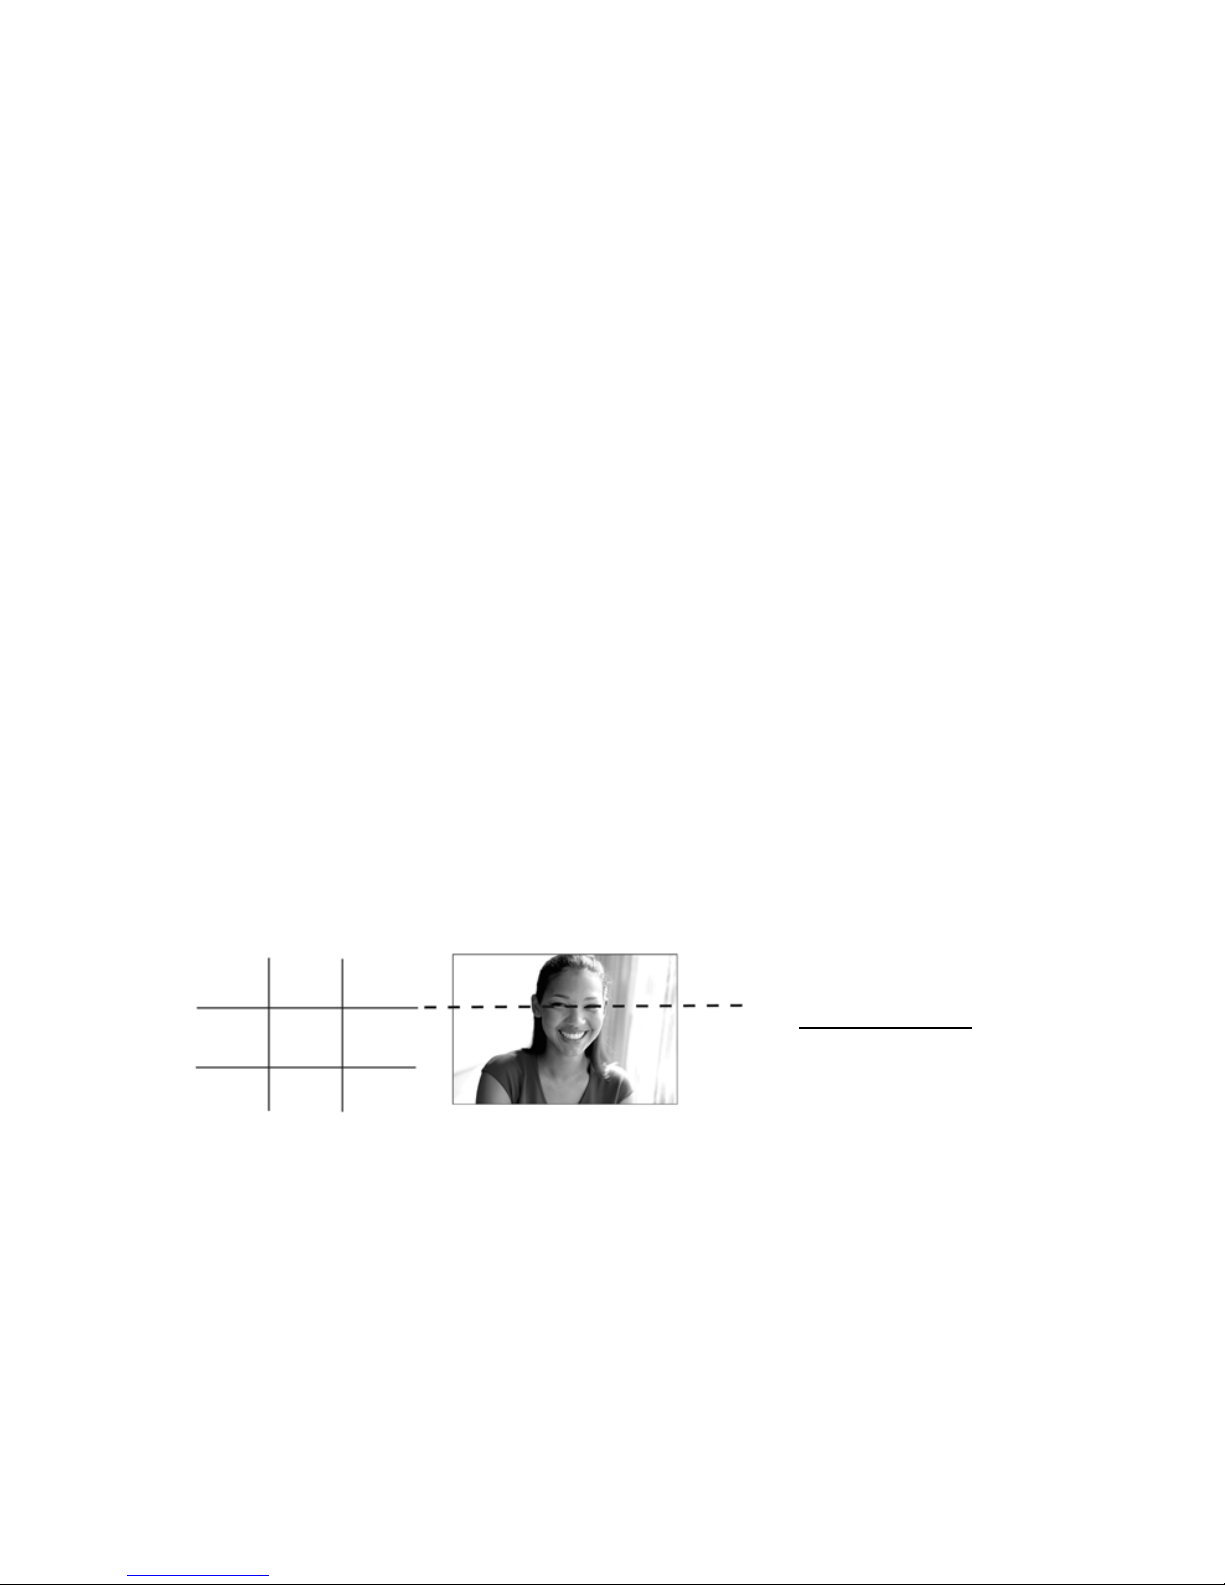
Technical Framing
To check technical framing, turn on U. Scan and Safe on your monitor. Underscan
shows the entire area that will be recorded. Make sure that everything visible on
the screen is what you want to record.
Safe mode puts a white border around the area that will be visible on all playback
televisions. Make sure anything that must be visible (wide gestures, words, a
logo) remains visible in this part of the picture.
Aesthetic Framing
Another important part of setting up your shot is aesthetic or stylistic framing.
You may have an incredibly beautiful scene and subject but without proper framing, your subject can get lost in the shot, you might include things which could
prove distracting to the viewer, and make your shot visually confusing. If the talent is not framed correctly, the shot may deliver the wrong impression of what
you are trying to communicate.
As you frame the shot, question everything in the shot and where it sits in the
frame. Is everything in the frame there for a reason? Is the boom microphone in
the shot? Is the logo on the back wall going to be visible to all your viewers? If you
have more than one actor, do their positions in the shot support the scene?
The aesthetic framing of your shot can be as important as getting your camera
properly adjusted. For example, a wide, expansive shot may be appropriate if you
are showing off a specific location, but it doesn’t make much sense if you are trying to establish an intimate one-on-one talk with the audience. Framing your talent too tightly can give your audience an unwanted sense of apprehension or
claustrophobia.
The Rule of Thirds
Use the DV Rack framing
Grid to help you keep your
shots well framed.
See The Settings Menu
learn how to turn on the
Grid.
to
The best rule of thumb when framing your shot is to use the “Rule of Thirds.” If
you were to draw an imaginary tic-tac-toe grid on your field monitor, you would
try to line up the “important things” in your shot along these lines. When shooting a tight interview shot, for example, try to line up your talent’s eyes along the
upper horizontal line of the grid.
If you are shooting a wide shot, frame the person’s body along one of the vertical
lines, which will place them slightly left or right of center.
Keep in mind that the “Rule of Thirds” is really only a guideline, and not a hard
“rule.” The most important rule is to keep your audience’s attention.
44
Videography Basics
Page 51

Happily, you won’t need to take a felt pen to your computer screen. DV Rack has
a Grid feature which superimposes lines on your picture to help you frame while
shooting. See Using the Field Monitor Grid to frame your shot
.
Keeping your shot in frame while shooting
While shooting, keep an eye on the framing of your subject. People have a tendency to move around, even in a simple “talking head” interview segment. If you
need to re-frame, use a light touch on the tripod.
TIP: If you are having trouble getting a smooth panning motion while turning your camera on
the tripod, try slipping a rubber band around the handle. Insert your thumb in the band and
pull on the rubber band rather than the handle directly. The rubber band will act as a shock
absorber for a shaky hand, and your pan will look smoother and more professional.
Zooming
Zooming in and out too much is the number one source of visual cheesiness in
home movies. The next time that you watch a Hollywood feature film, take note
of how often you see shots that zoom in or out. You will find that zooms rarely
occur in professional films. If you want your video to look more like Hollywood
and less like a home movie, try to resist the urge to zoom unless absolutely necessary. A slow zoom-in or out to establish a scene, followed by static shots, is an
appropriate use of a zoom.
Try to maintain the “rule of thirds” while you zoom. This usually means panning
slightly up or down to maintain the talent's eye line during the move. Practice it a
few times if needed before you actually record.
Dynamic Range
Dynamic Range refers to the number of steps there are between the lowest level
that a signal can reach, and the highest level it can reach. In a system with a broad
dynamic range, for instance your stereo, extreme lows and highs are reproduced
well. In contrast, most telephones have a poor dynamic range. A telephone’s
range is limited mostly to the treble range with very little bass range.
Serious Magic DV Rack Field Guide
45
Page 52

In video, dynamic range is often discussed in reference to the luminance or brightness of the video signal. DV works on a digital scale of values from 16 to 239 for
brightness. That's the total allowable or viewable range of values that can represent how bright or dark a pixel is.
Why is dynamic range important? Well, the more of your dynamic range you use,
the more full and realistic your audio and video will feel. Hearing a symphony
play on a well-recorded CD can have much more impact than listening to the
same recording on an AM radio. Why? Because there is much more dynamic
range possible on a CD than an AM radio.
With video, it's tougher to talk about examples. The popular Lord of the Rings
DVD has some excellent examples in its Bonus Materials. The cast interviews on
the set look great. They are very well defined and more “crisp” than many other
video shots. When comparing such great looking shots to much of the footage
shot on DV cameras, it's easy to say things like “Well, that was shot on a better
camera.” Is that really why it is better? Or is it simply better use of dynamic
range? The interviews were lit to take full advantage of the video palette. The
shadows are more defined, the whites of the eyes are bright white, but not too
white, etc.
The biggest difference between a high-end DV camcorder and a prosumer DV
camcorder is not dynamic range, both record to the same tape format. It's how
well the high-end camera fills the available dynamic range with useful information. In many cases, a prosumer camera can achieve the same results as a high-end
camera if you set up your shot efficiently using objective monitoring tools. Seeing
how the camera is using the dynamic range of brightness, for example, can keep a
shot looking “crisp” instead of washed out. This is one of the big advantages of
DV Rack. Tools like the Waveform Monitor, Spectra 60 and SureShot let you maximize your signal to fill the available dynamic range. This can only be done at the
time you are shooting because the expanded dynamic range must be captured on
location by adjusting your camera, lights and scene composition. Attempting to
do this with editing software after the fact would be like trying to expand a one
megapixel digital still to four megapixels in a paint program. You just can't put
back information that wasn't captured in the first place.
Another benefit to using as much dynamic range as possible is that in post-production more dynamic range means more latitude in applying image processing.
If, for example, you shoot an intentionally dark shot that uses only the lower 60%
of the brightness range available to you, it will be difficult to brighten or expand
this range while editing. You'll likely introduce banding artifacts because you're
attempting to expand a limited brightness range. It is preferable to use 100% of
the dynamic range available to you when shooting and then darkening it in postproduction to the lower 80% instead of shooting at 60% and trying to expand to
80%.
46
Videography Basics
Page 53

A
activating DV Rack 1
allowable quality thresholds 33
audio balance and range 35
audio levels, checking 7
audio peak markers 36
audio problems, detecting 33
Audio Spectrum Analyzer, about 29
Auto Mute Camera Setting 13
avi format 6
B
bars, displaying color bars 12
Blue Gun only mode 12
blue screen, using 38
Broadcast License Number 1
buffer, pre-roll recording 28
buttons, the DVR 28
C
Canopus format 6
capturing stills 31
chroma key, shooting 38
Clip Alerts, about 32
Clip Notes, editing 29
Color Bars, calibrating to 4
Color Bars, color names 39
color temperature 40
components, adding 15
components, closing 15
components, dragging 15
components, rearranging 15
components, starting 12
connecting cameras 3
continuity checking 37
copying still images 31
D
dials, default position 14
dials, turning 14
DV format 6
DV Grabber, about 30
DV Quality Monitor, about 32
DV tape recording to 3
DVR Slave to Cam Setting 13
DVR, using 28
dynamic range, improving 5
dynamic range, the benefits of
great 46
E
editing clips in other programs 17
exposure, improving 6
F
feedback, preventing 4
files, recovering ejected clips 18
files, where are my clip files? 17
fluorescent lighting 40
focus, improving 6
format, selecting DV file 6
framing, aesthetic tips 43
framing, improving 6
Freeze button 36
freezing the Field Monitor 12
Frequently Asked Questions 12
G
glare, getting rid of on laptops 4
glossary - Please see Help
Grab Pixel Ratio setting 13
grabbing video stills 31
green screen, using 38
Grid Mode setting 13
Grid Scale setting 13
H
Help 12
Hold button 36
I
installing DV Rack 1
K
keyboard shortcuts 14
L
Letterbox Size Setting 13
Letterbox, turning Ltrbox mode on 12
M
Menu settings 12
Menu Settings, changing 14
microphone placement 7
microphones, comparing audio 36
monitor resolution 11
mono mode, checking audio in 35
muting your computer speakers 12
N
native DV format 6
47
Page 54

P
panning tips 45
pixel ratio, setting in stills 30
popping sounds in audio 32
Pre-record Time Setting 13
Q
QuickTime format 6
R
Rec File Format setting 13
recording clips 28
red boxes appear in signal 32
Rule of Thirds 8
S
Safe Area Size Setting 13
Safe Area, displaying 12
scrolling through components 11
scrubbing through clips 28
Seriousmagic.com 2
setting quality thresholds 33
Settings Menu, displaying 12
shadow, preserving in your video 41
shortcuts, keyboard 14
Shot Clock Slave setting 13
Shot Clock, about the 33
socks, matching 27
sound check 7
splitting the Field Monitor 12
starting DV Rack 2
Stereo mode, checking audio in 36
system requirements - Please see Help
video too bright 32
W
Waveform Monitor Settings, using 26
Waveform Monitor, about the 25
Waveform Monitor, reading the 25
web site, Serious Magic 2
white balance, automatic 40
white balance, setting 6
white balance, why its important 40
Y
yellow boxes in video signal 32
Z
Zebra 1 Mode Setting 13
Zebra 1 Value Setting
13
Zebra 1, displaying 12
Zebra 2 Mode Setting 13
Zebra 2 Value Setting 13
Zebra 2, displaying 12
zooming in the Field Monitor 12
T
tape, recording to 3
Tech Support web pages 12
timing clips 34
Troubleshooting - Please see Help
U
underscan 7
underscan, displaying 12
V
video drivers, compatible - Please see
Help
Vectorscope, about 26
Video Safe Area indicator 12
Video Safe area, about the 43
48
 Loading...