

Page 1

1
Sergio iSpin Operation Manual
Thank you for purchasing the Sergio iSpin music sound effect system for your iPod® or MP3 player. The Sergio iSpin is the latest
innovation from Sergio, a long time leader in the design of professional audio systems. It is designed specifica lly to create your
own music style, and remix music anywhere in an easy and fun way.
Page 2

1
IMPORTANT
Read Before Proceeding
Please read through this operating instruction so you will know how to operate this product properly. After you have finished
reading the instruction, put it in a safe place for future reference.
In some countries or regions, the shape of power plug or power outlet may sometimes differ from that shown in the
explanatory drawings. However the method of connecting and operating the unit is the same.
Page 3

2
Table of Contents
Table of Content
1. Packag e Cont ents
………………………………………………………………………………………………………………………… 3
2. Featur es
………………………………………………………………………………………………………………………………….… 4
3. Quick Start
………………………………………………………………………………………………………………………………… 5
4. Controls and Indicators
………………………………………………………………………………………………………………… 7
5. iPod® / MP3 Player
……………………………………………………………………………………………………………………… 10
6. Using iSpin
………………………………………………………………………………………………………………………………… 12
7. Wiring Diagrams
…………………………………………………………………………………………………………………………… 17
8. Specification
……………………………………………………………………………………………………………………………… 18
9. Consumer Guide to Product Safety
…………………………………………………………………………………………………… 19
10. Trouble Shooting
…………………………………………………………………………………………………………………………… 21
11. Warra nty
……………………………………………………………………………………………………………………………………… 24
Page 4

3
Package Contents
The iSpin package includes the following:
1. iSpin sound effect device (Model FV-1)
2. A headphone set (with microphone)
3. A power adaptor
4. Operation manual
Page 5

4
Features
iPod® / MP3 Player
z The iSpin can be used with three different combinations of signal sources:
iPod® + iPod®
MP3 player + MP3 player
iPod® + MP3 player
z The iPod® will be charged when inserted into iSpin, provided the iSpin is on
z Two universal iPod® docking stations accept all iPod® models (Top Surface)
z Two line-in 3.5mm plugs for MP3 players (Rear)
Music Mix
z Two sets of effects programs
z Programs 1 and 2 switch selectable
z Switch headphones between mix and cue
channels
SPIN: It is a simulation of Scratch Feature on DJ turntable
Knob1 Knob2 Knob2
Program1 REVERB LP FILTER
Program2 PITCH DOWN
Spin
HP FILTER
z Switch audio output between original sound and mix sound effect
z Cross-fade music mix from source A to source B. Simultaneous occurrence of a fade-in and a fade-out
Micro Headphone Mix
z Mic can be routed directly or through sound effects
Page 6
5
Quick Start
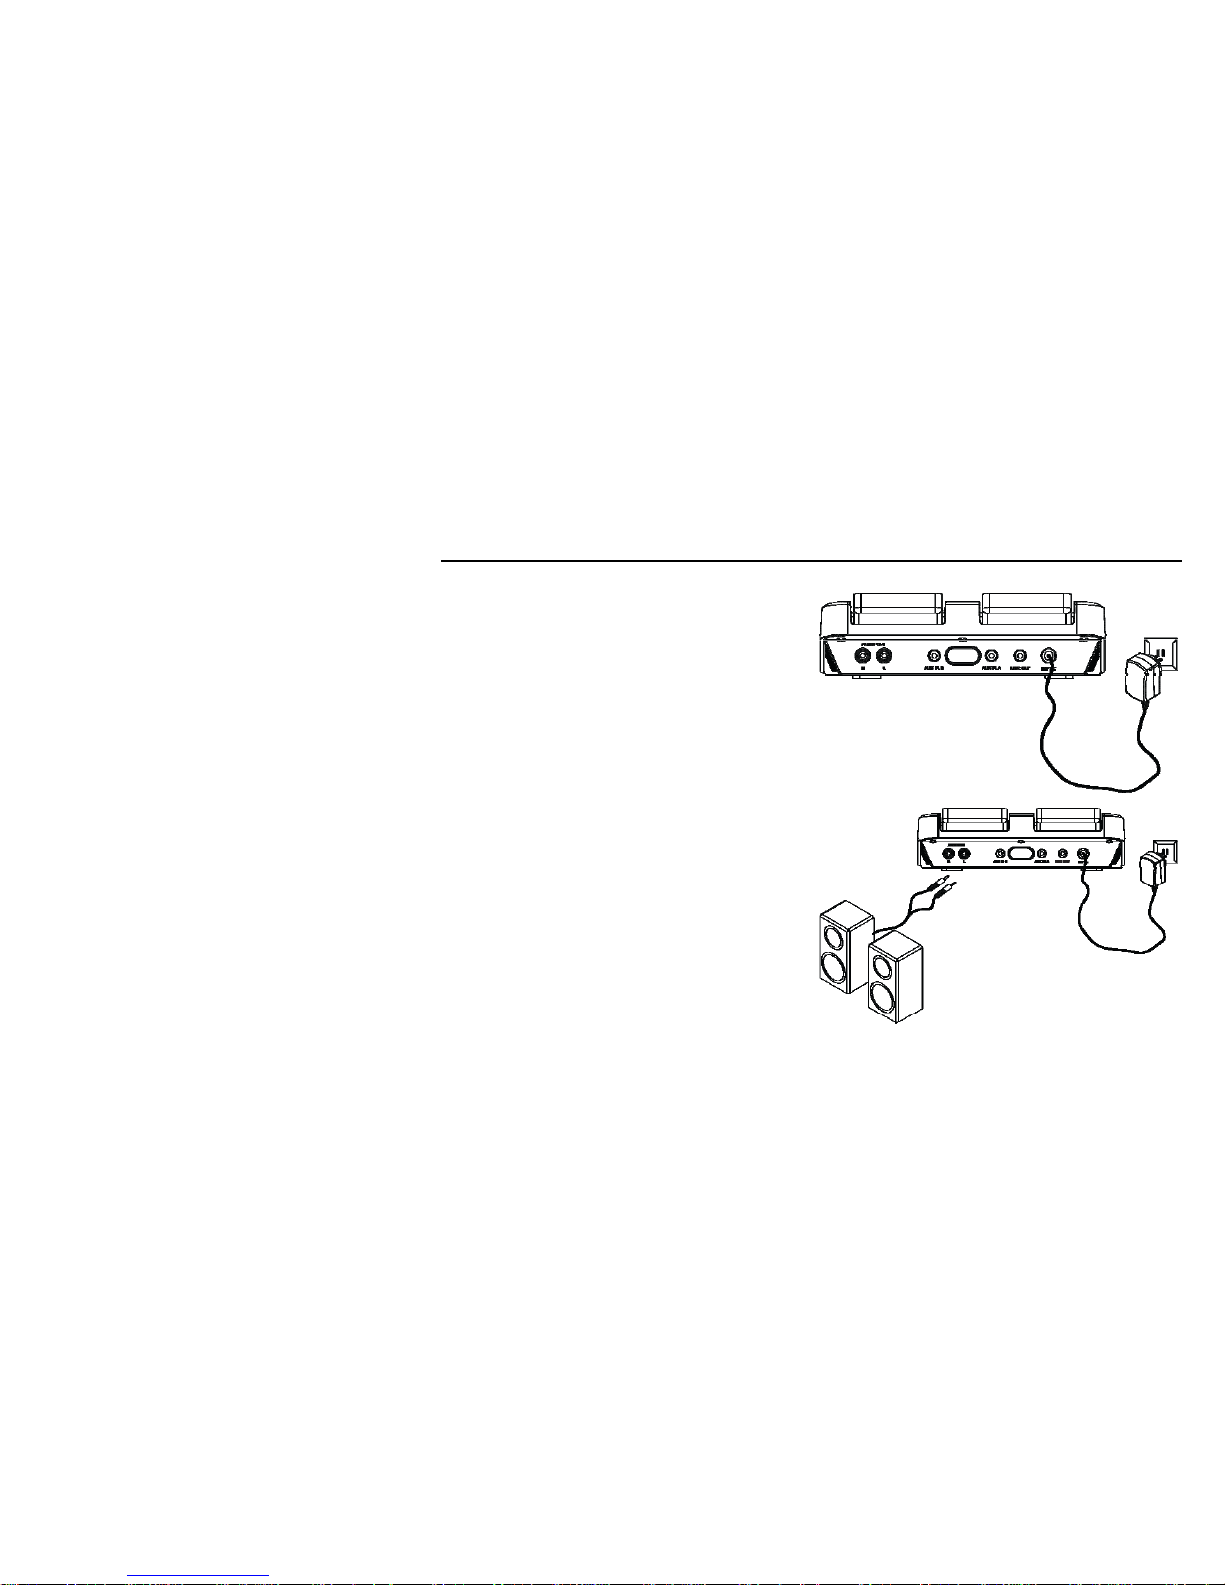
1. Connect the included wall-mount power supply to the
jack marked ‘12VDC’.
2. Connect AV cord from your sound system to the iSpin
output jacks (RCA type).
Note: Connect the iSpin outputs to a suitable sound
system. This may be powered speakers, a professional
sound system, or the audio inputs of a television.
Page 7
6
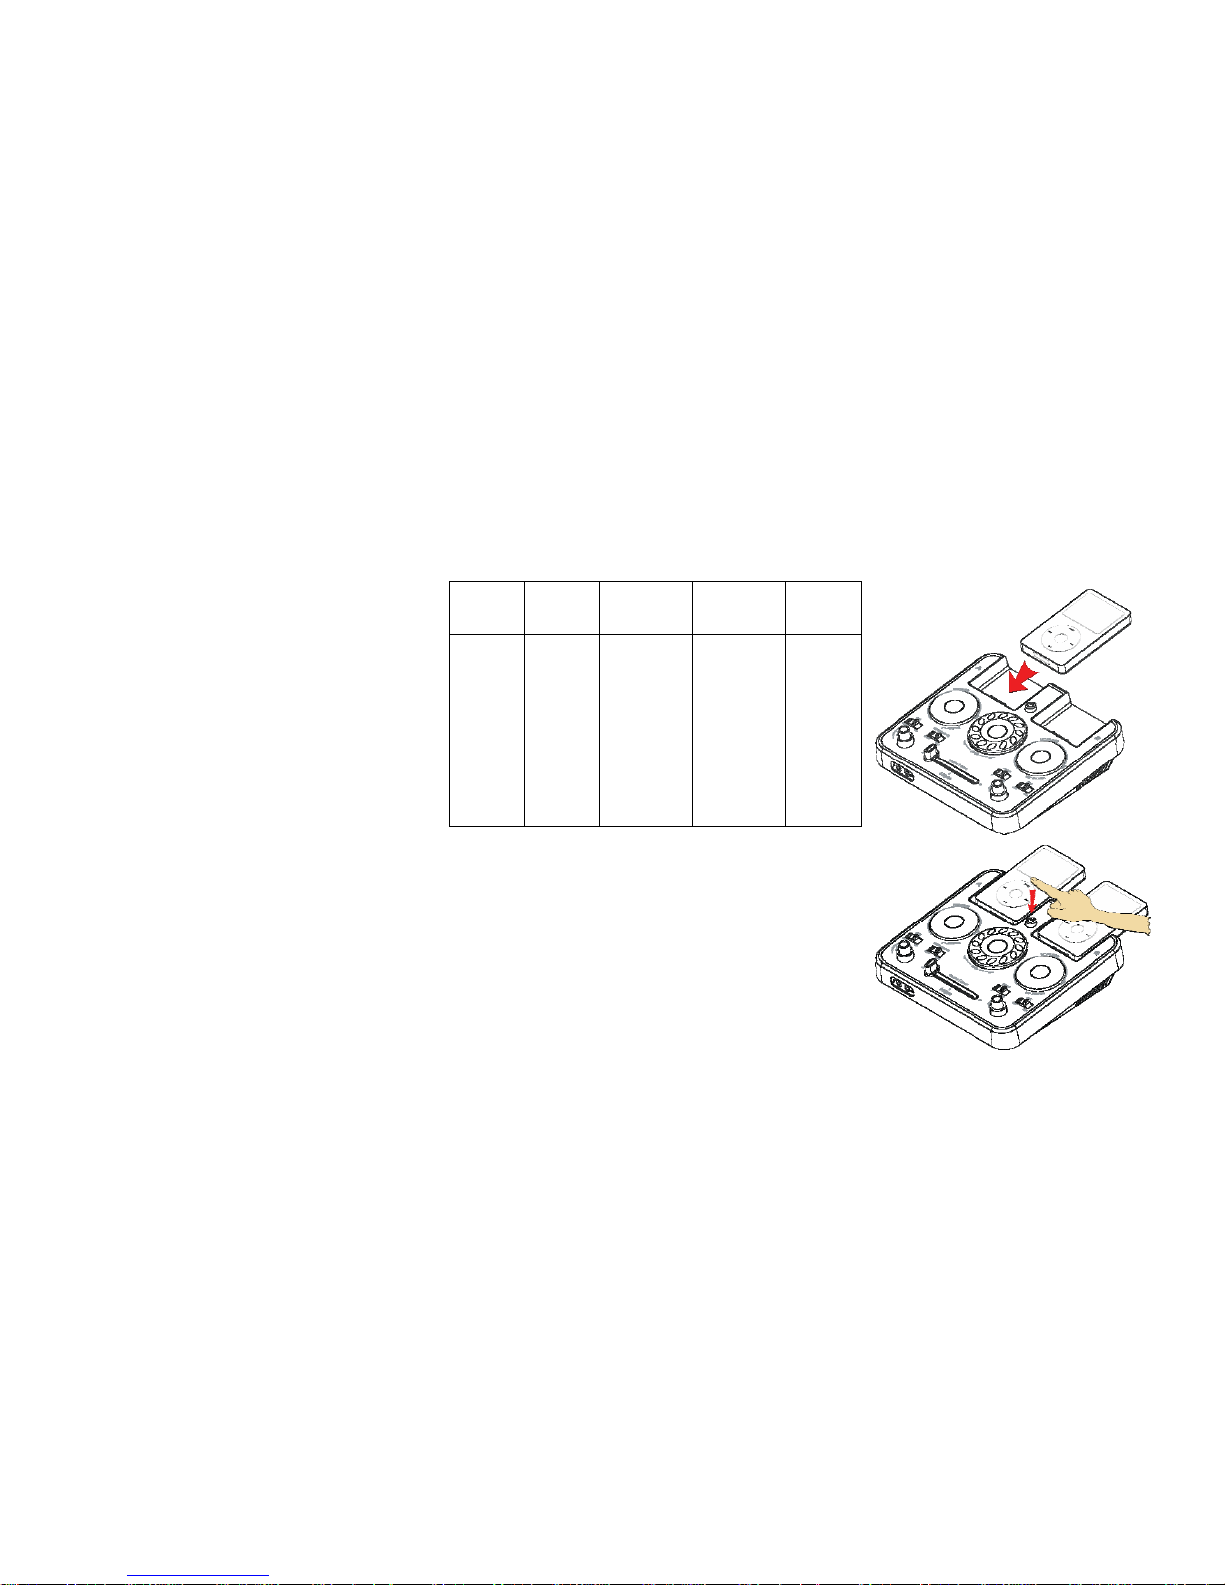
3. Insert iPod® devices into the docking connectors or connect an MP3
player into the line-in jacks (rear).
Shuffle
Insert
Mini
Insert
Thin iPod®
Insert
Thick iPod®
Insert
Nano
Insert
Use with
iPod®
Shuffle
NOTE:
iSpin will
NOT
charge
iPod®
shuffle.
Use with
iPod®
Mini
iPod® 3Gen
10-15 GB
iPod® 3Gen
20 GB
iPod® 4Gen
20 GB
iPod® Photo
30 GB
iPod®
3Gen 30GB
iPod®
3Gen 40GB
iPod®
4Gen 40GB
iPod®
Photo 40GB
iPod®
Photo 60GB
iPod®
Nano 2GB
iPod®
Nano 4GB
4. Switch Power On.
Page 8
7
Controls and Indicators
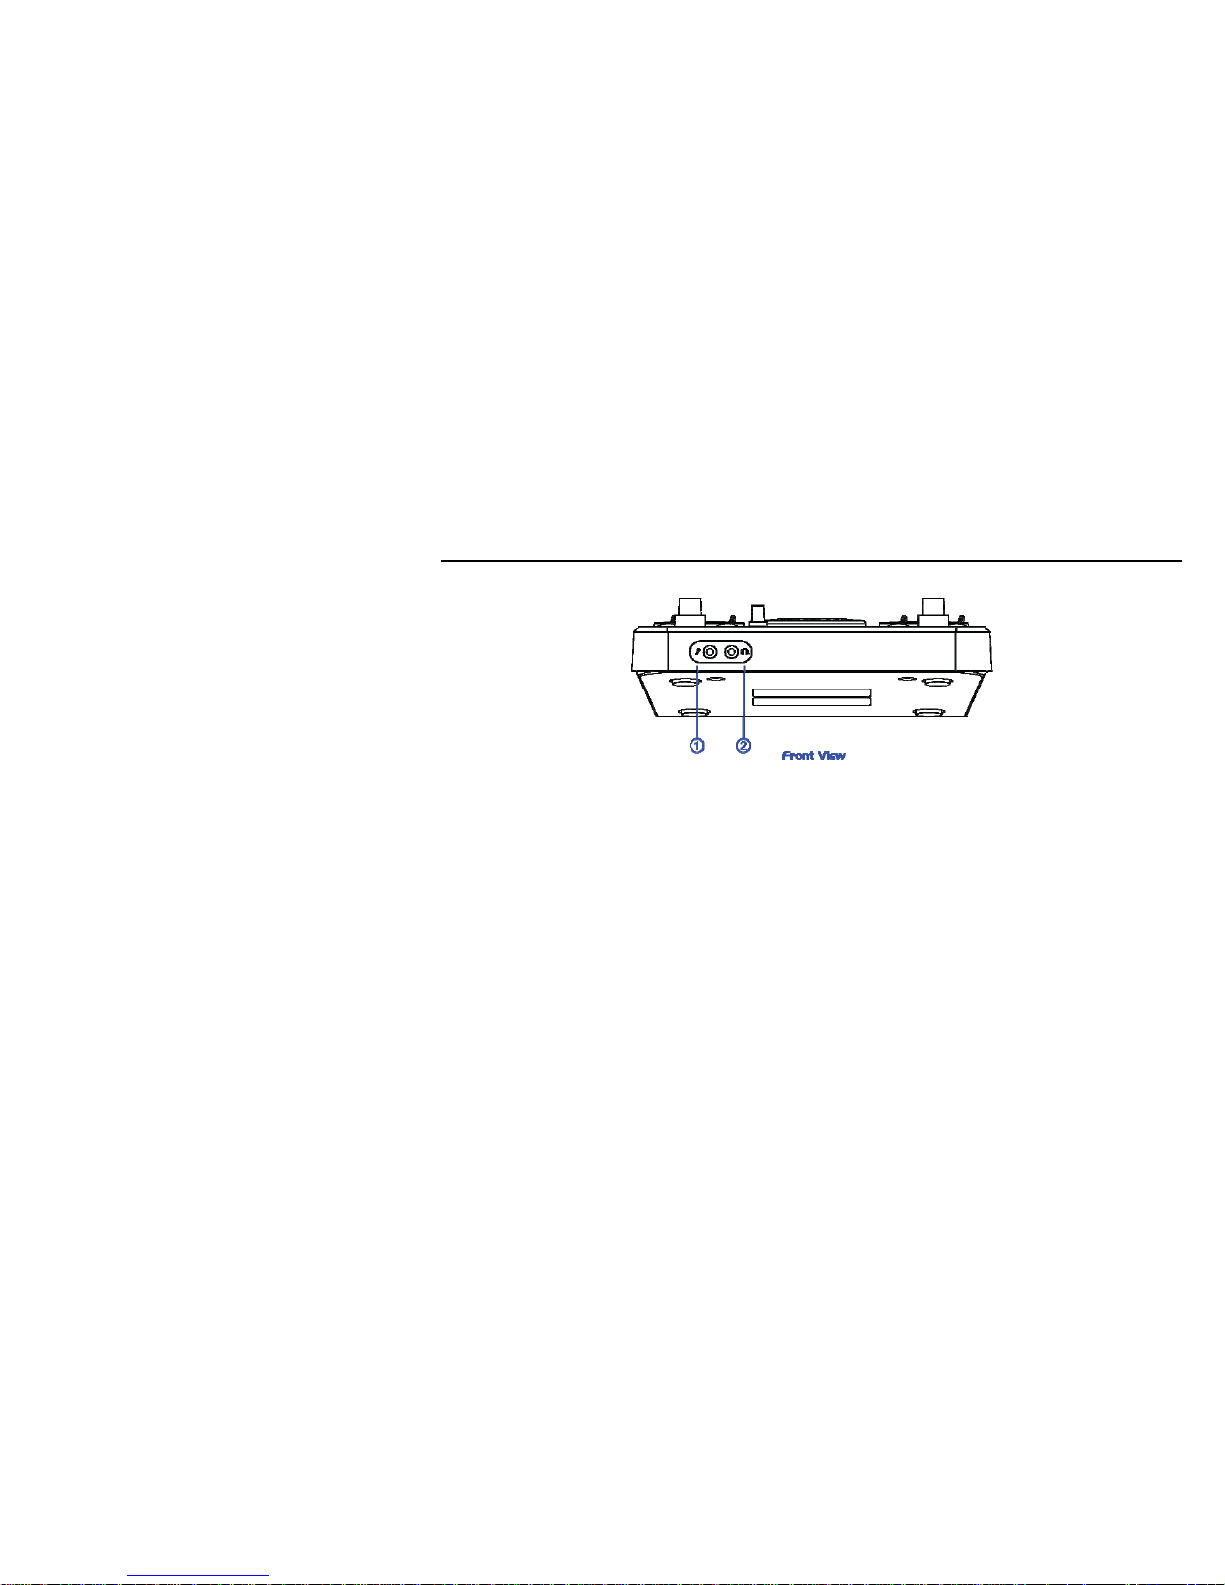
1. Microphone Ja ck (3.5mm dia.)
2. Headphone Jack (3.5mm dia.)
Page 9
8
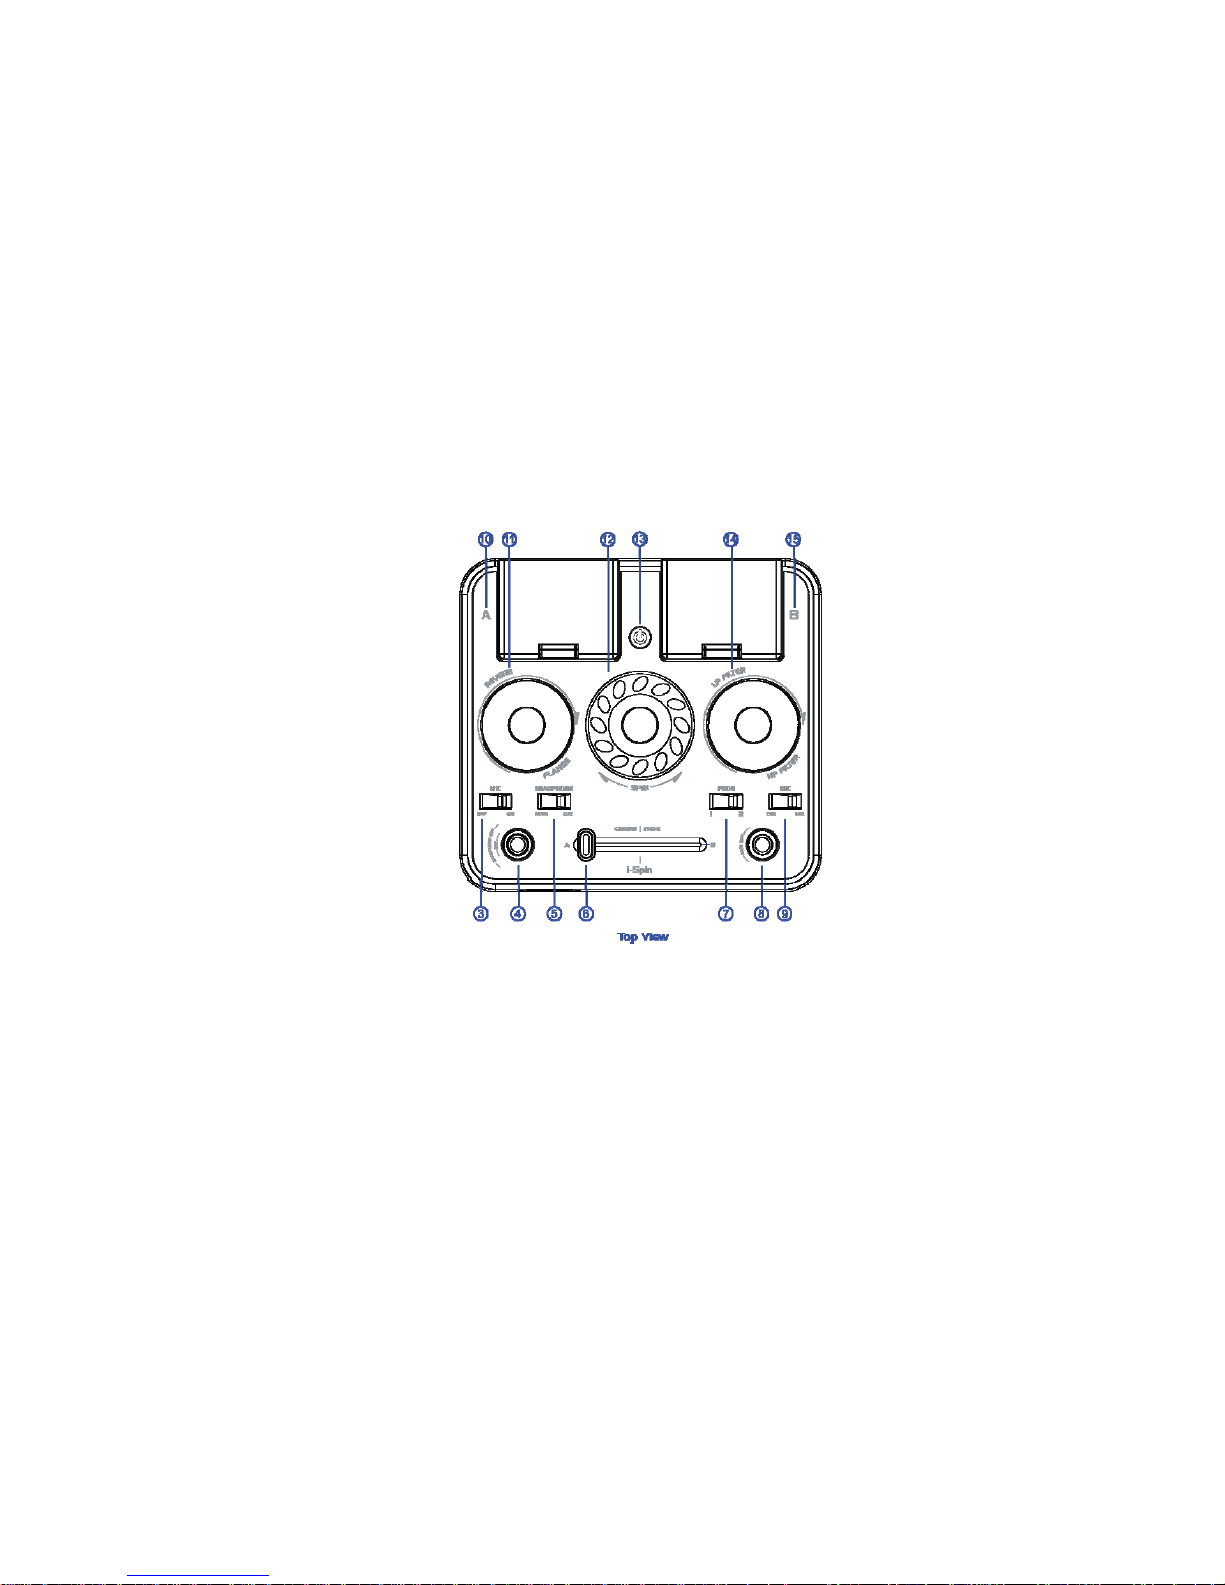
3. Microphone ON/OFF Selection Switch
4. Top: Headphone Volume Knob, Down: Microphone
Volu me K nob
5. Headphone Main/Cue Selection Switch
6. CROSS | FADE
7. Program 1 / Program 2 Selection Switch
8. Main Output Volume Knob
9. Microphone Mix / Cue S election Switch
10. iPod® / MP3 player Source A
11. Effects Control #1 (Reverb/Pitch Down)
12. Spin Feature Knob
13. Po wer ON/OFF Switc h
14. Effects control #2 (Low Pass/High Pass filter)
15. iPod® / MP3 player Source B
Page 10
9
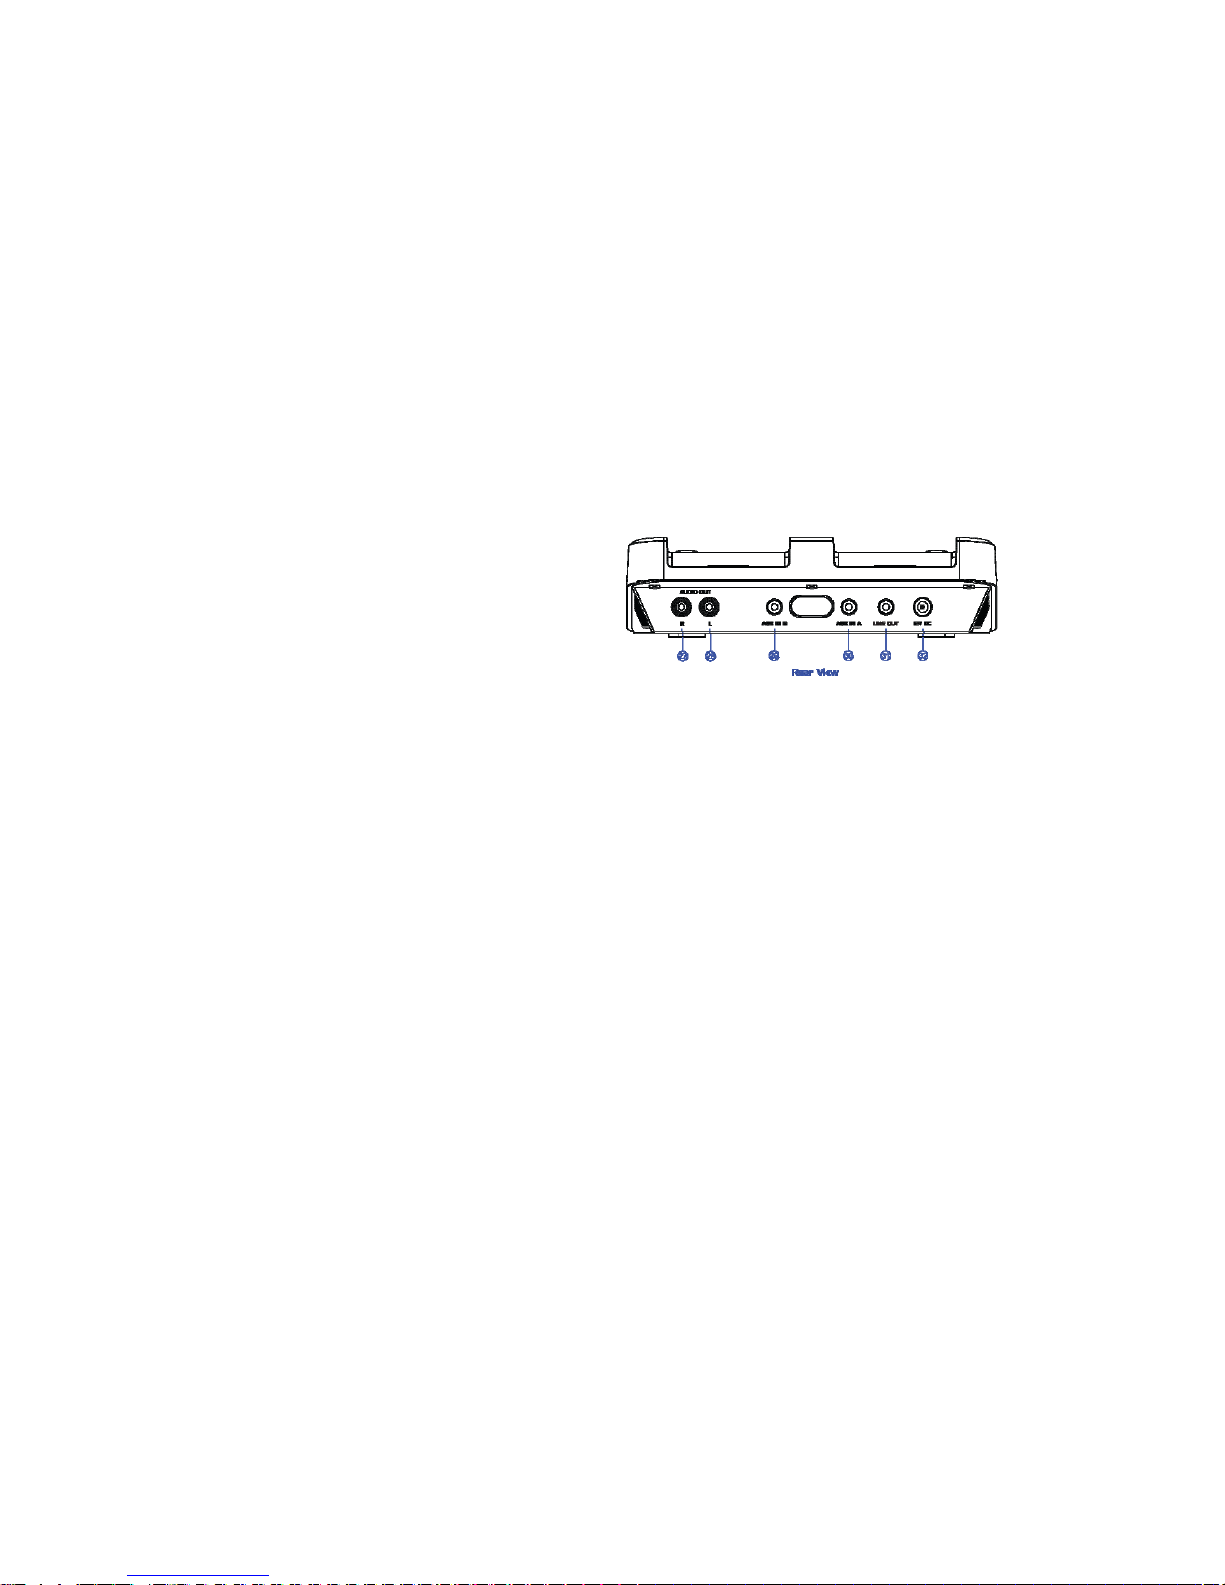
16. Right Channel Output Jack
17. Left Channel Output Jack
18. MP3 player Source B Input
19. MP3 player Source A Input
20. Record Lineout
21. 12V Input Jack
Page 11
10
iPod® / MP3 Player
Charge your iPod®
Note: Please make sure you are using the correct insert for your iPod® or MP3 player and that it is properly docked into the
iSpin. Failure to do so may damage your iPod® or MP3 player.
*[While your iPod® is docked in the system, it recharges (until fully charged). Note that iPod® Shuffles and
other non-docking iPod®s will NOT be charged.]
Listening to your iPod®
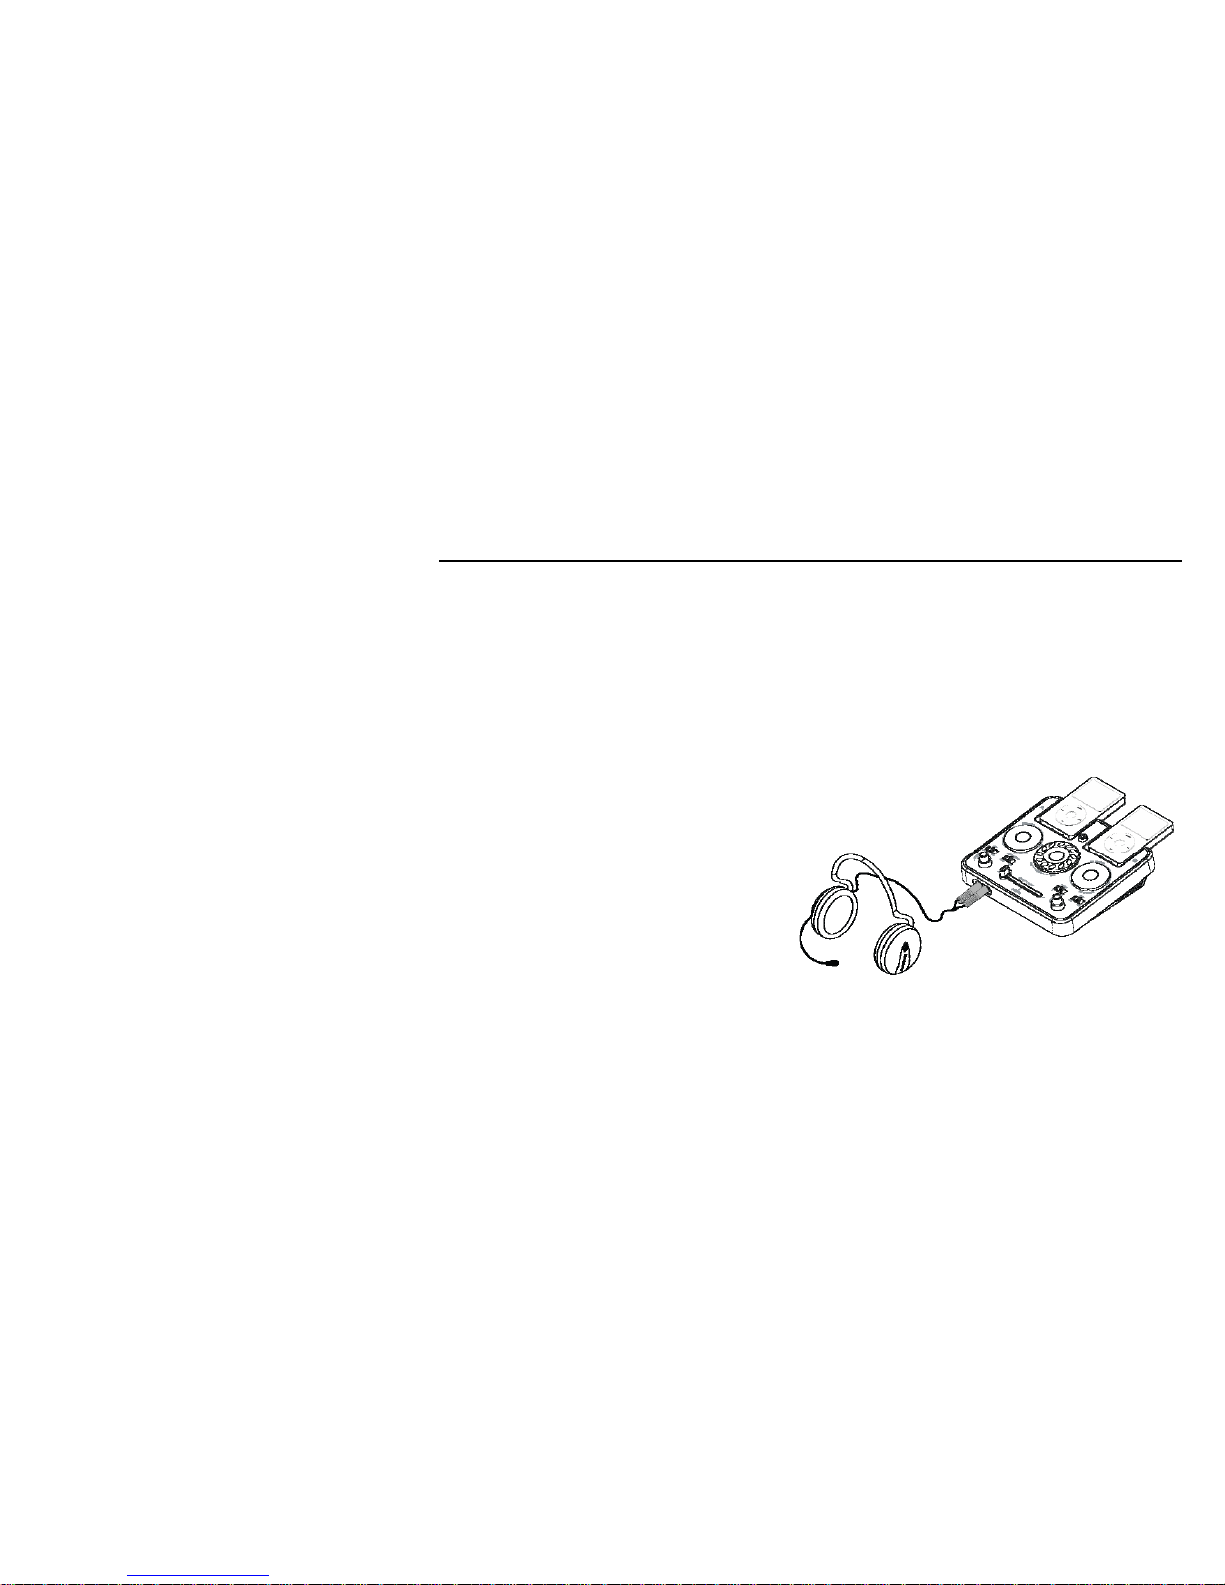
1. Plug-in the RCA Jack (○30,○31,○32)or Phone jack (○33) from
the multimedia speaker / subwoofer. If you are using
the microphone/headphone, plug it into the
headphone and microphone jacks. (○
1,○2
)
2. Turn the power ON. (○
27
)
3. 3. Insert the iPod® onto the dock. (iPod® will
automatically turn ON)
4. 4. Choose your music on iPod®.
5. Adjust output volume from main output volume knob (○
18
) or headphone output volume knob.
Page 12
11
Listening to a non docking iPod® or other portable audio devices
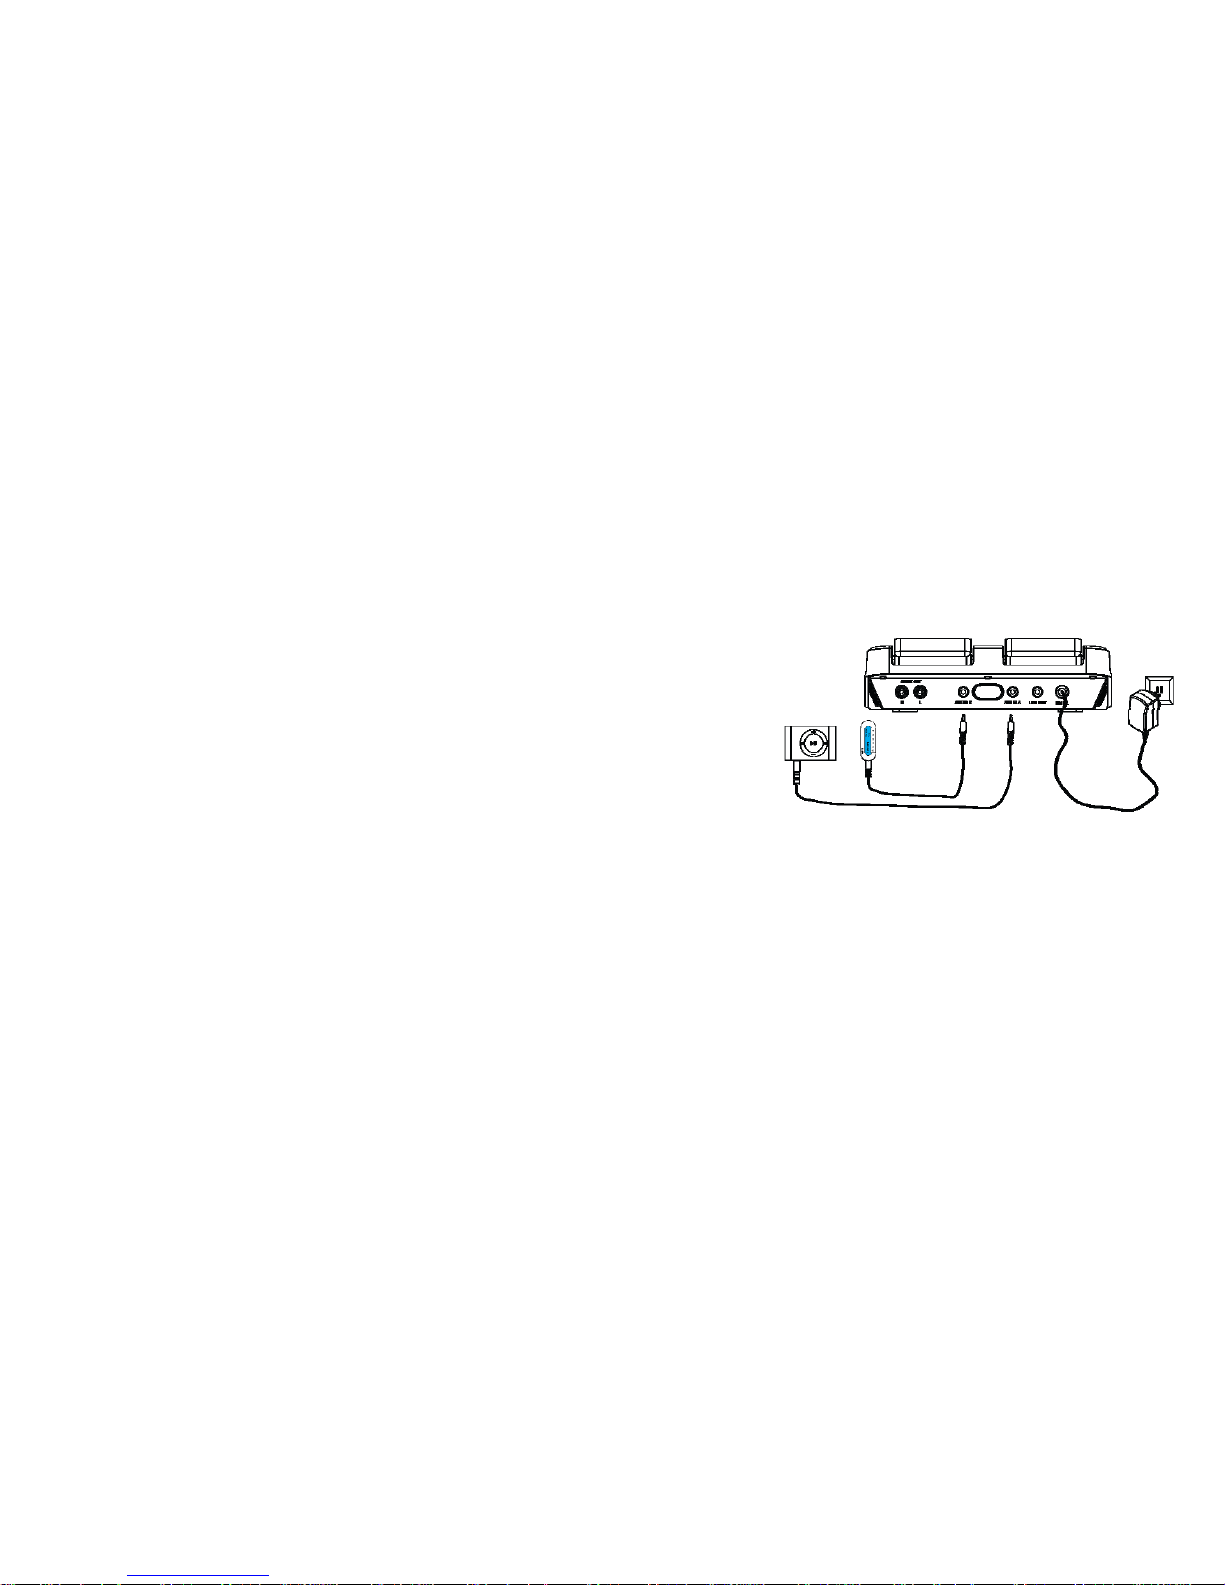
1. Plug-in the RCA Jack (○30,○31,○32)or Phone jack (○33) from the multimedia speaker / subwoofer. If you are using micro
headphone, please plug-in your Micro headphone cord to headphone and microphone inserts. (○
1,○2
)
2. Turn the power ON. (○
27
)
3. Connect your MP3 player’s audio patchcord to the
line-in jack. (AUX IN ○
33
or ○34)
Page 13

12
Using iSpin
MIC ON / OFF
Turn ON and OFF for your microphone. If you’re entertaining a crowd, they my not want to hear your background ‘chatter’. This
allows you to kill the microphone when it is not wanted!
Headphone Cue / Main
With the headphone switch in the ‘CUE’ position, you can listen to the song playing on the device that’s NOT being sent
(through the fader) to the main output. This allows you to cue up the other player to the next song.
Headphone main allows you to listen to iSpin’s main output.
********** AH YES, BUT THE EFFECTS! ************
The effects portion of iSpin is what really makes the device fun. The effects are dramatic, but may require some experience
before you can use them confidently in a performance. One important note: When switching between the two effects program
banks, a brief disruption of the sound occurs (perhaps 1/50
th
of a second), and although this will be barely heard with a large
sound system in a typical room, you may wish to be careful when switching program banks in any case. Also, some effect
programs actually STOP the sound, and it is important to know just which knobs do this and under what conditions.
These are effects not found on any other unit of this type, and for many users, it will be the first time such effects are
experienced. Final note on effects: HAVE FUN!
Page 14

13
Program 1
a. REVERB
Th e le ft k nob , in pro gra m 2, bec ome s a r eve rb c ont rol , wi th a n interesting feature: As the knob is rotated clockwise, reverb will
begin to be added to the program, but if quickly turned clockwise, the most recent sounds of the program will be ‘frozen’ into
the reverb. This is another case where if the knob is fully clockwise, the program is essentially off!
Be careful with this knob, in either program, because when it is fully clockwise, no music will get through the system.
b. LP FILTER
The right-most knob in this program set is just like the sa me knob in the other program set (HP Filter), but in this case, it filters
out the higher frequencies. Also very handy when affecting highly rhythmic program, and very popular with ‘trance’ styles.
Program 2
a. FLANGE
The center knob controls a wonderful sound effect called ‘flanging’, essentially the addition of the program that has been
delayed by a very short time, only thousandths of a second . This gives the listener the impression that the music source (or
their head) is slowly moving as the knob is turned. Very nice to add a slowly evolving, ‘dreamy’ aspect to the sound.
b. HP FILTER
The right-most knob controls this popular effect, which progressively removes the bass as the knob is rotated clockwise. This
is not a simple equalizer; it is a sharp high pass filter that can remove all but the highest frequencies. Very nice as a slow
modification to program with strong beats and a lot of cymbals.
Page 15
14
Spin
The simulation of scratch feature in DJ turntable.
Cross fader
The cross fader does two things at the same time: It fades between the two music sources, allowing you to blend from one
program into a new one, but also it does the exact opposite to the CUE channel. This allows you to cue up a new song on the
player that ISN’T being sent to the main output. This allows you to cue up to a precise spot so that you can start the new
program and quickly cross fade to it to align the beat of the two programs.
MIC Effects / Main
1. MIC Effects: The microphone’s output is sent through the effects channel.
2. MIC Main: The microphone’s output is sent directly to the main output, bypassing the effects processor.
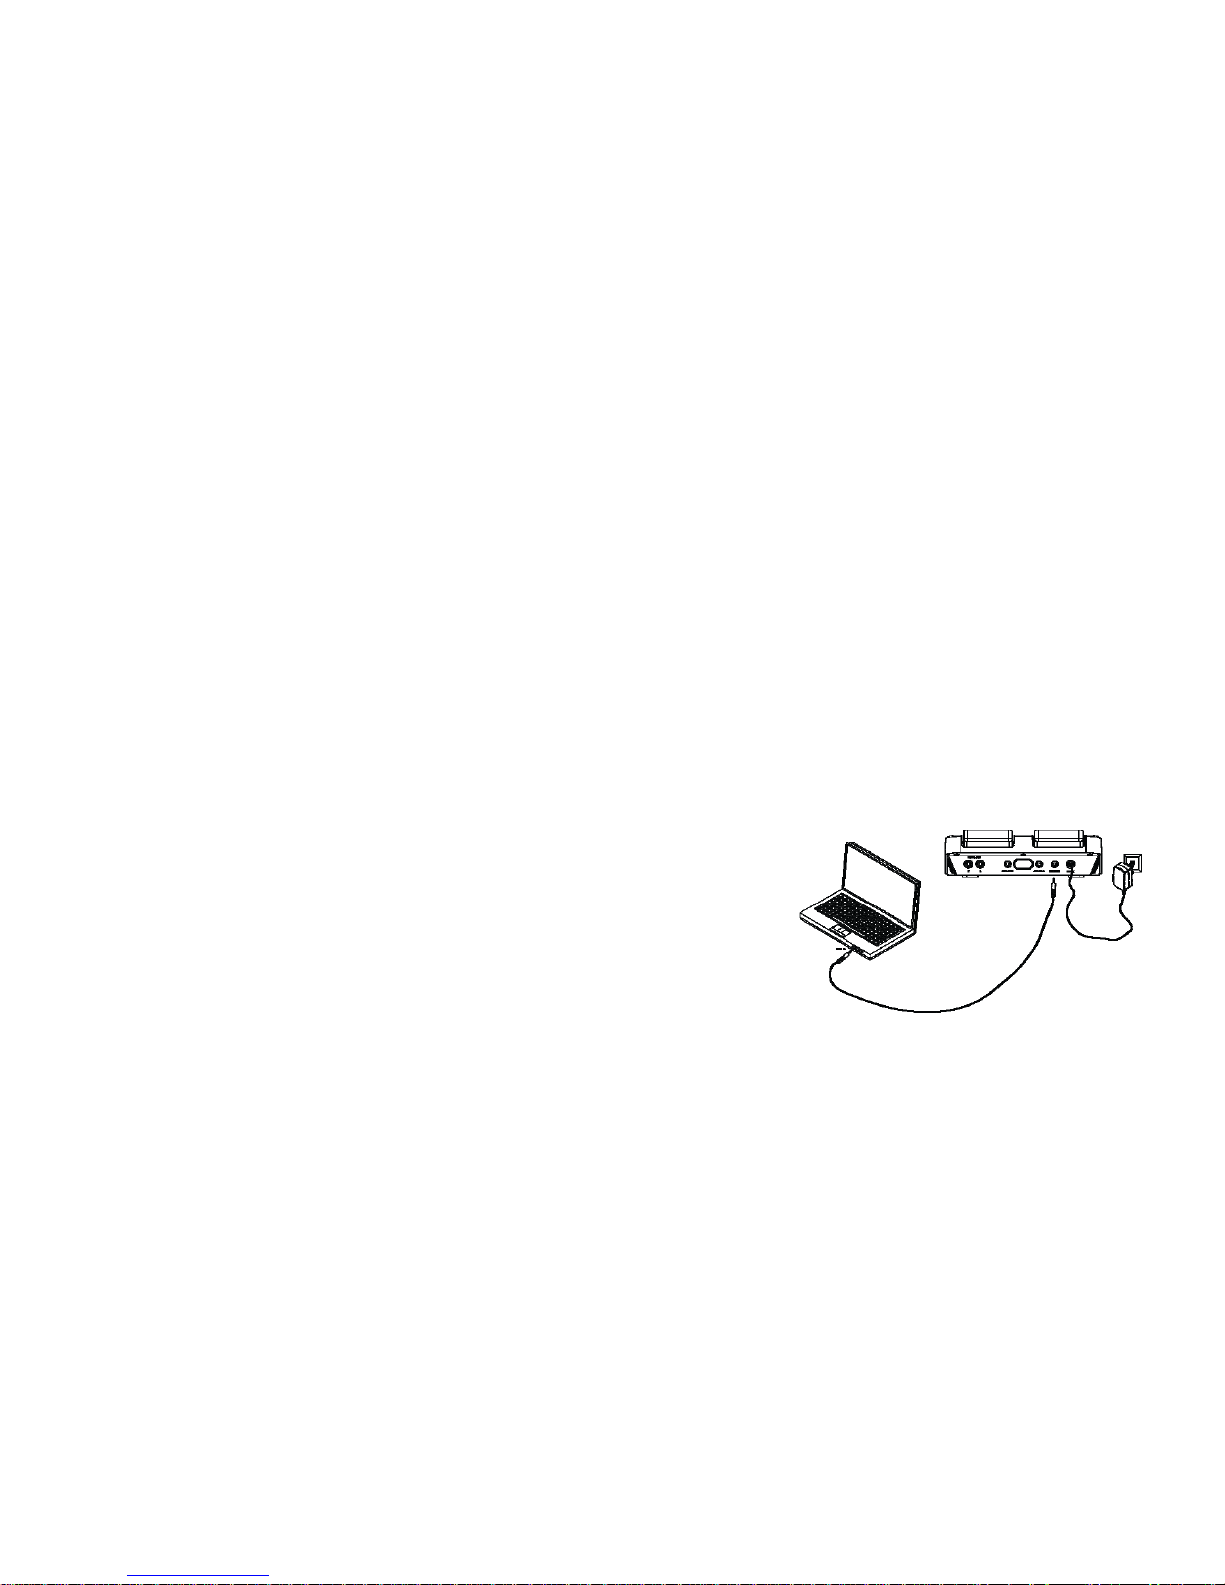
Recording music to computer
1. Turn the power ON (○27).
2. Plug one end of an audio cable into phone line-out jack
(○
35
) and other end to computer sound card’s line-in jack.
Of course, this requires a stereo cable.
Page 16

15
For Windows XP Users:
3. Turn ON your computer, and start the “Sound Recorder” recording program on your Windows XP for recording purpose. (You
may use your favorite recording software to record your created music).
Before using Windows XP sound recorder program, you have to configure as following:
a. Go to Control Panel
b. Choose Volume
c. Choose Option
d. Choose Content
e. Go to Start.
f. Choose All Programs.
g. Choose Accessories.
h. Choose Entertainment.
i. Choose Sound Recorder.
Note1: Not all computers have stereo inputs. Be sure to check for this if you want to mix directly into your computer.
Note2: If you do not satisfy with Windows XP’s sound recorder program, please download or purchase other recording
programs from Internet or stores.
For Other Operating System Users:
Page 17

16
Please follow the above step1 ~ step2, and use your favorite recording programs by downloading from the Internet or
purchase from stores.
Connectors
Page 18
17
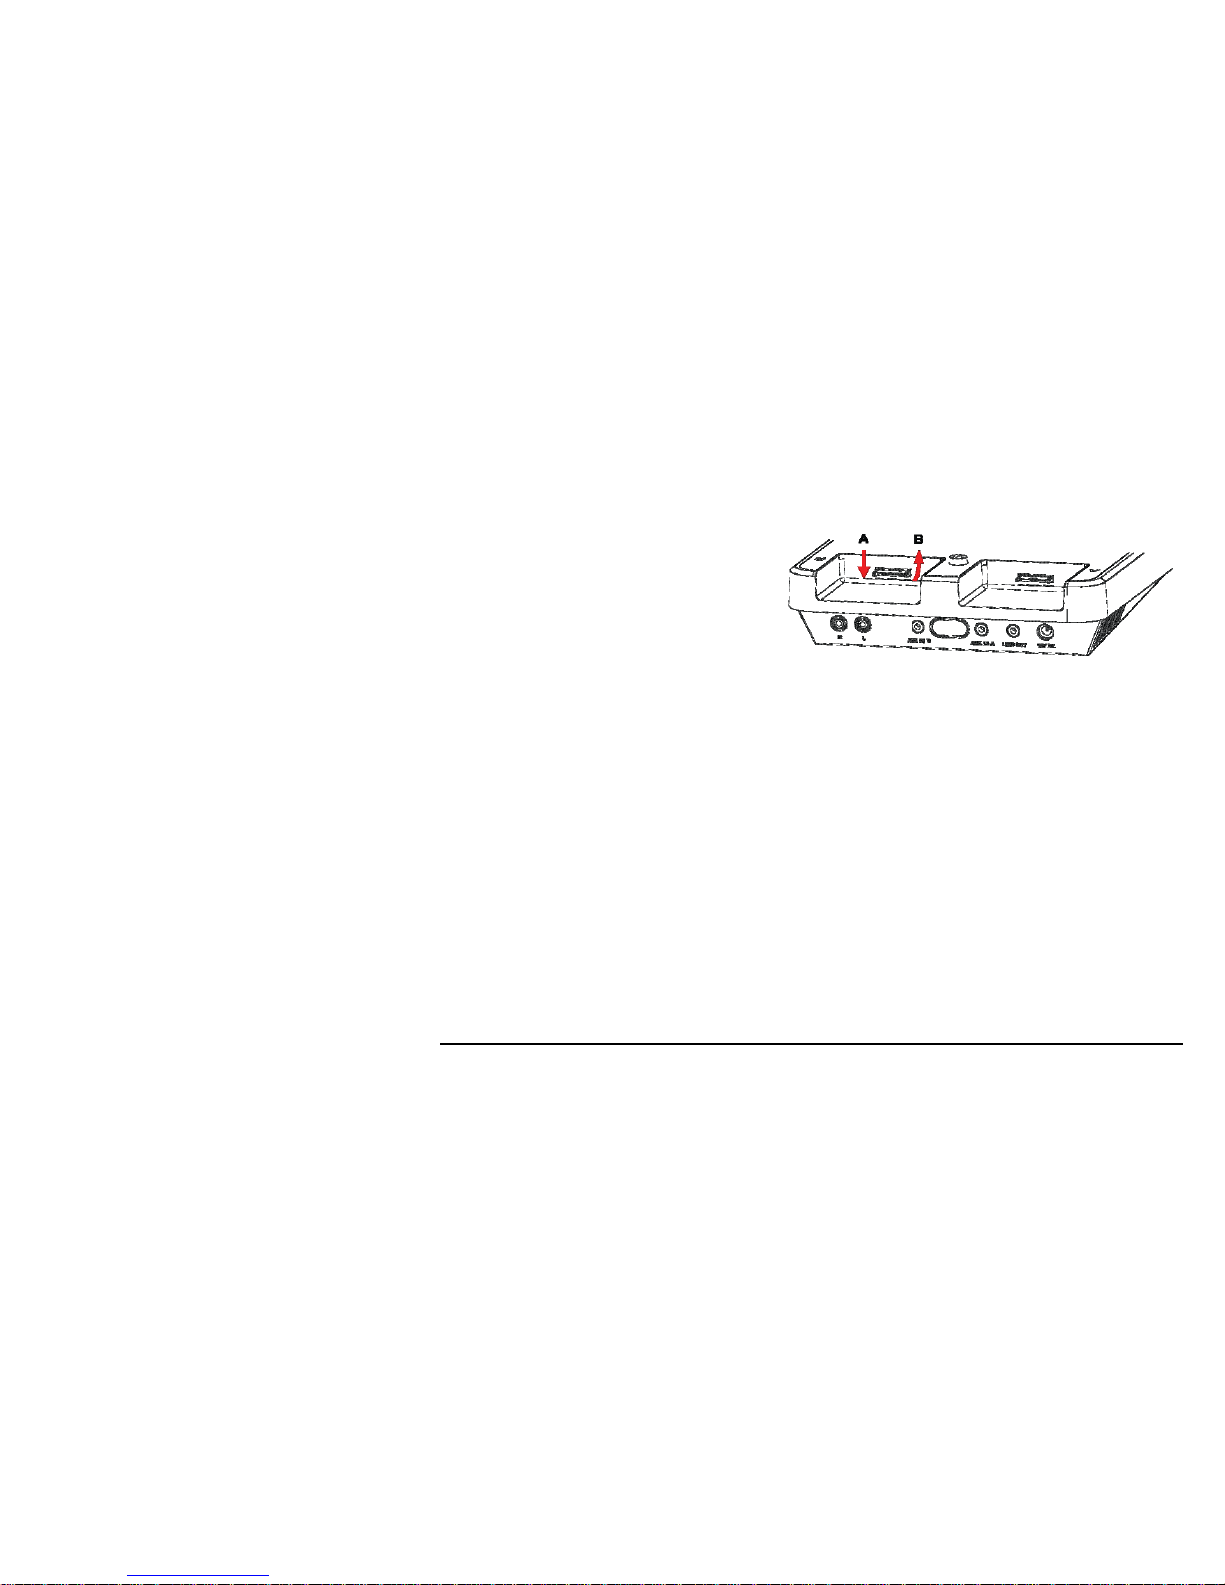
Sergio iSpin’s connector design is an innovate
technology that can move up (B) and down (A) to fit any
generation of iPod®s.
Note: The patent for this technology is processing.
Wiring Diagrams
Page 19
18
For Your Speakers
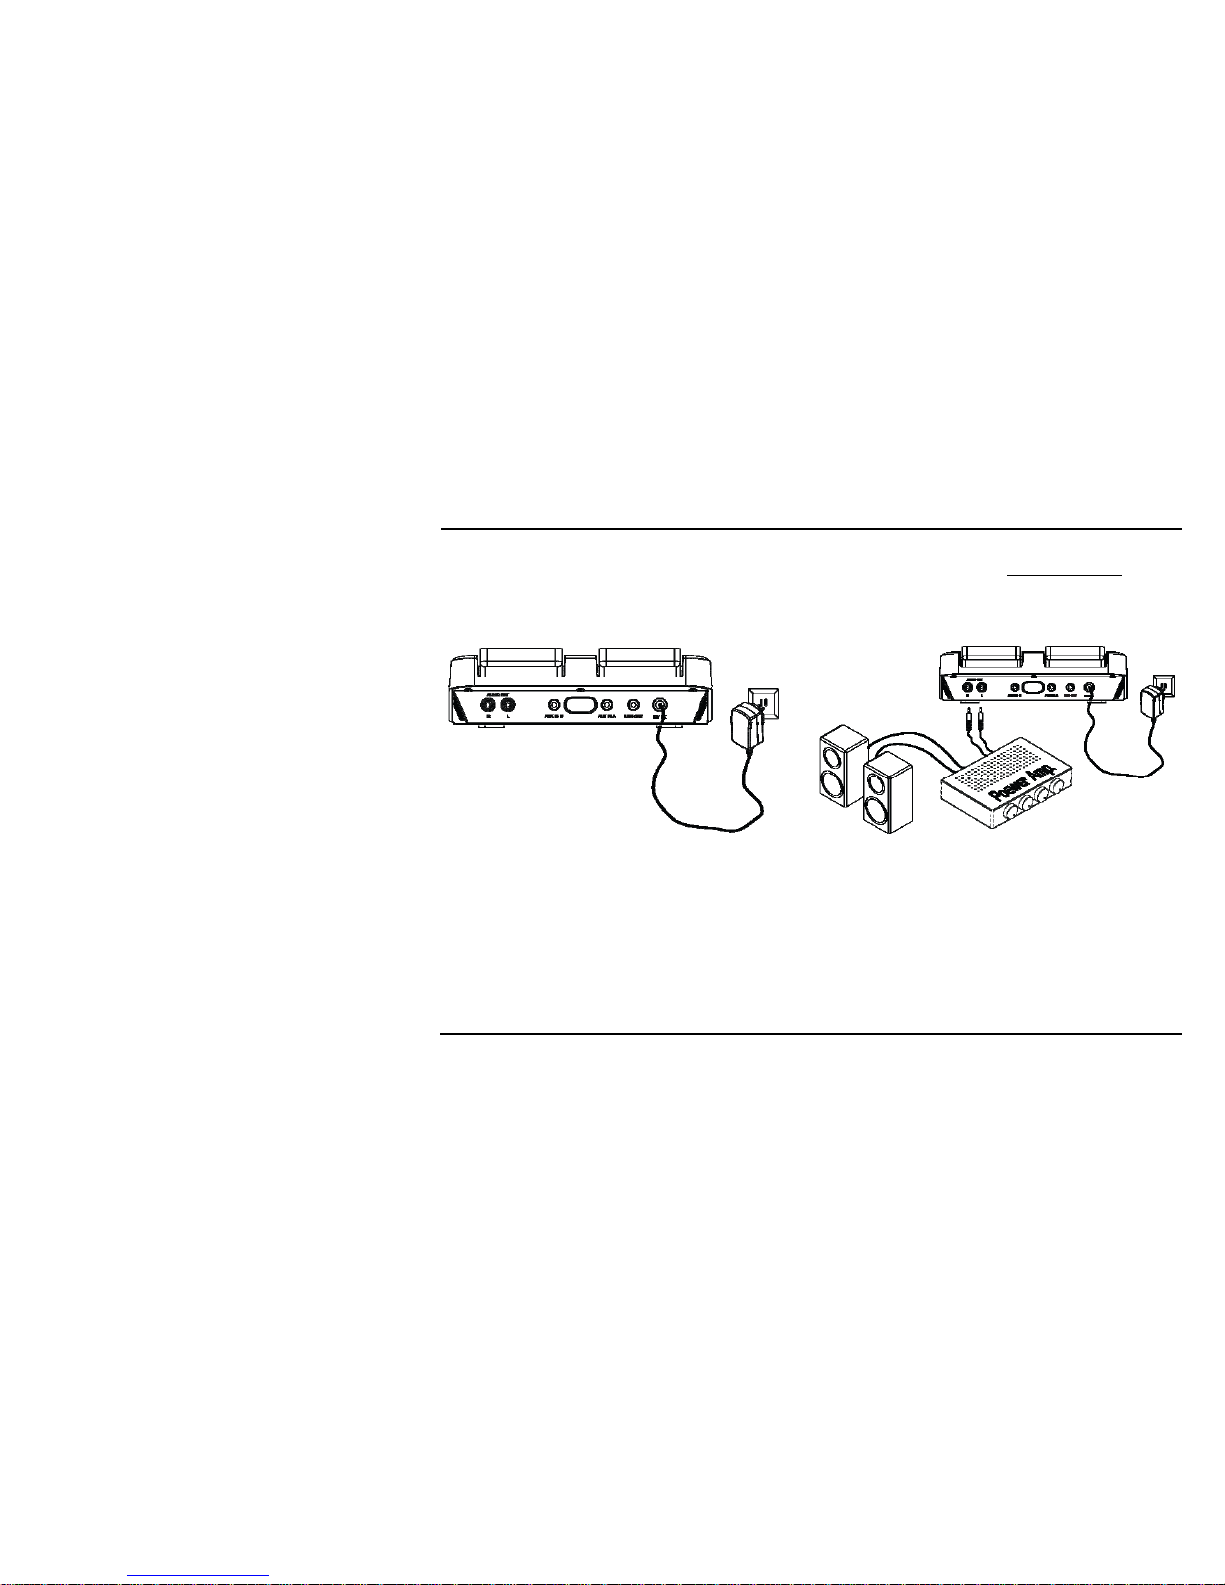
Plug in one end of an audio cable (RCA) into the Main Output (R/L, ○30,○31) and the other end to a multimedia speaker set. This
could be a powered speaker system, a professional sound system, or even the audio inputs of a television, just as you would
with a video game.
Specification
Page 20

19
General Specification
Power Output DC 12V, 1.66A
Power Input AC 100 ~ 240 V / 50 ~ 60Hz / 0.4A
Power Consumption (charging) 1. 980mA (Two iPod®s)
2. 260mA (Two MP3 Players)
Operating Environment Temperature +5°C - +35°C (+41°F - +95°F)
External Dimension 184mm*200mm*52.3mm
Weight 800g
Recommend Speaker / Subwoofer
Satellite 40 watts (PMPO) *2 (MAX)
Impedance: 4-8 Ω.
Frequency: 165~18KHZ
Recommend Micro Headphone Spec
Microphone Uni-Directional
Frequency: 30-16KHZ
Impedance:320hms / 1KHZ
Headphone Frequency: 20-20KHZ
Impedance: 320hm / 1KHZ
A Consumer Guide to Product
Page 21

20
Consumer Guide to Product Safety
FCC Information
This Device complies part 15 of the FCC Rule. Operation Is subject to the condition that this
device does not cause harmful interference.
This equipment compiles with the limits for a Class B digital device as specif ied in Part 15 of FCC Rules. These limits provide
reasonable protection against radio and TV interference in a residential area.
CE Information
This Device complies part 15 of the CE Rule. Operation Is subject to the condition that this
device does not cause harmful interference.
UL Information
The Device has met all of Underwriters Laboratories safety requirements.
1. Water and Moisture: The unit should not be used near water. For example: near a bathtub, washbowl, kitchen sink,
laundry tub, swimming pool or in a wet basement.
2. Ventilation: The unit should be situated so that its location or position does not interfere with its proper ventilation. For
example, it should not be situated on a bed sofa, rug or similar surface that may block ventilation openings.
3. Heat: The unit should be situated away from heat sources such as radiators, heat registers, stoves or other appliances
that produce heat.
4. Power Sources: The unit should be connected to a power supply only of the type described in the operating instructions
or as marked on the appliance.
5. Object and liquid Entry: Care should be taken so that objects do not fall and liquids are not spilled into any openings or
Page 22

21
vents located on the product.
6. Lightning and Power Surge Protection: Unplug the unit from the wall outlet during the lightning storm or when it is left
unattended and unused for long periods of time. This will prevent damage to the product due to lightning and power-line
surges.
7. Overloading: Do not overload wall outlets, extension cords, or integral convenience receptacles as this can result in a risk
of fire or electric shock.
8. Damage Requiring Service: The unit should be serviced by qualified service personnel when:
A: The power supply cord or plug has been damaged.
B: Objects have fallen into or liquid has been spilled into the enclosure.
C: The unit has been exposed to rain.
D: The unit has been dropped or the enclosure damaged.
E: The unit exhibits a marked change in performance or does not operate normally.
Trouble Shooting
Page 23

22
Symptom Possible Problem Solution
iPod® is not installed properly. Remove your iPod® from the dock and check for obstruction on the
co nne cto rs i n the doc k an d on you r iP od® . Th en re sea t it in th e do ck.
Your iPod® software is too old. Upgrade software on your iPod®. For details visit
http://www.apple.com/iPod®/download.
iPod® is locked up. Please make sure your iPod® is working properly before docking into
the unit. Please refer to your iPod® manual for details.
iPod® does not
respond to the
unit
Using 1
st
or 2nd generation
iPod®, iPod® Shuffle or other
devices.
iSpin cannot control those iPod®s.
iPod® is not installed properly. Remove your iPod® from the dock and check for obstruction on the
co nne cto rs i n the doc k an d on you r iP od® . Th en re sea t it in th e do ck.
iPod® is locked up /frozen.
iPod® doesn’t
charge
iPod® battery has problem.
Pl eas e m ake su re y our iP od ® is working properly before docking into
the unit. Please refer to your iPod® manual for details.
Volume level is set too high. Decrease the volume.
If the iPod® oringial sound source (MP3) is poor quality, distortion
and noise are easily noticed with high-power speakers. Try a
different audio source such as a music CD.
Sound is distorted
Sound source is distorted.
If you are using an external sound source like older generation of
Page 24

23
iPod® or iPod® Shuffle, try reducing the output volume on the
device itself. Also try turning bass boost OFF.
Micro Headphone
does not fit into
the jack
Using a micro headphone other
than computer-use headphone.
Please use a computer PC micro headphone with 3.5mm input jack.
Using speakers without amplifier. Please use multimedia speakers with amplifier.
iPod® is not installed properly. Remove your iPod® from the dock and check for obstruction on the
co nne cto rs i n the doc k an d on you r iP od® . Th en re sea t it in th e do ck.
You have turned the knob1 too
much to the end.
Try to turn the knob1 on the iSpin to the initial position to avoid erase
of sound.
Cannot hear
sound from
speakers
The RCA output jacks are not
plug in correctly.
Please plug in the RCA cord from your speakers to the RCA jacks
correctly.
Cannot hear
sound from micro
headphone
The 3.5mm patch cord is not
correctly plug into the
microphone 3.5mm jacks.
AC power adaptor is not plug
onto wall-mount power supply
correctly.
Correctly plug the power adaptor onto the wall-mount power supply.
Power I ndica tion
Light does not ON
Using the wrong power supply Please use the power adaptor that has included in the Sergio
Page 25

24
adaptor. package. If you have lost the power adaptor, please purchase the DC
12V, 1.66A power adaptor.
Recording does
not work
Line in and out cord connect in
the wrong way.
Please refer to “Recording music to computer” section for proper
line-in and line-out.
Page 26

25
Limited 90-Day Warranty Information
Sergio Products warrants this product to be free from defect in workmanship and materials, under normal use and conditions, for a per iod of 90
days from the date of original purchase.
If this product fails to function in a satisfactory manner, it is best to first return it to the store where it was originally purchased.
If this fails to resolve the manner and service still be required by reason of any defect or malfunction during the warranty period.
Sergio will repair or, at its discretion, replace this product without charge (except for a $10.00 charge for handling, packing, return UPS/postage,
and insurance). This decision is subject to verification of the defect or mal function upon delivery of this product to the Factory Service Center
listed below. The product must include proof of purchase, incl uding date of purchase. The fee for service without proof of purchase is $30.00.
If service is still required:
1. Enclose a photocopy of your sales receipt, credit card statement, or other proof of the date of purchase, if within the warranty period.
2. Enclose a check or money order payable to the order of Sergio Inc, for the sum of $10.00 ($30.00 without proof of purchase).
3. Send the unit prepaid and insured, to the Factory Service Center listed below:
Sergio Inc
1012 West Beverly Blvd. #345
Montebello, CA 90640
Disclaimer of Warranty
NOTE: This warranty is valid only if the product is used for the purpose for which it was designed. It does not cover (i) products which have been
damaged by negligence or willful actions, misuse or accident, or which have been modified or repaired by unauthorized persons; (i i) cracked or
broken cabinets, or units damaged by excessive heat; (iii) damage to digital media players, CD’s or tape cassettes (if applicable); (iv) the cost
of shipping this product to the Factory Service Center and i ts return to the owner.
This Warranty is valid only in United States of America and Canada. It does not extend to owners of the product other than to the original
purchaser. This warranty gives you specific legal rights, and you may also have other rights which vary from state to state, province to province.
Your acknowledgement and agreement to full y and completely abide by the above mentioned disclaimer of warranty is contractually binding to
you upon your transfer of currency (money order, cashier’s check, or credit card) for purchase of your Sergio product.
Question? Visit www.sergiospin.com
For any other questions: 1-888-251-7728
Page 27

26
 Loading...